run flat MINI Clubman 2010 Owner's Manual
[x] Cancel search | Manufacturer: MINI, Model Year: 2010, Model line: Clubman, Model: MINI Clubman 2010Pages: 160, PDF Size: 2.58 MB
Page 33 of 160
REFERENCEAT A GLANCE CONTROLS DRIVING TIPS MOBILITY
31
Adjustments
Sitting safely
The ideal sitting position can make a vital contri-
bution to relaxed, fatigue-free driving. In con-
junction with the safety belts, the head restraints
and the airbags, the seated position has a major
influence on your safety in the event of an acci-
dent. To ensure that the safety systems operate
with optimal efficiency, we strongly urge you to
observe the instructions contained in the follow-
ing section.
For additional information on transporting chil-
dren safely, refer to page37.
Airbags
Always maintain an adequate distance
between yourself and the airbags. Always
grip the steering wheel on the rim, with your
hands in the 3 o'clock and 9 o'clock positions, to
minimize the risk of injury to the hands or arms
in the event of the airbag being triggered off.
No one and nothing should come between the
airbags and the seat occupant.
Do not use the cover of the front airbag on the
front passenger side as a storage area. Ensure
that the front passenger is correctly seated, e.g.
that no feet or legs are propped against the
dashboard. Otherwise, leg injury could result if
the front airbag suddenly deployed.
Make sure that passengers keep their heads
away from the side airbag and do not lean
against the cover of the head airbag; otherwise,
serious injuries can result if the airbag deploys.<
Even if you follow all the instructions, injuries
resulting from contact with airbags cannot be
fully excluded, depending on the circumstances.
The ignition and inflation noise may provoke a
mild hearing loss in extremely sensitive individ-
uals. This effect is usually only temporary.
For airbag locations and additional information
on airbags, refer to page65.
Head restraint
A correctly adjusted head restraint reduces the
risk of neck injury in the event of an accident.
Adjust the head restraint in such a way
that its center is at approx. ear level. Oth-
erwise, there is an increased risk of injury in the
event of an accident.<
Head restraints, refer to page33.
Safety belt
Before every drive, make sure that all occupants
wear their safety belts. Airbags complement the
safety belt as an additional safety device, but
they do not represent a substitute.
Never allow more than one person
to wear a single safety belt. Never
allow infants or small children to ride in a pas-
senger's lap.
Make sure that the belt in the lap area sits low
across the hips and does not press against the
abdomen. The safety belt must not rest against
the throat, run across sharp edges, pass over
hard or fragile objects or be pinched. Fasten the
safety belt so that it is pulled taut across the lap
and shoulder, fitting the body snugly without
any twists. Otherwise, the belt could slide over
the hips in the event of a frontal collision and
injure the abdomen. Avoid wearing bulky cloth-
ing and regularly pull the belt in the upper-body
area taut; otherwise, its restraining effect could
be impaired.<
Safety belts, refer to page34.
Seats
Note before adjusting
Never attempt to adjust your seat while
the vehicle is moving. The seat could
respond with unexpected movement, and the
ensuing loss of vehicle control could lead to an
accident.
Page 53 of 160
REFERENCEAT A GLANCE CONTROLS DRIVING TIPS MOBILITY
51
Current vehicle speed
To have the current speed shown in the upper
display otherwise serving for the outside tem-
perature display and clock.1.Press the button in the turn indicator lever
repeatedly until the current speed appears
in the lower display.
2.Wait for the speed display to automatically
move to the upper display.
The outside temperature then appears in the
lower display of the computer.
Settings and information
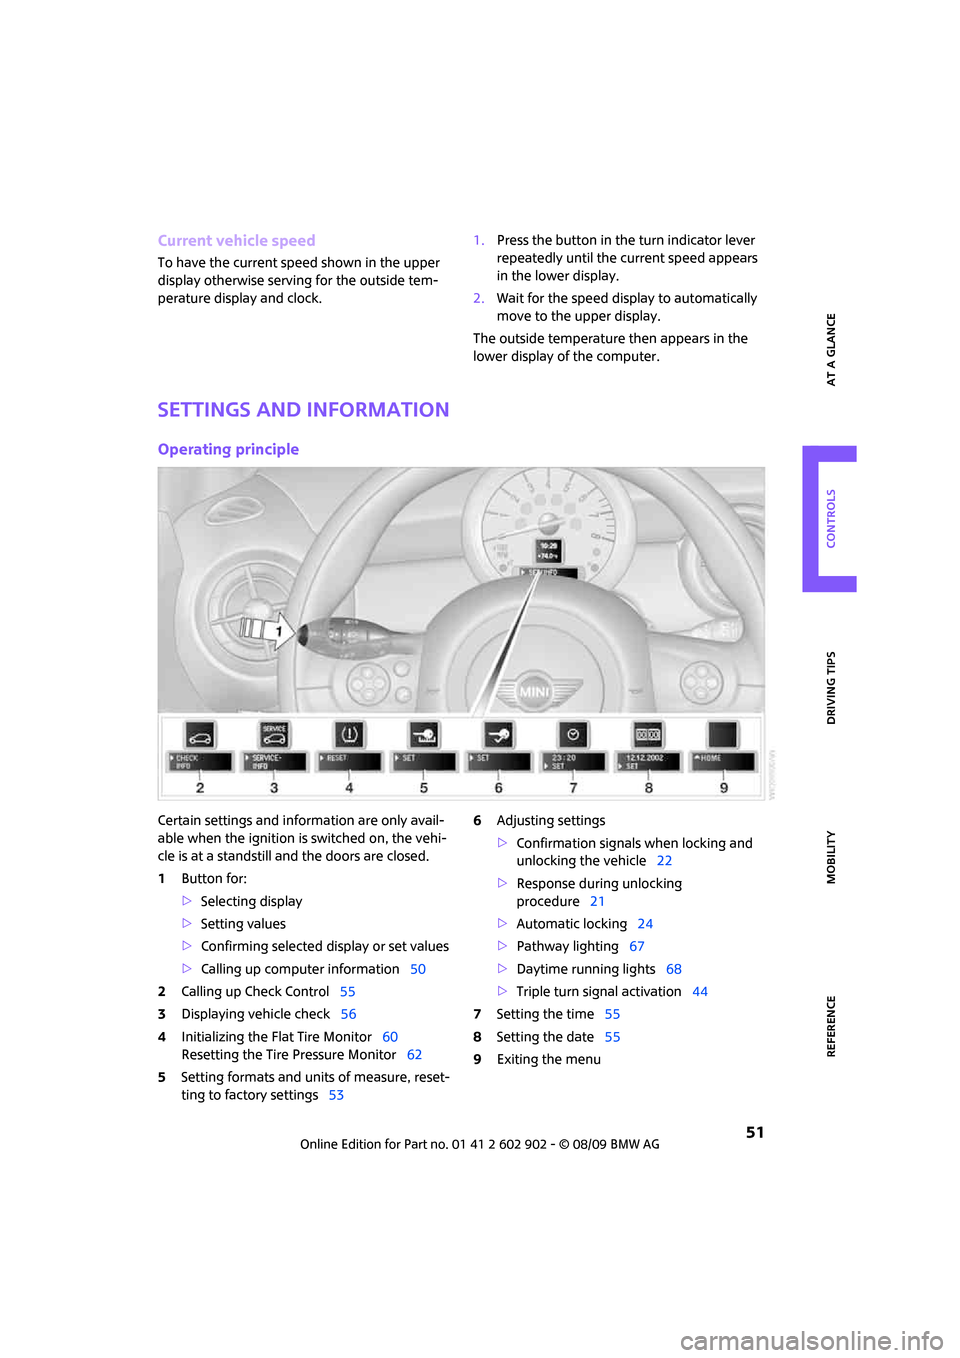
Operating principle
Certain settings and information are only avail-
able when the ignition is switched on, the vehi-
cle is at a standstill and the doors are closed.
1Button for:
>Selecting display
>Setting values
>Confirming selected display or set values
>Calling up computer information50
2Calling up Check Control55
3Displaying vehicle check56
4Initializing the Flat Tire Monitor60
Resetting the Tire Pressure Monitor62
5Setting formats and units of measure, reset-
ting to factory settings536Adjusting settings
>Confirmation signals when locking and
unlocking the vehicle22
>Response during unlocking
procedure21
>Automatic locking24
>Pathway lighting67
>Daytime running lights68
>Triple turn signal activation44
7Setting the time55
8Setting the date55
9Exiting the menu
Page 63 of 160
REFERENCEAT A GLANCE CONTROLS DRIVING TIPS MOBILITY
61
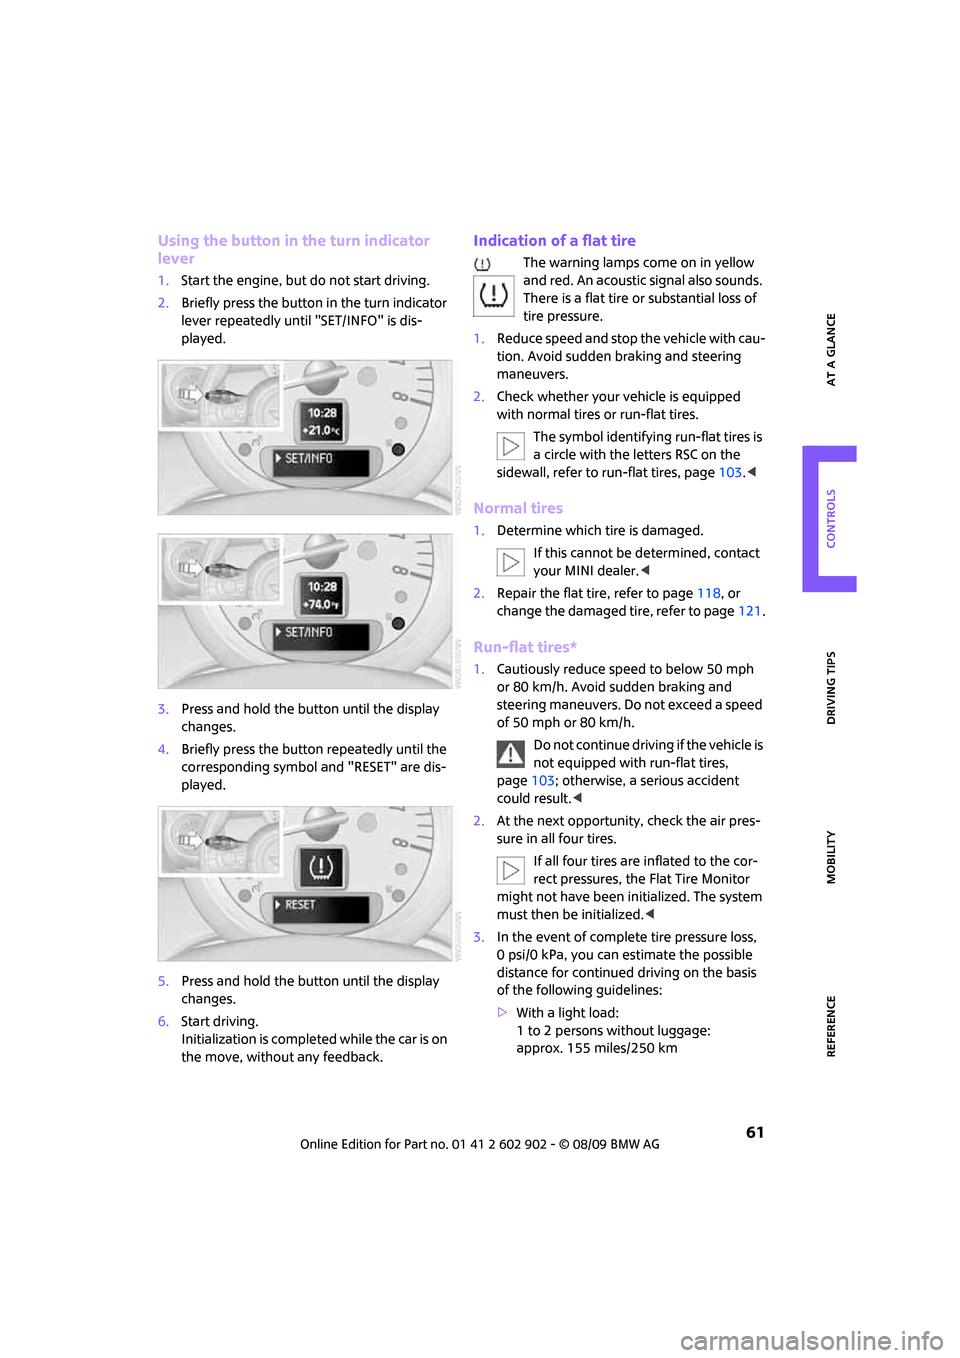
Using the button in the turn indicator
lever
1.Start the engine, but do not start driving.
2.Briefly press the button in the turn indicator
lever repeatedly until "SET/INFO" is dis-
played.
3.Press and hold the button until the display
changes.
4.Briefly press the button repeatedly until the
corresponding symbol and "RESET" are dis-
played.
5.Press and hold the button until the display
changes.
6.Start driving.
Initialization is completed while the car is on
the move, without any feedback.
Indication of a flat tire
The warning lamps come on in yellow
and red. An acoustic signal also sounds.
There is a flat tire or substantial loss of
tire pressure.
1.Reduce speed and stop the vehicle with cau-
tion. Avoid sudden braking and steering
maneuvers.
2.Check whether your vehicle is equipped
with normal tires or run-flat tires.
The symbol identifying run-flat tires is
a circle with the letters RSC on the
sidewall, refer to run-flat tires, page103.<
Normal tires
1.Determine which tire is damaged.
If this cannot be determined, contact
your MINI dealer.<
2.Repair the flat tire, refer to page118, or
change the damaged tire, refer to page121.
Run-flat tires*
1.Cautiously reduce speed to below 50 mph
or 80 km/h. Avoid sudden braking and
steering maneuvers. Do not exceed a speed
of 50 mph or 80 km/h.
Do not continue driving if the vehicle is
not equipped with run-flat tires,
page103; otherwise, a serious accident
could result.<
2.At the next opportunity, check the air pres-
sure in all four tires.
If all four tires are inflated to the cor-
rect pressures, the Flat Tire Monitor
might not have been initialized. The system
must then be initialized.<
3.In the event of complete tire pressure loss,
0 psi/0 kPa, you can estimate the possible
distance for continued driving on the basis
of the following guidelines:
>With a light load:
1 to 2 persons without luggage:
approx. 155 miles/250 km
Page 65 of 160
REFERENCEAT A GLANCE CONTROLS DRIVING TIPS MOBILITY
63
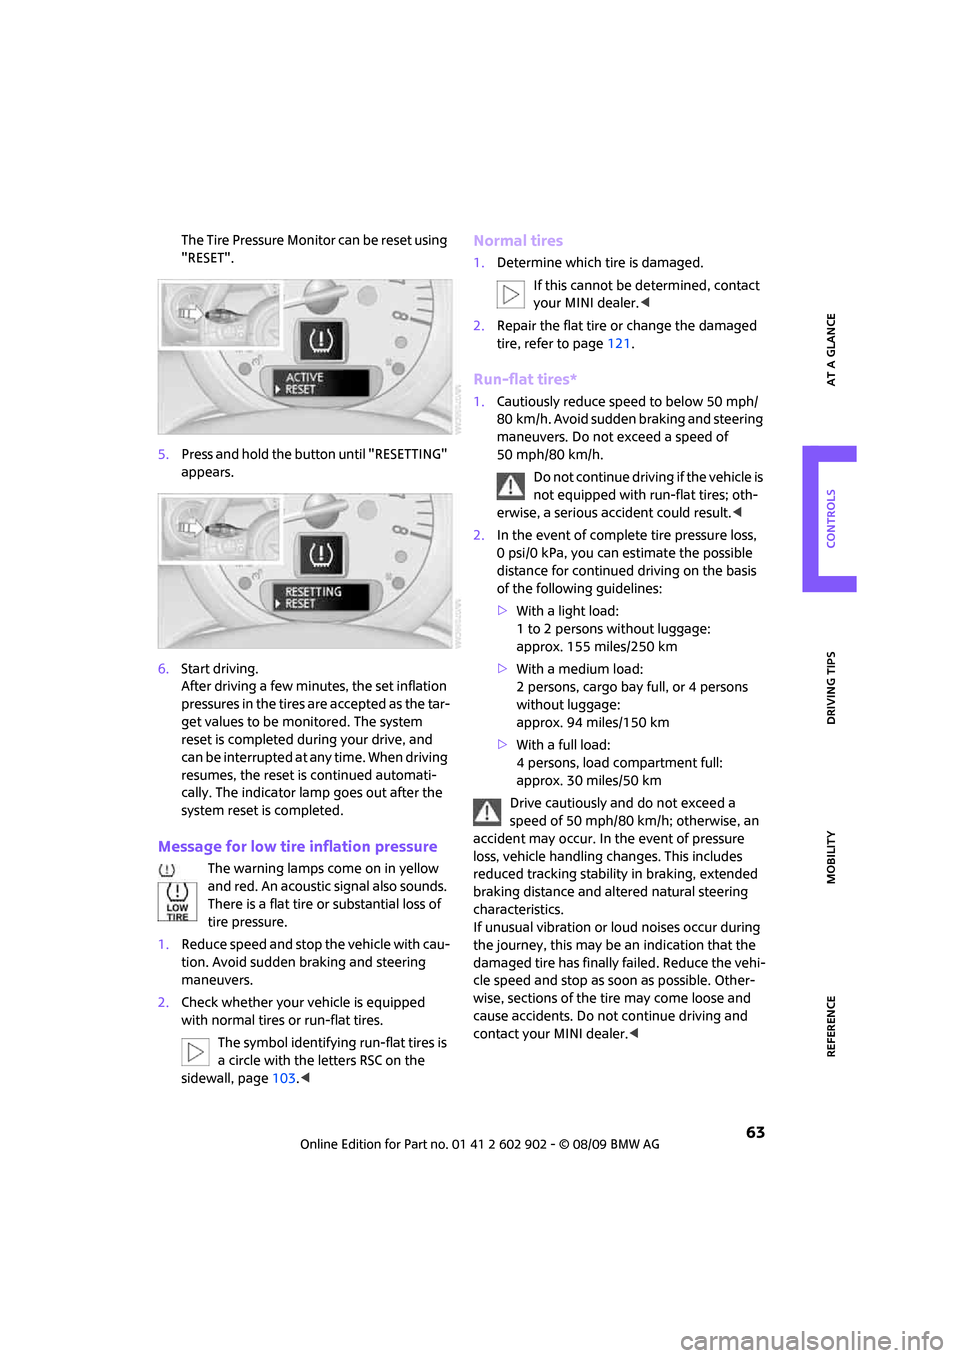
The Tire Pressure Monitor can be reset using
"RESET".
5.Press and hold the button until "RESETTING"
appears.
6.Start driving.
After driving a few minutes, the set inflation
pressures in the tires are accepted as the tar-
get values to be monitored. The system
reset is completed during your drive, and
can be interrupted at any time. When driving
resumes, the reset is continued automati-
cally. The indicator lamp goes out after the
system reset is completed.
Message for low tire inflation pressure
The warning lamps come on in yellow
and red. An acoustic signal also sounds.
There is a flat tire or substantial loss of
tire pressure.
1.Reduce speed and stop the vehicle with cau-
tion. Avoid sudden braking and steering
maneuvers.
2.Check whether your vehicle is equipped
with normal tires or run-flat tires.
The symbol identifying run-flat tires is
a circle with the letters RSC on the
sidewall, page103.<
Normal tires
1.Determine which tire is damaged.
If this cannot be determined, contact
your MINI dealer.<
2.Repair the flat tire or change the damaged
tire, refer to page121.
Run-flat tires*
1.Cautiously reduce speed to below 50 mph/
80 km/h. Avoid sudden braking and steering
maneuvers. Do not exceed a speed of
50 mph/80 km/h.
Do not continue driving if the vehicle is
not equipped with run-flat tires; oth-
erwise, a serious accident could result.<
2.In the event of complete tire pressure loss,
0 psi/0 kPa, you can estimate the possible
distance for continued driving on the basis
of the following guidelines:
>With a light load:
1 to 2 persons without luggage:
approx. 155 miles/250 km
>With a medium load:
2 persons, cargo bay full, or 4 persons
without luggage:
approx. 94 miles/150 km
>With a full load:
4 persons, load compartment full:
approx. 30 miles/50 km
Drive cautiously and do not exceed a
speed of 50 mph/80 km/h; otherwise, an
accident may occur. In the event of pressure
loss, vehicle handling changes. This includes
reduced tracking stability in braking, extended
braking distance and altered natural steering
characteristics.
If unusual vibration or loud noises occur during
the journey, this may be an indication that the
damaged tire has finally failed. Reduce the vehi-
cle speed and stop as soon as possible. Other-
wise, sections of the tire may come loose and
cause accidents. Do not continue driving and
contact your MINI dealer.<
Page 98 of 160
Wheels and tires
96
Wheels and tires
Tire inflation pressures
Information for your safety
It is not merely the tires' service life, but also
driving comfort and, to a great extent, driving
safety that depend on the condition of the tires
and the maintenance of the specified tire
pressure.
Checking pressure
Check the tire inflation pressure regularly
and correct it, if necessary: at least twice a
month and before starting long trips. If you fail
to observe this precaution you may be driving
on tires with incorrect tire pressures, a condition
that can not only compromise your vehicle's
driving stability, but also lead to tire damage and
the risk of an accident. Do not drive with
deflated, i.e. flat tires, except when using run-
flat tires. A flat tire will seriously impair your
vehicle's handling and braking response.
Attempts to drive on a flat tire can lead to loss of
control over the vehicle.<
Check the tire inflation pressures only on cold
tires. This means after a maximum of 1.25 miles/
2 km driving or when the vehicle has been
parked for at least 2 hours. When tires are warm,
the tire inflation pressure is higher.
After adjusting the tire inflation pressure,
reinitialize the flat tire monitor, page60,
or reset the tire pressure control, page62.<
Checking the tire inflation pressure of
the compact tire*
To check the inflation pressure, fold up the level
load floor. Remove the onboard vehicle tool kit
and the space-saver spare tire, refer to
page121.
Inflation pressure specifications
The tables below provide all the correct inflation
pressures for the specified tire sizes at ambient
temperature.
The tire inflation pressures apply to the
tire sizes approved and the tire brands
recommended by the manufacturer of
your MINI. Your MINI dealer will be glad to
advise you.<
For correct identification of the right tire infla-
tion pressures, observe the following:
>Tire sizes for your vehicle
>Load conditions
>Maximum allowable driving speed
Tire inflation pressures for driving up to
100 mph or 160 km/h
For normal driving up to 100 mph or 160 km/h
and to achieve optimum driving comfort, adjust
pressures to the respective tire inflation pres-
sures listed on the following pages in the col-
umns for traveling speeds up to a maximum of
100 mph or 160 km/h.
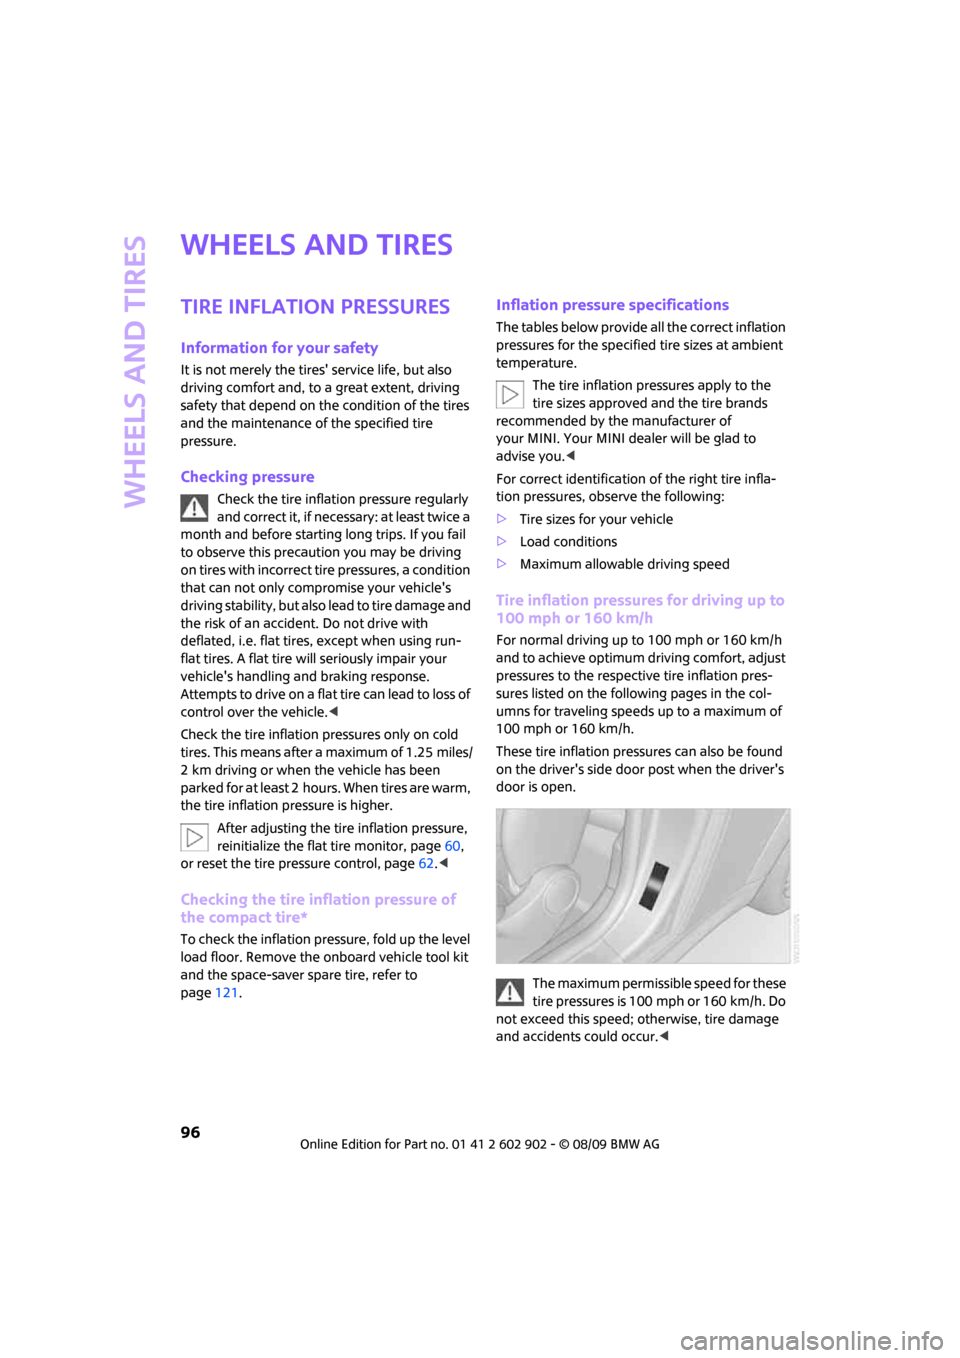
These tire inflation pressures can also be found
on the driver's side door post when the driver's
door is open.
The maximum permissible speed for these
tire pressures is 100 mph or 160 km/h. Do
not exceed this speed; otherwise, tire damage
and accidents could occur.<
Page 104 of 160
Wheels and tires
102
RSC - run-flat tires*
You will recognize run-flat tires by a circular
symbol containing the letters RSC on the side of
the tire, page103.
M+S
Winter and all-season tires.
These have better winter properties than sum-
mer tires.
XL
Designation for specially reinforced tires.
Tire condition
Inspect your tires regularly for tread wear, signs
of damage and for foreign objects lodged in the
tread. Check the tread depth.
Tread depth
The tread depth should not drop below 1/8 in/
3 mm, although, for example, European legisla-
tion only specifies a minimum tread depth of
1/16 in/1.6 mm. At tread depths below 1/8 in/
3 mm there is an increased risk of high-speed
hydroplaning, even when only small amounts of
water are present on the road surface.
Winter tires
When winter tires wear down past a tread depth
of 1/6 in/4 mm, they become perceptibly less
suitable for winter conditions. In the interest of
safety, new tires should be installed.
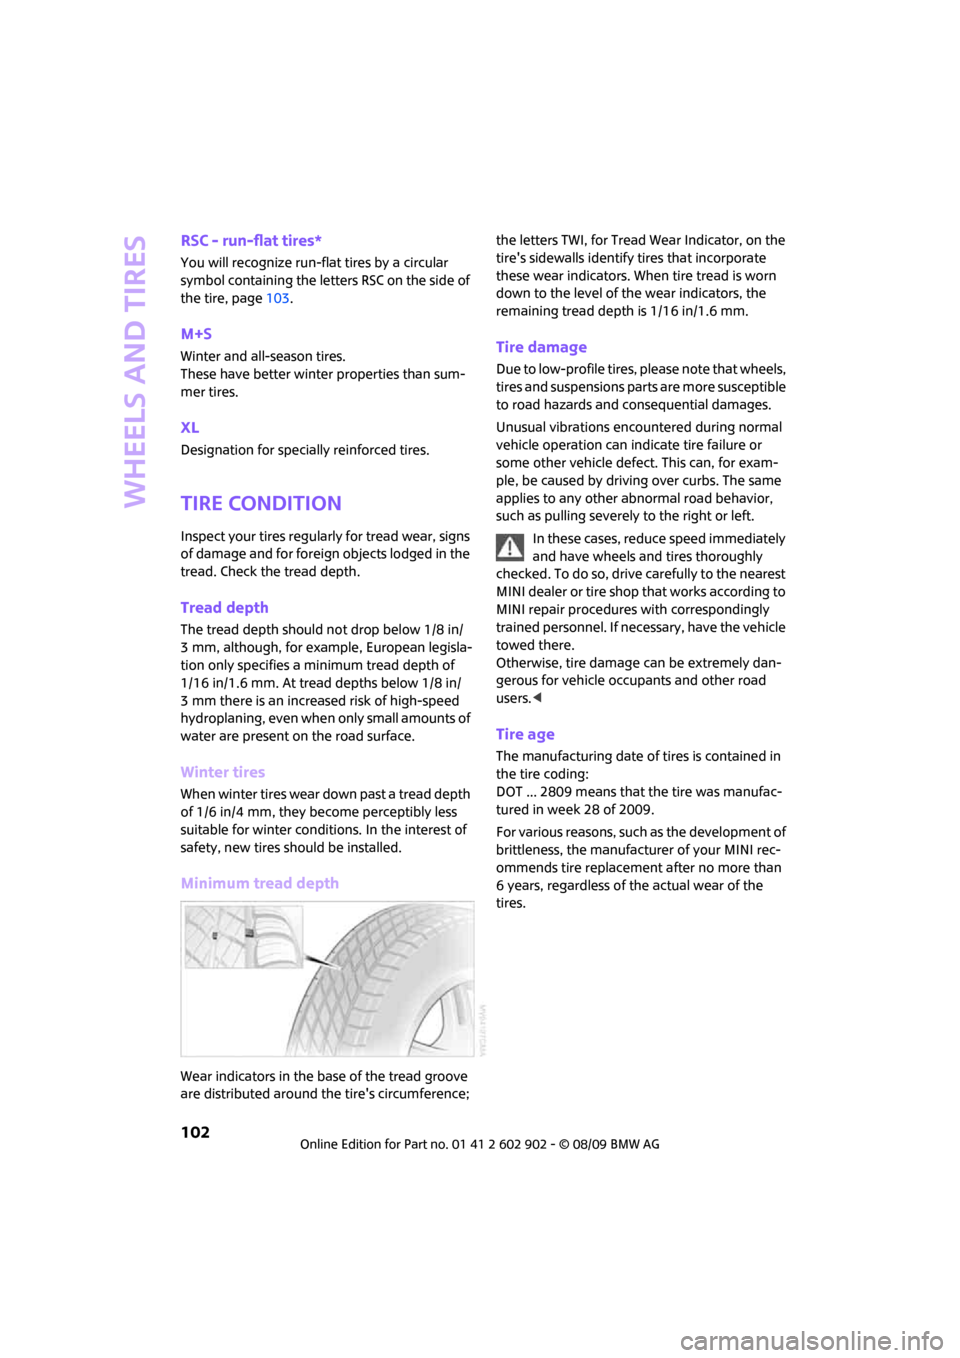
Minimum tread depth
Wear indicators in the base of the tread groove
are distributed around the tire's circumference; the letters TWI, for Tread Wear Indicator, on the
tire's sidewalls identify tires that incorporate
these wear indicators. When tire tread is worn
down to the level of the wear indicators, the
remaining tread depth is 1/16 in/1.6 mm.
Tire damage
Due to low-profile tires, please note that wheels,
tires and suspensions parts are more susceptible
to road hazards and consequential damages.
Unusual vibrations encountered during normal
vehicle operation can indicate tire failure or
some other vehicle defect. This can, for exam-
ple, be caused by driving over curbs. The same
applies to any other abnormal road behavior,
such as pulling severely to the right or left.
In these cases, reduce speed immediately
and have wheels and tires thoroughly
checked. To do so, drive carefully to the nearest
MINI dealer or tire shop that works according to
MINI repair procedures with correspondingly
trained personnel. If necessary, have the vehicle
towed there.
Otherwise, tire damage can be extremely dan-
gerous for vehicle occupants and other road
users.<
Tire age
The manufacturing date of tires is contained in
the tire coding:
DOT ... 2809 means that the tire was manufac-
tured in week 28 of 2009.
For various reasons, such as the development of
brittleness, the manufacturer of your MINI rec-
ommends tire replacement after no more than
6 years, regardless of the actual wear of the
tires.
Page 105 of 160
REFERENCEAT A GLANCE CONTROLS DRIVING TIPS MOBILITY
103
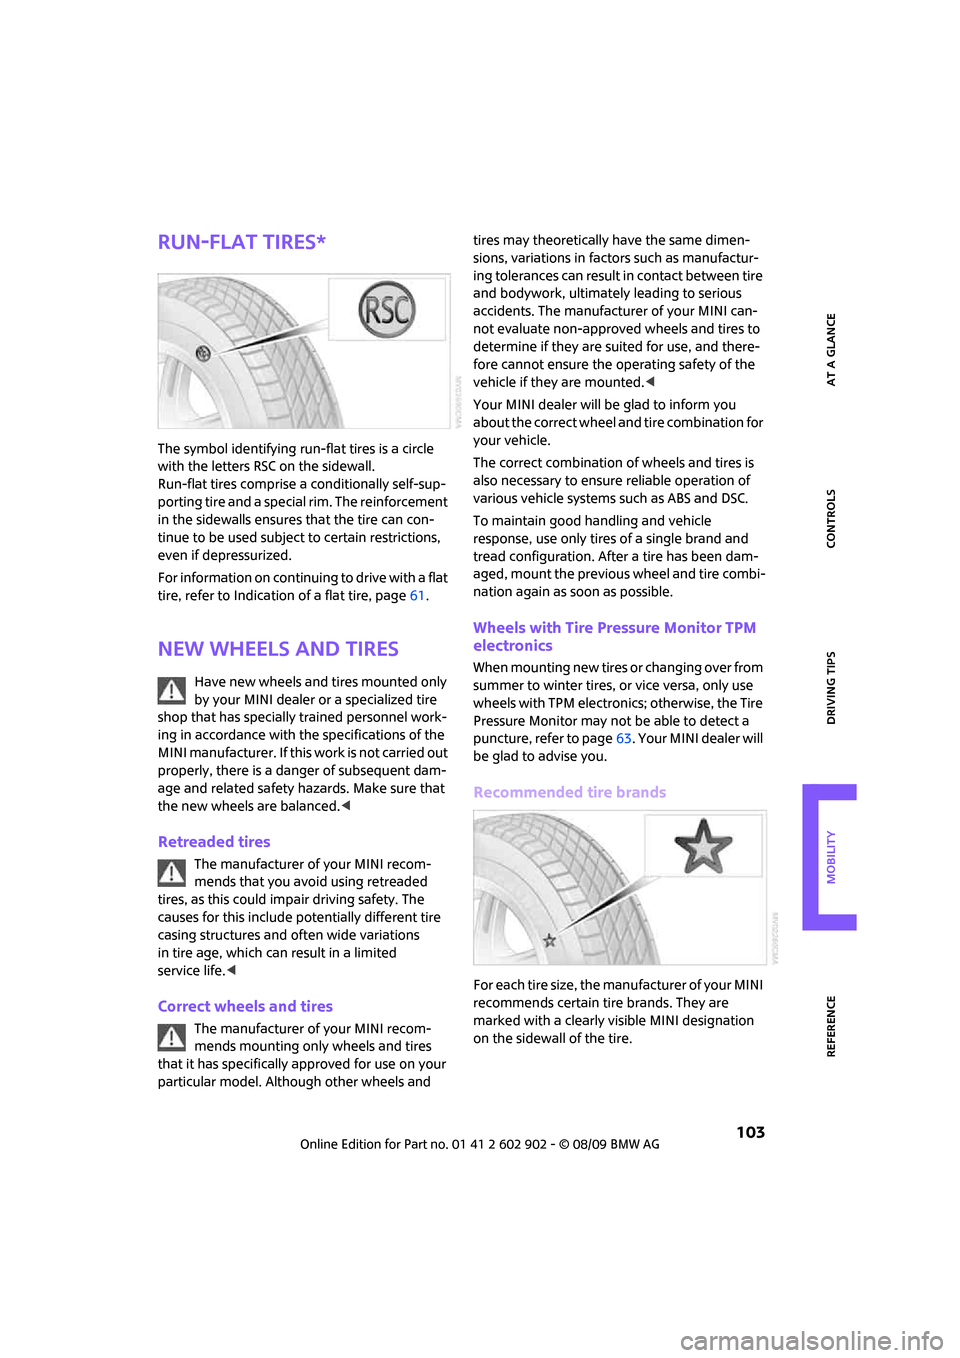
Run-flat tires*
The symbol identifying run-flat tires is a circle
with the letters RSC on the sidewall.
Run-flat tires comprise a conditionally self-sup-
porting tire and a special rim. The reinforcement
in the sidewalls ensures that the tire can con-
tinue to be used subject to certain restrictions,
even if depressurized.
For information on continuing to drive with a flat
tire, refer to Indication of a flat tire, page61.
New wheels and tires
Have new wheels and tires mounted only
by your MINI dealer or a specialized tire
shop that has specially trained personnel work-
ing in accordance with the specifications of the
MINI manufacturer. If this work is not carried out
properly, there is a danger of subsequent dam-
age and related safety hazards. Make sure that
the new wheels are balanced.<
Retreaded tires
The manufacturer of your MINI recom-
mends that you avoid using retreaded
tires, as this could impair driving safety. The
causes for this include potentially different tire
casing structures and often wide variations
in tire age, which can result in a limited
service life.<
Correct wheels and tires
The manufacturer of your MINI recom-
mends mounting only wheels and tires
that it has specifically approved for use on your
particular model. Although other wheels and tires may theoretically have the same dimen-
sions, variations in factors such as manufactur-
ing tolerances can result in contact between tire
and bodywork, ultimately leading to serious
accidents. The manufacturer of your MINI can-
not evaluate non-approved wheels and tires to
determine if they are suited for use, and there-
fore cannot ensure the operating safety of the
vehicle if they are mounted.<
Your MINI dealer will be glad to inform you
about the correct wheel and tire combination for
your vehicle.
The correct combination of wheels and tires is
also necessary to ensure reliable operation of
various vehicle systems such as ABS and DSC.
To maintain good handling and vehicle
response, use only tires of a single brand and
tread configuration. After a tire has been dam-
aged, mount the previous wheel and tire combi-
nation again as soon as possible.
Wheels with Tire Pressure Monitor TPM
electronics
When mounting new tires or changing over from
summer to winter tires, or vice versa, only use
wheels with TPM electronics; otherwise, the Tire
Pressure Monitor may not be able to detect a
puncture, refer to page63. Y o u r M I N I d e a l e r w i l l
be glad to advise you.
Recommended tire brands
For each tire size, the manufacturer of your MINI
recommends certain tire brands. They are
marked with a clearly visible MINI designation
on the sidewall of the tire.
Page 106 of 160
Wheels and tires
104
When properly used, these tires meet the high-
est standards in terms of safety and handling
characteristics.
Run-flat tires*
When mounting new tires or changing over from
summer to winter tires and vice versa, mount
run-flat tires for your own safety. Keep in mind
that no space-saver spare tire is available in the
event of a flat. Your MINI dealer will be glad to
advise you.
Special characteristics of winter tires
The manufacturer of MINI recommends the use
of winter tires on snowy roads or if temperatures
drop below 457/ +76. Although all-season
M+S tires provide better winter traction than
summer tires, they generally fail to provide the
same levels of cold-weather performance as
winter tires.
Pay attention to speed
Always comply with the speed limit for the
winter tires mounted on your car; failure
to do so could result in tire damage and acci-
dents.<
If the car is capable of speeds higher than that
permitted for the winter tires, a label stating the
maximum permitted speed for the mounted
tires must be displayed in your field of view. Spe-
cialist tire dealers and your MINI dealer can sup-
ply these labels.
Storage
Always store wheels and tires in a cool, dry place
with as little exposure to light as possible.
Always protect tires against all contact with oil,
grease and fuels.
Do not exceed the maximum tire inflation pres-
sure indicated on the sidewall of the tire.
Swapping wheels among the axles
Depending on the individual use, front and rear
tires may exhibit different wear and tear.
In order to maintain an even wear and tear, the
wheels may be rotated between the axles. Your
MINI dealer will be glad to advise you.Always check the inflation pressure after the tire
rotation, if necessary change the pressure.
Snow chains*
Only certain types of fine-link snow chains have
been tested by the manufacturer of your MINI,
classified as road-safe and recommended. Con-
tact your MINI dealer for more details.
Only attach snow chains in pairs to the front
wheels with the following tires.
>175/65 R 15 M+S
>175/60 R 16 M+S
John Cooper Works:
>185/50 R 17 86 H M+S XL RSC
Observe the manufacturer's instructions when
mounting snow chains. Do not exceed a speed
of 30 mph or 50 km/h.
Do not initialize the Flat Tire Monitor if
snow chains are mounted; otherwise, the
instrument might issue an incorrect reading.
When driving with snow chains, it can be useful
to briefly deactivate the DSC or activate the DTC,
refer to page59.<
Page 120 of 160
Replacing components
118
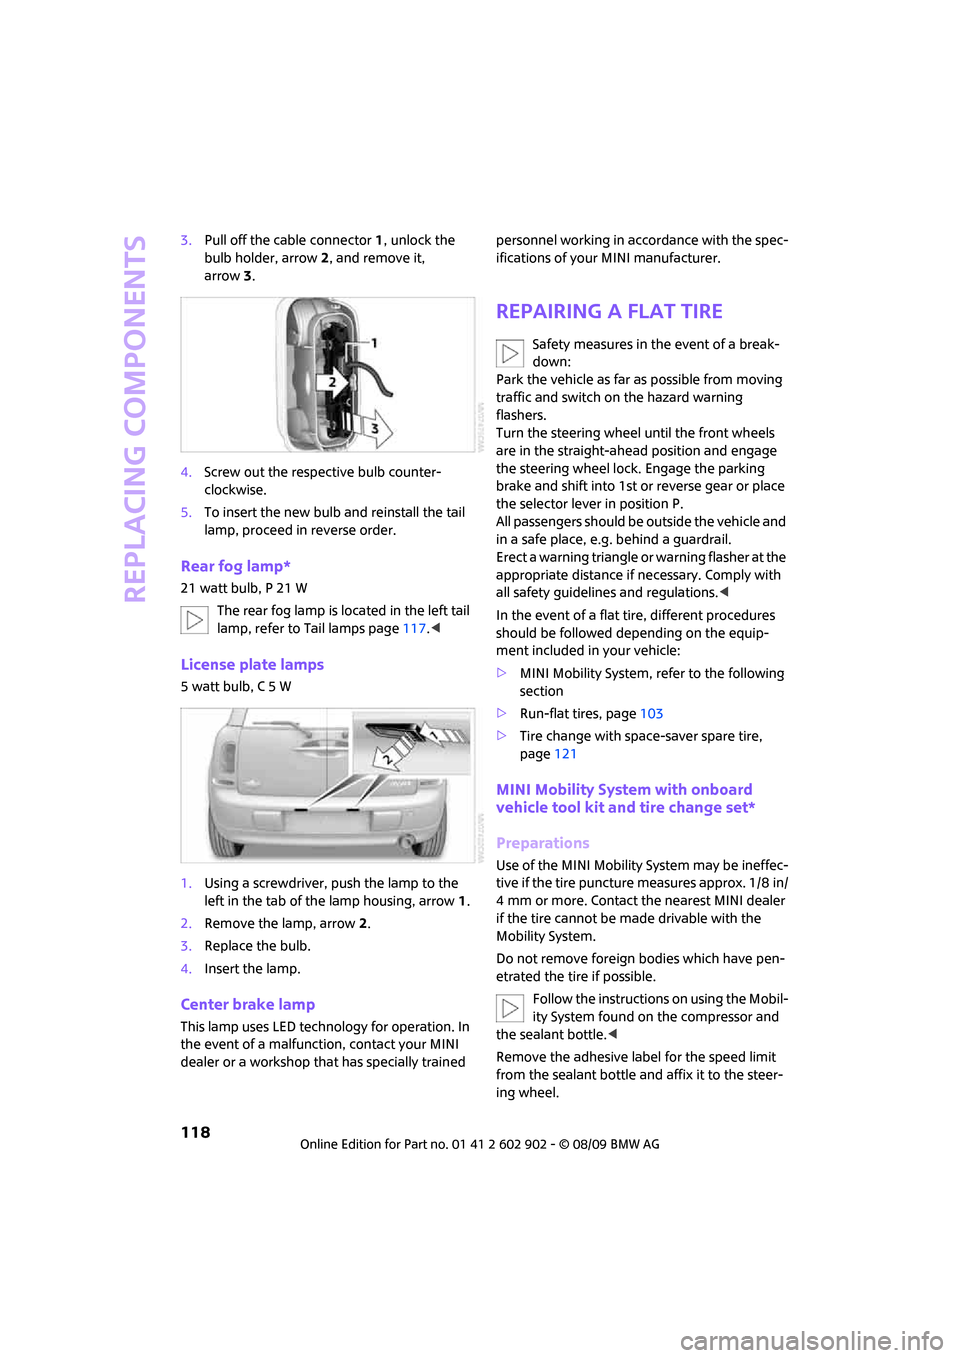
3.Pull off the cable connector 1, unlock the
bulb holder, arrow2, and remove it,
arrow3.
4.Screw out the respective bulb counter-
clockwise.
5.To insert the new bulb and reinstall the tail
lamp, proceed in reverse order.
Rear fog lamp*
21 watt bulb, P 21 W
The rear fog lamp is located in the left tail
lamp, refer to Tail lamps page117.<
License plate lamps
5 watt bulb, C 5 W
1.Using a screwdriver, push the lamp to the
left in the tab of the lamp housing, arrow1.
2.Remove the lamp, arrow 2.
3.Replace the bulb.
4.Insert the lamp.
Center brake lamp
This lamp uses LED technology for operation. In
the event of a malfunction, contact your MINI
dealer or a workshop that has specially trained personnel working in accordance with the spec-
ifications of your MINI manufacturer.
Repairing a flat tire
Safety measures in the event of a break-
down:
Park the vehicle as far as possible from moving
traffic and switch on the hazard warning
flashers.
Turn the steering wheel until the front wheels
are in the straight-ahead position and engage
the steering wheel lock. Engage the parking
brake and shift into 1st or reverse gear or place
the selector lever in position P.
All passengers should be outside the vehicle and
in a safe place, e.g. behind a guardrail.
Erect a warning triangle or warning flasher at the
appropriate distance if necessary. Comply with
all safety guidelines and regulations.<
In the event of a flat tire, different procedures
should be followed depending on the equip-
ment included in your vehicle:
>MINI Mobility System, refer to the following
section
>Run-flat tires, page103
>Tire change with space-saver spare tire,
page121
MINI Mobility System with onboard
vehicle tool kit and tire change set*
Preparations
Use of the MINI Mobility System may be ineffec-
tive if the tire puncture measures approx. 1/8 in/
4 mm or more. Contact the nearest MINI dealer
if the tire cannot be made drivable with the
Mobility System.
Do not remove foreign bodies which have pen-
etrated the tire if possible.
Follow the instructions on using the Mobil-
ity System found on the compressor and
the sealant bottle.<
Remove the adhesive label for the speed limit
from the sealant bottle and affix it to the steer-
ing wheel.
Page 122 of 160

Replacing components
120
4.Unscrew the dust cap from the valve of the
defective wheel and screw the filling hose 2
of the sealant bottle onto the valve.
5.Ensure that the compressor is switched off.
6.Insert the plug 3 into the lighter socket/
power socket in the vehicle interior,
page81.
7.With the engine running:
Switch on the compressor and let is run for
approx. 3 to 8 minutes to fill the tire with
sealant and achieve a tire inflation pressure
of approx. 26 psi/180 kPa.
When the tire is being filled with seal-
ant, the inflation pressure may spo-
radically reach approx. 73 psi/500 kPa. Do
not switch off the compressor in this
phase.<
Do not run the compressor for longer
than 10 minutes; otherwise, the
device will overheat and possibly be
damaged.<
8.Switch off the compressor.
If an air pressure of 26 psi/180 kPa is not
reached:
1.Unscrew the filling hose 2 from the wheel
and drive the vehicle forward and backward
approx. 33 ft/10 m to distribute the liquid
sealant in the tire evenly.
2.Inflate the tire again with the compressor.
If an inflation pressure of 26 psi/180 kPa
still cannot be reached, the tire is too
heavily damaged. Please contact the nearest
MINI dealer.<
Detach the connection hose 9 and filling hose 2
from the sealant bottle connection and tire
valve.Wrap the empty sealant bottle in suitable mate-
rial to avoid dirtying the cargo bay. Stow the
Mobility System back in the vehicle.
Distributing the sealant
Immediately drive approx. 3 mls/5 km to evenly
distribute the sealant.
Do not exceed speeds of 50 mph/
80 km/h.
If possible, do not drop below 10 mph/
20 km/h.<
Correcting the tire inflation pressure
1.After driving approx. 3 mls/5 km or ten min-
utes, stop at a suitable location.
2.Screw the connection hose 2 of the com-
pressor directly onto the tire valve.
3.Insert the plug 3 into the power socket in the
vehicle interior.
4.Correct the inflation pressure to 26 psi/
180 kPa. With the engine running:
>To increase the inflation pressure: switch on
the compressor. To check the current infla-
tion pressure, switch off the compressor.
Do not run the compressor for longer
than 10 minutes; otherwise, the
device will overheat and possibly be
damaged.<
>To decrease the inflation pressure: press the
release button 5.
If the tire cannot maintain the inflation
pressure, drive the vehicle again, refer to
Distributing the sealant. Then repeat steps
1to4.
If an inflation pressure of 26 psi/180 kPa still
cannot be reached, the tire is too heavily dam-
aged. Contact the nearest MINI dealer.<
Driving on
Do not exceed the permitted maximum
speed of 50 mph/80 km/h; doing so may
result in an accident.<
Replace the defective tire as soon as possible
and have the new wheel/tire assembly bal-
anced.
Have the Mobility System refilled.