tow MINI Clubman 2014 (Mini Connected) User Guide
[x] Cancel search | Manufacturer: MINI, Model Year: 2014, Model line: Clubman, Model: MINI Clubman 2014Pages: 276, PDF Size: 6.44 MB
Page 127 of 276
If there are several towns/cities with the same
name:1.Change to the list of town/city names.2.Highlight the town/city.3.Select the town/city.
Entering the postal code
1.Select "Town/City/Postal Code" or the dis‐
played town/city.2. Select the symbol.3.Select the digits individually.4.Change to the list of postal codes and
towns/cities.5.Highlight the entry.6.Selecting an entry.
The associated destination town/city is dis‐
played.
Entering a street and intersection
1.Select "Street" or the displayed street.2.Enter a street and intersection in the same
way as you would enter a town/city.
If there are several streets with the same name:
1.Change to the list of street names.2.Highlight the street.3.Select the street.
Alternative: enter the street address
and house number
1.Select "Street" or the displayed street.2.Enter the street as you would the town/city.3."House number"4.Select the numbers.5.Change to the list of house numbers.6.Select a house number or range of house
numbers.Street does not exist in the destination
city/town
The desired street does not exist in the speci‐
fied city/town because it belongs to another
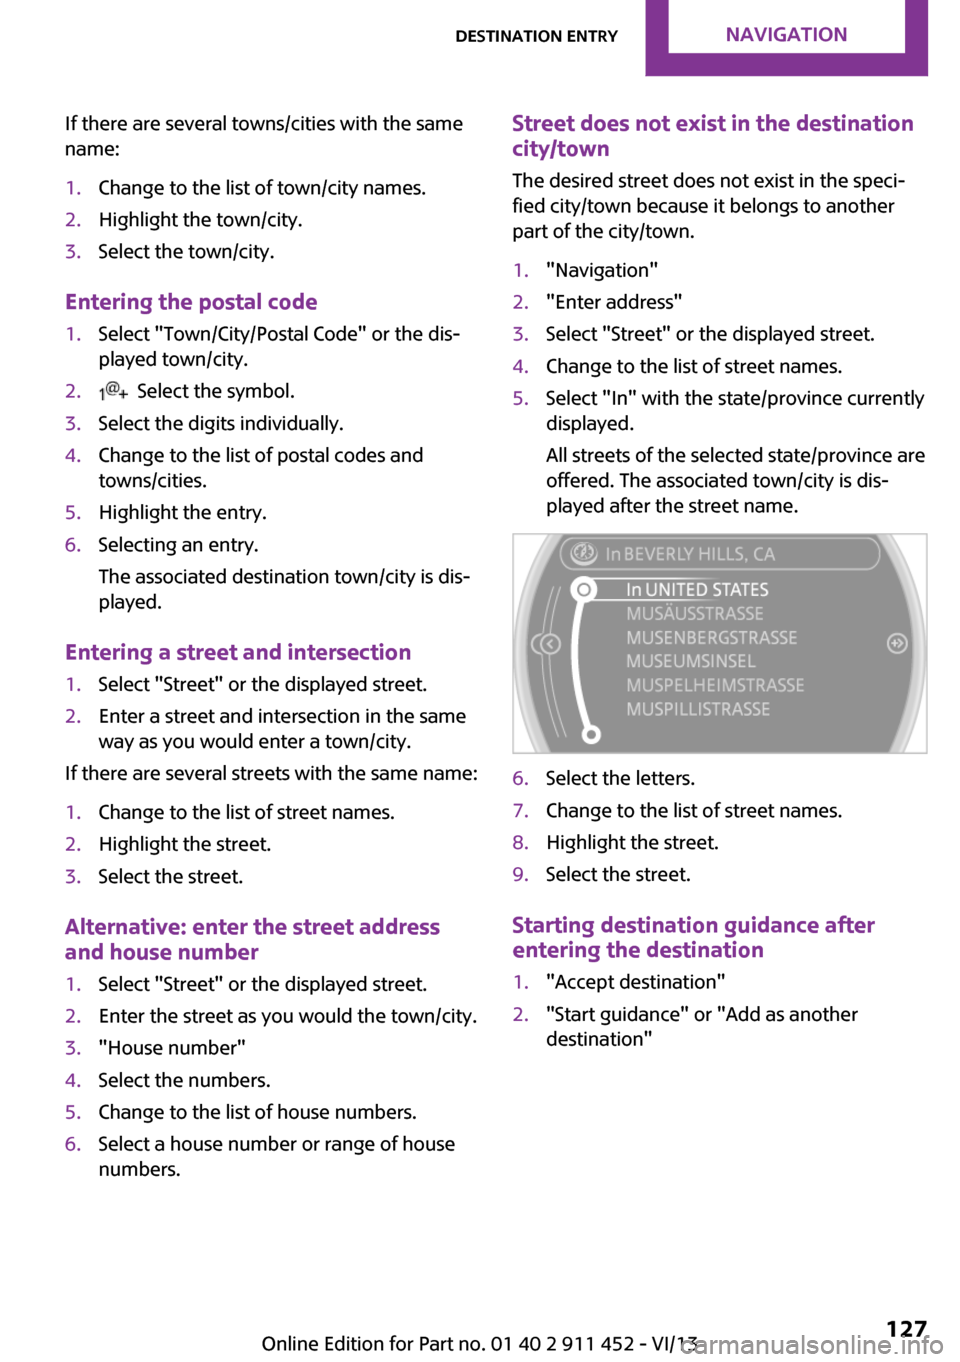
part of the city/town.1."Navigation"2."Enter address"3.Select "Street" or the displayed street.4.Change to the list of street names.5.Select "In" with the state/province currently
displayed.
All streets of the selected state/province are
offered. The associated town/city is dis‐
played after the street name.6.Select the letters.7.Change to the list of street names.8.Highlight the street.9.Select the street.
Starting destination guidance after
entering the destination
1."Accept destination"2."Start guidance" or "Add as another
destination"Seite 127Destination entryNavigation127
Online Edition for Part no. 01 40 2 911 452 - VI/13
Page 130 of 276
Editing the destination
Destinations can be edited, for example to
change the house number of an existing entry.1."Navigation"2."Last destinations"3.Highlight the destination.4.Open "Options".5."Edit destination"
Deleting the last destinations
1."Navigation"2."Last destinations"3.Highlight the destination.4.Open "Options".5."Delete entry" or "Delete all last
destinations"
Special destinations
General information
Even with the latest navigation data, informa‐
tion on individual special destinations may
have changed; for example, gas stations might
not be in operation.
Opening the search for specialdestinations
Selection of special destinations, such as hotels
or tourist attractions.
1."Navigation"2."Points of Interest"3.Select the search function.
A-Z search
1."A-Z search"2."Town/City"3.Select or enter the town/city.4."Category"5.Select the category.6."Category details"
For some special destinations, it may be
possible to select multiple category details.
Move the MINI joystick to the left to leave
the category details.7."Keyword"8.Enter the keyword.
A list of the special destinations is dis‐
played.9.Select a special destination.
Details are displayed.
If multiple details are stored, you can leaf
through the pages.
If a phone number is available, a connec‐
tion can be established if necessary.10. Select the symbol.11."Start guidance" or "Add as another
destination"
Add a destination as a further destination,
refer to page 134.
Category search
1."Category search"2."Search destination"3.Select or enter the town/city.4."Category"5.Select the category.6."Category details"
For some special destinations, it may be
possible to select multiple category details.
Move the MINI joystick to the left to leave
the category details.7."Start search"
A list of the special destinations is dis‐
played.8.Select a special destination.
Details are displayed.
If multiple details are stored, you can leaf
through the pages.Seite 130NavigationDestination entry130
Online Edition for Part no. 01 40 2 911 452 - VI/13
Page 131 of 276
If a phone number is available, a connec‐
tion can be established if necessary.9. Select the symbol.10."Start guidance" or "Add as another
destination"
Add a destination as a further destination,
refer to page 134.
Position of special destinations
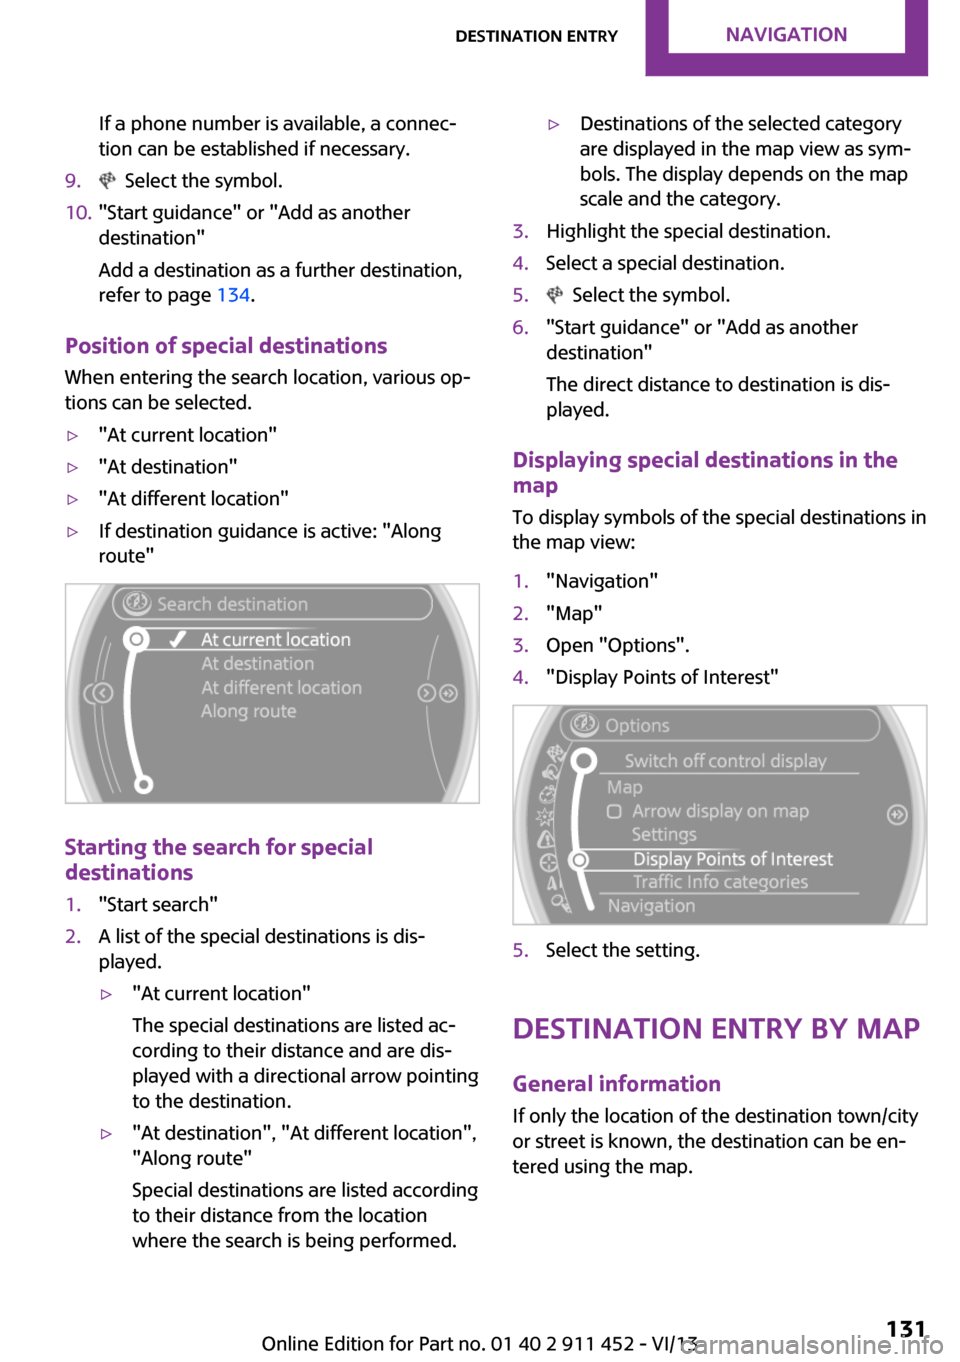
When entering the search location, various op‐
tions can be selected.
▷"At current location"▷"At destination"▷"At different location"▷If destination guidance is active: "Along
route"
Starting the search for special
destinations
1."Start search"2.A list of the special destinations is dis‐
played.▷"At current location"
The special destinations are listed ac‐
cording to their distance and are dis‐
played with a directional arrow pointing
to the destination.▷"At destination", "At different location", "Along route"
Special destinations are listed according
to their distance from the location
where the search is being performed.▷Destinations of the selected category
are displayed in the map view as sym‐
bols. The display depends on the map
scale and the category.3.Highlight the special destination.4.Select a special destination.5. Select the symbol.6."Start guidance" or "Add as another
destination"
The direct distance to destination is dis‐
played.
Displaying special destinations in the
map
To display symbols of the special destinations in
the map view:
1."Navigation"2."Map"3.Open "Options".4."Display Points of Interest"5.Select the setting.
Destination entry by map
General information If only the location of the destination town/city
or street is known, the destination can be en‐
tered using the map.
Seite 131Destination entryNavigation131
Online Edition for Part no. 01 40 2 911 452 - VI/13
Page 132 of 276
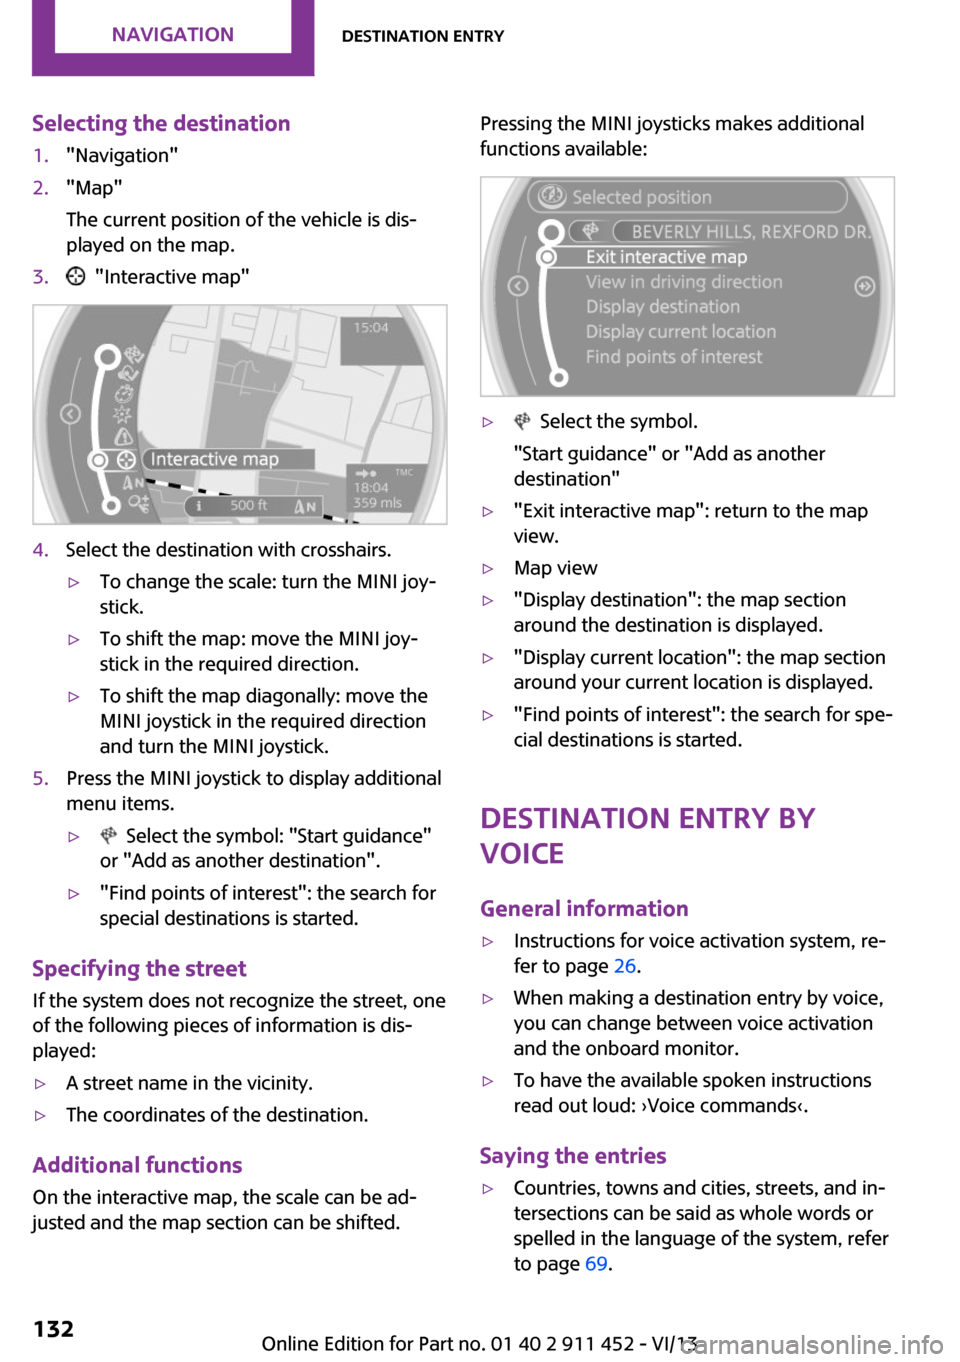
Selecting the destination1."Navigation"2."Map"
The current position of the vehicle is dis‐
played on the map.3. "Interactive map"4.Select the destination with crosshairs.▷To change the scale: turn the MINI joy‐
stick.▷To shift the map: move the MINI joy‐
stick in the required direction.▷To shift the map diagonally: move the
MINI joystick in the required direction
and turn the MINI joystick.5.Press the MINI joystick to display additional
menu items.▷ Select the symbol: "Start guidance"
or "Add as another destination".▷"Find points of interest": the search for
special destinations is started.
Specifying the street
If the system does not recognize the street, one
of the following pieces of information is dis‐
played:
▷A street name in the vicinity.▷The coordinates of the destination.
Additional functions
On the interactive map, the scale can be ad‐
justed and the map section can be shifted.
Pressing the MINI joysticks makes additional
functions available:▷ Select the symbol.
"Start guidance" or "Add as another
destination"▷"Exit interactive map": return to the map
view.▷Map view▷"Display destination": the map section
around the destination is displayed.▷"Display current location": the map section
around your current location is displayed.▷"Find points of interest": the search for spe‐
cial destinations is started.
Destination entry by
voice
General information
▷Instructions for voice activation system, re‐
fer to page 26.▷When making a destination entry by voice,
you can change between voice activation
and the onboard monitor.▷To have the available spoken instructions
read out loud: ›Voice commands‹.
Saying the entries
▷Countries, towns and cities, streets, and in‐
tersections can be said as whole words or
spelled in the language of the system, refer
to page 69.Seite 132NavigationDestination entry132
Online Edition for Part no. 01 40 2 911 452 - VI/13
Page 133 of 276
Example: to enter a town/city in a US states
as a whole word, the language of the sys‐
tem must be English.▷Spell the entry if the spoken language and
the language of the system differ.▷Say the letters smoothly, and avoid exag‐
gerating the pronunciation and inserting
lengthy pauses between the letters.▷The methods of entry depend on the navi‐
gation data in use and the country and lan‐
guage settings.
Entering a town/city separately
The town/city can be said as a complete word.
1. Press the button on the steering
wheel.2.›City‹ or ›Spell city‹3.Wait for the system to prompt you for the
town/city.4.Say the name of the town/city, or name at
least the first three letters.5.Select a location:▷Select a recommended town/city: ›Yes‹.▷Select a different town/city: ›New
entry‹.▷Select an entry: ›Entry ...‹, for instance,
entry 2.▷Spell an entry: ›Spell city‹.6.Continue making the entry as prompted by
the system.
If there are several towns/cities with the same
name:
Towns/cities of the same name are grouped in
a list and displayed as one location followed by
an ellipsis.
1.Select an entry: ›Yes‹ or ›Entry ...‹, e. g., En‐
try 2.2.Select the desired town/city.
The town/city can also be selected from the
list on the onboard monitor:Turn the MINI joystick until the destination
town/city is selected and press the
MINI joystick.
Entering a street or intersection
separately
Enter a street and intersection in the same way
as you would enter a town/city.
Entering a house number separately Depending on the data in the navigation sys‐
tem, house numbers up to number 2,000 can
be entered.
1.›House number‹2.Say the house number.3.›Yes‹ to confirm the house number.4.›Accept destination‹
Starting destination guidance
›Start guidance‹
Adding further intermediate
destinations
›Add as another destination‹
Further intermediate destinations can be
added.
Storing a destination The destination is automatically added to the
list of last destinations.
Planning a trip with in‐termediate destinations
New trip
Various intermediate destinations can be en‐
tered for a trip. The trip destination needs to be
entered first, destination entry, refer to
page 126.
Seite 133Destination entryNavigation133
Online Edition for Part no. 01 40 2 911 452 - VI/13
Page 143 of 276
What to do if...Vehicle equipment
This chapter describes all series equipment as
well as country-specific and special equipment
offered for this model series.Therefore, it also
describes equipment that may not be found in
your vehicle, for instance due to the selected
special equipment or the country version. This
also applies to safety-related functions and sys‐
tems.
What to do if...▷The current transmission position cannot be
displayed?
The vehicle is located in an unrecognized
region, is in a poor reception area, or the
system is currently determining the posi‐
tion. Reception is usually best when you
have an unobstructed view of the sky.▷The destination without street information
is not used for route guidance?
When city has been input, no downtown
can be determined. Input any street in the
selected city and start destination guid‐
ance.▷The destination is not used for route guid‐
ance?
The destination data are not contained in
the navigation data. Select a destination
that is as close as possible to the original.▷Letters for destination input cannot be se‐
lected?
The stored data do not contain the data of
the destination. Select a goal that is as close
as possible to the original.▷Is the map displayed in shades of gray?
"Traffic conditions/gray map" active:The Control Display changes to a black and
white display. This enables a better view of
the traffic bulletins.▷Spoken instructions are no longer output
during route guidance in front of intersec‐
tions?
The area has not yet been fully recorded, or
you have left the recommended route and
the system requires a few seconds to calcu‐
late a new route suggestion.▷Does the navigation system fail to react to
entries?
If the battery was disconnected, it takes up
to 10 minutes for the system to becoming
functional again.Seite 143What to do if...Navigation143
Online Edition for Part no. 01 40 2 911 452 - VI/13
Page 190 of 276
Snap-in adapter
General information More information on compatible snap-in
adapters that support the functions of the mo‐
bile phone is available at the service center.
Notes At high temperatures, the charging function of
the mobile phone may be limited and functions
may not be executed.
When using the mobile phone via the vehicle,
note the operating instructions of the mobile
phone.
Installation position In the center armrest.
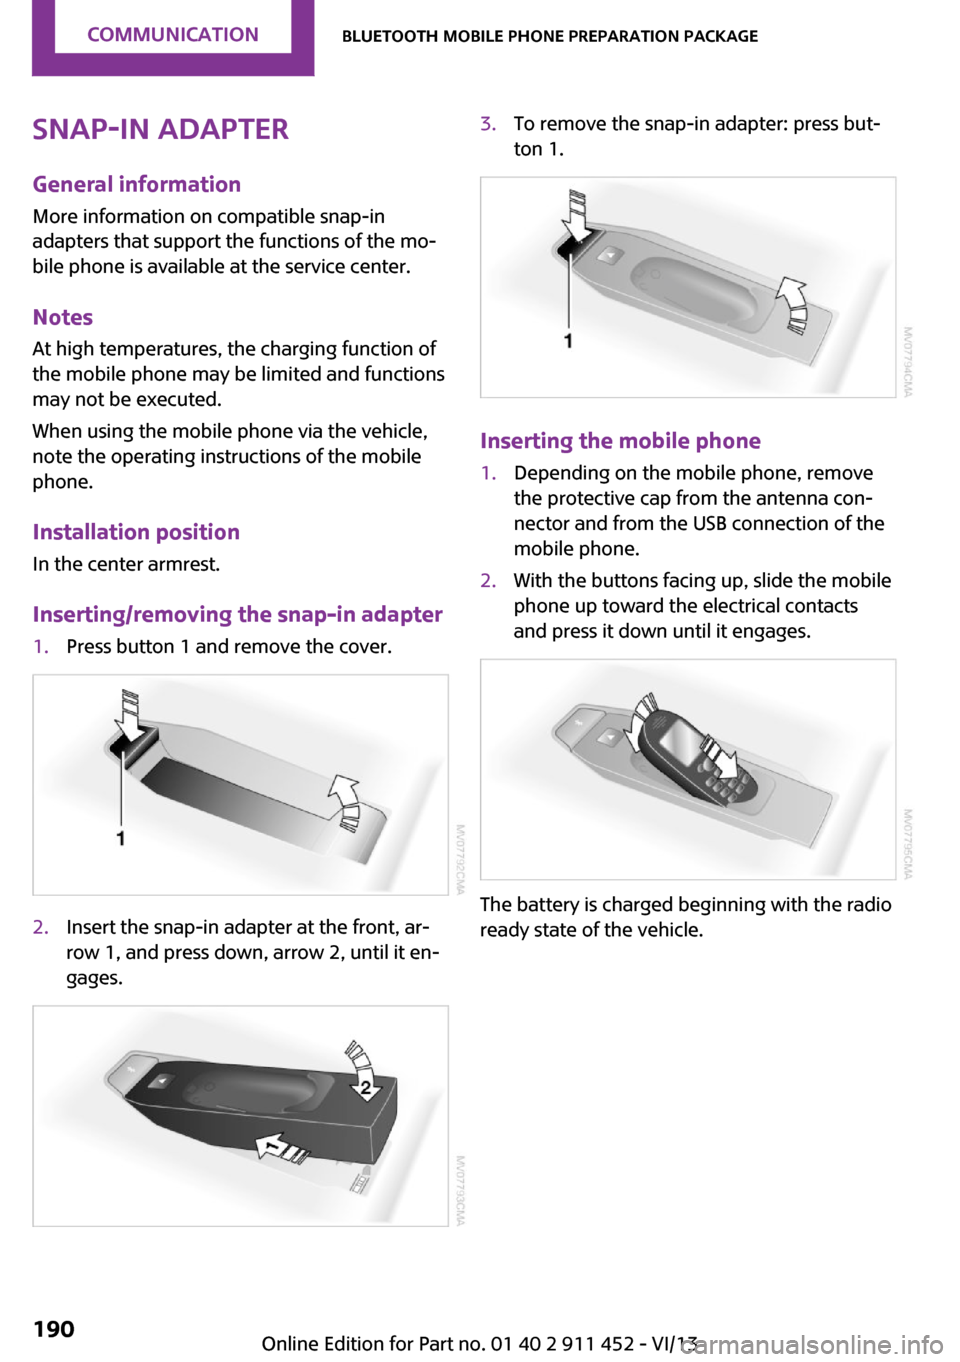
Inserting/removing the snap-in adapter1.Press button 1 and remove the cover.2.Insert the snap-in adapter at the front, ar‐
row 1, and press down, arrow 2, until it en‐
gages.3.To remove the snap-in adapter: press but‐
ton 1.
Inserting the mobile phone
1.Depending on the mobile phone, remove
the protective cap from the antenna con‐
nector and from the USB connection of the
mobile phone.2.With the buttons facing up, slide the mobile
phone up toward the electrical contacts
and press it down until it engages.
The battery is charged beginning with the radio
ready state of the vehicle.
Seite 190CommunicationBluetooth mobile phone preparation package190
Online Edition for Part no. 01 40 2 911 452 - VI/13
Page 217 of 276
pecially if your vehicle is equipped with low-
profile tires.
Indications of tire damage or other vehicle de‐
fects:▷Unusual vibrations during driving.▷Unusual handling such as a strong ten‐
dency to pull to the left or right.
Damage can be caused by driving over curbs,
road damage and similar situations.
In case of tire damage
If there are indications of tire damage, re‐
duce your speed immediately and have the
wheels and tires checked right away; other‐
wise, there is the increased risk of an accident.
Drive carefully to the next service center or tire
shop.
If necessary, have the vehicle towed.
Otherwise, tire damage can present a life-
threatening hazard to vehicle occupants and
other road users. ◀
Repair of tire damage
For safety reasons, the manufacturer of
your vehicle recommends that you do not have
damaged tires repaired; they should be re‐
placed. Otherwise, damage can occur as a re‐
sult. ◀
Tire age RecommendationFor several reasons, among other things be‐
cause of beginning brittleness, the manufac‐
turer of your MINI recommends mounting new
tires at the latest after six years, regardless of
the actual wear.
Manufacture date The date of manufacture of the tires is specified
in the tire label:
DOT … 2313: the tire was manufactured in
week 23 of 2013.
Changing wheels and
tires
Mounting Information on mounting tires
Have mounting and balancing performed
only by a service center or tire specialist.
If this work is not carried out properly, there is
the danger of subsequent damage and related
safety hazards. ◀
Wheel and tire combination Information on the right wheel and tire combi‐
nation and rim version for your vehicle can be
obtained from the service center.
Incorrect wheel and tire combinations impair
the function of a variety of systems such as ABS
or DSC.
To maintain good handling and vehicle re‐
sponse, use only tires with a single tread con‐
figuration from a single manufacturer.
Following tire damage, have the original wheel
and tire combination remounted on the vehicle
as soon as possible.
Approved wheels and tires
The manufacturer of your vehicle recom‐
mends that you use only wheels and tires that
have been approved for your particular vehicle
model.
For example, despite having the same official
size ratings, variations can lead to body contact
and with it, the risk of severe accidents.
The manufacturer of your vehicle cannot evalu‐
ate non-approved wheels and tires to deter‐
mine if they are suited for use, and therefore
cannot ensure the operating safety of the vehi‐
cle if they are mounted. ◀Seite 217Wheels and tiresMobility217
Online Edition for Part no. 01 40 2 911 452 - VI/13
Page 220 of 276
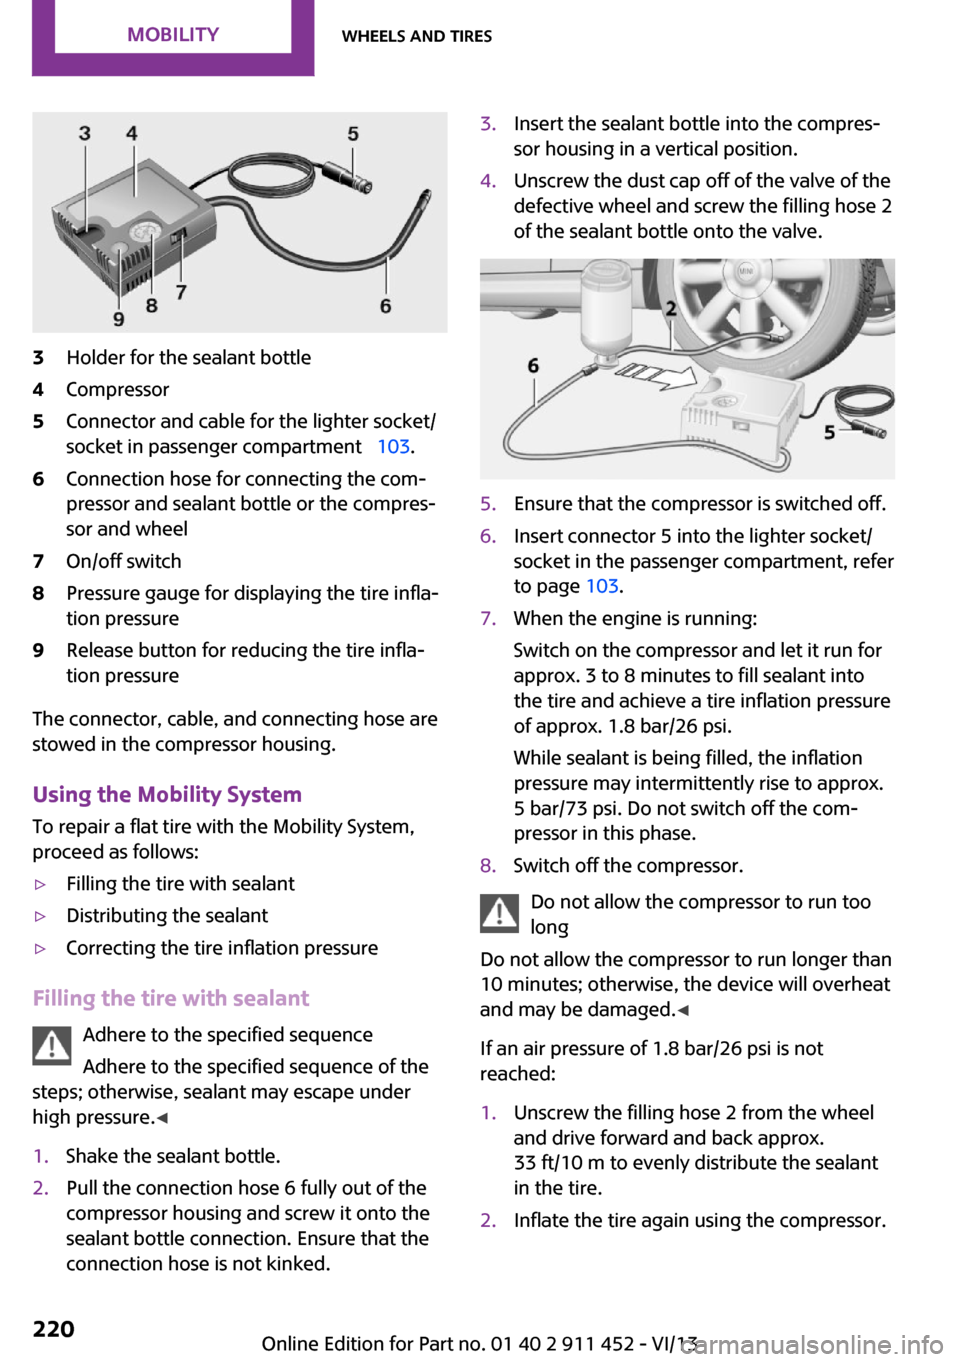
3Holder for the sealant bottle4Compressor5Connector and cable for the lighter socket/
socket in passenger compartment 103.6Connection hose for connecting the com‐
pressor and sealant bottle or the compres‐
sor and wheel7On/off switch8Pressure gauge for displaying the tire infla‐
tion pressure9Release button for reducing the tire infla‐
tion pressure
The connector, cable, and connecting hose are
stowed in the compressor housing.
Using the Mobility System
To repair a flat tire with the Mobility System,
proceed as follows:
▷Filling the tire with sealant▷Distributing the sealant▷Correcting the tire inflation pressure
Filling the tire with sealant
Adhere to the specified sequence
Adhere to the specified sequence of the
steps; otherwise, sealant may escape under
high pressure. ◀
1.Shake the sealant bottle.2.Pull the connection hose 6 fully out of the
compressor housing and screw it onto the
sealant bottle connection. Ensure that the
connection hose is not kinked.3.Insert the sealant bottle into the compres‐
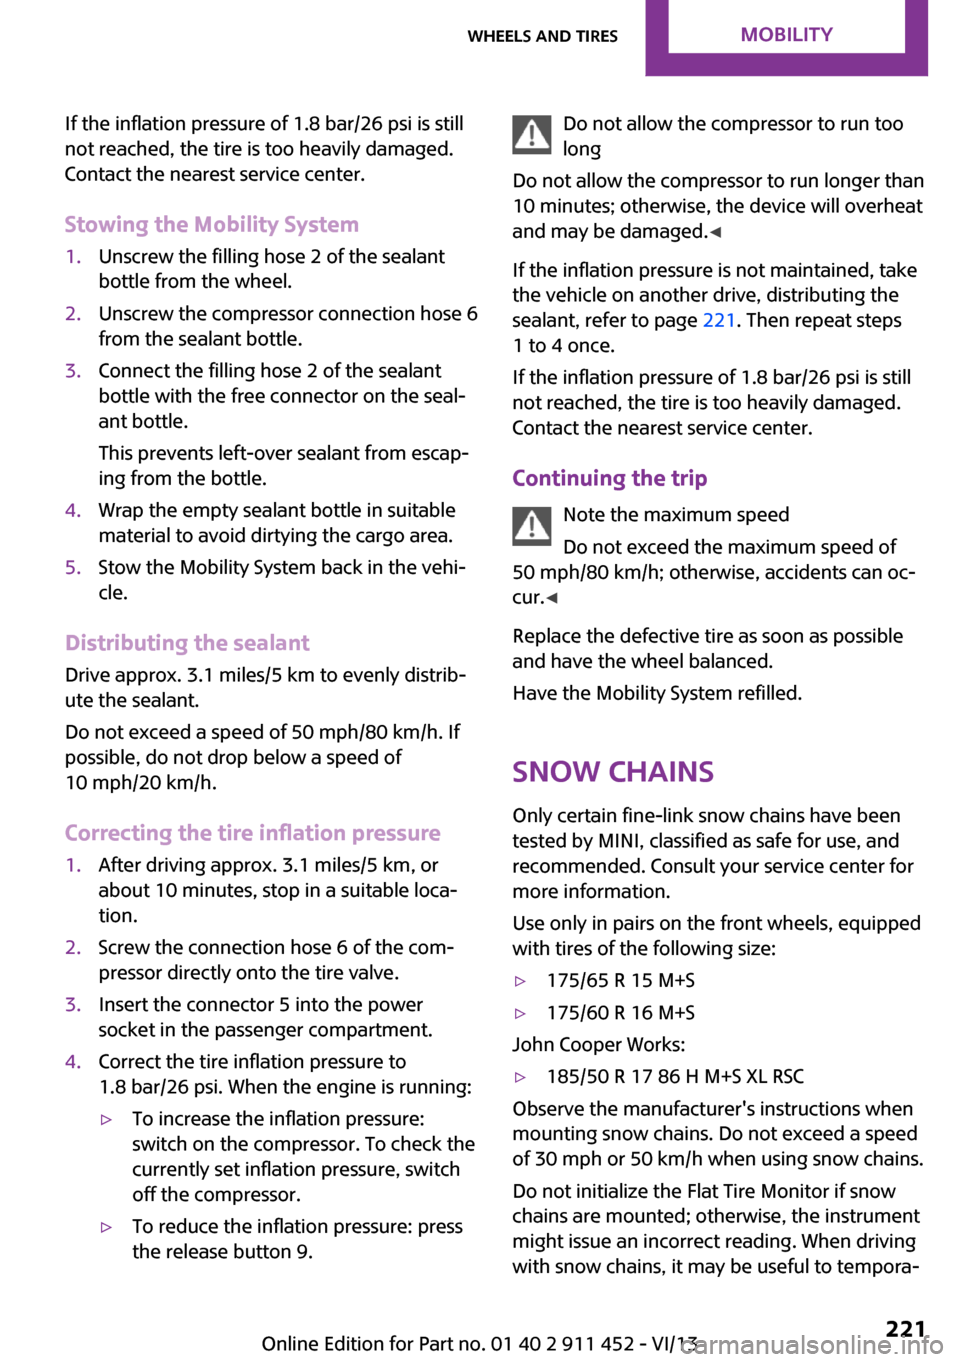
sor housing in a vertical position.4.Unscrew the dust cap off of the valve of the
defective wheel and screw the filling hose 2
of the sealant bottle onto the valve.5.Ensure that the compressor is switched off.6.Insert connector 5 into the lighter socket/
socket in the passenger compartment, refer
to page 103.7.When the engine is running:
Switch on the compressor and let it run for
approx. 3 to 8 minutes to fill sealant into
the tire and achieve a tire inflation pressure
of approx. 1.8 bar/26 psi.
While sealant is being filled, the inflation
pressure may intermittently rise to approx.
5 bar/73 psi. Do not switch off the com‐
pressor in this phase.8.Switch off the compressor.
Do not allow the compressor to run too
long
Do not allow the compressor to run longer than
10 minutes; otherwise, the device will overheat
and may be damaged. ◀
If an air pressure of 1.8 bar/26 psi is not
reached:
1.Unscrew the filling hose 2 from the wheel
and drive forward and back approx.
33 ft/10 m to evenly distribute the sealant
in the tire.2.Inflate the tire again using the compressor.Seite 220MobilityWheels and tires220
Online Edition for Part no. 01 40 2 911 452 - VI/13
Page 221 of 276
If the inflation pressure of 1.8 bar/26 psi is still
not reached, the tire is too heavily damaged.
Contact the nearest service center.
Stowing the Mobility System1.Unscrew the filling hose 2 of the sealant
bottle from the wheel.2.Unscrew the compressor connection hose 6
from the sealant bottle.3.Connect the filling hose 2 of the sealant
bottle with the free connector on the seal‐
ant bottle.
This prevents left-over sealant from escap‐
ing from the bottle.4.Wrap the empty sealant bottle in suitable
material to avoid dirtying the cargo area.5.Stow the Mobility System back in the vehi‐
cle.
Distributing the sealant
Drive approx. 3.1 miles/5 km to evenly distrib‐
ute the sealant.
Do not exceed a speed of 50 mph/80 km/h. If
possible, do not drop below a speed of
10 mph/20 km/h.
Correcting the tire inflation pressure
1.After driving approx. 3.1 miles/5 km, or
about 10 minutes, stop in a suitable loca‐
tion.2.Screw the connection hose 6 of the com‐
pressor directly onto the tire valve.3.Insert the connector 5 into the power
socket in the passenger compartment.4.Correct the tire inflation pressure to
1.8 bar/26 psi. When the engine is running:▷To increase the inflation pressure:
switch on the compressor. To check the
currently set inflation pressure, switch
off the compressor.▷To reduce the inflation pressure: press
the release button 9.Do not allow the compressor to run too
long
Do not allow the compressor to run longer than
10 minutes; otherwise, the device will overheat
and may be damaged. ◀
If the inflation pressure is not maintained, take
the vehicle on another drive, distributing the
sealant, refer to page 221. Then repeat steps
1 to 4 once.
If the inflation pressure of 1.8 bar/26 psi is still
not reached, the tire is too heavily damaged.
Contact the nearest service center.
Continuing the trip Note the maximum speed
Do not exceed the maximum speed of
50 mph/80 km/h; otherwise, accidents can oc‐
cur. ◀
Replace the defective tire as soon as possible
and have the wheel balanced.
Have the Mobility System refilled.
Snow chains
Only certain fine-link snow chains have been
tested by MINI, classified as safe for use, and
recommended. Consult your service center for more information.
Use only in pairs on the front wheels, equipped
with tires of the following size:▷175/65 R 15 M+S▷175/60 R 16 M+S
John Cooper Works:
▷185/50 R 17 86 H M+S XL RSC
Observe the manufacturer's instructions when
mounting snow chains. Do not exceed a speed
of 30 mph or 50 km/h when using snow chains.
Do not initialize the Flat Tire Monitor if snow
chains are mounted; otherwise, the instrument
might issue an incorrect reading. When driving
with snow chains, it may be useful to tempora‐
Seite 221Wheels and tiresMobility221
Online Edition for Part no. 01 40 2 911 452 - VI/13