buttons MINI Clubman 2014 Owner's Manual (Mini Connected)
[x] Cancel search | Manufacturer: MINI, Model Year: 2014, Model line: Clubman, Model: MINI Clubman 2014Pages: 276, PDF Size: 6.44 MB
Page 15 of 276
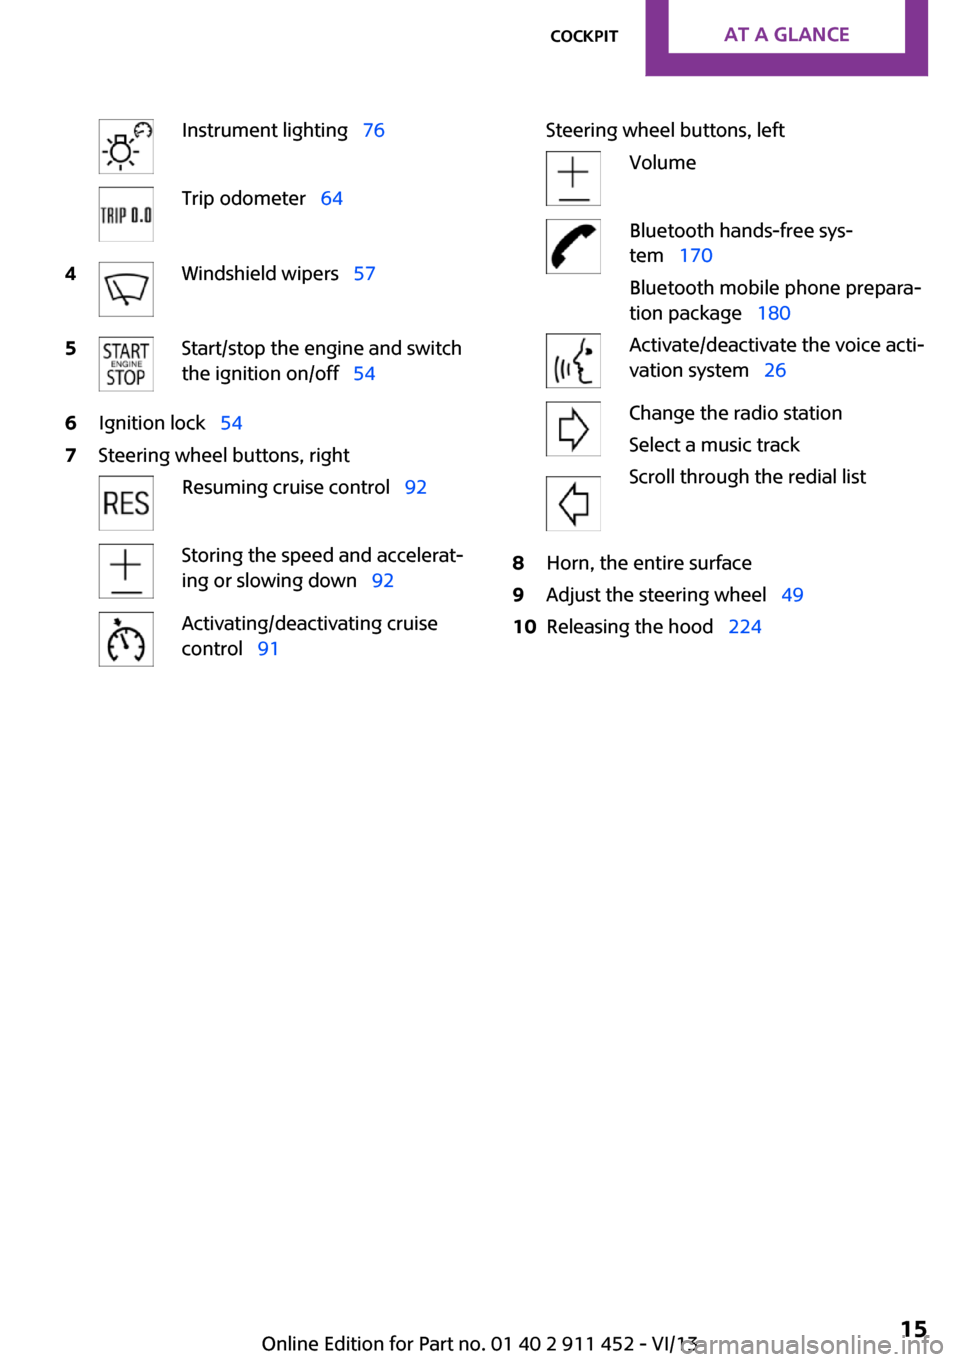
Instrument lighting 76Trip odometer 644Windshield wipers 575Start/stop the engine and switch
the ignition on/off 546Ignition lock 547Steering wheel buttons, rightResuming cruise control 92Storing the speed and accelerat‐
ing or slowing down 92Activating/deactivating cruise
control 91Steering wheel buttons, leftVolumeBluetooth hands-free sys‐
tem 170
Bluetooth mobile phone prepara‐
tion package 180Activate/deactivate the voice acti‐
vation system 26Change the radio station
Select a music track
Scroll through the redial list8Horn, the entire surface9Adjust the steering wheel 4910Releasing the hood 224Seite 15CockpitAt a glance15
Online Edition for Part no. 01 40 2 911 452 - VI/13
Page 18 of 276
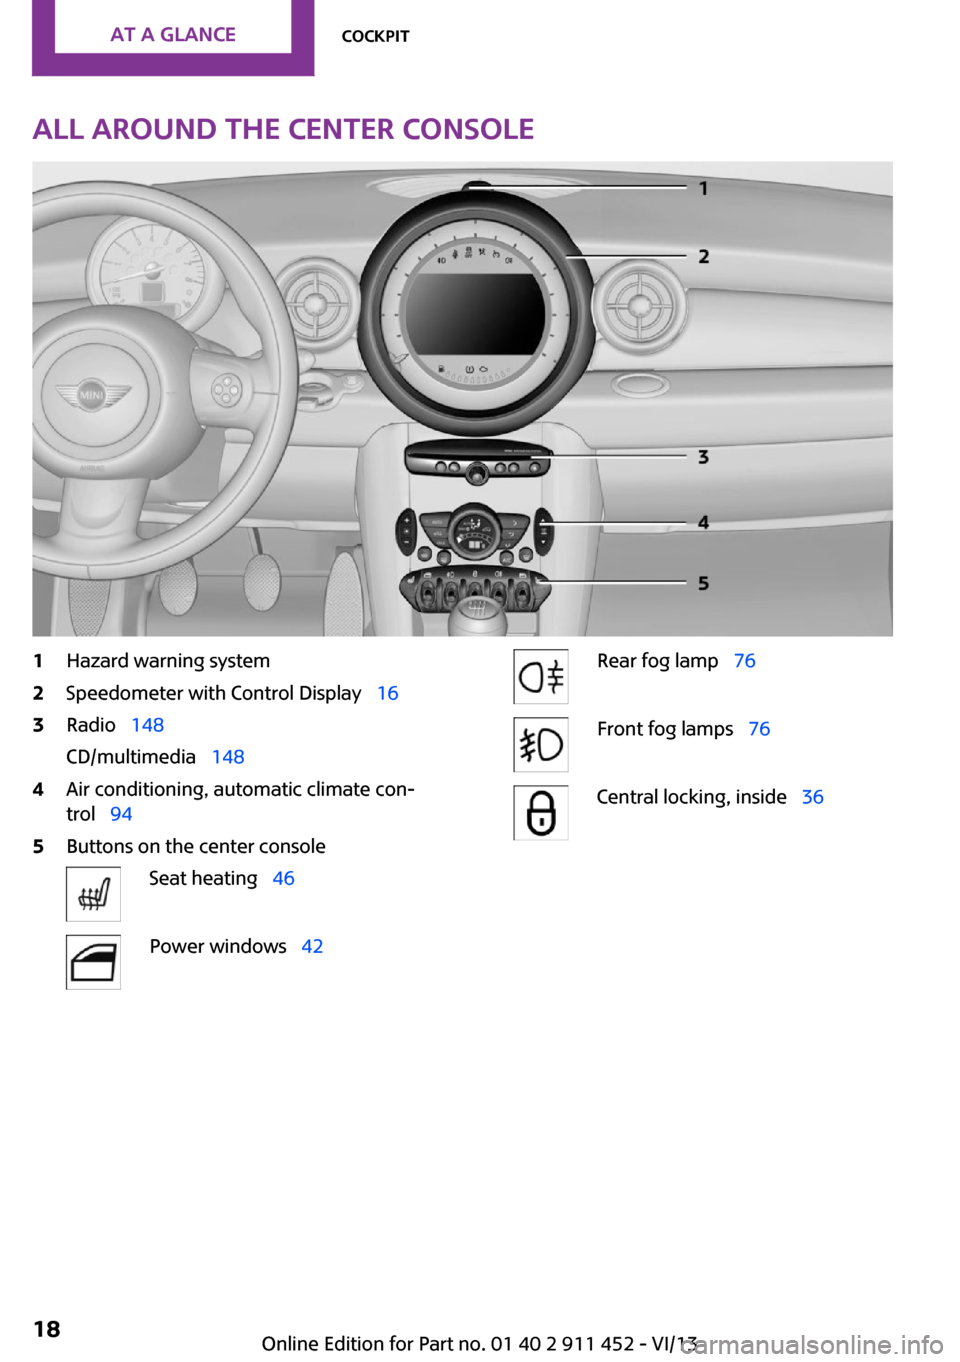
All around the center console1Hazard warning system2Speedometer with Control Display 163Radio 148
CD/multimedia 1484Air conditioning, automatic climate con‐
trol 945Buttons on the center consoleSeat heating 46Power windows 42Rear fog lamp 76Front fog lamps 76Central locking, inside 36Seite 18At a glanceCockpit18
Online Edition for Part no. 01 40 2 911 452 - VI/13
Page 19 of 276
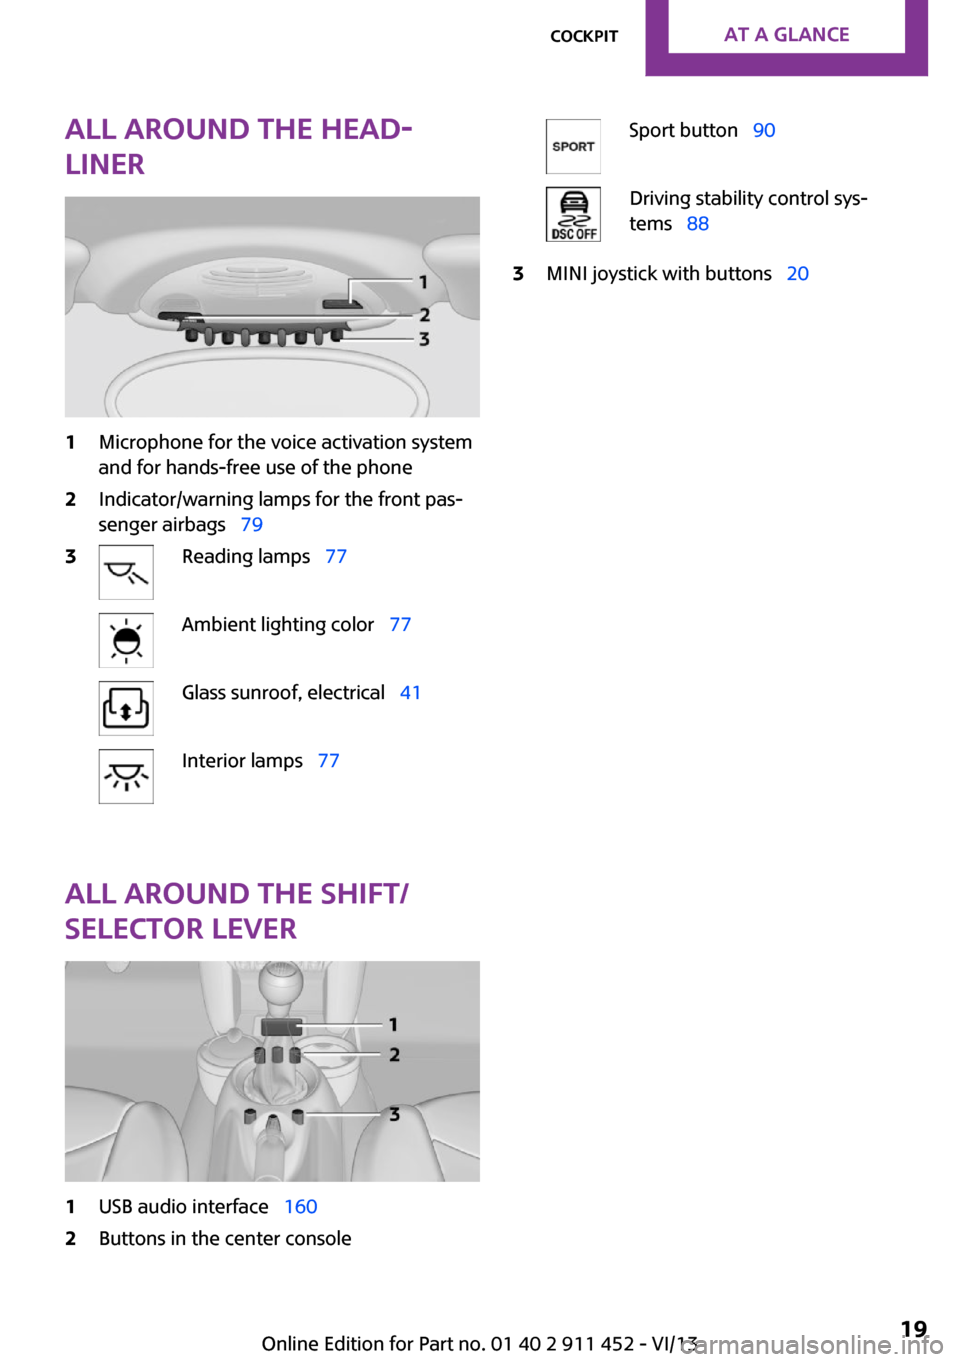
All around the head‐
liner1Microphone for the voice activation system
and for hands-free use of the phone2Indicator/warning lamps for the front pas‐
senger airbags 793Reading lamps 77Ambient lighting color 77Glass sunroof, electrical 41Interior lamps 77
All around the shift/
selector lever
1USB audio interface 1602Buttons in the center consoleSport button 90Driving stability control sys‐
tems 883MINI joystick with buttons 20Seite 19CockpitAt a glance19
Online Edition for Part no. 01 40 2 911 452 - VI/13
Page 20 of 276
Onboard monitorVehicle equipmentThis chapter describes all series equipment as
well as country-specific and special equipment
offered for this model series.Therefore, it also
describes equipment that may not be found in
your vehicle, for instance due to the selected
special equipment or the country version. This
also applies to safety-related functions and sys‐
tems.
The concept The onboard monitor combines the functions
of a large number of different switches. Thus,
these functions can be operated from a central
location.
Using the onboard monitor during a trip
To avoid becoming distracted and posing
an unnecessary hazard to your vehicle's occu‐
pants and to other road users, never attempt to
use the controls or enter information unless
traffic and road conditions allow this. ◀
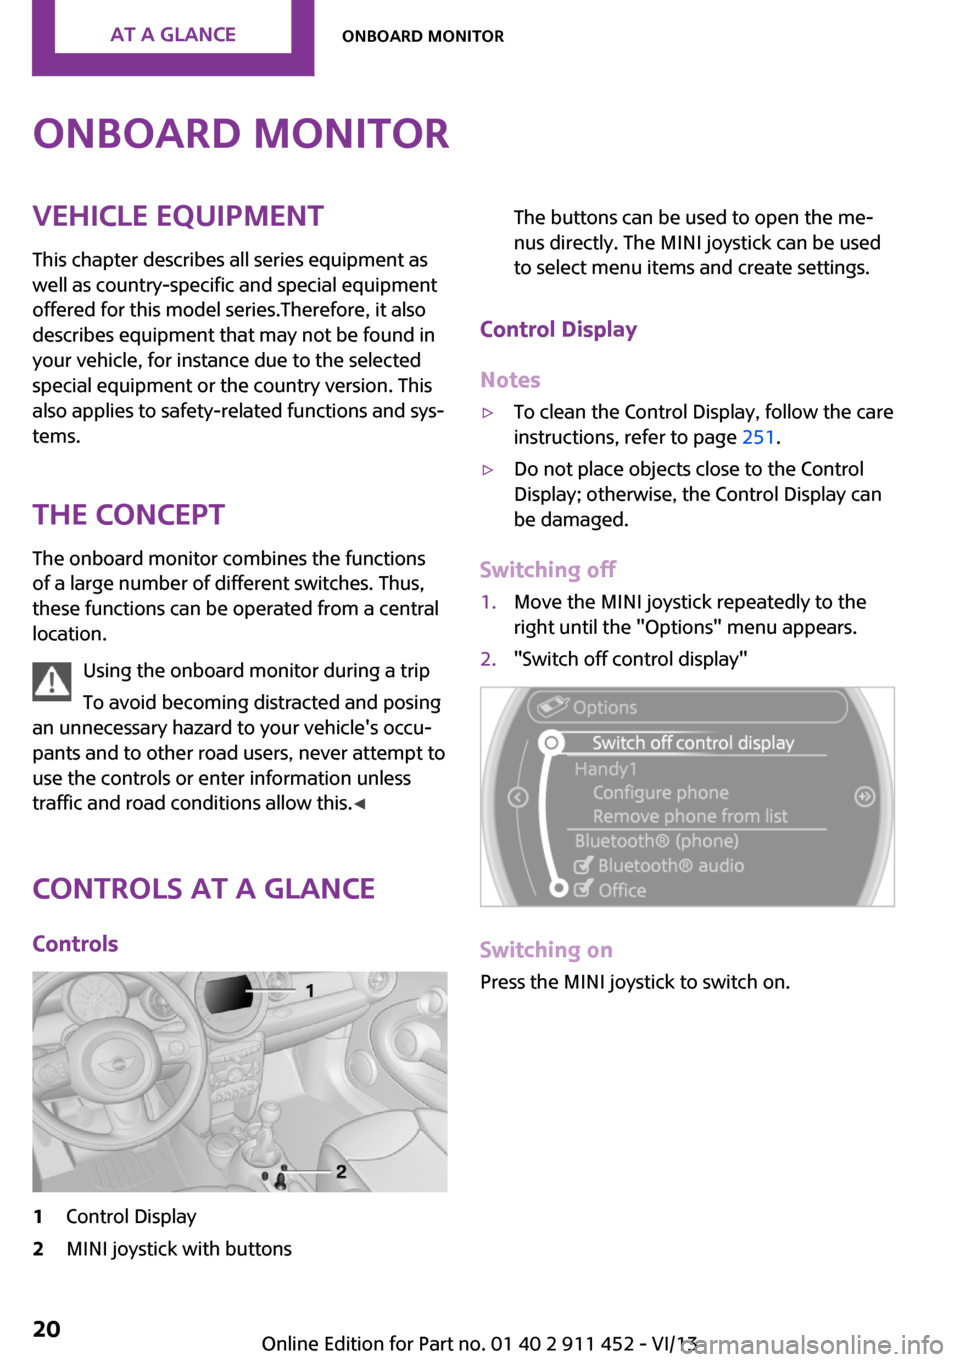
Controls at a glance Controls1Control Display2MINI joystick with buttonsThe buttons can be used to open the me‐
nus directly. The MINI joystick can be used
to select menu items and create settings.
Control Display
Notes
▷To clean the Control Display, follow the care
instructions, refer to page 251.▷Do not place objects close to the Control
Display; otherwise, the Control Display can
be damaged.
Switching off
1.Move the MINI joystick repeatedly to the
right until the "Options" menu appears.2."Switch off control display"
Switching on
Press the MINI joystick to switch on.
Seite 20At a glanceOnboard monitor20
Online Edition for Part no. 01 40 2 911 452 - VI/13
Page 21 of 276
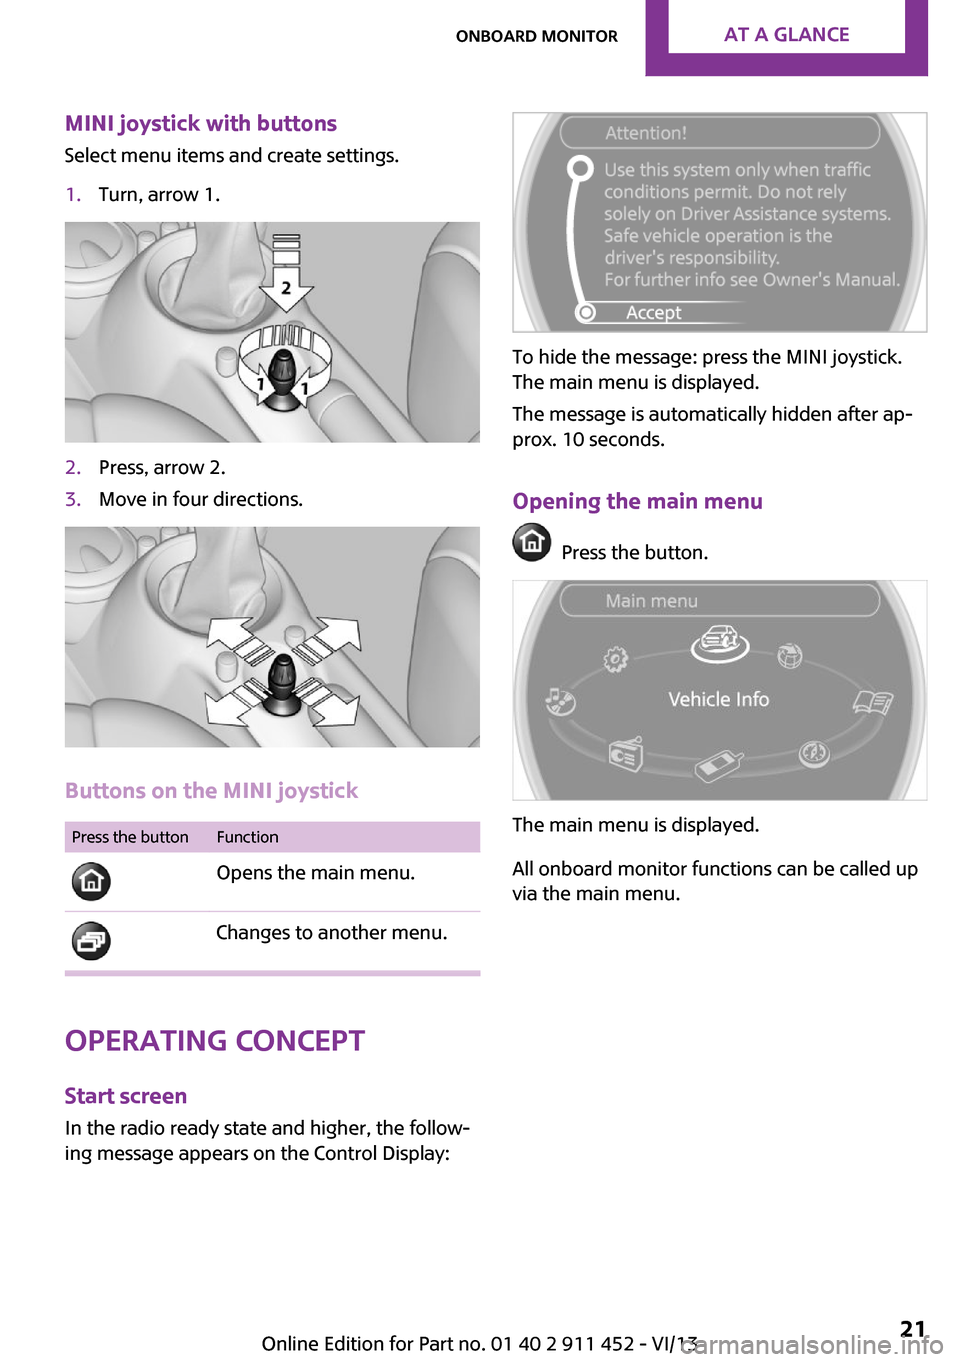
MINI joystick with buttonsSelect menu items and create settings.1.Turn, arrow 1.2.Press, arrow 2.3.Move in four directions.
Buttons on the MINI joystick
Press the buttonFunction
Opens the main menu. Changes to another menu.
Operating concept
Start screen In the radio ready state and higher, the follow‐
ing message appears on the Control Display:
To hide the message: press the MINI joystick.
The main menu is displayed.
The message is automatically hidden after ap‐
prox. 10 seconds.
Opening the main menu
Press the button.
The main menu is displayed.
All onboard monitor functions can be called up
via the main menu.
Seite 21Onboard monitorAt a glance21
Online Edition for Part no. 01 40 2 911 452 - VI/13
Page 32 of 276

Opening and closingVehicle equipmentThis chapter describes all series equipment as
well as country-specific and special equipment
offered for this model series.Therefore, it also
describes equipment that may not be found in
your vehicle, for instance due to the selected
special equipment or the country version. This
also applies to safety-related functions and sys‐
tems.
Remote control/key Buttons on the remote control1Opening the tailgate/split door2Unlocking3Locking
General information
Each remote control contains a rechargeable
battery that is automatically recharged when it
is in the ignition lock while the car is being
driven. Use each remote control at least twice a
year for longer road trips in order to maintain
the batteries' charge status. In vehicles equip‐
ped with Comfort Access, the remote control
contains a replaceable battery, refer to
page 40.
The settings called up and implemented when
the vehicle is unlocked depend on which re‐
mote control is used to unlock the vehicle, Per‐
sonal Profile, refer to page 32.
In addition, information about service require‐
ments is stored in the remote control, Service
data in the remote control, refer to page 228.
Integrated key
Press button 1 to unlock the key.
The integrated key fits the following locks:
▷Driver's door, refer to page 35.
New remote controls
You can obtain new remote controls from your
service center.
Loss of the remote controls Lost remote controls can be blocked by your
service center.
Personal Profile
The concept
You can set several of your vehicle's functions
to suit your personal needs and preferences.
▷Through Personal Profile, most of these set‐
tings are stored for the remote control cur‐
rently in use.▷While the vehicle is being unlocked, the re‐
mote control is recognized and the settingsSeite 32ControlsOpening and closing32
Online Edition for Part no. 01 40 2 911 452 - VI/13
Page 33 of 276
stored with it are called up and imple‐
mented.▷Your personal settings will be recognized
and called up again even if the vehicle has
been used in the meantime by someone
else with another remote control.▷The individual settings are stored for no
more than three remote controls.
Personal Profile settings
The following functions and settings can be
stored in a profile.
More information on the settings can be found
under:
▷Response of the central locking system
when the car is being unlocked, refer to
page 34.▷Automatic locking of the vehicle, refer to
page 36.▷Triple turn signal activation, refer to
page 57.▷Settings for the displays on the onboard
monitor, in the speedometer, and in the
tachometer:▷12h/24h clock format, refer to
page 68.▷Date format, refer to page 69.▷Brightness of the Control Display, refer
to page 70.▷Language on the Control Display, refer
to page 69.▷Units of measure for fuel consumption,
distance covered/remaining distances,
and temperature, refer to page 68.▷Light settings:▷Headlamp courtesy delay feature, refer
to page 75.▷Daytime running lights, refer to
page 75.▷Automatic climate control, refer to
page 96: AUTO program, activating/deac‐
tivating the cooling function, setting thetemperature, air volume, and air distribu‐
tion.▷Entertainment:▷Tone settings, refer to page 146.▷Volume, refer to page 146.
Central locking system
The concept
The central locking system becomes active
when the driver's door is closed.
The system simultaneously engages and re‐
leases the locks on the following:
▷Doors.▷MINI: tailgate.▷MINI Clubman: split door.▷Fuel filler flap.
Operating from the outside
▷Via the remote control.▷Via the door lock.▷In cars with Comfort Access, via the door
handles on the driver's and front passenger
sides.
The following takes place simultaneously when
locking/unlocking the vehicle via the remote
control:
▷Depending on the vehicle equipment, the
anti-theft protection is switched on and off
as well. The anti-theft protection makes it
impossible to unlock the doors using the
lock buttons or door handles.▷The welcome lamps, interior lamps, and
ambient lighting are switched on and off.▷The alarm system is armed or disarmed, re‐
fer to page 41.
Operating from the inside
Via the button for the central locking system,
refer to page 36.
Seite 33Opening and closingControls33
Online Edition for Part no. 01 40 2 911 452 - VI/13
Page 39 of 276
tects the remote control when it is nearby or in
the passenger compartment.
Comfort Access supports the following func‐
tions:▷Unlocking/locking of the vehicle.▷Unlocking the tailgate/split door separately▷Starting the engine.
Functional requirements
▷There are no external sources of interfer‐
ence in the vicinity.▷To lock the vehicle, the remote control
must be located outside of the vehicle.▷The next unlocking and locking cycle is not
possible until after approx. 2 seconds.▷The engine can only be started if the re‐
mote control is inside the vehicle.▷The doors and tailgate/split door must be
closed to operate the windows and the
glass sunroof.
Comparison with ordinary remote
control
The functions can be controlled by pressing the
buttons or via Comfort Access.
Notes on opening and closing, refer to page 32.
If you notice a brief delay while opening or
closing the windows or glass sunroof, the sys‐
tem is checking whether a remote control is in‐
side the vehicle. Repeat the opening or closing
procedure, if necessary.
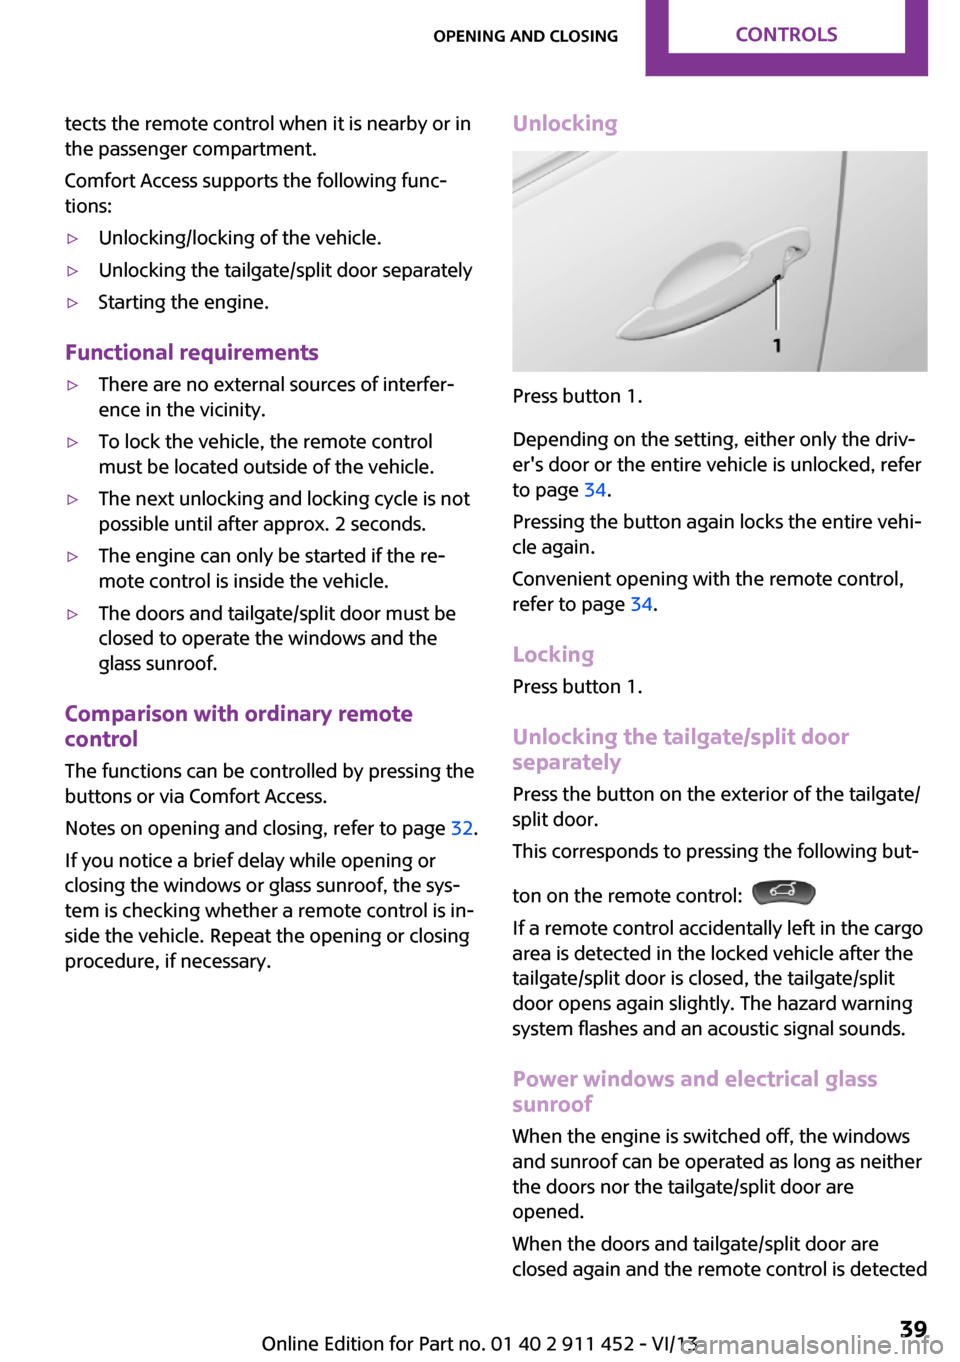
Unlocking
Press button 1.
Depending on the setting, either only the driv‐
er's door or the entire vehicle is unlocked, refer
to page 34.
Pressing the button again locks the entire vehi‐
cle again.
Convenient opening with the remote control,
refer to page 34.
Locking
Press button 1.
Unlocking the tailgate/split door
separately
Press the button on the exterior of the tailgate/
split door.
This corresponds to pressing the following but‐
ton on the remote control:
If a remote control accidentally left in the cargo
area is detected in the locked vehicle after the
tailgate/split door is closed, the tailgate/split
door opens again slightly. The hazard warning
system flashes and an acoustic signal sounds.
Power windows and electrical glass
sunroof
When the engine is switched off, the windows
and sunroof can be operated as long as neither
the doors nor the tailgate/split door are
opened.
When the doors and tailgate/split door are
closed again and the remote control is detected
Seite 39Opening and closingControls39
Online Edition for Part no. 01 40 2 911 452 - VI/13
Page 40 of 276
inside the vehicle, the windows and the sunroof
can be operated again.
Insert the remote control into the ignition lock
to be able to operate the windows and the sun‐
roof while the engine is switched off and the
doors are open.
Switching on the radio ready state Press the Start/Stop button to switch on the
radio ready state, refer to page 54.
Do not depress the brake or the clutch; other‐
wise, the engine will start.
Starting the engine The engine can be started or the ignition can
be switched on, refer to page 54, when a re‐
mote control is inside the vehicle. It is not nec‐
essary to insert a remote control into the igni‐
tion lock.
Switching off the engine in cars with
automatic transmission
The engine can only be switched off with the
selector lever in position P, refer to page 61.
To switch off the engine with the selector lever
in position N, the remote control must be in‐
serted in the ignition lock.
Before driving a vehicle with automatic
transmission into a car wash1.Insert the remote control into the ignition
switch.2.Depress the brake pedal.3.Move the selector lever to position N.4.Switch the engine off.
The vehicle can roll.
Malfunction The Comfort Access functions can be disturbed
by local radio waves, such as by a mobile
phone in the immediate vicinity of the remote
control or when a mobile phone is being
charged in the vehicle.
If this occurs, open or close the vehicle using
the buttons on the remote control or use the
integrated key in the door lock.
To start the engine afterward, insert the remote
control into the ignition switch.
Warning lamps The warning lamp in the instrument
cluster lights up when you attempt to
start the engine: the engine cannot be
started.
The remote control is not in the vehicle or has a
malfunction. Take the remote control with you
inside the vehicle or have it checked. If neces‐
sary, insert another remote control into the ig‐
nition switch.
The warning lamp in the instrument
cluster lights up while the engine is run‐
ning: the remote control is no longer in‐
side the vehicle.
After switching off the engine, the engine can
only be started again within approx. 10 sec‐
onds if no door has been opened.
The indicator lamp lights up and a mes‐
sage appears on the Control Display: re‐
place the remote control battery.
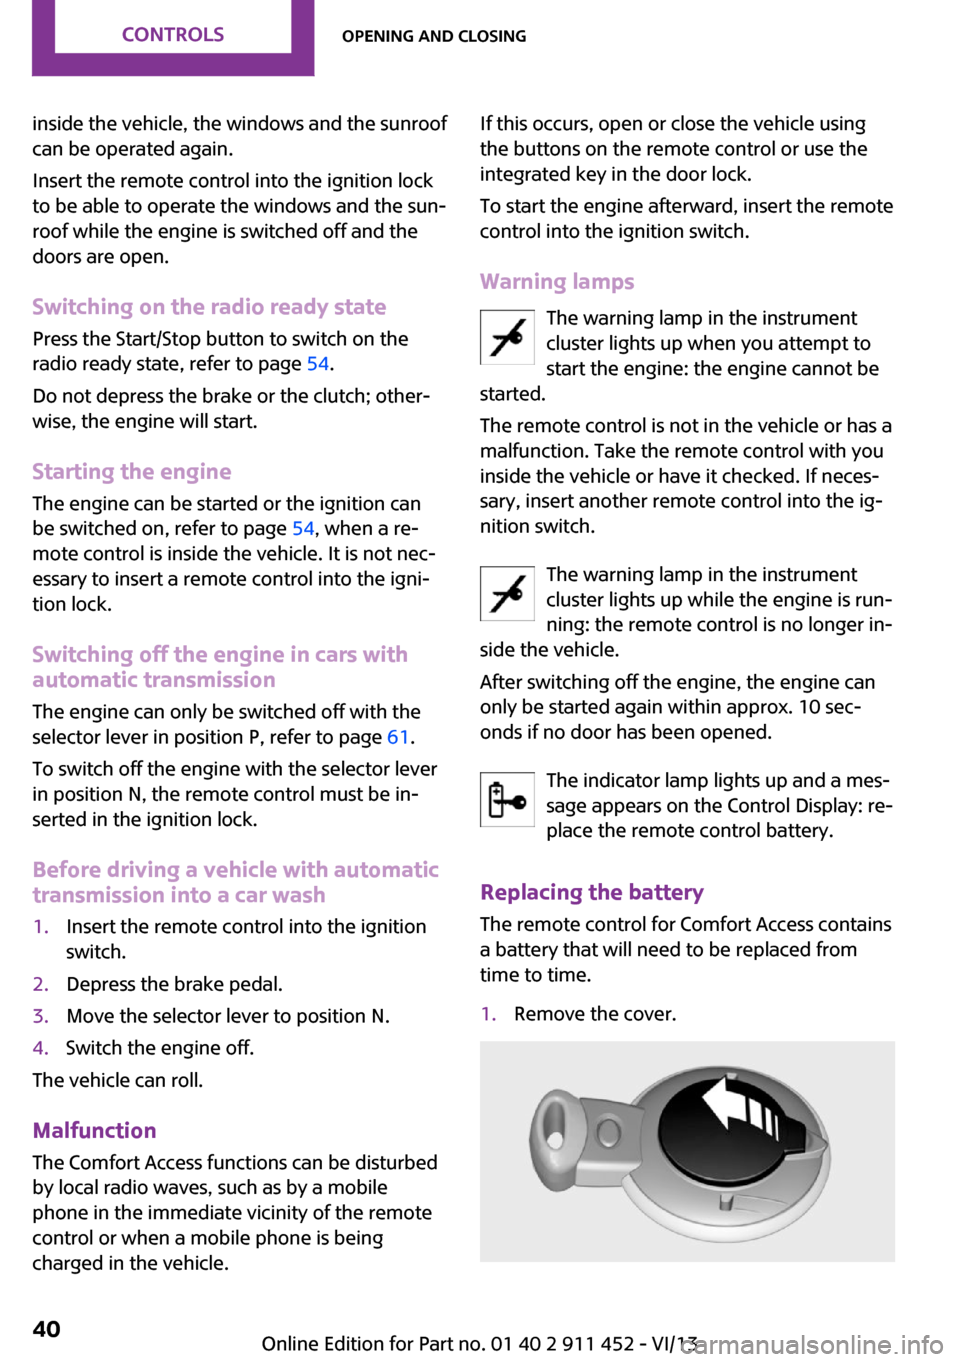
Replacing the battery
The remote control for Comfort Access contains
a battery that will need to be replaced from
time to time.1.Remove the cover.Seite 40ControlsOpening and closing40
Online Edition for Part no. 01 40 2 911 452 - VI/13
Page 99 of 276

Interior equipmentVehicle equipmentThis chapter describes all series equipment as
well as country-specific and special equipment
offered for this model series.Therefore, it also
describes equipment that may not be found in
your vehicle, for instance due to the selected
special equipment or the country version. This
also applies to safety-related functions and sys‐
tems.
Universal garage door
opener
The concept
The universal garage door opener can be used
to operate up to 3 functions in remote-control‐
led systems, such as garage door drives or
lighting systems. The universal garage door
opener replaces up to 3 different hand-held
transmitters. To operate it, the buttons on the
interior rearview mirror must be programmed
for the desired functions. The hand-held trans‐
mitter for the system is needed for the pro‐
gramming procedure.
During programming
During programming and before activat‐
ing a device using the Universal Garage Door
Opener, ensure that there are no people, ani‐
mals, or objects in the range of movement of
the remote-controlled device; otherwise, there
is a risk of injury or damage.
Also follow the safety instructions of the hand-
held transmitter. ◀
Before selling the vehicle, delete the stored
functions for security reasons.Compatibility
If this symbol is printed on the packag‐
ing or in the operating instructions of
the system being operated, the system
is generally compatible with the universal ga‐
rage door opener.
If you have any questions, please contact:▷Your service center.▷www.homelink.com on the Internet.
HomeLink is a registered trademark of Johnson
Controls, Inc.
Controls on the interior rearview mirror
1LED2Buttons3Hand-held transmitter, required for pro‐
gramming.
Programming
General information
1.Switch on the ignition.2.Initial setup:
Press the right and left buttons on the inte‐
rior rearview mirror simultaneously for ap‐
prox. 20 seconds until the LED on the inte‐
rior rearview mirror begins to flash. All
programmed settings of the buttons on the
interior rearview mirror are deleted.Seite 99Interior equipmentControls99
Online Edition for Part no. 01 40 2 911 452 - VI/13