turn signal bulb MINI Clubman 2014 Owner's Manual (Mini Connected)
[x] Cancel search | Manufacturer: MINI, Model Year: 2014, Model line: Clubman, Model: MINI Clubman 2014Pages: 276, PDF Size: 6.44 MB
Page 57 of 276

Turn signal, high beams,
headlamp flasher1Turn signal2Switching on the high beams3Switching off the high beams/headlamp
flasher
Turn signal
Press the lever beyond the resistance point.
To switch off manually, press the lever to the
resistance point.
Unusually rapid flashing of the indicator lamp
indicates that a turn signal bulb has failed.
Signaling a turn briefly Press the lever to the resistance point and hold
it there for as long as you want the turn signal
to flash.
Triple turn signal activation Press the lever to the resistance point.
The turn signal flashes three times.
This function can be activated or deactivated:
1."Settings"2."Lighting"3."Triple turn signal"
The setting is stored for the remote control cur‐
rently in use.
Washer/wiper system
Notes Do not switch on the wipers if frozen
Do not switch on the wipers if they are
frozen onto the windshield; otherwise, the
wiper blades and the windshield wiper motor
may be damaged. ◀
Do not use the wipers on a dry windshield
Do not use the wipers on a dry wind‐
shield; otherwise, the wiper blades may wear
more rapidly or become damaged. ◀
At a glance
1Switching on wipers2Switching off wipers or brief wipeSeite 57DrivingControls57
Online Edition for Part no. 01 40 2 911 452 - VI/13
Page 234 of 276

2.Press the release, arrow 1, and pull off the
connector, arrow 2.3.Insert the new bulb and attach the cover in
reverse order.
Turn signal, parking lamp, roadside
parking lamp, and front fog lamp
Access to the bulbs via the wheel housing
Follow the general instructions on lamps and
bulbs, refer to page 232.
1Turn signal2Parking lamp/roadside parking lamp/fog
lamp
Replacing the turn signal bulb
21-watt bulb, P 21 W, or PY 21 W
1.Turn the wheel.2.Remove cover 1.
To do this, turn the cover counterclockwise.3.Remove the inside cover. To do this, turn
the cover counterclockwise.4.Turn the bulb counterclockwise and re‐
move it.5.Insert the new bulb and attach the covers
in reverse order.
Replacing the parking lamp bulb and
roadside parking lamp bulb
5-watt bulb, W 5 W
1.Turn the wheel.2.Remove cover 2.
To do this, turn the cover counterclockwise.Seite 234MobilityReplacing components234
Online Edition for Part no. 01 40 2 911 452 - VI/13
Page 235 of 276

3.Turn the upper bulb counterclockwise and
remove it.4.Insert the new bulb and attach the cover in
reverse order.
Replacing the front fog lamp bulb
H8 bulb, 35 watt
1.Turn the wheel.2.Remove cover 2.
To do this, turn the cover counterclockwise.3.Pull off the plug-in cable connector.4.Turn the lower bulb counterclockwise and
remove it.5.Insert the new bulb and attach the cover in
reverse order.Lateral turn signals
5-watt bulb, W 5 W1.Push the lamp forward with the air grille
and remove it.2.Turn the bulb holder counterclockwise and
remove it.3.Pull out the bulb and replace it.4.Insert the new bulb and attach the cover in
reverse order.
Tail lamps, bulb replacement
Follow the general instructions on lamps and
bulbs, refer to page 232.
Turn signal: 21-watt bulb, PY 21 W
Brake lamp: 21-watt/5-watt bulb, W 5 W
Remaining lamps: 21-watt bulb, P 21 W
MINI
1Turn signal2Tail lamp LED3Brake lampSeite 235Replacing componentsMobility235
Online Edition for Part no. 01 40 2 911 452 - VI/13
Page 236 of 276

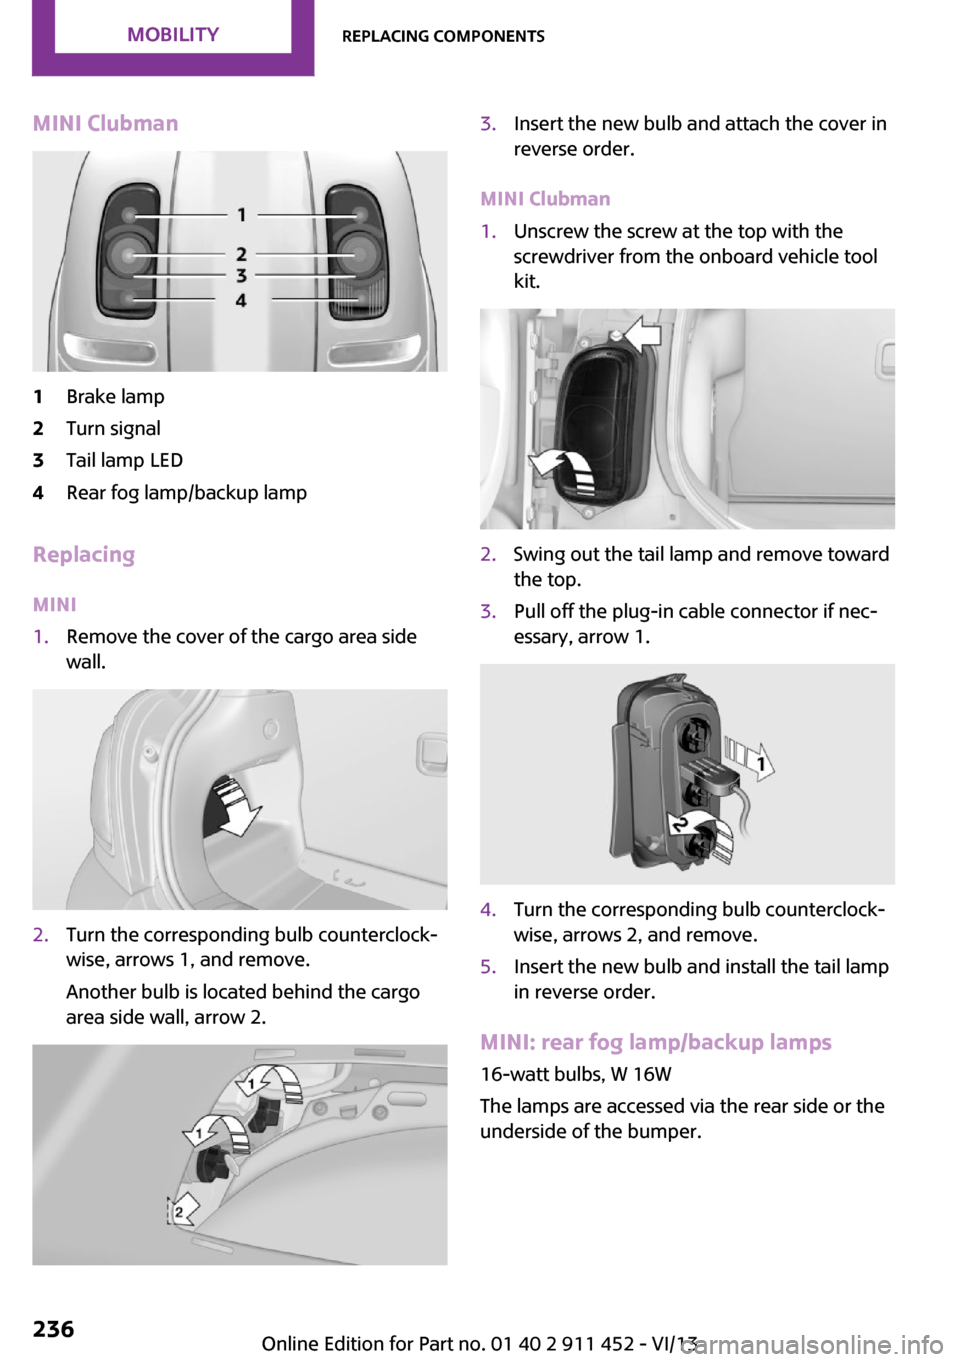
MINI Clubman1Brake lamp2Turn signal3Tail lamp LED4Rear fog lamp/backup lamp
Replacing
MINI
1.Remove the cover of the cargo area side
wall.2.Turn the corresponding bulb counterclock‐
wise, arrows 1, and remove.
Another bulb is located behind the cargo
area side wall, arrow 2.3.Insert the new bulb and attach the cover in
reverse order.
MINI Clubman
1.Unscrew the screw at the top with the
screwdriver from the onboard vehicle tool
kit.2.Swing out the tail lamp and remove toward
the top.3.Pull off the plug-in cable connector if nec‐
essary, arrow 1.4.Turn the corresponding bulb counterclock‐
wise, arrows 2, and remove.5.Insert the new bulb and install the tail lamp
in reverse order.
MINI: rear fog lamp/backup lamps
16-watt bulbs, W 16W
The lamps are accessed via the rear side or the
underside of the bumper.
Seite 236MobilityReplacing components236
Online Edition for Part no. 01 40 2 911 452 - VI/13
Page 273 of 276

Tire Quality Grading 215
Tires– Flat tire 82– Inflation pressure 210– Inflation pressure loss 84– Pressure monitoring, refer to
Tire Pressure Monitor
TPM 83
Tires, breaking in 112
Tires, changing 217
Tires, condition 216
Tires, damage 216
Tire size 215
Tires, minimum tread 216
Tires, retreaded tires 218
Tires, storage 218
Tire tread 216
Toll roads, route 135
Tone 146
Tool kit, refer to Onboard ve‐ hicle tool kit 230
Tools, refer to Onboard vehi‐ cle tool kit 230
Torque, refer to Engine data 254
Towing another vehicle 245
Towing, being towed 245
Town/city, navigation 126
Tow-starting 245
TPM, refer to Tire Pressure Monitor 83
Traction control 89
Traffic bulletins, naviga‐ tion 139
Transmission
– Overriding selector lever
lock in case of automatic
transmission with Step‐
tronic 63
Transmission lock
– Refer to Changing selector
lever positions 61
Transmission, manual 60
Transporting children safely 50
Treble, tone 146
Trip-distance counter, refer to
Trip odometer 64
Triple turn signal activa‐ tion 57
Trip odometer 64
Trips, planning 133
Trunk doors, refer to Split door 37
Trunk lid, refer to Tailgate 37
Trunk, refer to Cargo area 37
Turning lamps, refer to Adap‐ tive Light Control 76
Turn signal– Indicator lamp 16
Turn signal, bulb replace‐
ment 234
Turn signals 57
Turn signals, triple turn signal activation 57
U
Uniform Tire Quality Grading/ UTQG 215
Unintentional alarms, avoid‐ ing 41
Units
– Average fuel consump‐
tion 68– Temperature 68
Units of measure, changing on
Control Display 68
Universal remote control 99
Unlocking
– From the inside 36– From the outside 34– Tailgate 39– Without remote control, re‐
fer to Comfort Access 38
Update, software 166
Upholstery care 250
Upholstery material care 250
V
Vehicle– Identification num‐
ber 170, 180
Vehicle battery 240
Vehicle, breaking in 112
Vehicle care 249
Vehicle care, refer to Care 248
Vehicle equipment 6
Vehicle paintwork, care 250
Vehicle storage 251
Vehicle, switching off 56
Vehicle wash 248
Ventilation
– Air conditioning 98
Version of the navigation
data 124
Video playback, iPhone 162
Video playback, snap-in adapter 162
Voice activation
– Navigation 132
Voice activation, short com‐
mands 258
Voice activation system 26
Volume, setting 146
W Warning and indicator lamps 17
Warning messages, refer to Check Control 71
Warning signal volumes 146
Warning triangle 243
Washer/wiper system 57
Washer/wiper system, rain sensor 58
Washer/wiper system, washer fluid 60
Washer fluid 60
Washer fluid reservoir 60
Washing, vehicle 248
Welcome lamps 75
Wheel change 238
Seite 273Everything from A to ZReference273
Online Edition for Part no. 01 40 2 911 452 - VI/13