display MINI Clubman 2014 Repair Manual
[x] Cancel search | Manufacturer: MINI, Model Year: 2014, Model line: Clubman, Model: MINI Clubman 2014Pages: 210, PDF Size: 5.12 MB
Page 161 of 210

Socket for OBD Onboard
Diagnosis
Socket for Onboard Diagnosis
The socket for Onboard Diagnosis may
only be used by the service center, by work‐
shops that operate according to the specifica‐
tions of the vehicle manufacturer with appro‐
priately trained personnel, and by other
authorized persons. Otherwise, its use may
lead to vehicle malfunctions. ◀
Primary components in the vehicle emissions
can be checked via the OBD socket using a de‐
vice.
Emissions The warning lamps light up. The vehicle
is producing higher emissions. You can
continue your journey, but moderate
your speed and exercise due caution. Have the
vehicle checked as soon as possible.
Under certain circumstances, one of the lamps
flashes or lights up continuously. This indicates
that there is excessive misfiring or a malfunc‐
tion in the engine. If this happens, reduce the
vehicle speed and drive to the next service cen‐
ter promptly. Serious engine misfiring within a
brief period can seriously damage emission
control components, in particular the catalytic
converter. In addition, the mechanical engine
components may become damaged.
If the fuel filler cap is not properly tight‐
ened, the OBD system may conclude
that fuel vapor is escaping; this will cause a dis‐
play to light up. If the filler cap is then tight‐
ened, the display should go out in a few days.Seite 161MaintenanceMobility161
Online Edition for Part no. 01 40 2 911 429 - VI/13
Page 164 of 210

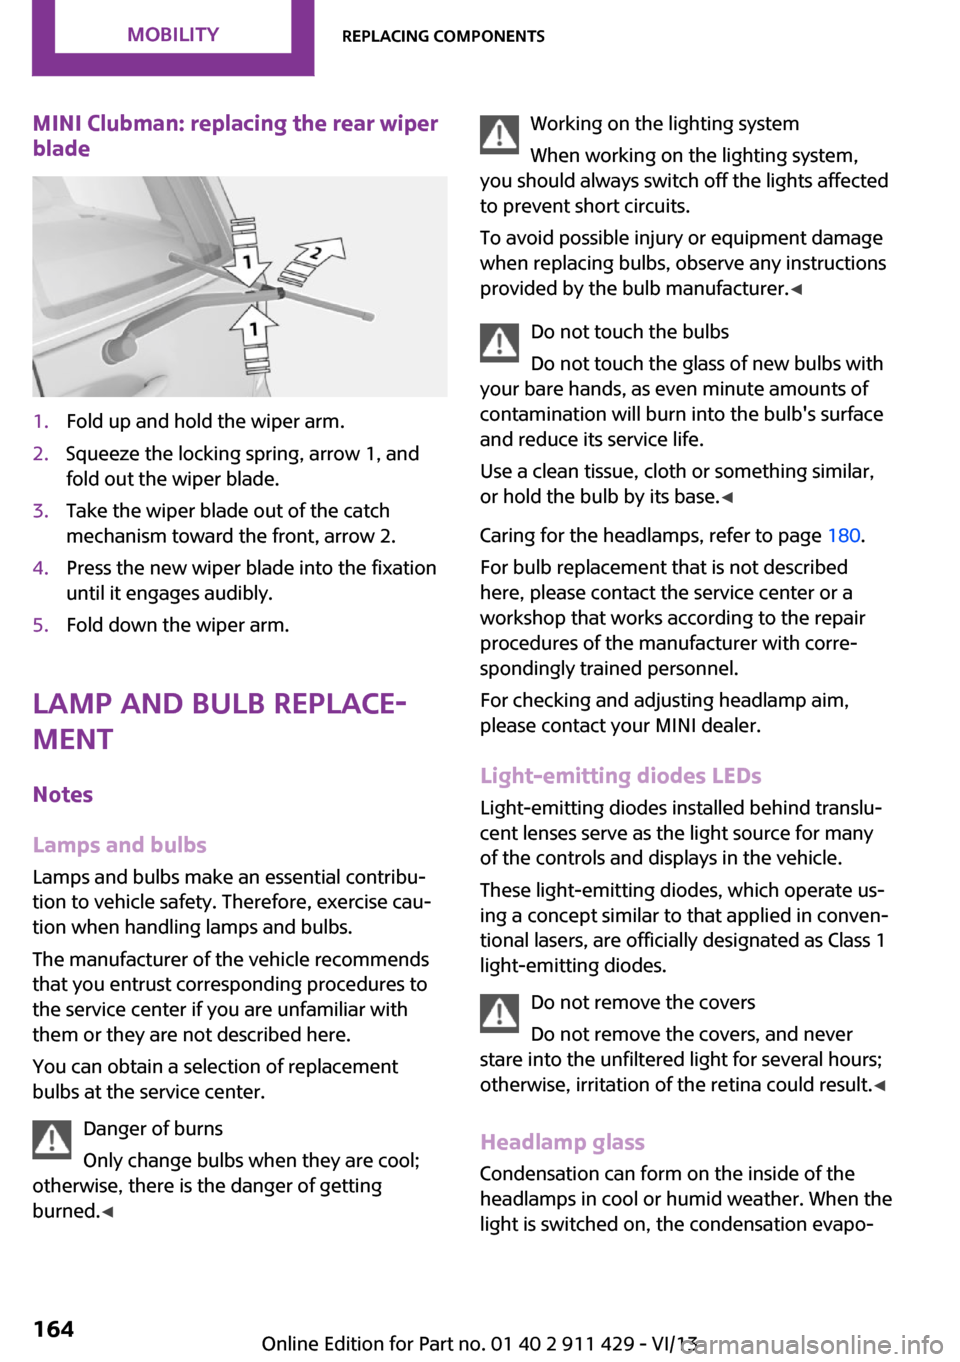
MINI Clubman: replacing the rear wiper
blade1.Fold up and hold the wiper arm.2.Squeeze the locking spring, arrow 1, and
fold out the wiper blade.3.Take the wiper blade out of the catch
mechanism toward the front, arrow 2.4.Press the new wiper blade into the fixation
until it engages audibly.5.Fold down the wiper arm.
Lamp and bulb replace‐
ment
Notes
Lamps and bulbs Lamps and bulbs make an essential contribu‐
tion to vehicle safety. Therefore, exercise cau‐
tion when handling lamps and bulbs.
The manufacturer of the vehicle recommends
that you entrust corresponding procedures to
the service center if you are unfamiliar with
them or they are not described here.
You can obtain a selection of replacement
bulbs at the service center.
Danger of burns
Only change bulbs when they are cool;
otherwise, there is the danger of getting
burned. ◀
Working on the lighting system
When working on the lighting system,
you should always switch off the lights affected
to prevent short circuits.
To avoid possible injury or equipment damage
when replacing bulbs, observe any instructions
provided by the bulb manufacturer. ◀
Do not touch the bulbs
Do not touch the glass of new bulbs with
your bare hands, as even minute amounts of
contamination will burn into the bulb's surface
and reduce its service life.
Use a clean tissue, cloth or something similar,
or hold the bulb by its base. ◀
Caring for the headlamps, refer to page 180.
For bulb replacement that is not described
here, please contact the service center or a
workshop that works according to the repair
procedures of the manufacturer with corre‐
spondingly trained personnel.
For checking and adjusting headlamp aim,
please contact your MINI dealer.
Light-emitting diodes LEDs Light-emitting diodes installed behind translu‐
cent lenses serve as the light source for many
of the controls and displays in the vehicle.
These light-emitting diodes, which operate us‐
ing a concept similar to that applied in conven‐
tional lasers, are officially designated as Class 1
light-emitting diodes.
Do not remove the covers
Do not remove the covers, and never
stare into the unfiltered light for several hours;
otherwise, irritation of the retina could result. ◀
Headlamp glass
Condensation can form on the inside of the
headlamps in cool or humid weather. When the
light is switched on, the condensation evapo‐Seite 164MobilityReplacing components164
Online Edition for Part no. 01 40 2 911 429 - VI/13
Page 172 of 210

The vehicle jack is designed for changing
wheels only.
The vehicle jack is designed for changing
wheels only. Do not attempt to raise another
vehicle model with it or to raise any load of any
kind. To do so could cause accidents and per‐
sonal injury. ◀1.Position the vehicle jack at the jacking point
closest to the wheel.
The entire surface of the jack base must
rest on the ground vertically beneath the
jacking point.2.Guide the jack head into the rectangular re‐
cess of the jacking point when cranking up.3.Jack the vehicle up until the wheel you are
changing is raised from the ground.
Mounting the compact wheel
1.Unscrew the lug bolts and remove the
wheel.2.Remove accumulations of mud or dirt from
the mounting surfaces of the wheel and
hub. Also clean the lug bolts.3.Mount the new wheel.4.Screw in at least two bolts crosswise.5.Screw in the remaining lug bolts.6.Fully tighten all lug bolts in a diagonal pat‐
tern.7.Lower the vehicle.8.Remove the jack.Retightening the lug bolts
Retighten the lug bolts diagonally.
Checking that the lug bolts are tight
Always have the lug bolts checked with a
calibrated torque wrench as soon as possible to
ensure that they are tightened to the specified
torque. Otherwise, incorrectly tightened lug
bolts are a hidden safety risk. ◀
The tightening torque equals
103.3 lb ft/140 Nm.
Replace the defective tire as soon as possible
and have the new wheel balanced.
Vehicle battery Maintenance
The battery is maintenance-free, i.e., the elec‐
trolyte will last for the life of the battery in tem‐
perate climate conditions.
The service center will be happy to answer any
questions on the battery.
Battery replacement Use approved vehicle batteries
Only use vehicle batteries that have been
approved for your vehicle by the manufacturer;
otherwise, the vehicle could be damaged and
systems or functions may not be fully availa‐
ble. ◀
Have the vehicle battery registered by the serv‐
ice center after it is replaced to ensure that all comfort functions are available without restric‐
tions and that any associated Check Control
messages are no longer displayed.Seite 172MobilityReplacing components172
Online Edition for Part no. 01 40 2 911 429 - VI/13
Page 175 of 210

MINI Clubman
The first aid kit is located in the left side trim on
the cargo area floor or under the flat loading
floor.
Roadside Assistance
Service availability Roadside Assistance can be reached around the
clock in many countries. You can obtain assis‐
tance there in the event of a vehicle break‐
down.
Roadside Assistance A phone number for Roadside Assistance can
be displayed, refer to page 132, via the radio.
Jump-starting NotesIf the battery is discharged, the engine can be
started using the battery of another vehicle and
two jumper cables. In the same way, you can
help jump-start another vehicle. Only use
jumper cables with fully insulated clamp han‐
dles.
To prevent personal injury or damage to both
vehicles, adhere strictly to the following proce‐
dure.
Do not touch live parts
To avoid the risk of potentially fatal injury,
always avoid all contact with electrical compo‐
nents while the engine is running. ◀
Preparation1.Check whether the battery of the other ve‐
hicle has a voltage of 12 volts and approxi‐
mately the same capacitance in Ah. This in‐
formation can be found on the battery.2.Switch off the engine of the assisting vehi‐
cle.3.Switch off any electronic systems/power
consumers in both vehicles.
Bodywork contact between vehicles
There must not be any contact between
the bodies of the two vehicles, otherwise there
is a danger of shorting. ◀
Seite 175Breakdown assistanceMobility175
Online Edition for Part no. 01 40 2 911 429 - VI/13
Page 182 of 210

Chrome surfacesCarefully clean components such as the radia‐
tor grille or door handles with an ample supply
of water, possibly with shampoo added, partic‐
ularly when they have been exposed to road
salt. For additional treatment, use a chrome
polish.
Light-alloy wheels
When cleaning the wheels on the vehicle, only
use a neutral wheel rim cleaner with a pH value
of 5 to 9.
Do not use abrasive cleaners or a steam jet hot‐
ter than 140 ℉/60 ℃; otherwise, damage may
result. Adhere to the manufacturer instructions.
Aggressive, acidic, or alkaline cleaners may de‐
stroy the protective coating of neighboring
components such as the brake disc.
Exterior sensors The sensors on the outside of the vehicle, such
as for Park Distance Control, must be kept clean
and free of ice to ensure that they remain fully
functional.
Decorative trim Clean decorative trims and fine wood compo‐
nents with a moist cloth only. Then dry with a
soft cloth.
Safety belts Dirty belt straps impede the reeling action and
thus have a negative impact on safety.
No chemical cleaning
Do not clean chemically; this can destroy
the webbing. ◀
Carpets/floor mats No objects in the area around the pedals
Keep floor mats, carpets, and any other
objects out of the area of motion of the pedals;
otherwise, the function of the pedals could be
impeded while drivingDo not place additional floor mats over existing
mats or other objects.
Only use floor mats that have been approved
for the vehicle and can be properly fixed in
place.
Ensure that the floor mats are securely fastened
again when they are returned after being re‐
moved, such as for cleaning. ◀
Floor mats can be removed for cleaning.
If they are very dirty, clean with a microfiber
cloth and water or an interior cleaner. To pre‐
vent matting of the carpet, rub back and forth
in the direction of travel only.
Displays
To clean the displays, such as the radio or dis‐
play elements, use an antistatic microfiber
cloth.
Cleaning displays
Do not use chemical or household cleans‐
ers.
Keep all fluids and moisture away from the
unit.
Otherwise, they could affect or damage surfa‐
ces or electrical components.
Avoid pressing too hard when cleaning and do
not use abrasive materials; otherwise, damage
can result. ◀
CD/DVD drives No cleaning CD
Do not use cleaning CDs; otherwise, parts
of the drive may become damaged. ◀
Long-term vehicle storage
Your service center can advise you on what to
consider when storing the vehicle for longer
than three months.Seite 182MobilityCare182
Online Edition for Part no. 01 40 2 911 429 - VI/13
Page 183 of 210

Indicator/warning lampsVehicle equipment
This chapter describes all series equipment as
well as country-specific and special equipment
offered for this model series.Therefore, it alsodescribes equipment that may not be found in
your vehicle, for instance due to the selected
special equipment or the country version. This
also applies to safety-related functions and sys‐
tems.
Overview
The indicator and warning lamps can light up in
a variety of combinations and colors in display
area 1 or 2. The table contains information on
causes and how to respond. Note whether a
lamp lights up alone or in combination with an‐
other. Some lamps can light up in different col‐
ors. Corresponding distinctions are made in the
text. 12CauseHow to respondTurn signalThe high beams/headlamp flasher are
switched on.The front fog lamps are switched on.The rear fog lamps are switched on.Fasten safety belts.Fasten safety belt, refer to
page 37.External temperature warningDrive conservatively, refer to
page 54.Lights up briefly:
Approx. 2.1 US gal/8 liters of fuel remain in
the tank.
Remains on:
The remaining range is no more than
30 miles/50 km, refer to page 55.Seite 183Indicator/warning lampsMobility183
Online Edition for Part no. 01 40 2 911 429 - VI/13
Page 189 of 210

12CauseHow to respondDynamic Stability Control DSC and Dynamic
Traction Control DTC failed.Driving stability limited during ac‐
celeration and cornering.
You can continue your journey,
but moderate your speed and ex‐
ercise due caution. Have the sys‐
tem checked as soon as possible.Indication in US modelsThe driving stability control systems including
ABS and the Tire Pressure Monitor display
have failed, refer to page 76.Reduced braking and driving sta‐
bility. Drive cautiously and defen‐
sively. Avoid full brake applica‐
tion, operation on poor roads,
and use of the full throttle and
kickdown positions of the acceler‐
ator. Have the system checked
immediately.Indication in Canadian modelsThe driving stability control systems including
ABS and the Flat Tire Monitor or the Tire Pres‐
sure Monitor have failed, refer to page 76.Reduced braking and driving sta‐
bility. Drive cautiously and defen‐
sively. Avoid full brake applica‐
tion, operation on poor roads,
and use of full throttle and kick‐
down positions of the accelerator.
Have the system checked imme‐
diately.In vehicles with the Flat Tire MonitorLight up in yellow and red:A tire is deflated.Carefully bring the car to a stop.
Additional information, refer to
page 69.Seite 189Indicator/warning lampsMobility189
Online Edition for Part no. 01 40 2 911 429 - VI/13
Page 201 of 210

Breaking in 100
Button for starting the engine, refer to Start/Stop button 44
C
California Proposition 65 Warning 7
Car battery, refer to Vehicle battery 172
Car care products 180
Care, displays 182
Care, vehicle 180
Cargo area– Comfort Access 29– Doors, refer to Split door 27– Opening from the out‐
side 27– Tailgate, refer to Split
door 27
Cargo area doors, refer to Split
door 27
Cargo area lamp, refer to Inte‐ rior lamps 65
Cargo area tailgate, refer to Tailgate 27
Car horn, refer to Horn 12
Carpet, care 182
Car phone, refer to Tele‐ phone 126
Car wash 179
CBC, Cornering Brake Con‐ trol 76
CBS Condition Based Serv‐ ice 160
CD/DVD drives, care 182
Center console, refer to Around the center con‐
sole 15
Central locking
– Comfort Access 28– From the inside 25– From the outside 22
Central locking system
– Concept 21– From the outside 21Changes, technical, refer to
Safety 6
Changing wheels/tires 149
Check Control 60
Children, transporting 40
Child restraint fixing system LATCH 41
Child restraint fixing sys‐ tems 40
Child restraint fixing systems, mounting 40
Child seat, mounting 40
Child seats, refer to Transport‐ ing children safely 40
Chrome parts, care 182
Circulation of air, refer to Re‐ circulated air mode 83, 85
Cleaning, displays 182
Cleaning, refer to Care 179
Climate 82
Climate mode– Ventilation 86
Clock 54
Clock
– 12h/24h format 57
Closing
– From the inside 25– From the outside 22
Clubdoor 26
Clutch, breaking in 100
Cockpit 12
Cold start, refer to Starting the engine 45
Combination instrument, refer to Displays 14
Combination switch, refer to Turn signal/high beams/
headlamp flasher 47
Combination switch, refer to Washer/wiper system 48
Comfort Access
– In the car wash 29– Replacing the battery 30
Comfort area, refer to Around
the center console 15
Compact wheel, inflation pres‐ sure 143
Compartment for remote con‐
trol, refer to Ignition lock 44
Compass, digital 89
Computer 55
Computer, displaying informa‐ tion 55
Condition Based Service CBS 160
Confirmation signals for vehi‐ cle locking/unlocking 23
Consumption, refer to Aver‐ age fuel consumption 56
Control Display, care 182
Controls and displays 12
Control systems, driving stabil‐ ity 76
Convenient operation– Windows 23
Coolant temperature 55
Cooling function, switching on and off 86
Cooling, maximum 85
Cornering Brake Control,
CBC 76
Corrosion on brake discs 102
Cradle for telephone or mobile phone, refer to Snap-in
adapter 133
Cruise control 79
Cupholders 91
Current fuel consumption 56
Curve lights, refer to Adaptive Light Control 64
Cylinders, number of, refer to Engine data 196
D
Dashboard lighting, refer to Instrument lighting 65
Dashboard, refer to Cock‐ pit 12
Dashboard, refer to Dis‐ plays 14
Data, technical 196
Seite 201Everything from A to ZReference201
Online Edition for Part no. 01 40 2 911 429 - VI/13
Page 202 of 210

Date– Display format 57– Setting 58
Daytime running lights 63
Decorative trim, care 182
Defogging windows 83
Defroster
– Rear window 83, 86
Defrosting windows 83
Defrost setting, refer to De‐ frosting windows 83
Digital compass 89
Dip stick, engine oil 157
Directional indicators, refer to Turn signals 47
Displacement, refer to Engine data 196
Display lighting, refer to In‐ strument lighting 65
Displays 14
Displays and controls 12
Displays, care 182
Displays, cleaning 182
Displays, refer to Instrument cluster 14
Disposal
– Remote control battery 30
Distance warning, refer to
Park Distance Control
PDC 80
Door
– Rear, refer to Clubdoor 26
Door key, refer to Remote
control with integrated
key 20
Door lock 24
Door lock, confirmation sig‐ nals 23
Doors, manual operation 25
Doors, unlocking and locking
– Confirmation signals 23– From the inside 25– From the outside 22
DOT Quality Grades 147
Drive-off assistant, refer to Hill drive-off assistant 78
Driving notes, breaking
in 100
Driving off on hills, refer to Hill drive-off assistant 78
Driving stability control sys‐ tems 76
Driving tips, refer to Driving notes 100
Dry air, refer to Cooling func‐ tion 86
DSC Dynamic Stability Con‐ trol 76
DTC Dynamic Traction Con‐ trol 77
Dynamic Stability Control DSC 76
Dynamic Traction Control DTC 77
E Electrical malfunction– Door lock 25– Fuel filler flap 138
Electronic brake-force distri‐
bution 76
Electronic Stability Program ESP, refer to Dynamic Stabil‐
ity Control DSC 76
Emergency activation
– Automatic transmission, re‐
fer to Overriding selector
lever lock 53
Emergency operation, fuel
filler flap, unlocking man‐
ually 138
Emergency operation, refer to
Manual operation
– Door lock 25
Energy, saving, refer to Saving
fuel 108
Engine, breaking in 100
Engine compartment 155
Engine oil, adding 157
Engine oil, additives, refer to Approved engine oils 158
Engine oil, alternative oil
types 158
Engine oil change intervals, refer to Service require‐
ments 59
Engine oil, dip stick 157
Engine oil, filling capacity 199
Engine oil, MINI maintenance system 160
Engine oil types, alterna‐ tive 158
Engine oil types, ap‐ proved 158
Engine, overheating, refer to Coolant temperature 55
Engine power, refer to Engine data 196
Engine, RPM 196
Engine start, assistance 175
Engine, starting 45
Engine, starting– Comfort Access 28
Engine, starting, Start/Stop
button 44
Engine, stopping, Start/Stop button 44
Engine, switching off 46
Equipment, interior 87
ESP Electronic Stability Pro‐ gram, refer to Dynamic Sta‐
bility Control DSC 76
Exchanging wheels/tires 149
Exterior mirrors 38
Exterior mirrors, adjusting 38
Exterior mirrors, folding in and out 38
Exterior sensors, care 182
External temperature dis‐ play 54
External temperature display
– Changing the units 57– On the computer 57
External temperature warn‐
ing 54
Externel temperature dis‐ play 54
Seite 202ReferenceEverything from A to Z202
Online Edition for Part no. 01 40 2 911 429 - VI/13
Page 203 of 210

FFailure messages, refer to Check Control 60
False alarm, refer to Avoiding unintentional alarms 30
Fastening safety belts, refer to Safety belts 36
Fault messages, refer to Check Control 60
Filling capacities 199
Filter– Refer to Activated-charcoal
filter 84– Refer to Microfilter 84– Refer to Microfilter/acti‐
vated-charcoal filter with
automatic climate control 86
First aid kit 174
First aid, refer to First aid kit 174
Flashing when locking/unlock‐ ing 23
Flat tire
– Flat Tire Monitor 70– Indicator/warning lamp 70– Run-flat tire 71– Tire Pressure Monitor
TPM 72
Flat Tire Monitor FTM 69
Flat Tire Monitor FTM
– Flat tire message 70– Initializing the system 70– Limits of the system 70– Snow chains 70
Flat tire, wheel change 170
Floor mats, care 182
Fog lamps 65
Foot brake 102
Footwell lamps, refer to Inte‐ rior lamps 65
Front airbags 67
Front fog lamp, bulb replace‐ ment 166
Front fog lamps 65
Front lamps, bulb replace‐ ment 165
Front passenger airbags, de‐
activating 68
FTM Flat Tire Monitor 69
Fuel 140
Fuel– Refer to Average fuel con‐
sumption 56
Fuel, additives 140
Fuel, average consump‐ tion 56
Fuel cap, closing 138
Fuel consumption display
– Average fuel consump‐
tion 56
Fuel filler flap, closing 138
Fuel filler flap, opening 138
Fuel filler flap, unlocking in case of an electrical malfunc‐
tion 138
Fuel gauge 55
Fuel, saving 108
Fuel tank capacity, refer to Filling capacities 199
Fuel tank contents, refer to Filling capacities 199
Fuel tank, refer to Filling ca‐ pacities 199
Fuse 173
G Garage door opener, refer to Universal garage door
opener 87
Gasoline 140
Gasoline gauge, refer to Fuel gauge 55
Gasoline quality 140
Gear change
– Automatic transmission with
Steptronic 52
Gear display, automatic trans‐
mission with Steptronic 51
Glass sunroof, electrical 31
Glass sunroof, electrical– Convenient operation 23– Opening, closing 31– Raising 31– Remote control 23
H
Halogen headlamps, bulb re‐ placement 165
Hand car wash, care 180
Hand-held transmitter, alter‐ nating code 88
Hands-free microphone 15
Hazard warning system 15
Head airbags 67
Headlamp control, auto‐ matic 62
Headlamp courtesy delay fea‐ ture 64
Headlamp flasher 47, 63
Headlamps 62
Headlamps, care 180
Headlamps, cleaning, washer fluid 50
Head restraints 37
Head restraints
– Adjusting the height 37– Removing 37
Heatable
– Windshield 86
Heating
– Rear window 83, 86– Seats 36– Windshield 86
Height adjustment
– Seats 34
High beams 63
High beams, bulb replace‐ ment 165
Hill drive-off assistant 78
Hills 102
Holder for remote control, re‐ fer to Ignition lock 44
Homepage 6
Hood 155
Hood, closing 156
Seite 203Everything from A to ZReference203
Online Edition for Part no. 01 40 2 911 429 - VI/13