key MINI Clubman 2014 Owner's Manual
[x] Cancel search | Manufacturer: MINI, Model Year: 2014, Model line: Clubman, Model: MINI Clubman 2014Pages: 210, PDF Size: 5.12 MB
Page 20 of 210
Opening and closingVehicle equipmentThis chapter describes all series equipment as
well as country-specific and special equipment
offered for this model series.Therefore, it also
describes equipment that may not be found in
your vehicle, for instance due to the selected
special equipment or the country version. This
also applies to safety-related functions and sys‐
tems.
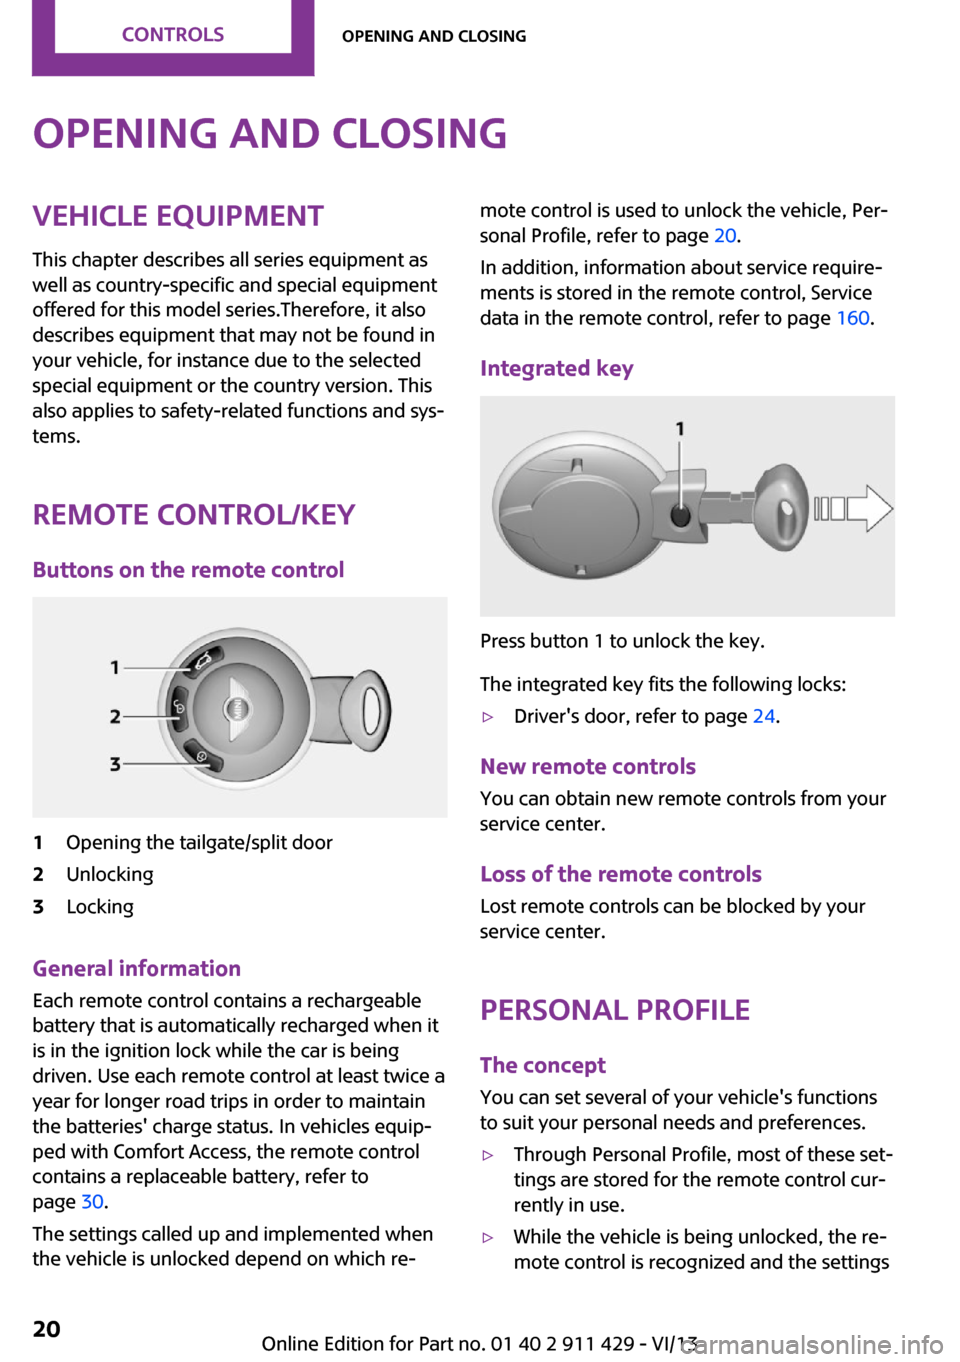
Remote control/key Buttons on the remote control1Opening the tailgate/split door2Unlocking3Locking
General information
Each remote control contains a rechargeable
battery that is automatically recharged when it
is in the ignition lock while the car is being
driven. Use each remote control at least twice a
year for longer road trips in order to maintain
the batteries' charge status. In vehicles equip‐
ped with Comfort Access, the remote control
contains a replaceable battery, refer to
page 30.
The settings called up and implemented when
the vehicle is unlocked depend on which re‐
mote control is used to unlock the vehicle, Per‐
sonal Profile, refer to page 20.
In addition, information about service require‐
ments is stored in the remote control, Service
data in the remote control, refer to page 160.
Integrated key
Press button 1 to unlock the key.
The integrated key fits the following locks:
▷Driver's door, refer to page 24.
New remote controls
You can obtain new remote controls from your
service center.
Loss of the remote controls Lost remote controls can be blocked by your
service center.
Personal Profile
The concept
You can set several of your vehicle's functions
to suit your personal needs and preferences.
▷Through Personal Profile, most of these set‐
tings are stored for the remote control cur‐
rently in use.▷While the vehicle is being unlocked, the re‐
mote control is recognized and the settingsSeite 20ControlsOpening and closing20
Online Edition for Part no. 01 40 2 911 429 - VI/13
Page 24 of 210
The function is deactivated.9.Press and hold the button until the display
changes. The setting is stored.
Switching on the interior lamps
When the vehicle is locked:
Press the button.
You can also use this function to locate your ve‐
hicle in parking garages, etc.
Unlocking the tailgate/split door
Press the button for approx. 1 second
and then release it.
The tailgate pivots back and up when it opens.
Ensure that adequate clearance is available be‐
fore opening.
Malfunctions The function of the remote control may be im‐
paired by local radio waves. If this occurs, un‐
lock and lock the vehicle at the door lock with
the integrated key.
If it should become impossible to lock the vehi‐
cle with a remote control, the battery in the re‐
mote control is discharged. Use this remote
control on an extended trip to recharge the
battery, refer to page 20.
For US owners only The transmitter and receiver units comply with
part 15 of the FCC/Federal Communication
Commission regulations. Operation is governed
by the following:
FCC ID:
LX8766S
LX8766E
LX8CAS
Compliance statement:
This device complies with part 15 of the FCC
Rules. Operation is subject to the following two
conditions:
▷This device may not cause harmful interfer‐
ence, and▷this device must accept any interference re‐
ceived, including interference that may
cause undesired operation.
Any unauthorized modifications or changes to
these devices could void the user's authority to
operate this equipment.
Using the door lock
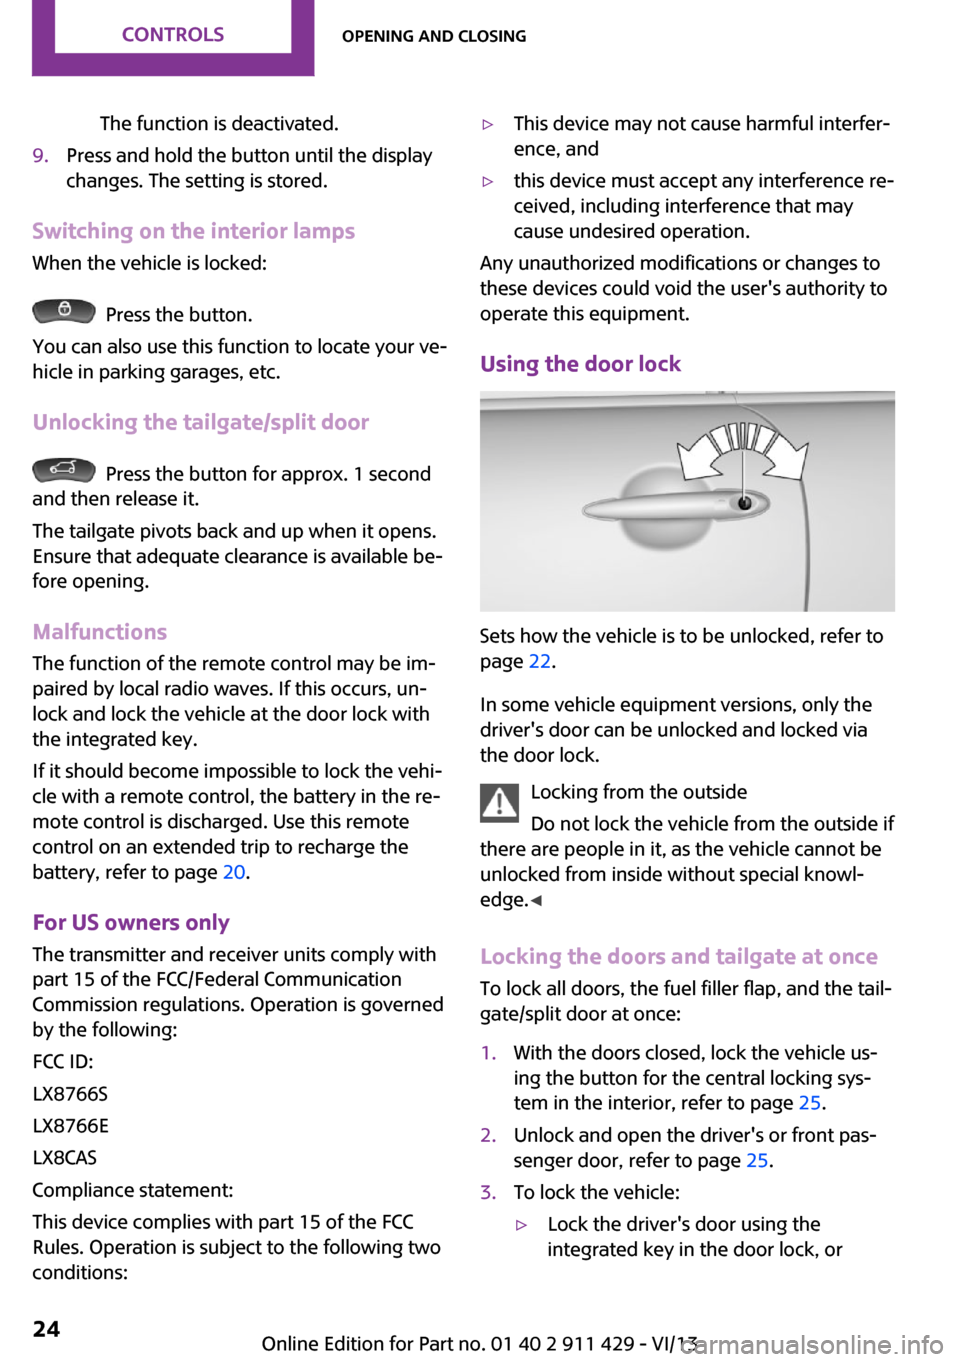
Sets how the vehicle is to be unlocked, refer to
page 22.
In some vehicle equipment versions, only the
driver's door can be unlocked and locked via
the door lock.
Locking from the outside
Do not lock the vehicle from the outside if
there are people in it, as the vehicle cannot be
unlocked from inside without special knowl‐
edge. ◀
Locking the doors and tailgate at once
To lock all doors, the fuel filler flap, and the tail‐
gate/split door at once:
1.With the doors closed, lock the vehicle us‐
ing the button for the central locking sys‐
tem in the interior, refer to page 25.2.Unlock and open the driver's or front pas‐
senger door, refer to page 25.3.To lock the vehicle:▷Lock the driver's door using the
integrated key in the door lock, orSeite 24ControlsOpening and closing24
Online Edition for Part no. 01 40 2 911 429 - VI/13
Page 25 of 210
▷Press down the lock button of the front
passenger door and close the door
from the outside.
Convenient opening and closing
In vehicles with an alarm system or Comfort Ac‐
cess, the windows and the glass sunroof can be
operated via the door lock.
Opening/closing
Turn the key to the unlock or lock position and
hold it there.
Keep the closing area clear
Watch during the opening and closing
process to be sure that no one becomes trap‐
ped. Releasing the key stops the motion. ◀
Manual operation If an electrical malfunction occurs, the driver's
door can be unlocked or locked by turning the
integrated key to the end positions of the door
lock.
Opening and closing:
from the inside
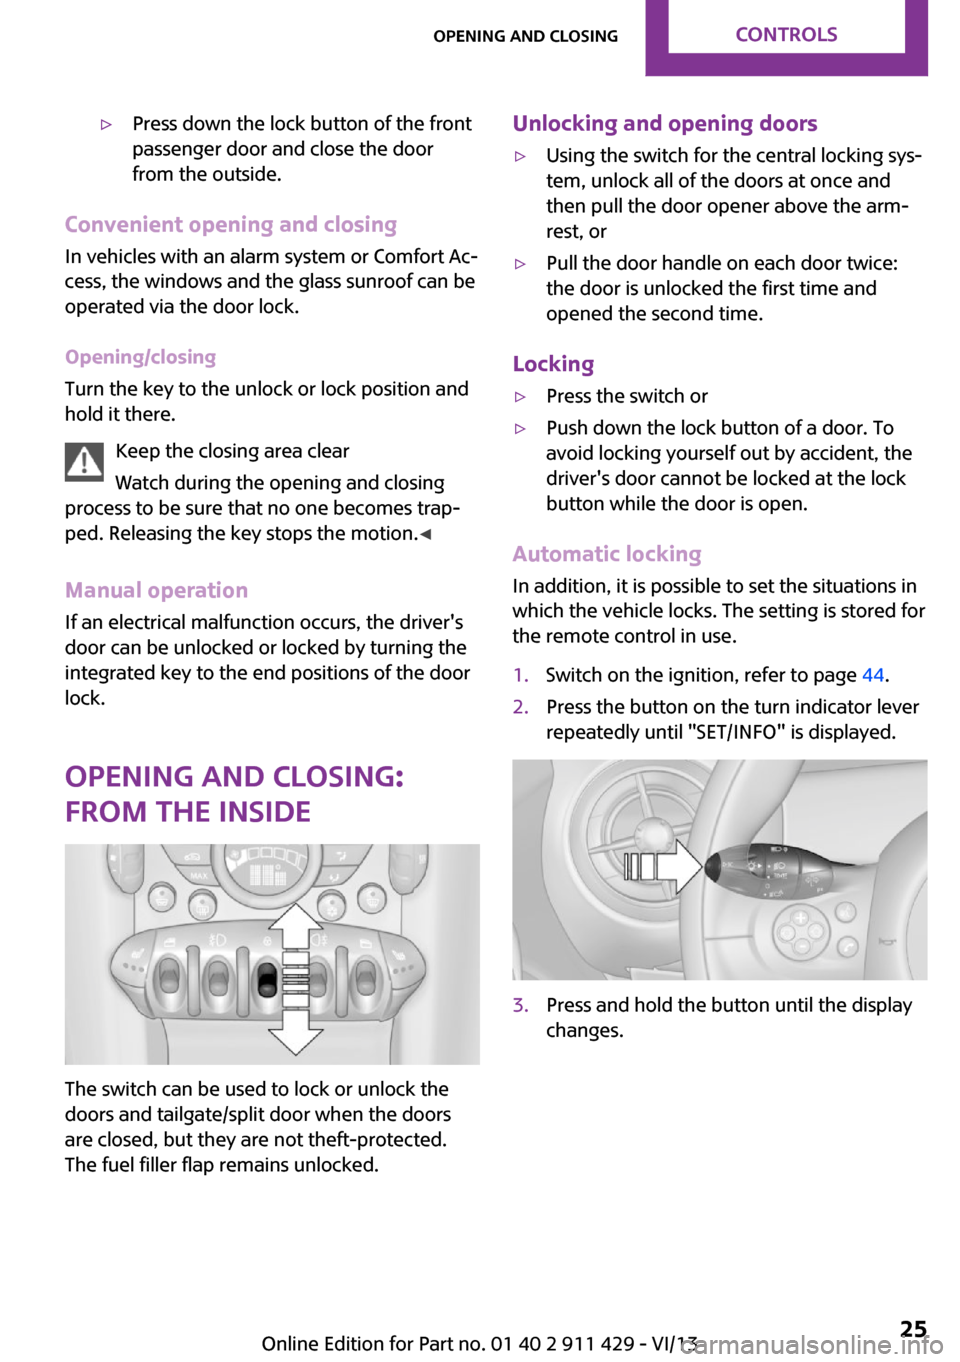
The switch can be used to lock or unlock the
doors and tailgate/split door when the doors
are closed, but they are not theft-protected.
The fuel filler flap remains unlocked.
Unlocking and opening doors▷Using the switch for the central locking sys‐
tem, unlock all of the doors at once and
then pull the door opener above the arm‐
rest, or▷Pull the door handle on each door twice:
the door is unlocked the first time and
opened the second time.
Locking
▷Press the switch or▷Push down the lock button of a door. To
avoid locking yourself out by accident, the
driver's door cannot be locked at the lock
button while the door is open.
Automatic locking
In addition, it is possible to set the situations in
which the vehicle locks. The setting is stored for
the remote control in use.
1.Switch on the ignition, refer to page 44.2.Press the button on the turn indicator lever
repeatedly until "SET/INFO" is displayed.3.Press and hold the button until the display
changes.Seite 25Opening and closingControls25
Online Edition for Part no. 01 40 2 911 429 - VI/13
Page 29 of 210
Locking
Press button 1.
Unlocking the tailgate/split door separately
Press the button on the exterior of the tailgate/
split door.
This corresponds to pressing the following but‐
ton on the remote control:
If a remote control accidentally left in the cargo
area is detected in the locked vehicle after the
tailgate/split door is closed, the tailgate/split
door opens again slightly. The hazard warning
system flashes and an acoustic signal sounds.
Power windows and electrical glass
sunroof
When the engine is switched off, the windows
and sunroof can be operated as long as neither
the doors nor the tailgate/split door are
opened.
When the doors and tailgate/split door are
closed again and the remote control is detected
inside the vehicle, the windows and the sunroof
can be operated again.
Insert the remote control into the ignition lock
to be able to operate the windows and the sun‐
roof while the engine is switched off and the
doors are open.
Switching on the radio ready state Press the Start/Stop button to switch on the
radio ready state, refer to page 44.
Do not depress the brake or the clutch; other‐
wise, the engine will start.
Starting the engine The engine can be started or the ignition can
be switched on, refer to page 44, when a re‐
mote control is inside the vehicle. It is not nec‐
essary to insert a remote control into the igni‐
tion lock.
Switching off the engine in cars with
automatic transmission
The engine can only be switched off with the
selector lever in position P, refer to page 51.
To switch off the engine with the selector lever
in position N, the remote control must be in‐
serted in the ignition lock.
Before driving a vehicle with automatic
transmission into a car wash1.Insert the remote control into the ignition
switch.2.Depress the brake pedal.3.Move the selector lever to position N.4.Switch the engine off.
The vehicle can roll.
Malfunction The Comfort Access functions can be disturbed
by local radio waves, such as by a mobile
phone in the immediate vicinity of the remote
control or when a mobile phone is being
charged in the vehicle.
If this occurs, open or close the vehicle using
the buttons on the remote control or use the
integrated key in the door lock.
To start the engine afterward, insert the remote
control into the ignition switch.
Warning lamps The warning lamp in the instrument
cluster lights up when you attempt to
start the engine: the engine cannot be
started.
The remote control is not in the vehicle or has a
malfunction. Take the remote control with you
inside the vehicle or have it checked. If neces‐
sary, insert another remote control into the ig‐
nition switch.
The warning lamp in the instrument
cluster lights up while the engine is run‐
Seite 29Opening and closingControls29
Online Edition for Part no. 01 40 2 911 429 - VI/13
Page 30 of 210
ning: the remote control is no longer inside the
vehicle.
After switching off the engine, the engine can
only be started again within approx. 10 sec‐
onds if no door has been opened.
The indicator lamp lights up: replace
the remote control battery.
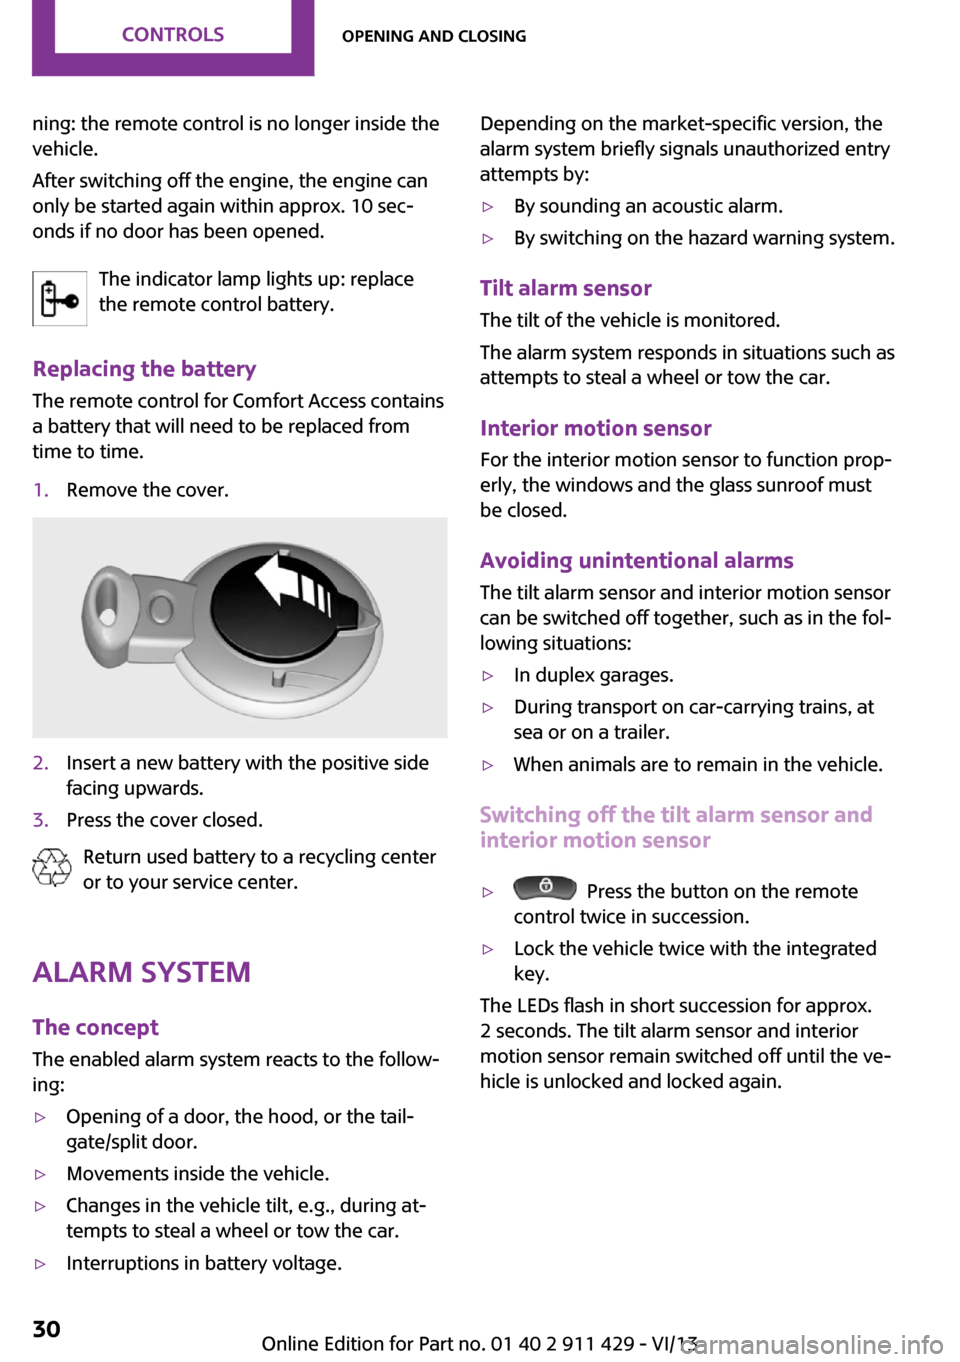
Replacing the battery
The remote control for Comfort Access contains
a battery that will need to be replaced from
time to time.1.Remove the cover.2.Insert a new battery with the positive side
facing upwards.3.Press the cover closed.
Return used battery to a recycling center
or to your service center.
Alarm system
The concept
The enabled alarm system reacts to the follow‐
ing:
▷Opening of a door, the hood, or the tail‐
gate/split door.▷Movements inside the vehicle.▷Changes in the vehicle tilt, e.g., during at‐
tempts to steal a wheel or tow the car.▷Interruptions in battery voltage.Depending on the market-specific version, the
alarm system briefly signals unauthorized entry
attempts by:▷By sounding an acoustic alarm.▷By switching on the hazard warning system.
Tilt alarm sensor
The tilt of the vehicle is monitored.
The alarm system responds in situations such as
attempts to steal a wheel or tow the car.
Interior motion sensor For the interior motion sensor to function prop‐
erly, the windows and the glass sunroof must be closed.
Avoiding unintentional alarms
The tilt alarm sensor and interior motion sensor
can be switched off together, such as in the fol‐
lowing situations:
▷In duplex garages.▷During transport on car-carrying trains, at
sea or on a trailer.▷When animals are to remain in the vehicle.
Switching off the tilt alarm sensor and
interior motion sensor
▷ Press the button on the remote
control twice in succession.▷Lock the vehicle twice with the integrated
key.
The LEDs flash in short succession for approx.
2 seconds. The tilt alarm sensor and interior
motion sensor remain switched off until the ve‐
hicle is unlocked and locked again.
Seite 30ControlsOpening and closing30
Online Edition for Part no. 01 40 2 911 429 - VI/13
Page 126 of 210
TelephoneVehicle equipment
This chapter describes all series equipment as
well as country-specific and special equipment
offered for this model series.Therefore, it also
describes equipment that may not be found in
your vehicle, for instance due to the selected
special equipment or the country version. This
also applies to safety-related functions and sys‐
tems.
At a glance The concept
Mobile phones can be connected with the vehi‐
cle via Bluetooth.
After a suitable mobile phone is paired with the
vehicle once, you can operate the mobile
phone via the radio and via the buttons on the
steering wheel.
Bluetooth® is a registered trademark of Blue‐
tooth® SIG, Inc.
Certain functions may need to be enabled by
the mobile phone provider or service provider.
Using the mobile phone while driving
Make entries only when traffic and road
conditions allow. Do not hold the mobile phone
in your hand while you are driving; use the
hands-free system instead. If you do not ob‐
serve this precaution, you can endanger the ve‐
hicle occupants and other road users. ◀
Snap-in adapter The snap-in adapter is used to:▷Hold the mobile phone.▷Recharge the battery.▷Connect the mobile phone to an outside
antenna of the vehicle.This provides for better network reception
and consistent sound quality.
Do not operate a mobile phone that is con‐
nected to the vehicle on the mobile phone key‐
pad, as this may lead to a malfunction.
Approved mobile phones
Details on which mobile phones with a Blue‐
tooth interface are supported by the mobile
phone preparation package can be obtained at
www.mini.com/connectivity.
Notes At high temperatures, the charging function of
the mobile phone may be limited and functions
may not be executed.
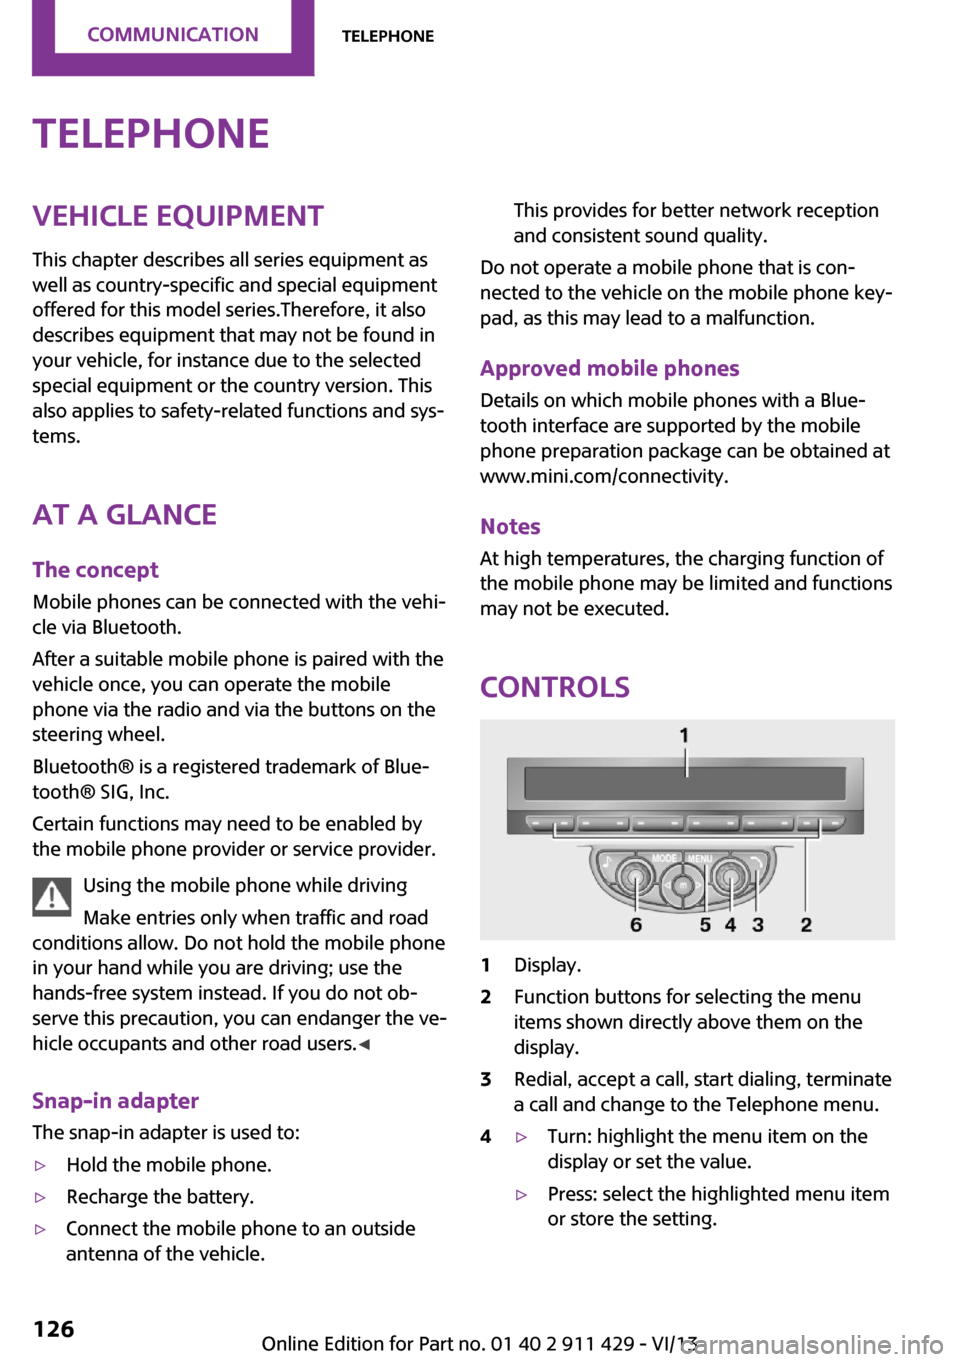
Controls
1Display.2Function buttons for selecting the menu
items shown directly above them on the
display.3Redial, accept a call, start dialing, terminate
a call and change to the Telephone menu.4▷Turn: highlight the menu item on the
display or set the value.▷Press: select the highlighted menu item
or store the setting.Seite 126CommunicationTelephone126
Online Edition for Part no. 01 40 2 911 429 - VI/13
Page 127 of 210
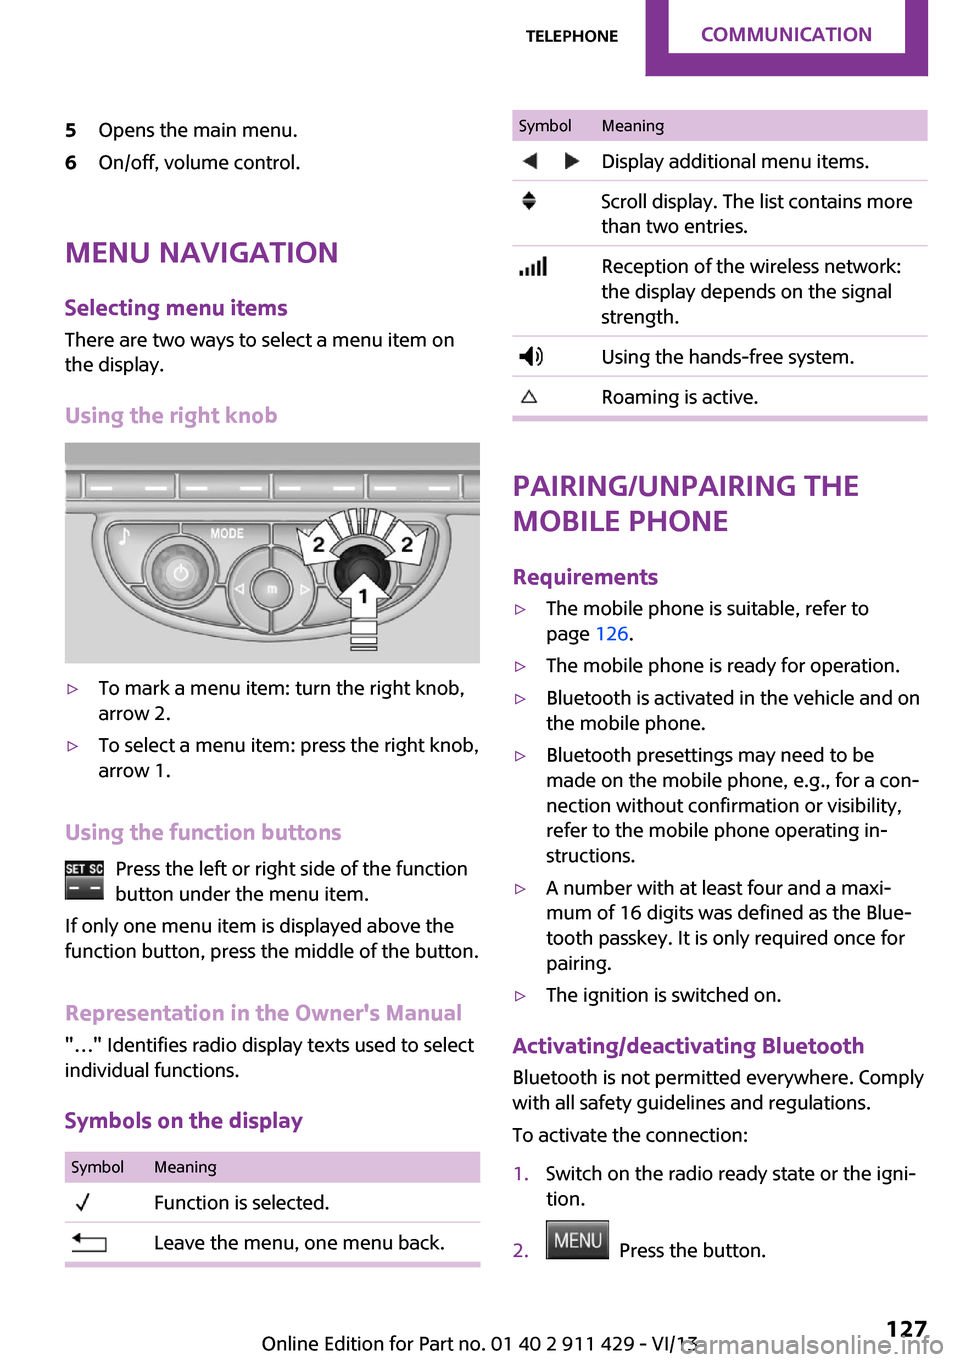
5Opens the main menu.6On/off, volume control.
Menu navigationSelecting menu items
There are two ways to select a menu item on
the display.
Using the right knob
▷To mark a menu item: turn the right knob,
arrow 2.▷To select a menu item: press the right knob,
arrow 1.
Using the function buttons
Press the left or right side of the functionbutton under the menu item.
If only one menu item is displayed above the
function button, press the middle of the button.
Representation in the Owner's Manual
"…" Identifies radio display texts used to select
individual functions.
Symbols on the display
SymbolMeaning Function is selected. Leave the menu, one menu back.SymbolMeaning Display additional menu items. Scroll display. The list contains more
than two entries. Reception of the wireless network:
the display depends on the signal
strength. Using the hands-free system. Roaming is active.
Pairing/unpairing the
mobile phone
Requirements
▷The mobile phone is suitable, refer to
page 126.▷The mobile phone is ready for operation.▷Bluetooth is activated in the vehicle and on
the mobile phone.▷Bluetooth presettings may need to be
made on the mobile phone, e.g., for a con‐
nection without confirmation or visibility,
refer to the mobile phone operating in‐
structions.▷A number with at least four and a maxi‐
mum of 16 digits was defined as the Blue‐
tooth passkey. It is only required once for
pairing.▷The ignition is switched on.
Activating/deactivating Bluetooth
Bluetooth is not permitted everywhere. Comply
with all safety guidelines and regulations.
To activate the connection:
1.Switch on the radio ready state or the igni‐
tion.2. Press the button.
Seite 127TelephoneCommunication127
Online Edition for Part no. 01 40 2 911 429 - VI/13
Page 128 of 210
3."PHONE"4."BT-ON"
To deactivate the connection again:
1."BT"2."BT-OFF"3."YES"
Pairing and connectingPairing the mobile phone
To avoid becoming distracted and posing
an unnecessary hazard both to your own vehi‐
cle's occupants and to other road users, only
pair the mobile phone while the vehicle is sta‐
tionary. ◀
1.Switch on the radio ready state or the igni‐
tion.2. Press the button.3."PHONE"4."BT"5."PAIR"
Turn the right knob to display the Bluetooth
name of your vehicle.6.To perform additional steps on the mobile
phone, refer to the mobile phone operating
instructions: for instance, search for or con‐
nect the Bluetooth device or a new device.
The Bluetooth name of the vehicle appears
on the mobile phone display.7.Select the Bluetooth name of the vehicle on
the mobile phone display.
You are prompted by the radio or mobile
phone to enter the same Bluetooth pass‐
key.8.Enter the passkey on the mobile phone and
confirm it.9."ADD"10.Enter the same passkey on the radio using
the function buttons and confirm it.To delete the last digit: "DELETE"11."OK"
Press twice if necessary.
If pairing was successful, the mobile phone ap‐
pears on the radio display.
Four mobile phones can be paired with the ve‐
hicle at once.
If pairing was unsuccessful: What to do if..., re‐
fer to page 129.
Repeating the pairing procedure/help If pairing failed:
1."REPEAT"2.Repeat steps 6 to 10.
To display the Customer Relations phone num‐
ber: "CALLS"
Turn the right knob to display the Customer Re‐
lations phone number and information needed
for pairing.
Following the initial pairing
▷The mobile phone is detected/connected in
the vehicle within a short period of time
when the engine is running or the ignition
is switched on.▷The phone book entries of the telephone
stored on the SIM card or mobile phone are
transmitted to the vehicle after detection,
depending on the mobile phone.▷Specific settings may be necessary in some
mobile phones, e.g., authorization or a se‐
cure connection; refer to the mobile phone
operating instructions.
Connecting a particular mobile phone
1.Switch on the radio ready state or the igni‐
tion.2. Press the button.3."PHONE"4."BT"Seite 128CommunicationTelephone128
Online Edition for Part no. 01 40 2 911 429 - VI/13
Page 129 of 210
5.Turn the right knob until the mobile phone
to be connected is displayed.6."PRIO"
Press the button repeatedly until the de‐
sired position is reached.
Unpairing the mobile phone
1.Switch on the radio ready state or the igni‐
tion.2. Press the button.3."PHONE"4."BT"5.Turn the right knob until the mobile phone
to be unpaired is displayed.6."DELETE"7."YES"
What to do if...
Information on suitable mobile phones, refer to
page 126.
The mobile phone could not be paired or con‐
nected.
▷Is Bluetooth activated in the vehicle and on
the mobile phone? Activate Bluetooth on
the vehicle and on the mobile phone.▷Do the Bluetooth passkeys on the mobile
phone and the vehicle match? Enter the
same passkey on the mobile phone and on
the radio.▷Did it take longer than 30 seconds to enter
the passkey? Repeat the pairing procedure.▷Are too many Bluetooth devices connected
to the mobile phone or vehicle? Delete con‐
nections with other devices if necessary.▷Is the mobile phone in power-save mode or
does it have only a limited remaining bat‐
tery life? Charge the mobile phone in the
snap-in adapter or via the charging cable.▷Depending on the mobile phone, it is possi‐
ble that only one mobile phone can be con‐
nected to the vehicle. Unpair the connectedmobile phone from the vehicle and pair
and connect only one mobile phone.
The mobile phone no longer reacts?
▷Switch the mobile phone off and on again.▷Is the ambient temperature too high or
low? Do not expose the mobile phone to
extreme environmental conditions.
No phone book entries or only some phone
book entries are displayed, or they are incom‐
plete.
▷Transmission of the phone book entries is
not yet complete.▷It is possible that only the phone book en‐
tries of the mobile phone or the SIM card
are transmitted.▷It may not be possible to display phone
book entries with special characters.▷The number of phone book entries to be
stored is too high.▷Is the data volume of the contact too large,
e. g., due to stored information such as
notes? Reduce the data volume of the con‐
tact.
The phone connection quality is poor.
▷The strength of the Bluetooth signal on the
mobile phone can be adjusted, depending
on the mobile phone.▷Insert the mobile phone into the snap-in
adapter or place it in the area of the center
console.▷Adjust the volume of the microphone and
loudspeakers.
If all points in this list have been checked and
the required function is still not available, con‐
tact Customer Relations or the service center.
Controls
▷Accept/reject a call.▷Dial a phone number.▷Dial a phone number from the phone book.Seite 129TelephoneCommunication129
Online Edition for Part no. 01 40 2 911 429 - VI/13
Page 132 of 210
Dialing a phone number stored in a list
To select an entry and establish a connection:1.Switch on the radio ready state or the igni‐
tion.2. Press the button.3."PHONE"4.Select a list, for instance "TOP8"5.Turn the right knob to select an entry and
press the knob to dial the phone number.
Deleting an individual entry
1.Select an entry from the list.2."DEL"
DTMF suffix dialing
DTMF suffix dialing can be used for gaining ac‐
cess to network services or for controlling devi‐
ces, e.g., to make a remote inquiry of an an‐
swering machine. The DTMF code is needed for
this purpose.
This function is only available if a connection
exists and if the hands-free system is being
used.
1."KEYPAD"2.Enter the DTMF code on the buttons 0–9.3.If necessary, press and hold the function
button on the right or left to enter special
characters.
Displaying the call duration
During a call:
"DURAT"
Hands-free system
General information
Calls that are being made on the hands-free
system can be continued on the mobile phone
and vice versa.
From the mobile phone to the hands-
free system
Calls that were begun outside of the Bluetoothrange of the vehicle can be continued on the
hands-free system with the ignition switched
on.
Depending on the mobile phone, the system
automatically switches to the hands-free sys‐
tem.
If the system does not switch over automati‐
cally, follow the instructions on the mobile
phone display; refer also to the mobile phone
operating instructions.
From the hands-free system to the
mobile phone
Calls that are made on the hands-free system
can in some cases be continued on the mobile
phone; this depends on the mobile phone.
Follow the instructions on the mobile phone
display; refer also to the mobile phone operat‐
ing instructions.
MINI phone numbers When the ignition is switched on, various serv‐ice phone numbers can be displayed.▷"Road Assist": Roadside Assistance, if help
is required in the event of a breakdown.▷"Serv. Appt.": MINI service center, if a serv‐
ice appointment needs to be arranged.▷"Cust Relat": Customer Relations, for infor‐
mation on all aspects of your vehicle.
Displaying the phone numbers
1.Switch on the radio ready state or the igni‐
tion.2. Press the button.3."MINI"4.Turn the right knob until the desired phone
number is displayed.Seite 132CommunicationTelephone132
Online Edition for Part no. 01 40 2 911 429 - VI/13