Headlight MINI Clubman 2016 Owner's Manual (Mini Connected)
[x] Cancel search | Manufacturer: MINI, Model Year: 2016, Model line: Clubman, Model: MINI Clubman 2016Pages: 246, PDF Size: 5.21 MB
Page 14 of 246
CockpitVehicle features and op‐
tions
This chapter describes all standard, country-
specific and optional features offered with the
series. It also describes features that are not
necessarily available in your car, e. g., due to
the selected options or country versions. This
also applies to safety-related functions and sys‐
tems. The respectively applicable country provi‐
sions must be observed when using the respec‐
tive features and systems.
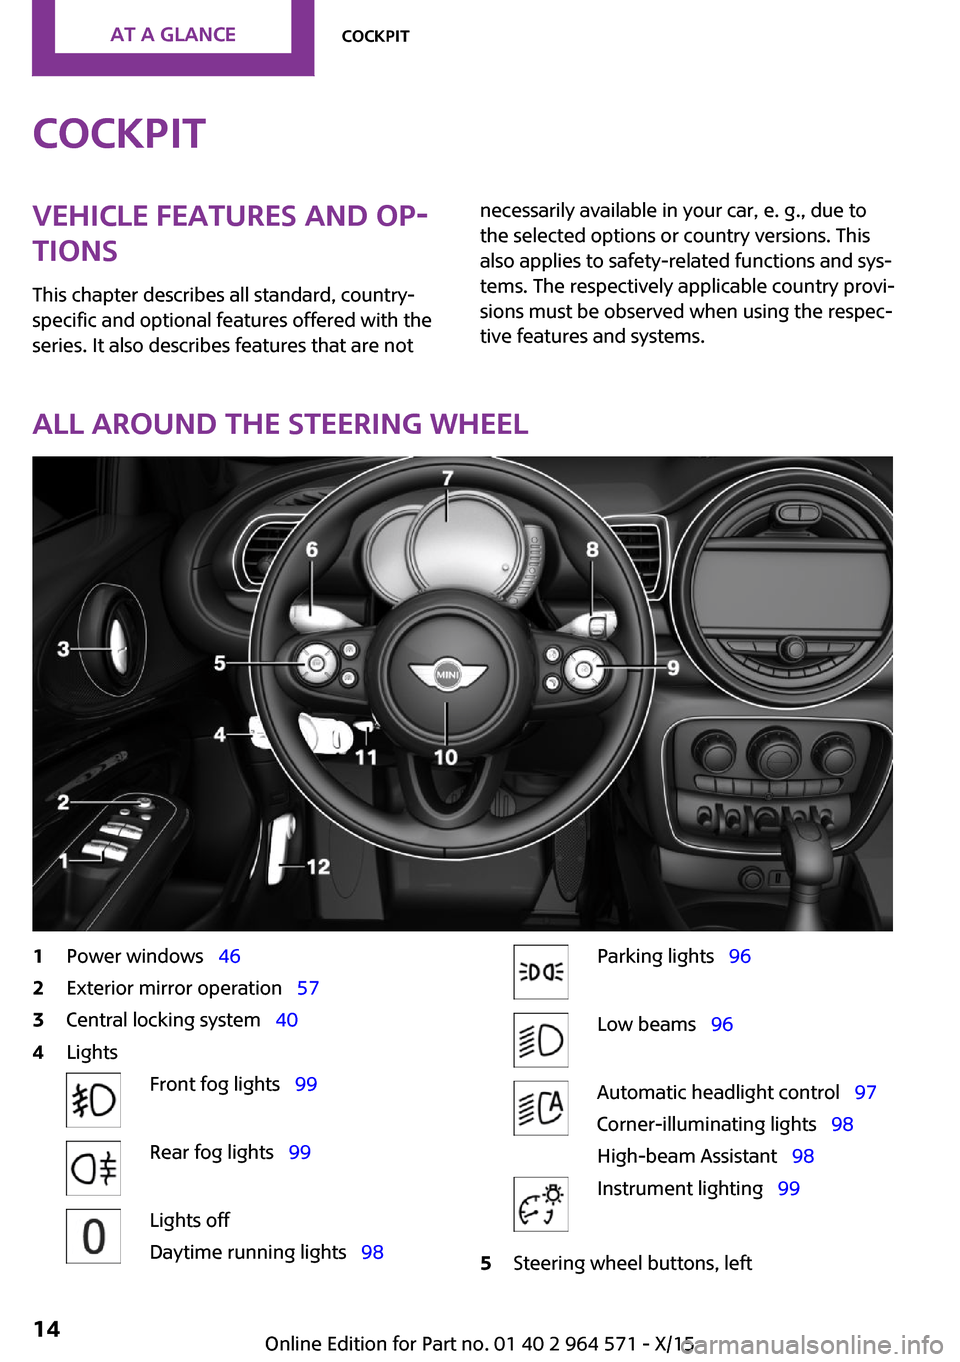
All around the steering wheel
1Power windows 462Exterior mirror operation 573Central locking system 404LightsFront fog lights 99Rear fog lights 99Lights off
Daytime running lights 98
Parking lights 96Low beams 96Automatic headlight control 97
Corner-illuminating lights 98
High-beam Assistant 98
Instrument lighting 995Steering wheel buttons, leftSeite 14AT A GLANCECockpit14
Online Edition for Part no. 01 40 2 964 571 - X/15
Page 70 of 246
The parking brake is released.
Automatic release in cars with
Steptronic transmission
For automatic release, step on the accelerator
pedal.
The LED and indicator lamp go out.
The parking brake is automatically released
when you step on the accelerator:
▷Engine on.▷Drive mode engaged.▷Driver buckled in and doors closed.
Automatic release in cars with manual
transmission
Drive off as usual. The parking brake disen‐
gages when the clutch pedal is released.
The LED and indicator lamp go out.
Under the following conditions, the parking
brake is automatically released:
▷Engine on.▷Gear engaged.▷Driver buckled in and doors closed.▷Engine power is sufficient to drive off.
Malfunction
In the event of a failure or malfunction of the
parking brake, secure the vehicle against rolling
using a wheel chock, for example, when leav‐
ing it.
After a power failure
Putting the parking brake into
operation
1.Switch on the ignition.2. Press the switch while stepping on the
brake pedal or selector lever position P is
set.
It may take several seconds for the brake to be
put into operation. Any sounds associated with
this are normal.
The indicator lamp in the instrument
cluster goes out as soon as the parking
brake is ready for operation.
Turn signal, high beams,
headlight flasher
Turn signal
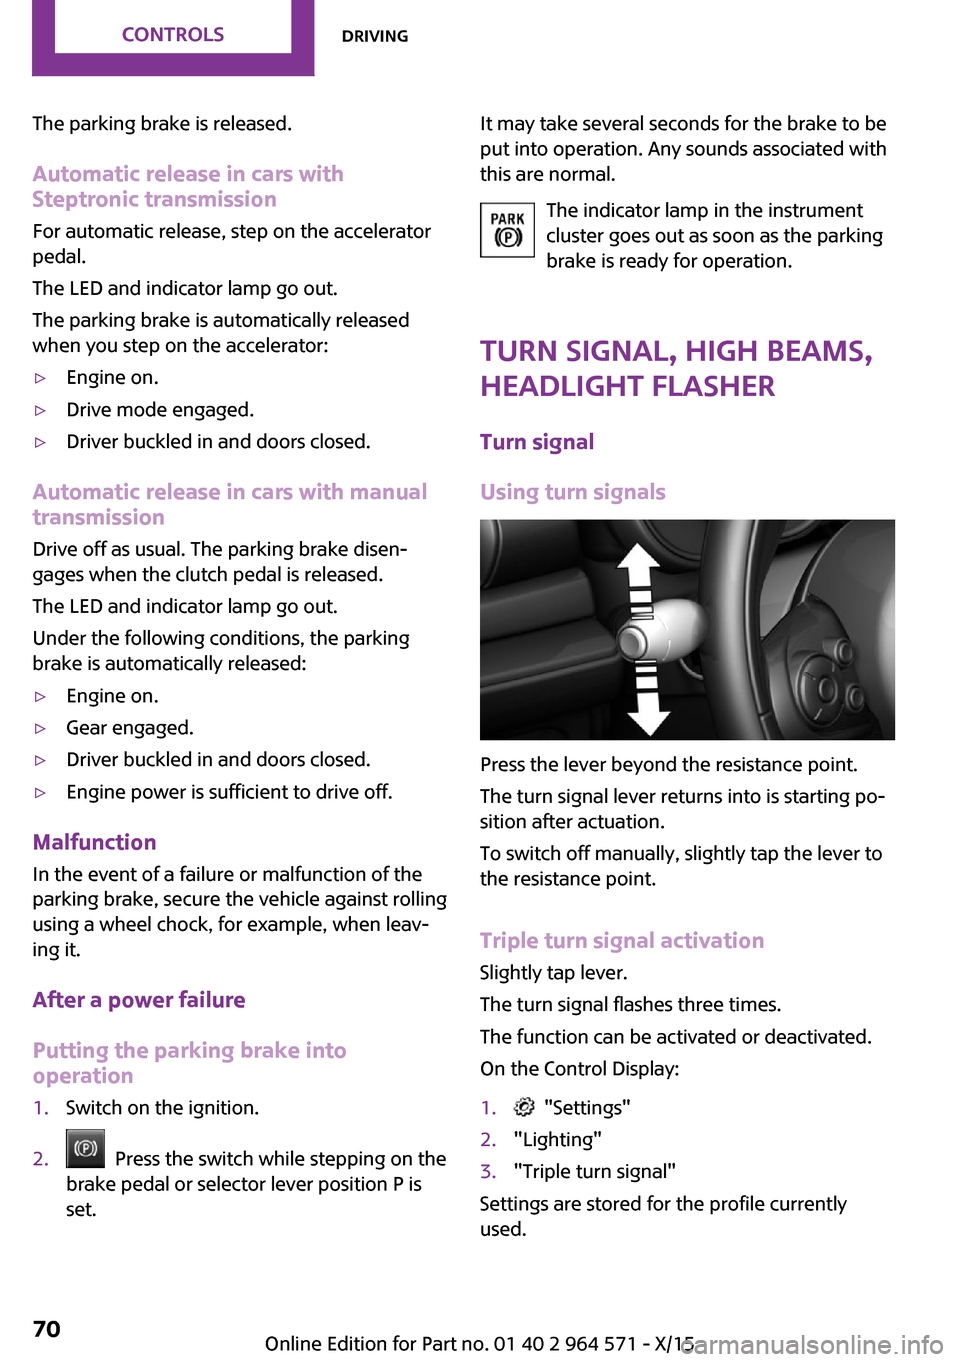
Using turn signals
Press the lever beyond the resistance point.
The turn signal lever returns into is starting po‐
sition after actuation.
To switch off manually, slightly tap the lever to
the resistance point.
Triple turn signal activation
Slightly tap lever.
The turn signal flashes three times.
The function can be activated or deactivated.
On the Control Display:
1. "Settings"2."Lighting"3."Triple turn signal"
Settings are stored for the profile currently
used.
Seite 70CONTROLSDriving70
Online Edition for Part no. 01 40 2 964 571 - X/15
Page 71 of 246

Signaling briefly
Press the lever to the resistance point and hold
it there for as long as you want the turn signal
to flash.
Malfunction
Unusually rapid flashing of the indicator lamp
indicates that a turn signal bulb has failed.
High beams, headlight flasher
▷High beams, arrow 1.▷Headlight flasher, arrow 2.
Washer/wiper system
Switching the wipers on/off and brief
wipe
General information
Do not use the wipers if the windshield is dry,
as this may damage the wiper blades or cause
them to become worn more quickly.
Information
WARNING
If the wipers start moving in the folded
away state, body parts can be jammed or dam‐
age may occur to parts of the vehicle. There is
risk of injuries or risk of property damage. Make
sure that the vehicle is switched off when the
wipers are in the folded away state and the
wipers are folded in when switching on.◀
CAUTION
If the wipers are frozen to the windshield,
the wiper blades can be torn off and the wiper
motor overheat on switching on. There is risk of
property damage. Defrost the windshield prior
to switching the wipers on.◀
Switching on
The lever automatically returns to its initial po‐
sition when released.
▷Normal wiper speed: tap up once.
The wipers switch to intermittent operation
when the vehicle is stationary.
▷Fast wiper speed: tap up twice or tap once
beyond the resistance point.
Wipers change to normal speed when vehi‐
cle comes to standstill.
Switching off and brief wipe
The lever automatically returns to its initial po‐
sition when released.
▷Single wipe: press down once.▷To switch off from normal wiper speed:
press down once.
Seite 71DrivingCONTROLS71
Online Edition for Part no. 01 40 2 964 571 - X/15
Page 83 of 246

Parking lights, headlight control
Parking lights or headlights are acti‐
vated.
For additional information, refer to
Parking lights/low beams, headlight control, re‐
fer to page 96.
Front fog lights
Front fog lights are activated.
For additional information, refer to
Front fog lights, refer to page 99.
High-beam Assistant
High-beam Assistant is switched on.
High beams are activated and off auto‐
matically as a function of the traffic sit‐
uation.
For additional information, refer to High-beam
Assistant, refer to page 98.
Cruise control
The system is switched on. It maintains
the speed that was set using the control
elements on the steering wheel.
Blue lights
High beams
High beams are activated.
For additional information, refer to High
beams, refer to page 71.
General lamps
At least one Check Control message is
displayed or is stored.
Text messages
Text messages in combination with a symbol in
the instrument cluster explain a Check Control
message and the meaning of the indicator and
warning lights.
Supplementary text messages
Additional information, such as on the cause of
an error or the required action, can be called up
via Check Control.
With urgent messages the added text will be
automatically displayed on the Control Display.
Symbols
Within the supplementary text, the following
functions can be selected independent of the
check control message.
▷ Display additional information about
the Check Control message in the
Integrated Owner's Manual.
▷ "Service request"
Contact a dealer’s service center or another
qualified service center or repair shop.
▷ "Roadside Assistance"
Contact Roadside Assistance.
Hiding Check Control messages
Press and hold button on turn signal lever.
▷Some Check Control messages are dis‐
played continuously and are not cleared
until the malfunction is eliminated. If sev‐
eral malfunctions occur at once, the mes‐
sages are displayed consecutively.
These messages can be faded for approx.
8 seconds. After this time, they are dis‐
played again automatically.
Seite 83DisplaysCONTROLS83
Online Edition for Part no. 01 40 2 964 571 - X/15
Page 96 of 246
LightsVehicle features and op‐
tions
This chapter describes all standard, country-
specific and optional features offered with the
series. It also describes features that are not
necessarily available in your car, e. g., due to
the selected options or country versions. This
also applies to safety-related functions and sys‐
tems. The respectively applicable country provi‐
sions must be observed when using the respec‐
tive features and systems.
Overview
Switches in the vehicle
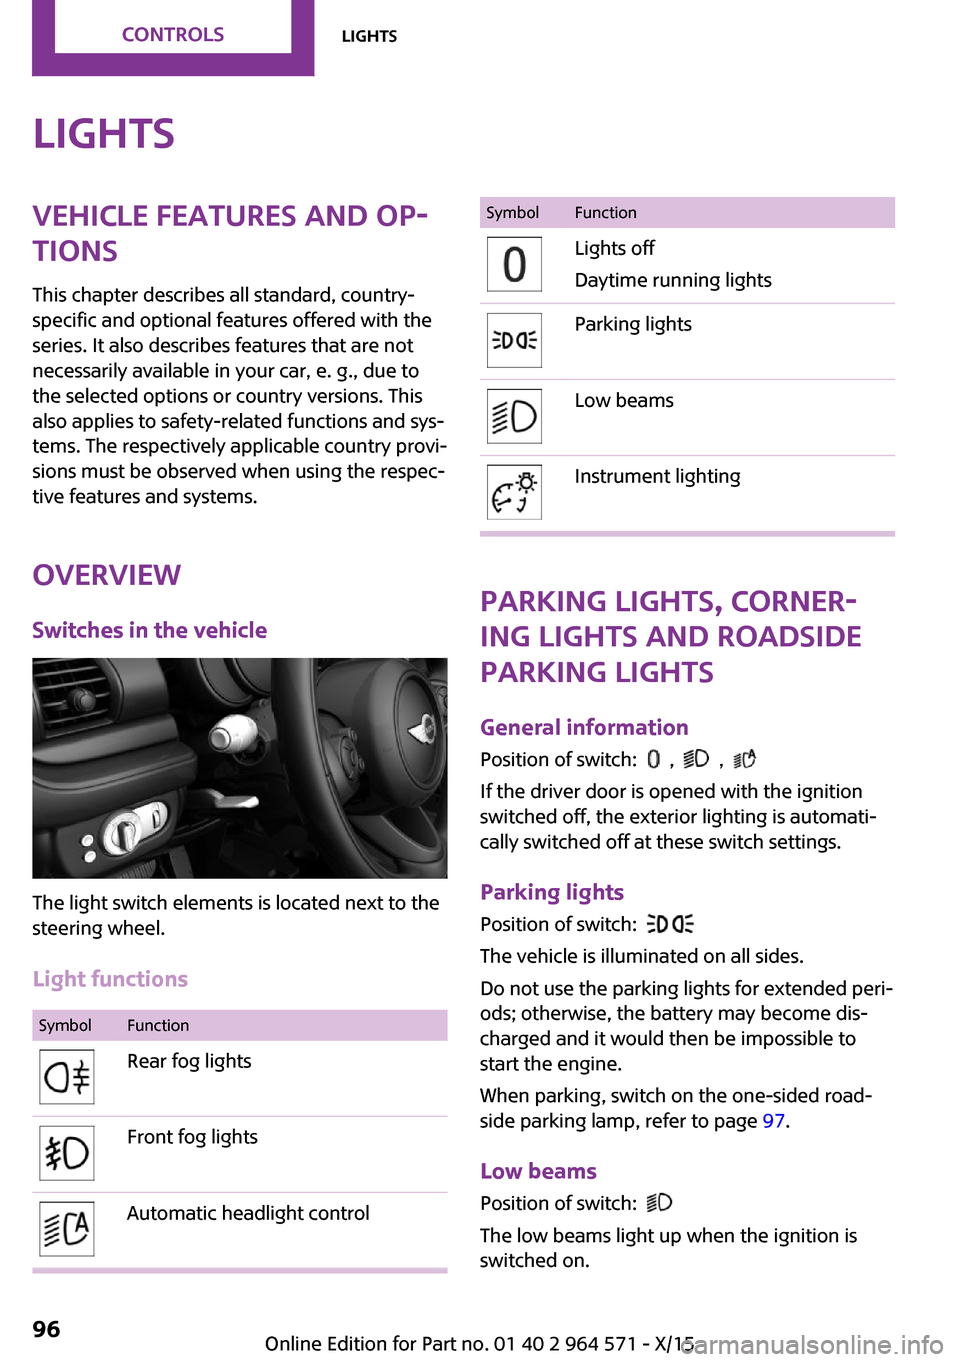
The light switch elements is located next to the
steering wheel.
Light functions
SymbolFunctionRear fog lightsFront fog lightsAutomatic headlight controlSymbolFunctionLights off
Daytime running lights
Parking lightsLow beamsInstrument lighting
Parking lights, corner‐
ing lights and roadside
parking lights
General information
Position of switch: , ,
If the driver door is opened with the ignition
switched off, the exterior lighting is automati‐
cally switched off at these switch settings.
Parking lights
Position of switch:
The vehicle is illuminated on all sides.
Do not use the parking lights for extended peri‐
ods; otherwise, the battery may become dis‐
charged and it would then be impossible to
start the engine.
When parking, switch on the one-sided road‐
side parking lamp, refer to page 97.
Low beams
Position of switch:
The low beams light up when the ignition is
switched on.
Seite 96CONTROLSLights96
Online Edition for Part no. 01 40 2 964 571 - X/15
Page 97 of 246
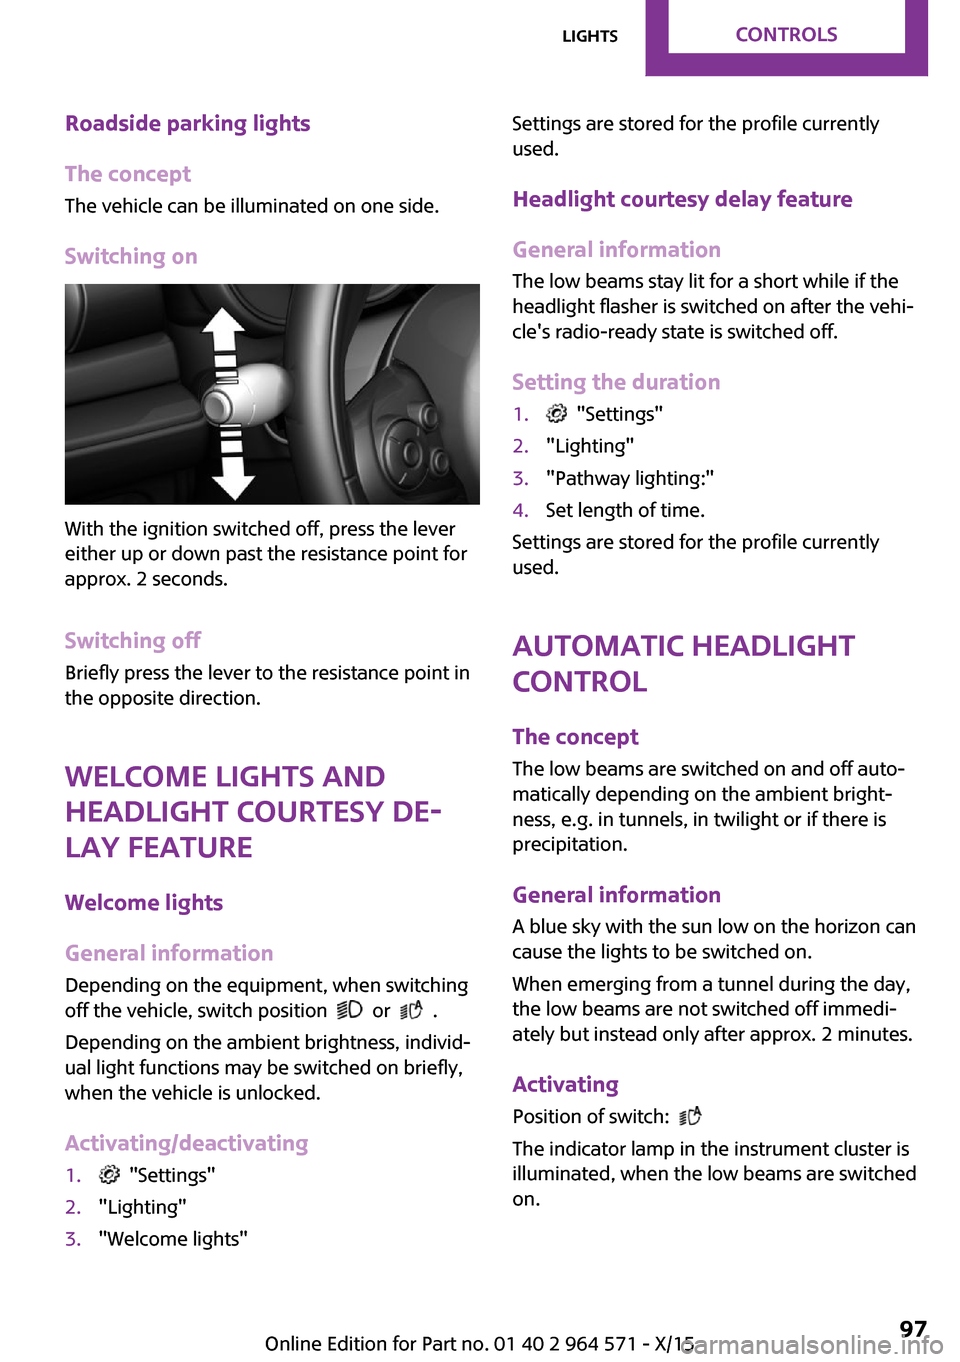
Roadside parking lights
The concept
The vehicle can be illuminated on one side.
Switching on
With the ignition switched off, press the lever
either up or down past the resistance point for
approx. 2 seconds.
Switching off
Briefly press the lever to the resistance point in
the opposite direction.
Welcome lights and
headlight courtesy de‐
lay feature
Welcome lights
General information
Depending on the equipment, when switching
off the vehicle, switch position or .
Depending on the ambient brightness, individ‐
ual light functions may be switched on briefly,
when the vehicle is unlocked.
Activating/deactivating
1. "Settings"2."Lighting"3."Welcome lights"Settings are stored for the profile currently
used.
Headlight courtesy delay feature
General information
The low beams stay lit for a short while if the
headlight flasher is switched on after the vehi‐
cle's radio-ready state is switched off.
Setting the duration
1. "Settings"2."Lighting"3."Pathway lighting:"4.Set length of time.
Settings are stored for the profile currently
used.
Automatic headlight
control
The concept
The low beams are switched on and off auto‐
matically depending on the ambient bright‐
ness, e.g. in tunnels, in twilight or if there is
precipitation.
General information
A blue sky with the sun low on the horizon can
cause the lights to be switched on.
When emerging from a tunnel during the day,
the low beams are not switched off immedi‐
ately but instead only after approx. 2 minutes.
Activating
Position of switch:
The indicator lamp in the instrument cluster is
illuminated, when the low beams are switched
on.
Seite 97LightsCONTROLS97
Online Edition for Part no. 01 40 2 964 571 - X/15
Page 99 of 246
When the low beams are on, the lights are au‐
tomatically brightened or dimmed.
The blue indicator lamp in the instru‐
ment cluster lights up when the system
switches on the high beams.
Deactivating
The High-beam Assistant is deactivated when
manually switching the high beams on and off,
refer to page 71.
To reactivate the High-beam Assistant, press
the button on the turn signal lever.
System limits
The High-beam Assistant cannot serve as a
substitute for the driver's personal judgment of
when to use the high beams. Therefore, man‐
ually switch off the high beams in situations
where required to avoid a safety risk.
The system is not fully functional in the follow‐
ing situations, and driver intervention may be
necessary:
▷In very unfavorable weather conditions,
such as fog or heavy precipitation.
▷When detecting poorly-lit road users such
as pedestrians, cyclists, horseback riders
and wagons; when driving close to train or
ship traffic; and at animal crossings.
▷In tight curves, on hilltops or in depressions,
in cross traffic or half-obscured oncoming
traffic on highways.
▷In poorly-lit towns and cities and in the
presence of highly reflective signs.
▷When the windshield behind the interior
mirror is fogged over, dirty or covered with
stickers, etc.
Fog lights
Front fog lights
The low beams must be switched on.
Press button. The green indicator lamp
lights up.
If the automatic headlight control, refer to
page 97, is activated, the low beams will come
on automatically when you switch on the front
fog lights.
When the high beams or headlight flasher are
activated, the front fog lights are not switched
on.
Rear fog lights
The low beams or front fog lights must be
switched on.
Press button. The yellow indicator
lamp lights up.
If the automatic headlight control, refer to
page 97, is activated, the low beams will come
on automatically when you switch on the rear
fog lights.
Instrument lighting
Adjusting
The parking lights or low beams
must be switched on to adjust
the brightness.
Adjust the brightness with the
thumbwheel.
Interior lights
General information
The interior lights, footwell lights, access lights
and courtesy lights are controlled automati‐
cally.
Thumb wheel for the instrument lighting con‐
trols brightness of some of these features.
Seite 99LightsCONTROLS99
Online Edition for Part no. 01 40 2 964 571 - X/15
Page 204 of 246

3.Continue turning the wiper blade all the
way so that it pops out of the holder.
4.Press the new wiper blade into the holder
until you hear it snap into place.
5.Fold the wipers in.
Lamp and bulb replace‐
ment
General information
Lights and bulbs make an essential contribution
to vehicle safety.
The manufacturer of the vehicle recommends
that you have appropriate work performed by a
dealer’s service center or another qualified
service center or repair shop if you are unfami‐
liar with it or if it has not been described here.
A spare lamp box is available from a dealer’s
service center or another qualified service cen‐
ter or repair shop.
Information
Lights and bulbs
WARNING
Bulbs can get hot during operation. Con‐
tact with the bulbs can cause burns. There is
risk of injuries. Only change bulbs after they
have cooled off.◀
WARNING
Work on switched-on lighting systems
can cause short circuits. There is risk of injuries
or risk of property damage. When working on
the lighting system, switch off the lamps in
question. If necessary, heed the bulb manufac‐
turer's instructions.◀
CAUTION
Dirty bulbs have a reduced service life.
There is risk of property damage. Do not hold
new bulbs with your bare hands. Use a clean
cloth or something similar, or hold the bulb by
its base.◀
Light-emitting diodes (LEDs)
Some items of equipment use light-emitting di‐
odes installed behind a cover as a light source.
These light-emitting diodes, which are related
to conventional lasers, are officially designated
as Class 1 light-emitting diodes.
WARNING
Too intensive brightness can irritate or
damage the retina of the eye. There is risk of
injuries. Do not look directly into the headlights
or other light sources. Do not remove the LED
covers.◀
Headlight glass
Condensation can form on the inside of the ex‐
ternal lights in cool or humid weather. When
driving with the lights switched on, the conden‐
sation evaporates after a short time. The head‐
light glass does not need to be changed.
If despite driving with the lights switched on,
increasing humidity forms, e. g. water droplets
in the lamp, the manufacturer of your vehicle
recommends having it checked by a dealer’s
service center or another qualified service cen‐
ter or repair shop.
Seite 204MOBILITYReplacing components204
Online Edition for Part no. 01 40 2 964 571 - X/15
Page 205 of 246

Front lights, bulb replacement
Overview
Halogen headlights
1Low beams/high beams2Turn signal
LED headlights
1Daytime running lights2Low beams/high beams3Turn signalBug light1Parking lights2Daytime running lights3Fog lights
LED bug light
1Parking lights2Fog lights
LED low beams/LED high beams
Follow the general instructions on lights and
bulbs, refer to page 204.
The lights feature LED technology. In the case
of a malfunction, contact a dealer’s service cen‐
ter or another qualified service center or repair
shop.
Halogen low beams/halogen high
beams
Follow the general instructions on lights and
bulbs, refer to page 204.
Seite 205Replacing componentsMOBILITY205
Online Edition for Part no. 01 40 2 964 571 - X/15
Page 206 of 246
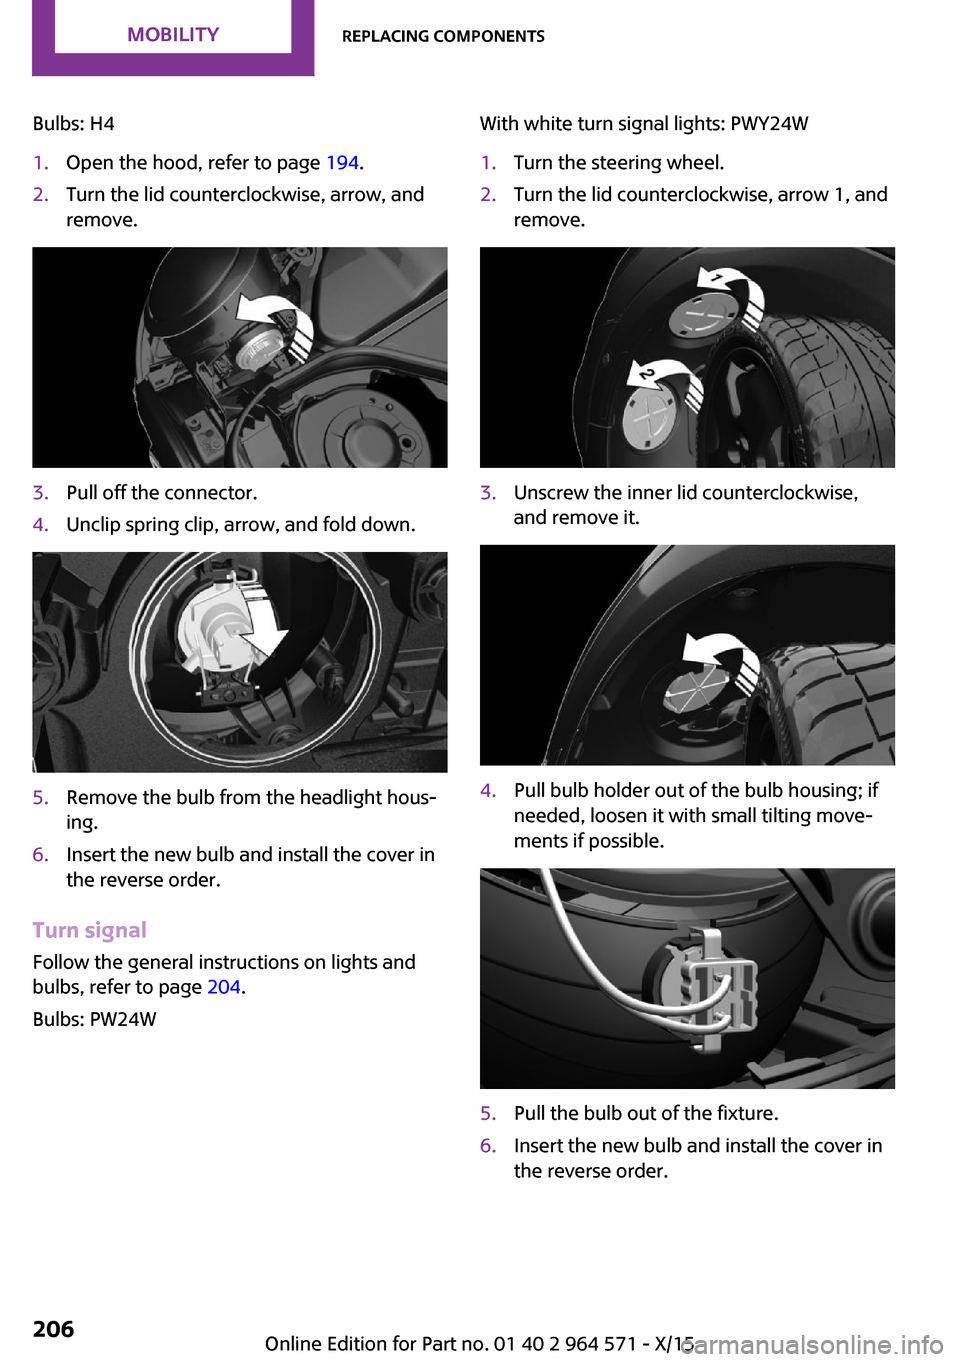
Bulbs: H41.Open the hood, refer to page 194.2.Turn the lid counterclockwise, arrow, and
remove.
3.Pull off the connector.4.Unclip spring clip, arrow, and fold down.5.Remove the bulb from the headlight hous‐
ing.
6.Insert the new bulb and install the cover in
the reverse order.
Turn signal
Follow the general instructions on lights and
bulbs, refer to page 204.
Bulbs: PW24W
With white turn signal lights: PWY24W1.Turn the steering wheel.2.Turn the lid counterclockwise, arrow 1, and
remove.
3.Unscrew the inner lid counterclockwise,
and remove it.
4.Pull bulb holder out of the bulb housing; if
needed, loosen it with small tilting move‐
ments if possible.
5.Pull the bulb out of the fixture.6.Insert the new bulb and install the cover in
the reverse order.
Seite 206MOBILITYReplacing components206
Online Edition for Part no. 01 40 2 964 571 - X/15