brake MINI Convertible 2009 Owner's Manual
[x] Cancel search | Manufacturer: MINI, Model Year: 2009, Model line: Convertible, Model: MINI Convertible 2009Pages: 176, PDF Size: 2.82 MB
Page 7 of 176

REFERENCEAT A GLANCE CONTROLS DRIVING TIPS MOBILITY
5
ics, requires specially adapted maintenance and
repair methods. Therefore, have the necessary
work on your MINI only carried out by a MINI
Dealer or a workshop that has specially trained
personnel working in accordance with the spec-
ifications of the MINI manufacturer. If this work
is not carried out properly, there is a danger
of subsequent damage and related safety
hazards.<
Parts and accessories
For your own safety, use genuine parts
and accessories approved by the manu-
facturer of the MINI.
When you purchase accessories tested
and approved by the manufacturer of the MINI
and Original MINI Parts, you simultaneously
acquire the assurance that they have been thor-
oughly tested by the manufacturer of the MINI
to ensure optimum performance when installed
on your vehicle.
The manufacturer of the MINI warrants these
parts to be free from defects in material and
workmanship.
The manufacturer of the MINI will not accept any
liability for damage resulting from installation of
parts and accessories not approved by the man-
ufacturer of the MINI.
The manufacturer of the MINI cannot test every
product made by other manufacturers to verify
if it can be used on a MINI safely and without risk
to either the vehicle, its operation, or its occu-
pants.
Original MINI Parts, MINI Accessories and other
products approved by the manufacturer of the
MINI, together with professional advice on using
these items, are available from all MINI Dealers.
Installation and operation of non-MINI
approved accessories such as alarms, radios,
amplifiers, radar detectors, wheels, suspension
components, brake dust shields, telephones,
including operation of any mobile phone from
within the vehicle without using an externally
mounted antenna, or transceiver equipment, for
instance, CBs, walkie-talkies, ham radios or sim-
ilar accessories, may cause extensive damage to
the vehicle, compromise its safety, interfere with the vehicle's electrical system or affect the valid-
ity of the MINI Limited Warranty. See your MINI
Dealer for additional information.<
Maintenance, replacement, or repair of
the emission control devices and systems
may be performed by any automotive repair
establishment or individual using any certified
automotive part.<
California Proposition 65 warning
California law requires us to issue the following
warning:
Engine exhaust and a wide variety of
automobile components and parts,
including components found in the interior fur-
nishings in a vehicle, contain or emit chemicals
known to the State of California to cause cancer
and birth defects and reproductive harm. In
addition, certain fluids contained in vehicles and
certain products of component wear contain or
emit chemicals known to the State of California
to cause cancer and birth defects or other repro-
ductive harm.
Battery posts, terminals and related accessories
contain lead and lead compounds. Wash your
hands after handling.
Used engine oil contains chemicals that have
caused cancer in laboratory animals. Always
protect your skin by washing thoroughly with
soap and water.<
Service and warranty
We recommend that you read this publication
thoroughly.
Your MINI is covered by the following wa-
ranties:
>New Vehicle Limited Warranty
>Rust Perforation Limited Warranty
>Federal Emissions System Defect Warranty
>Federal Emissions Performance Warranty
>California Emission Control System Limited
Warranty
Detailed information about these warranties is
listed in the Service and Warranty Information
Page 29 of 176

REFERENCEAT A GLANCE CONTROLS DRIVING TIPS MOBILITY
27
Insert the remote control into the ignition lock to
be able to operate the windows or glass sunroof
when the engine is switched off and the doors
are open.
Switching on radio readiness
Switch on radio readiness by briefly pressing the
start/stop button, page44.
Do not depress the brake or the clutch,
otherwise the engine will start.<
Starting the engine
The engine can be started or the ignition can be
switched on when a remote control is inside the
vehicle. It is not necessary to insert a remote
control into the ignition lock, page44.
Switching off the engine in cars with
automatic transmission
The engine can only be switched off when the
selector lever is in position P, page45.
To switch the engine off when the selector lever
is in position N, the remote control must be in
the ignition lock.
Before driving a vehicle with automatic
transmission into a car wash
1.Insert remote control into ignition lock.
2.Depress the brake.
3.Move the selector lever to position N.
4.Switch off the engine.
The vehicle can roll.
Malfunction
Convenient access may malfunction due to local
radio waves.
If this happens, open or close the vehicle via the
buttons on the remote control or using the inte-
grated key.
Insert the remote control into the ignition lock
and start the engine.
Warning lamps
The warning lamp comes on when an
attempt is made to start the engine: the
engine cannot be started. The remote
control is not inside the vehicle or is malfunc-
tioning. Take the remote control with you inside
the vehicle or have it checked. If necessary,
insert another remote control into the ignition
lock.
The warning lamp comes on when the
engine is running: the remote control is
no longer inside the vehicle. After the
engine is switched off, the engine can only be
restarted within approx. 10 seconds.
The indicator lamp comes on: replace
the battery in the remote control.
Replacing the battery
The remote control for convenient access con-
tains a battery that will need to be replaced from
time to time.
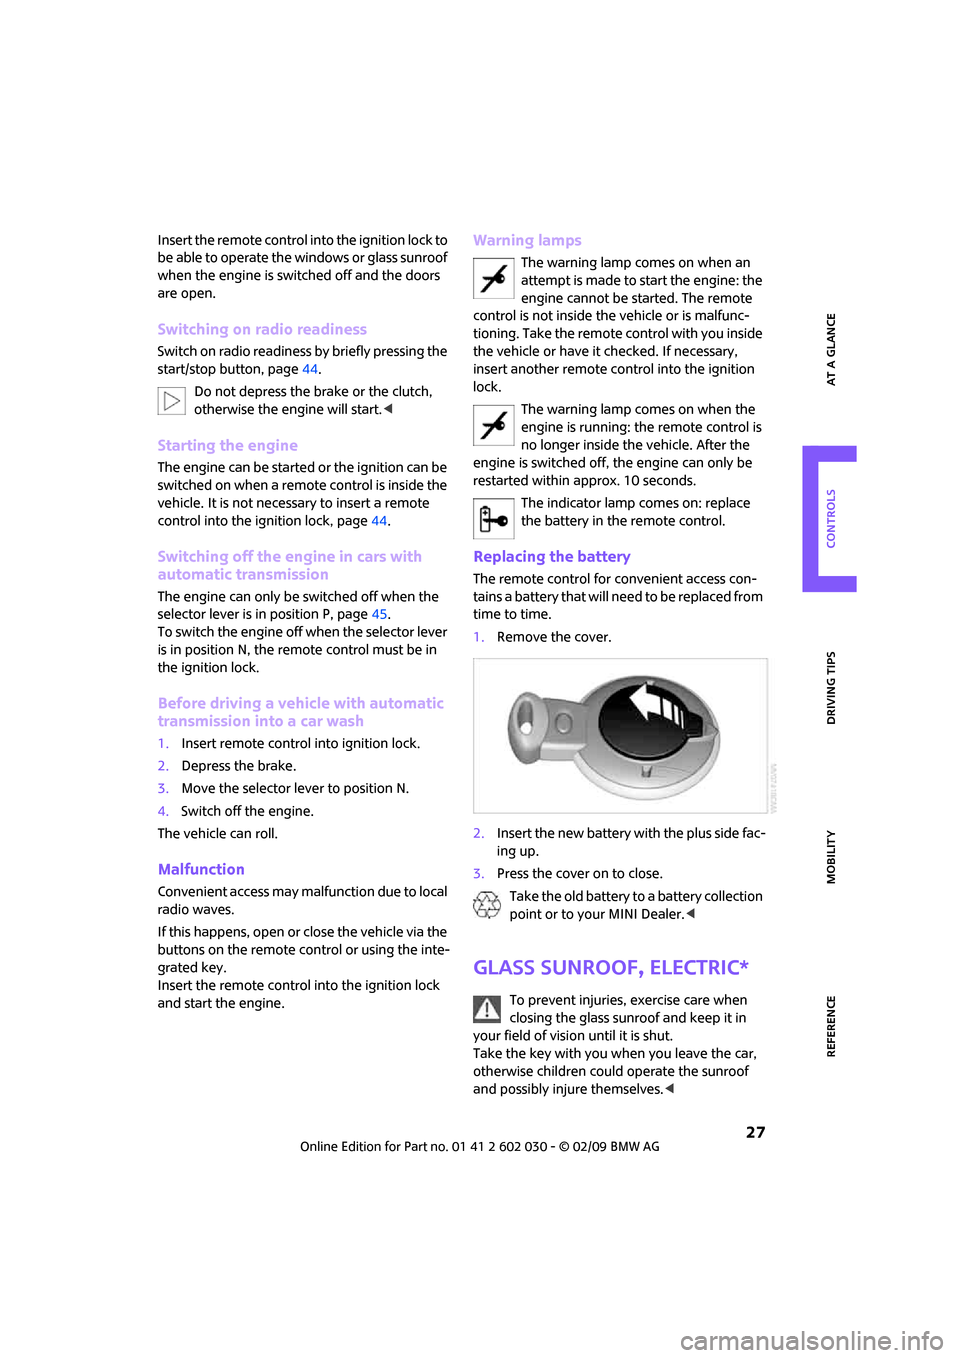
1.Remove the cover.
2.Insert the new battery with the plus side fac-
ing up.
3.Press the cover on to close.
Take the old battery to a battery collection
point or to your MINI Dealer.<
Glass sunroof, electric*
To prevent injuries, exercise care when
closing the glass sunroof and keep it in
your field of vision until it is shut.
Take the key with you when you leave the car,
otherwise children could operate the sunroof
and possibly injure themselves.<
Page 46 of 176

Driving
44
Driving
Ignition lock
Inserting the key into the ignition lock
Insert the key all the way into the ignition lock.
Radio readiness
Individual electrical consumers can operate.
Removing the key from the ignition lock
Press in the key briefly. It is ejected slightly.
At the same time:
>The ignition is switched off if it was on be-
forehand.
Automatic transmission
You cannot take out the key unless the selector
lever is in the P position: interlock.
Start/stop button
Press the start/stop button to switch radio readi-
ness or the ignition on and off. Do not depress
the brake or clutch while doing so.When you press the start/stop button and
depress the clutch if the car has manual
transmission or the brake if the car has auto-
matic transmission, the engine starts.<
Radio readiness
Individual electrical consumers can operate. The
time and outside temperature are displayed in
the tachometer.
Radio readiness is switched off automatically:
>When the key is removed from the igni-
tion lock
>When using convenient access
* by pushing
the button on the door handle or the
button on the remote control, refer to Lock-
ing on page26
>After a certain has elapsed
Ignition on
Most indicator and warning lamps in indicator
area 1, page13, light up for varying lengths of
time.
When the engine is off, switch off the igni-
tion and any unnecessary electrical con-
sumers in order to preserve the battery.<
Radio readiness and ignition off
All indicator and warning lamps in the displays
go out.
The ignition automatically turns off
* when the
driver's door is opened. Pressing the start/stop
button again switches the ignition back on.
The ignition is not switched off in situations such
as the following:
>The clutch or brake is depressed
>The low beams are switched on
Starting the engine
Do not allow the engine to run in enclosed
spaces; otherwise inhalation of the nox-
Page 47 of 176

REFERENCEAT A GLANCE CONTROLS DRIVING TIPS MOBILITY
45
ious exhaust gases can lead to unconsciousness
and death. Exhaust gases contain carbon mon-
oxide, an odorless and colorless, but highly toxic
gas. Never leave an unattended vehicle with the
engine running, otherwise such a vehicle repre-
sents a potential safety hazard.
Before leaving the car while the engine is run-
ning, place the transmission in neutral or move
the selector lever to position P and forcefully
apply the parking brake to prevent the car from
moving.<
Avoid frequent starting in quick succes-
sion or repeated start attempts in which
the engine does not start. Otherwise, the fuel is
not burned or inadequately burned and there is
a danger of overheating and damaging the cat-
alytic converter.<
Do not let the engine warm up with the vehicle
at a standstill. Move off immediately at a moder-
ate engine speed.
When starting the engine, do not depress the
accelerator pedal.
Manual transmission
Key in ignition lock or inside vehicle with conve-
nient access, refer to page26.
1.Depress the brake.
2.Depress the clutch.
3.Press the start/stop button.
Automatic transmission
Key in ignition lock or inside vehicle with conve-
nient access, refer to page26.
1.Depress the brake.
2.Shift the selector lever into position P or N.
3.Press the start/stop button.The starter operates automatically for a certain
time, and stops automatically as soon as the
engine has started.
Switching off the engine
Always take the key with you when you
leave the vehicle.
When parking, apply the parking brake force-
fully, otherwise the vehicle could begin to roll.<
Manual transmission
1.With the car at a standstill, press the start/
stop button.
2.Shift into first gear or reverse.
3.Forcefully apply the parking brake.
Automatic transmission
1.With the car at a standstill, move the selector
lever to position P.
2.Press the start/stop button.
3.Forcefully apply the parking brake.
Before driving into a car wash
By following these steps, the vehicle is able
to roll:
1.Place the remote control, even with conve-
nient access, in the ignition lock.
2.Depress the brake.
3.Move the selector lever to position N.
4.Switch off the engine.
Parking brake
The parking brake is primarily intended to pre-
vent the vehicle from rolling while parked; it
brakes the rear wheels.
Applying
The lever locks in position automatically.
Page 48 of 176

Driving
46
Releasing
Pull slightly upwards, press the button and lower
the lever.
In exceptional cases, if the parking brake
has to be used to slow or stop the car,
do not pull the lever up too hard. In doing so,
continuously press the button of the parking
brake lever.
Otherwise, excessive force could lead to over-
braking and loss of traction, i.e. fishtailing, at the
rear axle.<
Manual transmission
When shifting into 5th or 6th gear, press
the gearshift lever to the right. Otherwise
the engine could be damaged if you inadvert-
ently shift into 3
rd or 4th gear.<
Reverse gear
Select this only when the vehicle is stationary.
When the gearshift lever is pressed to the left, a
slight resistance has to be overcome.
Automatic transmission*
with Steptronic
In addition to the fully automatic mode, you can
shift gears manually using Steptronic, page47.
Parking the vehicle
To prevent the vehicle from rolling, always
select position P and apply the parking
brake before leaving the vehicle with the engine
running.<
Removing the key
1.Move the selector lever to position P.
2.Switch off the engine.
3.Remove the key.
Selector lever positions
P R N D M/S + –
Displays in the tachometer
P R N D DS M1 to M6
The selector lever position is displayed, or the
current gear in the manual mode.
Changing selector lever positions
>The selector lever can only be moved out of
position P if the ignition i s s w i t c h e d o n o r t h e
engine is running: interlock.
>Before moving the lever away from P or N
with the vehicle stationary, first depress the
brake; otherwise the selector lever will
refuse to move: shiftlock.
To prevent the vehicle from creeping
after you select a driving position, de-
press the brake until you are ready to start.<
Page 50 of 176

Driving
48
If you do not shift gears with the shift paddles or
accelerate for a certain amount of time, the
transmission automatically returns to D, auto-
matic drive.
>Pull one of the shift paddles.
Transmission shifts up.
>Push one of the shift paddles.
Transmission shifts down.
M1 to M6 is displayed in the gear indicator.
Manually unlock the selector lever lock
Should the selector lever refuse to move out of
position P even though the ignition is switched
on, the brake is depressed and the button on the
selector lever is pressed, the selector lever lock
can be overridden:
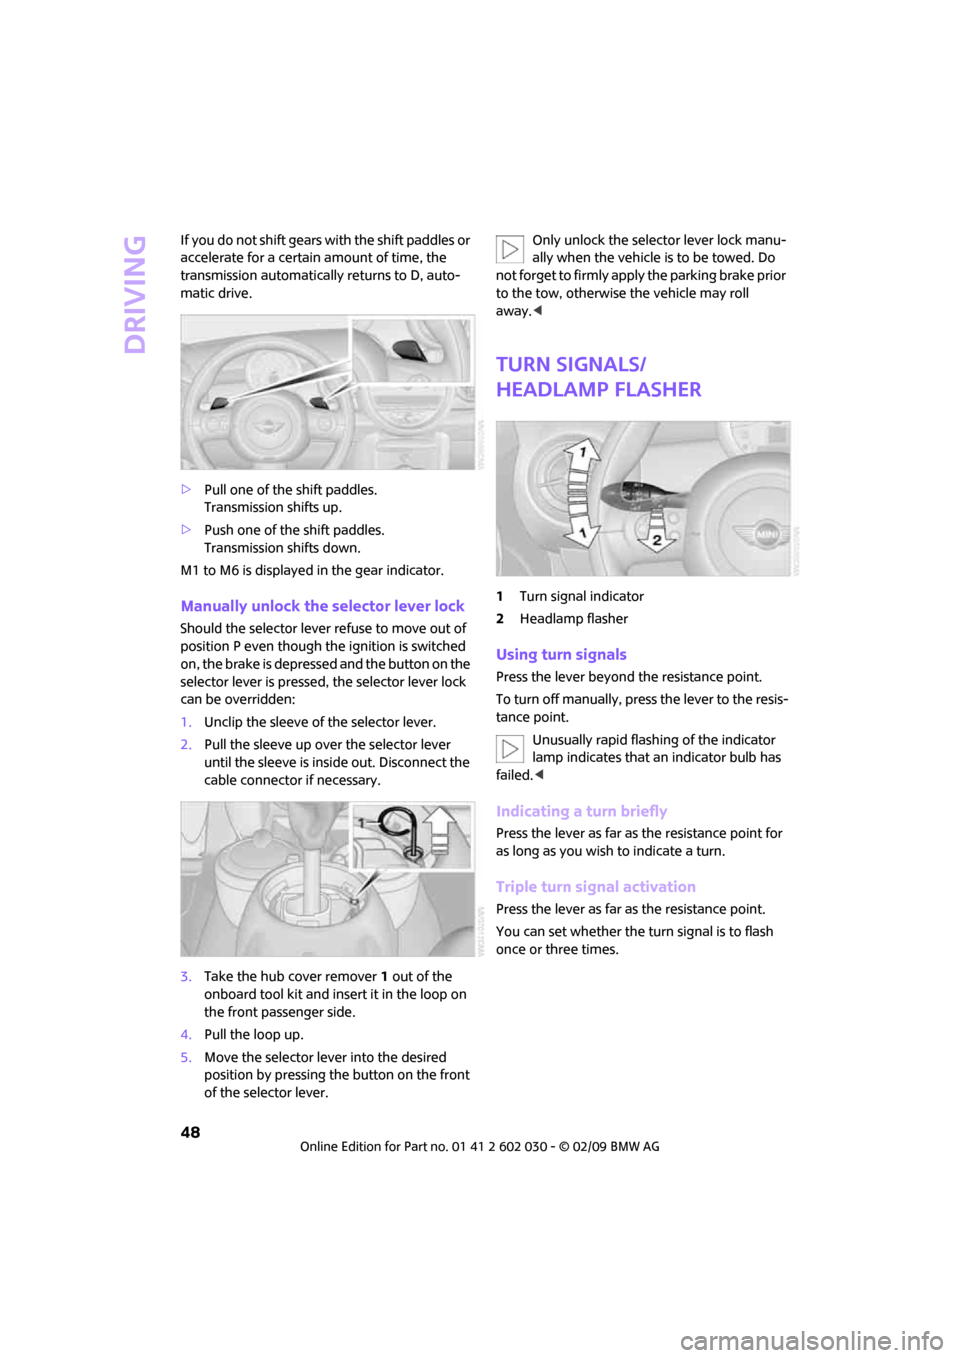
1.Unclip the sleeve of the selector lever.
2.Pull the sleeve up over the selector lever
until the sleeve is inside out. Disconnect the
cable connector if necessary.
3.Take the hub cover remover1 out of the
onboard tool kit and insert it in the loop on
the front passenger side.
4.Pull the loop up.
5.Move the selector lever into the desired
position by pressing the button on the front
of the selector lever.Only unlock the selector lever lock manu-
ally when the vehicle is to be towed. Do
not forget to firmly apply the parking brake prior
to the tow, otherwise the vehicle may roll
away.<
Turn signals/
headlamp flasher
1Turn signal indicator
2Headlamp flasher
Using turn signals
Press the lever beyond the resistance point.
To turn off manually, press the lever to the resis-
tance point.
Unusually rapid flashing of the indicator
lamp indicates that an indicator bulb has
failed.<
Indicating a turn briefly
Press the lever as far as the resistance point for
as long as you wish to indicate a turn.
Triple turn signal activation
Press the lever as far as the resistance point.
You can set whether the turn signal is to flash
once or three times.
Page 54 of 176

Driving
52
Activating
1Resuming cruise control
2Activating/deactivating cruise control
3Maintaining, storing and increasing speed
4Maintaining, storing and decreasing speed
Indicator lamp in the speedometer lights up.
The cruise control system is ready and can be
activated.
Activating/deactivating cruise control
Press button 2.
In addition, the system is automatically deacti-
vated:
>When the brakes are applied
>When the clutch is depressed
>When the automatic transmission is in selec-
tion lever position N
>When the driving stability control system
is active
Cruise control is not deactivated by depressing
the accelerator pedal. Once the accelerator
pedal is released, the stored speed is achieved
again and maintained.
The stored speed is cleared when the ignition is
switched off.
Maintaining current speed
Press button3.
The system maintains and stores the current
vehicle speed.
If, on a downhill grade, the engine braking effect
is not sufficient, the controlled speed may be
exceeded. On uphill grades vehicle speed may
drop if the engine output is insufficient.
Increasing speed
Press button3 repeatedly until the desired
speed is reached. Every time you press the but-
ton, the speed increases by approx. 1 mph or
approx. 2 km/h.
Accelerating using the button
Press and hold button3.
The vehicle accelerates without pressure on the
accelerator pedal. After the button is released,
the driving speed is maintained and stored.
Decreasing speed
Press button4 repeatedly until the desired
speed is reached.
The functions here are the same as for increas-
ing the speed or accelerating, except that the
speed will be decreased.
Resuming a speed stored beforehand
Press button 1.
The last speed stored is achieved again and
maintained.
The stored speed is cleared when the ignition is
switched off.
Display in tachometer*
Selected speed is displayed briefly.
If --- mph or --- km/h is displayed briefly
in the tachometer, the conditions neces-
sary for operation may not be fulfilled.<
Malfunction
The warning lamp in the tachometer
lights up if the system fails.
Page 61 of 176

REFERENCEAT A GLANCE CONTROLS DRIVING TIPS MOBILITY
59
The extent of service work required can be
read out from the remote control by your
MINI Dealer.<
Displaying vehicle check
For certain maintenance operations, you can
view the respective distance remaining or due
date individually in the tachometer.
1.Switch on the ignition, refer to page44.
2.Briefly press the button in the turn indicator
lever repeatedly until "SET/INFO" is displayed.
3.Press and hold the button until the display
changes.
4.Briefly press the button repeatedly until the
corresponding symbol and "SERVICE-INFO"
are displayed.
5.Press and hold the button until the display
changes.
6.Briefly press the button to display the indi-
vidual service items, refer to the following
information.
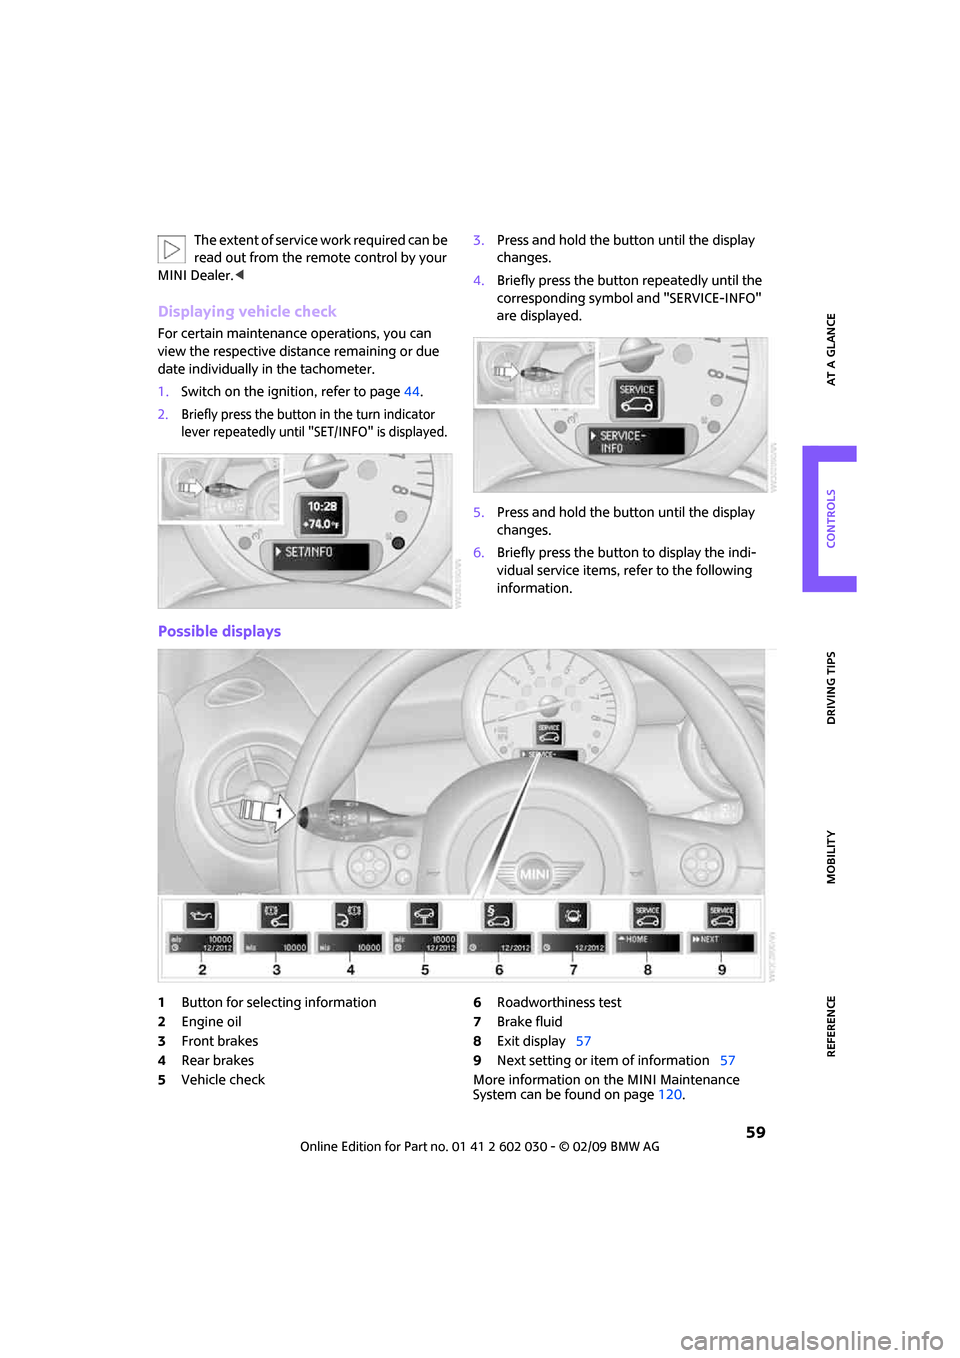
Possible displays
1Button for selecting information
2Engine oil
3Front brakes
4Rear brakes
5Vehicle check6Roadworthiness test
7Brake fluid
8Exit display57
9Next setting or item of information57
More information on the MINI Maintenance
System can be found on page120.
Page 66 of 176

Technology for driving comfort and safety
64
in hazardous driving thereby running the risk of
an accident.<
Antilock Brake System ABS
ABS prevents locking of the wheels during brak-
ing. Safe steering response is maintained even
during full braking. Active safety is thus
increased.
Braking safely, refer to page93.
Among others, ABS includes the following
functions:
>Cornering Brake Control CBC
>Electronic brake-force distribution EBV
>Brake Assist
Cornering Brake Control CBC
Driving stability and steering characteristics are
further enhanced while braking in turns or dur-
ing a lane change.
Electronic brake-force distribution EBV
The system controls the brake pressure in the
rear wheels to ensure stable braking behavior.
Brake Assist
Rapidly depressing the brake causes this system
to automatically develop maximum braking
force. Thus, the system helps keep braking dis-
tance to a minimum. At the same time, all the
benefits provided by ABS are exploited.
Do not reduce the pressure on the brake for the
duration of the full braking application.
Dynamic Stability Control DSC
DSC prevents the driving wheels from losing
traction when you pull away from rest or accel-
erate. The system also recognizes unstable driv-
ing conditions, for example if the rear of the car
is about to swerve or if momentum is acting at
an angle past the front wheels. In these cases,
DSC helps the vehicle maintain a safe course
within physical limits by reducing engine output
and through braking actions at the individual
wheels.
DSC also encompasses the following functions:>Antilock Brake System ABS
>Electronic brake-force distribution EBV
>Brake Assist
>Cornering Brake Control CBC
>Hill Start Assist
Deactivating DSC
Press the button repeatedly until the DSC indica-
tor lamps come on. DSC is deactivated. Stabiliz-
ing and propulsion promoting actions are no
longer executed.
When driving with snow chains or to 'rock free'
in snow, it can be helpful to switch off DSC for a
brief period.
To increase vehicle stability, activate DSC again
as soon as possible.
Activating DSC
Press the button again: the DSC indicator lamps
go out.
For better control
If the indicator lamp flashes:
The DSC controls the driving and break-
ing forces.
If the indicator lamps are on:
DSC is deactivated.
Dynamic Traction Control DTC*
DTC is a type of DSC that is propulsion optimized
for special road conditions such as uncleared
snowy roads. The system ensures maximum
propulsion though with restricted driving stabil-
Page 67 of 176

REFERENCEAT A GLANCE CONTROLS DRIVING TIPS MOBILITY
65
ity. You therefore need to drive with suitable
caution.
In the following exceptional situations, it can be
useful to briefly activate DTC:
>when driving on snow-covered inclines, in
slush, or on uncleared snowy roads
>when rocking the vehicle free, driving out of
deep snow or on loose surfaces
>when driving with snow chains
Activating DTC
Press the button: the DTC indicator lamps
come on.
For better control
If the indicator lamp flashes:
DTC controls the driving and breaking
forces.
If the indicator lamps are on:
DTC is activated.
Deactivating DTC
Press the button again: the DSC indicator lamps
go out.
Deactivating both DTC and DSC
Press the button for at least 3 seconds: the DSC
indicator lamps in the display elements come
on. The Dynamic Traction Control DTC and
Dynamic Stability Control DSC are both deacti-
vated. There will be no more stabilizing inter-
ventions.
Interventions (differential lock
*) in braking
occur to improve propulsion when drive wheels
are rotating unevenly, even when the DSC is
deactivated.
Activating DSC
Press the button again: the indicator lamps
go out.
Hill Start Assist
Hill Start Assist aids you in comfortably driving
off on inclines. It is not necessary to use the
parking brake for this.
1.Hold the MINI with the brake.
2.Release the brake and immediately
drive off.
Hill Start Assist holds the car in place for approx.
2 seconds after the brake is released.
Depending on the load and gradient, the
vehicle can roll backward slightly during
this period. After you release the brake, immedi-
ately start driving since the hill start assist only
holds the vehicle for about 2 seconds, and it will
start to roll backwards.<
Sport button*
Pressing the button causes your MINI to respond
even more sportily.