lights MINI Convertible 2010 Owner's Manual
[x] Cancel search | Manufacturer: MINI, Model Year: 2010, Model line: Convertible, Model: MINI Convertible 2010Pages: 174, PDF Size: 3.05 MB
Page 21 of 174

REFERENCEAT A GLANCE CONTROLS DRIVING TIPS MOBILITY
19
Personal Profile settings
For more information on specific settings, refer
to the specified pages.
>Response of the central locking system
when the car is being unlocked19
>Automatic locking of the vehicle23
>Triple turn signal activation48
>Settings for the displays in the speedometer
and tachometer:
>12h/24h mode of the clock, refer to For-
mats and units of measure57
>Date format, refer to Formats and units
of measure57
>Units of measure for fuel consumption,
distance covered/remaining distances
and temperature, refer to Formats and
units of measure57
>Light settings:
>Pathway lighting74
>Daytime running lights75
>Automatic climate control
*: activating/
deactivating the AUTO program, setting the
temperature, air volume and air
distribution81
>Entertainment:
>Audio volume, refer to separate Owner's
Manual
>Speed-dependent volume, refer to sepa-
rate Owner's Manual
Central locking system
The concept
The central locking system is ready for operation
whenever the driver's door is closed.
The system simultaneously engages and
releases the locks on the following:
>Doors
>Liftgate
>Fuel filler flap
Operating from outside
>Via the remote control
>Via the door lock
*
>In cars with Comfort Access*, via the door
handles on the driver's and passenger's
sides.
The anti-theft system is also operated at the
same time. It prevents the doors from being
unlocked using the lock buttons or door han-
dles. The remote control can also be used to
switch on/off the welcome lamps and interior
lamps. The alarm system
* is also activated or
deactivated, page25.
Operating from inside
Button for central locking system, page23.
In the event of a sufficiently severe accident, the
central locking system unlocks automatically. In
addition, the hazard warning flashers and inte-
rior lamps come on.
Opening and closing:
from outside
Persons or animals in a parked vehicle
could lock the doors from the inside. Take
the key with you when you leave the vehicle so
that the vehicle can be opened from the out-
side.<
Using the remote control
Unlocking
Press the button.
The welcome lamps and interior lamps come on.
Unlocking mode
You can also set which parts of the car are
unlocked. The setting is stored for the remote
control in use.
Page 33 of 174
REFERENCEAT A GLANCE CONTROLS DRIVING TIPS MOBILITY
31
If the temperature drops below +10 7/
–12 6, do not operate the convertible
top; otherwise, damage may occur.
Do not leave a wet convertible top open for
more than one day, since the humidity may
cause damages.
Do not place any objects on the convertible top,
as they could otherwise fall off while the con-
vertible top is being operated and result in prop-
erty damage or personal injury.
If the rollover protective system is extended, do
not operate the convertible top.
Always completely finish the operation of the
convertible top. Driving off before an opening or
closing procedure is completely finished can
lead to property damage or personal injury.
Do not reach into the moving parts during the
opening and closing procedure. Keep children
away from the pivoting range of the convertible
top.
For safety reasons, only operate the convertible
top while the vehicle is standing.<
While opening and closing, the convertible
top pivots upward. If operating the con-
vertible top inside a garage or under a bridge, or
similar low structure, ensure the minimum clear-
ance is 7 ft/2 m; otherwise, the vehicle may be
damaged.<
Before opening and closing
>Please observe the previous safety instruc-
tions.
>Please ensure the luggage compartment
roller cover is in its lowest position, refer to
page95; otherwise, the convertible top can-
not be opened.
>Ensure the cargo does not push against the
luggage compartment roller cover from
below.
>Ensure that the liftgate is closed.
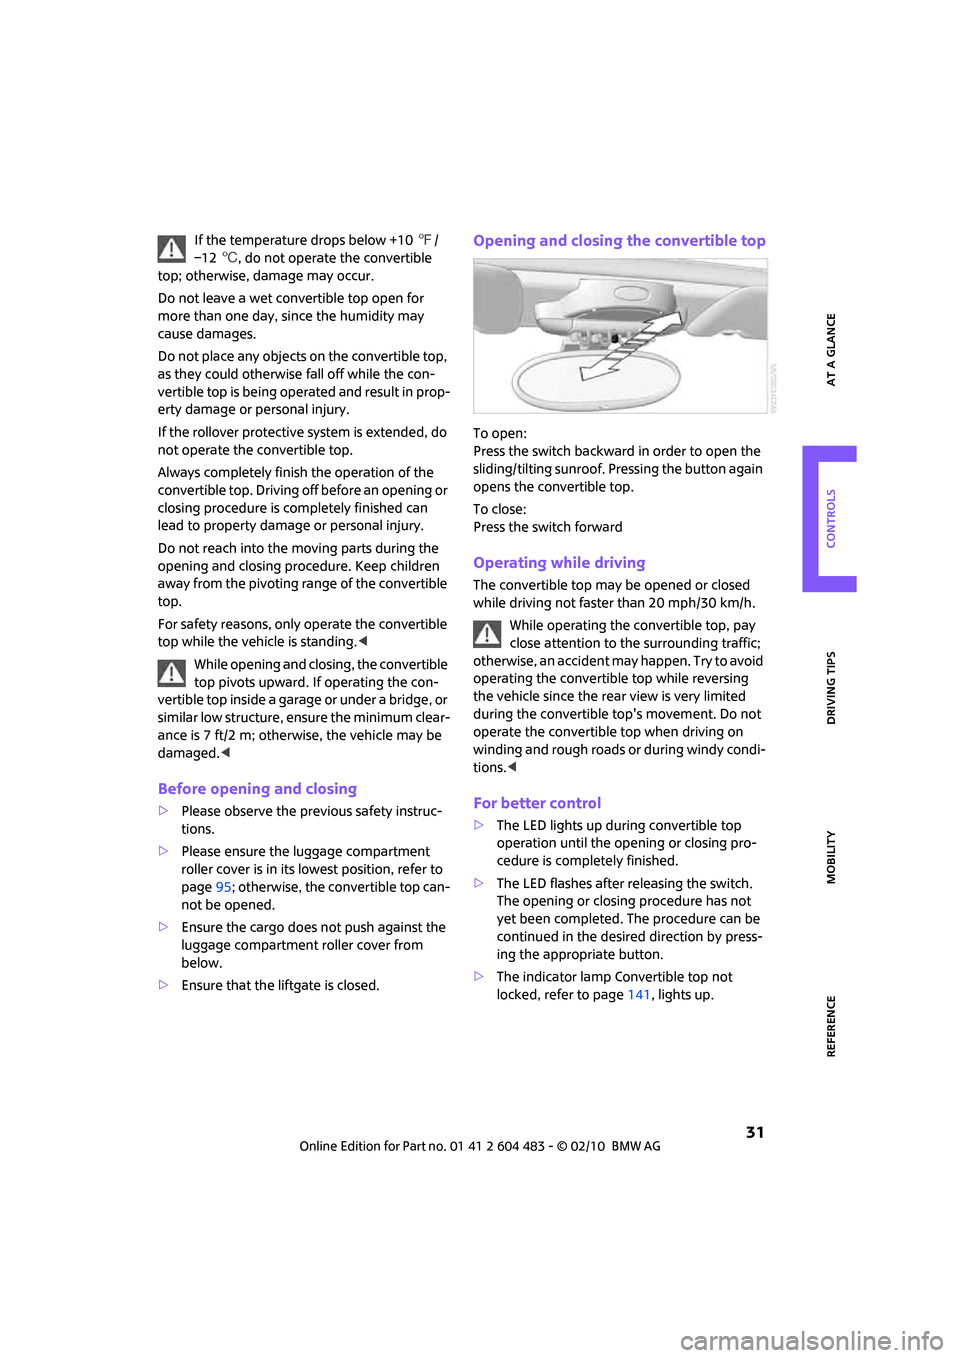
Opening and closing the convertible top
To open:
Press the switch backward in order to open the
sliding/tilting sunroof. Pressing the button again
opens the convertible top.
To close:
Press the switch forward
Operating while driving
The convertible top may be opened or closed
while driving not faster than 20 mph/30 km/h.
While operating the convertible top, pay
close attention to the surrounding traffic;
otherwise, an accident may happen. Try to avoid
operating the convertible top while reversing
the vehicle since the rear view is very limited
during the convertible top's movement. Do not
operate the convertible top when driving on
winding and rough roads or during windy condi-
tions.<
For better control
>The LED lights up during convertible top
operation until the opening or closing pro-
cedure is completely finished.
>The LED flashes after releasing the switch.
The opening or closing procedure has not
yet been completed. The procedure can be
continued in the desired direction by press-
ing the appropriate button.
>The indicator lamp Convertible top not
locked, refer to page141, lights up.
Page 54 of 174
Driving
52
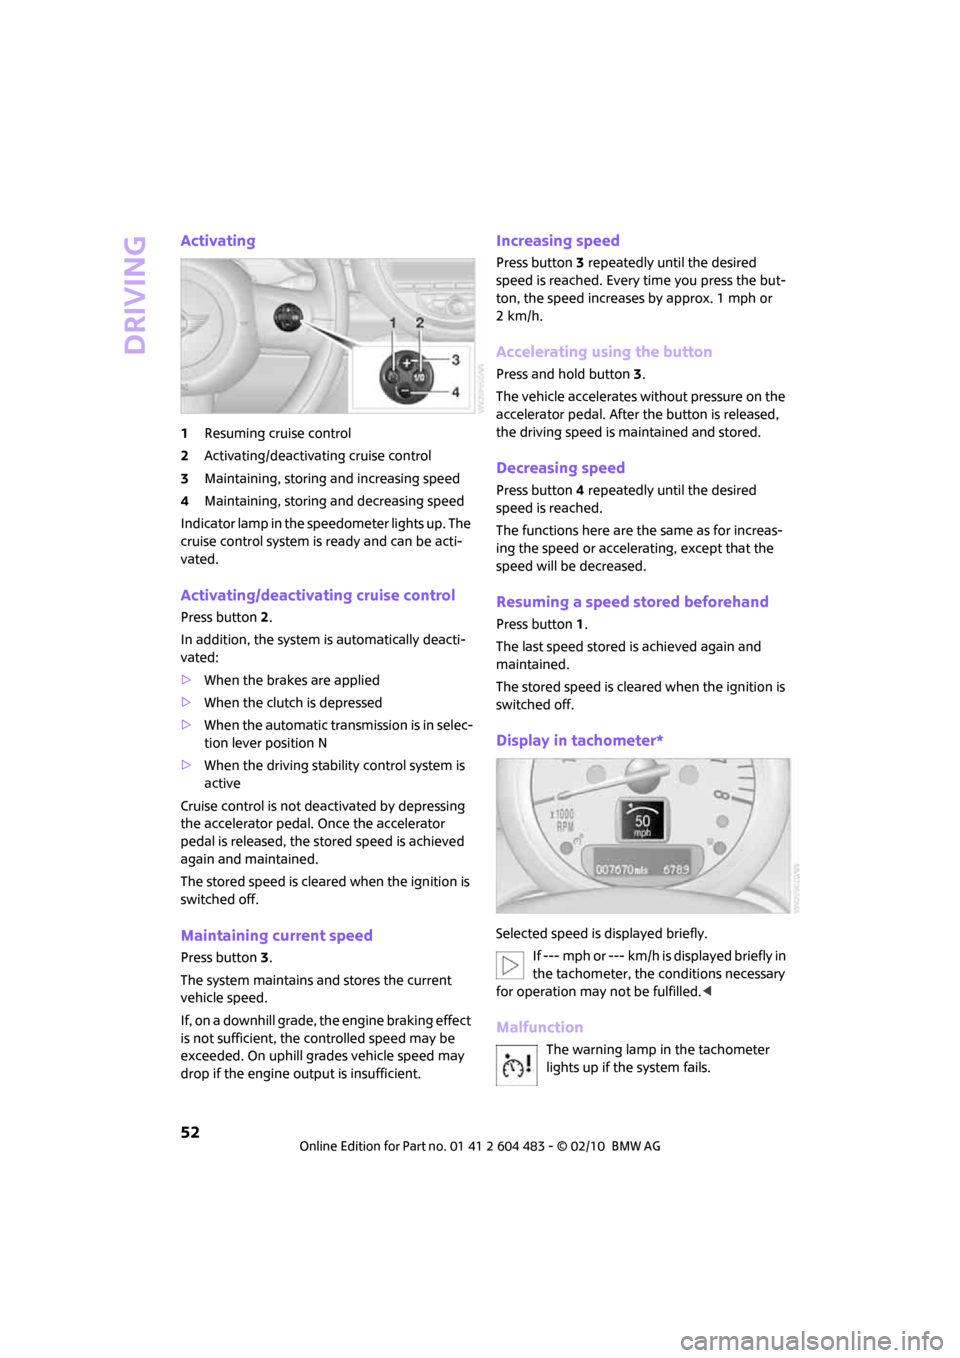
Activating
1Resuming cruise control
2Activating/deactivating cruise control
3Maintaining, storing and increasing speed
4Maintaining, storing and decreasing speed
Indicator lamp in the speedometer lights up. The
cruise control system is ready and can be acti-
vated.
Activating/deactivating cruise control
Press button 2.
In addition, the system is automatically deacti-
vated:
>When the brakes are applied
>When the clutch is depressed
>When the automatic transmission is in selec-
tion lever position N
>When the driving stability control system is
active
Cruise control is not deactivated by depressing
the accelerator pedal. Once the accelerator
pedal is released, the stored speed is achieved
again and maintained.
The stored speed is cleared when the ignition is
switched off.
Maintaining current speed
Press button3.
The system maintains and stores the current
vehicle speed.
If, on a downhill grade, the engine braking effect
is not sufficient, the controlled speed may be
exceeded. On uphill grades vehicle speed may
drop if the engine output is insufficient.
Increasing speed
Press button3 repeatedly until the desired
speed is reached. Every time you press the but-
ton, the speed increases by approx. 1 mph or
2km/h.
Accelerating using the button
Press and hold button3.
The vehicle accelerates without pressure on the
accelerator pedal. After the button is released,
the driving speed is maintained and stored.
Decreasing speed
Press button4 repeatedly until the desired
speed is reached.
The functions here are the same as for increas-
ing the speed or accelerating, except that the
speed will be decreased.
Resuming a speed stored beforehand
Press button 1.
The last speed stored is achieved again and
maintained.
The stored speed is cleared when the ignition is
switched off.
Display in tachometer*
Selected speed is displayed briefly.
If --- mph or --- km/h is displayed briefly in
the tachometer, the conditions necessary
for operation may not be fulfilled.<
Malfunction
The warning lamp in the tachometer
lights up if the system fails.
Page 55 of 174

REFERENCEAT A GLANCE CONTROLS DRIVING TIPS MOBILITY
53
Controls overview
Odometer, outside
temperature display,
clock
1Outside temperature display and clock or
current speed
2Odometer and trip odometer
3Resetting the trip odometer
Units of measure
Select the respective units of measure, miles or
km for the odometer as well as 7 or 6 for the
outside temperature, page57.
Outside temperature display, time
Setting the time, refer to page60.
Outside temperature warning
When the displayed temperature sinks to
approx. +377/+36, a signal sounds and a
warning lamp lights up. There is an increased
risk of black ice.
Black ice can also form at temperatures
above +377/+36. Therefore, drive
carefully, e.g. on bridges and sections of road in
the shade; otherwise, there is an increased acci-
dent risk.<
Current vehicle speed
To have the current speed shown in the upper
display otherwise serving for the outside tem-
perature display and clock.1.Press the button in the turn indicator lever
repeatedly until the current speed appears
in the lower display.
2.Wait for the speed display to automatically
move to the upper display.
The outside temperature then appears in the
lower display.
Odometer and trip odometer
Resetting the trip odometer
With the ignition switched on, press knob 3 in
the tachometer.
When the vehicle is parked
To display the time, outside temperature and
odometer briefly after the key is removed from
the ignition lock:
Press knob 3 in the tachometer.
Tachometer
Never operate the engine with the needle in the
red overspeed zone of the gauge. In this range,
the fuel supply is interrupted to protect the
engine.
Coolant temperature
A warning lamp will come on if the coolant, and
therefore the engine, becomes too hot.
Check coolant level, refer to page118.
Page 58 of 174
Controls overview
56
Settings and information
Operating principle
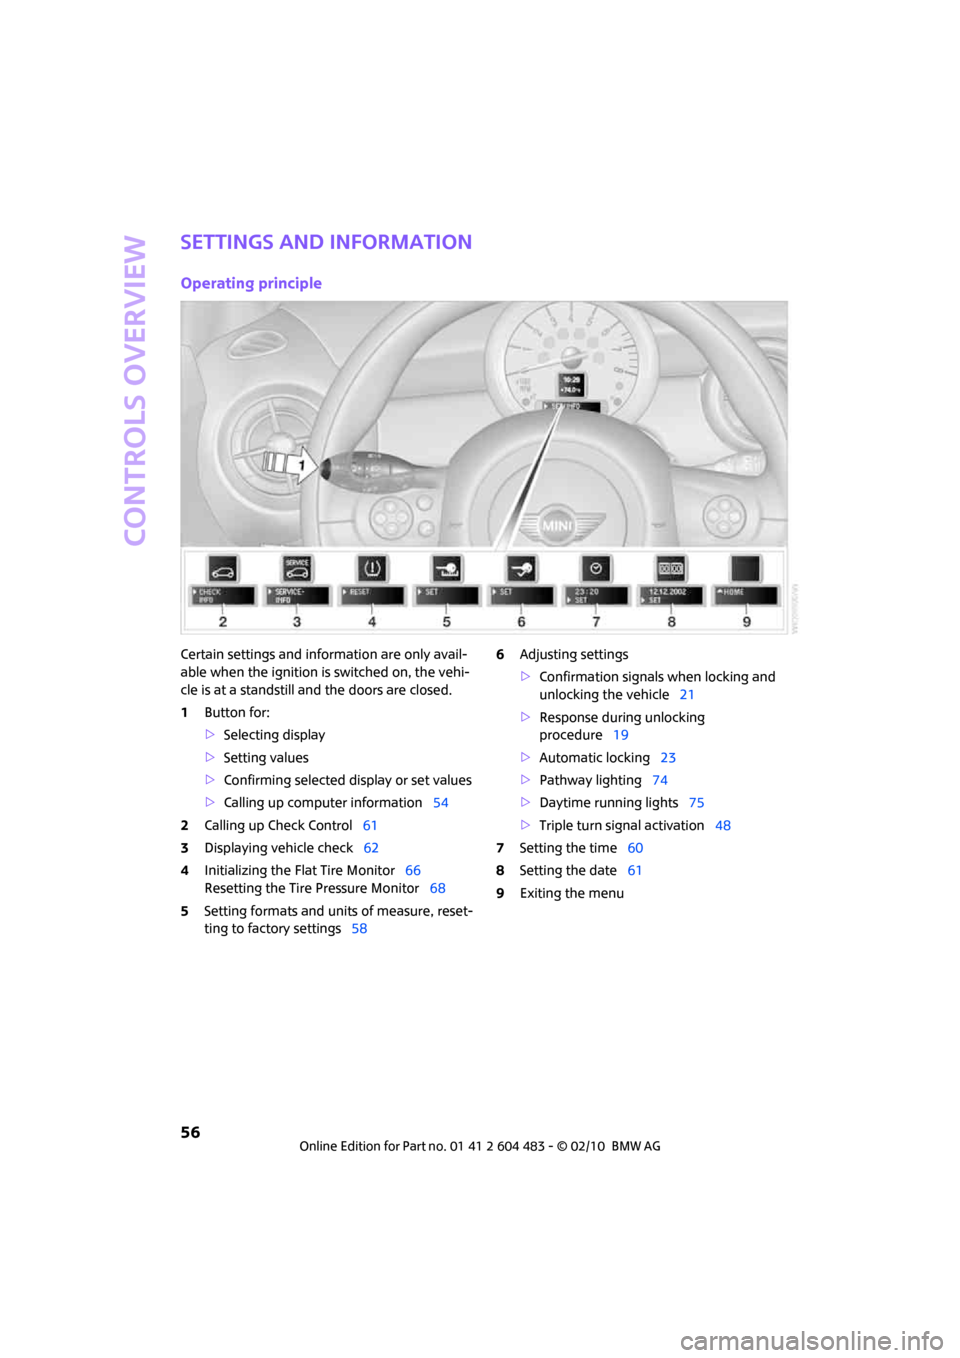
Certain settings and information are only avail-
able when the ignition is switched on, the vehi-
cle is at a standstill and the doors are closed.
1Button for:
>Selecting display
>Setting values
>Confirming selected display or set values
>Calling up computer information54
2Calling up Check Control61
3Displaying vehicle check62
4Initializing the Flat Tire Monitor66
Resetting the Tire Pressure Monitor68
5Setting formats and units of measure, reset-
ting to factory settings586Adjusting settings
>Confirmation signals when locking and
unlocking the vehicle21
>Response during unlocking
procedure19
>Automatic locking23
>Pathway lighting74
>Daytime running lights75
>Triple turn signal activation48
7Setting the time60
8Setting the date61
9Exiting the menu
Page 68 of 174
Technology for driving comfort and safety
66
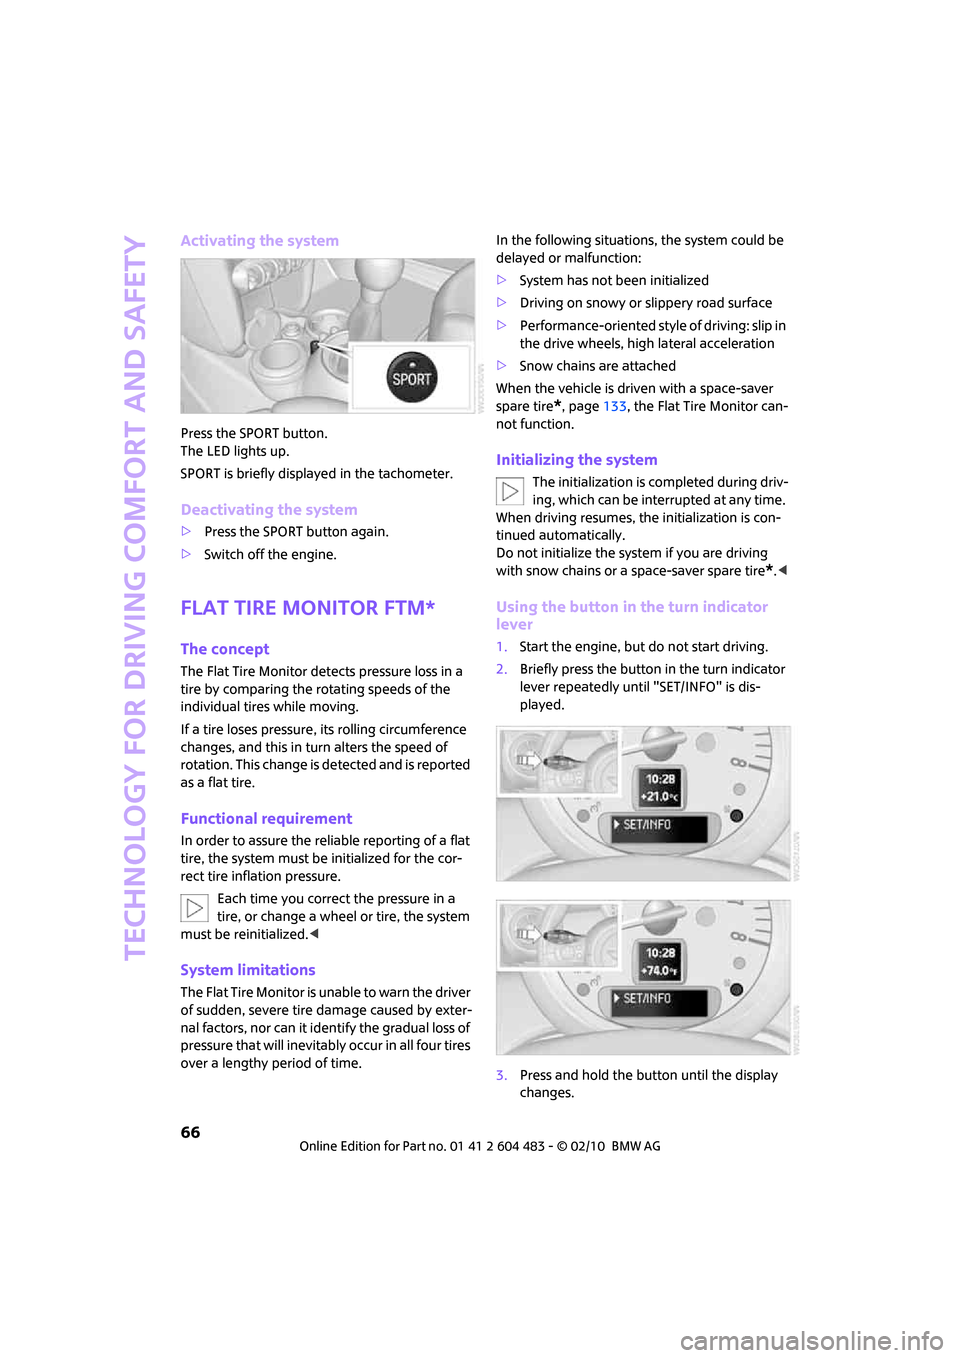
Activating the system
Press the SPORT button.
The LED lights up.
SPORT is briefly displayed in the tachometer.
Deactivating the system
>Press the SPORT button again.
>Switch off the engine.
Flat Tire Monitor FTM*
The concept
The Flat Tire Monitor detects pressure loss in a
tire by comparing the rotating speeds of the
individual tires while moving.
If a tire loses pressure, its rolling circumference
changes, and this in turn alters the speed of
rotation. This change is detected and is reported
as a flat tire.
Functional requirement
In order to assure the reliable reporting of a flat
tire, the system must be initialized for the cor-
rect tire inflation pressure.
Each time you correct the pressure in a
tire, or change a wheel or tire, the system
must be reinitialized.<
System limitations
The Flat Tire Monitor is unable to warn the driver
of sudden, severe tire damage caused by exter-
nal factors, nor can it identify the gradual loss of
pressure that will inevitably occur in all four tires
over a lengthy period of time.In the following situations, the system could be
delayed or malfunction:
>System has not been initialized
>Driving on snowy or slippery road surface
>Performance-oriented style of driving: slip in
the drive wheels, high lateral acceleration
>Snow chains are attached
When the vehicle is driven with a space-saver
spare tire
*, page133, the Flat Tire Monitor can-
not function.
Initializing the system
The initialization is completed during driv-
ing, which can be interrupted at any time.
When driving resumes, the initialization is con-
tinued automatically.
Do not initialize the system if you are driving
with snow chains or a space-saver spare tire
*.<
Using the button in the turn indicator
lever
1.Start the engine, but do not start driving.
2.Briefly press the button in the turn indicator
lever repeatedly until "SET/INFO" is dis-
played.
3.Press and hold the button until the display
changes.
Page 71 of 174
REFERENCEAT A GLANCE CONTROLS DRIVING TIPS MOBILITY
69
Message for low tire inflation pressure
The warning lamps come on in yellow
and red. An acoustic signal also sounds.
There is a flat tire or substantial loss of
tire pressure.
1.Reduce speed and stop the vehicle with cau-
tion. Avoid sudden braking and steering
maneuvers.
2.Check whether your vehicle is equipped
with normal tires or run-flat tires.
The symbol identifying run-flat tires is
a circle with the letters RSC on the
sidewall, page114.<
Normal tires
1.Determine which tire is damaged.
If this cannot be determined, contact
your MINI dealer.<
2.Repair the flat tire or change the damaged
tire, refer to page132.
Run-flat tires*
1.Cautiously reduce speed to below 50 mph/
80 km/h. Avoid sudden braking and steering
maneuvers. Do not exceed a speed of
50 mph/80 km/h.
Do not continue driving if the vehicle is
not equipped with run-flat tires; oth-
erwise, a serious accident could result.<
2.In the event of complete tire pressure loss,
0 psi/0 kPa, you can estimate the possible
distance for continued driving on the basis
of the following guidelines:
>With a light load:
1 to 2 persons without luggage:
approx. 155 miles/250 km
>With a medium load:
2 persons, cargo bay full, or 4 persons
without luggage:
approx. 94 miles/150 km
>With a full load:
4 persons, load compartment full:
approx. 30 miles/50 kmDrive cautiously and do not exceed a
speed of 50 mph/80 km/h; otherwise, an
accident may occur. In the event of pressure
loss, vehicle handling changes. This includes
reduced tracking stability in braking, extended
braking distance and altered natural steering
characteristics.
If unusual vibration or loud noises occur during
the journey, this may be an indication that the
damaged tire has finally failed. Reduce the vehi-
cle speed and stop as soon as possible. Other-
wise, sections of the tire may come loose and
cause accidents. Do not continue driving and
contact your MINI dealer.<
Malfunction
The small warning lamp flashes in yel-
low and then lights up continuously; the
larger warning lamp comes on in yel-
low. No punctures can be detected.
This type of message is shown in the following
situations:
>If there is a malfunction.
Have the system checked.
>If a wheel without TPM electronics has been
mounted.
>If TPM is temporarily malfunctioning due to
other systems or devices using the same
radio frequency.
Message for unsuccessful system reset
Both warning lamps come on in yellow.
The system is not reset after a tire has
been changed, for example.
Check the tire inflation pressure and
reset the system, page68.
Page 76 of 174

Lamps
74
Lamps
Parking lamps/low beams
0Lamps off and daytime running lights
1Parking lamps and daytime running lights
2Low-beam headlamps and welcome lamps
3Automatic headlamp control
*, daytime run-
ning lights and welcome lamps
When you open the driver's door with the igni-
tion switched off, the exterior lighting is auto-
matically switched off if the light switch is in
position 0, 2 or 3.
Switch on the parking lamps if necessary, switch
position 1.
Parking lamps
Turn the light switch to position 1.
The front, rear and side vehicle lighting is
switched on.
Activation of lights on one side of the vehicle for
parking, page76.
The parking lamps will discharge the bat-
tery. Therefore, do not leave them on for
unduly long periods of time; otherwise, the bat-
tery might not have enough power to start the
engine.<
Low beams
Turn the light switch to position 2.
The low beams come on when the ignition is on.
Automatic headlamp control*
When the switch is in position3, the low beams
are switched on and off automatically depend-
ing on ambient light conditions, e.g. in a tunnel,
in twilight, or if there is precipitation.
The headlamps may also come on when the sun
is sitting low on a blue sky.
When driving into tunnels with bright overhead
lights, there may be a delay before the head-
lamps come on.
The low beams remain switched on indepen-
dent of the ambient lighting conditions when
you switch on the fog lamps
*.
If the daytime running lights are activated,
page75, the low beams are always switched on
with the light switch in position 3 and the igni-
tion on. The exterior lamps are automatically
switched off after the vehicle is parked.
The automatic headlamp control cannot
serve as a substitute for your personal
judgment in determining when the lamps
should be switched on in response to ambient
lighting conditions. For example, the system
cannot detect fog or hazy weather. To avoid
safety risks, you should respond to these kinds
of low-visibility situations by switching the head-
lamps on manually.<
Welcome lamps
If you leave the light switch in the low beam or
automatic headlamp control position when you
switch off the ignition, the parking lamps and
interior lamps come on for a certain time as soon
as the vehicle is unlocked.
Pathway lighting
If you activate the headlamp flasher after
switching off the ignition with the lamps
switched off, the low beams come on and
remain on for a certain time.
The setting is stored for the remote control in
use, refer to Personal Profile, page18.
Page 77 of 174
REFERENCEAT A GLANCE CONTROLS DRIVING TIPS MOBILITY
75
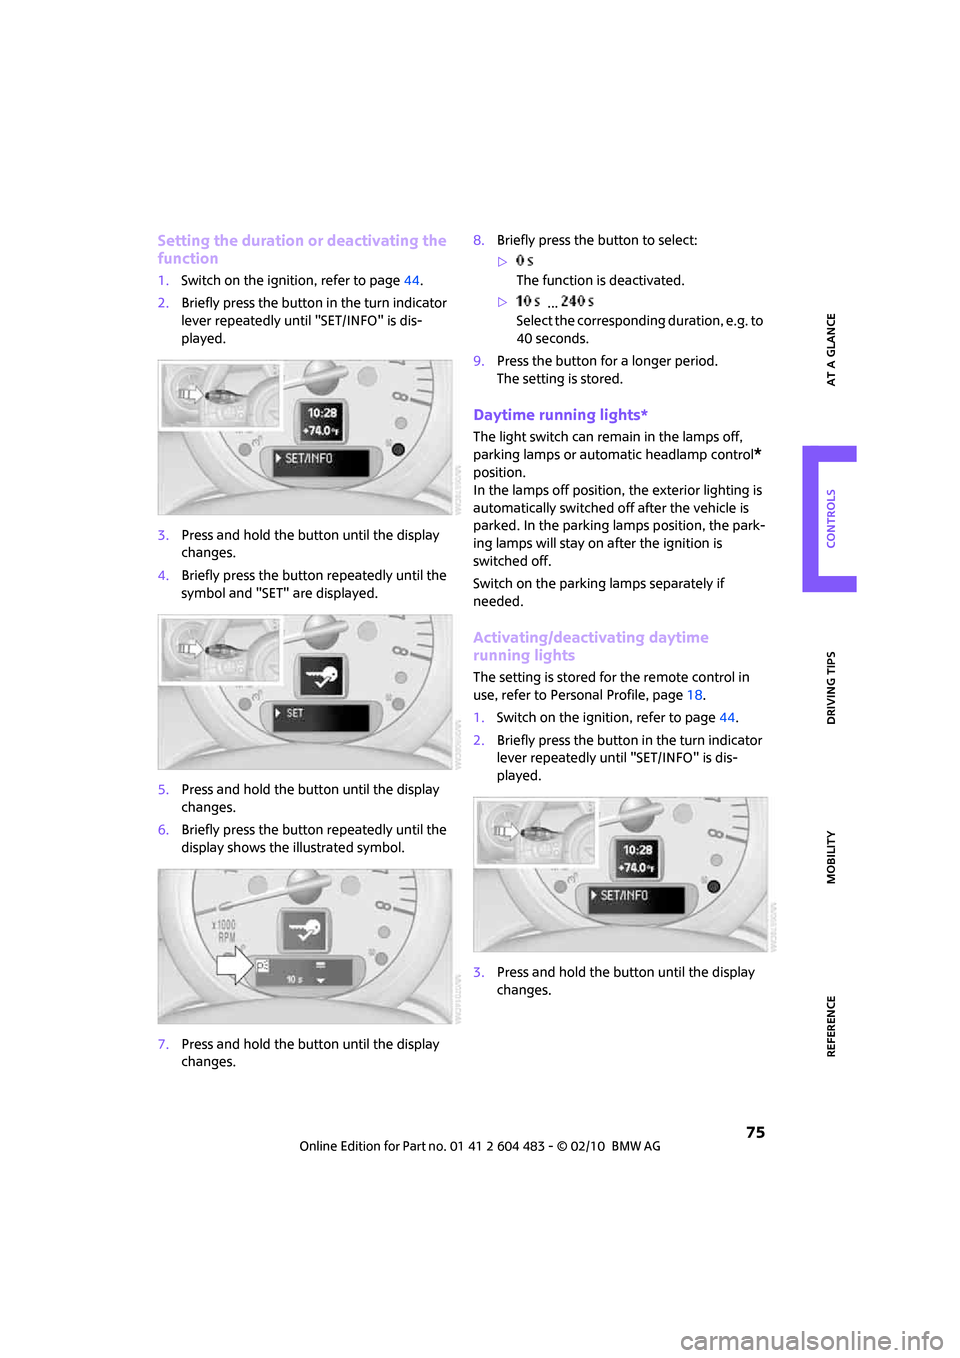
Setting the duration or deactivating the
function
1.Switch on the ignition, refer to page44.
2.Briefly press the button in the turn indicator
lever repeatedly until "SET/INFO" is dis-
played.
3.Press and hold the button until the display
changes.
4.Briefly press the button repeatedly until the
symbol and "SET" are displayed.
5.Press and hold the button until the display
changes.
6.Briefly press the button repeatedly until the
display shows the illustrated symbol.
7.Press and hold the button until the display
changes.8.Briefly press the button to select:
>
The function is deactivated.
>...
Select the corresponding duration, e.g. to
40 seconds.
9.Press the button for a longer period.
The setting is stored.
Daytime running lights*
The light switch can remain in the lamps off,
parking lamps or automatic headlamp control
*
position.
In the lamps off position, the exterior lighting is
automatically switched off after the vehicle is
parked. In the parking lamps position, the park-
ing lamps will stay on after the ignition is
switched off.
Switch on the parking lamps separately if
needed.
Activating/deactivating daytime
running lights
The setting is stored for the remote control in
use, refer to Personal Profile, page18.
1.Switch on the ignition, refer to page44.
2.Briefly press the button in the turn indicator
lever repeatedly until "SET/INFO" is dis-
played.
3.Press and hold the button until the display
changes.
Page 78 of 174
Lamps
76
4.Briefly press the button repeatedly until the
symbol and "SET" are displayed.
5.Press and hold the button until the display
changes.
6.Briefly press the button repeatedly until the
display shows the illustrated symbol, arrow.
7.Press and hold the button until the display
changes.
8.Briefly press the button to select:
>
Daytime running lights activated.
>
Daytime running lights deactivated.
9.Press the button for a longer period.
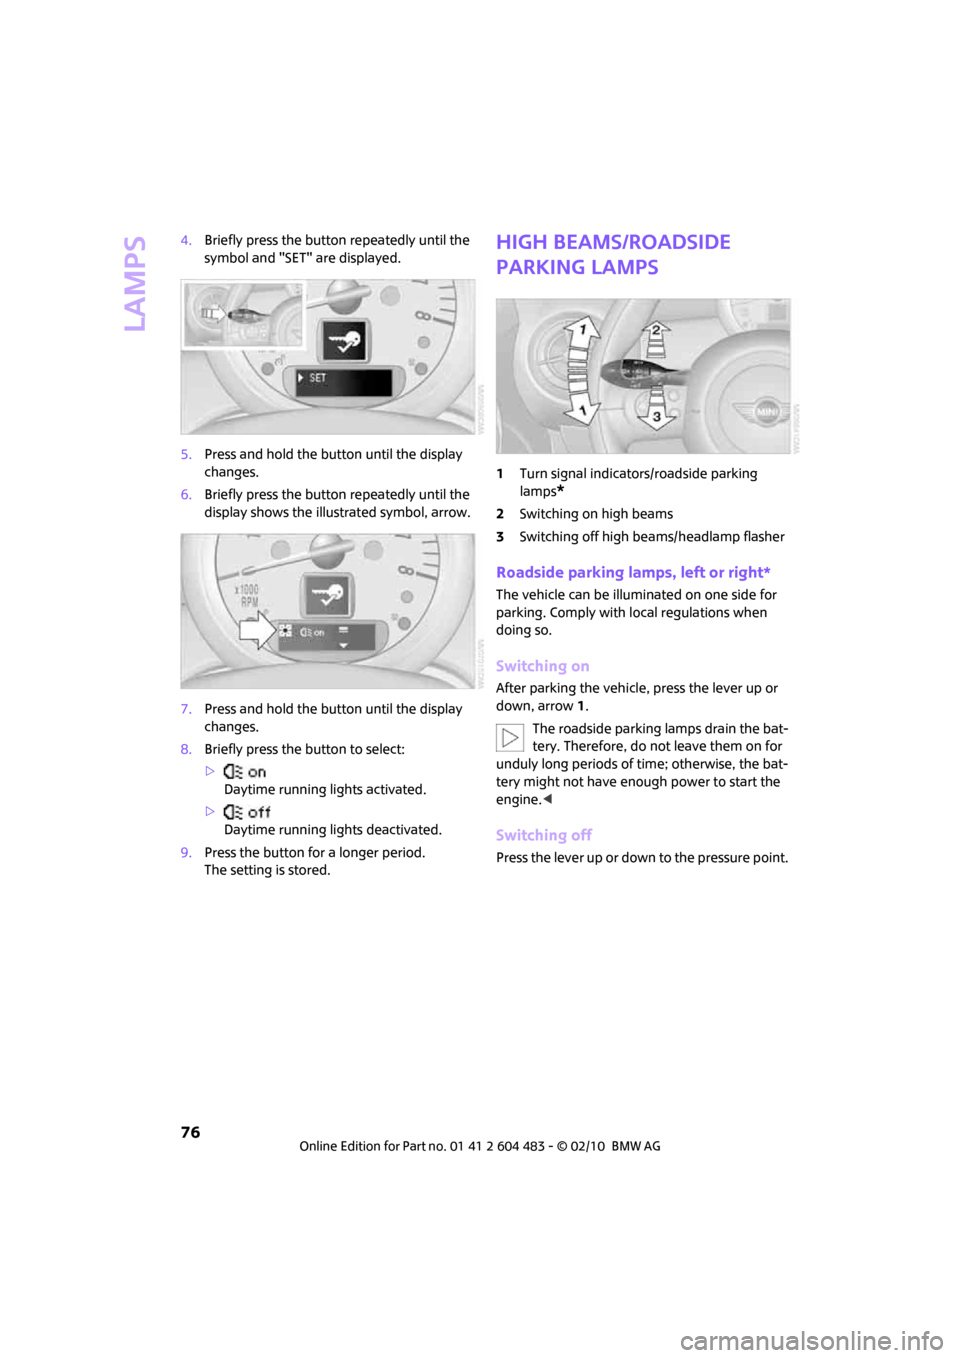
The setting is stored.High beams/roadside
parking lamps
1Turn signal indicators/roadside parking
lamps
*
2Switching on high beams
3Switching off high beams/headlamp flasher
Roadside parking lamps, left or right*
The vehicle can be illuminated on one side for
parking. Comply with local regulations when
doing so.
Switching on
After parking the vehicle, press the lever up or
down, arrow 1.
The roadside parking lamps drain the bat-
tery. Therefore, do not leave them on for
unduly long periods of time; otherwise, the bat-
tery might not have enough power to start the
engine.<
Switching off
Press the lever up or down to the pressure point.