light MINI COOPER 2003 Owner's Guide
[x] Cancel search | Manufacturer: MINI, Model Year: 2003, Model line: COOPER, Model: MINI COOPER 2003Pages: 148, PDF Size: 3.17 MB
Page 101 of 148

99
OVERVIEW REPAIRSOPERATIONCONTROLS DATA INDEX
CARING FOR YOUR VEHICLESuitable car-care products
Use the cleaning and car-care prod-
ucts available at your MINI Dealer.<
Washing your vehicle You can wash your new MINI from the out-
set in automatic car washes. Preference
should be for cloth car washes. If, due to
lack of availability, brush car washes must
be used, modern systems with soft brushes
should be given preference.
When using steam cleaners or high-
pressure cleaners, maintain sufficient
distance to the vehicle and do not exceed a
maximum temperature of 140 7 / 60 6.
If the jet is too close or the pressure is too
high, this can lead to damage or initial
damage that can develop into more serious
damage. Water that enters vehicle compo-
nents can lead to damage over the long
term.<
After washing the vehicle, apply the
brakes briefly to dry them, otherwise
water can reduce braking efficiency over
the short term and the brake rotors can cor-
rode.<
Switch the rain sensor off when pass-
ing through an automatic car wash,
see page 54. Failure to do so could result in
damage caused by undesired wiper activa-
tion.<
Rod antenna
If necessary, for example before
entering a car wash or a garage with
elevator ramp, remove the rod antenna.
To do so, grip the rod antenna at the base
and unscrew it from the antenna foot by
turning it to the left.<
Headlamps
When cleaning the headlamps,
please observe the following: do not
rub them dry, and never use abrasives or
strong solvents. Remove dirt and contami-
nation – such as insects – by soaking with
shampoo and then rinsing with plenty of
water. Always use a deicer spray to remove
accumulated ice and snow – never use a
scraper.<
Vehicle paintwork Regular care contributes greatly to driving
safety and value retention.
Environmental influences varying from one
region to the next can affect the vehicle
paintwork. Please base the frequency and
scope of car care on these various influ-
ences.Care of upholstery Depressions that come about on the uphol-
stery material of the seats in daily use can
be brushed out using a slightly damp brush
against the grain.
The fact that velour lays down is not a qual-
ity defect, but rather is inevitable in the
case of home textiles or clothing materials.
In the case of strong sunlight and longer
parking periods, cover the seats or all win-
dows to prevent discoloration.
ba.book Seite 99 Montag, 5. August 2002 8:09 20
ProCarManuals.com
Page 102 of 148

100
CARING FOR YOUR VEHICLECare of special parts >Light-alloy wheels
*:
Use wheel cleaner especially during the
winter months, but do not use any
aggressive, acidic, strong alkali or rough
cleansers or steam jets above 140 7 /
60 6. Observe the manufacturer's
instructions
>Chrome parts
* such as cooler grille, door
handles, etc.:
Especially if exposed to road salt, care-
fully clean these parts with plenty of
water and possibly with a shampoo addi-
tive.
For additional treatment, use chrome
polish
>Rubber parts:
Treat only with water or rubber care
products
Do not use silicon sprays or other
silicon-containing care products,
otherwise noise and damage could
occur.<
>Plastic parts, imitation leather surfaces,
headliner, lamp glass, covering glass for
the instrument cluster, as well as matt
black molded parts:
Clean with water and, if necessary, plas-
tic care products. Do not dampen seats
and the headliner.
Never use solvents such as lacquer thin-
ner, heavy-duty grease remover, fuel or
similar
>Wood paneling
*:
Please clean wood paneling and other
wood parts only with a damp cloth. Dry
off with a soft cloth
>Safety belts:
Only clean using mild soap, leaving the
belts fitted.
Do not dry clean, as the fabric can be
destroyed.
Always roll up safety belts only when dry.
Dirty safety belts prevent unrolling and
thus negatively affect safety>Floor carpets and floor mats
*:
If heavily soiled, clean using interior
cleaner. Floor mats can be removed to
allow the interior to be cleaned
>Wiper blades:
Clean with soapy water. Replace wiper
blades twice a year, before and after the
cold season. This is particularly impor-
tant on vehicles fitted with a rain sensor.
ba.book Seite 100 Montag, 5. August 2002 8:09 20
ProCarManuals.com
Page 104 of 148

102
OBD SOCKET The interface socket for onboard diagnos-
tics is located on the driver's side, behind a
cover located beneath the instrument
panel. The cover has the letters OBD on it.
The purpose of the OBD system is to ensure
proper operation of the emission control
system for the vehicle‘s lifetime. The sys-
tem monitors emission-related compo-
nents for deterioration and malfunction.
An illuminated lamp informs you of
the need for service, not of the
need to stop the vehicle.
However, the system should be checked by
your MINI Dealer at the earliest possible
opportunity.
Under certain conditions, the indicator will
blink or flash. This indicates a rather severe
level of engine misfire. When this occurs,
you should reduce speed and consult the
nearest MINI Dealer as soon as possible.
Severe engine misfire over only a short
period of time can seriously damage emis-
sion control components, especially the
catalytic converter.
Service Engine Soon warning lamp
for Canadian models.
When the filler cap is not properly
tightened, the OBD system can detect
the vapor leak and the indicator will light
up. If the filler cap is subsequently tight-
ened, the indicator lamp should go out
within a few days.<
ba.book Seite 102 Montag, 5. August 2002 8:09 20
ProCarManuals.com
Page 109 of 148

107
OVERVIEW REPAIRSOPERATION CONTROLS DATA INDEX
LAMPS AND BULBSProceed carefully when handling lamps and
bulbs. If you are not familiar with any of
the procedures, consult your MINI Dealer.
Do not touch the glass portion of a
new bulb with your bare hands since
even small amounts of impurities burn into
the surface and reduce the service life of
the bulb. Use a clean cloth, paper napkin, or
similar material, or hold the bulb by its
metallic base.<
Replacement bulbs are available from your
MINI Dealer.
Whenever working on the electrical
system, switch off the electrical
accessory you are working on or disconnect
the cable from the negative terminal of the
battery. Failure to do this could result in
short circuits.
To prevent injuries and damage, comply
with any instructions provided by the bulb
manufacturer.<
1Low beams H7 bulb, 55 Watts2High beamsH7 bulb, 55 Watts
The H7 bulb is pressurized. Therefore,
wear safety glasses and protective
gloves. If the lamp is damaged there is a
risk of injury.
1. Pull on the tab of the cover of the defec-
tive lamp and open it
2. Press the retaining wire lightly at the
eyelet and at the same time guide it out-
wards
3. Fold the retaining wire down
4. Remove the lamp holder and replace the
lamp
5. Reinsert the lamp holder in the correct
position
6. Fold the retaining wire back up and
catch in place. Ensure that it is placed in
the middle of the wire connector.Xenon lamps* The service life of these bulbs is very long
and the probability of a failure is very low,
provided that they are not switched on and
off an unusual number of times. If one of
these bulbs should nevertheless fail, it is
possible to continue driving with great cau-
tion using the fog lamps, provided traffic
laws in your area do not prohibit this.
Because of the extremely high volt-
ages involved, any work on the xenon
lighting system should be carried out by
technically-qualified personnel only. Other-
wise, there is a risk of fatal injury.<
ba.book Seite 107 Montag, 5. August 2002 8:09 20
ProCarManuals.com
Page 115 of 148

113
OVERVIEW REPAIRSOPERATION CONTROLS DATA INDEX
CHANGING TIRES – MINI WITH SPACE-SAVER SPARE TIRE
*
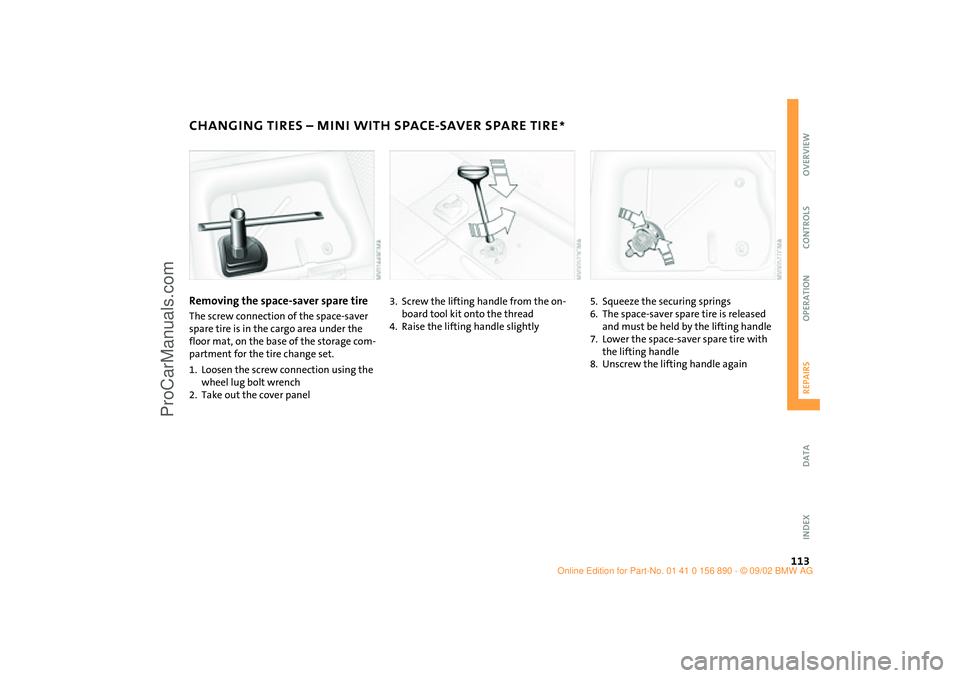
Removing the space-saver spare tire
The screw connection of the space-saver
spare tire is in the cargo area under the
floor mat, on the base of the storage com-
partment for the tire change set.
1. Loosen the screw connection using the
wheel lug bolt wrench
2. Take out the cover panel
3. Screw the lifting handle from the on-
board tool kit onto the thread
4. Raise the lifting handle slightly
5. Squeeze the securing springs
6. The space-saver spare tire is released
and must be held by the lifting handle
7. Lower the space-saver spare tire with
the lifting handle
8. Unscrew the lifting handle again
ba.book Seite 113 Montag, 5. August 2002 8:09 20
ProCarManuals.com
Page 118 of 148

116
FLAT TIRE– RUN FLAT TIRES
*
You will recognize Run Flat tires by a circu-
lar symbol containing the letters RSC on
the side of the tire.
Run Flat tires consist of self-contained tires
and special rims. The tire reinforcement
ensures that the tire retains some residual
safety in the event of pressure drop and
driving remains possible to a restricted
degree.
The reinforcement on the flanks of
the Run Flat tires means that it is usu-
ally not possible to detect an air loss from
outside.<
Flat tire The yellow indicator lamp in the instru-
ment cluster lights up to indicate a flat tire.
In addition, a gong sounds, see pages 17,
64.
1. Reduce vehicle speed carefully to under
50 mph / 80 km/h, avoiding hard brake
applications and steering maneuvers.
2. Do not exceed a speed of 50 mph /
80 km/h.
3. Identify damaged tires; check tire infla-
tion pressures on all four wheels at the
next opportunity, see page 85
4. Correct the tire inflation pressure if you
wish to continue your journey and this is
permitted, see next text section
5. Have damaged tires changed by your
MINI Dealer, see page 88.Your MINI Dealer has the information
needed for working with Run Flat
tires and is equipped with the necessary
special tools. They provide advice if you
wish to replace the tires on your MINI, or re-
equip from summer to winter tires or vice
versa, also see pages 85, 88, 89.<
For safety reasons, do not have a
damaged safety tire repaired.<
ba.book Seite 116 Montag, 5. August 2002 8:09 20
ProCarManuals.com
Page 120 of 148

118
FLAT TIRE – MINI MOBILITY SYSTEM
*
MINI Mobility System
To repair a flat tire you will find a MINI
Mobility System in your MINI. With the
help of this system you can apply a liquid
sealant on the inside of the tire, which seals
the damaged area and enables you to con-
tinue to drive. Using the MINI Mobility SystemIn order to repair a flat tire with the MINI
Mobility System, proceed as follows:
>Prepare for tire repair, see page 119
>Pump in liquid sealant, see page 119
>Reinflate the tire, see page 120
>Distribute liquid sealant, see page 120
>Check tire inflation pressure, see
page 121
>Drive on, see page 121.
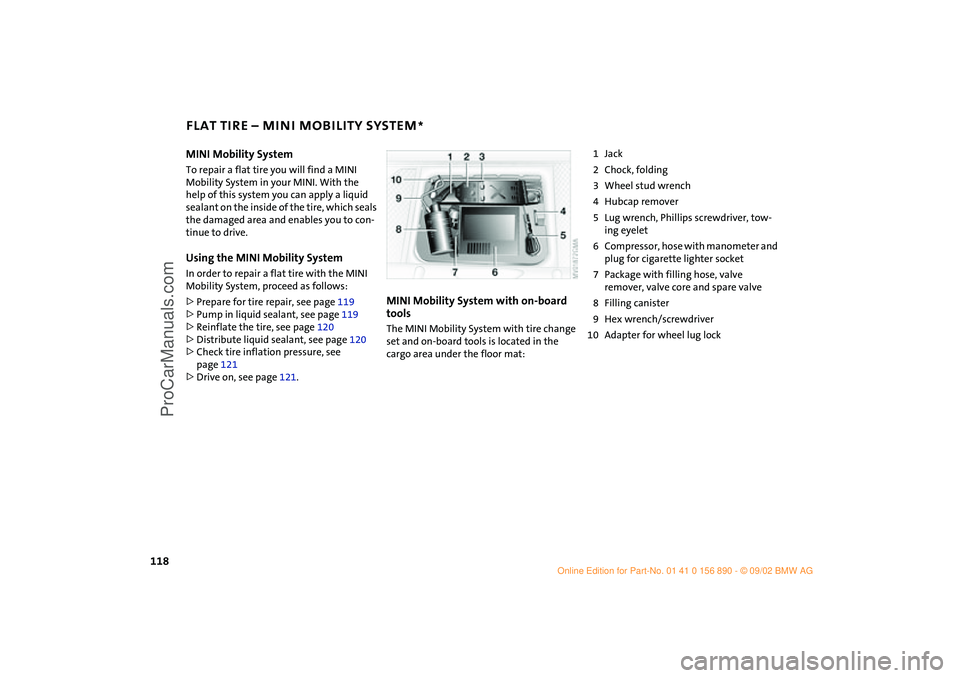
MINI Mobility System with on-board
toolsThe MINI Mobility System with tire change
set and on-board tools is located in the
cargo area under the floor mat:
1Jack
2Chock, folding
3Wheel stud wrench
4Hubcap remover
5Lug wrench, Phillips screwdriver, tow-
ing eyelet
6Compressor, hose with manometer and
plug for cigarette lighter socket
7Package with filling hose, valve
remover, valve core and spare valve
8Filling canister
9Hex wrench/screwdriver
10 Adapter for wheel lug lock
ba.book Seite 118 Montag, 5. August 2002 8:09 20
ProCarManuals.com
Page 122 of 148

120
FLAT TIRE – MINI MOBILITY SYSTEM
*
Reinflating the tire
1. Screw hose 1 with manometer onto the
tire valve
2. Connect plug 3 to the cigarette lighter
socket in the vehicle interior, see
page 73
3. Ignition key in position 1:
Turn on compressor 2
4. Pump up the tires to at least 26.1 psi /
180 kPa, but not to more than 36.2 psi /
250 kPa.
To check the current air pressure, shut
off the device for a short time
Do not run the compressor for
longer than 6 minutes, otherwise
the device will overheat and possibly be
damaged.<
If an air pressure of 26.1 psi /
180 kPa cannot be reached, drive
back and forth about 35 ft / 10 m so that
the liquid sealant is distributed in the
tire. Afterwards repeat the procedure.
If an air pressure of 26.1 psi / 180 kPa is
still not reached, the tire is too badly
damaged. Please contact the nearest
MINI Dealer.<
5. Turn off compressor 2
6. Unscrew hose 1 from the tire valve
7. Store the MINI Mobility System back in
the vehicle.
Distributing liquid sealantImmediately drive for 10 minutes, so that
the liquid sealant is uniformly distributed.
Do not exceed a speed of 40 mph /
60 km/h).
If possible do not drive at a speed lower
than 10 mph / 20 km/h. Stop at a suitable
location.<
ba.book Seite 120 Montag, 5. August 2002 8:09 20
ProCarManuals.com
Page 127 of 148

125
OVERVIEW REPAIRSOPERATION CONTROLS DATA INDEX
JUMP-STARTINGPreparing for jump-starting1. Check whether the battery of the sup-
port vehicle has 12 Volts and approxi-
mately the same capacity – measured in
Ah, printed on the battery
2. Switch off the engine of the support
vehicle
3. Switch off any electrical systems and
components in both vehicles – except
for the hazard warning flashers of the
support vehicle.
>Do not disconnect the discharged bat-
tery from the vehicle electrical system
>Make certain that there is no contact
between the bodywork of the two
vehicles – short circuit hazard!
4. With the battery of the MINI COOPER,
remove the cover panel. To do so, press
both clips at the same time
or
with the MINI COOPER S, open the cover
of the positive terminal connection for
jump-starting
*, see arrow 1.
Connect the jumper cables
Adhere to the sequence also when
providing support for other vehicles;
failure to observe this procedure can lead
to sparks at the terminals and pose an
injury hazard.<
1. On the MINI COOPER S, the positive ter-
minal connection for jump-starting, see
arrow 1, functions as the positive bat-
tery terminal.
Make a connection with the "+" jumper
cable between the positive terminal of
the discharged battery and the positive
terminal of the support battery
2. Use the second, "–" jumper cable to set
up the connection between the negative
terminals of both vehicles.
To do so:
>Connect one terminal clamp to the
negative terminal and/or to an engine
or body ground of the support vehicle
>Connect the second terminal clamp to
the negative terminal of the battery
and/or to an engine or body ground of
the vehicle to be started. For the MINI,
see arrow 2.
Performing the jump-start1. Start the engine of the vehicle providing
the current and allow to run at a fast idle
speed for several minutes
2. Start the engine on the vehicle with the
discharged battery in the usual manner.
>If the first start attempt is not suc-
cessful, wait a few minutes before
another attempt in order to allow the
discharged battery to recharge
On the MINI:
Before disconnecting the jumper
cables, switch on the lighting, rear window
defroster and the highest blower speed as
well as the engine for at least approx.
10 seconds to prevent a voltage surge from
the regulator to the electrical systems and
components.<
3. Then disconnect the jumper cables in
the reverse order.
If necessary have the battery checked and
completely charged at a MINI Dealer.
ba.book Seite 125 Montag, 5. August 2002 8:09 20
ProCarManuals.com
Page 138 of 148

EVERYTHING FROM A TO Z
136
A
ABS (Antilock Brake
System)16,17,83
Accessories7,99
Activated-charcoal filter72
Adjusting
backrest35
steering wheel38
Air conditioner operation
air conditioning system68
automatic climate
control71
Air conditioning system67
Air distribution
air conditioning system68
automatic climate
control71,72
Air outlets, ventilation69
Air pressure85
Air recirculation68,71
Air supply
air conditioning system68
automatic climate
control71
Air vents69,72
Air, dry68
Air, drying71
Airbags16,33,40
Airing out69
Alarm system31
All-season tires89 Antenna99
Antifreeze96
Antilock Brake System
(ABS)16,17,83
Anti-theft system31
Aquaplaning, see
Hydroplaning81
ASC+T (Automatic Stability
Control plus
Traction)16,17,62
Ashtray73
AUTO Program, see Automatic
air distribution71
Auto washing99
Automatic
air distribution71
air supply71
cruise control56
Automatic car wash99
Automatic climate control70
Automatic Stability Control
plus Traction
(ASC+T)16,17,62
Average fuel consumption61
Average speed61
Axle loads132
B
Backrest, adjusting35
Backup lamps48
bulb replacement109 Bar, towing126
Battery124
charge current15
charging122
disposal122
maintenance122
Battery, remote control22
Belts33,38
Beverage holder73
Blower71
BMW6
Bonnet16,91
Bore130
Brake fluid level15,84,97
Brake hydraulic system15
Brake lamp
bulb replacement109
Brake pads80,84
Brake rotors80
Brake system80,84
brake fluid97
Brakes81,84
Braking system16
Breaking-in80
Bridging124
Bulb replacement
backup lamps109
brake lamp, center110
cargo area lamps111
footwell lamps111
front fog lamps108 front turn signal
indicators108
glove compartment
lamp111
interior lamps110
license plate lamp110
parking lamps108
reading lamps110
rear lamps109
side turn signal
indicators108
standing lamps108
tail lamps109
vanity mirror111
C
California Proposition
65 warning103
Capacity
fuel tank133
Car care99
Car wash99
Car-care products99
Care99
chrome parts100
floor mats100
imitation leather100
leather101
light-alloy wheels100
plastic parts100
rubber parts100
Hilfsrahmen für Querverweise
ba.book Seite 136 Montag, 5. August 2002 8:09 20
ProCarManuals.com