jump start MINI COOPER 2003 Owners Manual
[x] Cancel search | Manufacturer: MINI, Model Year: 2003, Model line: COOPER, Model: MINI COOPER 2003Pages: 148, PDF Size: 3.17 MB
Page 6 of 148

CONTENTS
4
In the engine compartment:
Bonnet91
Engine compartment – MINI COOPER92
Engine compartment – MINI COOPER S93
Washer fluid94
Engine oil94
Coolant96
Brake fluid97
Maintenance and care:
MINI Maintenance System98
Caring for your vehicle99
Vehicle immobilization101
Laws and regulations:
OBD socket102
Technical modifications103
California Proposition 65 warning103
Owner service procedures
Replacement procedures:
On-board tool kit106
Windshield wiper blades106
Lamps and bulbs107
Repairing a flat tire112
Changing tires –
MINI with space-saver spare tire112
Flat tire –
Run Flat tires116
MINI Mobility System118
Battery122
Fuses123
Giving and receiving assistance:
Warning triangle124
First-aid kit124
Jump-starting124
Towing126
Technical data
Engine data130
Dimensions131
Weights132
Capacities133 ba.book Seite 4 Montag, 5. August 2002 8:09 20
ProCarManuals.com
Page 53 of 148

51
OVERVIEW REPAIRS OPERATIONCONTROLS DATA INDEX
CONTINUOUSLY VARIABLE AUTOMATIC TRANSMISSION (CVT)
*
Available displays
P R N D SD 1 2 3 4 5 6 EP
Electronic transmission control moduleIf there is a malfunction in the transmission
system, EP appears in the display.
All selector lever positions can still be
selected. In positions for driving forward:
the vehicle can now only be driven with a
limited gear selection.
Avoid high engine loads. Proceed to
the nearest MINI Dealer.<
Do not work in the engine compart-
ment when a drive gear – forward or
reverse – is engaged. If you do this, the
vehicle could move.<
Jump-starting and towing, refer to
pages 124, 126.<
ba.book Seite 51 Montag, 5. August 2002 8:09 20
ProCarManuals.com
Page 95 of 148

93
OVERVIEW REPAIRSOPERATIONCONTROLS DATA INDEX
ENGINE COMPARTMENT – MINI COOPER S1Reservoir for windshield washer
system94
2Coolant expansion tank963Engine oil filler neck95
4Auxiliary terminal for jump-
starting124
5Brake fluid reservoir976Reservoir for headlamp cleaning
system94
7Engine oil dipstick94
ba.book Seite 93 Montag, 5. August 2002 8:09 20
ProCarManuals.com
Page 124 of 148

122
BATTERYLocation in the MINI COOPERThe battery is located in the engine com-
partment.
Exact location, see page 92.Location in the MINI COOPER SThe battery is located in the cargo area
under the floor mat.
Battery careThe battery is absolutely maintenance-free,
that is, the original electrolyte will normally
last for the service life of the battery under
moderate climatic conditions.
For all questions regarding the bat-
tery, please consult your MINI
Dealer.<
Charging the battery Only charge the battery in the vehicle via
the terminals in the engine compartment
with the engine switched off, see "Jump-
starting" on page 124.
Whenever working on the electrical
system, disconnect the cable from
the negative terminal of the battery. Fail-
ure to do this could result in fire hazards or
injury due to short circuits.
point or your MINI Dealer. Maintain
the battery in an upright position for trans-
port and storage. Secure the battery to pre-
vent it from tilting during transport.<
ba.book Seite 122 Montag, 5. August 2002 8:09 20
ProCarManuals.com
Page 126 of 148

124
WARNING TRIANGLE
*
FIRST-AID KIT
*
JUMP-STARTING
The warning triangle is located beneath the
luggage compartment cover.
Comply with legal requirements
requiring you to carry a hazard warn-
ing triangle in the vehicle.<
The first-aid kit is located on the left in the
luggage compartment, behind the side
trim panel.
Some articles in the first-aid kit are
perishable. For this reason, check the
expiration dates of each of the items regu-
larly, and replace any whose expiration
dates have passed. Source: any pharmacy.
Comply with legislation requiring you to
carry a first-aid kit in the vehicle.<
Do not use spray starter fluids to start
the engine.<
When your battery is discharged, you can
use two jumper cables to start your vehicle
with power from the battery in a second
vehicle. Correspondingly you can help start
another vehicle. Only use jumper cables
with fully insulated handles on the termi-
nal clamps.
Do not touch live wiring and cables
on a running engine. There is a risk of
fatal injury if you do this. Carefully observe
the following instructions to avoid personal
injury and/or damage to either vehicle or
both vehicles.<
ba.book Seite 124 Montag, 5. August 2002 8:09 20
ProCarManuals.com
Page 127 of 148

125
OVERVIEW REPAIRSOPERATION CONTROLS DATA INDEX
JUMP-STARTINGPreparing for jump-starting1. Check whether the battery of the sup-
port vehicle has 12 Volts and approxi-
mately the same capacity – measured in
Ah, printed on the battery
2. Switch off the engine of the support
vehicle
3. Switch off any electrical systems and
components in both vehicles – except
for the hazard warning flashers of the
support vehicle.
>Do not disconnect the discharged bat-
tery from the vehicle electrical system
>Make certain that there is no contact
between the bodywork of the two
vehicles – short circuit hazard!
4. With the battery of the MINI COOPER,
remove the cover panel. To do so, press
both clips at the same time
or
with the MINI COOPER S, open the cover
of the positive terminal connection for
jump-starting
*, see arrow 1.
Connect the jumper cables
Adhere to the sequence also when
providing support for other vehicles;
failure to observe this procedure can lead
to sparks at the terminals and pose an
injury hazard.<
1. On the MINI COOPER S, the positive ter-
minal connection for jump-starting, see
arrow 1, functions as the positive bat-
tery terminal.
Make a connection with the "+" jumper
cable between the positive terminal of
the discharged battery and the positive
terminal of the support battery
2. Use the second, "–" jumper cable to set
up the connection between the negative
terminals of both vehicles.
To do so:
>Connect one terminal clamp to the
negative terminal and/or to an engine
or body ground of the support vehicle
>Connect the second terminal clamp to
the negative terminal of the battery
and/or to an engine or body ground of
the vehicle to be started. For the MINI,
see arrow 2.
Performing the jump-start1. Start the engine of the vehicle providing
the current and allow to run at a fast idle
speed for several minutes
2. Start the engine on the vehicle with the
discharged battery in the usual manner.
>If the first start attempt is not suc-
cessful, wait a few minutes before
another attempt in order to allow the
discharged battery to recharge
On the MINI:
Before disconnecting the jumper
cables, switch on the lighting, rear window
defroster and the highest blower speed as
well as the engine for at least approx.
10 seconds to prevent a voltage surge from
the regulator to the electrical systems and
components.<
3. Then disconnect the jumper cables in
the reverse order.
If necessary have the battery checked and
completely charged at a MINI Dealer.
ba.book Seite 125 Montag, 5. August 2002 8:09 20
ProCarManuals.com
Page 129 of 148

127
OVERVIEW REPAIRSOPERATION CONTROLS DATA INDEX
TOWINGTow-startingIt is not possible to start the engine of a
vehicle equipped with an automatic trans-
mission by towing or pushing.
For instructions on jump starting, refer to
page 124.
Never attempt to use your vehicle to push
another car, since damage to the energy-
absorbing bumpers could result.Towing a vehicle
Only tow vehicles with Continuously
Variable automatic Transmission
(CVT) with the front wheels raised or on a
special transport vehicle, otherwise the
transmission can be damaged.<
1. Place gear selector lever in neutral or idle
2. Towing speed:
Max. 45 mph / 70 km/h
3. Towing distance:
Max. 95 miles / 150 km
4. Leave the ignition key at position 1 to
ensure that the brake lamps, turn sig-
nals, horn and windshield wipers remain
operative, and to prevent the steering
lock detent from engaging
5. Switch on the hazard-warning system,
observe country-specific regulations.
Find some means of identifying the vehicle
in tow, for instance, place a sign or warning
triangle in the rear window.
Make sure that the ignition key
remains in position 1 even when the
electrical system has failed to prevent the
steering lock from engaging.
The steering and brakes are without power
assist when the engine is off. This means
that increased effort is required for steer-
ing and braking.<
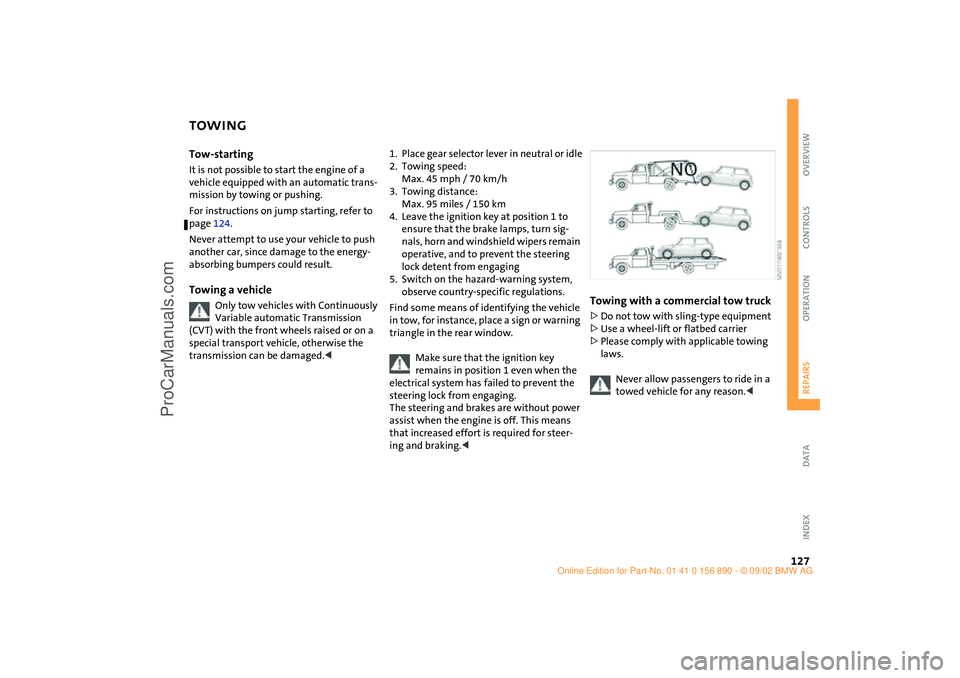
Towing with a commercial tow truck >Do not tow with sling-type equipment
>Use a wheel-lift or flatbed carrier
>Please comply with applicable towing
laws.
Never allow passengers to ride in a
towed vehicle for any reason.<
ba.book Seite 127 Montag, 5. August 2002 8:09 20
ProCarManuals.com
Page 141 of 148

EVERYTHING FROM A TO Z
139
OVERVIEW REPAIRS OPERATION CONTROLS DATA INDEX
Fuel gauge58
Fuses123
G
Gas display, see
Fuel gauge58
Gasoline83
Gear display51
Continuously Variable
automatic Transmission
(CVT)51
General driving notes81
Glove compartment73
Glove compartment lamps
bulb replacement111
Grills69,72
H
Handbrake47
Hazard warning flashers12
Head airbags40
Head restraints37
Headlamp cleaning
system55,94
filling94
Headlamp flasher52
Headlamps
cleaning55,99
lamp replacement107 Heated
outside rear view mirror39
rear window68,71
seats36
windshield68,71
windshield washer jets55
Heater67
outside rear view mirror39
windshield68
Heating
rear window68
seats36
Heavy cargo75
Height131
Hex wrench118
High beams18,52,107
High Performance
Synthetic Oil96
recommended grades of
oil96
Horn12
Hub cap remover112,118
Hydroplaning81
I
Ignition45
Ignition key22
Ignition key position,
see Ignition45
Illuminated vanity mirror39
Imitation leather100 Imprint2
Index2
Indicator lamps15
Individual air distribution72
Inflation pressure85
INSPECTION60
Instrument cluster, see Display
elements13
Instrument lighting53
Instrument panel12
Interface socket
for Onboard
Diagnostics102
Interior lamps53
bulb replacement110
Interior mirror
automatic dimming39
Interior motion sensor31,32
Interior protection
turning off25,32
Interior rearview mirror39
Interlock45
Interval
operation, wipers54
Interval display, service98
J
Jack112
Jump-starting124 K
Keys22
multifunction steering
wheel19
Kickdown50
L
Lamp replacement
headlamps107
high beams107
low beams107
parking lamp107
Lamps52
backup lamps109
brake lamps109,110
cargo area lamps111
daytime driving lamps52
fog lamps53
footwell lamps111
front fog lamps108
glove compartment111
high beams107
instrument lighting53
interior lamps53,110
license plate lamp110
low beams52,107
parking lamps52,108
reading lamps53,110
rear fog lamp109
standing lamps52,108
tail lamp109
ba.book Seite 139 Montag, 5. August 2002 8:09 20
ProCarManuals.com