clock MINI COOPER 2005 Owners Manual
[x] Cancel search | Manufacturer: MINI, Model Year: 2005, Model line: COOPER, Model: MINI COOPER 2005Pages: 165, PDF Size: 4.64 MB
Page 5 of 165
3OVERVIEW REPAIRS OPERATION CONTROLS DATA INDEX
Driving:Ignition lock
51
Starting the engine
51
Switching off the engine
52
Parking brake
53
Manual transmission
53
Continuously Variable automatic
Transmission (CVT)
54
Parking lamps/Low beams
57
signal/Headlamp flasher
58
Instrument lighting
58
Fog lamps
58
Interior lamps
59
Washer/wiper system
59
Cruise control
61
Everything under control:Odometer
63
Clock
63
Fuel gauge
63
Coolant temperature gauge
64
Tachometer
65
Service interval display
65
Onboard computer
66
Technology for safety and driving
convenience:All Season traction Control (ASC)
68
Dynamic Stability Control (DSC)
69
Antilock Brake System (ABS)
70
Flat Tire Monitor
71
Airbags
72
Park Distance Control (PDC)
74
Controlling the climate for pleasant
driving:Air conditioning system
75
Automatic climate control
78
Interior conveniences:Glove compartment
81
Ashtray, drinks holders
81
Cigarette lighter, 12 V power supply
82
Integrated universal remote control
83
Loading and transporting cargo:Luggage compartment in the MINI
85
Luggage compartment in the MINI Convertible
86
Loading cargo
86
Roof-mounted luggage rack
89
OPERATION, CARE, MAINTENANCESpecial operating instructions:Break-in procedures
92
General driving notes
93
Refueling
94
Brake system
96
Wheels and tires:Tire inflation pressure
97
Tire coding
99
Tire condition
100
Run Flat tires
101
New wheels and tires
102
Snow chains
104
ProCarManuals.com
Page 15 of 165
13
OVERVIEW REPAIRS OPERATION CONTROLS DATA INDEX
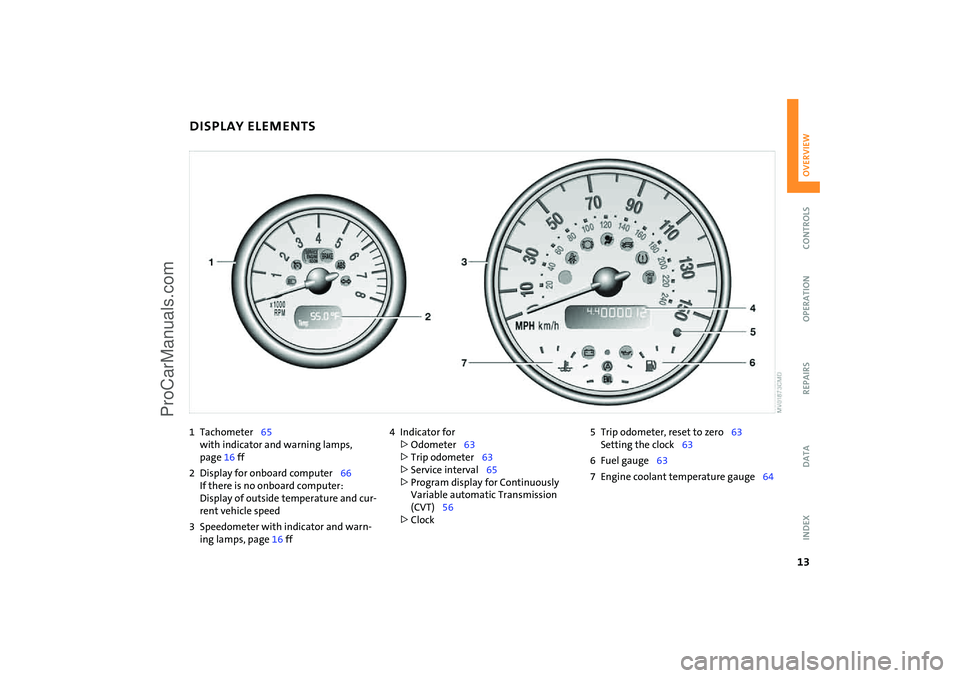
1 Tachometer
65
with indicator and warning lamps,
page
16 ff
2 Display for onboard computer
66
If there is no onboard computer:
Display of outside temperature and cur
-
rent vehicle speed3 Speedometer with indicator and warn
-
ing lamps, page
16 ff
4 Indicator for>Odometer
63
>Trip odometer
63
>Service interval
65
>Program display for Continuously
Variable automatic Transmission
(CVT)
56
>Clock
5 Trip odometer, reset to zero
63
Setting the clock
63
6 Fuel gauge
63
7 Engine coolant temperature gauge
64
DISPLAY ELEMENTS
ProCarManuals.com
Page 16 of 165
14
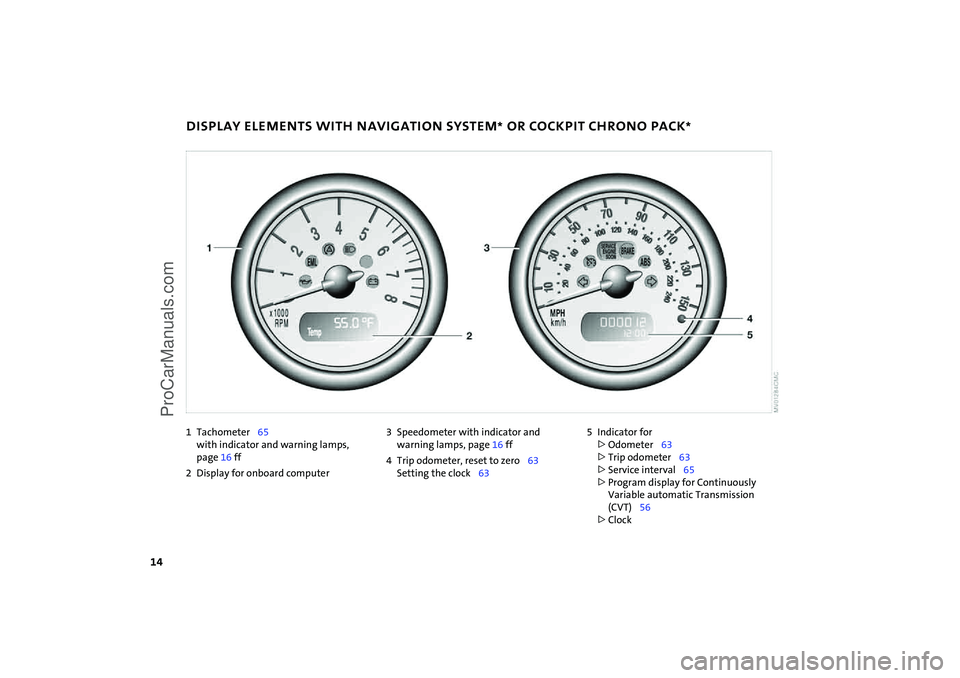
1Tachometer
65
with indicator and warning lamps,
page
16 ff
2 Display for onboard computer
3 Speedometer with indicator and
warning lamps, page
16 ff
4 Trip odometer, reset to zero
63
Setting the clock
63
5 Indicator for>Odometer
63
>Trip odometer
63
>Service interval
65
>Program display for Continuously
Variable automatic Transmission
(CVT)
56
>Clock
DISPLAY ELEMENTS WITH NAVIGATION SYSTEM
* OR COCKPIT CHRONO PACK
*
ProCarManuals.com
Page 43 of 165

41
OVERVIEW REPAIRS OPERATIONCONTROLS DATA INDEX
SAFE SEATING POSITIONThe ideal seating position can make a vital
contribution to relaxed, relatively fatigue-
free driving. Together with the safety belts
and airbags, the seating position also plays
an important role in providing occupants
with maximum levels of passive safety in
an accident. To ensure that the safety sys
-
tems operate with optimal efficiency, we
strongly urge you to observe the instruc
-
tions contained in the following section.For additional information about trans
-
porting children safely, refer to page
48.
Sitting safely with airbags
Always maintain an adequate dis
-
tance between yourself and all of the
airbags. Always hold the steering wheel by
the rim with the hands at the 9 and
3
o'clock positions to keep any chance of
injury to hands or arms to an absolute min
-
imum, should the airbag be deployed.
No one and nothing is to come between
the airbags and the seat occupant. Do not
use the front passenger airbag cover as a
storage surface for objects of any kind.
Ensure that the front passenger is correctly
seated, i.e. that no feet or legs are propped
against the dashboad. Otherwise, leg injury
could result if the front passenger airbag
suddenly deployed. Never let an occupant's
head rest near or on a side airbag because
the inflating airbag could cause a serious or
fatal injury.
circumstances injury may result from con
-
tact with the airbags. In sensitive individu
-
als, the ignition and inflation noise may
induce a mild hearing loss that is usually
temporary. For airbag locations and additional infor
-
mation on airbags, refer to page
72.
Safe seating position with safety belt Fasten your safety belt before each drive.
Airbags are an additional safety device and
work in conjunction with the safety belts,
but do not replace them.Your vehicle is equipped with four seats,
each of which is provided with a safety belt.
At all times, occupants should sit upright and be properly restrained –
infants and small children in appropriate
child-restraint systems; larger children and
adults using the safety belts.
Expectant mothers should always wear
their safety belts, taking care to position
the lap belt against the lower hips, where it
will not exert pressure against the abdomi
-
nal area.
Never allow more than one person to wear
a single safety belt. Never allow infants or
small children to ride in a passenger's lap.
Do not route the belt across your neck, or
run it across sharp edges. Be sure that the
belt does not become caught or jammed.
Avoid twisting the belt while routing it
firmly across the hips and shoulder; wear it
as snugly against your body as possible and
do not allow it to rest against sharp or frag
-
ile objects. Otherwise, the belt could slide
over your hips in the event of a frontal
impact and cause abdominal injury. Avoid
wearing bulky clothing and pull on the lap
belt periodically to retension it over your
shoulder. Otherwise, the safety belt's
restraint effectiveness could be reduced.
45.
ProCarManuals.com
Page 65 of 165

63
OVERVIEW REPAIRS OPERATIONCONTROLS DATA INDEX
ODOMETER
CLOCK
FUEL GAUGE
1 Trip odometer/clock
Resetting to zero when the trip odometer is
in the display:With ignition key in position
1, press the
button until the trip odometer is at zero.
To show the clock:Press the button briefly.2 Odometer
When the ignition key is not in the ignition
lock, you can activate the displays shown in
the illustration by pressing the button in
the display elements.
Setting 1. Press button
1 to display the clock
2. Press button
1 for approx. 5
seconds to
activate the clock-setting mode
3. Press button
1 to select 12-hour or 24-
hour mode
4. Wait approx. 5
seconds until the hours
display flashes
5. Press button
1 to set the hour
6. Wait approx. 5
seconds until the min
-
utes display flashes
7. Press button
1 to set the minute.
The set time is saved automatically after
approx. 1
minute.
In the speedometer or Cockpit Chrono Pack* If the indicator light
1 begins to be lit con
-
tinuously, there are approx. 2.1
gallons
/
8
liters of fuel in the tank.
Fuel tank capacity:
Approx. 13.2
gallons
/ 50
liters.
When you switch on the ignition, the indi
-
cator lamp lights up briefly to confirm that
the system is operational. If the angle of the vehicle varies, for exam
-
ple when you are driving in mountainous
areas, the needle may fluctuate slightly.
Refill the gas tank early. If you drive to the last drop of fuel, engine func
-
tions are not guaranteed and damage can
occur.<
ProCarManuals.com
Page 96 of 165
94
REFUELING
Always switch off the engine before refueling. If you do not, fuel cannot
be filled into the tank and the SERVICE
ENGINE SOON lamp may come on.<
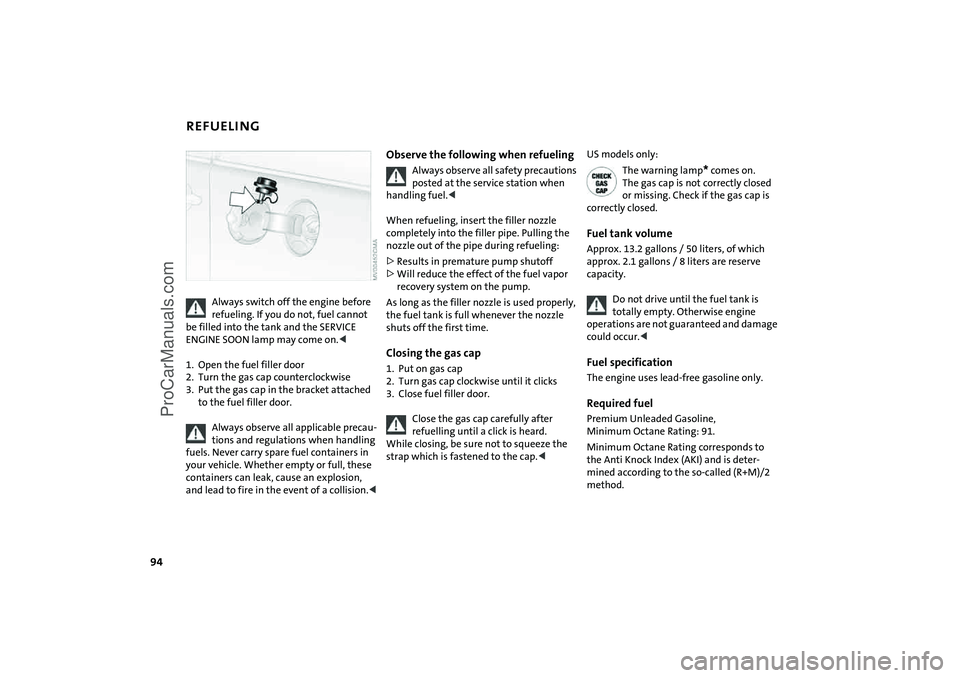
1. Open the fuel filler door2. Turn the gas cap counterclockwise3. Put the gas cap in the bracket attached
to the fuel filler door.
Always observe all applicable precau
-
tions and regulations when handling
fuels. Never carry spare fuel containers in
your vehicle. Whether empty or full, these
containers can leak, cause an explosion,
and lead to fire in the event of a collision.<
Observe the following when refueling
Always observe all safety precautions posted at the service station when
handling fuel.<
When refueling, insert the filler nozzle
completely into the filler pipe. Pulling the
nozzle out of the pipe during refueling:>Results in premature pump shutoff>Will reduce the effect of the fuel vapor
recovery system on the pump.As long as the filler nozzle is used properly,
the fuel tank is full whenever the nozzle
shuts off the first time.Closing the gas cap1. Put on gas cap 2. Turn gas cap clockwise until it clicks3. Close fuel filler door.
Close the gas cap carefully after
refuelling until a click is heard.
While closing, be sure not to squeeze the
strap which is fastened to the cap.<
US models only:
The warning lamp
* comes on.
The gas cap is not correctly closed
or missing. Check if the gas cap is
correctly closed.
Fuel tank volumeApprox. 13.2
gallons
/ 50
liters, of which
approx. 2.1
gallons
/ 8
liters are reserve
capacity.
Do not drive until the fuel tank is totally empty. Otherwise engine
operations are not guaranteed and damage
could occur.<
Fuel specification The engine uses lead-free gasoline only.Required fuel Premium Unleaded Gasoline,
Minimum Octane Rating: 91.Minimum Octane Rating corresponds to
the Anti Knock Index (AKI) and is deter
-
mined according to the so-called (R+M)/2
method.
ProCarManuals.com
Page 112 of 165
110
COOLANT
Do not add coolant to the cooling sys
-
tem when the engine is hot. Escaping
coolant can cause burns.<
Coolant consists of water and a coolant
additive. Not all commercially available
additives are suitable for your MINI. Your
MINI Dealer knows which additives are
suitable and will be glad to advise you.
Only use suitable additives, other
-
wise the engine can be damaged. The
additives are hazardous to your health.
mental laws regulating the disposal
of coolant additives.<
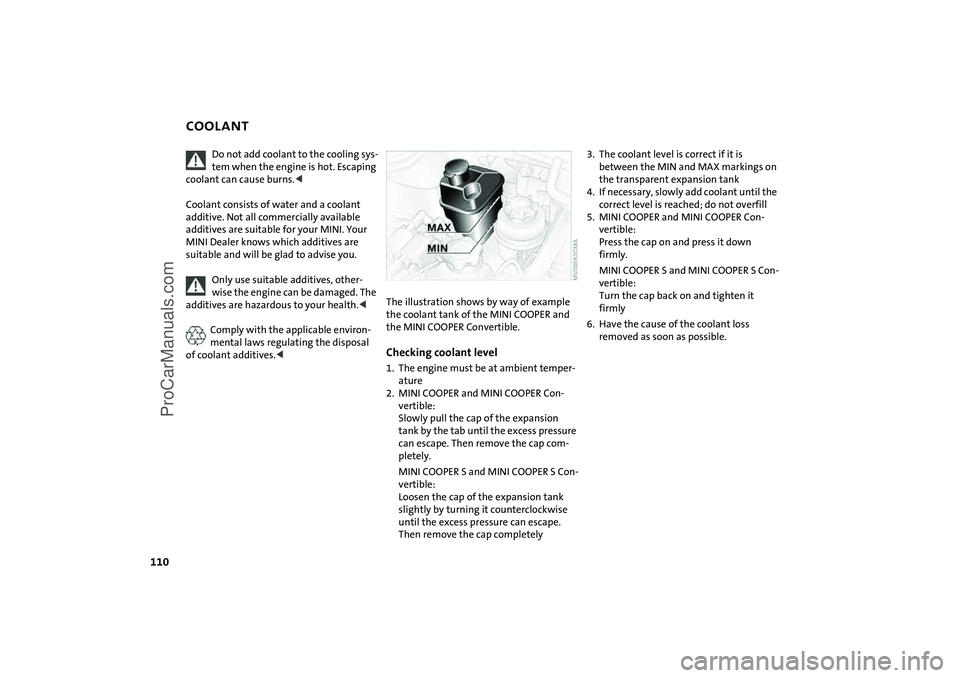
The illustration shows by way of example the coolant tank of the MINI
COOPER and
the MINI
COOPER Convertible.
Checking coolant level 1. The engine must be at ambient temper
-
ature
2. MINI COOPER and MINI COOPER Con
-
vertible:
Slowly pull the cap of the expansion
tank by the tab until the excess pressure
can escape. Then remove the cap com
-
pletely.MINI COOPER
S and MINI COOPER
S Con
-
vertible:
Loosen the cap of the expansion tank
slightly by turning it counterclockwise
until the excess pressure can escape.
Then remove the cap completely
3. The coolant level is correct if it is
between the MIN and MAX markings on
the transparent expansion tank4. If necessary, slowly add coolant until the
correct level is reached; do not overfill5. MINI COOPER and MINI COOPER Con
-
vertible:
Press the cap on and press it down
firmly. MINI COOPER
S and MINI COOPER
S Con
-
vertible:
Turn the cap back on and tighten it
firmly
6. Have the cause of the coolant loss
removed as soon as possible.
ProCarManuals.com
Page 151 of 165

EVERYTHING FROM A TO Z
149
OVERVIEW REPAIRS OPERATION CONTROLS DATA INDEX
Brakes
96
ABS
70
brake fluid
111
brake pads
96
break-in procedures
92
handbrake
53
indicator/warning
lamps
16, 17, 18
Breaking in
92
Bulb replacement, refer to
Lamps and bulbs
121
Buttons in multifunction
steering wheel
20
Continuously Variable
automatic Transmission
(CVT)
56
C California Proposition 65
warning
7
Capacities
145
Car care, refer to Caring for your
vehicle
113
Car keys, refer to Keys
24
Car radio, refer to separate Owner's Manual
Car telephone, refer to separate Owner's Manual
Car vacuum cleaner,
connecting, refer to Cigarette
lighter socket
82
Car wash
113
Car wash, refer to Washing
your vehicle
113
Car-care products
113
Care of plastics
114
Care of synthetic leather
114
Care, vehicle
113
Cargo area cover, refer to
Luggage compartment
cover
85
Cargo area, refer to Luggage
compartment in the MINI
85
Cargo area, refer to Luggage
compartment in the MINI
Convertible
86
Carpet care
115
Cassette operation, refer to
Owner's Manual for Radio
Catalytic converter, refer to
Hot exhaust system
93
CBC Cornering Brake Control
70
CD changer, refer to Owner's Manual for Radio
CD operation, refer to
Owner's Manual for Radio
Central locking system
24
interior
28
Changing bulbs
121
Changing the wiper
blades
120
, 121
Changing tires
127
space-saver spare tire
125
Charge-current indicator
light
16
Child seat, refer to Installing
child-restraint systems
49
Children, transporting
48
Child-restraint mounting
system, LATCH
50
Child-restraint systems
48
Chock, folding
space-saver spare tire
125
Chrome parts, refer to Caring
for your vehicle
114
Chrome-plated parts, care
114
Cigarette lighter
82
Cigarette lighter socket
82
Circulation of air, refer to
Recirculated air mode
76, 79
Cleaning the rear window
60
Cleaning the vehicle, refer to
Caring for your vehicle
113
Clock
63
12-hour/24-hour mode
63
changing the time
63
Closing
from inside
28
from outside
25
Clothes hooks
93
Clutch
51
break-in procedures
92
Cockpit
12
Coding, tires
99
Cold start, refer to
Starting the engine
52
Compact disk operation, refer to Owner's Manual for Radio
Compartments
81
Computer, refer to Onboard
computer
66
Condensed water, refer to Air
conditioning
76, 79
Configuring settings, refer to
Vehicle Memory
47
Consumption, refer to
Average consumption
67
Current fuel consumption
67
Contents
2
Continuously Variable
automatic Transmission
(CVT)
54
ignition
51
indicator lamp
56
interlock
51
selector lever lock
54
shiftlock
54
towing
136
tow-starting
137
Control elements, refer to
Cockpit
12
ProCarManuals.com
Page 152 of 165

EVERYTHING FROM A TO Z
150
Convenience operation
convertible top
37
from outside
26, 27
glass sunroof, electric
33
windows
31
Convertible top
35
care
115
convenience operation
37
electrical malfunction
37
emergency closing
37
malfunction
37
Coolant
110
indicator lamp
16
level
110
temperature gauge
64
Coolant temperature gauge
64
Cooling system, refer to
Capacities
145
Cooling, refer to Air
conditioning
76, 79
Copyright
2
Cornering Brake Control
(CBC)
70
warning lamp
17
Correct tires
99
Cosmetic mirror, refer to
Illuminated vanity mirror
47
Cruise control
61
buttons in the steering
wheel
20, 21
indicator lamp
19
Cup holders, refer to Beverage
holders
81
Curb weight, refer to
Weights
143
, 144
Current fuel consumption
67
setting units
67
Cylinders, refer to Engine
data
140
D Daily odometer, refer to Trip
odometer
63
Dashboard lighting, refer to
Instrument lighting
58
Dashboard, refer to Cockpit
12
Data
capacities
145
dimensions
141
engine
140
technical
140
weights
143
Date of the Owner's Manual
7
Daytime driving lamps
57
Deep water, refer to Driving
through water
93
Defrost setting, refer to
Defrosting and demisting
windows
80
Defrosting and demisting
windows
automatic climate control
80
Defrosting windows
80
air conditioning system
76
automatic climate control
79
Defrosting windshield, refer to
Defrosting and demisting
windows
80
Demisting windows
80
Digital clock
63
Dimensions
141
, 142
Dimming interior rearview
mirror
47
Dipstick, engine oil
108
Directional turn signal,
refer to Turn signal
indicators
58
Disc brakes
96
Displacement, refer to Engine
data
140
Display elements
13
with navigation system or
Cockpit Chrono Pack
14
Display lighting, refer to
Instrument lighting
58
Disposal
engine oil
109
vehicle battery
132
Distance covered, refer to
Odometer
63
Distance warning, refer to Park
Distance Control (PDC)
74
Door keys
24
Door lock
27
Doors, locking and unlocking
acknowledgment
signals
26, 27
from inside
28
from outside
26
DOT quality grades
99
Draft-free ventilation
77, 80
Drink holders, refer to Beverage
holders
81
Driving lamps, refer to Parking
lamps/Low beams
57
Driving notes
93
Driving stability control
systems
68, 69
Dry air, refer to Air
conditioning
76, 79
Drying air,
refer to Air
conditioning
76, 79
DSC Dynamic Stability
Control
69
indicator lamp
17
Dynamic Stability
Control (DSC)
69
indicator lamp
17
E Easy entry to the rear
44
EBD Electronic Brake Force
Distribution
70
ProCarManuals.com