tailgate MINI COOPER 2016 User Guide
[x] Cancel search | Manufacturer: MINI, Model Year: 2016, Model line: COOPER, Model: MINI COOPER 2016Pages: 251, PDF Size: 8.4 MB
Page 136 of 251
Things to remember when drivingVehicle features and op‐tions
This chapter describes all standard, country-
specific and optional features offered with the
series. It also describes features that are not
necessarily available in your car, e. g., due to
the selected options or country versions. This
also applies to safety-related functions and sys‐
tems. The respectively applicable country provi‐
sions must be observed when using the respec‐
tive features and systems.
Breaking-in period General information Moving parts need time to adjust to one an‐
other (break-in time).
The following instructions will help accomplish
a long vehicle life and good efficiency.
During break-in, do not use the Launch Control,
refer to page 61.
Engine, transmission, and axle drive
Up to 1,200 miles/2,000 km Do not exceed the maximum engine and road
speed:▷For gasoline engine 4,500 rpm and
100 mph/160 km/h.
Avoid full load or kickdown under all circum‐
stances.
From 1,200 miles/2,000 km
The engine and vehicle speed can gradually be
increased.
Tires
Tire traction is not optimal due to manufactur‐
ing circumstances when tires are brand-new;
they achieve their full traction potential after a
break-in time.
Drive conservatively for the first
200 miles/300 km.
Brake system Brakes require an initial break-in period of ap‐
prox. 300 miles/500 km to achieve optimal per‐
formance between brake discs and brake pads.
Drive moderately during this break-in period.
Clutch The function of the clutch reaches its optimal
level only after a distance driven of approx.
300 miles/500 km. During this break-in period,
engage the clutch gently.
Following part replacement The same break-in procedures should be ob‐
served if any of the components above-men‐
tioned have to be renewed in the course of the
vehicle's operating life.
General driving notes
Closing the tailgate WARNING
An open tailgate protrudes from the vehi‐
cle and can endanger occupants and other traf‐
fic participants or damage the vehicle in the
event of an accident, braking or evasive ma‐
neuvers. In addition, exhaust fumes may enter
the vehicle interior. There is risk of injuries or
risk of property damage. Do not drive with the
tailgate open. ◀Seite 136DRIVING TIPSThings to remember when driving136
Online Edition for Part no. 01 40 2 963 307 - VI/15
Page 137 of 251
If driving with the tailgate open cannot be
avoided:▷Close all windows and the glass sunroof.▷Greatly increase the air flow from the vents.▷Drive moderately.
Hot exhaust system
WARNING
During driving operation, high tempera‐
tures can occur underneath the body, e.g.
caused by the exhaust gas system. If combusti‐
ble materials, such as leaves or grass, come in
contact with hot parts of the exhaust gas sys‐
tem, these materials can ignite. There is risk of
injuries or risk of property damage.
Do not remove the heat shields installed and
never apply undercoating to them. Make sure
that no combustible materials can come in con‐
tact with hot vehicle parts in driving operation,
idle or during parking. Do not touch the hot ex‐
haust system. ◀
Mobile communication devices in the vehicle
WARNING
Vehicle electronics and mobile phones
can influence one another. There is radiation
due to the send operations of mobile phones.
There is risk of injuries or risk of property dam‐
age. If possible, in the car's interior use only
mobile phones with direct connections to an
exterior antenna in order to exclude mutual
disturbance and deflect the radiation from the
car's interior. ◀
Hydroplaning On wet or slushy roads, a wedge of water can
form between the tires and road surface.
This phenomenon is referred to as hydroplan‐
ing. It is characterized by a partial or complete
loss of contact between the tires and the road
surface, ultimately undermining your ability to
steer and brake the vehicle.
Driving through water
CAUTION
When driving too quickly through too
deep water, water can enter into the engine
compartment, the electrical system or the
transmission. There is risk of property damage.
When driving through water, do not exceed the
maximum indicated water level and the maxi‐
mum speed for driving through water. ◀
Drive through calm water only if it is not deeper
than 9.8 inches/25 cm and at this height, no
faster than walking speed, up to 3 mph/5 km/h.
Braking safely
Your vehicle is equipped with ABS as a standard
feature.
Applying the brakes fully is the most effective
way of braking in situations needed.
Steering is still responsive. You can still avoid
any obstacles with a minimum of steering ef‐
fort.
Pulsation of the brake pedal and sounds from
the hydraulic circuits indicate that ABS is in its
active mode.
Objects in the movement area around
pedals and floor area
WARNING
Objects in the driver's floor area can limit
the pedal distance or block a depressed pedal.
There is risk of an accident. Stow objects in the
vehicle such that they are secured and cannot
enter into the driver's floor area. Use floor mats
that are suitable for the vehicle and can be
safely attached to the floor. Do not use loose
floor mats and do not layer several floor mats.
Make sure that there is sufficient clearance for
the pedals. Ensure that the floor mats are se‐
curely fastened again after they were removed,
e.g. for cleaning. ◀Seite 137Things to remember when drivingDRIVING TIPS137
Online Edition for Part no. 01 40 2 963 307 - VI/15
Page 141 of 251
Securing
Follow the installation instructions of the roof
rack.
Loading Because roof racks raise the vehicle's center of
gravity when loaded, they have a major effect
on vehicle handling and steering response.
Therefore, note the following when loading and
driving:▷Do not exceed the approved roof/axle
loads and the approved gross vehicle
weight.▷Be sure that adequate clearance is main‐
tained for tilting and opening the glass sun‐
roof.▷Distribute the roof load uniformly.▷The roof load should not extend past the
loading area.▷Always place the heaviest pieces on the
bottom.▷Secure the roof luggage firmly, e.g., tie with
ratchet straps.▷Do not let objects project into the opening
path of the tailgate.▷Drive cautiously and avoid sudden acceler‐
ation and braking maneuvers. Take corners
gently.
Rear luggage rack
General information Installation only possible with rear luggage rack
preparation.
Rear racks are available as special accessories.
Information Follow the installation instructions of the rear
luggage rack.
Drive cautiously and avoid sudden acceleration
and braking maneuvers. Take corners gently.
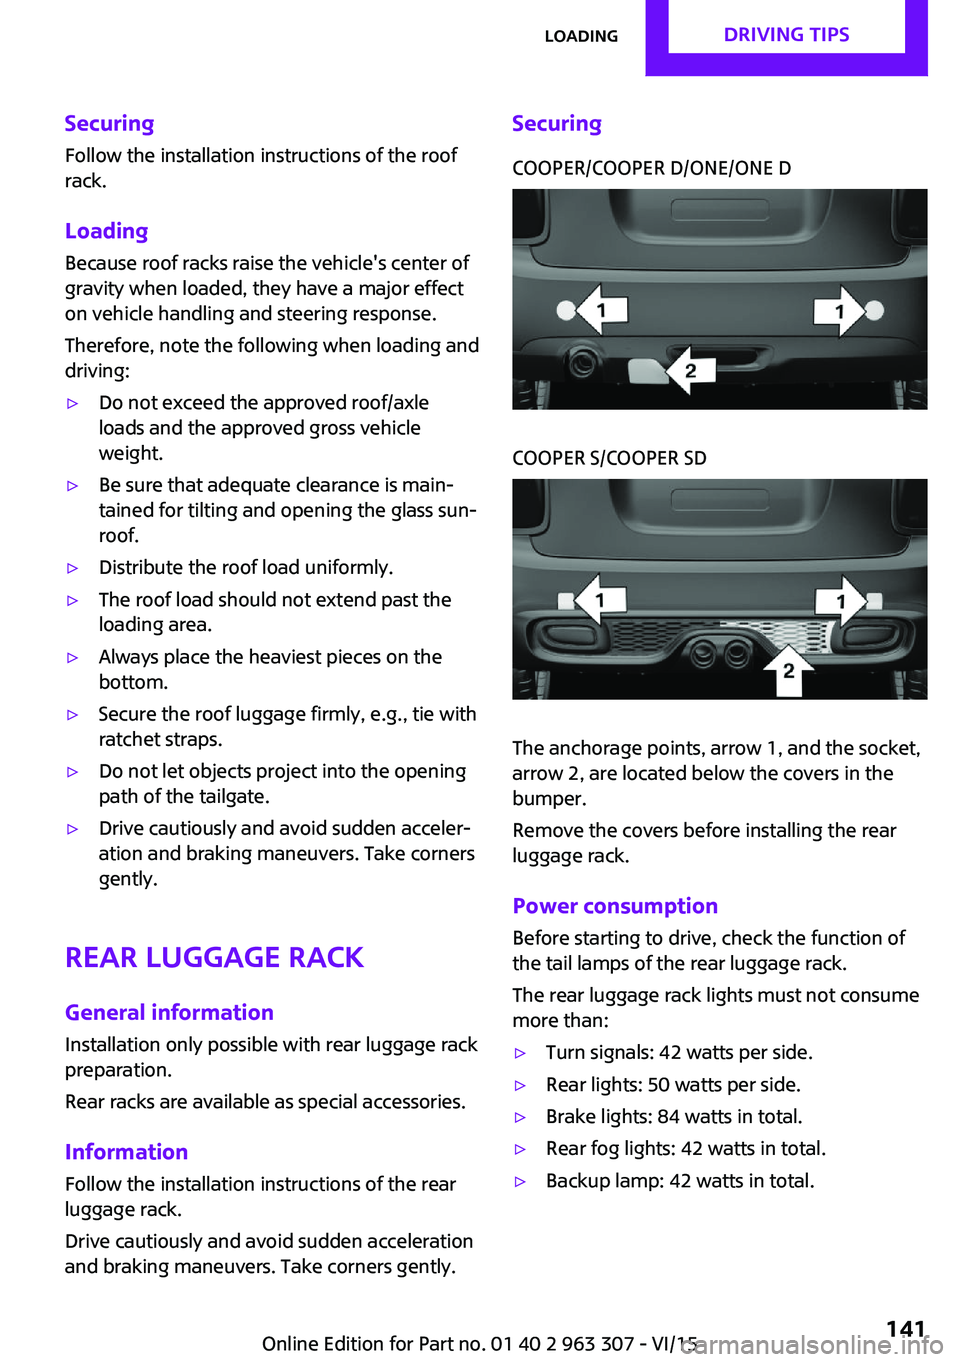
SecuringCOOPER/COOPER D/ONE/ONE DCOOPER S/COOPER SD
The anchorage points, arrow 1, and the socket,
arrow 2, are located below the covers in the
bumper.
Remove the covers before installing the rear
luggage rack.
Power consumption
Before starting to drive, check the function of
the tail lamps of the rear luggage rack.
The rear luggage rack lights must not consume
more than:
▷Turn signals: 42 watts per side.▷Rear lights: 50 watts per side.▷Brake lights: 84 watts in total.▷Rear fog lights: 42 watts in total.▷Backup lamp: 42 watts in total.Seite 141LoadingDRIVING TIPS141
Online Edition for Part no. 01 40 2 963 307 - VI/15
Page 202 of 251
Replacing componentsVehicle features and op‐
tions
This chapter describes all standard, country-
specific and optional features offered with the
series. It also describes features that are not
necessarily available in your car, e. g., due to
the selected options or country versions. This
also applies to safety-related functions and sys‐
tems. The respectively applicable country provi‐
sions must be observed when using the respec‐
tive features and systems.
Onboard vehicle tool kit
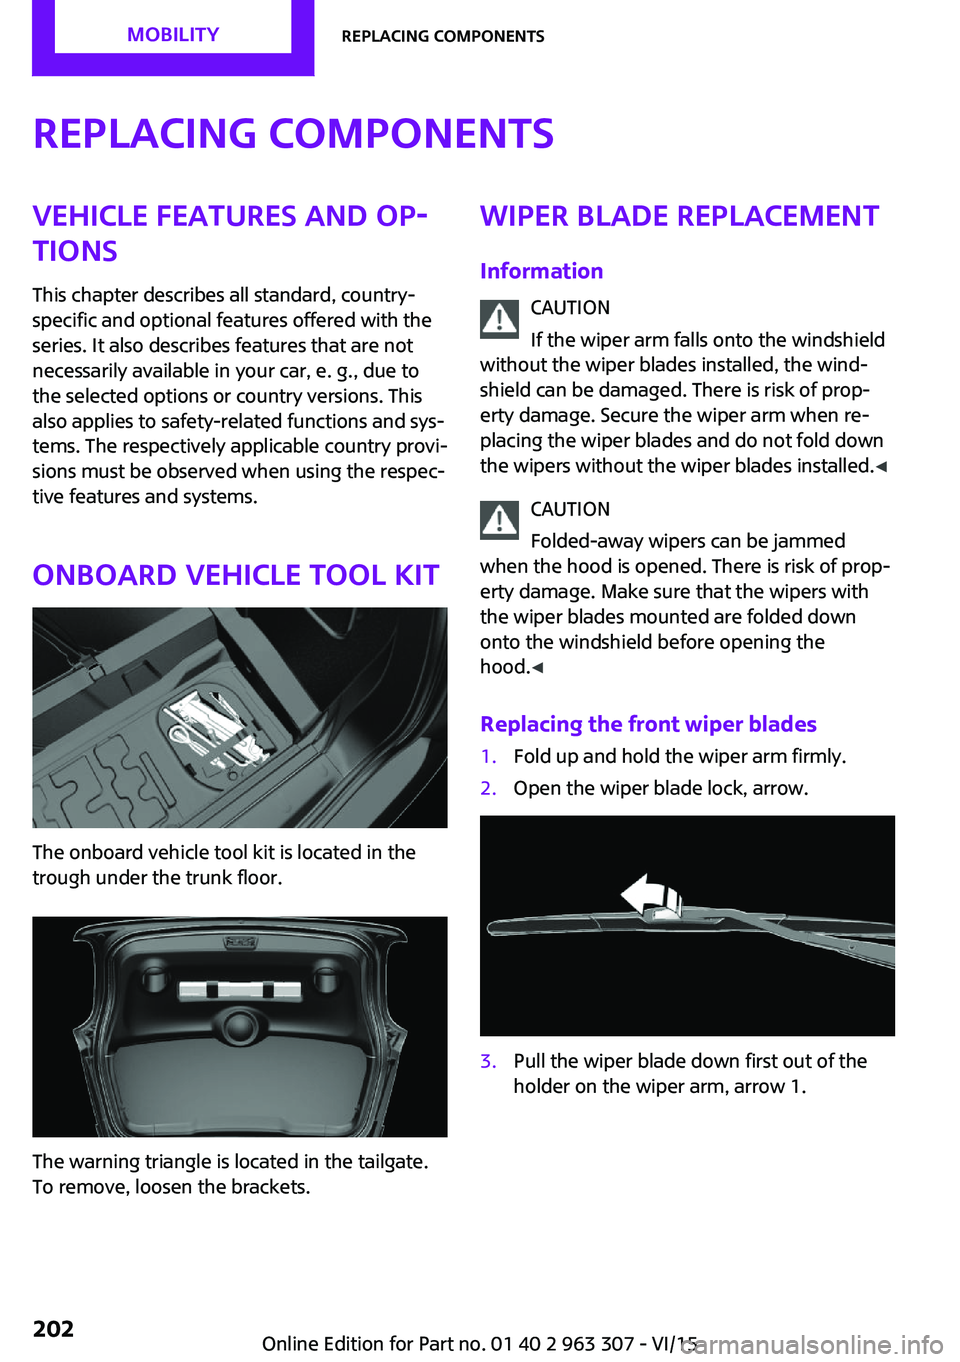
The onboard vehicle tool kit is located in the
trough under the trunk floor.
The warning triangle is located in the tailgate.
To remove, loosen the brackets.
Wiper blade replacement
Information CAUTION
If the wiper arm falls onto the windshield
without the wiper blades installed, the wind‐
shield can be damaged. There is risk of prop‐
erty damage. Secure the wiper arm when re‐
placing the wiper blades and do not fold down
the wipers without the wiper blades installed. ◀
CAUTION
Folded-away wipers can be jammed
when the hood is opened. There is risk of prop‐
erty damage. Make sure that the wipers with
the wiper blades mounted are folded down
onto the windshield before opening the
hood. ◀
Replacing the front wiper blades1.Fold up and hold the wiper arm firmly.2.Open the wiper blade lock, arrow.3.Pull the wiper blade down first out of the
holder on the wiper arm, arrow 1.Seite 202MOBILITYReplacing components202
Online Edition for Part no. 01 40 2 963 307 - VI/15
Page 207 of 251
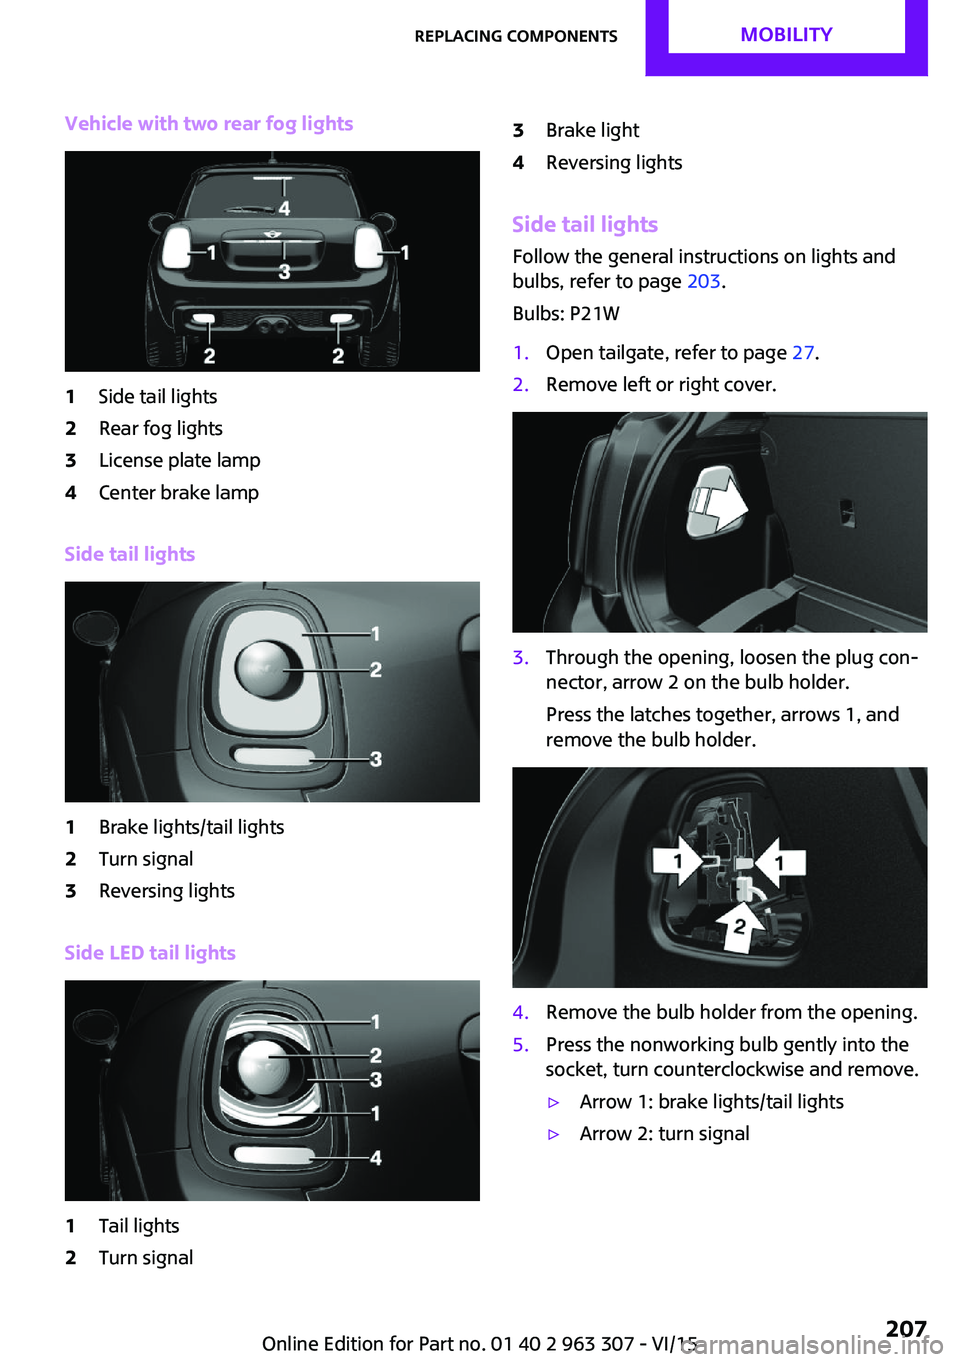
Vehicle with two rear fog lights1Side tail lights2Rear fog lights3License plate lamp4Center brake lamp
Side tail lights
1Brake lights/tail lights2Turn signal3Reversing lights
Side LED tail lights
1Tail lights2Turn signal3Brake light4Reversing lights
Side tail lights
Follow the general instructions on lights and
bulbs, refer to page 203.
Bulbs: P21W
1.Open tailgate, refer to page 27.2.Remove left or right cover.3.Through the opening, loosen the plug con‐
nector, arrow 2 on the bulb holder.
Press the latches together, arrows 1, and
remove the bulb holder.4.Remove the bulb holder from the opening.5.Press the nonworking bulb gently into the
socket, turn counterclockwise and remove.▷Arrow 1: brake lights/tail lights▷Arrow 2: turn signalSeite 207Replacing componentsMOBILITY207
Online Edition for Part no. 01 40 2 963 307 - VI/15
Page 214 of 251

Breakdown assistanceVehicle features and op‐
tions
This chapter describes all standard, country-
specific and optional features offered with the
series. It also describes features that are not
necessarily available in your car, e. g., due to
the selected options or country versions. This
also applies to safety-related functions and sys‐
tems. The respectively applicable country provi‐
sions must be observed when using the respec‐
tive features and systems.
Hazard warning flash‐
ers
The button is located above the radio.
Warning triangle
The warning triangle is located in the tailgate.
To remove, loosen the brackets.
First-aid kit
The first-aid kit is located in the trunk.
Some of the articles have a limited service life.
Check the expiration dates of the contents reg‐
ularly and replace any expired items promptly.
Jump-starting General information If the battery is discharged, the engine can be
started using the battery of another vehicle and
two jumper cables. Only use jumper cables with
fully insulated clamp handles.
Information DANGER
Contact with live components can lead to
an electric shock. There is risk of injuries or
danger to life. Do not touch any components
that are under voltage. ◀
To prevent personal injury or damage to both
vehicles, adhere strictly to the following proce‐
dure.
Seite 214MOBILITYBreakdown assistance214
Online Edition for Part no. 01 40 2 963 307 - VI/15
Page 248 of 251

RON recommended fuelgrade 176
Roofliner 17
Roof load capacity 227
Roof-mounted luggage rack 140
Rope for tow-starting/ towing 217
RSC Run Flat System Compo‐ nent, see Run-flat tires 187
Rubber components, care 222
Run-flat tires 187
S
Safe braking 137
Safety belt reminder for driv‐ er's seat and front passenger
seat 39
Safety belts 38
Safety belts, care 222
Safety switch, windows 33
Safety systems, airbags 81
Satellite radio 154
Saving fuel 142
Screwdriver 202
Screw thread for tow fit‐ ting 218
Sealant 188
Seat belts, see Safety belts 38
Seat heating, front 38
Seating position for chil‐ dren 45
Seats 36
Select a station 151
Selecting a station man‐ ually 152
Selection list in instrument cluster 70
Selector lever, Steptronic transmission 58
Sensors, care 223
Service and warranty 8
Service requirements, Condi‐ tion Based Service CBS 200 Service requirements, dis‐
play 68
SET button, see camera-based cruise control 101
SET button, see Cruise con‐ trol 106
Settings and information 72
Settings, locking/unlocking 29
Settings, mirrors 42
Shift paddles on the steering wheel 60
Side airbag 81
Signaling, horn 14
Signals when unlocking 30
Sitting safely 36
Size 226
Slide/tilt glass roof 33
Snow chains 191
Socket 125
Socket, OBD Onboard Diag‐ nostics 201
Sound settings 150
Spare fuse 213
Spare tire, refer to Emergency wheel 210
Speed, average 72
Speed limit detection, on- board computer 72
Speed limiter, display 69
Speed Limit Information 69
Speed warning 72
Sport instruments, cockpit 74
SPORT program, Dynamic Driving Control 99
Sport program, transmis‐ sion 59
Stability control systems 97
Start/stop, automatic func‐ tion 51
Start/Stop button 49
Start function during malfunc‐ tion 23
Starting the engine 50
Station, storing 152
Status of Owner's Manual 7
Steering wheel, adjusting 44 Steptronic Sport transmission,
refer to Steptronic transmis‐
sion 58
Steptronic transmission 58
Stopping the engine 50
Storage compartments 129
Storage, tires 187
Storing the vehicle 223
Suitable engine oil types 197
Summer tires, tread 185
Sun visor 125
Supplementary text mes‐ sages 66
Switch for Dynamic Driving 99
Switch, see Cockpit 14
Symbols 6
T Tachometer 67
Tailgate 27
Tailgate via remote control 25
Tail lights 206
Technical changes, refer to Own Safety 7
Technical data 226
Temperature, air condi‐ tioner 116
Temperature, automatic cli‐ mate control 118
Temperature display for exter‐ nal temperature 67
Temperature display, setting units 72
Temperature, engine 72
Tempomat, see camera-based cruise control 101
Terminal, starting aid 215
Text messages, supplemen‐ tary 66
Theft alarm system, see Alarm system 30
Thigh support 37
Tilt alarm sensor 31
Time, radio, setting time on the radio 73 Seite 248REFERENCEEverything from A to Z248
Online Edition for Part no. 01 40 2 963 307 - VI/15