stop start MINI COOPER 2016 Owner's Manual
[x] Cancel search | Manufacturer: MINI, Model Year: 2016, Model line: COOPER, Model: MINI COOPER 2016Pages: 251, PDF Size: 8.4 MB
Page 106 of 251

tions. There is risk of an accident. Adjust the
driving style to the traffic conditions. Watch
traffic closely and actively interfere in the re‐
spective situations. ◀
Cornering
If the desired speed is too high for a curve, the
speed is reduced slightly, although curves can‐
not be anticipated in advance. Therefore, drive
into a curve at an appropriate speed.
In tight curves the system offers only restricted
detection where a vehicle ahead of you might
be detected late or not at all.
When you approach a curve the system may
briefly report vehicles in the next lane due to
the bend of the curve. If the system decelerates
you may compensate it by briefly accelerating.
After releasing the gas pedal the system is reac‐
tivated and controls speed independently.
Weather
In the event of unfavorable weather and light conditions, e. g. if there is rain, snowfall, slush,
fog or glare, this may result in poorer recogni‐
tion of vehicles as well as short-term interrup‐
tions for vehicles that are already detected.
Drive attentively, and react to the current traffic
situation. If necessary, intervene actively, e.g.
by braking, steering or evading.
Malfunction
A Check Control message is displayed if the sys‐
tem fails or was automatically deactivated.
The system may not be fully functional in the
following situations:▷When an object was not correctly detected.▷In heavy fog, rain, sprayed water or snow‐
fall.▷In tight curves.▷If the field of view of the camera or the
front windshield are dirty or covered.▷When driving toward bright lights.▷Up to 20 seconds after the start of the en‐
gine, via the Start/Stop button.▷During calibration of the camera immedi‐
ately after vehicle delivery.
Cruise control
The concept
The system is functional at speeds beginning at
approx. 20 mph/30 km/h.
It maintains the speed that was set using the
control elements on the steering wheel.
The system brakes on downhill gradients if en‐
gine braking is insufficient.
Information WARNING
The use of the system can lead to an in‐
creased risk of accidents in the following situa‐
tions:
▷On winding roads.▷In heavy traffic.Seite 106CONTROLSDriving comfort106
Online Edition for Part no. 01 40 2 963 307 - VI/15
Page 112 of 251

An engine that has been switched off by the
Auto Start Stop function is restarted automati‐
cally when the parking assistant is activated.
Overview
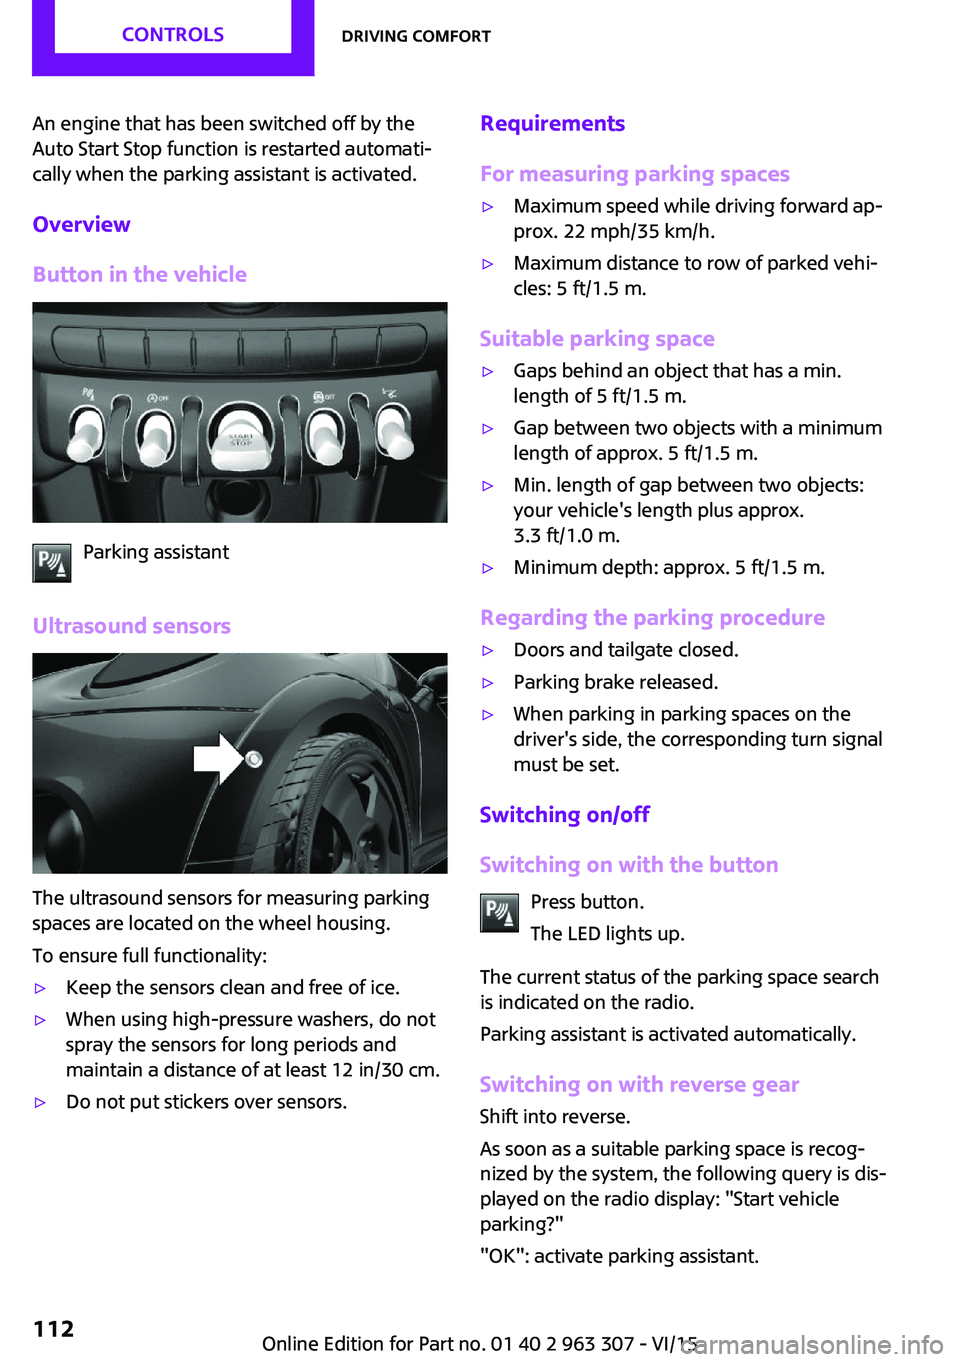
Button in the vehicle
Parking assistant
Ultrasound sensors
The ultrasound sensors for measuring parking
spaces are located on the wheel housing.
To ensure full functionality:
▷Keep the sensors clean and free of ice.▷When using high-pressure washers, do not
spray the sensors for long periods and
maintain a distance of at least 12 in/30 cm.▷Do not put stickers over sensors.Requirements
For measuring parking spaces▷Maximum speed while driving forward ap‐
prox. 22 mph/35 km/h.▷Maximum distance to row of parked vehi‐
cles: 5 ft/1.5 m.
Suitable parking space
▷Gaps behind an object that has a min.
length of 5 ft/1.5 m.▷Gap between two objects with a minimum
length of approx. 5 ft/1.5 m.▷Min. length of gap between two objects:
your vehicle's length plus approx.
3.3 ft/1.0 m.▷Minimum depth: approx. 5 ft/1.5 m.
Regarding the parking procedure
▷Doors and tailgate closed.▷Parking brake released.▷When parking in parking spaces on the
driver's side, the corresponding turn signal
must be set.
Switching on/off
Switching on with the button Press button.
The LED lights up.
The current status of the parking space search
is indicated on the radio.
Parking assistant is activated automatically.
Switching on with reverse gear
Shift into reverse.
As soon as a suitable parking space is recog‐ nized by the system, the following query is dis‐
played on the radio display: "Start vehicle
parking?"
"OK": activate parking assistant.
Seite 112CONTROLSDriving comfort112
Online Edition for Part no. 01 40 2 963 307 - VI/15
Page 143 of 251

By maintaining a suitable distance to the vehi‐
cle driving ahead of you.
Driving smoothly and proactively reduces fuel
consumption.
Avoid high engine speeds
As a rule: driving at low engine speeds lowers
fuel consumption and reduces wear.
Use 1st gear to get the vehicle moving. Starting
with the 2nd gear, accelerate rapidly. When ac‐
celerating, shift up before reaching high engine
speeds.
When you reach the desired speed, shift into
the highest applicable gear and drive with the
engine speed as low as possible and at a con‐
stant speed.
The gear shift indicator, refer to page 68, of
your vehicle indicates the most fuel efficient gear.
Use coasting conditions When approaching a red light, take your foot
off the accelerator and let the vehicle coast to a
halt.
For going downhill take your foot off the accel‐
erator and let the vehicle roll.
The flow of fuel is interrupted while coasting.
Switch off the engine
during longer stops
Switch off the engine during longer stops, e.g.,
at traffic lights, railroad crossings or in traffic
congestion.
Auto Start/Stop function
The Auto Start/Stop function of your vehicle au‐
tomatically switches off the engine during a
stop.If the engine is switched off and then restarted
rather than leaving the engine running con‐
stantly, fuel consumption and emissions are re‐
duced. Savings can begin within a few seconds
of switching off the engine.
In addition, fuel consumption is also deter‐
mined by other factors, such as driving style,
road conditions, maintenance or environmental
factors.
Switch off any functions
that are not currently
needed
Functions such as seat heating and the rear
window defroster require a lot of energy and
consume additional fuel, especially in city and stop-and-go traffic.
Therefore, switch off these functions if they are
not actually needed.
Have maintenance car‐
ried out
Have vehicles maintained regularly to achieve
optimal vehicle efficiency and service life. MINI
recommends that maintenance work be per‐
formed by a MINI dealer’s service center.
For information on the MINI Maintenance Sys‐
tems, refer to page 200.
GREEN mode
The concept
The GREEN mode supports a driving style that
saves on fuel consumption. For this purpose,
the engine control and comfort features, e. g.
the climate control output, are adjusted.
For Steptronic transmission:Seite 143Saving fuelDRIVING TIPS143
Online Edition for Part no. 01 40 2 963 307 - VI/15
Page 176 of 251

FuelVehicle features and op‐
tions
This chapter describes all standard, country-
specific and optional features offered with the
series. It also describes features that are not
necessarily available in your car, e. g., due to
the selected options or country versions. This
also applies to safety-related functions and sys‐
tems. The respectively applicable country provi‐
sions must be observed when using the respec‐
tive features and systems.
Fuel recommendation General information Depending on the region, many gas stations
sell fuel that has been customized to winter or
summer conditions. Fuel that is available in
winter helps make a cold start easier, e.g.
Information CAUTION
Even fuels that conform to the specifica‐
tions can be of low quality. This may cause en‐
gine problems, for instance poor engine start-
up behavior, poor handling and/or poor
performance. There is risk of property damage.
In case of engine problems, switch gas stations
or use a brand name fuel with a higher octane
rating. ◀
Gasoline For the best fuel efficiency, the gasoline should
be sulfur-free or very low in sulfur content.
Fuels that are marked on the gas pump as con‐
taining metal must not be used.CAUTION
Even small amounts of wrong fuel or
wrong fuel additives can damage the fuel sys‐
tem and the engine. Furthermore, the catalytic
converter is permanently damaged. There is
risk of property damage. Do not refuel or add
the following in the case of gasoline engines:▷Leaded gasoline.▷Metallic additives, e.g. manganese or iron.
Do not press the Start/Stop button after refuel‐
ing the wrong fuel. Contact a dealer’s service
center or another qualified service center or re‐
pair shop. ◀
Fuels with a maximum ethanol content of
25 %, i. e. E10 or E25, may be used for refuel‐
ing.
Ethanol should satisfy the following quality
standards:
US: ASTM 4806–xx
CAN: CGSB-3.511–xx
xx: comply with the current standard in each
case.
CAUTION
Wrong fuels can damage the fuel system
and the engine. There is risk of property dam‐
age. Do not use a fuel with a higher ethanol
percentage than recommended or one with
other types of alcohol, e.g. M5 to M100. ◀
Recommended fuel grade
MINI recommends AKI 91.
John Cooper Works:
MINI recommends AKI 93.
Minimum fuel grade MINI recommends AKI 89.
Seite 176MOBILITYFuel176
Online Edition for Part no. 01 40 2 963 307 - VI/15
Page 216 of 251

3.Let both engines run for several minutes.4.Disconnect the jumper cables in the reverse
order.
Check the battery and recharge if needed.
Tow-starting and towing
Information WARNING
Due to system limits, individual functions
can malfunction during tow-starting/towing
with the Intelligent Safety systems activated,
e.g. approach control warning with light brak‐
ing function. There is risk of an accident. Switch
all Intelligent Safety systems off prior to tow-
starting/towing. ◀
Switching off Intelligent Safety systems, refer to
page 90.
Steptronic transmission: transporting your vehicle
Information Your vehicle must not be towed if the front
wheels are touching the ground.
CAUTION
The vehicle can be damaged when tow‐
ing the vehicle with a lifted rear axle. There is
risk of property damage. Have vehicle trans‐
ported only with lifted front axle or on a load‐
ing platform. ◀
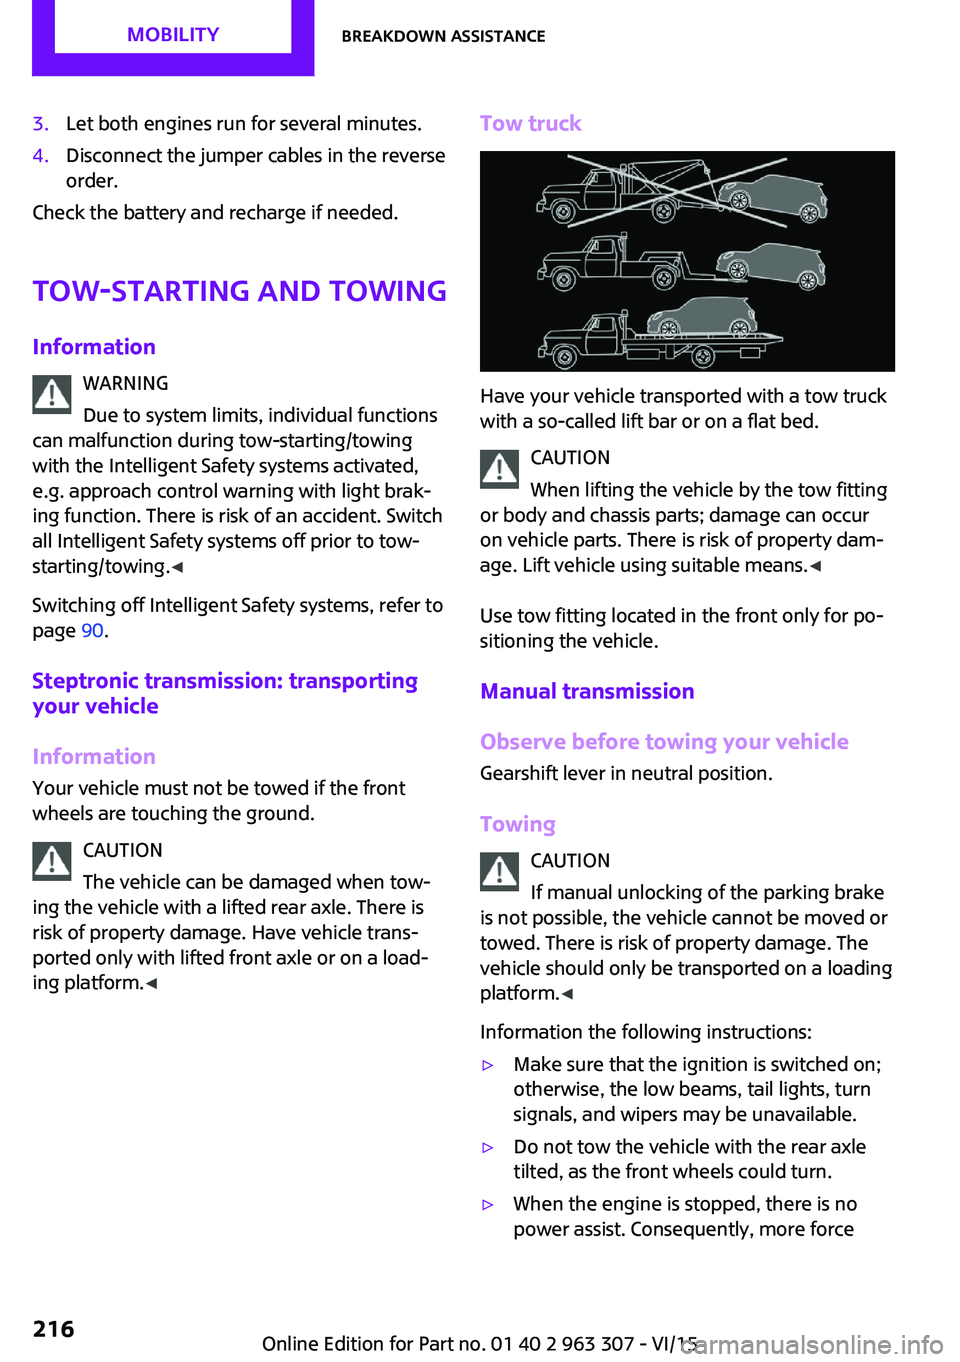
Tow truck
Have your vehicle transported with a tow truck
with a so-called lift bar or on a flat bed.
CAUTION
When lifting the vehicle by the tow fitting
or body and chassis parts; damage can occur
on vehicle parts. There is risk of property dam‐
age. Lift vehicle using suitable means. ◀
Use tow fitting located in the front only for po‐
sitioning the vehicle.
Manual transmission
Observe before towing your vehicle
Gearshift lever in neutral position.
Towing CAUTION
If manual unlocking of the parking brake
is not possible, the vehicle cannot be moved or
towed. There is risk of property damage. The
vehicle should only be transported on a loading
platform. ◀
Information the following instructions:
▷Make sure that the ignition is switched on;
otherwise, the low beams, tail lights, turn
signals, and wipers may be unavailable.▷Do not tow the vehicle with the rear axle
tilted, as the front wheels could turn.▷When the engine is stopped, there is no
power assist. Consequently, more forceSeite 216MOBILITYBreakdown assistance216
Online Edition for Part no. 01 40 2 963 307 - VI/15
Page 219 of 251

Tow-starting the engine is not possible due to
the Steptronic transmission.
Have the cause of the starting problems fixed.
Manual transmission
If possible, do not tow-start the vehicle but
start the engine by jump-starting, refer to
page 214. If the vehicle is equipped with a cat‐
alytic converter, only tow-start while the engine
is cold.1.Switch on the hazard warning system and
comply with local regulations.2.Ignition, refer to page 49, on.3.Engage third gear.4.Have the vehicle tow-started with the
clutch pedal pressed and slowly release the
pedal. After the engine starts, immediately
press on the clutch pedal again.5.Stop at a suitable location, remove the tow
bar or rope, and switch off the hazard
warning system.6.Have the vehicle checked.Seite 219Breakdown assistanceMOBILITY219
Online Edition for Part no. 01 40 2 963 307 - VI/15
Page 221 of 251

Steptronic transmission:1.Drive into the car wash.2.Engage selector lever position N.3.Make sure that the parking brake is re‐
leased.4.Press the Start/Stop button to switch off the
engine.
In this way, the ignition remains switched
on, and two Check-Control messages are
displayed.
A signal sounds when you leave the vehicle
while in selector lever position N.
The vehicle cannot be locked from the outside
when in selector lever position N. A signal is
sounded when an attempt is made to lock the
vehicle.
To start the engine with manual transmission:
1.Press on the clutch pedal.2.Press the Start/Stop button.
To start the engine with Steptronic transmis‐
sion:
1.Depress the brake pedal.2.Press the Start/Stop button.
Headlights
▷Do not rub dry and do not use abrasive or
acidic cleansers.▷Soak areas that have been dirtied e. g.,
from insects, with shampoo and wash off
with water.▷Thaw ice with de-icing spray; do not use an
ice scraper.
After washing the vehicle
After washing the vehicle, apply the brakes
briefly to dry them; otherwise, braking action
can be reduced and corrosion of the brake
discs can occur.
Completely remove all residues on the win‐
dows, to minimize loss of visibility due to
smearing and to reduce wiper noises and wiper
blade wear.
Vehicle care Car care products
The manufacturer of your vehicle recommends
using care and cleaning products from MINI.
WARNING
Cleansers can contain substances that are
dangerous and harmful to your health. There is
risk of injuries. When cleaning the interior, open
the doors or windows. Only use products in‐
tended for cleaning vehicles. Follow the instruc‐
tions on the container. ◀
Vehicle paint
Regular care contributes to driving safety and
value retention. Environmental influences in
areas with elevated air pollution or natural con‐
taminants, such as tree resin or pollen can af‐
fect the vehicle's paintwork. Tailor the fre‐
quency and extent of your car care to these
influences.
Aggressive substances such as spilled fuel, oil,
grease or bird droppings must be removed im‐
mediately to prevent the finish from being al‐
tered or discolored.
Leather careRemove dust from the leather often, using acloth or vacuum cleaner.
Otherwise, particles of dust and road grime
chafe in pores and folds, and lead to increased
wear and premature degradation of the leather
surface.
To guard against discoloration, such as from
clothing, provide leather care roughly every
two months.
Clean light-colored leather more frequently be‐
cause soiling on such surfaces is substantially
more visible.Seite 221CareMOBILITY221
Online Edition for Part no. 01 40 2 963 307 - VI/15
Page 242 of 251

Everything from A to ZIndexA
ABS, Antilock Brake Sys‐ tem 97
Acceleration Assistant, refer to Launch Control 61
ACC, see camera-based cruise control 101
Activated-charcoal filter 120
Active Cruise Control, see camera-based cruise con‐
trol 101
Additives, oil 197
Adjustments, seats/head re‐ straints 36
Adjustments, steering wheel 44
After washing vehicle 221
Airbags 81
Airbags, indicator/warning light 82
Air circulation, refer to Recir‐ culated-air mode 119
Air circulation, see Recircu‐ lated-air mode 116
Air conditioner 115
Air, dehumidifying, see Cool‐ ing function 116, 118
Air distribution, manual 116, 119
Air flow, air conditioner 116
Air flow, automatic climate control 119
Air pressure, tires 178
Air vents, refer to Ventila‐ tion 120
Alarm system 30
Alarm triggering 30
Alarm, unintentional 31
All around the center con‐ sole 16 All around the roofliner 17
All around the steering wheel 14
All-season tires, see Winter tires 187
Alternating-code hand-held transmitter 122
Alternative oil types 197
Antifreeze, washer fluid 57
Antilock Brake System, ABS 97
Anti-slip control, see DSC 97
Apple iPod/iPhone 157
Approved axle load 227
Ash tray 125
Assistance when driving off 100
Assist system, see Intelligent Safety 90
AUTO intensity 118
Automatic car wash 220
Automatic climate con‐ trol 117
Automatic Curb Monitor 42
Automatic deactivation, Front- seat passenger airbags 83
Automatic headlight con‐ trol 77
Automatic locking 30
Automatic recirculated-air control 119
Automatic transmission with Steptronic 58
AUTO program, automatic cli‐ mate control 118
AUTO program, intensity 118
Auto Start/Stop function 51
AUX-IN port 156
Average fuel consumption 71
Average speed 72
Axle loads, weights 227 B
Backrest curvature, refer to Lumbar support 37
Balance 150
Band-aids, see First-aid kit 214
Bar for tow-starting/ towing 217
Bass 150
Battery replacement, vehicle battery 212
Battery, vehicle 212
Belts, safety belts 38
Beverage holder, cu‐ pholder 130
Bluetooth, refer to Hands-free system 164
Bonus range, GREEN mode 144
Bottle holder, see Cu‐ pholder 130
Brake assistant 97
Brake discs, break-in 136
Brake pads, break-in 136
Braking, hints 137
Breakdown assistance 214
Break-in 136
Bug light 204
Bulb replacement 203
Bulb replacement, front 204
Bulb replacement, rear 206
Bulb replacement, side 209
Bulbs and lights 203
Button, Start/Stop 49
Bypassing, see Jump-start‐ ing 214 Seite 242REFERENCEEverything from A to Z242
Online Edition for Part no. 01 40 2 963 307 - VI/15
Page 244 of 251

Display, engine tempera‐ture 72
Display lighting, see Instru‐ ment lighting 79
Displays 62
Displays, cleaning 223
Disposal, coolant 199
Disposal, vehicle battery 213
Distance control, see PDC 108
Distance, setting units 72
Door lock, see Remote con‐ trol 22
Drive mode, GREEN mode 143
Drive-off assistant 100
Drive-off assistant, see DSC 97
Driving Dynamics Control 99
Driving instruction, GREEN mode 145
Driving instructions, break- in 136
Driving mode 99
Driving notes, general 136
Driving stability control sys‐ tems 97
Driving tips 136
DSC Dynamic Stability Con‐ trol 97
DTC Dynamic Traction Con‐ trol 98
Dynamic Damping Control 99
Dynamic Stability Control DSC 97
Dynamic Traction Control DTC 98
E Electronic displays, instrument cluster 63
Electronic oil measure‐ ment 195
Electronic Stability Program ESP, see DSC 97 Emergency detection, remote
control 23
Emergency release, fuel filler flap 174
Emergency start function, en‐ gine start 23
Emergency wheel, compact wheel, refer to Emergency
wheel 210
Energy Control 68
Engine, automatic Start/Stop function 51
Engine, automatic switch- off 51
Engine compartment 193
Engine compartment, working in 194
Engine coolant 198
Engine idling when driving, coasting 145
Engine oil 195
Engine oil, adding 196
Engine oil additives 197
Engine oil change 197
Engine oil filler neck 196
Engine oil types, alterna‐ tive 197
Engine oil types, suitable 197
Engine start during malfunc‐ tion 23
Engine start, jump-start‐ ing 214
Engine start, refer to Starting the engine 50
Engine stop 50
Engine temperature, dis‐ play 72
Entering a car wash 220
Equipment, interior 121
Error displays, see Check Con‐ trol 63
ESP Electronic Stability Pro‐ gram, see DSC 97
Exchanging wheels/tires 186
Exhaust system 137 Exterior mirror, automatic
dimming feature 43
Exterior mirrors 42
External start 214
External temperature dis‐ play 67
External temperature warn‐ ing 67
Eyes for securing cargo 140
F
Fader 150
Failure message, see Check Control 63
False alarm, refer to Uninten‐ tional alarm 31
Fan, refer to Air flow 116
Fan, see Air flow 119
Filler neck for engine oil 196
Fine wood, care 222
First-aid kit 214
Fitting for towing, see tow fit‐ ting 218
Flat tire, changing wheels 210
Flat Tire Monitor FTM 88
Flat tire, repairing 188
Flat tire, Tire Pressure Monitor TPM 84
Flat tire, warning lamp 85, 88
Flooding 137
Floor carpet, care 223
Floor mats, care 223
Fogged up windows 116
Folding back rear seat back‐ rests 127
Fold-out position, windshield wipers 57
Foot brake 137
Formats, setting 72
Front airbags 81
Front-end collision warning with City Braking func‐
tion 91
Front fog lights 79 Seite 244REFERENCEEverything from A to Z244
Online Edition for Part no. 01 40 2 963 307 - VI/15
Page 248 of 251

RON recommended fuelgrade 176
Roofliner 17
Roof load capacity 227
Roof-mounted luggage rack 140
Rope for tow-starting/ towing 217
RSC Run Flat System Compo‐ nent, see Run-flat tires 187
Rubber components, care 222
Run-flat tires 187
S
Safe braking 137
Safety belt reminder for driv‐ er's seat and front passenger
seat 39
Safety belts 38
Safety belts, care 222
Safety switch, windows 33
Safety systems, airbags 81
Satellite radio 154
Saving fuel 142
Screwdriver 202
Screw thread for tow fit‐ ting 218
Sealant 188
Seat belts, see Safety belts 38
Seat heating, front 38
Seating position for chil‐ dren 45
Seats 36
Select a station 151
Selecting a station man‐ ually 152
Selection list in instrument cluster 70
Selector lever, Steptronic transmission 58
Sensors, care 223
Service and warranty 8
Service requirements, Condi‐ tion Based Service CBS 200 Service requirements, dis‐
play 68
SET button, see camera-based cruise control 101
SET button, see Cruise con‐ trol 106
Settings and information 72
Settings, locking/unlocking 29
Settings, mirrors 42
Shift paddles on the steering wheel 60
Side airbag 81
Signaling, horn 14
Signals when unlocking 30
Sitting safely 36
Size 226
Slide/tilt glass roof 33
Snow chains 191
Socket 125
Socket, OBD Onboard Diag‐ nostics 201
Sound settings 150
Spare fuse 213
Spare tire, refer to Emergency wheel 210
Speed, average 72
Speed limit detection, on- board computer 72
Speed limiter, display 69
Speed Limit Information 69
Speed warning 72
Sport instruments, cockpit 74
SPORT program, Dynamic Driving Control 99
Sport program, transmis‐ sion 59
Stability control systems 97
Start/stop, automatic func‐ tion 51
Start/Stop button 49
Start function during malfunc‐ tion 23
Starting the engine 50
Station, storing 152
Status of Owner's Manual 7
Steering wheel, adjusting 44 Steptronic Sport transmission,
refer to Steptronic transmis‐
sion 58
Steptronic transmission 58
Stopping the engine 50
Storage compartments 129
Storage, tires 187
Storing the vehicle 223
Suitable engine oil types 197
Summer tires, tread 185
Sun visor 125
Supplementary text mes‐ sages 66
Switch for Dynamic Driving 99
Switch, see Cockpit 14
Symbols 6
T Tachometer 67
Tailgate 27
Tailgate via remote control 25
Tail lights 206
Technical changes, refer to Own Safety 7
Technical data 226
Temperature, air condi‐ tioner 116
Temperature, automatic cli‐ mate control 118
Temperature display for exter‐ nal temperature 67
Temperature display, setting units 72
Temperature, engine 72
Tempomat, see camera-based cruise control 101
Terminal, starting aid 215
Text messages, supplemen‐ tary 66
Theft alarm system, see Alarm system 30
Thigh support 37
Tilt alarm sensor 31
Time, radio, setting time on the radio 73 Seite 248REFERENCEEverything from A to Z248
Online Edition for Part no. 01 40 2 963 307 - VI/15