steering MINI COOPER CONVERTIBLE 2007 Owners Manual
[x] Cancel search | Manufacturer: MINI, Model Year: 2007, Model line: COOPER CONVERTIBLE, Model: MINI COOPER CONVERTIBLE 2007Pages: 172, PDF Size: 1.9 MB
Page 4 of 172

CONTENTS
2
© 2006 Bayerische Motoren Werke
Aktiengesellschaft
Munich, Germany
Reprinting, including excerpts, only with the
written consent of BMW AG, Munich.
Order No. 01 41 0 012 950
US English VIII/06
Printed in Germany
Printed on environmentally friendly paper,
bleached without chlorine, suitable for recycling.NOTES About this Owner's Manual6
Additional sources of information6
Symbols used6
Your individual vehicle6
Editorial notice7
For your own safety7
Symbol on vehicle parts8
Service and warranty8
Reporting safety defects9
OVERVIEWCockpit12
Display elements13
Display elements with navigation system
or Cockpit Chrono Pack14
Indicator and warning lamps16
Multifunction steering wheel20
CONTROLSOpening and closing:
Keys24
Central locking system24
Opening and closing: from outside25
Opening and closing: from inside28
Tailgate29
Electric power windows31
Glass sunroof, electric33
Roller sun blind34
Convertible top with integrated sliding
sunroof35
Wind deflector40
Adjustments:
Safe seating position42
Seat adjustment43
Head restraints44
Entry to the rear45
Safety belts46
Seat heating47
Steering wheel47
Mirrors48
Vehicle Memory49
Transporting children safely50
Page 14 of 172

12
1>Parking lamps/Low beams60
>Turn signal indicators61
>Standing lamps60
>High beams61
>Headlamp flasher61
>Onboard computer702 Washer/wiper system63
3 Instrument lighting62
4 Outside mirror adjustment48
5 Hazard warning flashers6 Bonnet release114
7 Adjusting steering wheel47
8Horn
9 Socket for Onboard Diagnostics
OBD122COCKPIT
Page 18 of 172

16
INDICATOR AND WARNING LAMPSTechnology that monitors itselfThe system runs a check on the indicator
and warning lamps marked by
+ when you
turn the key in the ignition lock. They each
light up once for different periods of time.
If a malfunction should occur in one of
these systems, the corresponding lamp
does not go out after the engine is started
or it lights up while the vehicle is moving.
You will see below the correct way to react
to this.
Red: stop immediately
Battery charge current
+
The battery is no longer being
charged. Indicates a defective alter-
nator drive belt or a problem with the
charge circuit. Please contact your MINI
Dealer.
If the drive belt is defective, do not
continue driving. The engine could be
damaged due to overheating. When the
power-assist is deactivated, increased
steering effort is required.<
Engine oil pressure
+
The engine oil pressure is too low.
Pull over immediately and switch
off the engine. Please contact your MINI
Dealer.
Do not continue driving; otherwise,
the engine could be damaged
because of inadequate lubrication.<
Brake warning lamp
+
Lights up although the parking
brake is released. The brake fluid
level is too low. Before driving further, be
sure to comply with the information on
page120. Have the system checked imme-
diately.
Canadian models display this
warning lamp.
If equipped with a navigation system or
Cockpit Chrono Pack:
Coolant temperature warning
lamp in the navigation system or
Cockpit Chrono Pack+
Lights up while driving:
engine is too hot. Pull over to the side of
the road immediately, switch off the
engine and allow it to cool down, refer also
to page68. Have the system checked
immediately.
Page 21 of 172

19
OVERVIEW REPAIRS OPERATION CONTROLS DATA INDEX
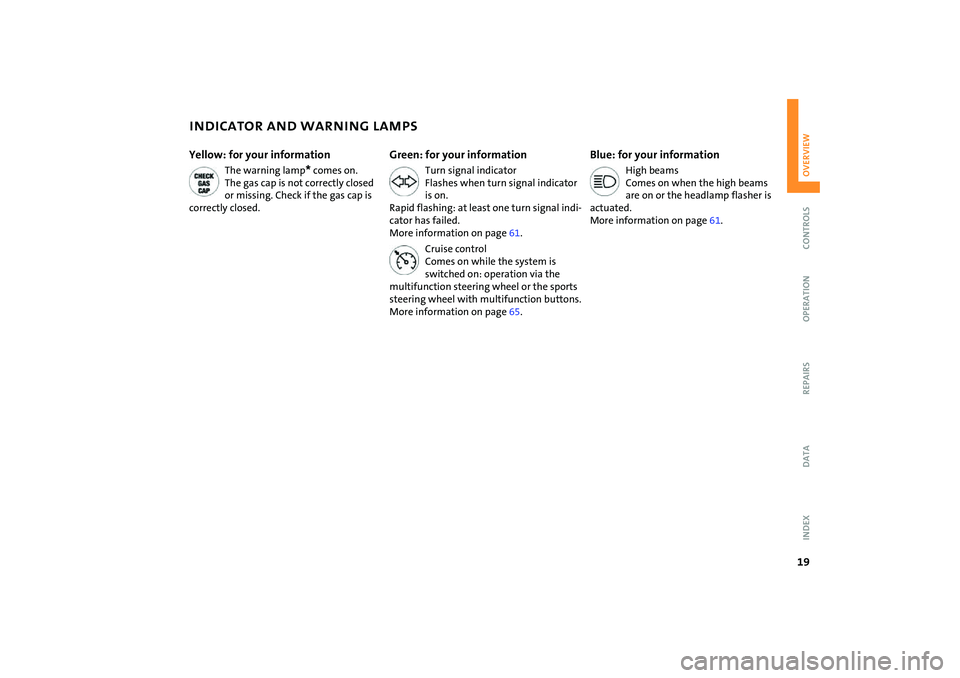
INDICATOR AND WARNING LAMPSYellow: for your information
The warning lamp
* comes on.
The gas cap is not correctly closed
or missing. Check if the gas cap is
correctly closed.
Green: for your information
Turn signal indicator
Flashes when turn signal indicator
is on.
Rapid flashing: at least one turn signal indi-
cator has failed.
More information on page61.
Cruise control
Comes on while the system is
switched on: operation via the
multifunction steering wheel or the sports
steering wheel with multifunction buttons.
More information on page65.
Blue: for your information
High beams
Comes on when the high beams
are on or the headlamp flasher is
actuated.
More information on page61.
Page 22 of 172

20
MULTIFUNCTION STEERING WHEEL
*
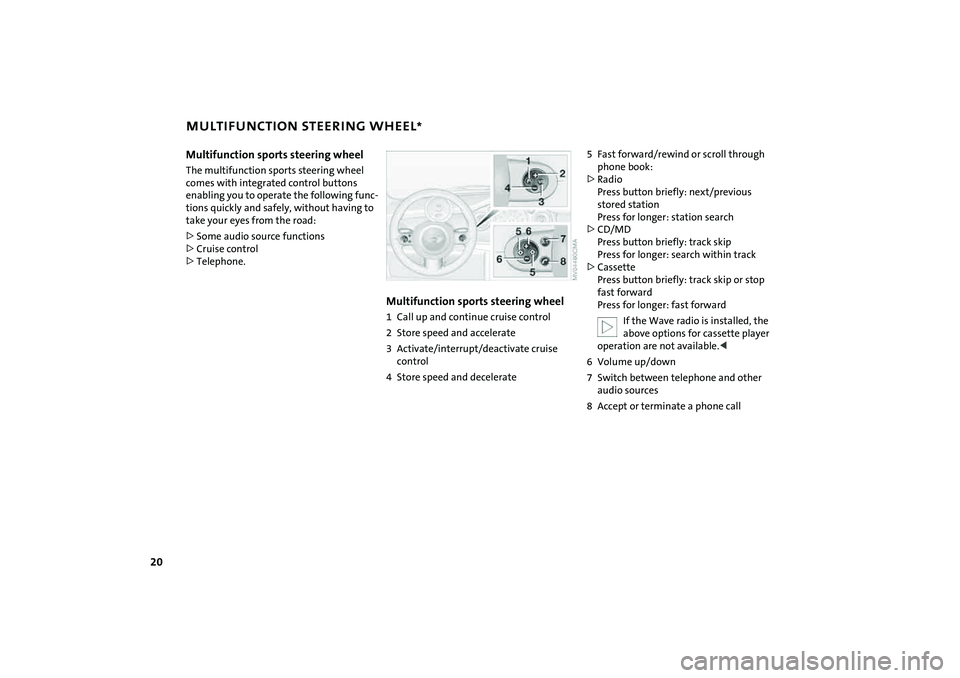
Multifunction sports steering wheel
The multifunction sports steering wheel
comes with integrated control buttons
enabling you to operate the following func-
tions quickly and safely, without having to
take your eyes from the road:
>Some audio source functions
>Cruise control
>Telephone.
Multifunction sports steering wheel1 Call up and continue cruise control
2 Store speed and accelerate
3 Activate/interrupt/deactivate cruise
control
4 Store speed and decelerate
5 Fast forward/rewind or scroll through
phone book:
>Radio
Press button briefly: next/previous
stored station
Press for longer: station search
>CD/MD
Press button briefly: track skip
Press for longer: search within track
>Cassette
Press button briefly: track skip or stop
fast forward
Press for longer: fast forward
If the Wave radio is installed, the
above options for cassette player
operation are not available.<
6 Volume up/down
7 Switch between telephone and other
audio sources
8 Accept or terminate a phone call
Page 44 of 172

42
SAFE SEATING POSITIONThe ideal seating position can make a vital
contribution to relaxed, relatively fatigue-
free driving. Together with the safety belts
and airbags, the seating position also plays
an important role in providing occupants
with maximum levels of passive safety in
an accident. To ensure that the safety sys-
tems operate with optimal efficiency, we
strongly urge you to observe the instruc-
tions contained in the following section.
For additional information about trans-
porting children safely, refer to page50.Airbags
Always maintain an adequate dis-
tance between yourself and all of the
airbags. Always hold the steering wheel by
the rim with the hands at the 9 and
3 o'clock positions to keep any chance of
injury to hands or arms to an absolute min-
imum, should the airbag be deployed.
No one and nothing is to come between
the airbags and the seat occupant. Do not
use the front passenger airbag cover as a
storage surface for objects of any kind.
Ensure that the front passenger is correctly
seated, e.g. that no feet or legs are propped
against the dashboard. Otherwise, leg
injury could result if the front passenger
airbag suddenly deployed.
Make sure that passengers do not lean
their heads against the side or head airbag,
as injuries could result if the side airbags
were triggered.<
Even if all these instructions are followed, it
cannot entirely be ruled out that in some
circumstances injury may result from con-
tact with the airbags. In sensitive individu-
als, the ignition and inflation noise may
induce a mild hearing loss that is usually
temporary.
For airbag locations and additional infor-
mation on airbags, refer to page76.Head restraintA correctly adjusted head restraint reduces
the risk of injury to the cervical spine in the
event of an accident.
Adjust the head restraint in such a
way that it is centered roughly at ear
level. Otherwise, there is an increased risk
of injury in the event of an accident.
work in conjunction with the safety belts,
but do not replace them. Your vehicle is
equipped with four seats, each of which is
provided with a safety belt.
Never allow more than one person to
wear a single safety belt. Never allow
infants or small children to ride in a passen-
ger's lap. Make sure that the belt in the lap
area sits low across the hips and does not
press against the abdomen. The safety belt
must not rest against the throat, run across
sharp edges, pass over hard or fragile
objects or be pinched. Fasten the safety
belt so that it is not twisted and sits as
snugly as possible against the lap and
shoulder. Otherwise the belt could slide
over the hips and injure the abdomen in
the event of a frontal collision. Avoid wear-
ing bulky clothing and pull the belt in the
upper-body area upward periodically to
retension it. Otherwise, the restraining
effect of the safety belt could be dimin-
ished.<
For information on using the safety belts,
refer to page46.
Page 49 of 172

47
OVERVIEW REPAIRS OPERATIONCONTROLS DATA INDEX
SAFETY BELTS SEAT HEATING
* STEERING WHEEL
Damaged safety belts
If the safety belts are stressed or
damaged due to an accident: have
the belt system, including the seat-belt
tensioners, replaced and the belt anchor-
ages inspected. Have the necessary work
carried out only by a MINI Dealer or a work-
shop that has specially trained personnel
working in accordance with the specifica-
tions of the MINI manufacturer, otherwise
correct operation of these safety systems is
not ensured.<
Press once for each temperature level.
The highest preselected temperature is set
when two LEDs are lit.
To switch off:
Press the button for a longer period.
Do not adjust the steering wheel
while the vehicle is moving; other-
wise unexpected movement could increase
the accident risk.<
Settings1. Push the locking lever downward
2. Adjust the desired steering wheel posi-
tion
3. Pull the lever back in.
Page 55 of 172

53
OVERVIEW REPAIRS OPERATIONCONTROLS DATA INDEX
IGNITION LOCK STARTING THE ENGINE0 Steering locked
1 Steering unlocked
2 Ignition switched on
3 Starting the engineSteering lockedThe key can be inserted or removed in this
position only.
To lock the steering:
1. Remove the key
2. Turn the steering wheel slightly to the
left or right until the lock engages.
An alarm goes off if the key remains in the
ignition after opening the driver's door.
Interlock for automatic transmission with
Steptronic:
To turn the key back to the 0 position or to
remove it, first move the selector lever to
position P.Steering unlockedIndividual electrical accessories are ready
for operation.
You will find that it is often easier to turn
the ignition key from position 0 to
position 1 when you move the steering
wheel slightly to help disengage the lock.Ignition switched onAll electrical accessories are ready for oper-
ation.Starting the engine
Vehicles with manual transmission:
step on the clutch when starting the
vehicle. A lockout prevents the engine from
starting if the clutch is not depressed.<
Do not allow the engine to run in
enclosed spaces. Breathing the nox-
ious exhaust gases can lead to uncon-
sciousness and death. The exhaust gases
contain carbon monoxide, an odorless and
colorless, but highly toxic gas.
Do not leave the vehicle unattended with
the engine running. This is a safety hazard.
Before getting out of the vehicle with the
engine running, put the transmission in
idle or position P, and apply the parking
brake. If you fail to do this, the vehicle
could move.<
Do not let the engine warm up with the
vehicle at a standstill. Move off immedi-
ately at a moderate engine speed.
Do not stop the starting procedure
too early, and do not continue it for
more than approx. 20 seconds. Release the
ignition key immediately when the engine
starts.
Extended starting attempts, characterized
by excessively frequent or long periods
with the starter engaged, can lead to dam-
age in the catalytic converter.<
Page 56 of 172

54
STARTING THE ENGINE SWITCHING OFF THE ENGINE PARKING BRAKEManual transmission1. Engage the parking brake
2. Gearshift lever in idle position
3. Depress the clutch
4. Start the engine.Automatic transmission with
Steptronic1. Press the footbrake
2. Put the selector lever in position P or N
3. Start the engine.Special starting conditionsIn the following situations, depress the
accelerator pedal halfway and continue
starting the engine for up to approx.
10 seconds:
>If the engine does not start on the first
attempt, for instance if the engine is very
hot or cold.
>The engine is started at very low temper-
atures, below approx. +57/–156, at
high altitudes above 3,300 ft/1000 m.You should never remove the ignition
key when the vehicle is in motion, as
the steering lock could engage.
When you leave the vehicle, always remove
the ignition key and engage the steering
lock.
When parking on inclines, engage the park-
ing brake, or the vehicle could roll.<
Manual transmissionTurn the ignition key to position 1 or 0.Automatic transmission with
SteptronicEngage selector lever position P, turn the
ignition key to position 1 or 0.
The parking brake is designed primarily to
prevent the vehicle from rolling when it is
parked. It operates against the rear wheels.To engageLever automatically locks in position.
The indicator lamp in the instrument clus-
ter lights up from ignition key position 2,
refer to page17.To release1. Pull up slightly
2. Press the button
3. Push the lever downwards.
If, in exceptional circumstances, it
should be necessary to engage the
parking brake while the vehicle is in
motion, do not pull the lever with excessive
Page 60 of 172

58
AUTOMATIC TRANSMISSION WITH STEPTRONIC
*
Switching from M/S + – Manual mode into
the selector lever positions P, R and N is
only possible via D.Shifting with the selector lever>Briefly press the selector lever in the +
direction:
Transmission shifts up
>Briefly press the selector lever in the –
direction:
Transmission shifts down.
M1 to M6 appear in the gear indicator.
Shifting on the steering wheel*The shift paddles allow the gears to be
changed rapidly and, above all, safely, since
both hands can remain on the steering
wheel.
To shift up or down with one of the two
shift paddles:
>Pull the shift paddle:
Transmission shifts up
>Press the shift paddle:
Transmission shifts down.
M1 to M6 appear in the gear indicator.
The transmission will execute only gear
changes that result in a plausible combina-
tion of vehicle speed and engine rpm, e.g. it
will not shift down if that would result in
excessive engine speed.
In the MINI COOPER S, with the selec-
tor lever in position D, automatic
mode, you can shift gears using the shift
paddles on the steering wheel. The trans-
mission automatically switches to manual
mode. If you do not shift gears with the
shift paddles or accelerate for a certain
amount of time, the transmission auto-
matically returns to automatic mode.<
MalfunctionEP appears on the display. The transmission
system is malfunctioning. Avoid high loads.
All selector lever positions can still be
engaged; in the forward driving positions,
however, the vehicle can only be driven
with a limited gear selection.
Have the system checked immediately.
Jump-starting and towing, refer to
page142 ff.