display MINI COOPER CONVERTIBLE 2009 Owners Manual
[x] Cancel search | Manufacturer: MINI, Model Year: 2009, Model line: COOPER CONVERTIBLE, Model: MINI COOPER CONVERTIBLE 2009Pages: 172, PDF Size: 2.73 MB
Page 12 of 172

Cockpit
10
Cockpit
Around the steering wheel: Controls and displays
1Adjusting the exterior mirrors, folding them
in and out
*38
2
Parking lamps73
Low beams73
Automatic headlamp control
*73
Turn signals47
High beams75
Headlamp flasher47
Roadside parking lamps
*75
Computer
*53
Page 14 of 172

Cockpit
12
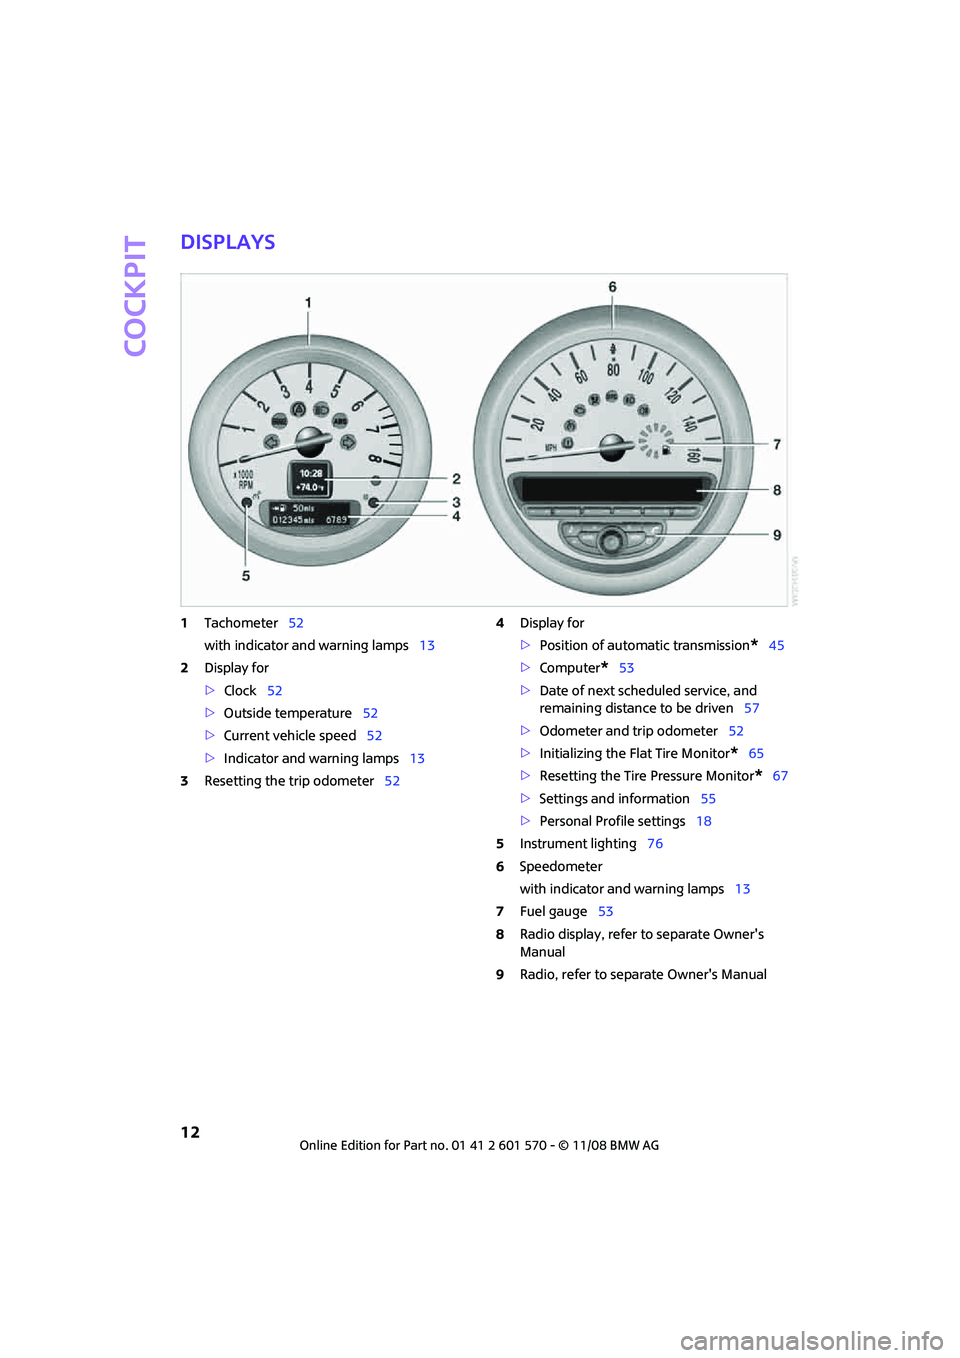
Displays
1Tachometer52
with indicator and warning lamps13
2Display for
>Clock52
>Outside temperature52
>Current vehicle speed52
>Indicator and warning lamps13
3Resetting the trip odometer524Display for
>Position of automatic transmission
*45
>Computer
*53
>Date of next scheduled service, and
remaining distance to be driven57
>Odometer and trip odometer52
>Initializing the Flat Tire Monitor
*65
>Resetting the Tire Pressure Monitor
*67
>Settings and information55
>Personal Profile settings18
5Instrument lighting76
6Speedometer
with indicator and warning lamps13
7Fuel gauge53
8Radio display, refer to separate Owner's
Manual
9Radio, refer to separate Owner's Manual
Page 21 of 172

REFERENCEAT A GLANCE CONTROLS DRIVING TIPS MOBILITY
19
Personal Profile settings
For more information on specific settings, refer
to the specified pages.
>Response of the central locking system
when the car is being unlocked19
>Automatic locking of the vehicle23
>Triple turn signal activation47
>Settings for the displays on the onboard
monitor, in the speedometer and in the
tachometer.
>12h/24h mode of the clock, refer to For-
mats and units of measure56
>Date format, refer to Formats and units
of measure56
>Units of measure for fuel consumption,
distance covered/remaining distances
and temperature, refer to Formats and
units of measure56
>Light settings:
>Pathway lighting73
>Daytime running lamps74
>Automatic climate control
*: AUTO program,
activating/deactivating cooling function and
automatic recirculated-air control, setting
temperature, air flow rate and
distribution80
>Entertainment:
>Audio volume, refer to separate Owner's
Manual
>Speed-dependent volume, refer to sepa-
rate Owner's Manual
Central locking system
The concept
The central locking system is ready for operation
whenever the driver's door is closed.
The system simultaneously engages and
releases the locks on the following:
>Doors
>Tailgate
>Fuel filler door
Operating from outside
>Via the remote control
>Via the door lock
*
>In cars with convenient access*, via the door
handles on the driver's and passenger's
sides.
The anti-theft system is also operated at the
same time. It prevents the doors from being
unlocked using the lock buttons or door han-
dles. The remote control can also be used to
switch on/off the welcome lamps and interior
lamps. The alarm system
* is also activated or
deactivated, page24.
Operating from inside
Button for central locking system, page22.
In the event of a sufficiently severe accident, the
central locking system unlocks automatically. In
addition, the hazard warning flashers and inte-
rior lamps come on.
Opening and closing:
from outside
Persons or animals in a parked vehicle
could lock the doors from the inside. Take
the key with you when you leave the vehicle so
that the vehicle can be opened from the out-
side.<
Using the remote control
Unlocking
Press button .
The welcome lamps and interior lamps come on.
Unlocking mode
You can also set which parts of the car are
unlocked. The setting is stored for the remote
control in use.
Page 22 of 172

Opening and closing
20
1.Switch on the ignition, refer to page43.
2.Briefly press the button in the turn indicator
lever repeatedly until "SET/INFO" is displayed.
3.Press and hold the button until the display
changes.
4.Briefly press the button repeatedly until the
symbol and "SET" are displayed.
5.Press and hold the button until the display
changes.
6.Briefly press the button repeatedly until the
display shows the illustrated symbol, arrow.
7.Press and hold the button until the display
changes.
8.Briefly press the button to select:
>
Press the button once to unlock
only the driver's door and the fuel filler
door. Press the button twice to unlock the entire
vehicle.
>
Press the button once to unlock
the entire vehicle.
9.Press and hold the button until the display
changes. The setting is stored for the remote
control currently in use.
Convenient opening
Hold the button down.
The power windows are opened and the glass
sunroof* is raised. In the MINI Convertible, the
windows and the sliding sunroof are opened.
In order to open the convertible top of your MINI
Convertible: release button and push again until
the convertible top is completely open. The side
window remains open.
Convenient closing is not possible by
means of the remote control.<
Locking
Press the button.
Do not lock the vehicle from the outside if
there is any person inside, because the
vehicle cannot be unlocked from inside without
special knowledge.<
Setting confirmation signals
To have the vehicle confirm when it has been
locked or unlocked.
1.Switch on the ignition, refer to page43.
2.Briefly press the button in the turn indicator
lever repeatedly until "SET/INFO" is dis-
played.
Page 23 of 172

REFERENCEAT A GLANCE CONTROLS DRIVING TIPS MOBILITY
21
3.Press and hold the button until the display
changes.
4.Briefly press the button repeatedly until the
symbol and "SET" are displayed.
5.Press and hold the button until the display
changes.
6.Briefly press the button to select, arrow:
> Confirmation signal during unlocking
> Confirmation signal during locking
7.Press and hold the button until the display
changes.
8.Briefly press the button to select:
>
The hazard warning flashers light up dur-
ing unlocking/locking.
>
An acoustic signal sounds during unlock-
ing/locking.
>
The hazard warning flashers light up and
an acoustic signal
* sounds during
unlocking/locking.
>
The function is deactivated.
9.Press and hold the button until the display
changes. The setting is stored.
Switching on interior lamps
While the car is locked:
Press the button.
You can also use this function to locate your
vehicle in parking garages, etc.
Unlocking the tailgate
Press the button.
When it is opened, the tailgate swings
upward and outward to the rear. Ensure
that there is sufficient clearance.
To prevent accidentally locking yourself out, do
not place the key down in the cargo bay. If the
tailgate was locked before opening, it will be
locked again after it is closed.
Before and after each trip, check that the tail-
gate has not been inadvertently unlocked.<
Malfunctions
The remote control may malfunction due to
local radio waves. If this occurs, unlock and lock
the car at the door lock with the integrated key.
If the car can no longer be locked with a remote
control, the battery in the remote control is dis-
charged. Use this remote control during an
extended drive; this will recharge the battery,
page18.
For US owners only
The transmitter and receiver units comply with
part 15 of the FCC/Federal Communications
Commission regulations. Operation is governed
by the following:
FCC ID:
LX8766S
LX8766E
LX8CAS
Compliance statement:
This device complies with part 15 of the FCC
Rules. Operation is subject to the following two
conditions:
>This device must not cause harmful interfer-
ence, and
>This device must accept any interference
received, including interference that may
cause undesired operation.
Page 25 of 172

REFERENCEAT A GLANCE CONTROLS DRIVING TIPS MOBILITY
23
Automatic locking
You can also set the situations in which the car
locks. The setting is stored for the remote con-
trol in use.
1.Switch on the ignition, refer to page43.
2.Briefly press the button in the turn indicator
lever repeatedly until "SET/INFO" is dis-
played.
3.Press and hold the button until the display
changes.
4.Briefly press the button repeatedly until the
symbol and "SET" are displayed.
5.Press and hold the button until the display
changes.
6.Briefly press the button repeatedly until the
display shows the illustrated symbol, arrow.7.Press and hold the button until the display
changes.
8.Briefly press the button to select:
>
The central locking system automatically
locks the vehicle after some time if no
door has been opened.
>
The central locking system automatically
locks the vehicle as soon as you drive off.
>
The central locking system automatically
locks the vehicle after some time if no
door has been opened, or as soon as you
drive off.
>
The central locking system remains
unlocked.
9.Press and hold the button until the display
changes. The setting is stored.
Trunk lid
To avoid damage, make sure there is suf-
ficient clearance before opening the tail-
gate.<
Opening
In some national-market versions, the tail-
gate cannot be unlocked using the remote
control unless the vehicle is unlocked first.<
Press the button in the handle, arrow, or the
button of the remote control, for an
extended period. The tailgate is unlocked and
can be opened.
Page 27 of 172

REFERENCEAT A GLANCE CONTROLS DRIVING TIPS MOBILITY
25
On certain national-market versions,
unlocking via the door lock triggers off the
alarm.<
Panic mode*
You can activate the alarm system if you find
yourself in a dangerous situation.
Press the button for at least two seconds.
Switching off the alarm:
Press any button.
Switching off an alarm
>Unlock the car with the remote control.
>Insert the key fully into the ignition lock.
>In cars with convenient access
*, press the
button on the door lock.
Display on the revolution counter
When the system is armed, all LEDs pulse. After
approx. 16 minutes one LED flashes.
>LEDs pulse or LED flashes: system is armed.
>One LED flashes at short intervals:
A door, the bonnet or the tailgate is not
properly closed. Even if these are not closed
fully, the remaining items are deadlocked
and the LEDs pulse after approx. 10 seconds
for approx. 16 minutes. Afterwards, one LED
flashes.
The interior movement detector is not acti-
vated.
>LEDs go out after the vehicle is unlocked:
No attempt was made to tamper with the car.
>LEDs flash after unlocking until the key is
inserted in the ignition, but for no longer
than approx. 5 minutes: an attempt was
made to tamper with the car.
Tilt alarm sensor
The vehicle's inclination is monitored. The alarm
is triggered, for instance, if an attempt is made
to steal the car's wheels or tow it away.
Interior movement detector
Before the interior movement detector can
operate correctly, the windows and glass roof
must be closed.
MINI Convertible
The passenger compartment is monitored up to
the height of the seat's surface. This way, the
anti-theft alarm system including the interior
motion sensor are armed, even if the convertible
top is open. Falling objects, e.g. tree leaves, may
trigger a false alarm, refer to Avoiding false
alarms.
Avoiding false alarms
The tilt alarm sensor and the interior movement
detector can be switched off together.
This prevents false alarms, e.g. in the following
situations:
>In duplex garages
>When being transported on car-carrying
trains, ferries or trailers
>If pets are to remain inside the car
Switching off the tilt alarm sensor and
interior movement detector
>Press the button on the remote con-
trol twice in succession.
>Lock the vehicle twice with the integrated
key.
LEDs flash in short succession for approx. 2 sec-
onds.
The tilt alarm sensor and the interior movement
detector are switched off until the car is next
unlocked and locked.
Page 45 of 172

REFERENCEAT A GLANCE CONTROLS DRIVING TIPS MOBILITY
43
Driving
Ignition lock
Inserting the key into the ignition lock
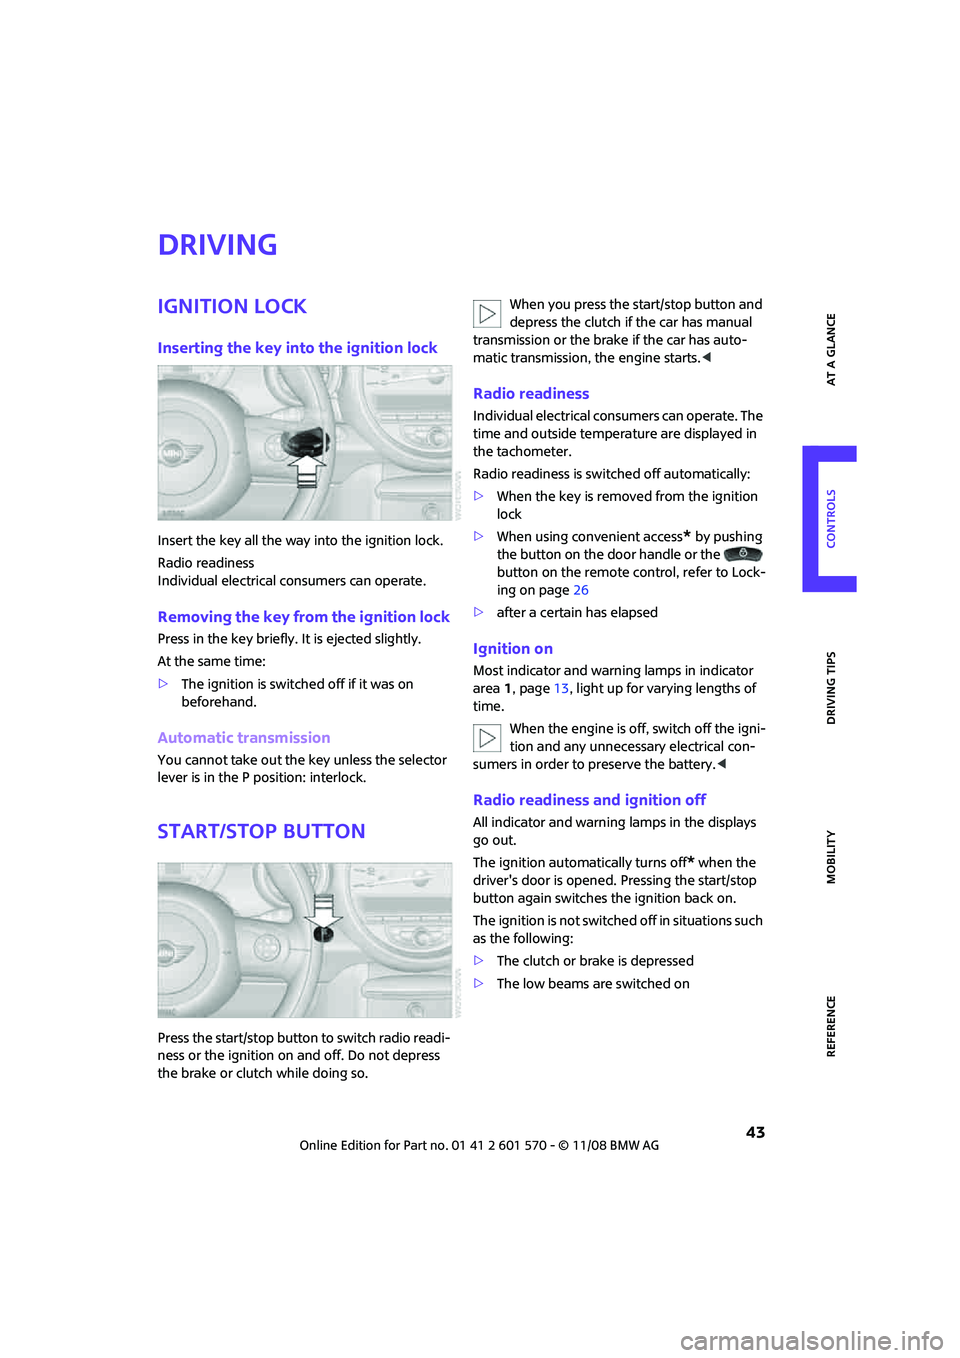
Insert the key all the way into the ignition lock.
Radio readiness
Individual electrical consumers can operate.
Removing the key from the ignition lock
Press in the key briefly. It is ejected slightly.
At the same time:
>The ignition is switched off if it was on
beforehand.
Automatic transmission
You cannot take out the key unless the selector
lever is in the P position: interlock.
Start/stop button
Press the start/stop button to switch radio readi-
ness or the ignition on and off. Do not depress
the brake or clutch while doing so.When you press the start/stop button and
depress the clutch if the car has manual
transmission or the brake if the car has auto-
matic transmission, the engine starts.<
Radio readiness
Individual electrical consumers can operate. The
time and outside temperature are displayed in
the tachometer.
Radio readiness is switched off automatically:
>When the key is removed from the ignition
lock
>When using convenient access
* by pushing
the button on the door handle or the
button on the remote control, refer to Lock-
ing on page26
>after a certain has elapsed
Ignition on
Most indicator and warning lamps in indicator
area 1, page13, light up for varying lengths of
time.
When the engine is off, switch off the igni-
tion and any unnecessary electrical con-
sumers in order to preserve the battery.<
Radio readiness and ignition off
All indicator and warning lamps in the displays
go out.
The ignition automatically turns off
* when the
driver's door is opened. Pressing the start/stop
button again switches the ignition back on.
The ignition is not switched off in situations such
as the following:
>The clutch or brake is depressed
>The low beams are switched on
Page 47 of 172

REFERENCEAT A GLANCE CONTROLS DRIVING TIPS MOBILITY
45
Parking brake
The parking brake is primarily intended to pre-
vent the vehicle from rolling while parked; it
brakes the rear wheels.
Applying
The lever locks in position automatically.
Releasing
Pull slightly upwards, press the button and lower
the lever.
In exceptional cases, if the parking brake
has to be used to slow or stop the car, do
not pull the lever up too hard. In doing so, con-
tinuously press the button of the parking brake
lever.
Otherwise, excessive force could lead to over-
braking and loss of traction, i.e. fishtailing, at the
rear axle.<
Manual transmission
When shifting into 5th or 6th gear, press
the gearshift lever to the right. Otherwise
the engine could be damaged if you inadvert-
ently shift into 3rd or 4th gear.<
Reverse gear
Select this only when the vehicle is stationary.
When the gearshift lever is pressed to the left, a
slight resistance has to be overcome.
Automatic transmission*
with Steptronic
In addition to the fully automatic mode, you can
shift gears manually using Steptronic, page46.
Parking the vehicle
To prevent the vehicle from rolling, always
select position P and apply the parking
brake before leaving the vehicle with the engine
running.<
Removing the key
1.Move the selector lever to position P.
2.Switch off the engine.
3.Remove the key.
Selector lever positions
P R N D M/S + –
Displays in the tachometer
P R N D DS M1 to M6
The selector lever position is displayed, or the
current gear in the manual mode.
Page 48 of 172

Driving
46
Changing selector lever positions
>The selector lever can only be moved out of
position P if the ignition i s s w i t c h e d o n o r t h e
engine is running: interlock.
>Before moving the lever away from P or N
with the vehicle stationary, first depress the
brake; otherwise the selector lever will
refuse to move: shiftlock.
To prevent the vehicle from creeping
after you select a driving position,
depress the brake until you are ready to
start.<
A lock prevents accidental shifting into selector
lever positions R and P.
Overriding the selector lever lock
Press the button on the front of the selector
lever, arrow.
P Park
Select this only when the vehicle is stationary.
The transmission locks to prevent the drive
wheels from turning.
R Reverse
Select this only when the vehicle is stationary.
N Neutral
Select this when you are in a car wash, for exam-
ple. The vehicle can roll.
D Drive, automatic position
Position for normal vehicle operation. All for-
ward gears are selected automatically.
Under normal operation conditions, fuel con-
sumption is lowest when you drive in position D.
Kick-down
Kick-down enables you to achieve maximum
performance.
Depress the accelerator pedal beyond the full-
throttle resistance point.
Sport program and manual operation
M/S
Move the selector lever from position D to the
left into the M/S shifting slot:
The Sport program is activated and DS is dis-
played.
Shifting with the selector lever
Push the selector lever forward or pull it back to
activate manual operation. Steptronic shifts the
gear.
>Pull the selector lever in the + direction.
Transmission shifts up.
>Push the selector lever in the – direction.
Transmission shifts down.
The tachometer displays M1 to M6.
To use the automatic mode again, move the
selector lever to the right into position D.
Upshifts and downshifts are executed only when
they will result in a plausible combination of
engine and vehicle speed; thus, for example, a
downshift that would cause the engine to over-
rev will not be executed by the system. The
selected gear is displayed briefly, followed by
the actual gear.
Shifting on the steering wheel
With the selector lever in position D, automatic
drive, you can shift gears using the shift paddles
on the steering wheel. The transmission auto-
matically switches to manual mode.