window MINI Countryman 2011 (Mini Connected) User Guide
[x] Cancel search | Manufacturer: MINI, Model Year: 2011, Model line: Countryman, Model: MINI Countryman 2011Pages: 254, PDF Size: 3.84 MB
Page 78 of 254
CONTROLSTechnology for driving comfort and safety
76
Airbags
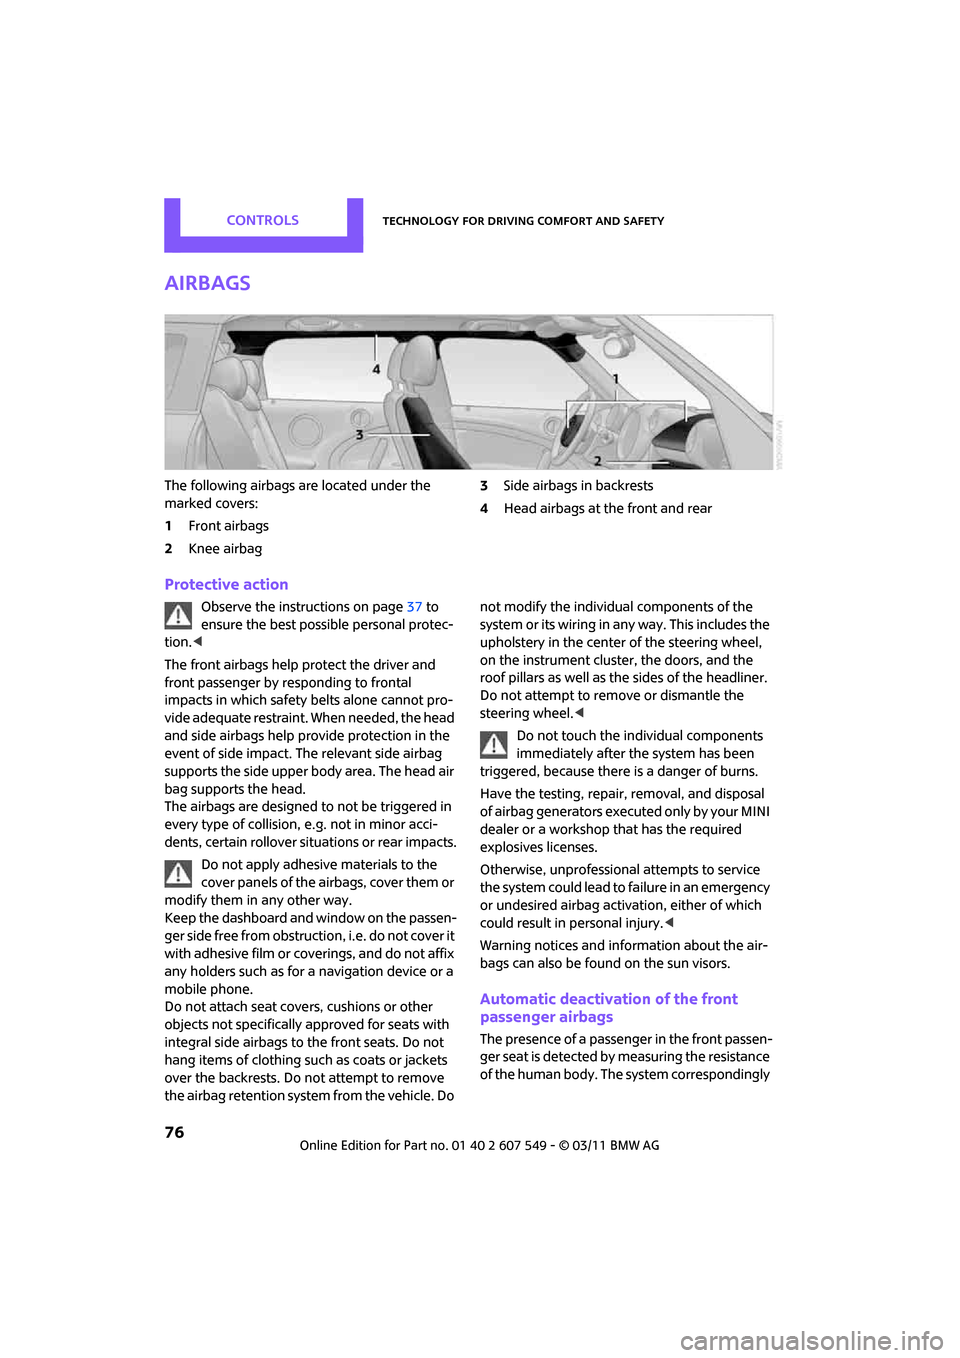
The following airbags are located under the
marked covers:
1Front airbags
2 Knee airbag 3
Side airbags in backrests
4 Head airbags at the front and rear
Protective action
Observe the instructions on page 37 to
ensure the best possible personal protec-
tion. <
The front airbags help protect the driver and
front passenger by re sponding to frontal
impacts in which safety belts alone cannot pro-
vide adequate restraint. When needed, the head
and side airbags help provide protection in the
event of side impact. The relevant side airbag
supports the side upper body area. The head air
bag supports the head.
The airbags are designed to not be triggered in
every type of collision, e.g. not in minor acci-
dents, certain rollover situations or rear impacts.
Do not apply adhesive materials to the
cover panels of the airbags, cover them or
modify them in any other way.
Keep the dashboard and window on the passen-
g e r s i d e f r e e f r o m o b s t r u c t i o n , i . e . d o n o t c o v e r i t
with adhesive film or co verings, and do not affix
any holders such as for a navigation device or a
mobile phone.
Do not attach seat cove rs, cushions or other
objects not specifically approved for seats with
integral side airbags to the front seats. Do not
hang items of clothing su ch as coats or jackets
over the backrests. Do not attempt to remove
the airbag retention system from the vehicle. Do not modify the individual components of the
syste m o r its w iring in any way. Th is includ es the
upholstery in the center of the steering wheel,
on the instrument cluster, the doors, and the
roof pillars as well as the sides of the headliner.
Do not attempt to remove or dismantle the
steering wheel.<
Do not touch the individual components
immediately after the system has been
triggered, because there is a danger of burns.
Have the testing, repair, removal, and disposal
of airbag generators executed only by your MINI
dealer or a workshop that has the required
explosives licenses.
Otherwise, unprofessional attempts to service
the system could lead to failure in an emergency
or undesired airbag activation, either of which
could result in personal injury. <
Warning notices and information about the air-
bags can also be found on the sun visors.
Automatic deactivation of the front
passenger airbags
The presence of a passenger in the front passen-
ger seat is detected by measuring the resistance
of the human body. The system correspondingly
Page 85 of 254
ClimateCONTROLS
83
Climate
Equipment versions
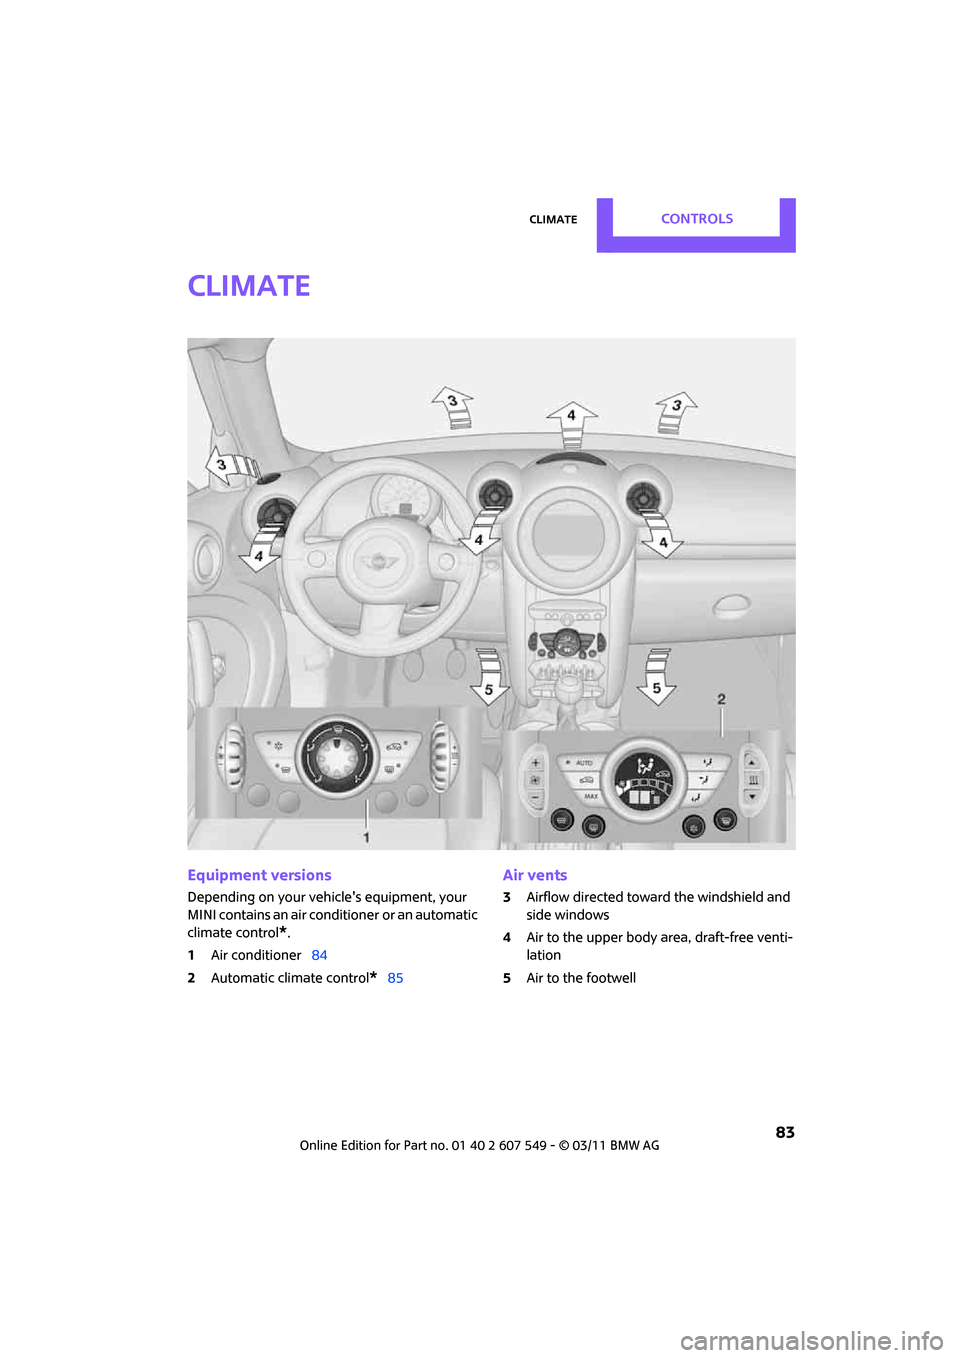
Depending on your vehicle's equipment, your
MINI contains an air conditioner
or an automatic
climate control
*.
1 Air conditioner 84
2 Automatic climate control
*85
Air vents
3Airflow directed toward the windshield and
side windows
4 Air to the upper body area, draft-free venti-
lation
5 Air to the footwell
Page 86 of 254
CONTROLSClimate
84
Air conditioner
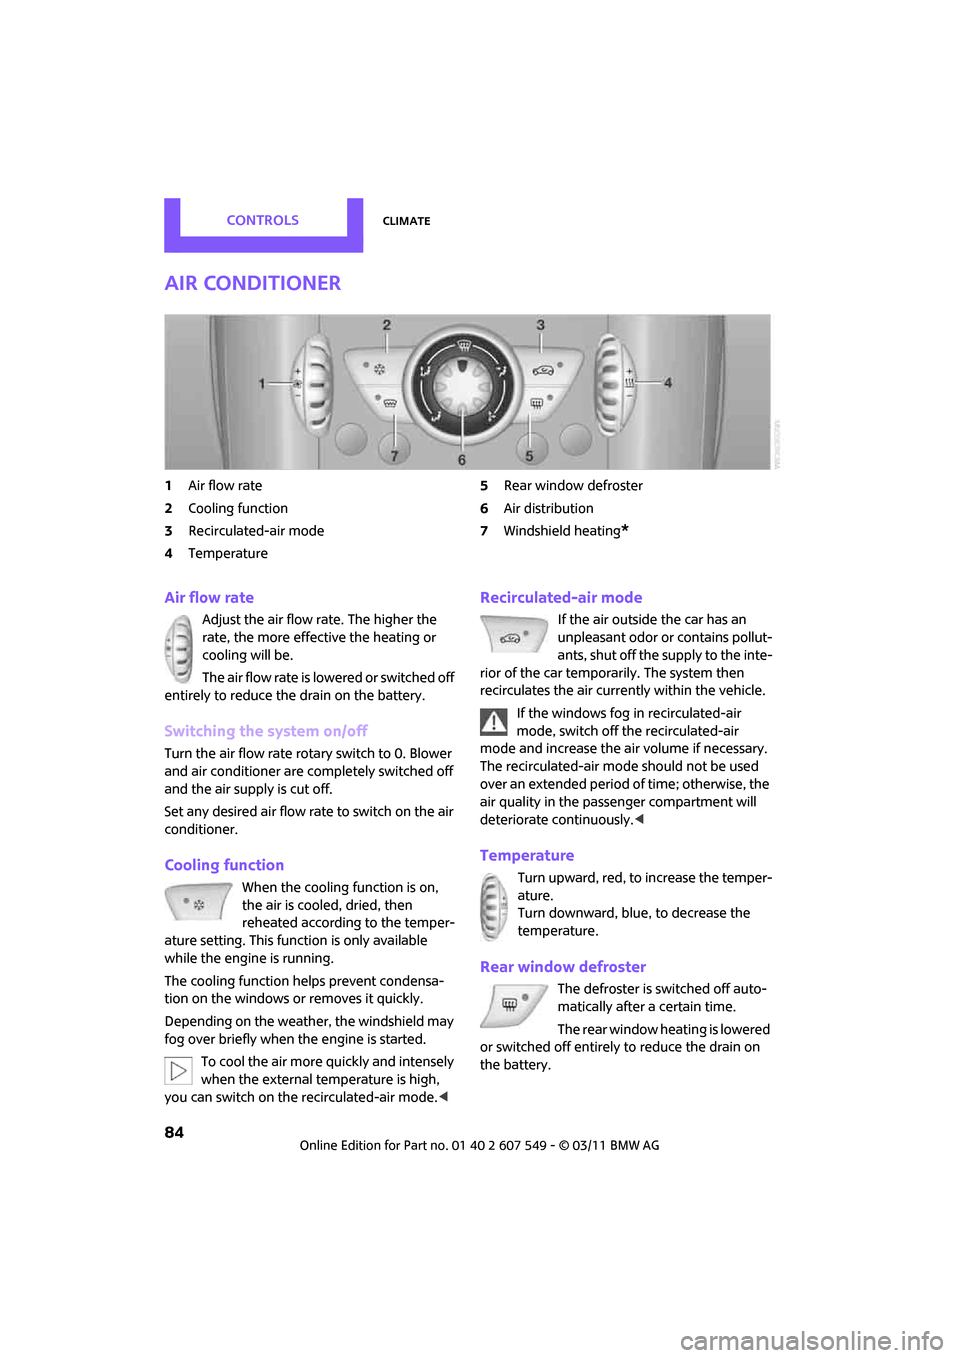
1Air flow rate
2 Cooling function
3 Recirculated-air mode
4 Temperature 5
Rear window defroster
6 Air distribution
7 Windshield heating
*
Air flow rate
Adjust the air flow rate. The higher the
rate, the more effective the heating or
cooling will be.
The air flow rate is lowered or switched off
entirely to reduce the drain on the battery.
Switching the system on/off
Turn the air flow rate rota ry switch to 0. Blower
and air conditioner are co mpletely switched off
and the air supply is cut off.
Set any desired air flow rate to switch on the air
conditioner.
Cooling function
When the cooling function is on,
the air is cooled, dried, then
reheated according to the temper-
ature setting. This function is only available
while the engine is running.
The cooling function helps prevent condensa-
tion on the windows or removes it quickly.
Depending on the weather, the windshield may
fog over briefly when the engine is started.
To cool the air more quickly and intensely
when the external temperature is high,
you can switch on the recirculated-air mode.<
Recirculated-air mode
If the air outside the car has an
unpleasant odor or contains pollut-
ants, shut off the supply to the inte-
rior of the car temporarily. The system then
recirculates the air currently within the vehicle.
If the windows fog in recirculated-air
mode, switch off the recirculated-air
mode and increase the air volume if necessary.
The recirculated-air mode should not be used
over an extended period of time; otherwise, the
air quality in the passenger compartment will
deteriorate continuously.<
Temperature
Turn upward, red, to increase the temper-
ature.
Turn downward, blue, to decrease the
temperature.
Rear window defroster
The defroster is switched off auto-
matically after a certain time.
The rear window heating is lowered
or switched off entirely to reduce the drain on
the battery.
Page 87 of 254
ClimateCONTROLS
85
Air distribution
Direct the flow of air to the
windows , to the upper body
area or to the footwell .
Intermediate settings are possible.
Windshield heating*
The windshield heating is switched
off automatically after a short time.
The front window heating is low-
ered or switched off entirely to reduce the drain
on the battery.
Defrosting windows and removing
condensation
1. Set air flow rate to the maximum level.
2. Set air distributi on to position .
Condensation is removed from the windows
more quickly when the cooling function
* is
also activated.
3. Set to the highest temperature, red.
4. Deactivate recirculated-air mode.
5. Turn on windshield heating if necessary.
6. Turn on rear window defroster if necessary.
Microfilter
The microfilter captures dust and pollen. The
microfilter is changed by your MINI dealer dur-
ing routine maintenance work.
Automatic clim ate control*
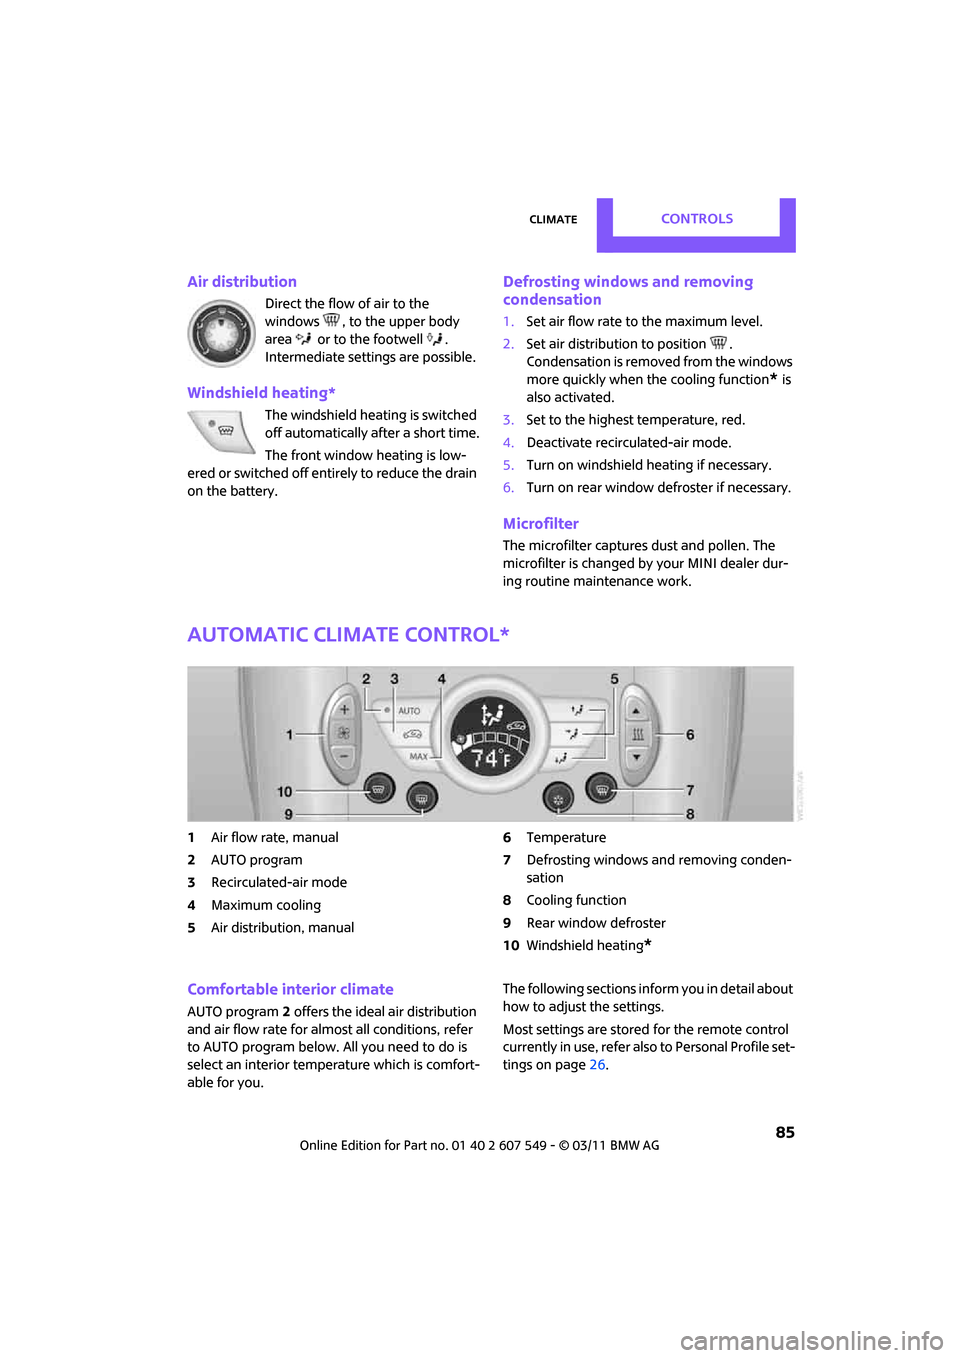
1Air flow rate, manual
2 AUTO program
3 Recirculated-air mode
4 Maximum cooling
5 Air distribution, manual 6
Temperature
7 Defrosting windows and removing conden-
sation
8 Cooling function
9 Rear window defroster
10 Windshield heating
*
Comfortable interior climate
AUTO program 2 offers the ideal air distribution
and air flow rate for almost all conditions, refer
to AUTO program below. All you need to do is
select an interior temp erature which is comfort-
able for you. The following sections info
rm you in detail about
how to adjust the settings.
Most settings are stored for the remote control
currently in use, refer also to Personal Profile set-
tings on page 26.
Page 88 of 254
CONTROLSClimate
86
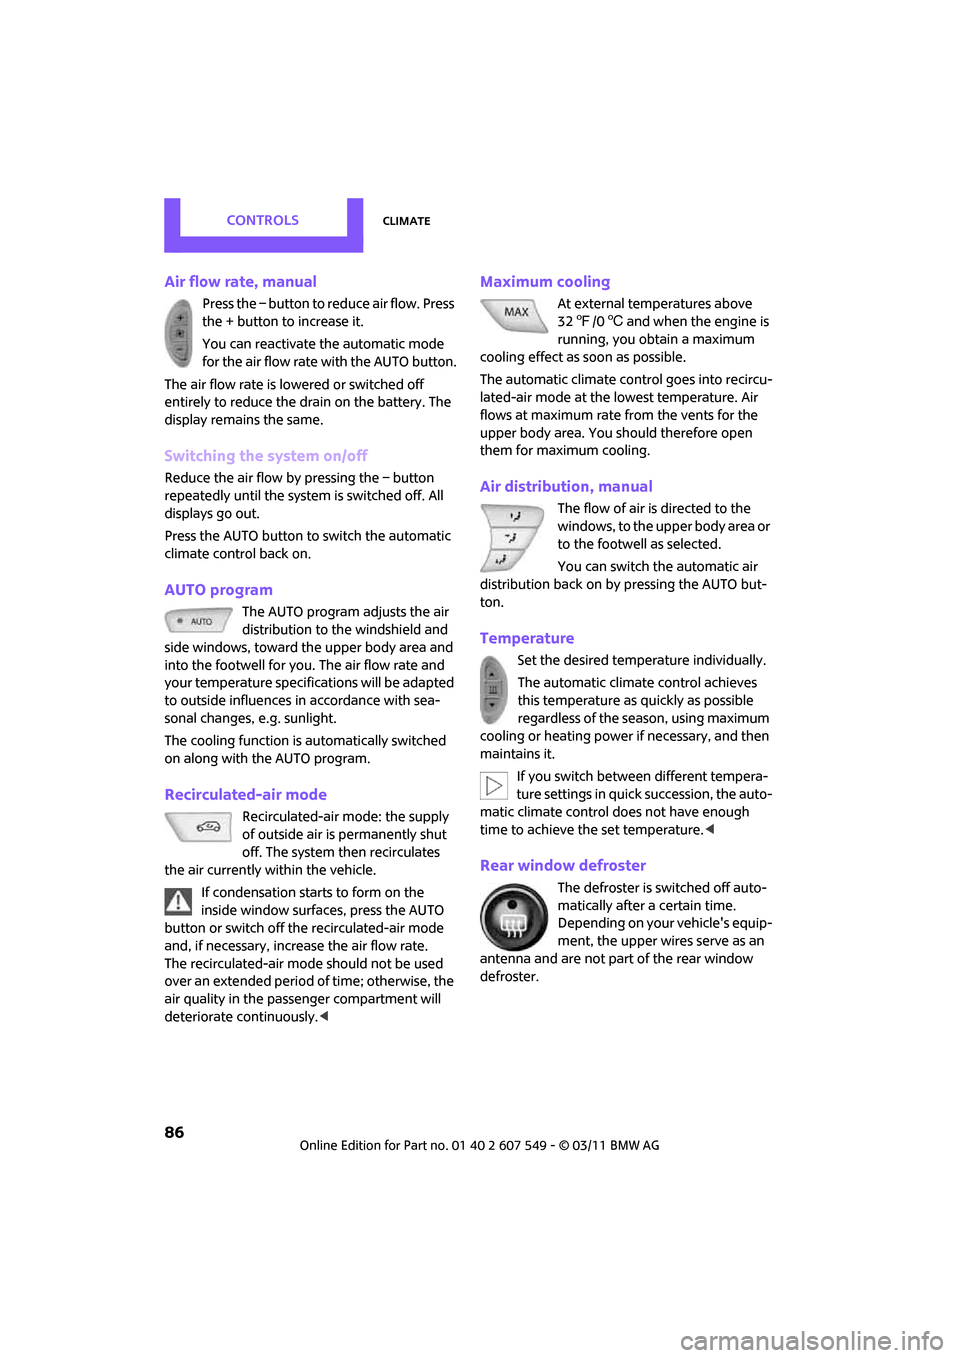
Air flow rate, manual
Press the – button to reduce air flow. Press
the + button to increase it.
You can reactivate the automatic mode
for the air flow rate with the AUTO button.
The air flow rate is lo wered or switched off
entirely to reduce the drain on the battery. The
display remains the same.
Switching the system on/off
Reduce the air flow by pressing the – button
repeatedly until the system is switched off. All
displays go out.
Press the AUTO button to switch the automatic
climate control back on.
AUTO program
The AUTO program adjusts the air
distribution to the windshield and
side windows, toward the upper body area and
into the footwell for you. The air flow rate and
your temperature specifications will be adapted
to outside influences in accordance with sea-
sonal changes, e.g. sunlight.
The cooling function is automatically switched
on along with the AUTO program.
Recirculated-air mode
Recirculated-air mode: the supply
of outside air is permanently shut
off. The system then recirculates
the air currently within the vehicle.
If condensation starts to form on the
inside window surfac es, press the AUTO
button or switch off the recirculated-air mode
and, if necessary, increa se the air flow rate.
The recirculated-air mode should not be used
over an extended period of time; otherwise, the
air quality in the passenger compartment will
deteriorate continuously. <
Maximum cooling
At external temperatures above
327 /06 and when the engine is
running, you obtain a maximum
cooling effect as soon as possible.
The automatic clim ate control goes into recircu-
lated-air mode at the lowest temperature. Air
flows at maximum rate from the vents for the
upper body area. You should therefore open
them for maximum cooling.
Air distribution, manual
The flow of air is directed to the
windows, to the upper body area or
to the footwell as selected.
You can switch the automatic air
distribution back on by pressing the AUTO but-
ton.
Temperature
Set the desired temperature individually.
The automatic climate control achieves
this temperature as quickly as possible
regardless of the season, using maximum
cooling or heating power if necessary, and then
maintains it.
If you switch between different tempera-
ture settings in quick succession, the auto-
matic climate control does not have enough
time to achieve the set temperature. <
Rear window defroster
The defroster is switched off auto-
matically after a certain time.
Depending on your vehicle's equip-
ment, the upper wires serve as an
antenna and are not part of the rear window
defroster.
Page 89 of 254
ClimateCONTROLS
87
Defrosting windows and removing
condensation
Quickly removes ice and condensa-
tion from the windshield and front
side windows.
For this purpose, also switch on the
cooling function.
The windshield heating
* is switched on auto-
matically.
Windshield heating*
The windshield heating is switched
off automatically after a certain
time.
Cooling function
The passenger compartment can only be cooled
while the engine is running.
When the cooling function is on,
the air is cooled, dried, then
reheated according to the temper-
ature setting.
The cooling function helps prevent condensa-
tion on the windows or removes it quickly.
Depending on the weather, the windshield may
fog over briefly when the engine is started. The
recirculated-air mode may be switched on auto-
matically.
When the AUTO button is pressed, the cooling
function switches on automatically.
Microfilter/activated-charcoal filter
The microfilter captures dust and pollen. The
activated-charcoal filter provides additional pro-
tection by filtering gase ous pollutants from the
outside air. Your MINI dealer replaces this com-
bined filter as a standard part of your scheduled
maintenance.
You can call up further information in the service
requirements display, page 59.
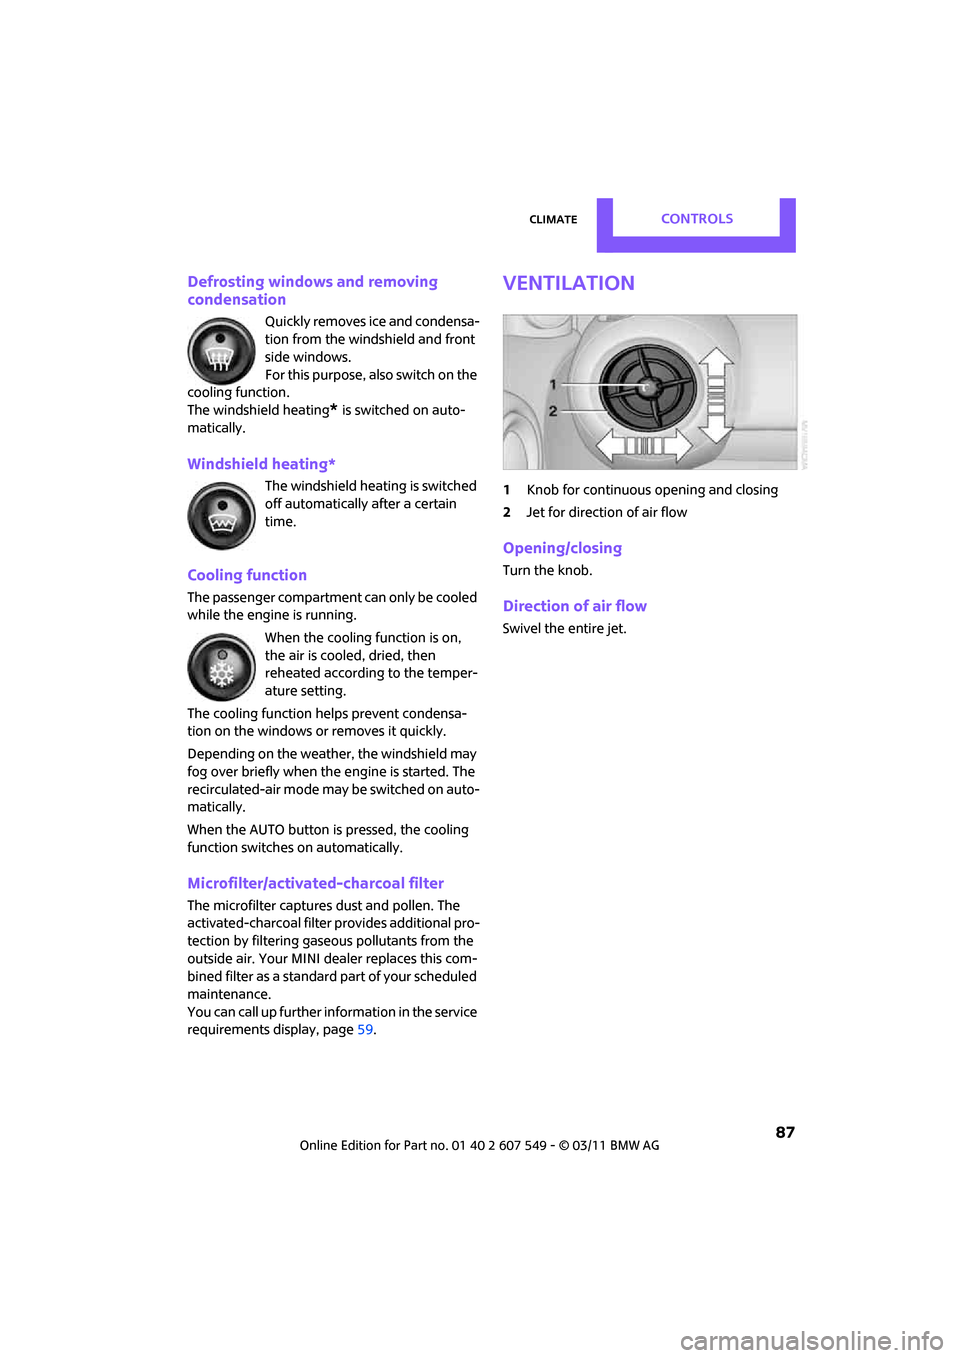
Ventilation
1 Knob for continuous opening and closing
2 Jet for direction of air flow
Opening/closing
Turn the knob.
Direction of air flow
Swivel the entire jet.
Page 98 of 254
DRIVING TIPSThings to remember when driving
96
Things to remember when driving
Break-in period
Moving parts need breaking-in time to adjust to
each other. Please follow the instructions below
in order to achieve the optimal service life and
economy of operation for your vehicle.
Engine and differential
Always obey all official speed limits.
Up to 1,200 miles/2,000 km
Drive at varying engine and road speeds, but do
not exceed the following:
> Gasoline engine
4,500 rpm or 100 mph/160 km/h
Avoid full-throttle operation and use of the
transmission's kickdown mode.
After driving 1,200 miles/2,000 km
Engine and vehicle speeds can be gradually
increased.
Tires
Due to technical factors associated with their
manufacture, tires do not achieve their full trac-
tion potential until after an initial break-in
period. Therefore, drive cautiously during the
first 200 miles/300 km.
Brake system
Brakes require an initial break-in period of
approx. 300 miles/500 km to achieve optimized
contact and wear patterns between brake pads
and rotors. Drive cautiously during this break-in
period.
Clutch
The function of the clutch reaches its optimal
level only after a distan ce driven of approx.
300 miles/500 km. During this break-in period,
engage the clutch gently.
Following part replacement
The same break-in procedures should be
observed if any of the components mentioned
above have to be renewed in the course of the
vehicle's operating life.
General driving notes
Closing liftgate
Only drive with the liftgate closed. Failure
to do so may endanger passengers or
other road users or may damage the vehicle in
the event of an accident or a braking and eva-
sive maneuver. In addi tion, exhaust gas may
flow into the passenger compartment. <
If special circumstances make it absolutely nec-
essary to drive with the liftgate open:
1. Close all windows an d the glass sunroof
*.
2. Switch off recirculated-air mode and switch
the airflow control of the air conditioner or
automatic climate control to high, refer to
page 84 or 86.
Hot exhaust system
As in all vehicles, extremely high tempera-
tures are generated on the exhaust sys-
tem. Do not remove the heat shields installed
adjacent to various sections of the exhaust sys-
tem, and never apply undercoating to them.
When driving, standing at idle and while park-
ing, take care to avoid possible contact between
the hot exhaust system and any highly flamma-
ble materials such as hay, leaves, grass, etc. Such
contact could lead to a fire, with the risk of seri-
ous personal injuries and property damage. Do
not touch hot exhaust tail pipes. Otherwise,
there is a risk of burns. <
Page 176 of 254
CommunicationsMobile phone preparation Bluetooth
174
Adjusting volume
Turn knob during announcement.
>The volume remains the same, even if the
volume of other audi o sources is changed.
> The volume is stored for the remote control
currently in use.
Notes
Do not use the voice activation system to initiate
an emergency call. In st ressful situations, the
voice and vocal pitch can change. This can
unnecessarily delay the establishment of a tele-
phone connection.
Ambient conditions
> Say the commands, numbers and letters
smoothly and with normal volume, empha-
sis and speed.
> Always say commands in the language of
the voice activation system. The language
for voice operation is preset and can not be
changed over the Control Display.
> Keep doors, windows, glass sunroof
*/pan-
oramic sunroof
*, or convertible top* closed
to avoid noise interference.
> Avoid ambient noise in the vehicle while
speaking.
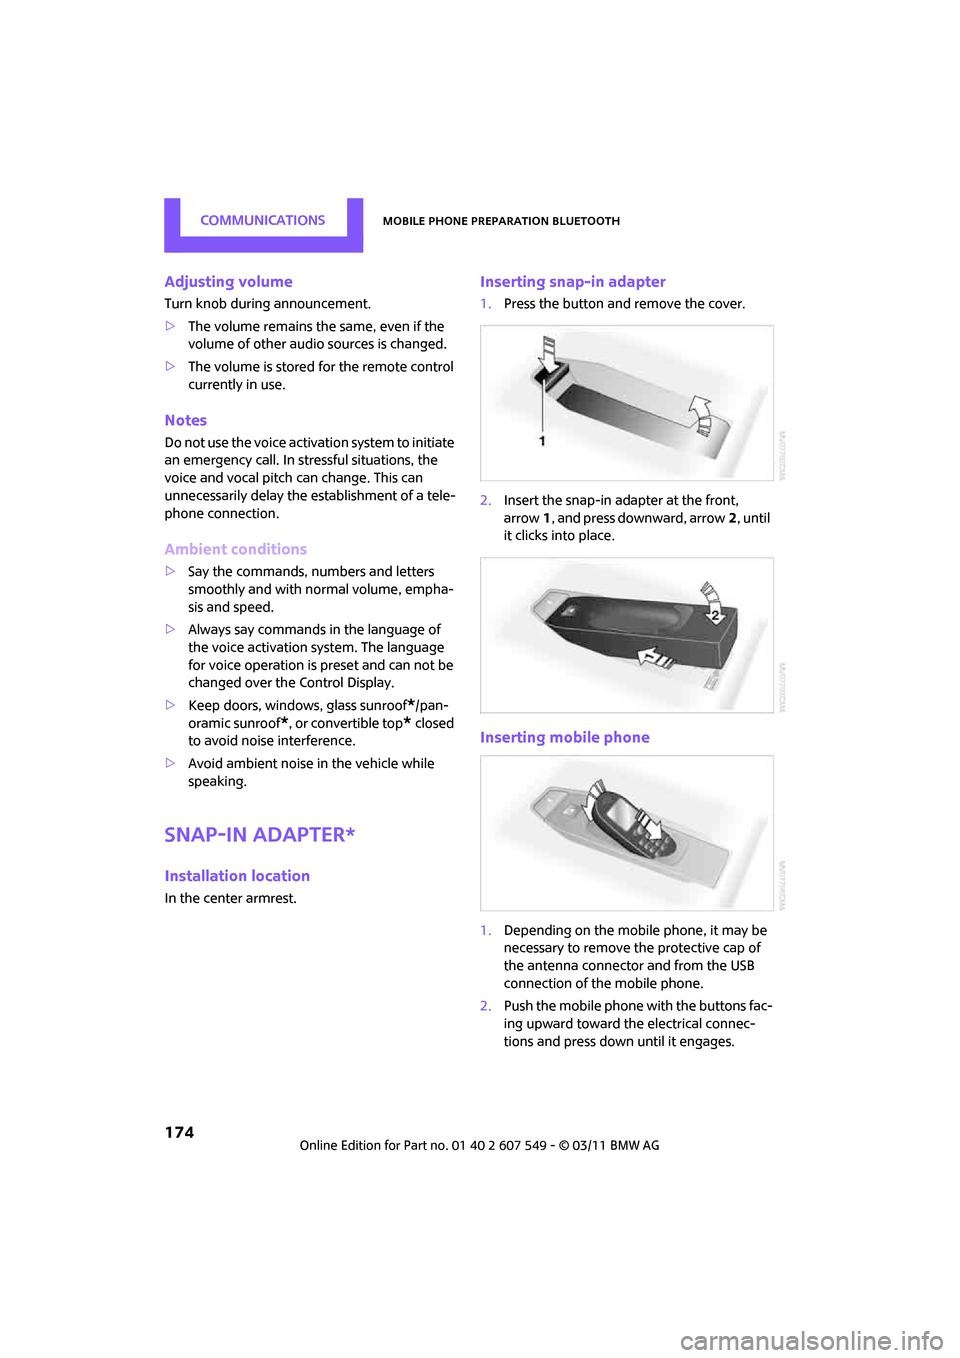
Snap-in adapter*
Installation location
In the center armrest.
Inserting snap-in adapter
1.Press the button and remove the cover.
2. Insert the snap-in ad apter at the front,
arrow 1, and press downward, arrow 2, until
it clicks into place.
Inserting mobile phone
1. Depending on the mobile phone, it may be
necessary to remove the protective cap of
the antenna connector and from the USB
connection of the mobile phone.
2. Push the mobile phone with the buttons fac-
ing upward toward the electrical connec-
tions and press down until it engages.
Page 201 of 254

Under the hoodMOBILITY
199
Important parts of the engine compartment
1Vehicle identification number*
2Battery, under the cover 219
3 Engine oil dipstick 199
4 Engine oil filler neck 200 5
Coolant expansion tank 200
6 Engine compartment fuse box 216
7 Reservoir for washer fl uid for the headlamp
and window washer system 53
Engine oil
The engine oil consumption is dependent on
driving style and driving conditions.
Check the engine oil level regularly, e.g. when
refueling.
Checking engine oil level
1.With the vehicle's engi ne at normal operat-
ing temperature, i.e. after uninterrupted
driving for at least 6 miles/10 km, park the
vehicle on a level surface.
2. Switch off the engine.
3. Pull the dipstick out after approx. 5 minutes
and wipe it off with a lint-free cloth, paper
towel or similar material. 4.
Carefully push the dipstick all the way into
the guide tube and pull it out again.
The oil level should be between the two
marks on the dipstick.
The oil quantity corresponding to the difference
between the two marks on the dipstick is
1 US quart/1 liter.
Page 206 of 254
MOBILITYCare
204
Care
Car-care products
Regular cleaning and care helps to maintain the
value of your MINI.
The manufacturer of your MINI recommends
using manufacturer-approved products to clean
and care for your vehicle.
Your MINI dealer would be pleased to advise
you on cleaning and care products and services
for your MINI.The ingredients of original MINI Care Prod-
ucts have been tested, and the products
have been tested in the laboratory and in prac-
tice. They offer optimum care and protection for
your vehicle. <
Do not use any cleansers containing alco-
hol or solvents as these may cause dam-
age. <
Cleaning agents may contain hazardous
or health-damaging substances. Follow
the warning and hazard instructions on the
packaging. For interior cleaning, always open
the doors or windows of the vehicle.
Do not use any products that are not intended
for cleaning the vehicle. <
External care
Washing your vehicle
Especially during the winter months the
vehicle should be frequently washed. Dirt
and road salt can damage the vehicle. <
After washing the vehicle, apply the
brakes briefly to dry them; otherwise,
water can reduce braking efficiency over the
short term and the brake rotors can corrode. <
Car washes
Preference should be given to cloth car washes.
Do not use automatic high-pressure car
washes; otherwise, water may drip into
the vehicle around the windows. <
Before driving in to the car wash, check if the sys-
tem is suitable for your MINI. Observe the fol-
lowing points:
> Vehicle dimensions, page 225
> If necessary: fold in the outside mirrors,
page 41
> Maximum permissible tire width
Avoid car washes with tracks higher than
4 in/10 cm; otherwise, the chassis could
be damaged. <
Preparations for driving into the car wash:
> Unscrew the rod antenna.
> Deactivate the rain sensor
* to prevent unin-
tentional wiping.
> Deactivate rear window wiper and protect it
from damage. Ask the car wash operator
about measures that can be taken to protect
the wipers.
> Remove additional atta chments, e.g. spoil-
ers or telephone antennas, if there is a pos-
sibility that they could be damaged.
> Inserting the remote control into the ignition
lock.
Automatic transmission
Before driving into the car wash, make sure that
the vehicle can roll:
1.Place the remote control, even with Comfort
Access, in the ignition lock.
2. Move the selector le ver to position N.
3. Release the parking brake.
4. Switch off the engine.