clock MINI Countryman 2011 Owner's Manual (Mini Connected)
[x] Cancel search | Manufacturer: MINI, Model Year: 2011, Model line: Countryman, Model: MINI Countryman 2011Pages: 254, PDF Size: 3.84 MB
Page 20 of 254
AT A GLANCEOn-board computer
18
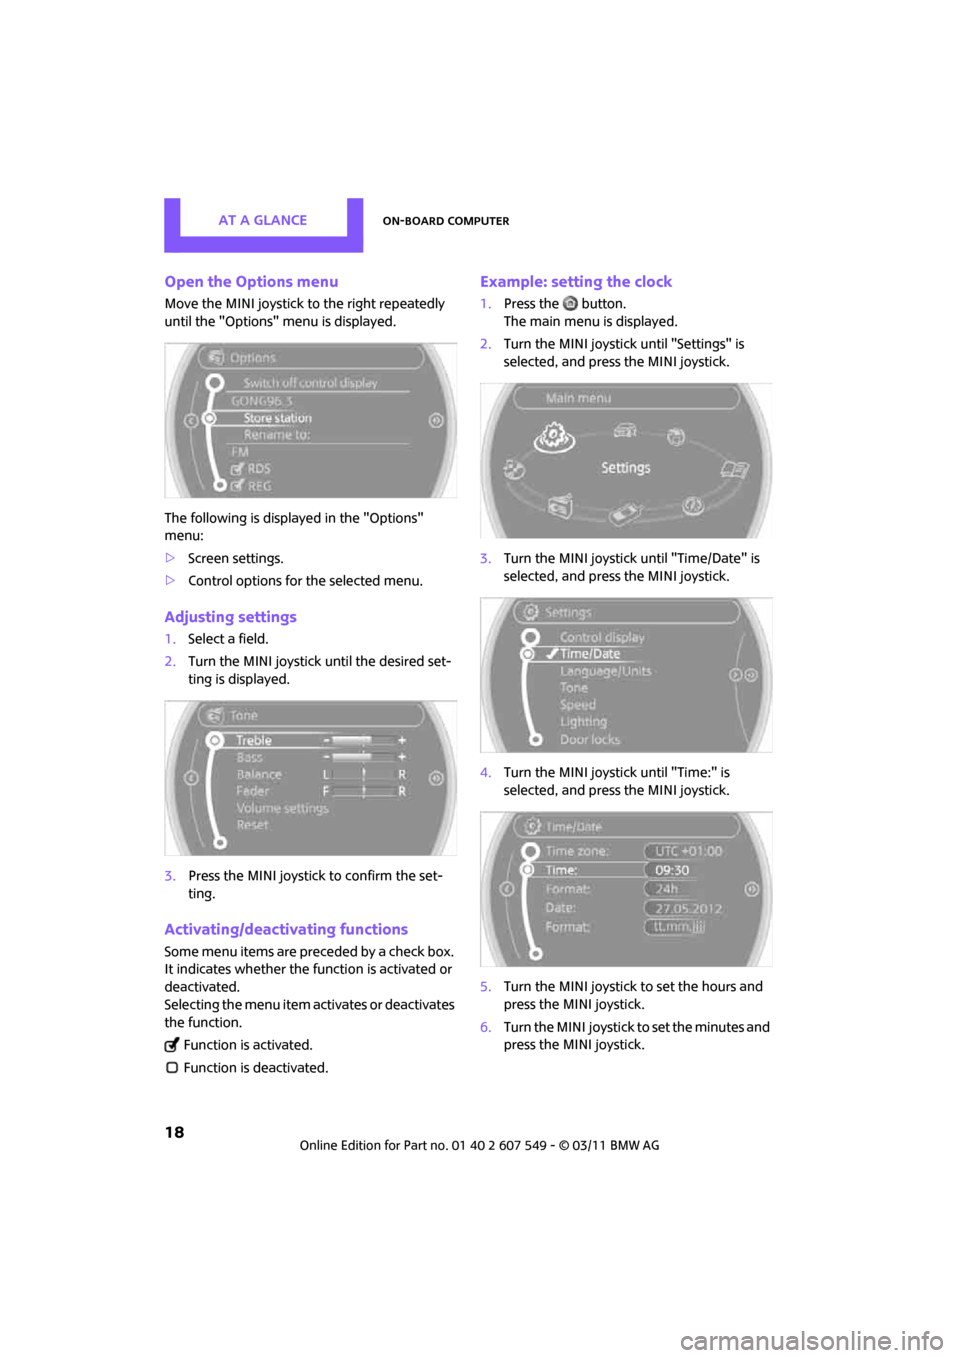
Open the Options menu
Move the MINI joystick to the right repeatedly
until the "Options" menu is displayed.
The following is displayed in the "Options"
menu:
>Screen settings.
> Control options for the selected menu.
Adjusting settings
1.Select a field.
2. Turn the MINI joystick until the desired set-
ting is displayed.
3. Press the MINI joystick to confirm the set-
ting.
Activating/deactivating functions
Some menu items are preceded by a check box.
It indicates whether the function is activated or
deactivated.
Selecting the menu item activates or deactivates
the function.
Function is activated.
Function is deactivated.
Example: setting the clock
1. Press the button.
The main menu is displayed.
2. Turn the MINI joystick until "Settings" is
selected, and press the MINI joystick.
3. Turn the MINI joystick until "Time/Date" is
selected, and press the MINI joystick.
4. Turn the MINI joystick until "Time:" is
selected, and press the MINI joystick.
5. Turn the MINI joystick to set the hours and
press the MINI joystick.
6. Turn the MINI joystick to set the minutes and
press the MINI joystick.
Page 29 of 254
Opening and closingCONTROLS
27
>Settings for the displa ys on the on-board
computer, in the speedometer and in the
tachometer:
> 12 h/24 h mode of the clock 61
> Date format 62
> Brightness of the Control Display 65
> Language on the Control Display 65
> Units of measure for fuel consumption,
distance covered/re maining distances
and temperature 58
> Show visual warning for Park Distance Con-
trol PDC
*66
> Light settings:
>Pathway lighting 79
> Daytime running lights 80
> Automatic climate control
*: activating/
deactivating the AUTO program, setting the
temperature, air volume and air
distribution 85
> Entertainment:
>Tone control 131
> Adjusting vo lume levels 130
Central lock ing system
The concept
The central locking system is ready for operation
whenever the driver's door is closed.
The system simultaneously engages and
releases the locks on the following:
>Doors
> Liftgate
> Fuel filler flap
Operating from outside
>Via the remote control
> Via the door lock
*
>In cars with Comfort Access*, via the door
handles on the driver's and passenger's
sides The remote control can also be used to switch
on/off the welcome lamps and interior lamps.
The alarm system
* is also activated or deacti-
vated, page 31.
Operating from inside
Button for central locking system, page 30.
In the event of a sufficiently severe accident, the
central locking system unlocks automatically. In
addition, the hazard warning flashers and inte-
rior lamps come on.
Opening and closing:
from outside
Persons or animals in a parked vehicle
could lock the doors from the inside. Take
the key with you when you leave the vehicle so
that the vehicle can be opened from the out-
side. <
Using the remote control
Unlocking
Press the button.
The welcome lamps and interior lamps come on.
Unlocking mode
You can also set which parts of the car are
unlocked. The setting is stored for the remote
control in use.
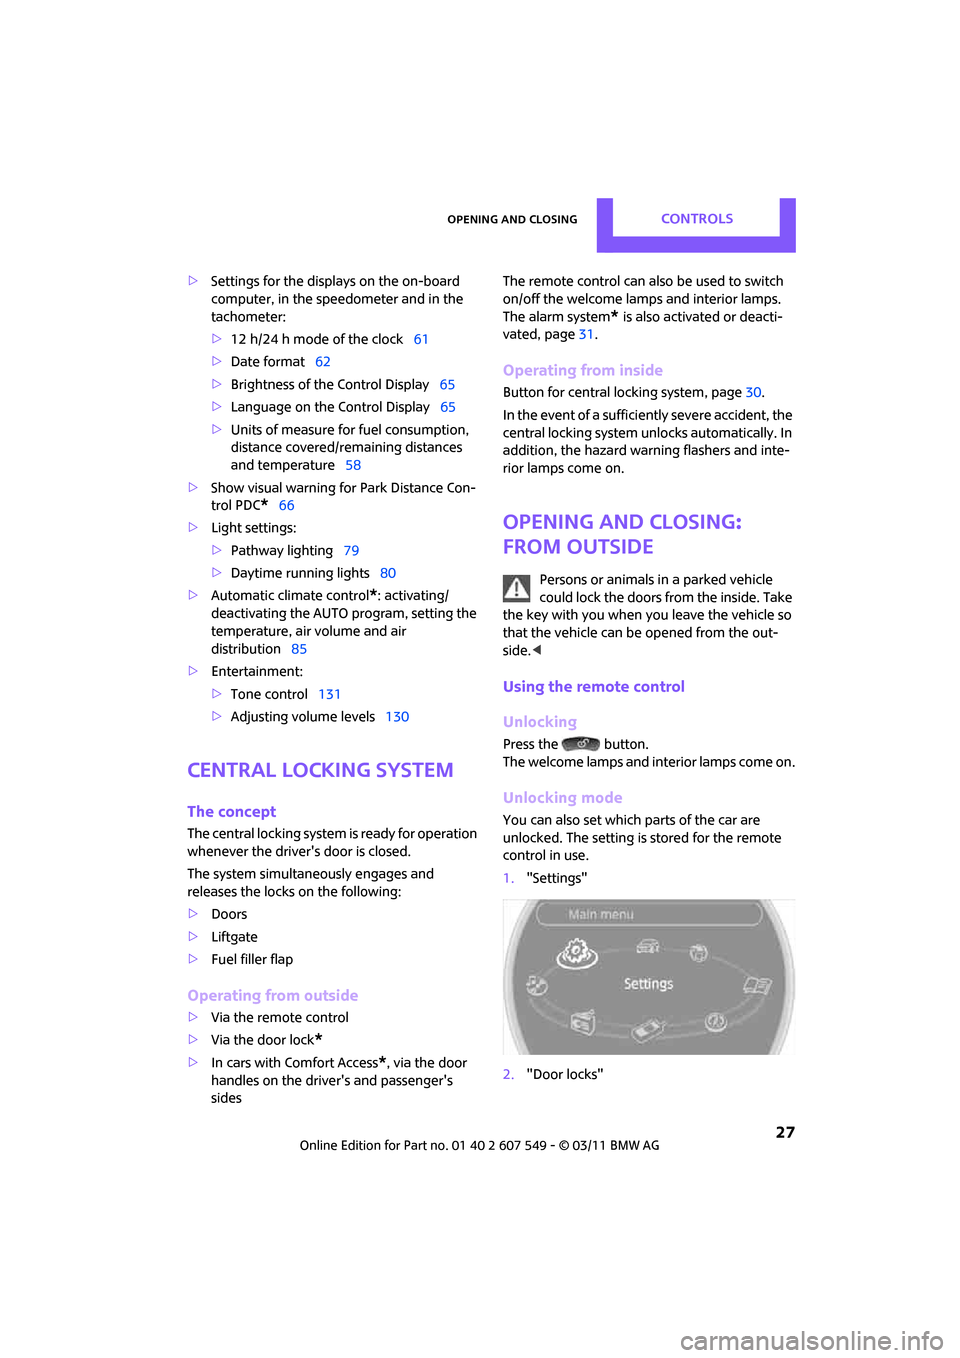
1."Settings"
2. "Door locks"
Page 39 of 254
AdjustmentsCONTROLS
37
Adjustments
Sitting safely
The ideal sitting position can make a vital contri-
bution to relaxed, fatigue-free driving. In con-
junction with the safety belts, the head restraints
and the airbags, the seated position has a major
influence on your safety in the event of an acci-
dent. To ensure that th e safety systems operate
with optimal efficiency, we strongly urge you to
observe the instructions contained in the follow-
ing section.
For additional information on transporting chil-
dren safely, refer to page 43.
Airbags
Always maintain an adequate distance
between yourself and the airbags. Always
grip the steering wheel on the rim, with your
hands in the 3 o'clock and 9 o'clock positions, to
minimize the risk of inju ry to the hands or arms
in the event of the airbag being triggered off.
No one and nothing should come between the
airbags and the seat occupant.
Do not use the cover of the front airbag on the
front passenger side as a storage area. Ensure
that the front passenger is correctly seated, e.g.
that no feet or legs are propped against the
dashboard. Otherwise, leg injury could result if
the front airbag suddenly deployed.
Make sure that passeng ers keep their heads
away from the side airbag and do not lean
against the cover of the head airbag, otherwise
injuries can occur when the airbags are trig-
gered. <
Even if you follow all the instructions, injuries
resulting from contact with airbags cannot be
fully excluded, depending on the circumstances.
The ignition and inflation noise may provoke a
mild hearing loss in ex tremely sensitive individ-
uals. This effect is usually only temporary.
For airbag locations and additional information
on airbags, refer to page 76.
Head restraint
A correctly adjusted head restraint reduces the
risk of neck injury in the event of an accident.
Adjust the head rest raint in such a way
that its center is at approx. ear level. Oth-
erwise, there is an increased risk of injury in the
event of an accident. <
Head restraints, refer to page 39.
Safety belt
Before every drive, make sure that all occupants
wear their safety belts. Airbags complement the
safety belt as an additi onal safety device, but
they do not represent a substitute.
Number of safety belts
Never allow more th an one person to
wear a single safety belt. Never allow
infants or small children to ride in a passenger's
lap.
Make sure that the belt in the lap area sits low
across the hips and does not press against the
abdomen. The safety belt must not rest against
the throat, run across sh arp edges, pass over
hard or fragile objects or be pinched. Fasten the
safety belt so that it is pulled taut across the lap
and shoulder, fitting the body snugly without
any twists. Otherwise, the belt could slide over
the hips in the event of a frontal collision and
injure the abdomen. Avoid wearing bulky cloth-
ing and regularly pull the belt in the upper-body
area taut; otherwise, its restraining effect could
be impaired. <
Safety belts, refer to page 40.
Page 63 of 254
Controls overviewCONTROLS
61
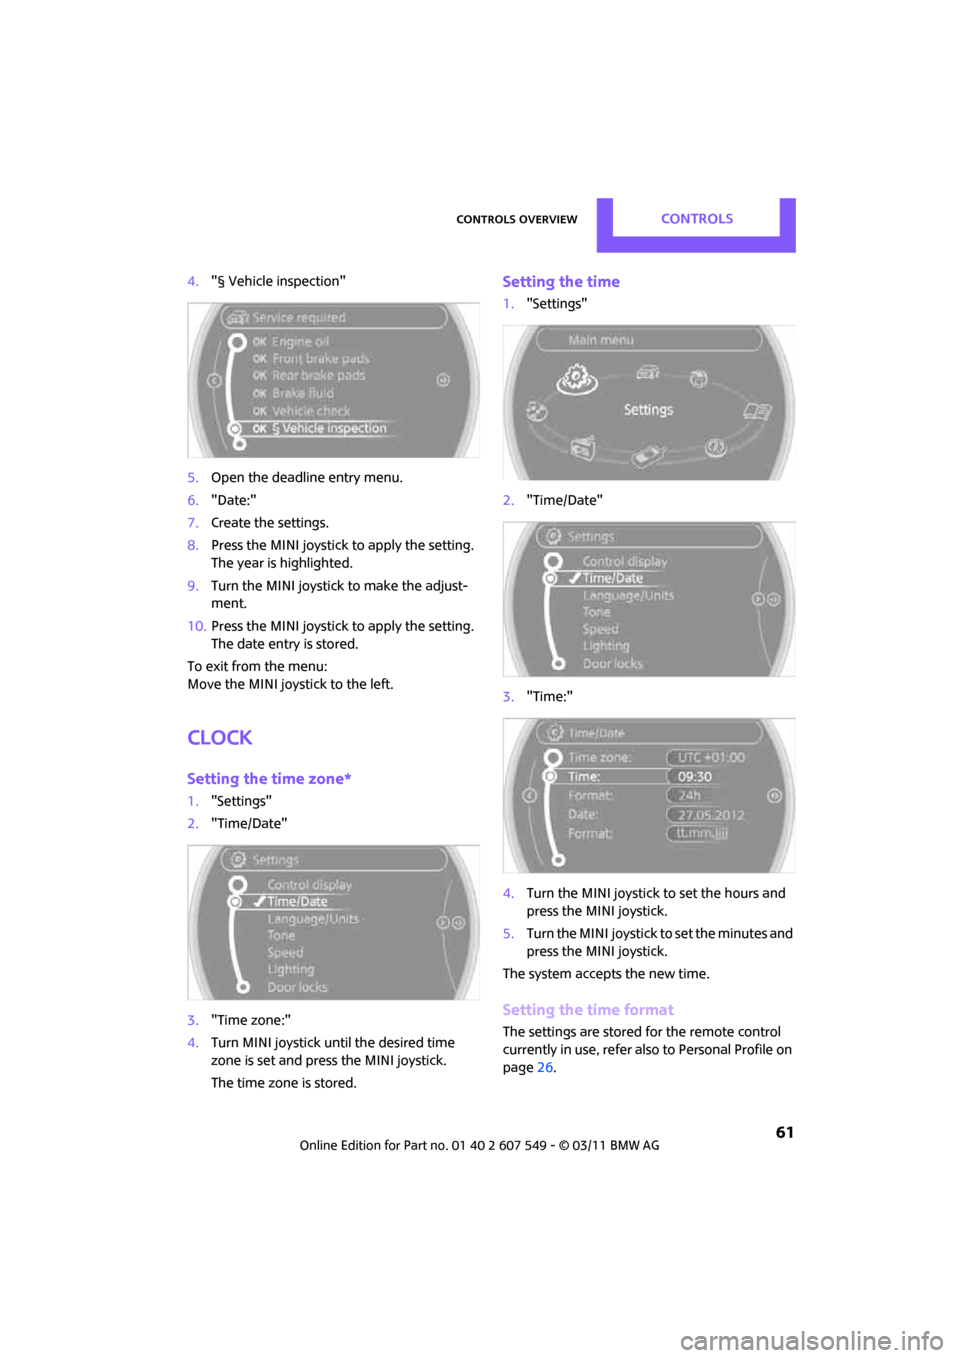
4."§ Vehicle inspection"
5. Open the deadline entry menu.
6. "Date:"
7. Create the settings.
8. Press the MINI joystick to apply the setting.
The year is highlighted.
9. Turn the MINI joystick to make the adjust-
ment.
10. Press the MINI joystick to apply the setting.
The date entry is stored.
To exit from the menu:
Move the MINI joystick to the left.
Clock
Setting the time zone*
1. "Settings"
2. "Time/Date"
3. "Time zone:"
4. Turn MINI joystick until the desired time
zone is set and press the MINI joystick.
The time zone is stored.
Setting the time
1."Settings"
2. "Time/Date"
3. "Time:"
4. Turn the MINI joystick to set the hours and
press the MINI joystick.
5. Turn the MINI joystick to set the minutes and
press the MINI joystick.
The system accepts the new time.
Setting the time format
The settings are stored for the remote control
currently in use, refer also to Personal Profile on
page 26.
Page 190 of 254
MOBILITYRefueling
188
Refueling
Switch off the engine before refueling;
otherwise, fuel cannot be added to the
tank and a message will be displayed. <
Take all precautionary measures and
observe all applicable regulations when
handling fuel. Do not carry any spare fuel con-
tainers in your vehicle. They can develop a leak
and cause an explosion or cause a fire in the
event of an accident. <
Fuel filler flap
Opening
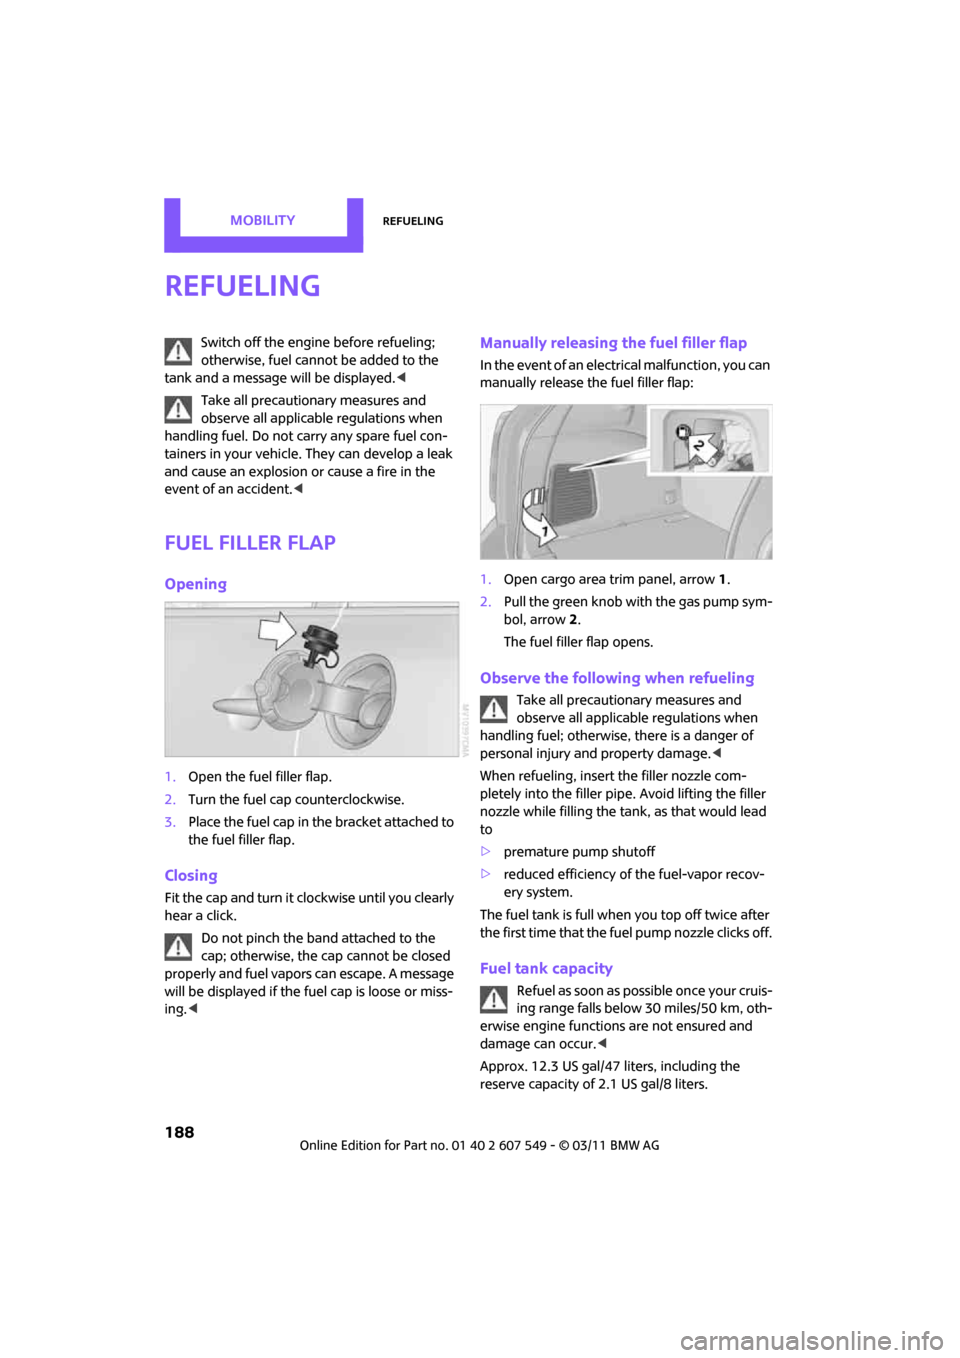
1.Open the fuel filler flap.
2. Turn the fuel cap counterclockwise.
3. Place the fuel cap in the bracket attached to
the fuel filler flap.
Closing
Fit the cap and turn it clockwise until you clearly
hear a click.
Do not pinch the band attached to the
cap; otherwise, the cap cannot be closed
properly and fuel vapors can escape. A message
will be displayed if the fuel cap is loose or miss-
ing. <
Manually releasing the fuel filler flap
In the event of an electrical malfunction, you can
manually release the fuel filler flap:
1. Open cargo area trim panel, arrow 1.
2. Pull the green knob with the gas pump sym-
bol, arrow 2.
The fuel filler flap opens.
Observe the following when refueling
Take all precautionary measures and
observe all applicable regulations when
handling fuel; otherwise, there is a danger of
personal injury an d property damage. <
When refueling, insert the filler nozzle com-
pletely into the filler pipe . Avoid lifting the filler
nozzle while filling the tank, as that would lead
to
> premature pump shutoff
> reduced efficiency of the fuel-vapor recov-
ery system.
The fuel tank is full when you top off twice after
the first time that the fuel pump nozzle clicks off.
Fuel tank capacity
Refuel as soon as po ssible once your cruis-
ing range falls below 30 miles/50 km, oth-
erwise engine functions are not ensured and
damage can occur. <
Approx. 12.3 US gal/47 liters, including the
reserve capacity of 2.1 US gal/8 liters.
Page 203 of 254
Under the hoodMOBILITY
201
Coolant temperature
A warning light will come on if the coolant, and
therefore the engine, becomes too hot.
A message appears on the Control Display.
Checking coolant level
Do not add coolant to the cooling system
when the engine is hot. Escaping coolant
can cause burns. <
Do not open the hood until the engine has
cooled down.
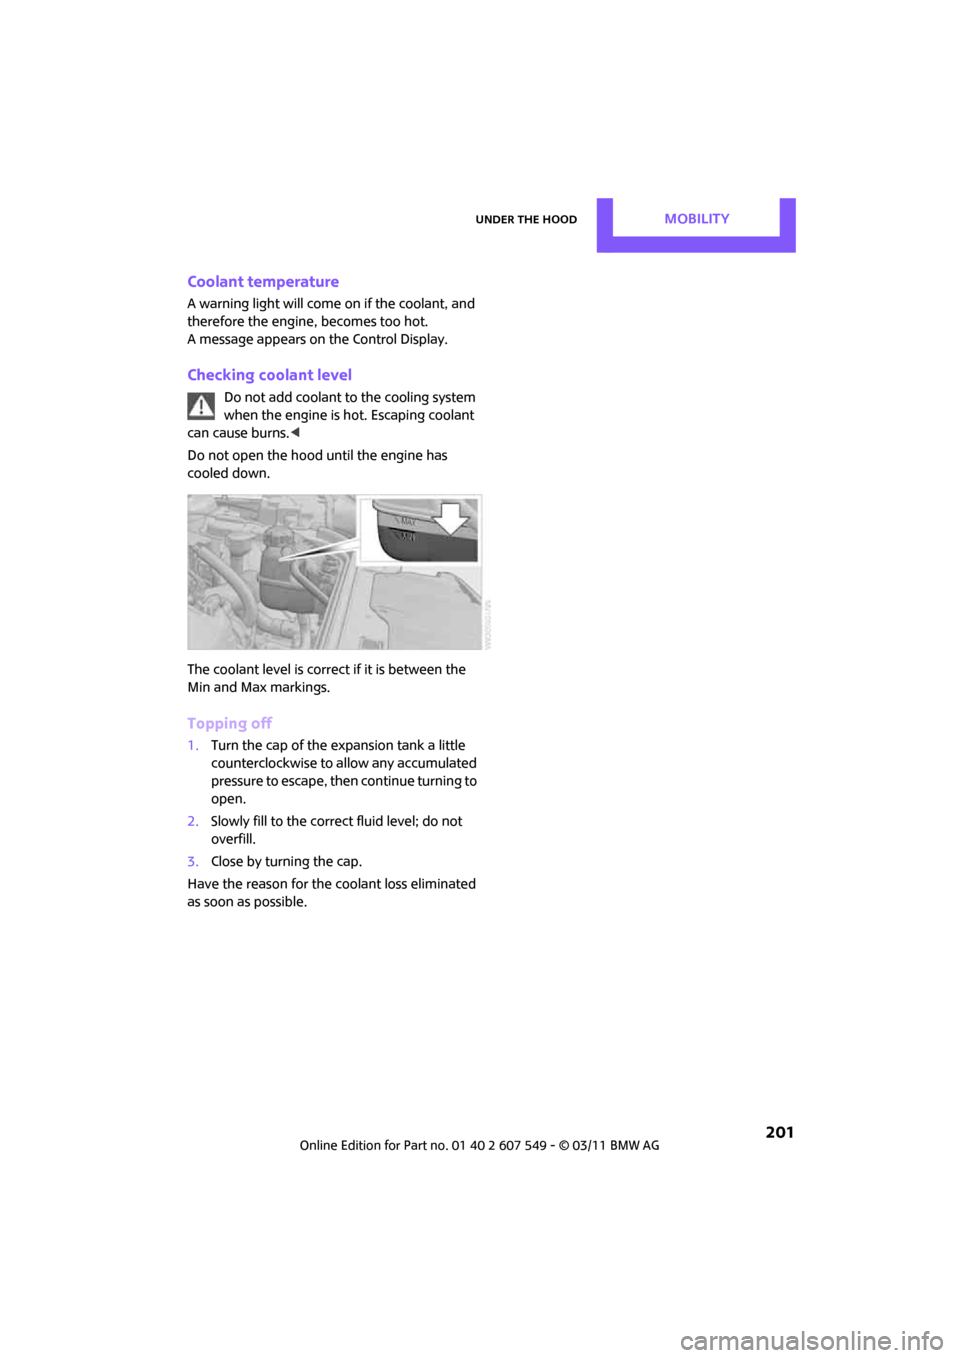
The coolant level is correct if it is between the
Min and Max markings.
Topping off
1. Turn the cap of the expansion tank a little
counterclockwise to allow any accumulated
pressure to escape, then continue turning to
open.
2. Slowly fill to the correct fluid level; do not
overfill.
3. Close by turning the cap.
Have the reason for the coolant loss eliminated
as soon as possible.
Page 211 of 254
Replacing componentsMOBILITY
209
tional laser diodes, and legislation defines them
as Class 1 light-emitting diodes.
Do not remove the covers or expose the
eyes directly to the unfiltered light source
for several hours; otherw ise, this could cause
irritation of the retina. <
Headlamp glass lens
In cool or humid weather, condensation may
occur on the interior of outside lights. The con-
densation disappears a short time after the light
is switched on. The headlamps do not need to
be changed. If a lot of moisture is present, e.g.
water droplets in the light, have them checked
by your service center.
Xenon lamps*
The service life of these bulbs is very long and
the probability of failure very low, provided that
they are not switched on and off an excessive
number of times. If a xenon lamp fails neverthe-
less, switch on the fog lamps and continue the
journey with great care, provided that local leg-
islation does not prohibit this.
Have any work on the xenon lamp system,
including bulb replac ement, carried out
only by a MINI dealer or a workshop that has
specially trained personnel working in accor-
dance with the specifications of the MINI manu-
facturer. Due to high voltage, there is a risk of
fatal injury if work on the xenon lamps is carried
out improperly. <
Halogen low beams and high beams
H13 bulb, 60/55 watts
The H13 bulb is pressurized. Therefore,
wear safety glasses an d protective gloves.
Otherwise, there is a risk of injury if the bulb is
damaged. <
Be careful when insta lling the cover; oth-
erwise, leaks could occur and cause dam-
age to the headlamp system. <
Accessing the lamp from the engine
compartment
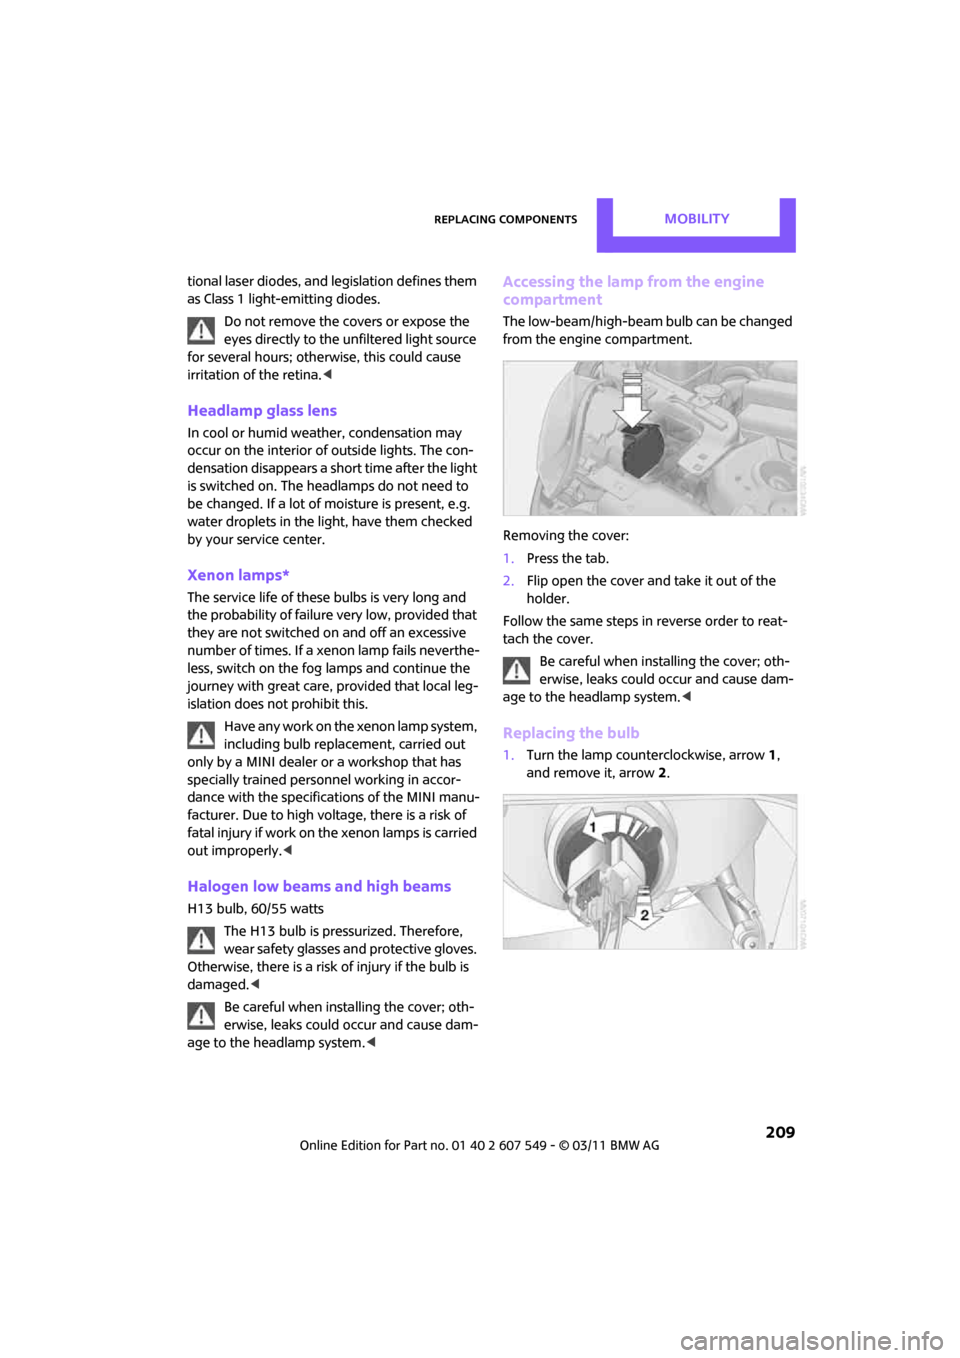
The low-beam/high-beam bulb can be changed
from the engine compartment.
Removing the cover:
1.Press the tab.
2. Flip open the cover and take it out of the
holder.
Follow the same steps in reverse order to reat-
tach the cover. Be careful when insta lling the cover; oth-
erwise, leaks could occur and cause dam-
age to the headlamp system. <
Replacing the bulb
1.Turn the lamp counterclockwise, arrow 1,
and remove it, arrow 2.
Page 212 of 254
MOBILITYReplacing components
210
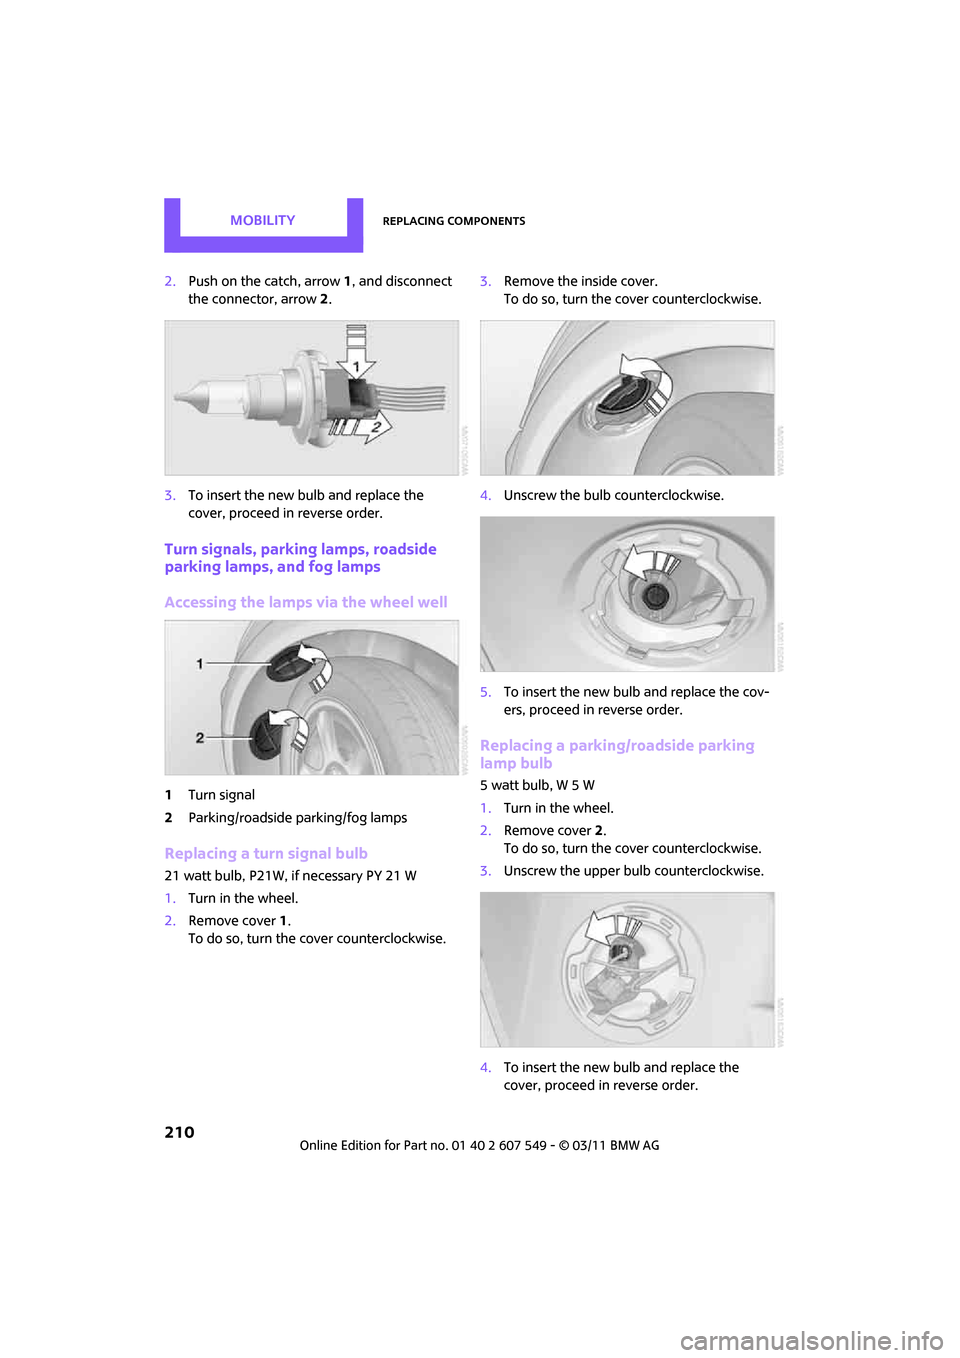
2.Push on the catch, arrow 1, and disconnect
the connector, arrow 2.
3. To insert the new bulb and replace the
cover, proceed in reverse order.
Turn signals, parking lamps, roadside
parking lamps, and fog lamps
Accessing the lamps via the wheel well
1Turn signal
2 Parking/roadside parking/fog lamps
Replacing a turn signal bulb
21 watt bulb, P21W, if necessary PY 21 W
1.Turn in the wheel.
2. Remove cover 1.
To do so, turn the cover counterclockwise. 3.
Remove the inside cover.
To do so, turn the cover counterclockwise.
4. Unscrew the bulb counterclockwise.
5. To insert the new bulb and replace the cov-
ers, proceed in reverse order.
Replacing a parking/roadside parking
lamp bulb
5 watt bulb, W 5 W
1.Turn in the wheel.
2. Remove cover 2.
To do so, turn the cover counterclockwise.
3. Unscrew the upper bulb counterclockwise.
4. To insert the new bulb and replace the
cover, proceed in reverse order.
Page 213 of 254
Replacing componentsMOBILITY
211
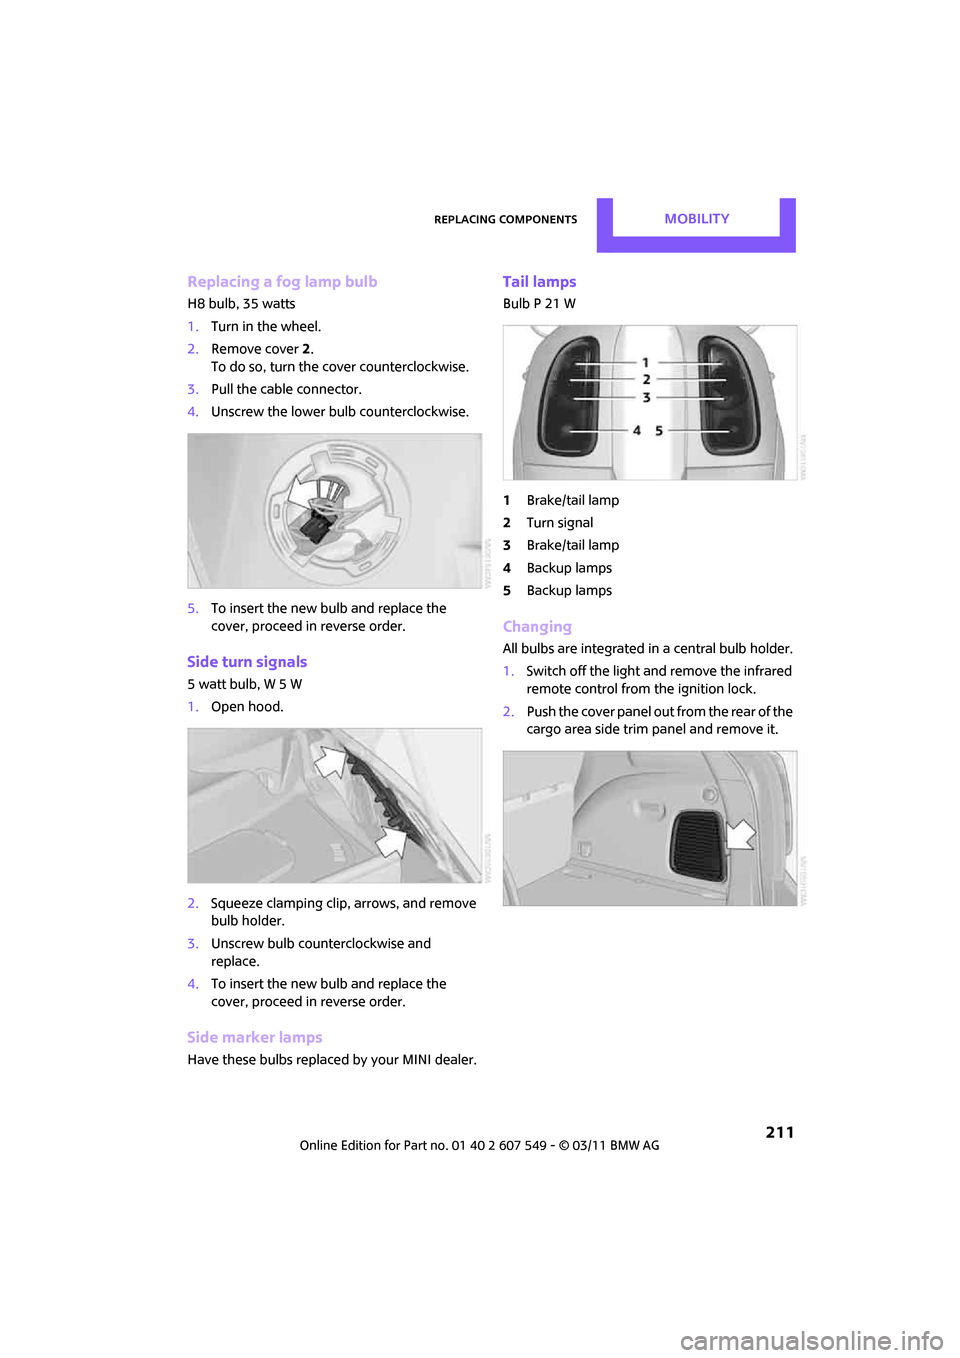
Replacing a fog lamp bulb
H8 bulb, 35 watts
1.Turn in the wheel.
2. Remove cover 2.
To do so, turn the cover counterclockwise.
3. Pull the cable connector.
4. Unscrew the lower bulb counterclockwise.
5. To insert the new bulb and replace the
cover, proceed in reverse order.
Side turn signals
5watt bulb, W5W
1.Open hood.
2. Squeeze clamping clip, arrows, and remove
bulb holder.
3. Unscrew bulb counterclockwise and
replace.
4. To insert the new bulb and replace the
cover, proceed in reverse order.
Side marker lamps
Have these bulbs replaced by your MINI dealer.
Tail lamps
Bulb P 21 W
1Brake/tail lamp
2 Turn signal
3 Brake/tail lamp
4 Backup lamps
5 Backup lamps
Changing
All bulbs are integrated in a central bulb holder.
1.Switch off the light and remove the infrared
remote control from the ignition lock.
2. Push the cover panel out from the rear of the
cargo area side trim panel and remove it.
Page 240 of 254
REFERENCEEverything from A to Z
238
Cargo loading101
– securing cargo 102
– stowing cargo 102
– vehicle 98
Cargo net 100
Cargo, securing 102
Carpets, care 206
Catalytic conver ter, refer to
Hot exhaust system 96
CD, audio playback 140
CD player 140
– controls 130
– fast forward/reverse 141
– random order 141
– selecting a track 140
– switching on/off 130
– tone control 131
– volume 130
Center armrest 91
Center brake lamp 212
Center console, refer to Around the center
console 14
Center Rail 91
Center Rail, refer to Storage
compartments 91
Central locking system 27
– Comfort Access 32
– from inside 30
– from outside 27
– setting unlocking behavior 27
Changing bulbs 208
Changing the language on the Control Display 65
Changing the measurement
units on the Control
Display 58
Changing wheels 214
Chassis number, refer to Engine compartment 199
Check Control 62
Child restraint fixing system LATCH 44
Child restraint systems 43
Child seats 43
Child-safety locks 45Chrome parts, care
206
Chrome parts, refer to Care 204
Cigarette lighter 92
Cleaning headlamps 52
– washer fluid 53
Clock
– 12 h/24 h mode 61
– setting time 61
Closing
– f
rom inside 30
– from outside 27
Clothes hooks 92
Cockpit 10
Cold start, refer to Starting the engine 46
Comfort Access 32
– replacing the battery 34
– what to observe before
entering a car wash 34
Comfort area, refer to Around the center console 14
Compartment for remote control, refer to Ignition
lock 46
Computer 56
– displays on Control Display 57
Condensation, refer to When the vehicle is parked 98
Condition Based Service CBS 202
Configuring settings, refer to
Personal Profile 26
Connecting vacuum cleaner, refer to Connecting electrical
appliances 92
Consumption, refer to Average fuel consumption 56
Contacts 161,176
– deleting 162,179
– displaying 162
– editing 162
– exporting/importing 179
– new contact 178
Control Display
– adjusting brightness 65Control Display, refer to iDrive
– switching on/off
19
Control Display, refer to On- board computer
– adjusting brightness 65
Control Display, refer to On-board computer 16
Control stick, refer to On-board computer 16
Control unit, refer to On-board
computer 16
Controls and displays 10
Convenient access, refer to
Comfort Access 32
Convenient operation
– windows 28
Convenient star t, refer to
Starting the engine 46
Coolant 200
– checking level 201
– filling 201
– temperature 201
Coolant temperature 201
Coo
ling fluid, refer to
Coolant 200
Cooling, maximum 86
Copyright 2
Cornering light, refer to
Adaptive Light Control 80
Criteria for route 118
Cruise control
– indicator lamp 13
Cruising range 56
Cupholders 92
Curb weight, refer to Weights 226
Current fuel consumption 56
Current playback
– external devices 145
D
Dashboard instruments, refer
to Displays 12
Dashboard lighting, refer to
Instrument lighting 81
Dashboard, refer to Cockpit 10