stop start MINI Countryman 2011 User Guide
[x] Cancel search | Manufacturer: MINI, Model Year: 2011, Model line: Countryman, Model: MINI Countryman 2011Pages: 196, PDF Size: 3.06 MB
Page 118 of 196

CommunicationsTelephone
116
10Switching displays 120
> "PHONE": telephone
> "COMP": computer
> "CONFIG": adjusting
11 Radio on/off, volume
>Press: to switch radio on/off
> Turn: adjusting volume 119
12 Ejecting CD
This symbol appears on the radio display
when a phone call is being made with the
hands-free system.
Pairing/unpairing mobile
phone
Overview
The pairing data of four mobile phones can be
stored simultaneously in the vehicle. When the
engine is running or the ignition is switched on,
each paired mobile phone is automatically
detected as soon as it is present in the passenger
compartment.
Requirements
> Suitable mobile ph one, refer to page114.
> Mobile phone operational.
> Bluetooth activated in vehicle, refer to
page 116, and in the mobile phone.
> Bluetooth presets in the mobile phone are
required, e.g. connection not confirmed or
visible, refer to Owner's Manual for the
mobile phone.
> A number with at least 4 and at most
16 digits has been established as the Blue-
tooth passkey. Only required once for pair-
ing.
> Ignition switched on.
Activating/deactivating Bluetooth link
Bluetooth is not permitted everywhere. Comply
with all safety guidelines and regulations.
To deactivate the Bluetooth connection:
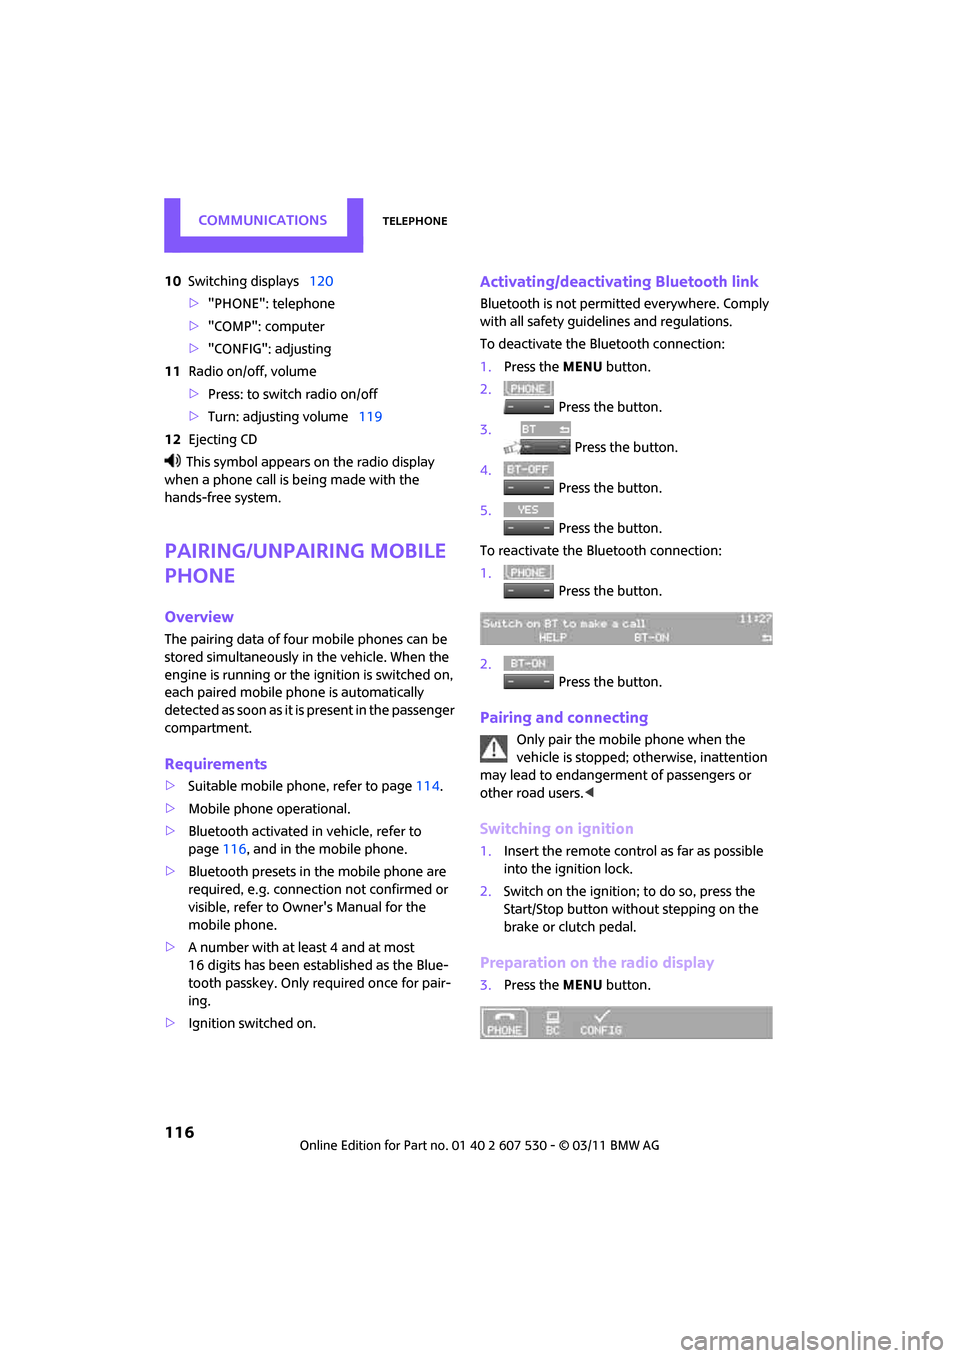
1.Press the MENU button.
2. Press the button.
3. Press the button.
4. Press the button.
5. Press the button.
To reactivate the Bluetooth connection:
1. Press the button.
2. Press the button.
Pairing and connecting
Only pair the mobile phone when the
vehicle is stopped; otherwise, inattention
may lead to endangerment of passengers or
other road users. <
Switching on ignition
1.Insert the remote control as far as possible
into the ignition lock.
2. Switch on the ignition; to do so, press the
Start/Stop button without stepping on the
brake or clutch pedal.
Preparation on the radio display
3.Press the MENU button.
Page 163 of 196

Giving and receiving assistanceMobility
161
With tow rope
When starting off in the towing vehicle, make
sure that the tow rope is taut.To avoid jerking and the associated
stresses on vehicle components when
towing, always use nylon ropes or nylon straps.
Attach the tow rope to the tow fittings only, as
attaching it to other parts of the vehicle could
result in damage. <
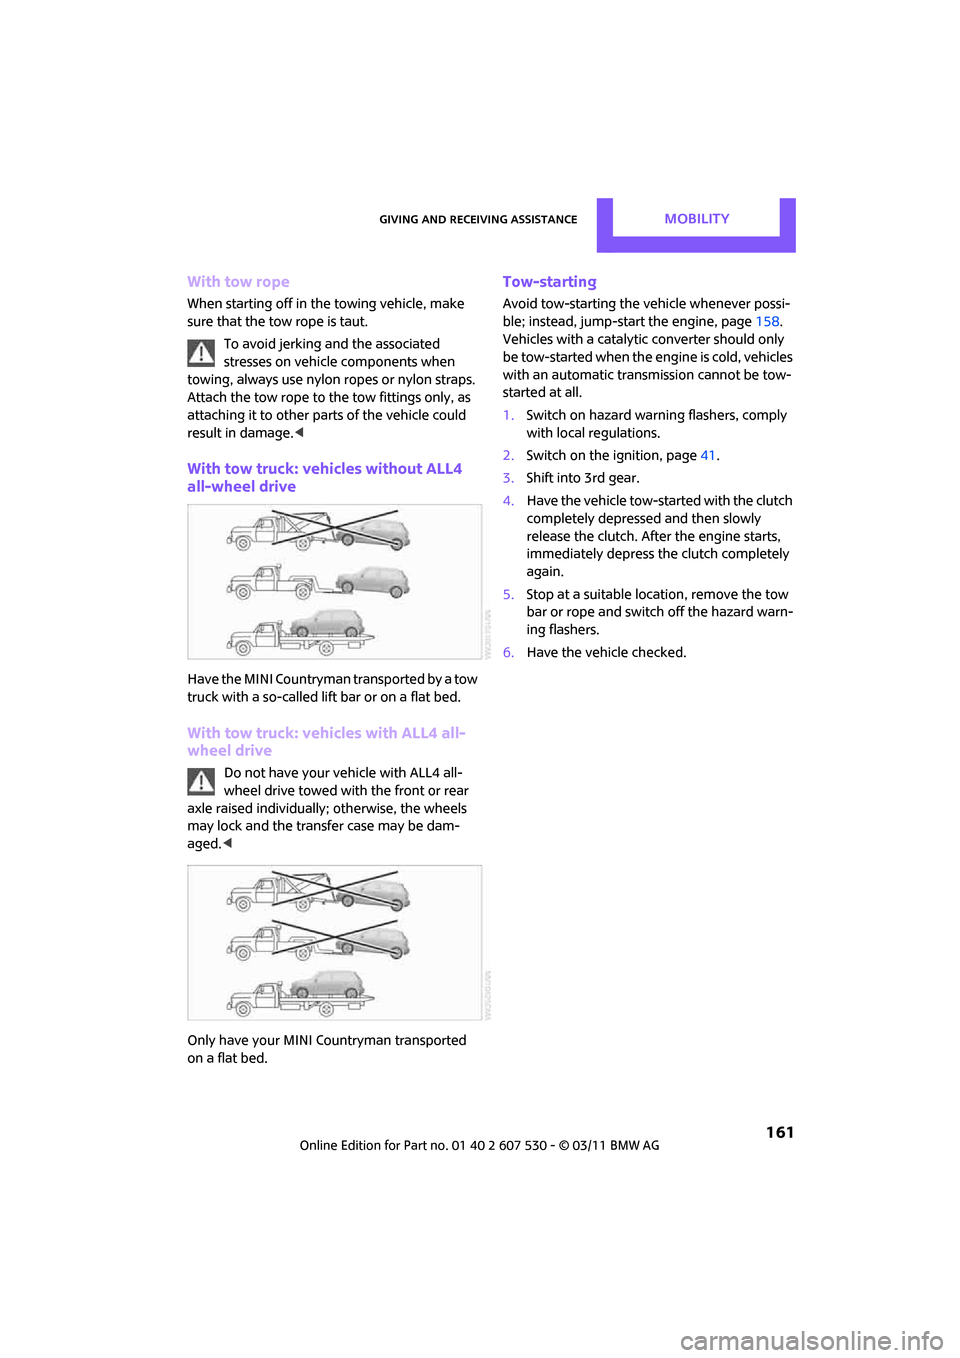
With tow truck: vehicles without ALL4
all-wheel drive
Have the MINI Countryman transported by a tow
truck with a so-called lift bar or on a flat bed.
With tow truck: vehicles with ALL4 all-
wheel drive
Do not have your vehicle with ALL4 all-
wheel drive towed with the front or rear
axle raised individually; otherwise, the wheels
may lock and the transfer case may be dam-
aged. <
Only have your MINI Countryman transported
on a flat bed.
Tow-starting
Avoid tow-starting the vehicle whenever possi-
ble; instead, jump-start the engine, page 158.
Vehicles with a catalytic converter should only
be tow-started when the engine is cold, vehicles
with an automatic transmission cannot be tow-
started at all.
1. Switch on hazard warn ing flashers, comply
with local regulations.
2. Switch on the ignition, page 41.
3. Shift into 3rd gear.
4. Have the vehicle tow-started with the clutch
completely depressed and then slowly
release the clutch. Afte r the engine starts,
immediately depress the clutch completely
again.
5. Stop at a suitable lo cation, remove the tow
bar or rope and switch off the hazard warn-
ing flashers.
6. Have the vehicle checked.
Page 166 of 196

MobilityIndicator and warning lamps
164
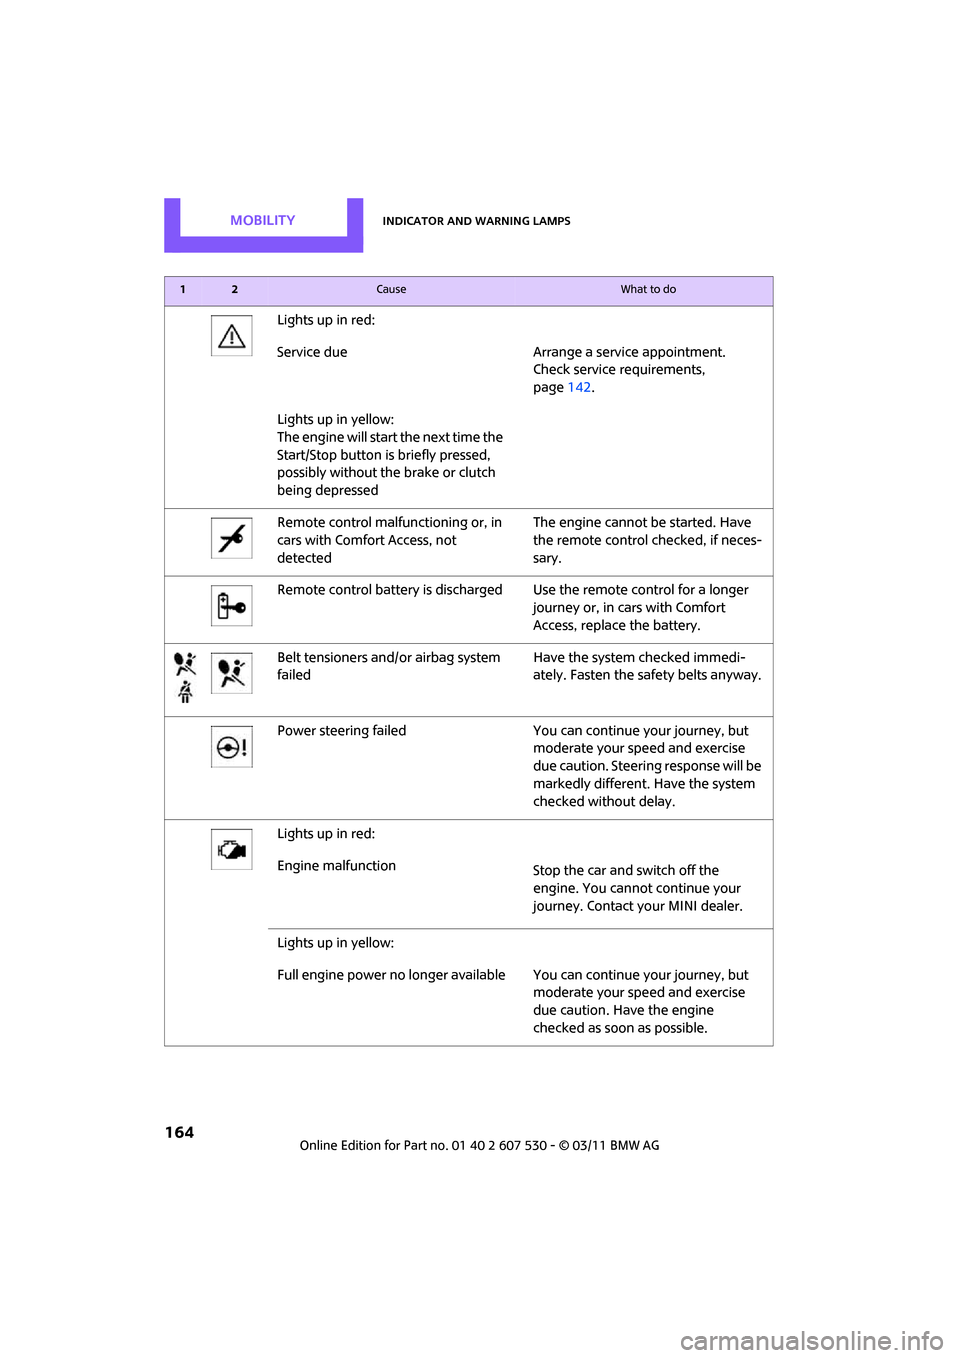
Lights up in red:
Service due Arrange a service appointment.Check service requirements,
page142.
Lights up in yellow:
The engine will start the next time the
Start/Stop button is briefly pressed,
possibly without the brake or clutch
being depressed
Remote control malfunctioning or, in
cars with Comfort Access, not
detected The engine cannot be started. Have
the remote control
checked, if neces-
sary.
Remote control battery is discharged Use the remote control for a longer journey or, in cars with Comfort
Access, replace the battery.
Belt tensioners and/ or airbag system
failed Have the system checked immedi-
ately. Fasten the safety belts anyway.
Power steering failed You can continue your journey, but moderate your speed and exercise
due caution. Steering response will be
markedly different. Have the system
checked without delay.
Lights up in red:
Engine malfunction Stop the car and switch off the
engine. You cannot continue your
journey. Contact your MINI dealer.
Lights up in yellow:
Full engine power no longer available Y ou can continue your journey, but
moderate your speed and exercise
due caution. Have the engine
checked as soon as possible.
12Cause What to do
Page 171 of 196

Indicator and warning lampsMobility
169
Indication* in Canadian models
The driving stabili ty control systems,
including ABS, ALL4 all-wheel drive,
and the Flat Tire Monitor or the Tire
Pressure Monitor
*, have failed, refer
also to page 59 Drive cautiously and think well ahead.
Avoid braking with full force, driving
on rough tracks, and depressing the
accelerator pedal to full throttle or
kickdown position. Have the system
checked immediately.
ALL4 all-wheel drive has failed. Con tinued driving is possible. Drive
cautiously and think well ahead. Avoid
rough track driving, full-throttle oper-
ation, and use of the transmission's
kickdown mode. Have the system
checked immediately.
ALL4 all-wheel drive and DSC have
failed. Continued driving is possible. Drive
cautiously and think well ahead. Avoid
rough track driving, full-throttle oper-
ation, and use of
the transmission's
kickdown mode. Have the system
checked immediately.
Vehicles with Flat Tire Monitor
*
Light up in yellow and red:
> Tire damage Carefully bring the car to a stop.
Observe the information starting on
page
62.
> Flat Tire Monitor not initialized Initialize Flat Tire Monitor, page
63.
Light up in yellow:
Flat Tire Monitor failed. Punctures are
not indicated Have the system checked.
12Cause What to do
Page 172 of 196

MobilityIndicator and warning lamps
170
Vehicles with Tire Pressure Monitor*
Light up in yellow and red:
There is a flat tire or significant tire
pressure loss, e.g. in the front right
tire Carefully bring the car to a stop.
Observe the information starting on
page
64.
Vehicles with Tire Pressure Monitor
*
Light up in yellow:
Tire Pressure Monitor not initialized Check the inflation pressure and reset
the system, page
65.
The small lamp flashes yellow and
then stays on, the large lamp lights
up in yellow:
> Wheel mounted without TPM
electronics Have the system checked.
> The TPM is temporarily malfunc-
tioning due to other systems or
devices using the same radio fre-
quency.
Vehicles with Tire Pressure Monitor
*
The small lamp flashes yellow and
then stays on, the large lamp lights
up in yellow:
> Tire Pressure Monitor failed.
Punctures are not indicated Have the system checked.
> Wheel mounted without TPM
electronics Have the system checked.
12Cause What to do
Page 191 of 196

Everything from A to ZReference
189
Speedo, refer to Speedometer 12
Speedometer 12
Split rear seat backrest, refer to
Expanding the cargo area 92
Sport button 62
Stability control, refer to
Driving stability control
systems 59
Start/Stop button 41
– starting the engine 42
– switching off the engine 42
Starting assistance, refer to
Jump-starting 158
Starting, refer to Starting the engine 42
Starting the engine
– Start/Stop button 41
Start-off assistance, refer to
– DSC 60
– Hill Assist 62
Stations, refer to Radio MINI
Boost CD 104
Status of this Owner's Manual at time of printing 4
Steering wheel 37
– adjustment 37
– buttons on steering wheel 11
– lock 41
– shift paddles 45
Steptronic, refer to Automatic transmission with
Steptronic 43
Storage area
– cargo area 92
Storage compartments 84
Storage space
– storage compartments 84
Storing the vehicle 147
Storing tires 137
Stowage, refer to Storage compartments 84
Summer tires, re fer to Wheels
and tires 130
Switches, refer to Cockpit 10
Switching off
– engine 42 Switching off the engine
– Start/Stop button
41
Switching on
– CD player 102,107
– Radio MINI Boost CD 102
Switching the co oling function
on and off 80
Symbols 4
T
Tachometer 51
Tail lamp, refer to Tail
lamps 151
– replacing bulb 151
Tail lamps 151
Tank volume, refer to Capacities 179
Technical data 176
Technical modifications 5
Telephone 114
– hands-free system 122
– installation location, refer to Center armrest 83
– voice commands 122
Temperature display
– setting the units 54
Temperature of coolant, refer
to Coolant temperature 141
Temperature setting
– air conditioner 77
– automatic climate control 79
Tempomat, refer to Cruise
control 49
Tensioning straps, refer to Securing cargo 96
The individual vehicle 4
Third brake lamp, refer to Center brake lamp 152
Three-point safety belt 35
Tightening the lug bolts
– torque 156
Tightening torque, refer to Tightening lug bolts 156
Time
– setting 103 Tire failure
– Flat Tire Monitor
63
– indicator/warning lamp 63
– MINI Mobility System 152
– run-flat tires 64
– Tire Pressure Monitor 64
Tire inflation pressure 130
– loss 63
Tire Pressure Monitor TPM 64
– limitations of system 65
– resetting system 65
– warning lamp 65
Tire pressure monitoring, refer
to Flat Tire Monitor 62
Tire Quality Grading 134
Tires
– age 136
– breaking in 90
– changing, refe r to Changing
wheels 155
– condition 135
– damage 135
– inflation pressure 130
– inflation pressure loss 65
– minimu
m tread depth 135
– new tires 136
– pressure monitoring, refer to Flat Tire Monitor 62
– pressure monitoring, refer to Tire Pressure Monitor
TPM 64
– puncture 63
– size 134
– wear indicators, refer to Minimum tread depth 135
– winter tires 137
– with emergency operation properties 136
Tires with emergency
operation properties, refer to
Run-flat tires 136
Tires with safety features, refer
to Run-flat tires 136
Tone
– control 103
– middle setting 103