MINI Countryman 2011 Service Manual
Manufacturer: MINI, Model Year: 2011, Model line: Countryman, Model: MINI Countryman 2011Pages: 196, PDF Size: 3.06 MB
Page 41 of 196
Transporting children safelyControls
39
To lock the safety belt
1.Secure the child restraint system with the
belt.
2. Pull the belt strap all the way out.
3. Allow the belt strap to retract and pull it taut
against the child restraint system.
The safety belt is locked.
To unlock the safety belt
1. Open the belt buckle
2. Remove the child restraint system.
3. Allow the safety belt strap to retract all the
way.
LATCH child restraint
fixing system
LATCH: Lower Anchors an d Tethers for Children.
To install and use the LATCH child restraint
system, follow the op erating and safety
instructions provided by the manufacturer of the
system; otherwise, the protective function of the
seat may be compromised. <
Anchor points for LATCH anchors
Before installing the child seat, pull the belt out
of the area for the child restraint fixing system.
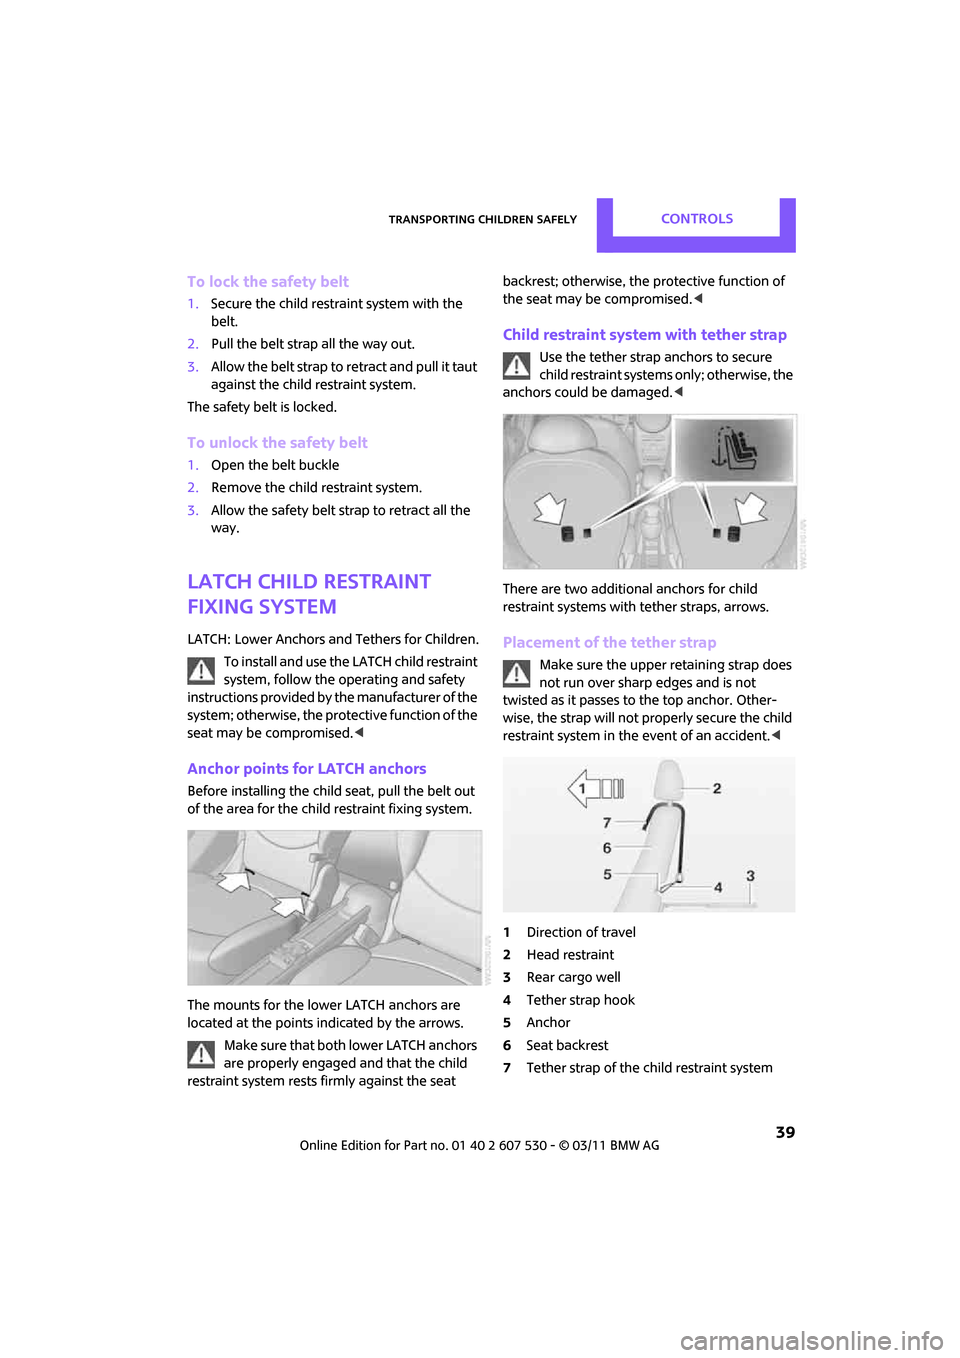
The mounts for the lower LATCH anchors are
located at the points indicated by the arrows.
Make sure t hat bo th low er LATC H anch ors
are properly engaged and that the child
restraint system rests fi rmly against the seat backrest; otherwise, the protective function of
the seat may be compromised.
<
Child restraint system with tether strap
Use the tether strap anchors to secure
child restraint systems only; otherwise, the
anchors could be damaged. <
There are two additional anchors for child
restraint systems with tether straps, arrows.
Placement of the tether strap
Make sure the upper retaining strap does
not run over sharp edges and is not
twisted as it passes to the top anchor. Other-
wise, the strap will not properly secure the child
restraint system in the event of an accident.<
1 Direction of travel
2 Head restraint
3 Rear cargo well
4 Tether strap hook
5 Anchor
6 Seat backrest
7 Tether strap of the child restraint system
Page 42 of 196
ControlsTransporting children safely
40
Attaching upper retaining strap to the
attachment point
1.Slide the head restraint upward.
2. Guide the tether strap between the head
restraint holders.
3. Attach the tether strap to the anchor using
the hook.
4. Push the head restraint into its lowermost
position.
5. Pull the retaining strap tight.
Securing doors and
windows
Rear doors
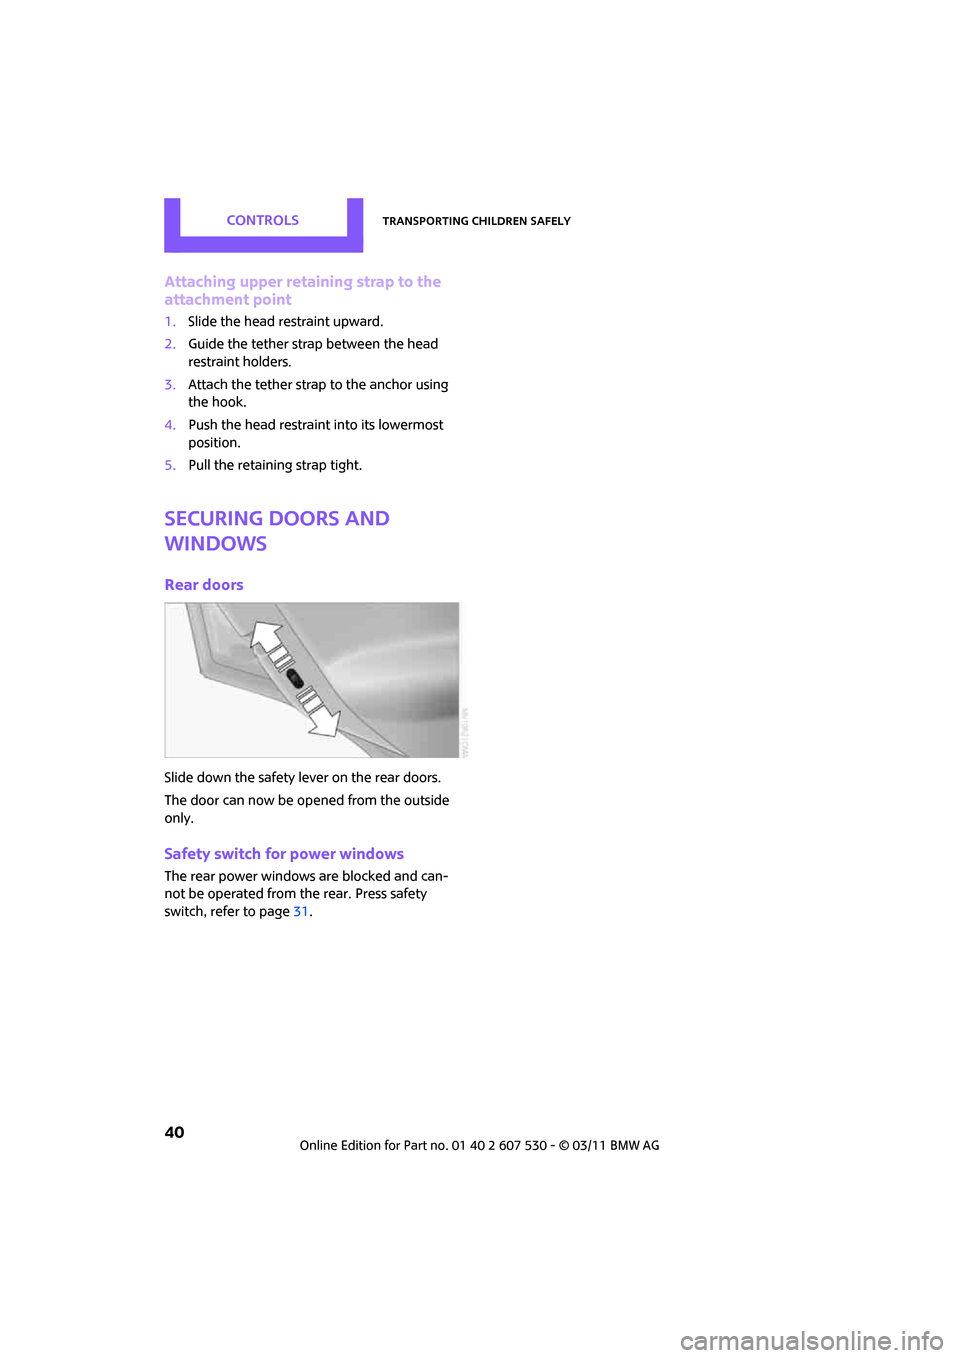
Slide down the safety lever on the rear doors.
The door can now be opened from the outside
only.
Safety switch for power windows
The rear power windows are blocked and can-
not be operated from the rear. Press safety
switch, refer to page 31.
Page 43 of 196
DrivingControls
41
Driving
Ignition lock
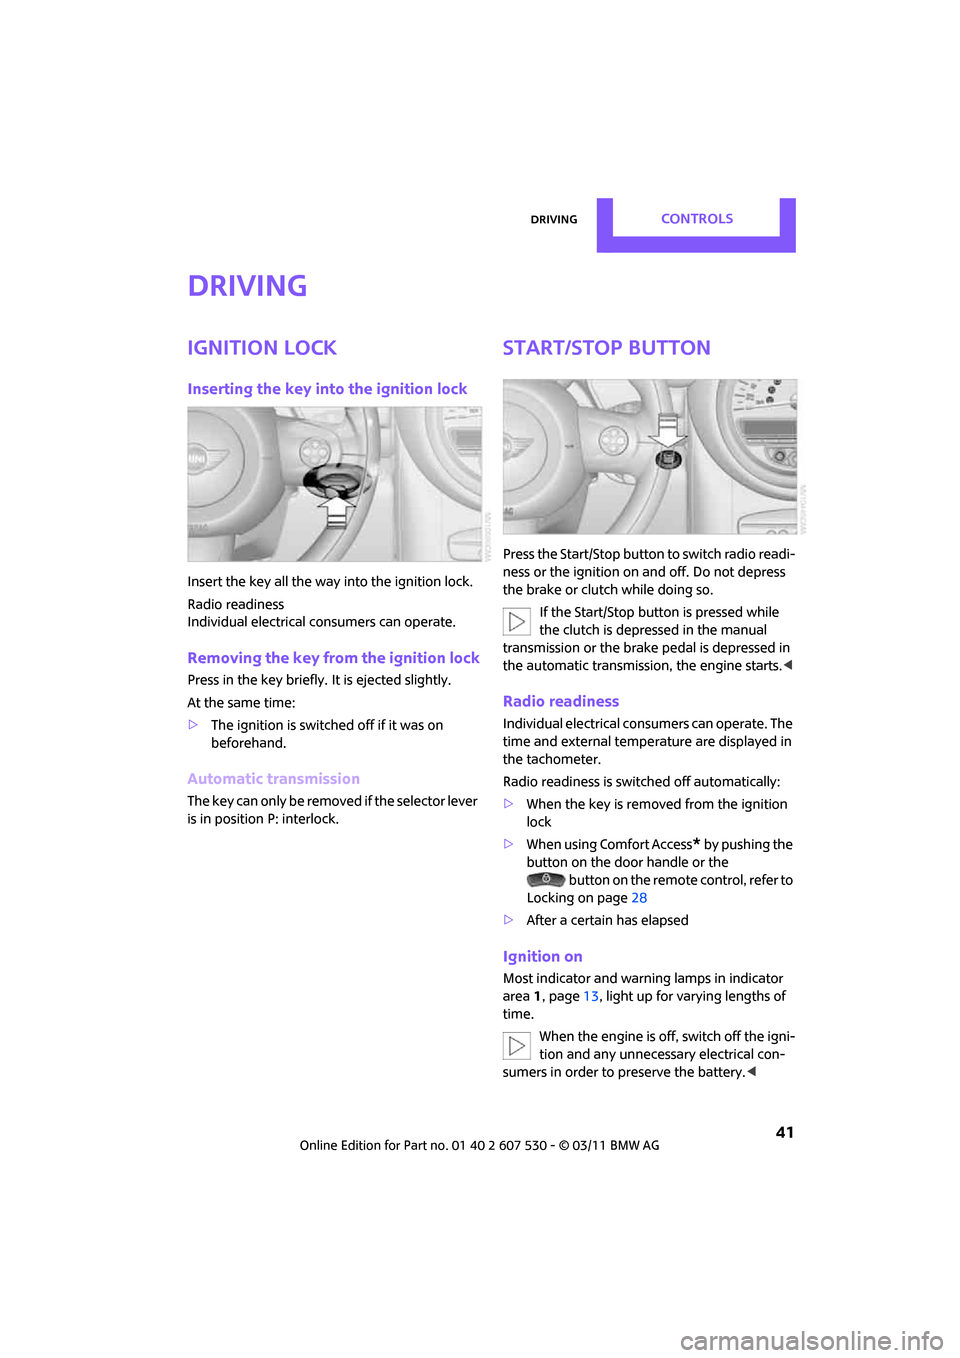
Inserting the key into the ignition lock
Insert the key all the way into the ignition lock.
Radio readiness
Individual electrical consumers can operate.
Removing the key from the ignition lock
Press in the key briefly. It is ejected slightly.
At the same time:
> The ignition is switched off if it was on
beforehand.
Automatic transmission
The key can only be removed if the selector lever
is in position P: interlock.
Start/Stop button
Press the Start/Stop button to switch radio readi-
ness or the ignition on and off. Do not depress
the brake or clutch while doing so.
If the Start/Stop button is pressed while
the clutch is depressed in the manual
transmission or the brak e pedal is depressed in
the automatic transmission, the engine starts. <
Radio readiness
Individual electrical consumers can operate. The
time and external temperature are displayed in
the tachometer.
Radio readiness is switched off automatically:
>When the key is removed from the ignition
lock
> When using Comfort Access
* by pushing the
button on the door handle or the
button on the remote control, refer to
Locking on page 28
> After a certain has elapsed
Ignition on
Most indicator and warning lamps in indicator
area 1, page 13, light up for va rying lengths of
time.
When the engine is off, switch off the igni-
tion and any unnecessary electrical con-
sumers in order to preserve the battery. <
Page 44 of 196
ControlsDriving
42
Radio readiness and ignition off
All indicator and warning lamps in the displays
go out.
The ignition switches off automatically if the
driver's door is opened. Pressing the Start/Stop
button again switches the ignition back on.
The ignition is not switched off in situations such
as the following:
> The clutch or brake is depressed
> The low beams are switched on
Starting the engine
Do not allow the engine to run in enclosed
areas; otherwise, inha lation of the noxious
exhaust gases can lead to loss of consciousness
and death. Exhaust gase s contain carbon mon-
oxide, an odorless and colorless, but highly toxic
gas. Never leave an unattended vehicle with the
engine running; otherwise, such a vehicle repre-
sents a potential safety hazard.
Before leaving the car while the engine is run-
ning, place the transmission in neutral or move
the selector lever to position P and forcefully
apply the parking brake to prevent the car from
moving. <
Avoid frequent starting in quick succes-
sion or repeated start attempts in which
the engine does not start. Otherwise, the fuel is
not burned or inadequate ly burned and there is
a danger of overheatin g and damaging the cat-
alytic converter. <
Do not let the engine warm up with the vehicle
at a standstill. Move off immediately at a moder-
ate engine speed.
When starting the engi ne, do not depress the
accelerator pedal.
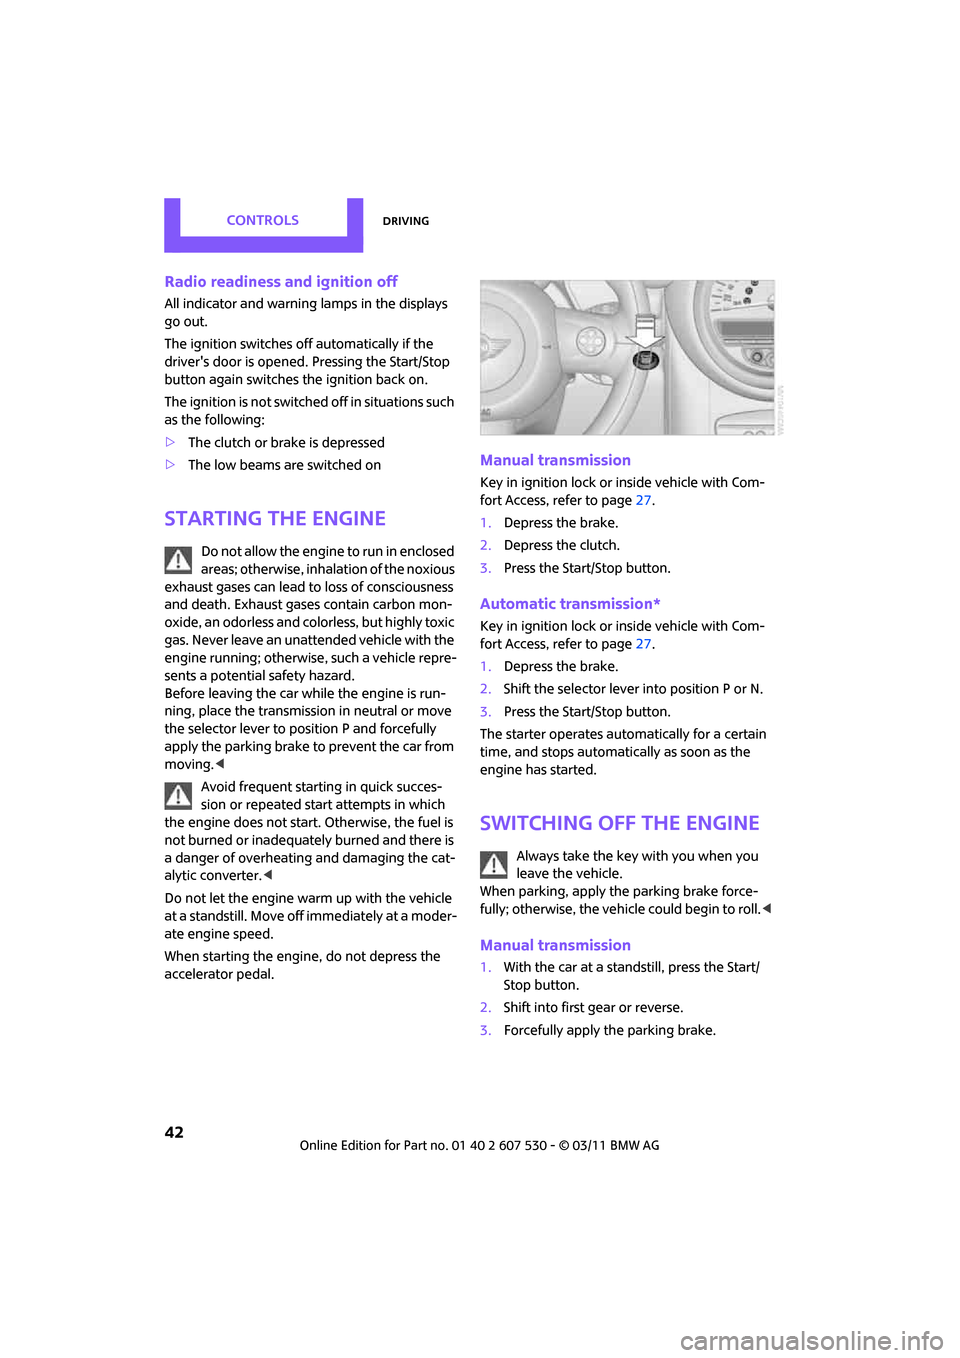
Manual transmission
Key in ignition lock or inside vehicle with Com-
fort Access, refer to page 27.
1. Depress the brake.
2. Depress the clutch.
3. Press the Start/Stop button.
Automatic transmission*
Key in ignition lock or inside vehicle with Com-
fort Access, refer to page 27.
1. Depress the brake.
2. Shift the selector lever into position P or N.
3. Press the Start/Stop button.
The starter operates auto matically for a certain
time, and stops automati cally as soon as the
engine has started.
Switching off the engine
Always take the key with you when you
leave the vehicle.
When parking, apply the parking brake force-
fully; otherwise, the vehicle could begin to roll. <
Manual transmission
1.With the car at a standstill, press the Start/
Stop button.
2. Shift into first gear or reverse.
3. Forcefully apply the parking brake.
Page 45 of 196
DrivingControls
43
Automatic transmission*
1.With the car at a stop, move the selector
lever to position P.
2. Press the Start/Stop button.
3. Forcefully apply the parking brake.
Before driving into a car wash
By following these steps, the vehicle is able to
roll:
1.Place the remote control, even with Comfort
Access, in the ig nition lock.
2. Depress the brake.
3. Move the selector lever to position N.
4. Switch off the engine.
Parking brake
The parking brake is primarily intended to pre-
vent the vehicle from rolling while parked; it
brakes the rear wheels.
Applying
The lever locks in position automatically.
Releasing
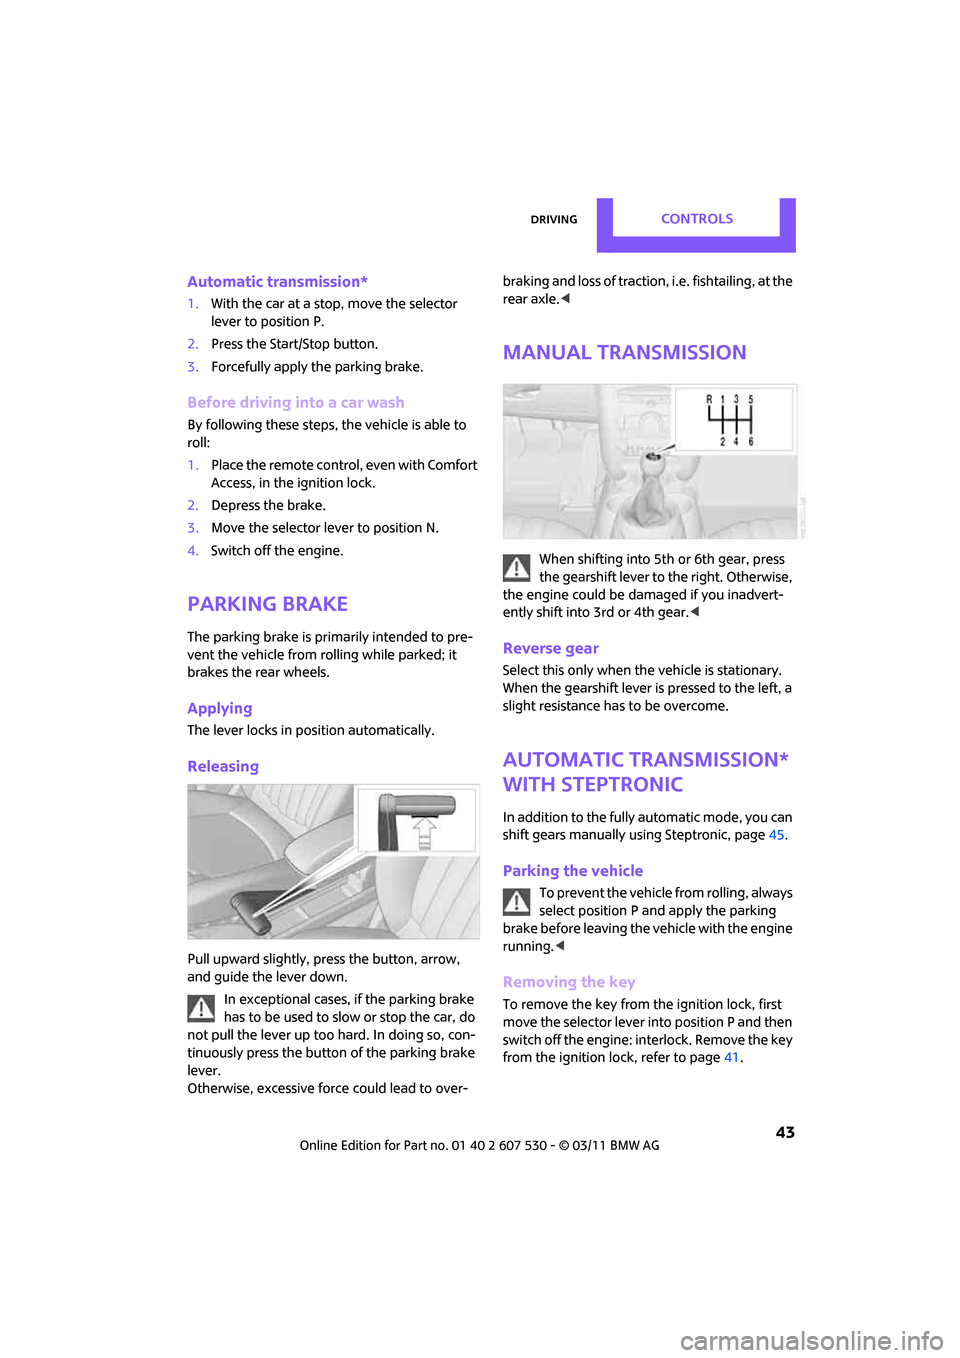
Pull upward slightly, press the button, arrow,
and guide the lever down.
In exceptional cases, if the parking brake
has to be used to slow or stop the car, do
not pull the lever up too hard. In doing so, con-
tinuously press the button of the parking brake
lever.
Otherwise, excessive force could lead to over- braking and loss of traction, i.e. fishtailing, at the
rear axle.
<
Manual transmission
When shifting into 5th or 6th gear, press
the gearshift lever to the right. Otherwise,
the engine could be damaged if you inadvert-
ently shift into 3rd or 4th gear.<
Reverse gear
Select this only when the vehicle is stationary.
When the gearshift lever is pressed to the left, a
slight resistance ha s to be overcome.
Automatic transmission*
with Steptronic
In addition to the fully automatic mode, you can
shift gears manually using Steptronic, page 45.
Parking the vehicle
To prevent the vehicle from rolling, always
select position P and apply the parking
brake before leaving the vehicle with the engine
running. <
Removing the key
To remove the key from the ignition lock, first
move the selector lever into position P and then
switch off the engine: interlock. Remove the key
from the ignition lock, refer to page 41.
Page 46 of 196

ControlsDriving
44
Selector lever positions
P R N D M/S + –
Displays in the tachometer
P R N D DS M1 to M6
The selector lever position is displayed, or the
current gear in the manual mode.
Changing selector lever positions
> The selector lever can only be moved out of
position P when the ignition is switched on
or the engine is running.
> Before moving the le ver away from P or N
with the vehicle stationary, first depress the
brake; otherwise, the selector lever will
refuse to move: shiftlock.
To prevent the vehicle from creeping
after you select a driving position,
depress the brake until you are ready to
start. <
A lock prevents accidental shifting into selector
lever positions R and P.
Overriding the selector lever lock
Press the button on the front of the selector
lever, arrow.
P Park
Select this only when the vehicle is stationary.
The transmission locks to prevent the drive
wheels from turning.
R Reverse
Select this only when the vehicle is stationary.
N Neutral
Select this when you are in a car wash, for exam-
ple. The vehicle can roll.
D Drive, automatic position
Position for normal vehi cle operation. All for-
ward gears are selected automatically.
Under normal operatin g conditions, the fuel
consumption is lowest wh en driving in position
D.
Kickdown
Kickdown enables you to achieve maximum
performance.
Depress the accelerator pedal beyond the full-
throttle resistance point.
Page 47 of 196
DrivingControls
45
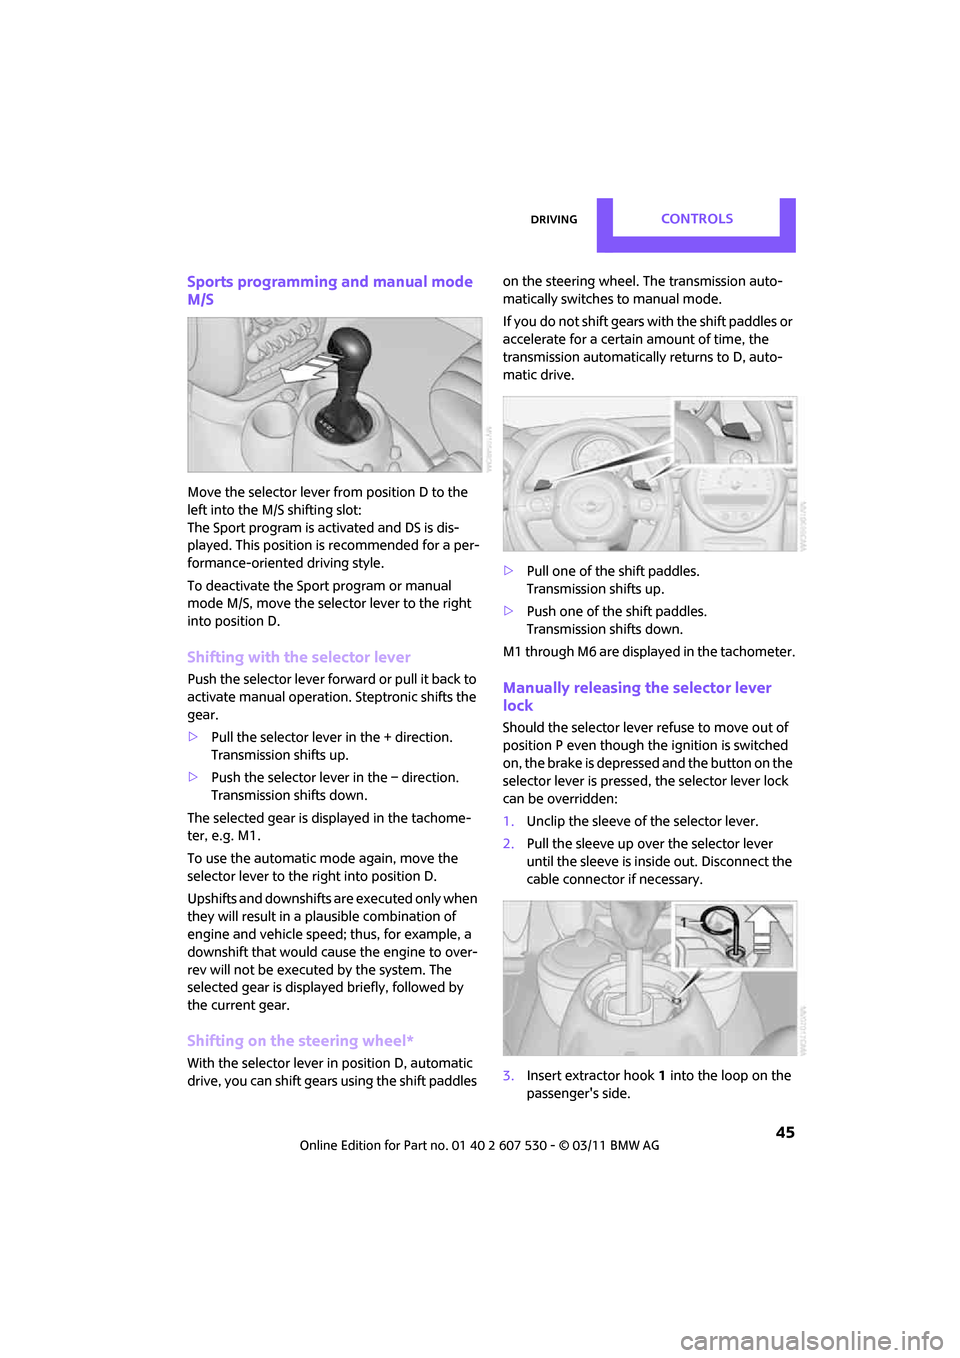
Sports programming and manual mode
M/S
Move the selector lever from position D to the
left into the M/S shifting slot:
The Sport program is activated and DS is dis-
played. This position is recommended for a per-
formance-oriented driving style.
To deactivate the Sport program or manual
mode M/S, move the selector lever to the right
into position D.
Shifting with the selector lever
Push the selector lever forward or pull it back to
activate manual operation. Steptronic shifts the
gear.
> Pull the selector lever in the + direction.
Transmission shifts up.
> Push the selector leve r in the – direction.
Transmission shifts down.
The selected gear is displayed in the tachome-
ter, e.g. M1.
To use the automatic mode again, move the
selector lever to the right into position D.
Upshifts and downshifts are executed only when
they will result in a pl ausible combination of
engine and vehicle speed; thus, for example, a
downshift that would cause the engine to over-
rev will not be executed by the system. The
selected gear is displayed briefly, followed by
the current gear.
Shifting on the steering wheel*
With the selector lever in position D, automatic
drive, you can shift gears using the shift paddles on the steering wheel. The transmission auto-
matically switches to manual mode.
If you do not shift gears with the shift paddles or
accelerate for a certai
n amount of time, the
transmission automatically returns to D, auto-
matic drive.
> Pull one of the shift paddles.
Transmission shifts up.
> Push one of th e shift paddles.
Transmission shifts down.
M1 through M6 are displayed in the tachometer.
Manually releasing the selector lever
lock
Should the selector lever refuse to move out of
position P even though the ignition is switched
on, the brake is depressed and the button on the
selector lever is pressed, the selector lever lock
can be overridden:
1. Unclip the sleeve of the selector lever.
2. Pull the sleeve up over the selector lever
until the sleeve is insi de out. Disconnect the
cable connector if necessary.
3. Insert extractor hook 1 into the loop on the
passenger's side.
Page 48 of 196
ControlsDriving
46
4.Pull the loop up.
5. Move the selector lever into the desired
position by pressing the button on the front
of the selector lever.
Before manually unlo cking the selector
lever lock, firmly set the parking brake to
prevent the vehicle from rolling away. <
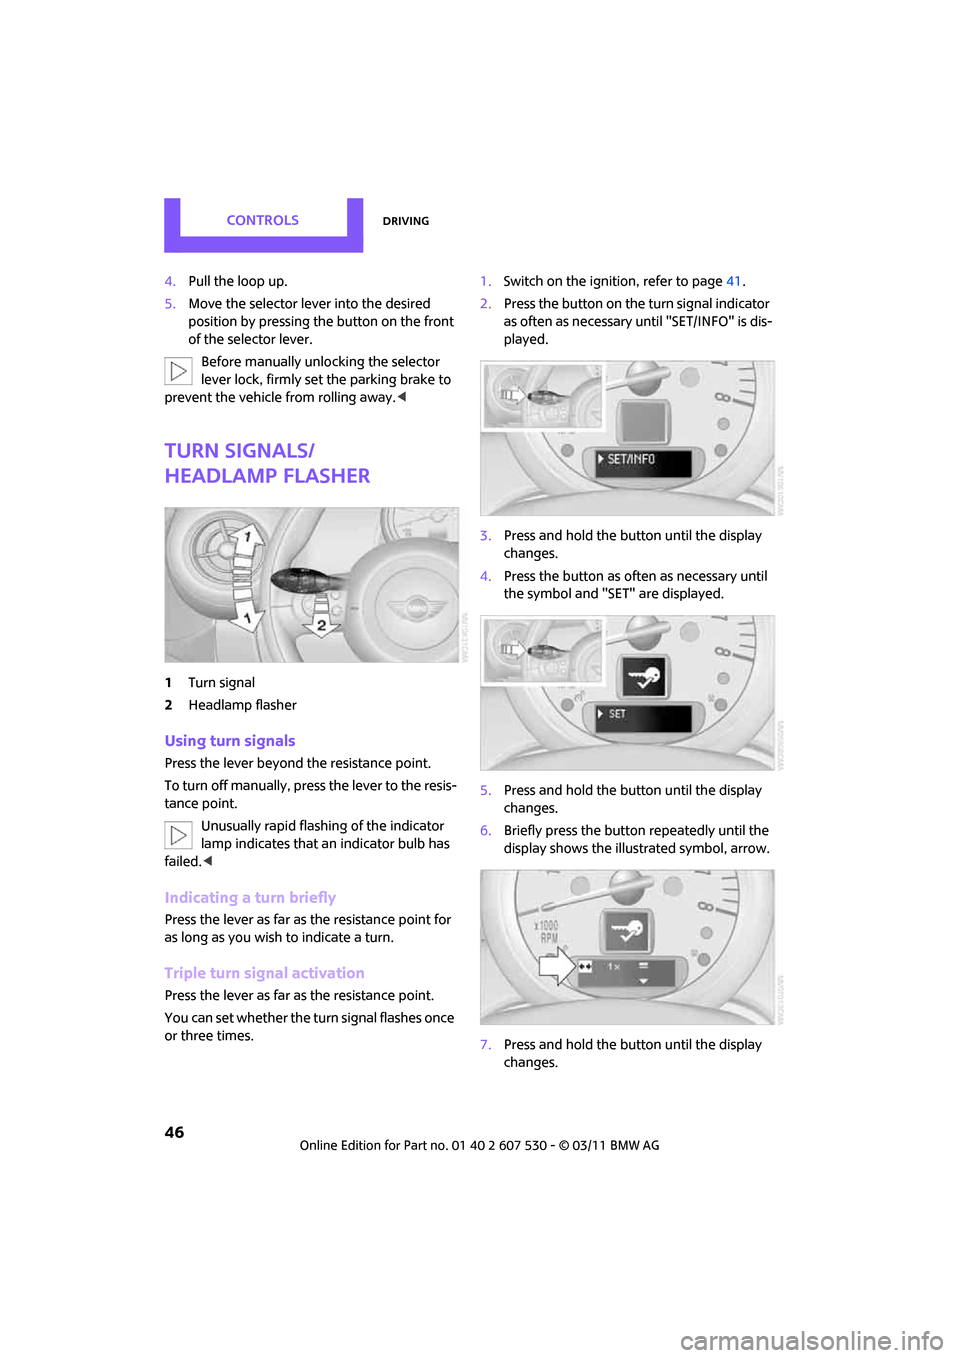
Turn signals/
headlamp flasher
1Turn signal
2 Headlamp flasher
Using turn signals
Press the lever beyond the resistance point.
To turn off manually, press the lever to the resis-
tance point. Unusually rapid flashing of the indicator
lamp indicates that an indicator bulb has
failed. <
Indicating a turn briefly
Press the lever as far as the resistance point for
as long as you wish to indicate a turn.
Triple turn signal activation
Press the lever as far as the resistance point.
You can set whether the turn signal flashes once
or three times. 1.
Switch on the ignition, refer to page 41.
2. Press the button on the turn signal indicator
as often as necessary until "SET/INFO" is dis-
played.
3. Press and hold the button until the display
changes.
4. Press the button as often as necessary until
the symbol and "SET" are displayed.
5. Press and hold the button until the display
changes.
6. Briefly press the button repeatedly until the
display shows the illu strated symbol, arrow.
7. Press and hold the button until the display
changes.
Page 49 of 196
DrivingControls
47
8.Press the button to select:
>
Brief indication of a turn.
> Triple turn signal.
9. Press and hold the butt on until the display
changes. The setting is stored.
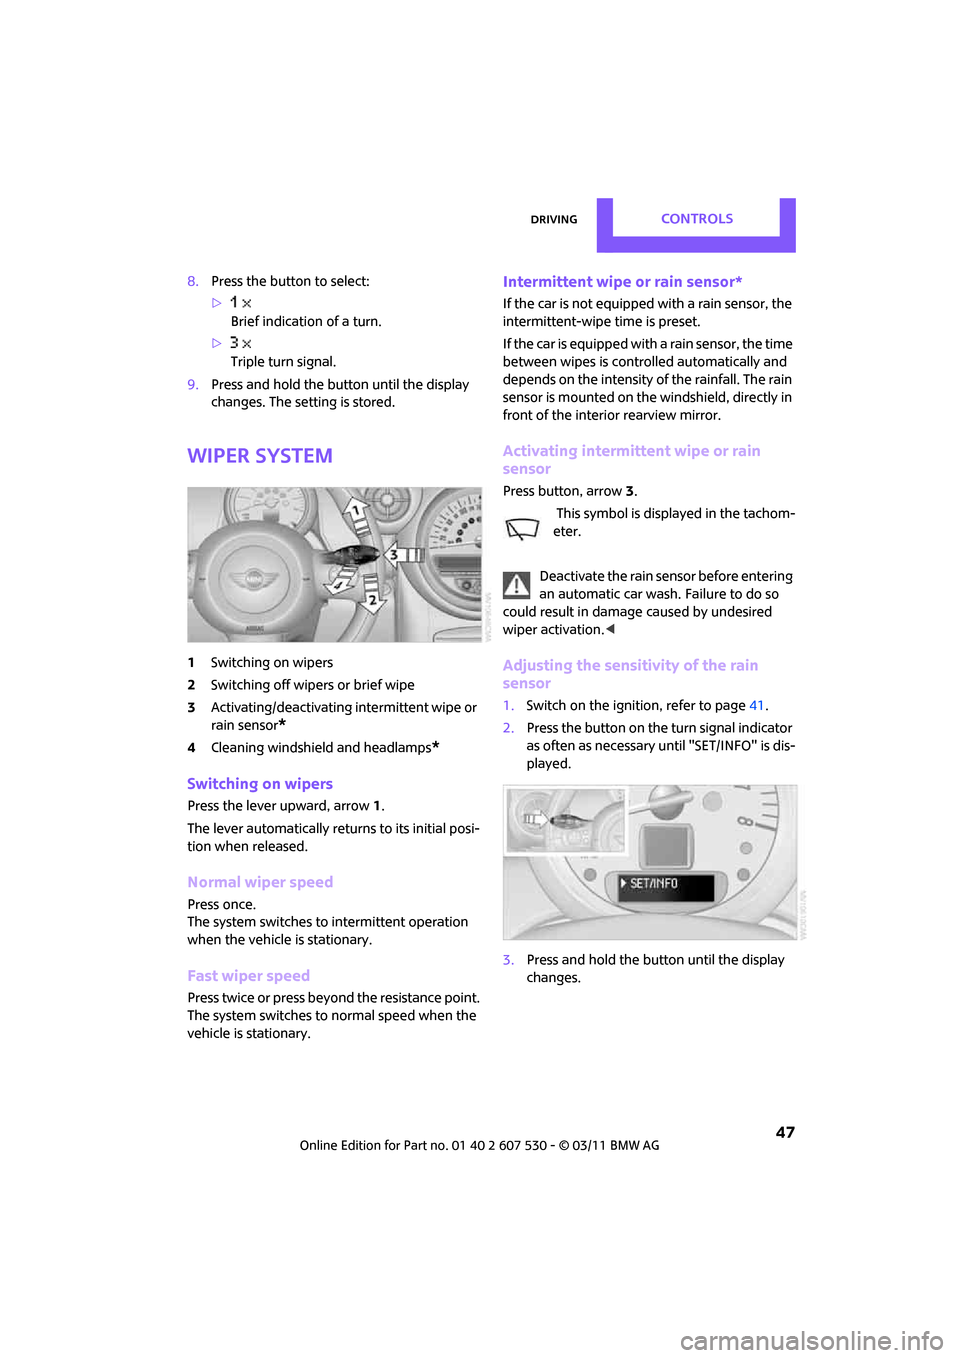
Wiper system
1 Switching on wipers
2 Switching off wipers or brief wipe
3 Activating/deactivating intermittent wipe or
rain sensor
*
4Cleaning windshield and headlamps*
Switching on wipers
Press the lever upward, arrow 1.
The lever automatically returns to its initial posi-
tion when released.
Normal wiper speed
Press once.
The system switches to intermittent operation
when the vehicle is stationary.
Fast wiper speed
Press twice or press beyo nd the resistance point.
The system switches to normal speed when the
vehicle is stationary.
Intermittent wipe or rain sensor*
If the car is not equipped with a rain sensor, the
intermittent-wipe time is preset.
If the car is equipped with a rain sensor, the time
between wipes is contro lled automatically and
depends on the intensity of the rainfall. The rain
sensor is mounted on the windshield, directly in
front of the interior rearview mirror.
Activating intermittent wipe or rain
sensor
Press button, arrow 3.
This symbol is displayed in the tachom-
eter.
Deactivate the rain sensor before entering
an automatic car wash. Failure to do so
could result in damage caused by undesired
wiper activation. <
Adjusting the sensitivity of the rain
sensor
1.Switch on the ignition, refer to page 41.
2. Press the button on the turn signal indicator
as often as necessary until "SET/INFO" is dis-
played.
3. Press and hold the butt on until the display
changes.
Page 50 of 196

ControlsDriving
48
4.Press the button as often as necessary until
the symbol and "SET" are displayed.
5. Press and hold the button until the display
changes.
6. Press the button to se lect the desired sensi-
tivity.
7. Wait, or press and hold the button until the
display changes.
The settings are stored.
Deactivating intermittent wipe or rain
sensor
Press the button again, arrow 3.
Brief wipe
Press the lever downward once, arrow 2.
Cleaning windshield and headlamps*
Pull the lever, arrow 4.
Washer fluid is sprayed onto the windshield and
the wipers are operated briefly.
When the vehicle lighting system is switched on,
the headlamps are cleaned at regular and
appropriate intervals. In cars equipped with an alarm system, the
headlamps cannot be cleaned when the hood is
open.
Do not use the washers when the washer
fluid reservoir is emp ty; otherwise, you will
damage the washer pump.
Only use the washers if the hood has been com-
pletely closed; otherwise, the headlamp washer
system
* may be damaged. Do not use the
washers if there is any danger that the fluid will
freeze on the windshield. If you do, your vision
could be obscured. For this reason, use anti-
freeze. <
Window washer nozzles
The window washer nozzles are heated auto-
matically
* while the engine is running or the
ignition is switched on.
Rear window wiper
0 Rear wipers parked
1 To switch on intermittent wipe :
Turn the cap to level 1.
Operation is continuous in reverse gear.
The rear wiper does not move if the cap is in
interval stage 1 before the ignition is switched
on.
Cleaning the rear window
2 To clean the rear window during intermit-
tent wipe :
Turn the cap further to level 2 and hold it
there.
3 To clean the rear window when wipers are
parked :
Turn the cap to level 3 and hold it there.