phone MINI Countryman 2011 Owner's Manual
[x] Cancel search | Manufacturer: MINI, Model Year: 2011, Model line: Countryman, Model: MINI Countryman 2011Pages: 196, PDF Size: 3.06 MB
Page 5 of 196
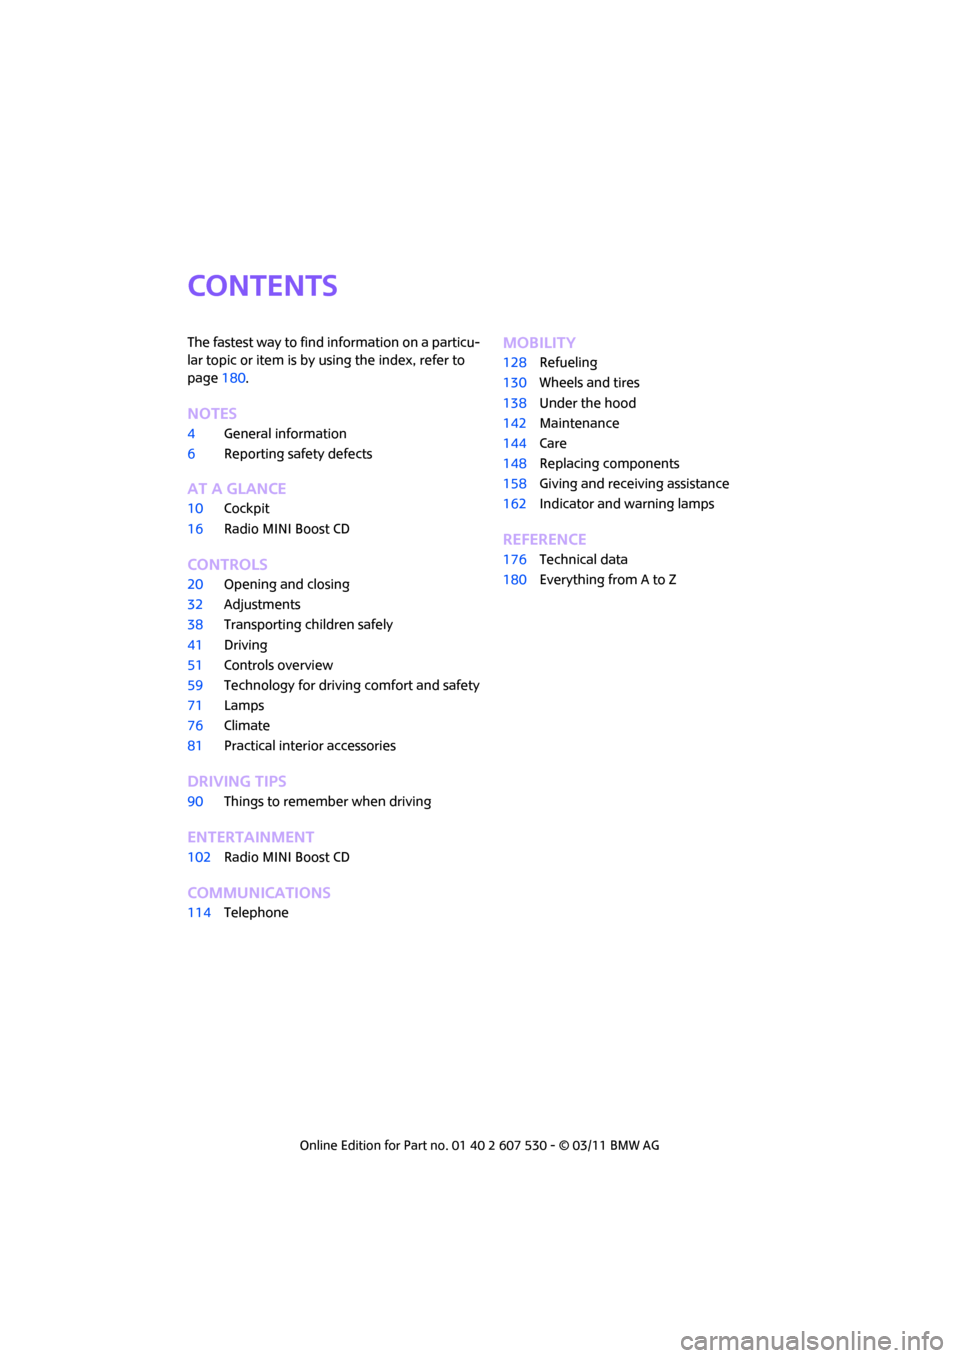
CONTENTS
The fastest way to find information on a particu-
lar topic or item is by using the index, refer to
page180.
Notes
4 General information
6 Reporting safety defects
AT A GLANCE
10Cockpit
16 Radio MINI Boost CD
Controls
20Opening and closing
32 Adjustments
38 Transporting children safely
41 Driving
51 Controls overview
59 Technology for drivin g comfort and safety
71 Lamps
76 Climate
81 Practical interior accessories
Driving tips
90Things to remember when driving
Entertainment
102Radio MINI Boost CD
Communications
114Telephone
Mobility
128Refueling
130 Wheels and tires
138 Under the hood
142 Maintenance
144 Care
148 Replacing components
158 Giving and receiving assistance
162 Indicator and warning lamps
Reference
176Technical data
180 Everything from A to Z
Page 7 of 196
General informationNotes
5
For your safety
Maintenance and repair
Advanced technology, e.g. the use of
modern materials and powerful electron-
ics, requires specially adapted maintenance and
repair methods. Therefore, have the necessary
work on your MINI only carried out by a MINI
dealer or a workshop that has specially trained
personnel working in acco rdance with the spec-
ifications of the MINI manufacturer. If this work
is not carried out properly , there is a danger of
subsequent damage and related safety haz-
ards. <
Parts and accessories
For your own safety, use genuine parts
and accessories approved by the manu-
facturer of the MINI.
When you purchase accessories tested
and approved by the manufacturer of the MINI
and Original MINI Parts, you simultaneously
acquire the assurance that they have been thor-
oughly tested by the manufacturer of the MINI
to ensure optimum performance when installed
on your vehicle.
The manufacturer of the MINI warrants these
parts to be free from defects in material and
workmanship.
The manufacturer of the MINI will not accept any
liability for damage result ing from installation of
parts and accessories not approved by the man-
ufacturer of the MINI.
The manufacturer of the MINI cannot test every
product made by other manufacturers to verify
if it can be used on a MINI safely and without risk
to either the vehicle, its operation, or its occu-
pants.
Original MINI Parts, MINI Accessories and other
products approved by the manufacturer of the
MINI, together with professional advice on using
these items, are available from all MINI dealers.
Installation and operation of accessories that
have not been approved by the manufacturer of your MINI, such as alarms, radios, amplifiers,
radar detectors, wheels, suspension compo-
nents, brake dust shield
s, telephones, including
operation of any mobile phone from within the
vehicle without using an externally mounted
antenna, or transceiver equipment, for instance,
CBs, walkie-talkies, ham radios or similar acces-
sories, may cause extensiv e damage to the vehi-
cle, compromise its safety, interfere with the
vehicle's electrical s y s t e m o r a f f e c t t h e v a l i d i t y o f
the MINI Limited Warranty. See your MINI dealer
for additional information. <
Maintenance, replacement, or repair of
the emission control devices and systems
may be performed by any automotive repair
establishment or individu al using any certified
automotive part. <
California Proposition 65 warning
California law requires us to issue the following
warning:
Engine exhaust and a wide variety of
automobile components and parts,
including components foun d in the interior fur-
nishings in a vehicle, contain or emit chemicals
known to the State of California to cause cancer
and birth defects and reproductive harm. In
addition, certain fluids co ntained in vehicles and
certain products of component wear contain or
emit chemicals known to the State of California
to cause cancer and birth defects or other repro-
ductive harm.
Battery posts, terminals and related accessories
contain lead and lead compounds. Wash your
hands after handling.
Used engine oil contains chemicals that have
caused cancer in laboratory animals. Always
protect your skin by washing thoroughly with
soap and water.<
Page 8 of 196
NotesGeneral information
6
Service and warranty
We recommend that you read this publication
thoroughly.
Your MINI is covered by the following warran-
ties:
> New Vehicle Limited Warranty
> Rust Perforation Limited Warranty
> Federal Emissions Syst em Defect Warranty
> Federal Emissions Performance Warranty
> California Emission Control System Limited
Warranty
Detailed information about these warranties is
listed in the Service and Warranty Information
Booklet for US models or in the Warranty and
Service Guide Booklet for Canadian models.
Your vehicle has been specifically adapted and
designed to meet the pa rticular operating con-
ditions and homologation requirements in your
country and continental region in order to
deliver the full driving pleasure while the vehicle
is operated under those conditions. If you wish
to operate your vehicle in another country or
region, you may be required to adapt your vehi-
cle to meet different prevailing operating condi-
tions and registration re quirements. You should
also be aware of any a pplicable warranty limita-
tions or exclusions for such country or region. In
such a case, please contact Customer Relations
for further information.
Maintenance
Maintain the vehicle regularly to sustain road
safety, operational reliab ility and the New Vehi-
cle Limited Warranty.
Specifications for required maintenance mea-
sures:
> MINI Maintenance System
> Service and Warranty Information Booklet
for US models
> Warranty and Service Guide Booklet for
Canadian models If the vehicle is not ma
intained according to
these specifications, this could result in serious
damage to the vehicle. Such damage is not cov-
ered by the MINI New Vehicle Limited Warranty.
Reporting safety defects
For US customers
The following applies only to vehicles owned
and operated in the US.
If you believe that your vehicle has a defect that
could cause a crash or could cause injury or
death, you should immediately inform the
National Highway Traffic Safety Administration,
NHTSA, in addition to notifying MINI of North
America, LLC, P.O. Box 1227, Westwood, New
Jersey 07675-1227, Telephone 1-800-831-
1117.
If NHTSA receives similar complaints, it may
open an investigation, and if it finds that a safety
defect exists in a group of vehicles, it may order
a recall and remedy ca mpaign. However, NHTSA
cannot become involved in individual problems
between you, your dealer, or MINI of North
America, LLC.
To contact NHTSA, you may call the Vehicle
Safety Hotline toll-free at 1-888-327-4236 (TTY:
1-800-424-9153); go to http://www.safer-
car.gov; or write to: Ad ministrator, NHTSA, 400
Seventh Street, SW., Washington, DC 20590. You
can also obtain other information about motor
vehicle safety from http://www.safercar.gov
For Canadian customers
Canadian customers who wish to report a
safety-related defect to Transport Canada,
Defect Investigations and Recalls, may tele-
phone the toll-free hotline 1-800-333-0510.
You can also obtain ot her information about
motor vehicle safety from http://www.tc.gc.ca/
roadsafety.
Page 13 of 196
CockpitAT A GLANCE
11
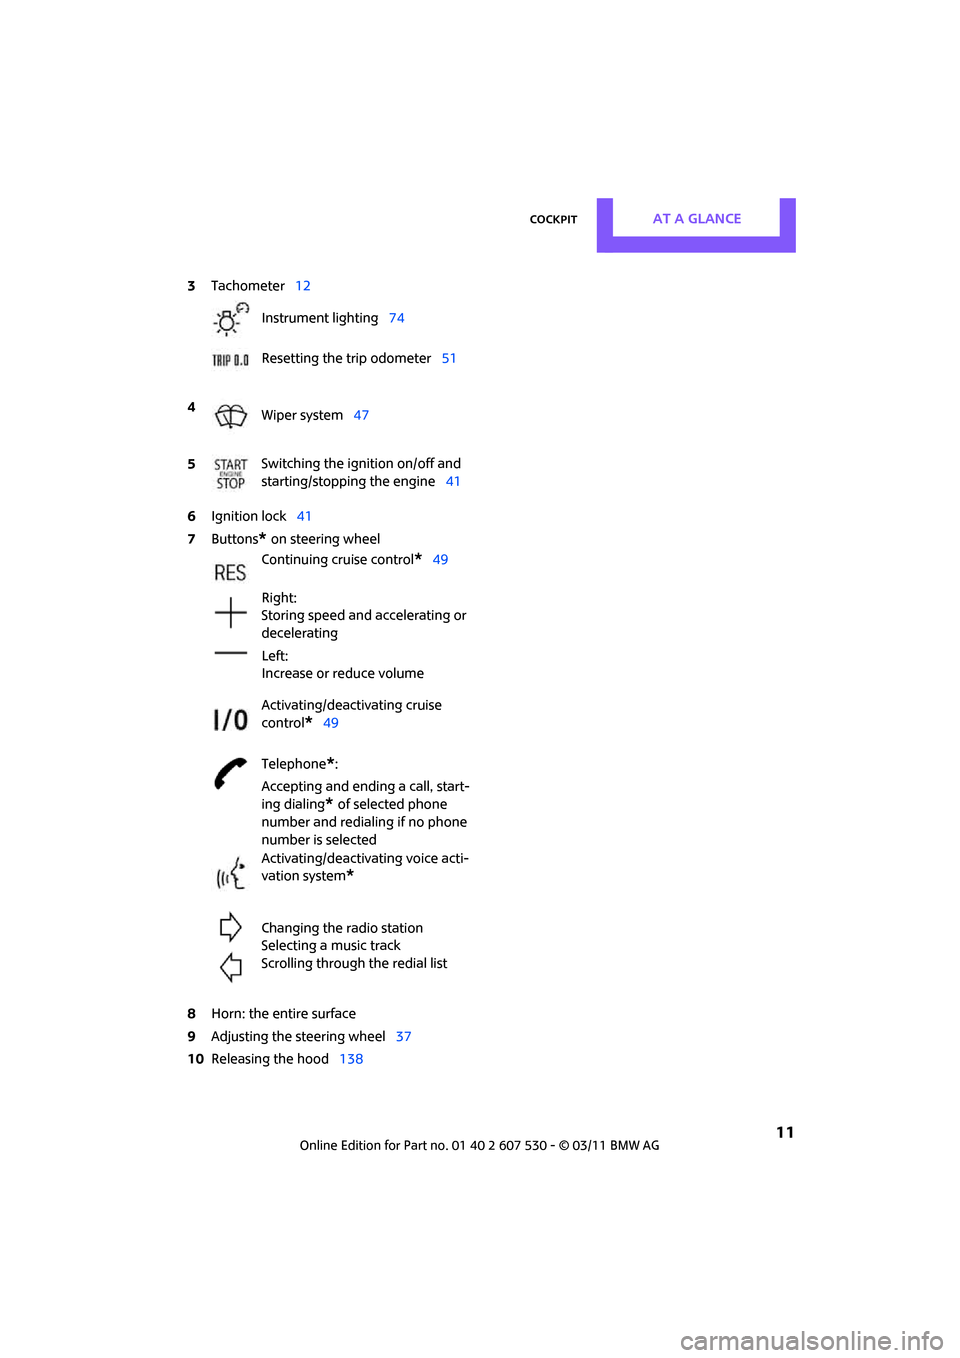
6Ignition lock 41
7 Buttons
* on steering wheel
8 Horn: the entire surface
9 Adjusting the steering wheel 37
10 Releasing the hood 138
3
Tachometer 12
Instrument lighting 74
Resetting the trip odometer 51
4 Wiper system 47
5 Switching the ignition on/off and
starting/stopping the engine
41
Continuing cruise control
*49
Right:
Storing speed and accelerating or
decelerating
Left:
Increase or reduce volume
Activating/deactivating cruise
control
*49
Telephone
*:
Accepting and ending a call, start-
ing dialing
* of selected phone
number and redialing if no phone
number is selected
Activating/deactivating voice acti-
vation system
*
Changing the radio station
Selecting a music track
Scrolling through the redial list
Page 17 of 196
CockpitAT A GLANCE
15
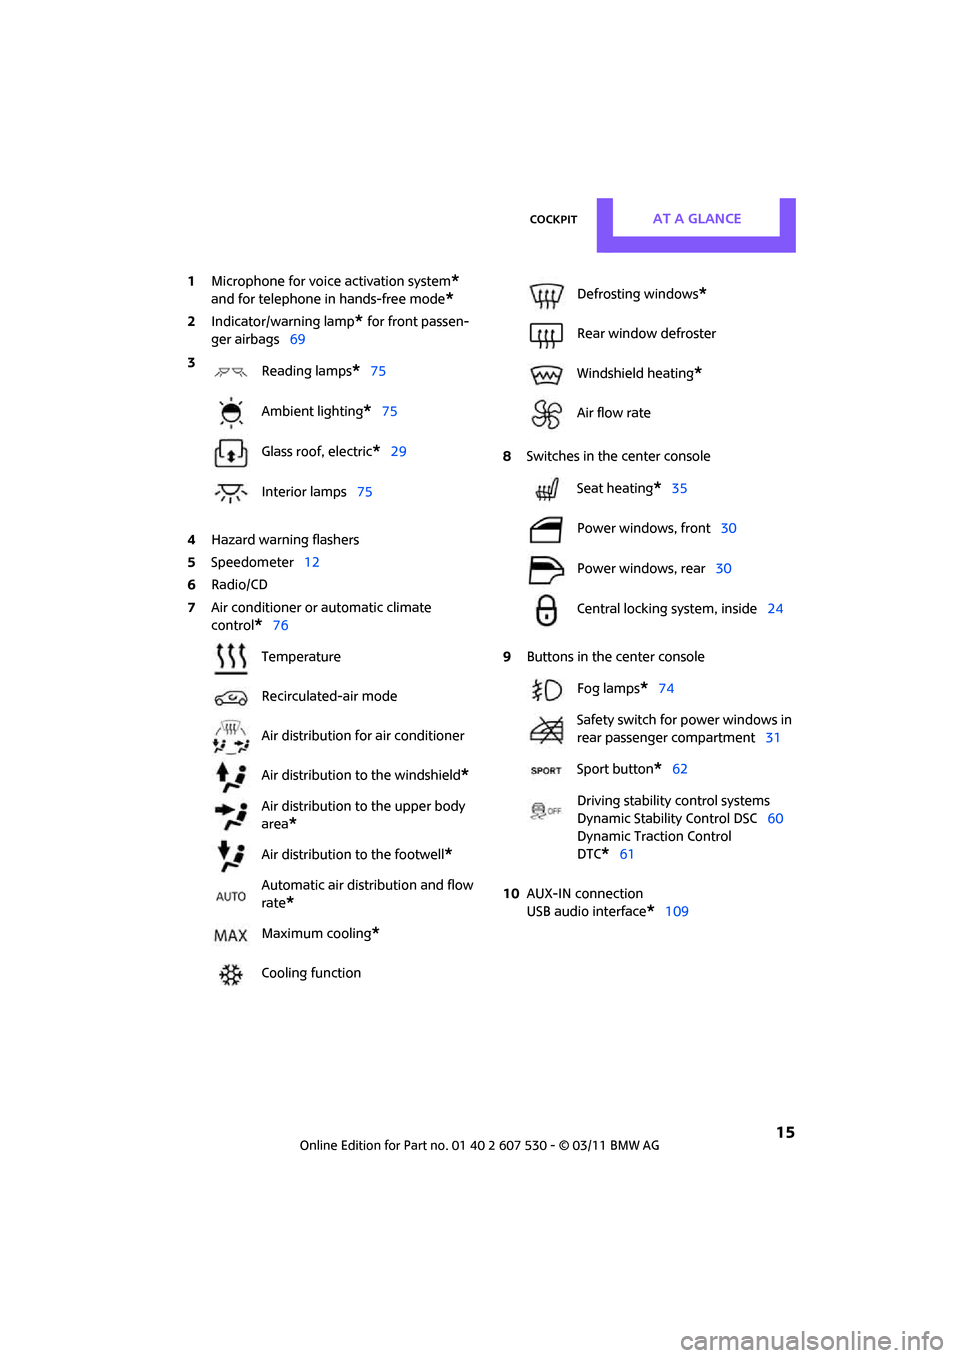
1Microphone for voice activation system*
and for telephone in hands-free mode*
2Indicator/warning lamp* for front passen-
ger airbags 69
4 Hazard warning flashers
5 Speedometer 12
6 Radio/CD
7 Air conditioner or automatic climate
control
*76 8
Switches in the center console
9 Buttons in the center console
10 AUX-IN connection
USB audio interface
*109
3
Reading lamps
*75
Ambient lighting
*75
Glass roof, electric
*29
Interior lamps 75
Temperature
Recirculated-air mode
Air distribution for air conditioner
Air distribution to the windshield
*
Air distribution to the upper body
area
*
Air distribution to the footwell*
Automatic air distribution and flow
rate
*
Maximum cooling*
Cooling function
Defrosting windows*
Rear window defroster
Windshield heating
*
Air flow rate
Seat heating
*35
Power windows, front 30
Power windows, rear 30
Central locking system, inside 24
Fog lamps
*74
Safety switch for power windows in
rear passenger compartment 31
Sport button
*62
Driving stability control systems
Dynamic Stability Control DSC 60
Dynamic Traction Control
DTC*61
Page 19 of 196
Radio MINI Boost CDAT A GLANCE
17
Menu navigation
Radio and telephone functions* can be called
up by using the buttons on the radio and menus.
Calling up the settings menu
Press the MENU button
> Settings
> MINI phone numbers
> Telephone
*
Calling up the audio menu
Press the MODEbutton
> Radio
> HD Radio
*
>Satellite radio*
>CD player
> External audio devi ce, e.g., MP3 player
> USB audio interface
*
Selecting a menu item
Menu items can be selected by using the knob
on the right or by using the function buttons
For the knob on the right
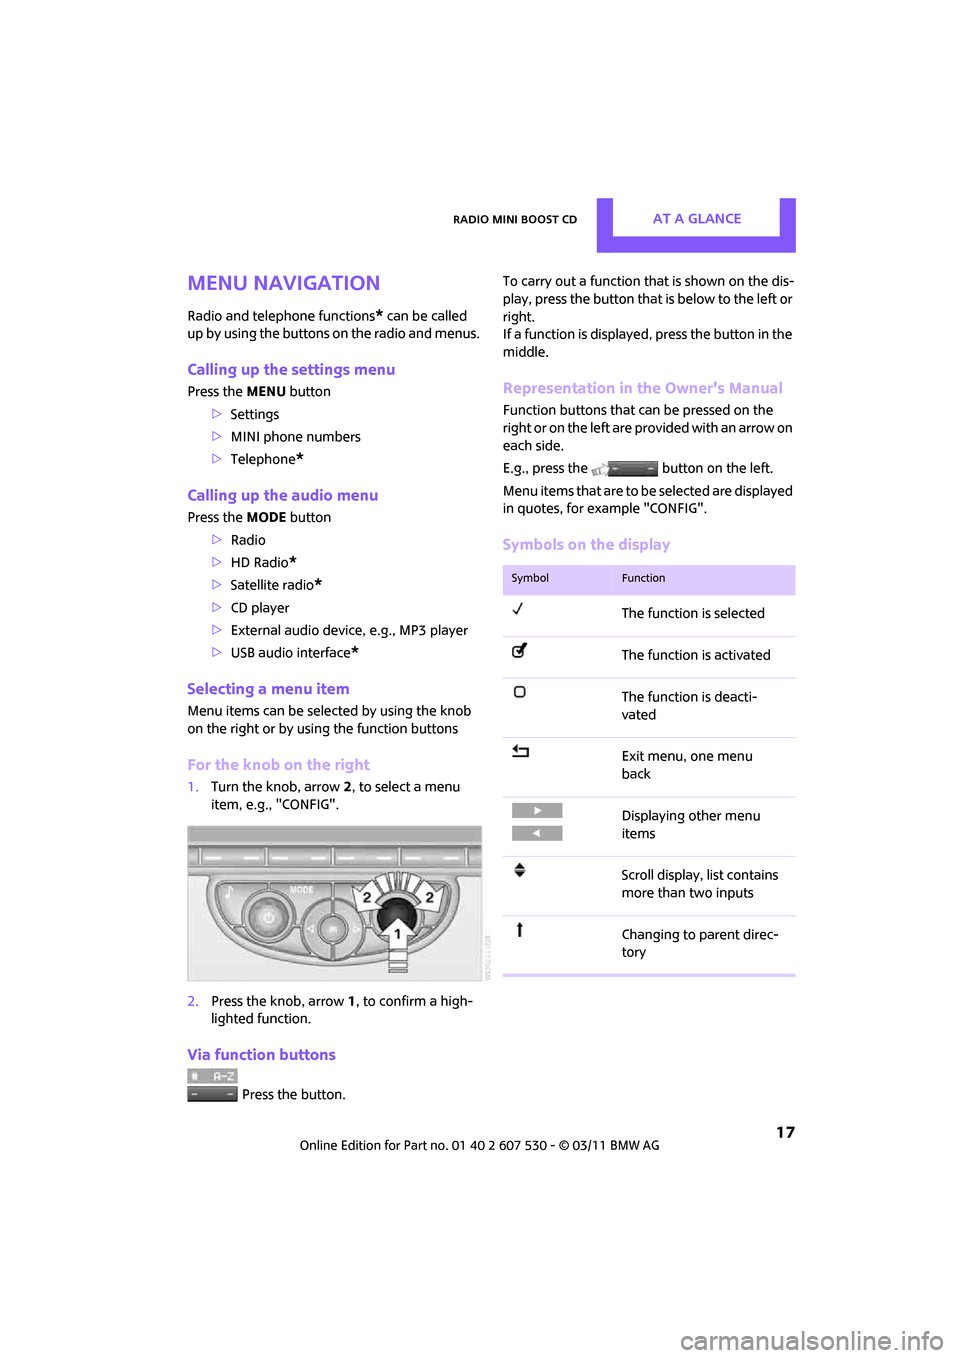
1. Turn the knob, arrow 2, to select a menu
item, e.g., "CONFIG".
2. Press the knob, arrow 1, to confirm a high-
lighted function.
Via function buttons
Press the button. To carry out a function that is shown on the dis-
play, press the button that
is below to the left or
right.
If a function is displaye d, press the button in the
middle.
Representation in the Owner's Manual
Function buttons that can be pressed on the
right or on the left are pr ovided with an arrow on
each side.
E.g., press the button on the left.
Menu items that are to be selected are displayed
in quotes, for example "CONFIG".
Symbols on the display
SymbolFunction
The function is selected
The function is activated
The function is deacti-
vated
Exit menu, one menu
back
Displaying other menu
items
Scroll display, list contains
more than two inputs
Changing to parent direc-
tory
Page 70 of 196
ControlsTechnology for driving comfort and safety
68
Airbags
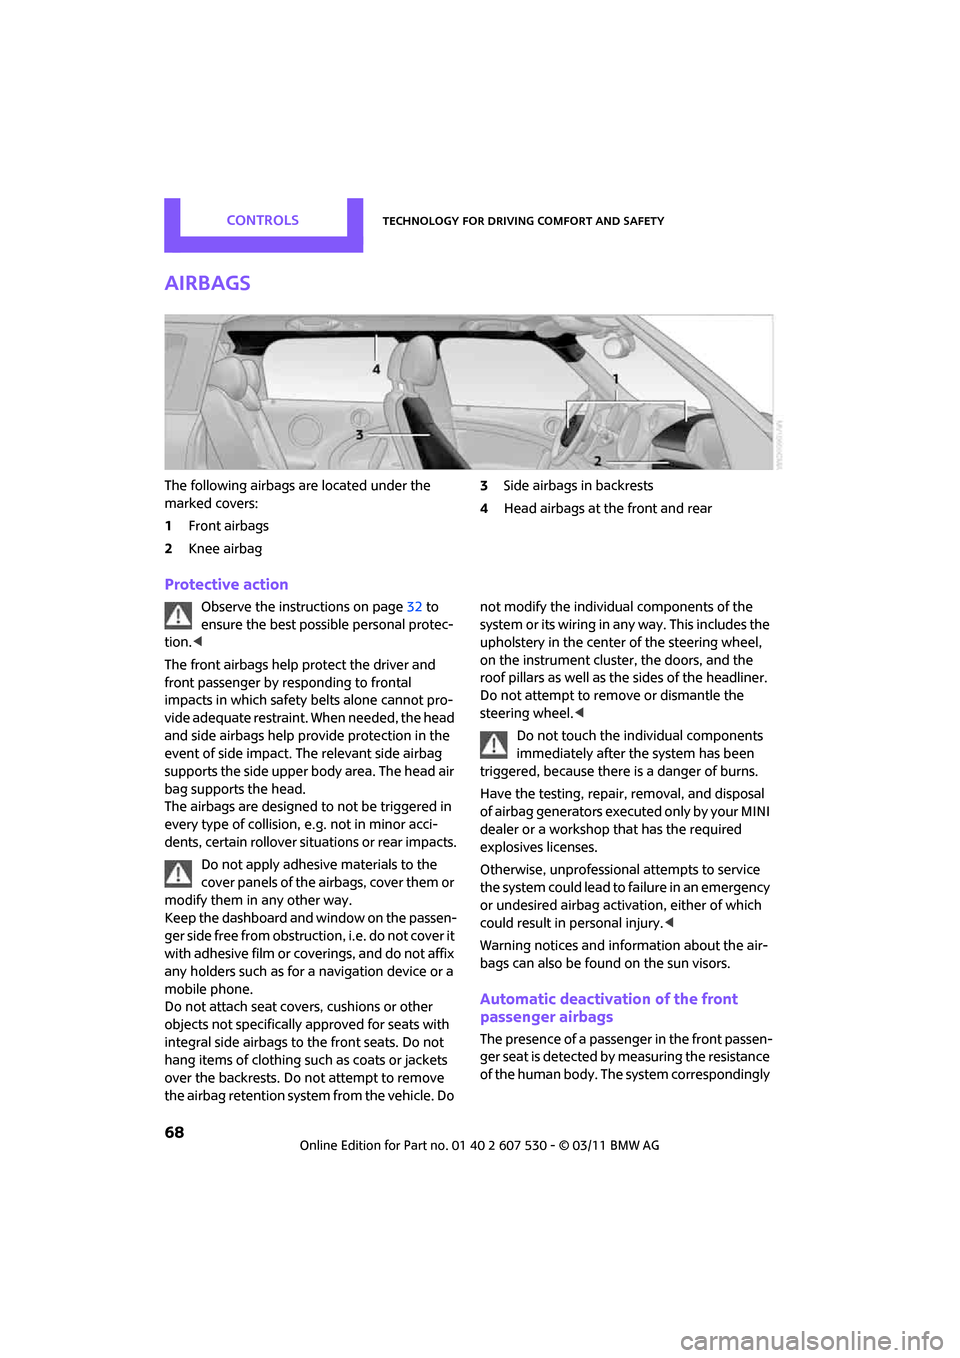
The following airbags are located under the
marked covers:
1Front airbags
2 Knee airbag 3
Side airbags in backrests
4 Head airbags at the front and rear
Protective action
Observe the instructions on page 32 to
ensure the best possible personal protec-
tion. <
The front airbags help protect the driver and
front passenger by re sponding to frontal
impacts in which safety belts alone cannot pro-
vide adequate restraint. When needed, the head
and side airbags help provide protection in the
event of side impact. The relevant side airbag
supports the side upper body area. The head air
bag supports the head.
The airbags are designed to not be triggered in
every type of collision, e.g. not in minor acci-
dents, certain rollover situations or rear impacts.
Do not apply adhesive materials to the
cover panels of the airbags, cover them or
modify them in any other way.
Keep the dashboard and window on the passen-
g e r s i d e f r e e f r o m o b s t r u c t i o n , i . e . d o n o t c o v e r i t
with adhesive film or co verings, and do not affix
any holders such as for a navigation device or a
mobile phone.
Do not attach seat cove rs, cushions or other
objects not specifically approved for seats with
integral side airbags to the front seats. Do not
hang items of clothing su ch as coats or jackets
over the backrests. Do not attempt to remove
the airbag retention system from the vehicle. Do not modify the individual components of the
syste m o r its w iring in any way. Th is includ es the
upholstery in the center of the steering wheel,
on the instrument cluster, the doors, and the
roof pillars as well as the sides of the headliner.
Do not attempt to remove or dismantle the
steering wheel.<
Do not touch the individual components
immediately after the system has been
triggered, because there is a danger of burns.
Have the testing, repair, removal, and disposal
of airbag generators executed only by your MINI
dealer or a workshop that has the required
explosives licenses.
Otherwise, unprofessional attempts to service
the system could lead to failure in an emergency
or undesired airbag activation, either of which
could result in personal injury. <
Warning notices and information about the air-
bags can also be found on the sun visors.
Automatic deactivation of the front
passenger airbags
The presence of a passenger in the front passen-
ger seat is detected by measuring the resistance
of the human body. The system correspondingly
Page 85 of 196

Practical interior accessoriesControls
83
original hand-held transmitter and release
both buttons as soon as the LED 2 flashes
rapidly.
If the LED 2 does not flash rapidly after
approx. 60 seconds, alter the distance and
repeat this step.
Canada: if the LED is not flashing rapidly
after 60 seconds, change the distance and
repeat the step or, if the programming was
interrupted by the hand-held transmitter,
press and hold the memory button and
press the button on the hand-held transmit-
ter for 2 seconds and release several times.
Glove compartment
Opening
Pull the handle to open the cover.
The light in the glove compartment comes on.
Closing
Fold cover up.
To prevent injury in the event of an acci-
dent, close the glove compartment after
use while the vehicle is being driven. <
Ventilation*
Depending on your vehicle's equipment, the
glove compartment can be ventilated and, if the
cooling function
* is switched on, can also be
cooled.
Opening
Rotate the switch in the direction of the arrow.
Closing
Rotate the switch in the opposite direction of the
arrow until it is in the vertical position.
Depending on the temperature setting of the air
conditioner or the automatic climate control,
high temperatures may result in the glove com-
partment.
Connection for external
audio device
You can connect an external audio device such
as a CD or MP3 player an d play audio tracks over
the vehicle's speaker system, refer to the Enter-
tainment chapter, page 109.
Center armrest*
Storage compartment
The center armrest between the front seats con-
tains either a compartment or the cover for the
mobile phone base plate
* or the snap-in
adapter
*.
Page 86 of 196
ControlsPractical interior accessories
84
Opening
Press the button, arrow, and lift the cover.
Storage compartments
In the vehicle interior
Depending on your vehicle's equipment, you
will find storage compartments in the front and
rear doors and in the center console
*.
Pockets
* are provided on the backrest rear pan-
els of the front seats.
Center Rail
On the Center Rail, a variety of accessories can
be fastened to a special base plate and moved
to various positions, e.g. a cupholder
* or a
mobile phone holder
*.
Do not attach accessory parts in the vicin-
ity of the parking brake; otherwise, they
can be damaged when the parking brake lever is
actuated. <
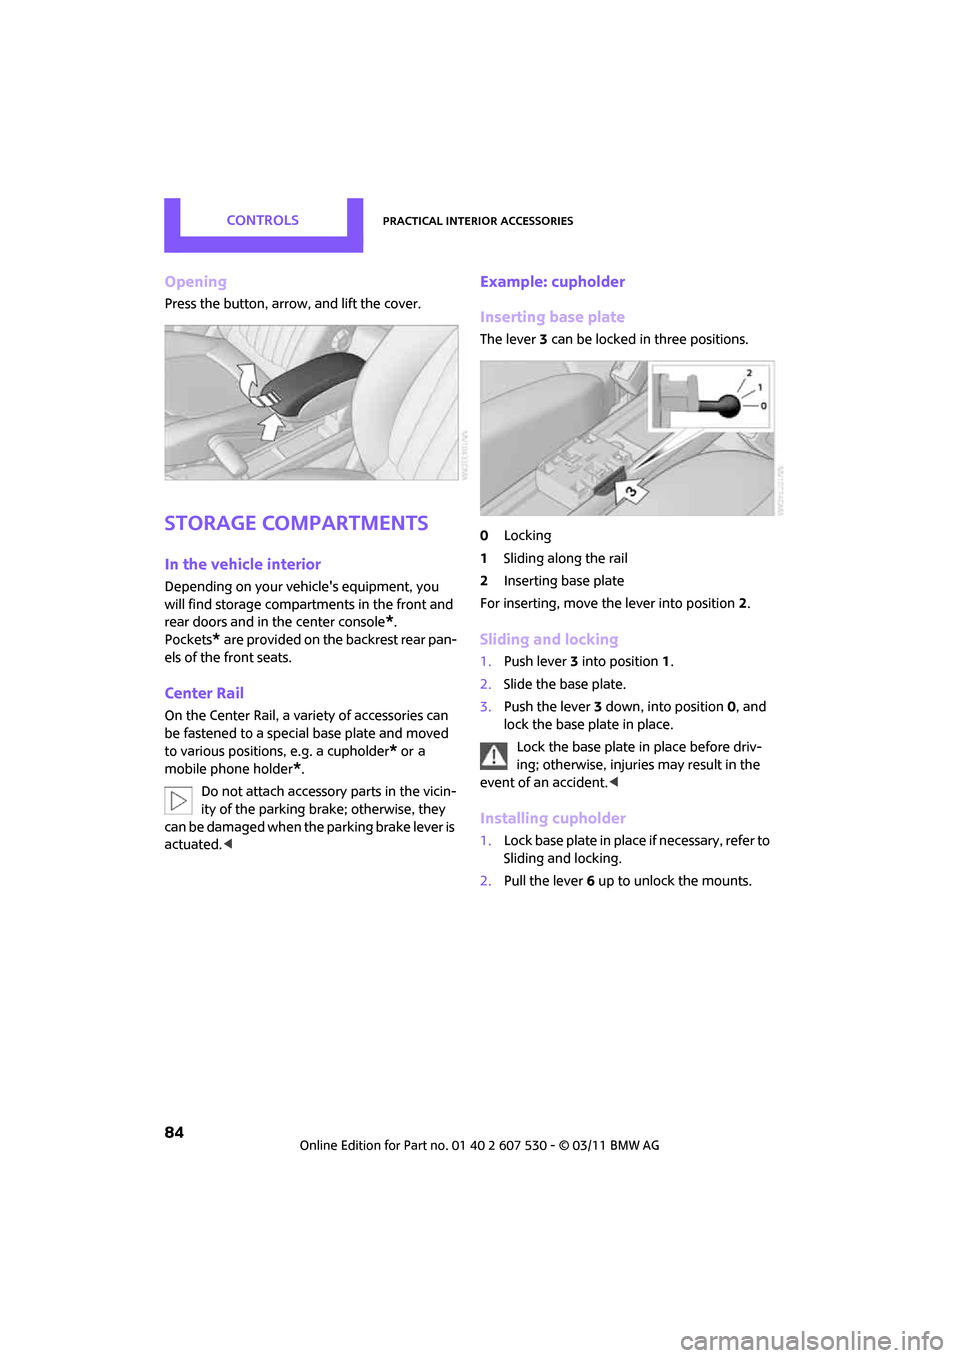
Example: cupholder
Inserting base plate
The lever 3 can be locked in three positions.
0 Locking
1 Sliding along the rail
2 Inserting base plate
For inserting, move the lever into position 2.
Sliding and locking
1. Push lever 3 into position 1.
2. Slide the base plate.
3. Push the lever 3 down, into position 0, and
lock the base plate in place.
Lock the base plate in place before driv-
ing; otherwise, injuries may result in the
event of an accident. <
Installing cupholder
1.Lock base plate in place if necessary, refer to
Sliding and locking.
2. Pull the lever 6 up to unlock the mounts.
Page 104 of 196
EntertainmentRadio MINI Boost CD
102
Radio MINI Boost CD
switching Radio on/off
Press the knob on the left. The radio
selects the last set audio source:
>Radio
> HD Radio
*
>Satellite radio*
>CD
> External audio device
> USB audio interface*.
Listening to the radi o when the ignition
is switched off
After turning off the radi o, which was ready for
operation, the radio functions are available for
approx. 20 minutes.
The radio can also be turned on again.
To spare the battery, ensure that the radio
is turned off when leaving the vehicle. <
Adjusting volume
Press left rotary knob. The settings are
stored for the remote control currently
in use.
As soon as you make a phone call using
the hands-free device, the radio will auto-
matically be muted. <
Setting the volume for the PDC* and bell
You can raise or lower the audio signals for the
PDC or bell with respect to the volume of the
audio sources.
The audio signals have a set minimum and max-
imum volume, below which they can not fall and
above which they can not go.
Set the audio source to a high volume to
be able to better set the volume of the
audio signals. < 1.
Press the button.
2. Press the button if necessary.
3. Press the button
or
Press the button.
4. Select the desired volume and press the but-
ton on the right.
Setting the speed-dependent volume
The speed-dependent volume controls auto-
matically increase the volume as the speed of
the vehicle increases. You can set different levels
for increasing the volume.
1.Press the button.
2. Press the button if necessary.
3. Press the button.
4. Select the desired volume and press the but-
ton on the right.
Setting the volume for external audio
devices
Your radio has the option of connecting to an
external audio device, e.g., an MP3 player, and
playing it over the loudspeakers in the vehicle.
You can set the volume by using the radio.
Connecting an external device, refer to
page 109.
To adjust the volume of an external audio device
to the radio:
1. Press the MODE button.
2. Press the button.
3. Press the button.