roof MINI Countryman 2013 User Guide
[x] Cancel search | Manufacturer: MINI, Model Year: 2013, Model line: Countryman, Model: MINI Countryman 2013Pages: 275, PDF Size: 4.09 MB
Page 83 of 275
CONTROLSTechnology for driving comfort and safety
82
upholstery in the center of the steering wheel,
on the instrument panel, the doors, and the roof
pillars as well as the sides of the headliner. Do
not attempt to remove or dismantle the steering
wheel.<
Do not touch the individual components
immediately after the system has been
triggered, because there is a danger of burns.
Have the testing, repair, removal, and disposal
o f a i r b a g g e n e r a t o r s e x e c u t e d o n l y b y y o u r M I N I
dealer or a workshop that has the required
explosives licenses.
Otherwise, unprofessiona l attempts to service
the system could lead to failure in an emergency
or undesired airbag activation, either of which
could result in personal injury. <
Warning notices and information about the air-
bags can also be found on the sun visors.
Automatic deactivation of the front
passenger airbags
The presence of a passenger in the front passen-
ger seat is detected by measuring the resistance
of the human body. The system correspondingly
activates or deactivates the front, side, and knee
airbags for the front passenger.
Make sure that the front passenger's feet
remain in the footwell; otherwise, it is not
possible to guarantee the function of the front
passenger airbags.<
The indicator lamp above the interior rearview
mirror shows the current st atus of the front pas-
senger airbags, deactivated or activated, refer to
Status of front passe nger airbags below.
Before transporting a child on the front
passenger seat, read the safety informa-
tion and follow the instru ctions under Transport-
ing children safely, page 46.<
Malfunction of the automatic
deactivation
When teenagers and adults assume certain sit-
ting positions, this can cause the front, side, and
knee airbags to deactivate. The indicator lamp for the front passenger airbags lights up when
this occurs. In such case
s, the passenger should
change his or her sitting position so that the
front passenger airbags are activated and the
indicator lamp goes out. If the desired airbag
status cannot be achieved by changing the sit-
ting position, transport the relevant passenger
on a rear seat.
> Do not attach covers, cushions, ball mats or
other items to the front passenger seat
unless they are specif ically recommended
by the manufacturer of your MINI.
> Do not place items on the front passenger
seat.
> Do not place items under the seat which
could press against the seat from below.
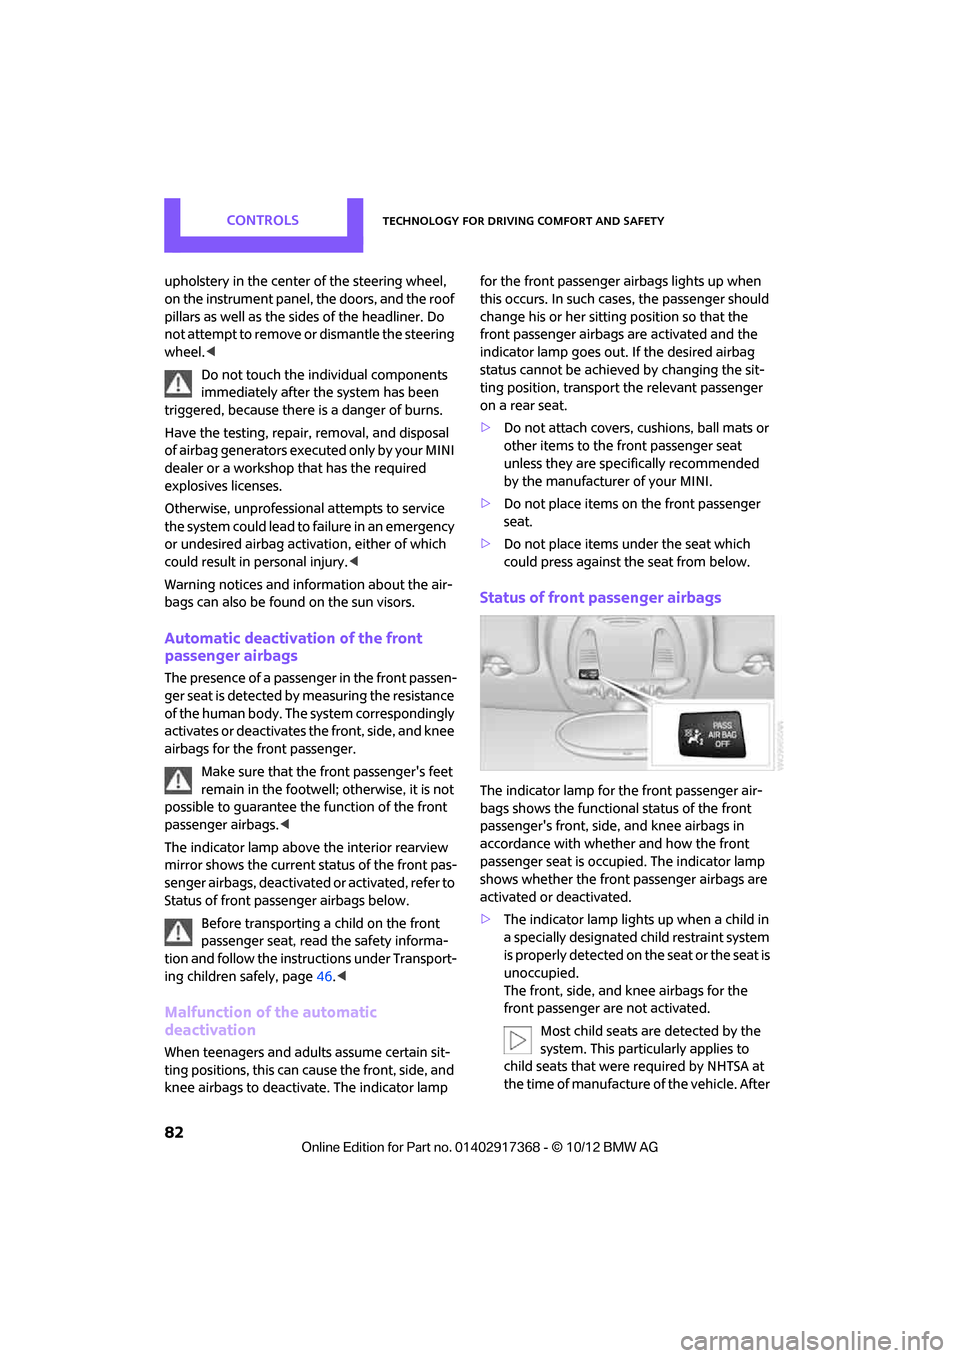
Status of front passenger airbags
The indicator lamp for the front passenger air-
bags shows the functional status of the front
passenger's front, side, and knee airbags in
accordance with whet her and how the front
passenger seat is occupied. The indicator lamp
shows whether the front passenger airbags are
activated or deactivated.
> The indicator lamp lights up when a child in
a specially designated child restraint system
is properly detected on the seat or the seat is
unoccupied.
The front, side, and knee airbags for the
front passenger are not activated.
Most child seats are detected by the
system. This particularly applies to
child seats that were required by NHTSA at
the time of manufacture of the vehicle. After
00320051004F004C00510048000300280047004C0057004C005200510003
Page 106 of 275
Things to remember when drivingDRIVING TIPS
105
If special circumstances make it absolutely nec-
essary to drive with the tailgate open:
1. Close all windows and the glass sunroof.
2. Switch off recirculated -air mode and switch
the airflow control of the air conditioner or
automatic climate control to high, refer to
page 88 or 90.
Hot exhaust system
As in all vehicles, extremely high tempera-
tures are generated on the exhaust sys-
tem. Do not remove the heat shields installed
adjacent to various sect ions of the exhaust sys-
tem, and never apply undercoating to them.
When driving, standing at idle and while park-
ing, take care to avoid possible contact between
the hot exhaust system and any highly flamma-
ble materials such as hay, leaves, grass, etc. Such
contact could lead to a fire, with the risk of seri-
ous personal injuries and property damage. Do
not touch hot exhaust tail pipes. Otherwise,
there is a risk of burns. <
Hydroplaning
When driving on wet or slushy roads,
reduce road speed. If you do not, a wedge
of water can form betw een tires and road sur-
face. This situation, known as hydroplaning, can
cause partial or complete loss of tire contact
with the road surface, so that the car cannot be
steered or braked properly. <
The risk of hydroplaning increases with declining
tread depth on the tires, refer also to Tread
depth on page 211.
Driving through water
Drive through water on the road only if it is
not deeper than 1 ft/30 cm, and then only
at walking speed at the most. Otherwise, the
vehicle's engine, the electrical systems and the
transmission may be damaged. <
Parking brake on inclines
On inclines, do not hold the vehicle with
the clutch; use the parking brake. Other-
wise, greater clutch wear will result. <
For information on driving off using Hill Assist,
refer to page 74.
Braking safely
Your MINI is equipped with ABS. If you are in a
situation which requires full braking, it is best to
brake using maximum brake pressure. Since the
vehicle maintains steeri ng responsiveness, you
can still avoid possible obstacles with a mini-
mum of steering effort.
The pulsation of the brake pedal, together with
the sound of hydraulic regulation, indicates that
ABS is functioning properly.
Objects in the movement range of the
pedals
Keep floor mats, carp et, and other objects
out of the movement range of the pedals;
otherwise, they may inhi bit the function of the
pedals during driving. Do not place additional
floor mats onto an existing one or onto other
objects. Only use floor mats that have been
approved for the vehicle and can be appropri-
ately fastened. Make sure that the floor mats are
securely fastened again after they have been
removed, e.g. for cleaning. <
Driving in wet conditions
When roads are wet or there is heavy rain, briefly
exert gentle pressure on the brake pedal every
few miles. Monitor traffic conditions to ensure
that this maneuver does not endanger other
road users. The heat generated in this process
helps dry the pads and rotors to ensure that.
Then full braking force will be immediately avail-
able when it is needed.
00320051004F004C00510048000300280047004C0057004C005200510003
Page 113 of 275
DRIVING TIPSThings to remember when driving
112
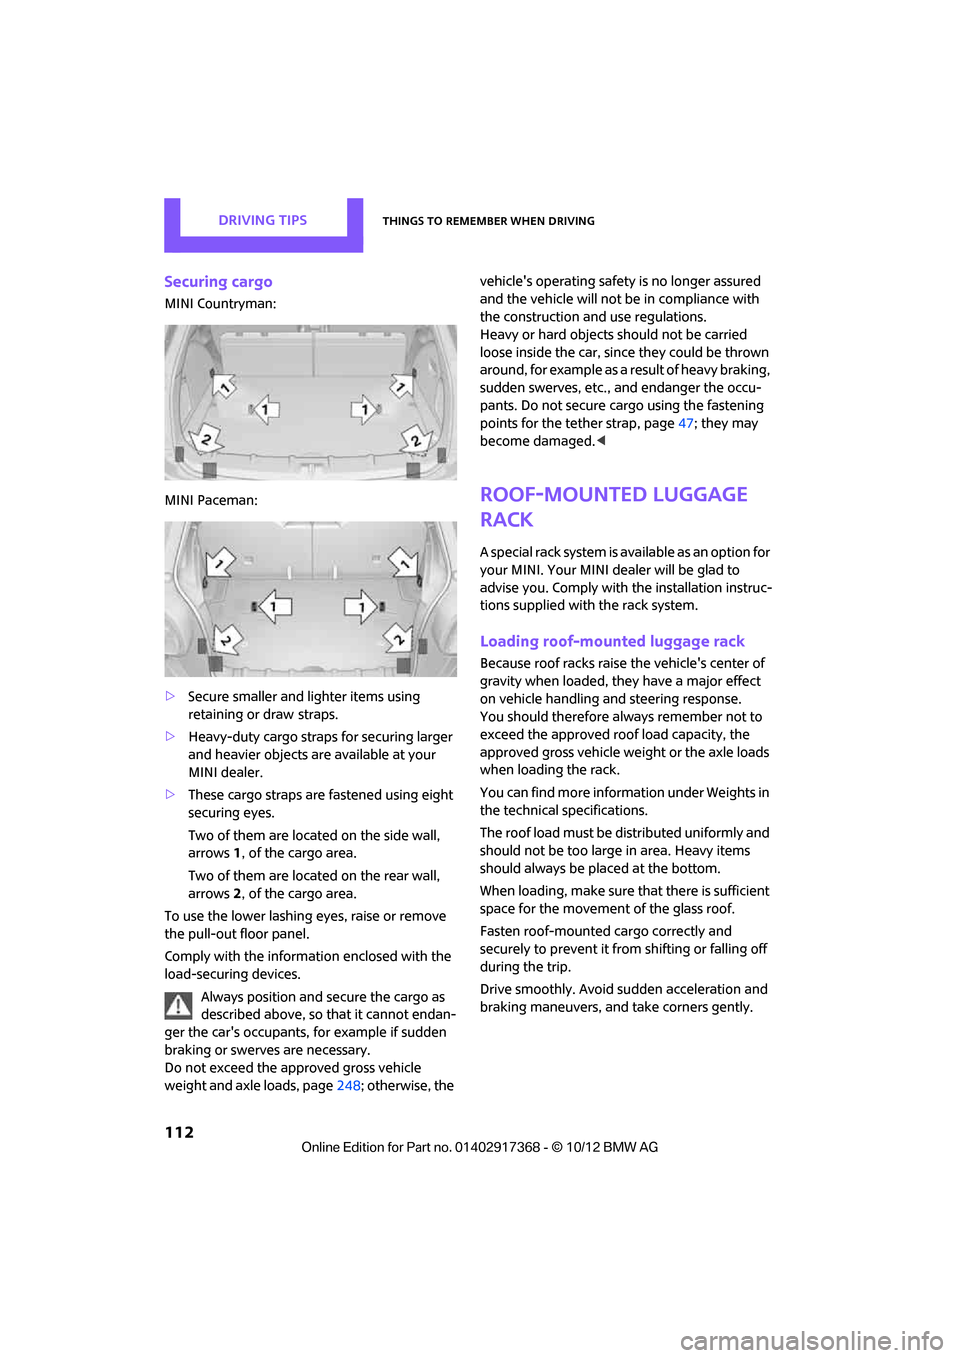
Securing cargo
MINI Countryman:
MINI Paceman:
>Secure smaller and lighter items using
retaining or draw
straps.
> Heavy-duty cargo straps for securing larger
and heavier objects are available at your
MINI dealer.
> These cargo straps are fastened using eight
securing eyes.
Two of them are located on the side wall,
arrows 1, of the cargo area.
Two of them are located on the rear wall,
arrows 2, of the cargo area.
To use the lower lashing eyes, raise or remove
the pull-out floor panel.
Comply with the information enclosed with the
load-securing devices.
Always position and secure the cargo as
described above, so that it cannot endan-
ger the car's occupants, for example if sudden
braking or swerves are necessary.
Do not exceed the approved gross vehicle
weight and axle loads, page 248; otherwise, the vehicle's operating safety is no longer assured
and the vehicle will not be in compliance with
the construction and use regulations.
Heavy or hard objects should not be carried
loose inside the car, since they could be thrown
around, for example as a result of heavy braking,
sudden swerves, etc., and endanger the occu-
pants. Do not secure cargo using the fastening
points for the tether strap, page
47; they may
become damaged. <
Roof-mounted luggage
rack
A special rack system is av ailable as an option for
your MINI. Your MINI dealer will be glad to
advise you. Comply with the installation instruc-
tions supplied with the rack system.
Loading roof-mounted luggage rack
Because roof racks raise the vehicle's center of
gravity when loaded, they have a major effect
on vehicle handling and steering response.
You should therefore always remember not to
exceed the approved roof load capacity, the
approved gross vehicle we ight or the axle loads
when loading the rack.
You can find more information under Weights in
the technical specifications.
The roof load must be distributed uniformly and
should not be too large in area. Heavy items
should always be placed at the bottom.
When loading, make sure that there is sufficient
space for the movement of the glass roof.
Fasten roof-mounted cargo correctly and
securely to prevent it from shifting or falling off
during the trip.
Drive smoothly. Avoid su dden acceleration and
braking maneuvers, and take corners gently.
00320051004F004C00510048000300280047004C0057004C005200510003
Page 186 of 275

Mobile phone preparation BluetoothCOMMUNICATIONS
185
The entries must be entered by voice and are
independent of the mobile phone's memory. Up
to 50 entries can be set up.
Storing the entry
Deleting the entry
Deleting all entries
Reading and selecting the entries
Selecting an entry
Adjusting volume
Turn knob during announcement.
>The volume remains the same, even if the
volume of other audio sources is changed.
> The volume is stored for the remote control
currently in use.
Notes
Do not use the voice operation system to initiate
an emergency call. In stressful situations, the
voice and vocal pitch can change. This can
unnecessarily delay the establishment of a tele-
phone connection.
Ambient conditions
>Say the commands, numbers and letters
smoothly and with normal volume, empha-
sis and speed.
> Always say the commands in the language
of the system. The language for voice oper-
ation system is pres et and can not be
changed via the Control Display.
> Keep doors, windows, glass sunroof/pan-
oramic sunroof, or convertible top closed to
avoid noise interference.
> Avoid ambient noise in the vehicle while
speaking.
Snap-in adapter
The concept
The snap-in adapter makes it possible to do the
following:
>Accommodate the mobile phone.
> Recharge its battery.
> Connect to the outside antenna of the vehi-
cle.
This assures a better network connection and
constant sound quality.
General information
Detailed information on snap-in adapters that
compatibly support mobile phone functions can
be found at your MINI dealer.
Do not expose your mobile phone to extreme
ambient conditions, for example, very high tem-
peratures; otherwise, functions on your mobile
phone may not work. Follow the operating
instructions for your mobile phone.
1.
{Save name }.
2. Say the name aloud. Do not exceed a
speaking duration of about 2 seconds.
3. Say the phone number after being
prompted to do so by the system.
4. {Save }.
1. {Delete name }.
2. Say the name when prompted.
3. Confirm prompt with {Yes }.
1. {Delete phonebook }.
The dialog for deleti ng phone book is
opened.
2. Confirm prompt with {Yes }.
3. Confirm repeated prompt with {Yes }.
1. {Read phonebook }.
The dialog for reading phone book is
opened.
2. {Dial number } when the desired entry is
read aloud.
1. {Dial name }.
2. Say the name when prompted.
3. Confirm prompt with {Yes }.
00320051004F004C00510048000300280047004C0057004C005200510003
Page 235 of 275
MOBILITYReplacing components
234
Check Control messages are no longer dis-
played.
Charging the battery
Note
Do not connect battery chargers to the
sockets installed in the vehicle at the fac-
tory; otherwise you may cause damage to the
battery. <
Only charge the battery in the vehicle when the
engine is off. Connectio ns, refer to Jump-start-
ing on page 236.
General information
To guarantee the full service life of the battery,
make sure that the battery is always properly
charged.
It may be necessary to charge the battery in the
following situations:
>If frequent short trips are taken.
> If the vehicle is frequently parked for more
than a month.
Disposal
After replacing old ba tteries, return the
used batteries to your MINI dealer or to a
recycling center. Maintain the battery in an
upright position for transport and storage.
Always secure the battery against tipping over
during transport. <
Power failure
After a temporary power loss, some equipment
may not be fully function al and may require ini-
tialization. Individual settings are also lost and
must be reprogrammed:
> Time and date
These values must be updated, page 66.
> Radio
In some cases, statio ns may have to be
stored again, page 143.
> Onboard monitor
Operability must be waited for, page118.>
Glass sunroof, electric
It may only be possible to tilt the sunroof, if
applicable. The system must be initialized.
Contact your near est MINI dealer.
Indicator and warning lamps
Lights up in red:
Battery is no longer being charged.
Alternator malfunction.
Switch off all unnecessary electrical consumers.
Have the battery checked without delay. Lights up in yellow:
Battery charge level very low, battery
aged, or battery not securely con-
nected.
Charge it by taking a long er drive or by using an
external charger. If th e display appears again,
have the battery checked as soon as possible.
Fuses
Do not attempt to repair a blown fuse or
replace it with a fuse of a different color or
Ampere rating. To do this could cause a fire in
the vehicle resulting from a circuit overload.
Have fuses replaced by your MINI dealer. <
A fuse assignment diag ram is located on the
inside of the fuse box cover panels.
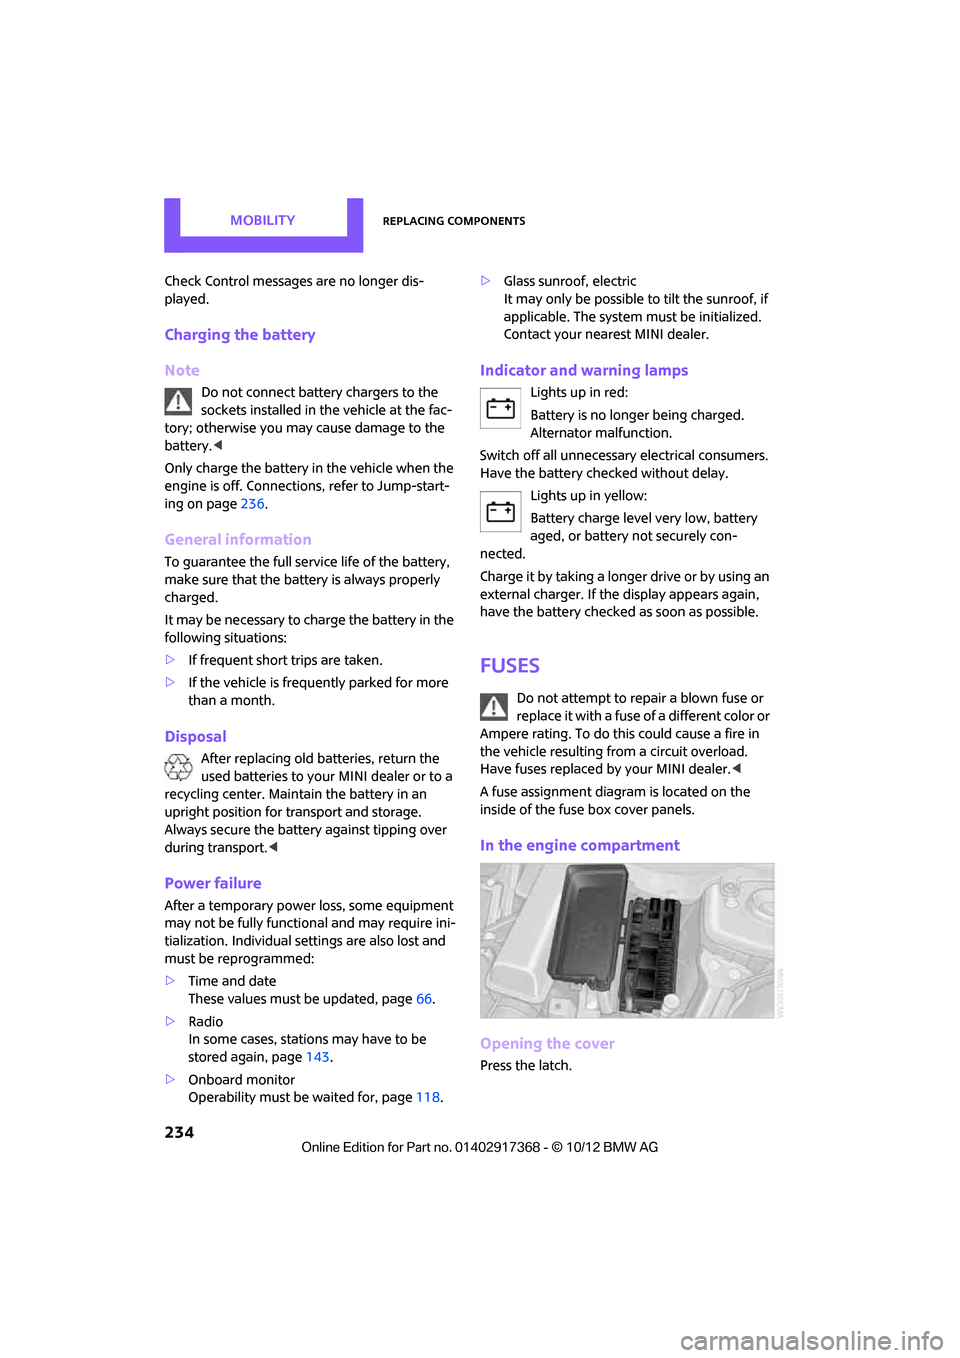
In the engine compartment
Opening the cover
Press the latch.
00320051004F004C00510048000300280047004C0057004C005200510003
Page 248 of 275
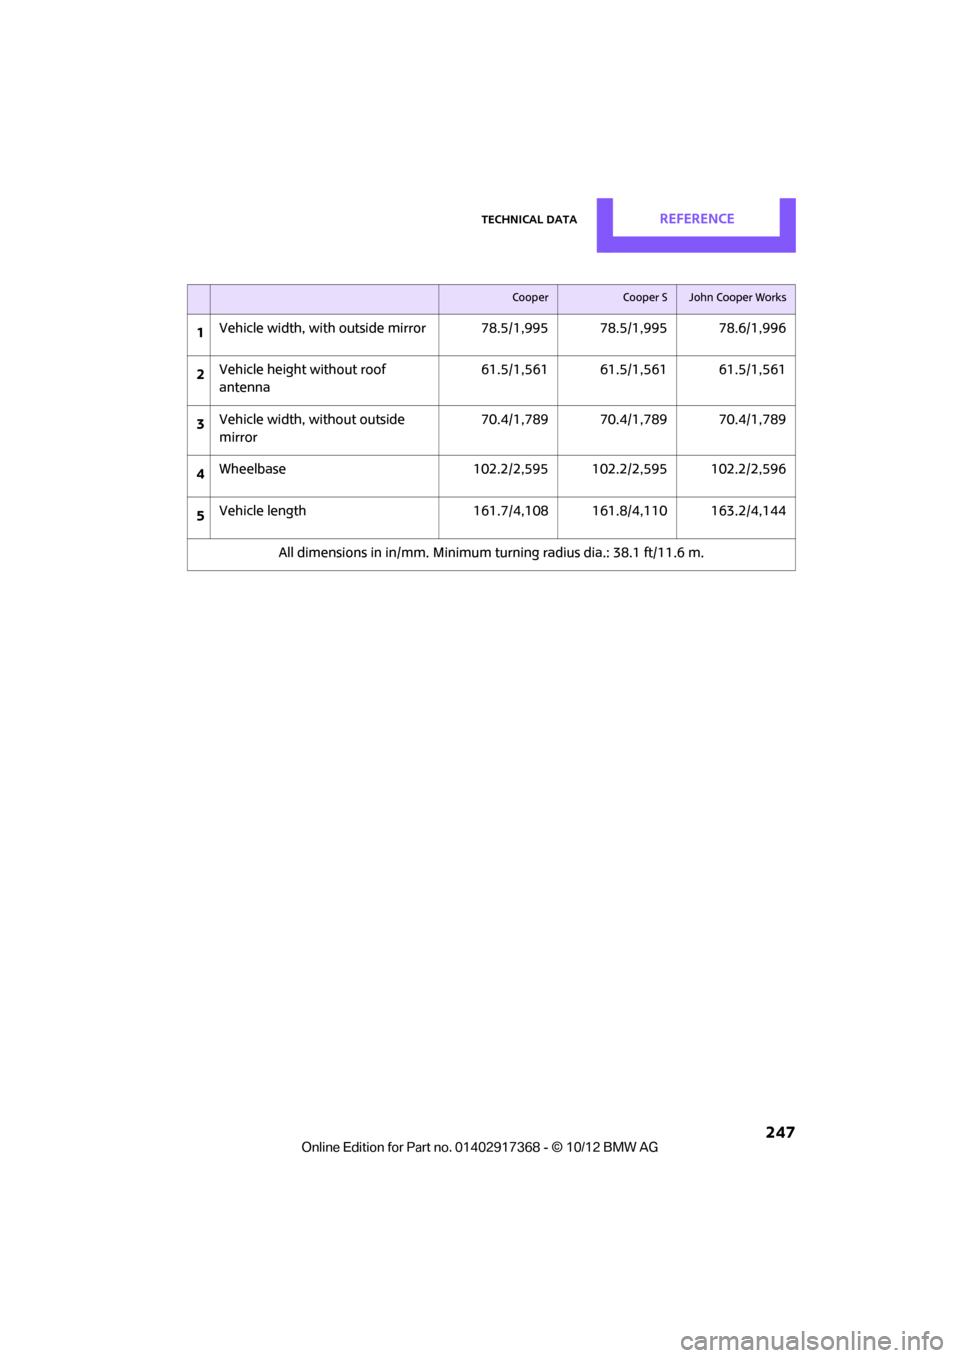
Technical dataREFERENCE
247
CooperCooper SJohn Cooper Works
1Vehicle width, with outside
mirror 78.5/1,995 78.5/1,995 78.6/1,996
2 Vehicle height without roof
antenna 61.5/1,561 61.5/1,561 61.5/1,561
3 Vehicle width, without outside
mirror 70.4/1,789 70.4/1,789 70.4/1,789
4 Wheelbase 102.2/2,595 102.2/2,595 102.2/2,596
5 Vehicle length 161.7/4,
108 161.8/4,110 163.2/4,144
All dimensions in in/mm. Minimum turning radius dia.: 38.1 ft/11.6 m.
00320051004F004C00510048000300280047004C0057004C005200510003
Page 249 of 275
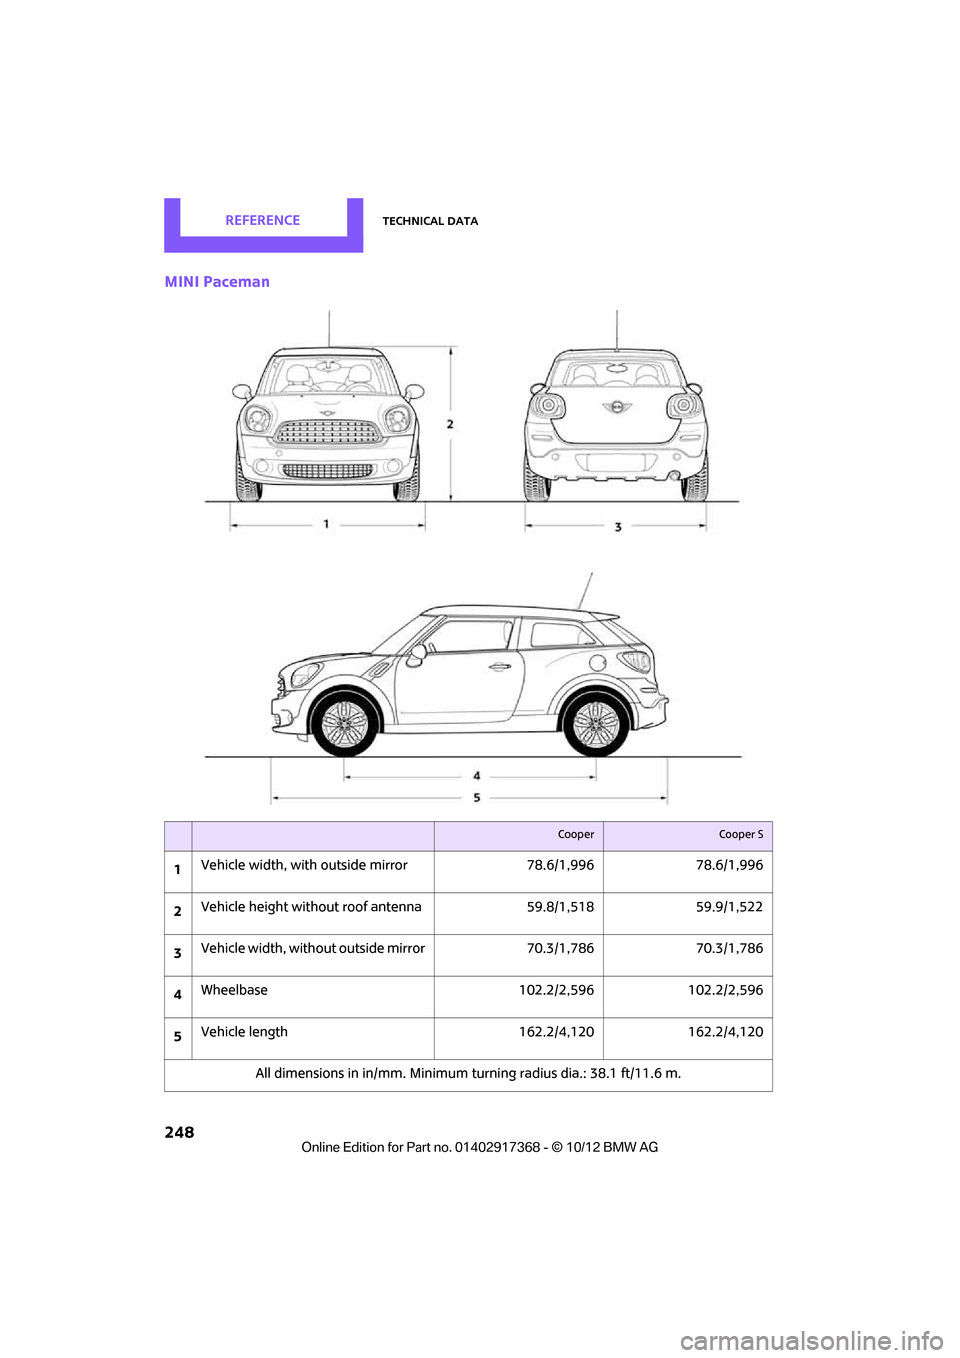
REFERENCETechnical data
248
MINI Paceman
CooperCooper S
1Vehicle width, with outs
ide mirror 78.6/1,996 78.6/1,996
2 Vehicle height without roof antenna
59.8/1,51859.9/1,522
3 Vehicle width, without outs
ide mirror70.3/1,786 70.3/1,786
4 Wheelbase
102.2/2,596102.2/2,596
5 Vehicle length
162.2/4,120162.2/4,120
All dimensions in in/mm. Minimum turning radius dia.: 38.1 ft/11.6 m.
00320051004F004C00510048000300280047004C0057004C005200510003
Page 250 of 275
Technical dataREFERENCE
249
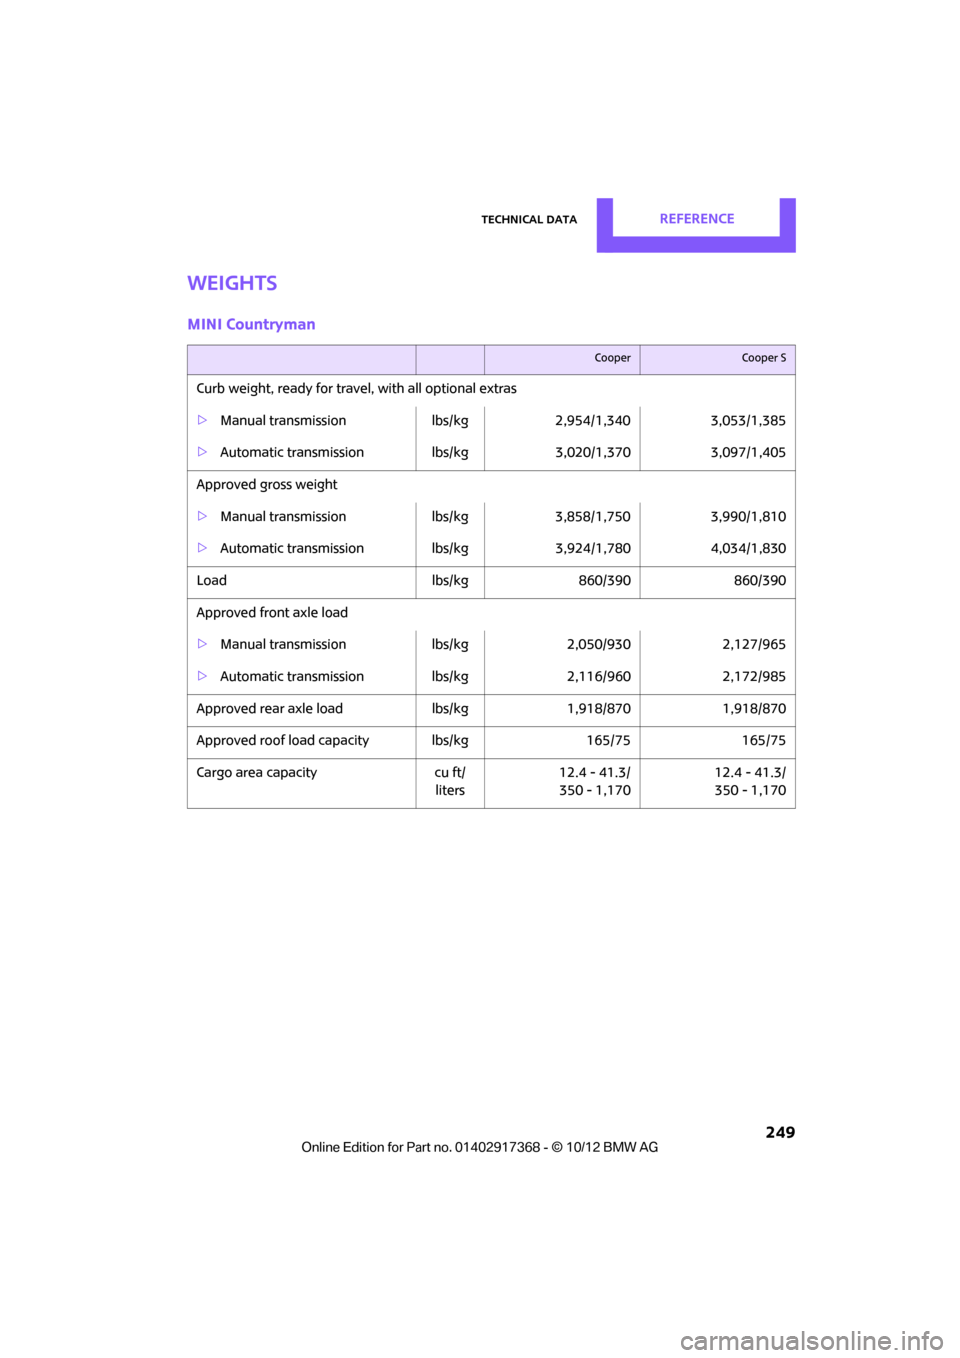
Weights
MINI Countryman
CooperCooper S
Curb weight, ready for travel, with all optional extras
> Manual transmission lbs/kg 2,954/1,340 3,053/1,385
> Automatic transmission lbs/kg 3,020/1,370 3,097/1,405
Approved gross weight
> Manual transmission lbs/kg 3,858/1,750 3,990/1,810
> Automatic transmission lbs/kg 3,924/1,780 4,034/1,830
Load lbs/kg 860/390 860/390
Approved front axle load
> Manual transmission lbs/kg 2,050/930 2,127/965
> Automatic transmission lbs/kg 2,116/960 2,172/985
Approved rear axle load lbs/kg 1,918/870 1,918/870
Approved roof load capacity lbs/kg 165/75 165/75
Cargo area capacity cu ft/ liters12.4 - 41.3/
350 - 1,170 12.4 - 41.3/
350 - 1,170
00320051004F004C00510048000300280047004C0057004C005200510003
Page 251 of 275

REFERENCETechnical data
250
Never exceed either the approved axle loads or
the gross vehicle weight.
Cooper S ALL4John Cooper Works
Curb weight, ready for travel, with all optional extras
> Manual transmission lbs/kg 3,208/1,455 3,263/1,480
> Automatic transmission lbs/kg 3,252/1,475 3,307/1,500
Approved gross weight
> Manual transmission lbs/kg 4,101/1,860 4,156/1,885
> Automatic transmission lbs/kg 4,145/1,880 4,200/1,905
Load lbs/kg 860/390 860/390
Approved front axle load
> Manual transmission lbs/kg 2,183/990 2,183/990
> Automatic transmission lbs/kg 2,227/1,010 2,227/1,010
Approved rear axle load lbs/kg 2,017/915 2,072/940
Approved roof load ca pacity lbs/kg 165/75 165/75
Cargo area capacity cu ft/ liters12.4 - 41.3/
350 - 1,170 12.4 - 41.3/
350 - 1,170
00320051004F004C00510048000300280047004C0057004C005200510003
Page 252 of 275
Technical dataREFERENCE
251
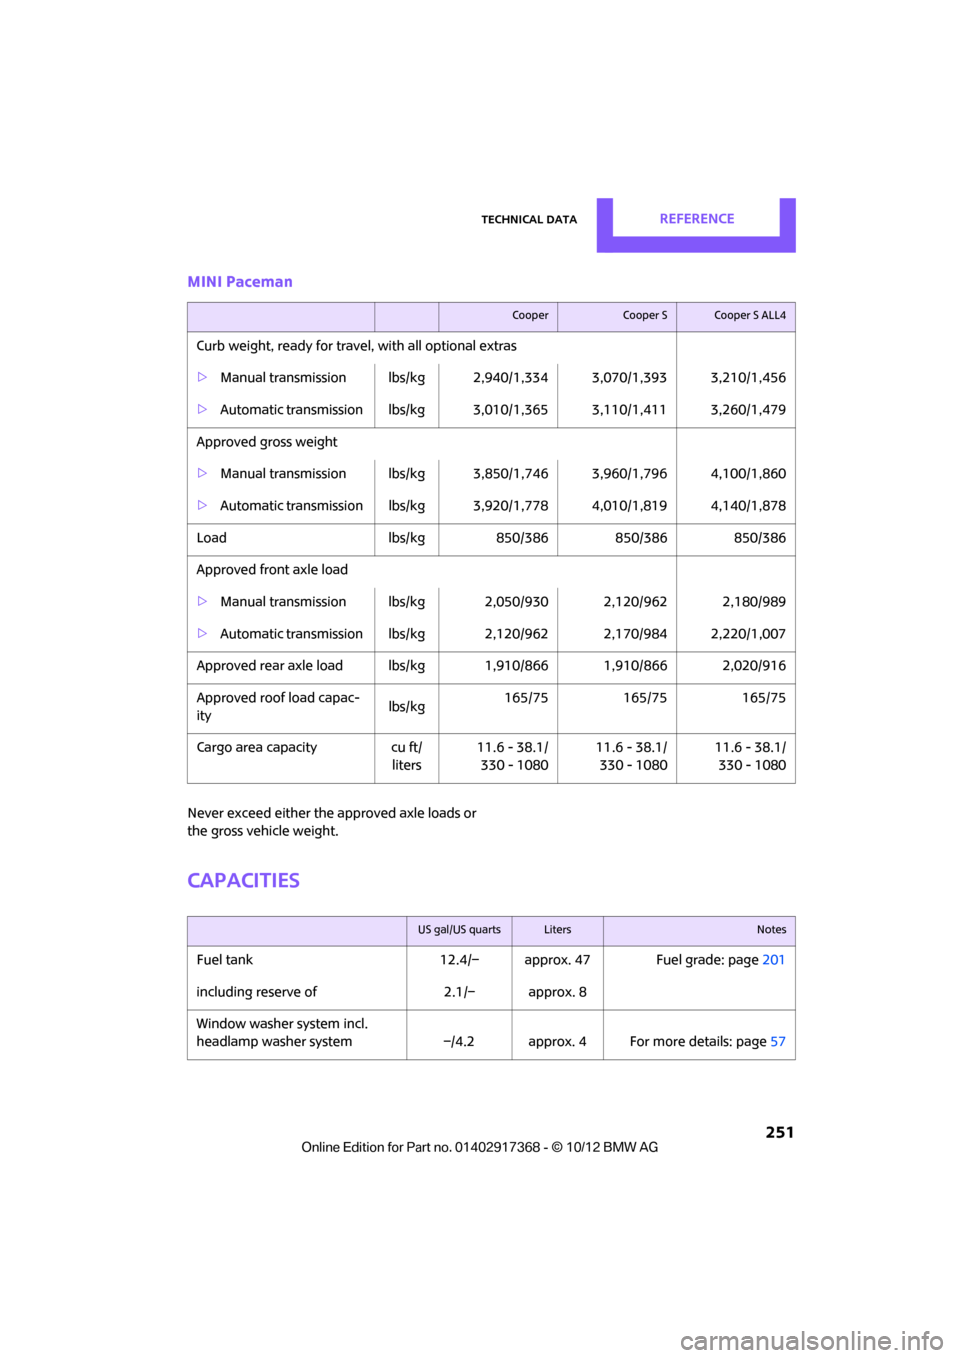
MINI Paceman
Never exceed either the approved axle loads or
the gross vehicle weight.
Capacities
CooperCooper SCooper S ALL4
Curb weight, ready for travel, with all optional extras
> Manual transmission lbs/kg 2,940/1,334 3,070/1,393 3,210/1,456
> Automatic transmission lbs/ kg 3,010/1,365 3,110/1,411 3,260/1,479
Approved gross weight
> Manual transmission lbs/kg 3,850/1,746 3,960/1,796 4,100/1,860
> Automatic transmission lbs/ kg 3,920/1,778 4,010/1,819 4,140/1,878
Load lbs/kg 850/386 850/386 850/386
Approved front axle load
> Manual transmission lbs/ kg 2,050/930 2,120/962 2,180/989
> Automatic transmission lbs/ kg 2,120/962 2,170/984 2,220/1,007
Approved rear axle load lbs/kg 1,910/866 1,910/866 2,020/916
Approved roof load capac-
ity lbs/kg165/75 165/75 165/75
Cargo area capacity cu ft/ liters11.6 - 38.1/
330 - 1080 11.6 - 38.1/
330 - 1080 11.6 - 38.1/
330 - 1080
US gal/US quartsLitersNotes
Fuel tank 12.4/– approx. 47 Fuel grade: page 201
including reserve of 2.1/– approx. 8
Window washer system incl.
headlamp washer system –/4.2 approx. 4 For more details: page 57
00320051004F004C00510048000300280047004C0057004C005200510003