Automatic gear lever MINI Countryman 2014 Owner's Manual
[x] Cancel search | Manufacturer: MINI, Model Year: 2014, Model line: Countryman, Model: MINI Countryman 2014Pages: 218, PDF Size: 5.45 MB
Page 51 of 218
Engine stop
General information Take the remote control with you
Take the remote control with you when
leaving the vehicle so that children, for exam‐
ple, cannot operate the windows and injure
themselves. ◀
Set the handbrake and further secure the
vehicle as required
Set the handbrake firmly when parking; other‐
wise, the vehicle may roll. On steep upward
and downward inclines, further secure the ve‐
hicle, for example, by turning the steering
wheel in the direction of the curb. ◀
Before driving into a car wash
To make it possible for the vehicle to roll in an
automatic car wash, follow the information on
Washing in automatic car washes, refer to
page 186.
Switching off the engine
Manual transmission1.With the vehicle at a standstill, press the
Start/Stop button.2.Shift into first gear or reverse.3.Set the handbrake firmly.4.Remove the remote control from the igni‐
tion lock.
Automatic transmission
1.Engage transmission position P with the ve‐
hicle stopped.2.Press the Start/Stop button.3.Set the handbrake firmly.4.Remove the remote control from the igni‐
tion lock.Handbrake
The concept
The handbrake is primarily intended to prevent
the vehicle from rolling while parked; it brakes
the rear wheels.
Also follow the instructions under Switching off
the engine, refer to page 51.
Setting
The lever engages automatically.
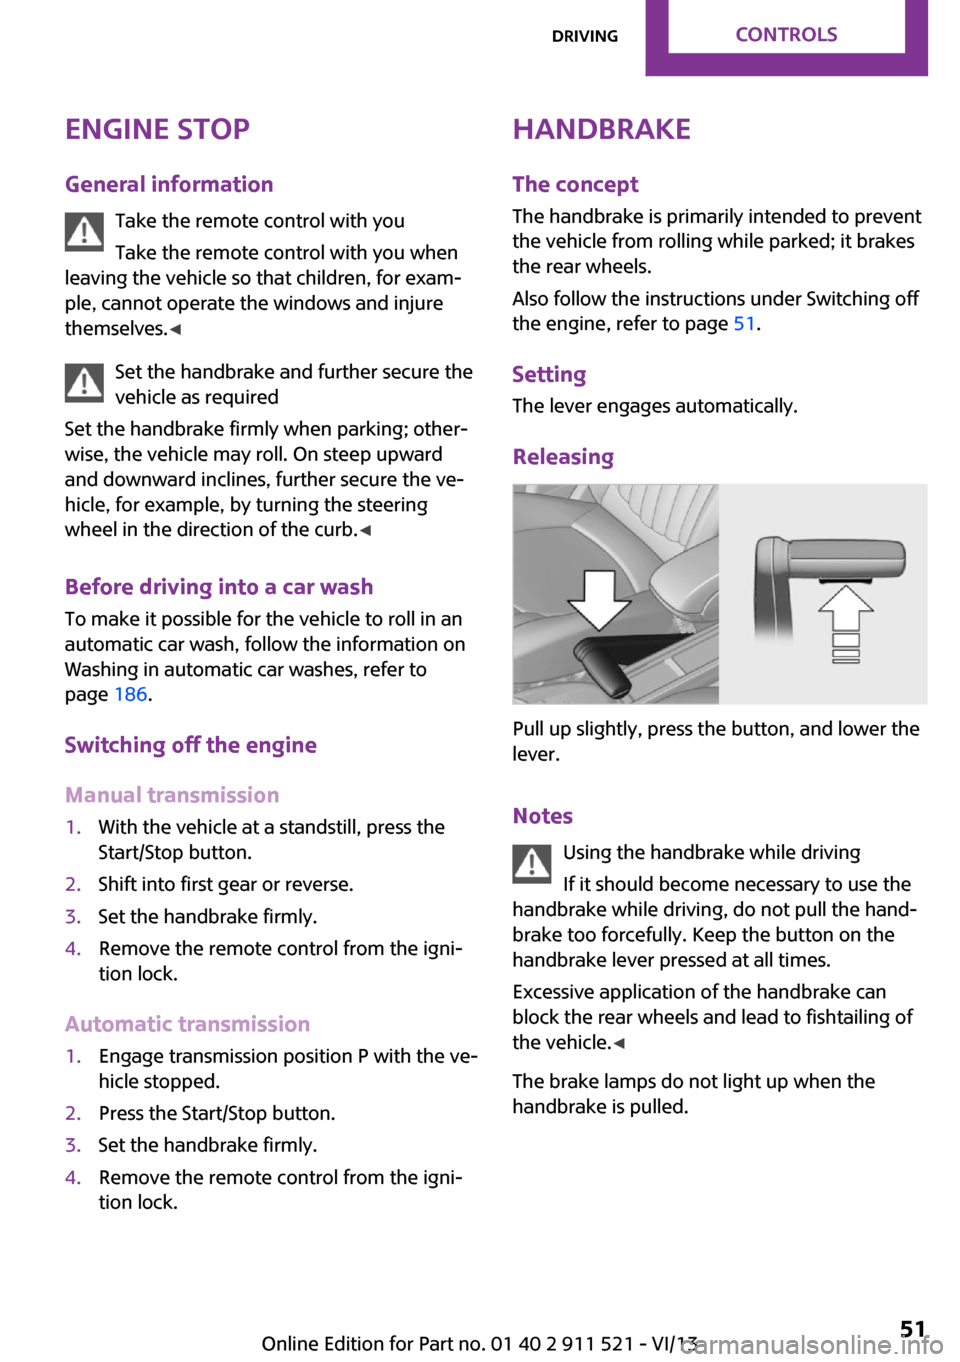
Releasing
Pull up slightly, press the button, and lower the
lever.
Notes Using the handbrake while driving
If it should become necessary to use the
handbrake while driving, do not pull the hand‐
brake too forcefully. Keep the button on the
handbrake lever pressed at all times.
Excessive application of the handbrake can
block the rear wheels and lead to fishtailing of
the vehicle. ◀
The brake lamps do not light up when the
handbrake is pulled.
Seite 51DrivingControls51
Online Edition for Part no. 01 40 2 911 521 - VI/13
Page 56 of 218
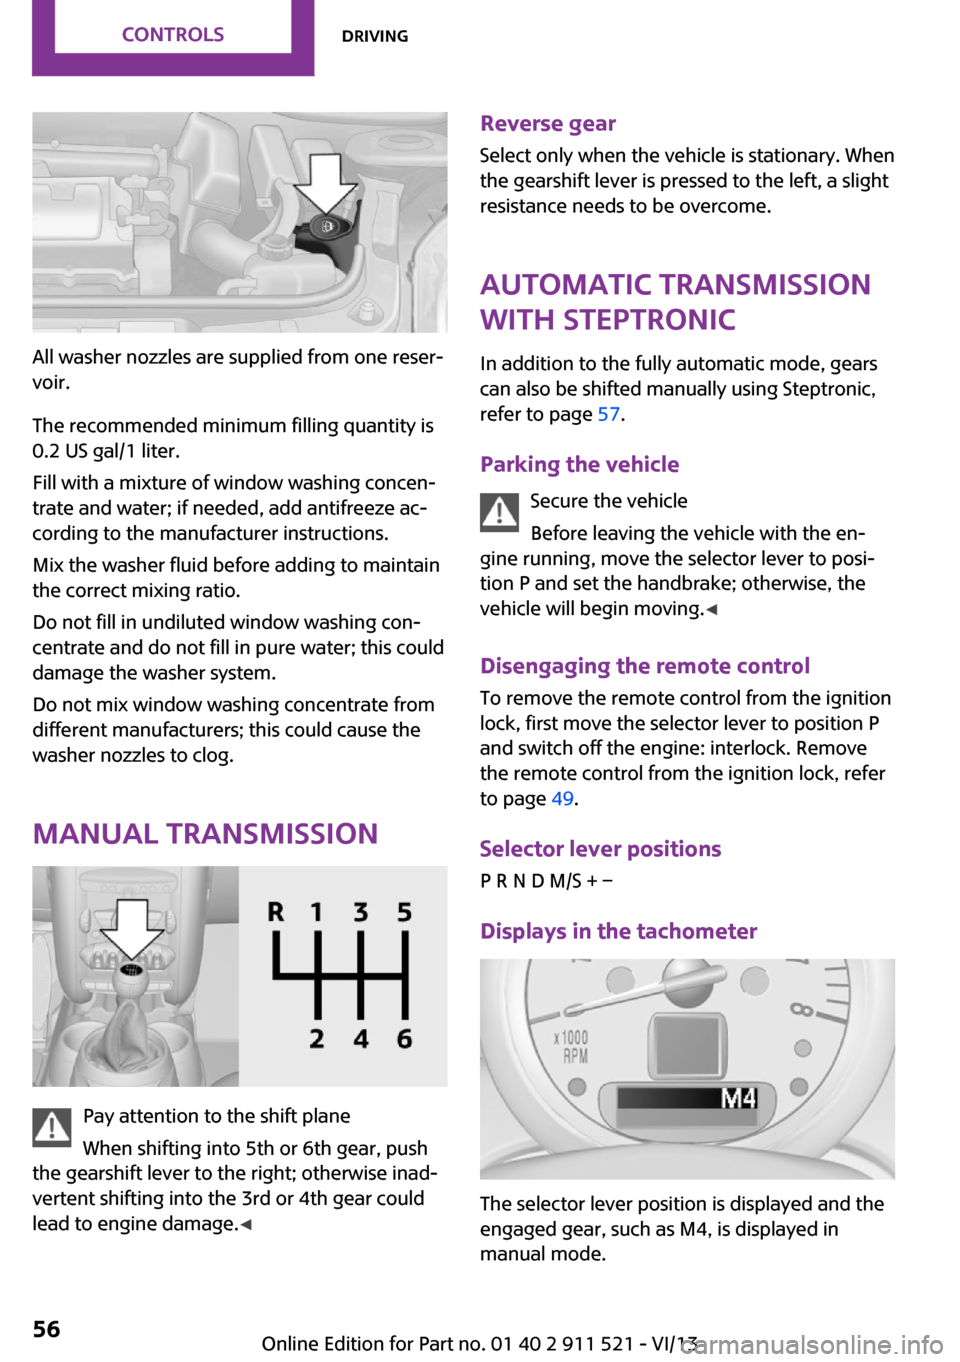
All washer nozzles are supplied from one reser‐
voir.
The recommended minimum filling quantity is
0.2 US gal/1 liter.
Fill with a mixture of window washing concen‐
trate and water; if needed, add antifreeze ac‐
cording to the manufacturer instructions.
Mix the washer fluid before adding to maintain
the correct mixing ratio.
Do not fill in undiluted window washing con‐
centrate and do not fill in pure water; this could
damage the washer system.
Do not mix window washing concentrate from
different manufacturers; this could cause the
washer nozzles to clog.
Manual transmission
Pay attention to the shift plane
When shifting into 5th or 6th gear, push
the gearshift lever to the right; otherwise inad‐
vertent shifting into the 3rd or 4th gear could
lead to engine damage. ◀
Reverse gear
Select only when the vehicle is stationary. When
the gearshift lever is pressed to the left, a slight
resistance needs to be overcome.
Automatic transmission
with Steptronic
In addition to the fully automatic mode, gears
can also be shifted manually using Steptronic,
refer to page 57.
Parking the vehicle Secure the vehicle
Before leaving the vehicle with the en‐
gine running, move the selector lever to posi‐
tion P and set the handbrake; otherwise, the
vehicle will begin moving. ◀
Disengaging the remote control
To remove the remote control from the ignition
lock, first move the selector lever to position P
and switch off the engine: interlock. Remove
the remote control from the ignition lock, refer
to page 49.
Selector lever positions
P R N D M/S + –
Displays in the tachometer
The selector lever position is displayed and the
engaged gear, such as M4, is displayed in
manual mode.
Seite 56ControlsDriving56
Online Edition for Part no. 01 40 2 911 521 - VI/13
Page 57 of 218
Changing selector lever positions▷With the ignition switched on or the engine
running, the selector lever can be moved
out of position P.▷When the vehicle is stationary, step on the
brake before shifting out of P or N; other‐
wise, the selector lever is locked: shiftlock.
Press on the brake pedal until you
start driving
To prevent the vehicle from creeping after
you select a driving position, maintain pres‐
sure on the brake pedal until you are ready
to start. ◀
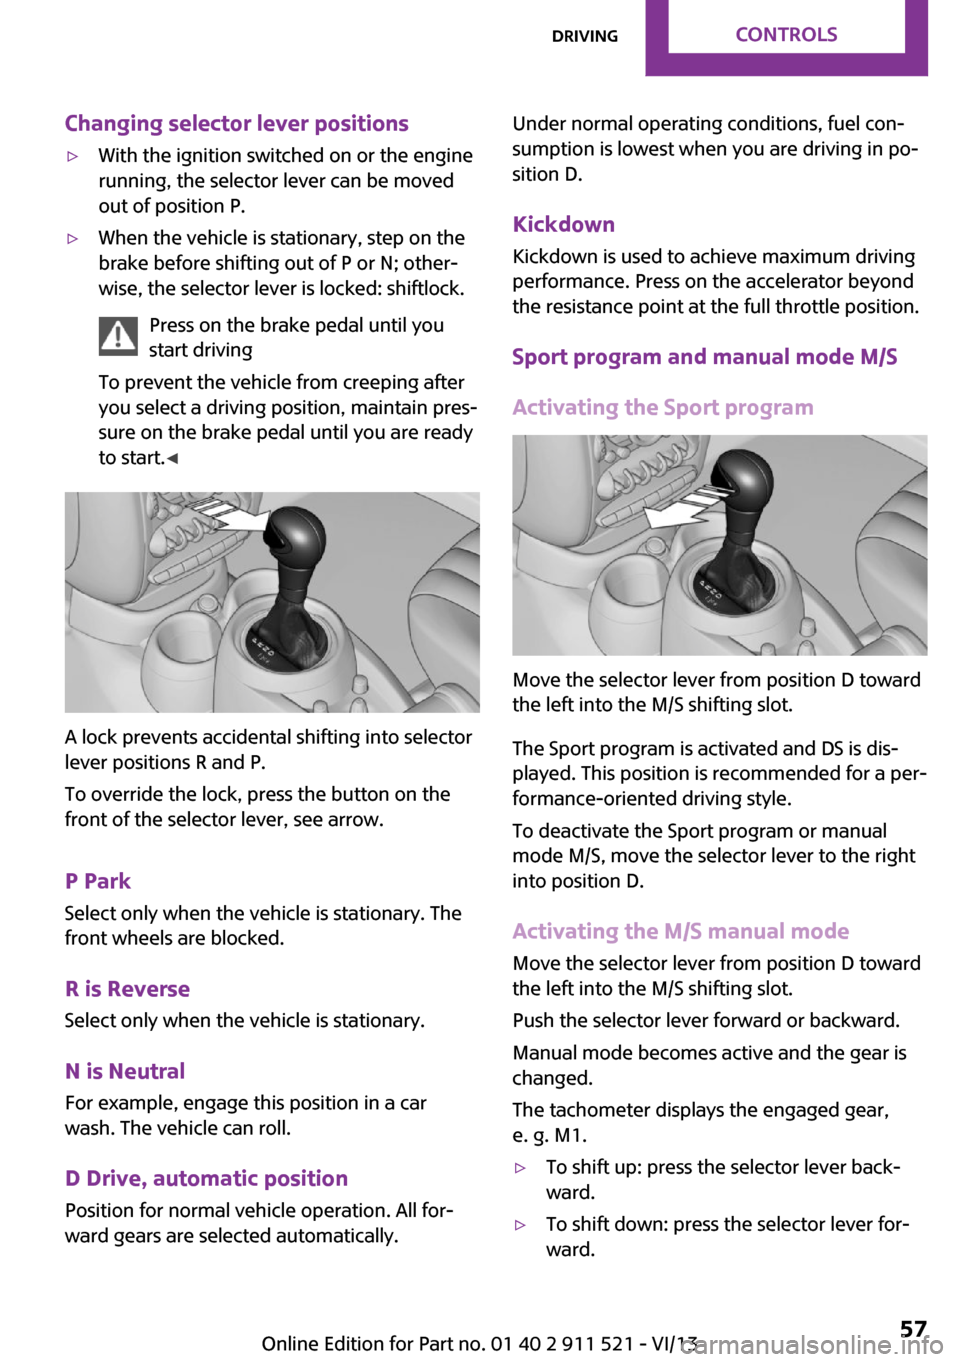
A lock prevents accidental shifting into selector
lever positions R and P.
To override the lock, press the button on the
front of the selector lever, see arrow.
P Park
Select only when the vehicle is stationary. The
front wheels are blocked.
R is Reverse
Select only when the vehicle is stationary.
N is NeutralFor example, engage this position in a car
wash. The vehicle can roll.
D Drive, automatic position Position for normal vehicle operation. All for‐
ward gears are selected automatically.
Under normal operating conditions, fuel con‐
sumption is lowest when you are driving in po‐
sition D.
Kickdown
Kickdown is used to achieve maximum driving
performance. Press on the accelerator beyond
the resistance point at the full throttle position.
Sport program and manual mode M/S
Activating the Sport program
Move the selector lever from position D toward
the left into the M/S shifting slot.
The Sport program is activated and DS is dis‐
played. This position is recommended for a per‐
formance-oriented driving style.
To deactivate the Sport program or manual
mode M/S, move the selector lever to the right
into position D.
Activating the M/S manual mode Move the selector lever from position D towardthe left into the M/S shifting slot.
Push the selector lever forward or backward.
Manual mode becomes active and the gear is
changed.
The tachometer displays the engaged gear,
e. g. M1.
▷To shift up: press the selector lever back‐
ward.▷To shift down: press the selector lever for‐
ward.Seite 57DrivingControls57
Online Edition for Part no. 01 40 2 911 521 - VI/13
Page 86 of 218
Avoid driving quickly with PDC
PDC is a parking aid that can display ob‐
jects when the vehicle approaches them slowly,
as is the case during parking maneuvers. Avoid
driving toward an object quickly as the system
may then be too late in issuing a warning for
technical reasons. ◀
Automatic operation
The system is activated after approx. one sec‐ ond when reverse gear or selector lever posi‐
tion R is engaged while the engine is running or
the ignition is switched on. Await this short pe‐
riod before setting the vehicle into motion.
Signal tones
The closer the vehicle is to the object, the
shorter the intervals become. If the distance to
a detected object is less than approx.
12 in/30 cm, a continuous tone is sounded.
If the distance remains constant, for example
when driving parallel to a wall, the signal tone
is stopped after approx. 3 seconds.
Volume
The signal tone volume can be adjusted.
Radio MINI Boost CD, refer to page 124.
System limits Check the traffic situation as well
PDC cannot serve as a substitute for the
driver's personal judgment of the traffic situa‐
tion. Check the traffic situation around the ve‐
hicle with your own eyes. Otherwise, an acci‐
dent could result from road users or objects
located outside of the PDC detection range.
Loud noises from outside and inside the vehicle
may prevent you from hearing the PDC's signal
tone. ◀Malfunction
The warning lamp lights up. PDC is mal‐functioning or has failed. Have the sys‐
tem checked.
To ensure full functionality of the sensors, keep
the sensors clean and free of ice. When using
high-pressure washers, do not spray the sen‐
sors for long periods and maintain a distance of
at least 12 in/30 cm.Seite 86ControlsDriving comfort86
Online Edition for Part no. 01 40 2 911 521 - VI/13
Page 183 of 218

MINI Countryman: rear
MINI Paceman: rear
Being towedFollow the towing instructions
Follow all towing instructions, or vehicle
damage or accidents may occur. ◀
▷Make sure that the ignition is switched on;
otherwise, the low beams, tail lamps, turn
signals, and windshield wipers may be un‐
available.▷Do not tow the vehicle with the rear axle
tilted, as the front wheels could turn.▷When the engine is stopped, there is no
power assist. Consequently, more force
needs to be applied when braking and
steering.▷Larger steering wheel movements are re‐
quired.▷Switch on the hazard warning system, de‐
pending on local regulations.Manual transmission
Gearshift lever in neutral position.
Automatic transmission Towing vehicles with an automatic trans‐
mission
Only transport vehicles with an automatic
transmission on tow trucks or with raised front
wheels; otherwise, the transmission may be
damaged. ◀
Towing with a tow bar Light towing vehicle
The towing vehicle must not be lighter
than your vehicle, or it will not be possible to
control vehicle response. ◀
Correctly attach the tow bar
Only secure the tow bar on the tow fit‐
tings; damage can occur when it is secured on
other parts of the vehicle. ◀
The tow fittings used should be on the same
side on both vehicles.
Should it prove impossible to avoid mounting
the tow bar at an offset angle, please observe
the following:▷Clearance and maneuvering capability will
be sharply limited during cornering.▷The tow bar will generate lateral forces if it
is attached offset.
Towing with a tow rope
When starting to tow the vehicle, make sure
that the tow rope is taut.
To avoid jerking and the associated stresses on
the vehicle components when towing, always
use nylon ropes or nylon straps.
Attaching the tow rope correctly
Only secure the tow rope on the tow fit‐
ting; otherwise, damage can occur when it is
secured on other parts of the vehicle. ◀
Seite 183Breakdown assistanceMobility183
Online Edition for Part no. 01 40 2 911 521 - VI/13
Page 199 of 218
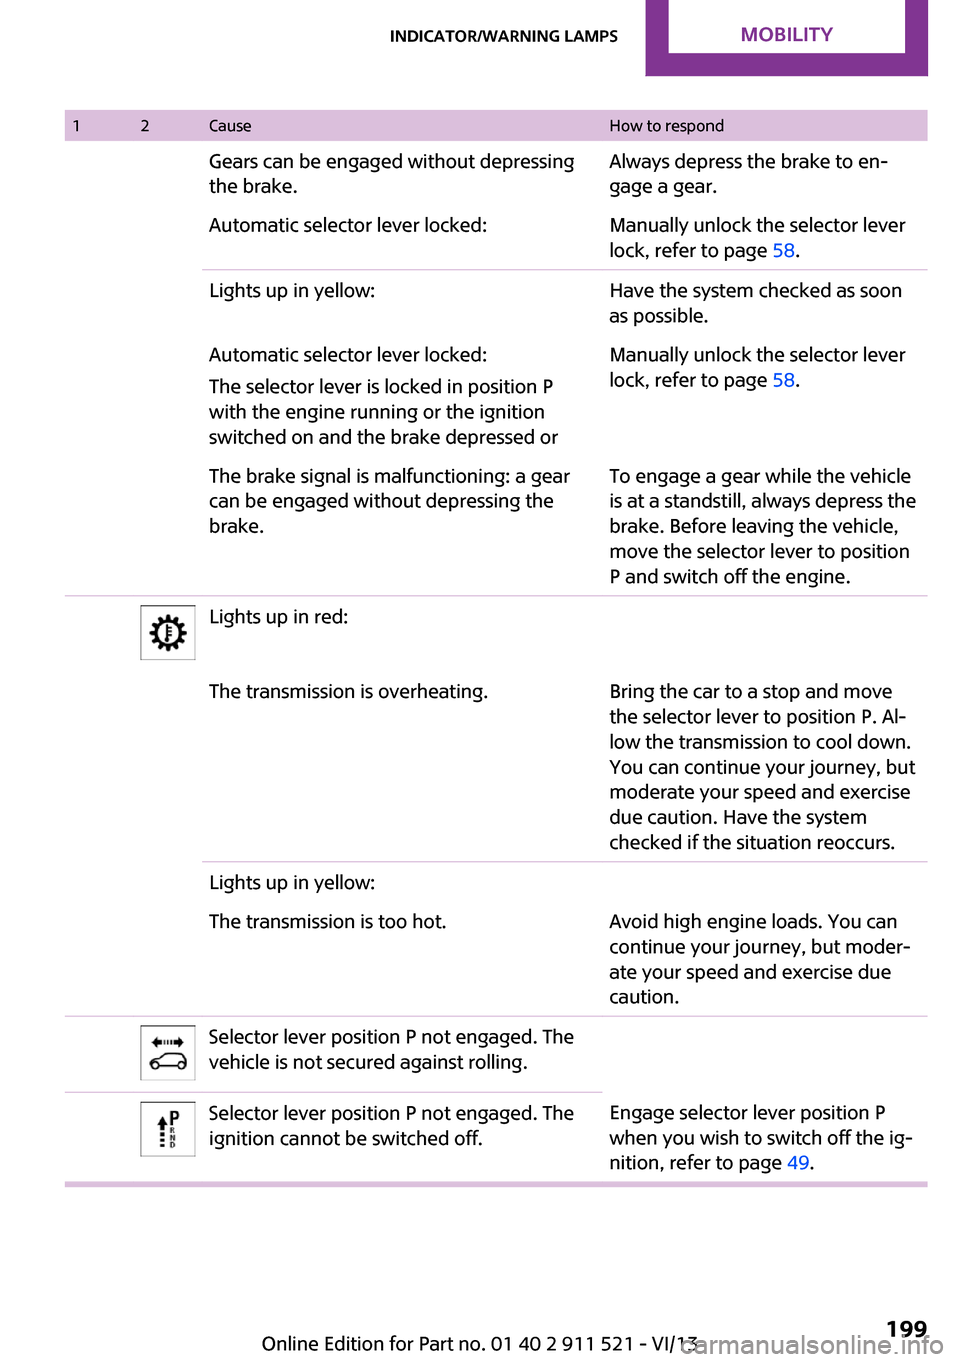
12CauseHow to respondGears can be engaged without depressing
the brake.Always depress the brake to en‐
gage a gear.Automatic selector lever locked:Manually unlock the selector lever
lock, refer to page 58.Lights up in yellow:Have the system checked as soon
as possible.Automatic selector lever locked:
The selector lever is locked in position P
with the engine running or the ignition
switched on and the brake depressed orManually unlock the selector lever
lock, refer to page 58.The brake signal is malfunctioning: a gear
can be engaged without depressing the
brake.To engage a gear while the vehicle
is at a standstill, always depress the
brake. Before leaving the vehicle,
move the selector lever to position
P and switch off the engine.Lights up in red:The transmission is overheating.Bring the car to a stop and move
the selector lever to position P. Al‐
low the transmission to cool down.
You can continue your journey, but
moderate your speed and exercise
due caution. Have the system
checked if the situation reoccurs.Lights up in yellow:The transmission is too hot.Avoid high engine loads. You can
continue your journey, but moder‐
ate your speed and exercise due
caution.Selector lever position P not engaged. The
vehicle is not secured against rolling.Selector lever position P not engaged. The
ignition cannot be switched off.Engage selector lever position P
when you wish to switch off the ig‐
nition, refer to page 49.Seite 199Indicator/warning lampsMobility199
Online Edition for Part no. 01 40 2 911 521 - VI/13
Page 214 of 218
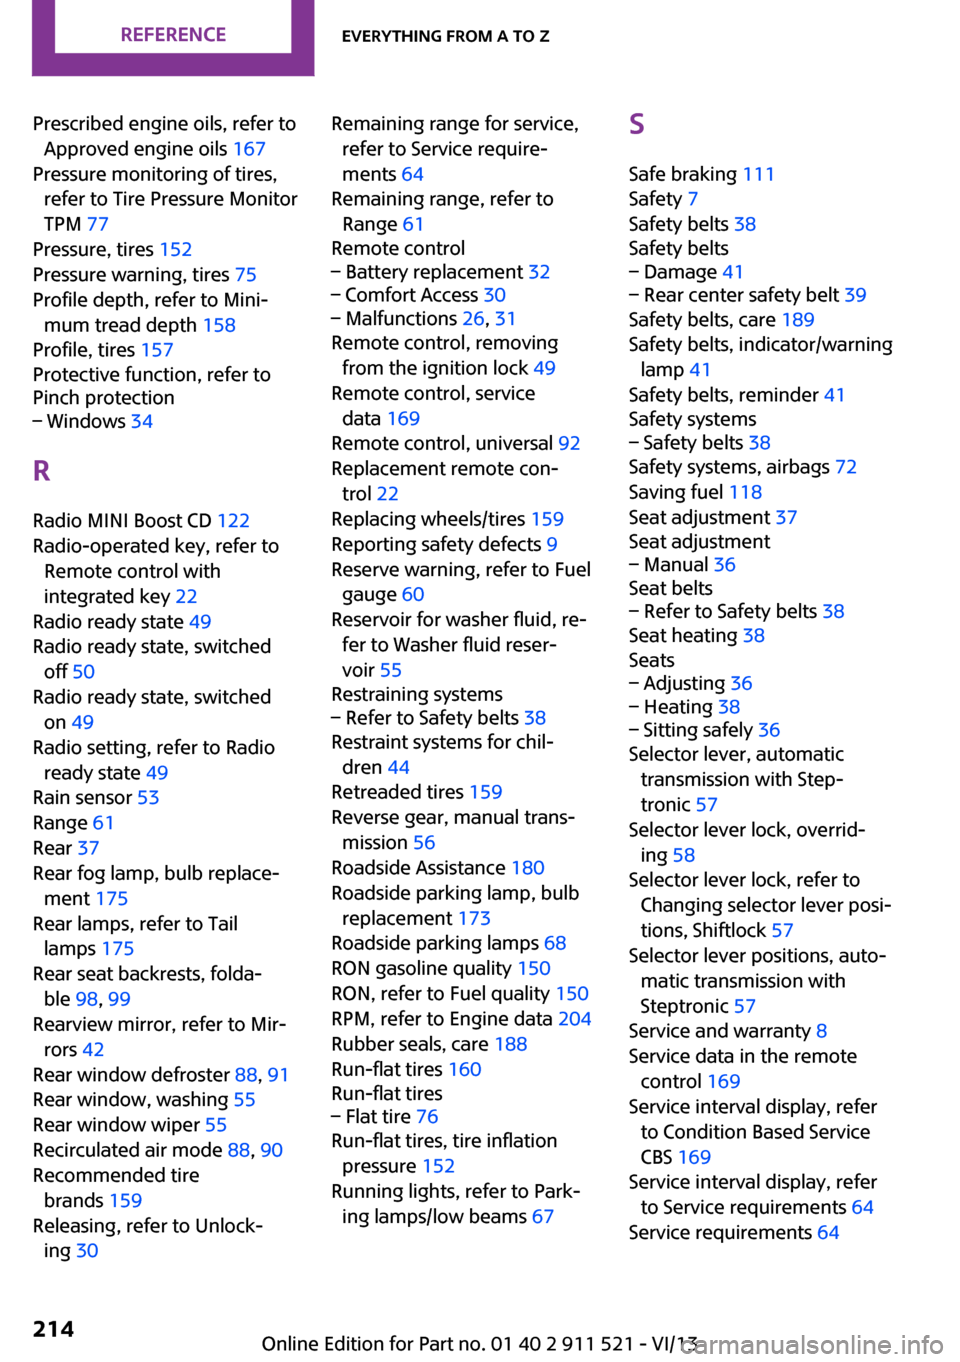
Prescribed engine oils, refer toApproved engine oils 167
Pressure monitoring of tires, refer to Tire Pressure Monitor
TPM 77
Pressure, tires 152
Pressure warning, tires 75
Profile depth, refer to Mini‐ mum tread depth 158
Profile, tires 157
Protective function, refer to
Pinch protection– Windows 34
R
Radio MINI Boost CD 122
Radio-operated key, refer to Remote control with
integrated key 22
Radio ready state 49
Radio ready state, switched off 50
Radio ready state, switched
on 49
Radio setting, refer to Radio ready state 49
Rain sensor 53
Range 61
Rear 37
Rear fog lamp, bulb replace‐ ment 175
Rear lamps, refer to Tail lamps 175
Rear seat backrests, folda‐ ble 98, 99
Rearview mirror, refer to Mir‐ rors 42
Rear window defroster 88, 91
Rear window, washing 55
Rear window wiper 55
Recirculated air mode 88, 90
Recommended tire brands 159
Releasing, refer to Unlock‐ ing 30
Remaining range for service,
refer to Service require‐
ments 64
Remaining range, refer to Range 61
Remote control– Battery replacement 32– Comfort Access 30– Malfunctions 26, 31
Remote control, removing
from the ignition lock 49
Remote control, service data 169
Remote control, universal 92
Replacement remote con‐ trol 22
Replacing wheels/tires 159
Reporting safety defects 9
Reserve warning, refer to Fuel gauge 60
Reservoir for washer fluid, re‐ fer to Washer fluid reser‐
voir 55
Restraining systems
– Refer to Safety belts 38
Restraint systems for chil‐
dren 44
Retreaded tires 159
Reverse gear, manual trans‐ mission 56
Roadside Assistance 180
Roadside parking lamp, bulb replacement 173
Roadside parking lamps 68
RON gasoline quality 150
RON, refer to Fuel quality 150
RPM, refer to Engine data 204
Rubber seals, care 188
Run-flat tires 160
Run-flat tires
– Flat tire 76
Run-flat tires, tire inflation
pressure 152
Running lights, refer to Park‐ ing lamps/low beams 67
S
Safe braking 111
Safety 7
Safety belts 38
Safety belts– Damage 41– Rear center safety belt 39
Safety belts, care 189
Safety belts, indicator/warning lamp 41
Safety belts, reminder 41
Safety systems
– Safety belts 38
Safety systems, airbags 72
Saving fuel 118
Seat adjustment 37
Seat adjustment
– Manual 36
Seat belts
– Refer to Safety belts 38
Seat heating 38
Seats
– Adjusting 36– Heating 38– Sitting safely 36
Selector lever, automatic
transmission with Step‐
tronic 57
Selector lever lock, overrid‐ ing 58
Selector lever lock, refer to Changing selector lever posi‐
tions, Shiftlock 57
Selector lever positions, auto‐ matic transmission with
Steptronic 57
Service and warranty 8
Service data in the remote control 169
Service interval display, refer to Condition Based Service
CBS 169
Service interval display, refer to Service requirements 64
Service requirements 64
Seite 214ReferenceEverything from A to Z214
Online Edition for Part no. 01 40 2 911 521 - VI/13