buttons MINI Countryman 2016 (Mini Connected) User Guide
[x] Cancel search | Manufacturer: MINI, Model Year: 2016, Model line: Countryman, Model: MINI Countryman 2016Pages: 282, PDF Size: 6.79 MB
Page 105 of 282

Interior equipmentVehicle features and op‐
tions
This chapter describes all standard, country-
specific and optional features offered with the
series. It also describes features that are not
necessarily available in your car, e. g., due to
the selected options or country versions. This
also applies to safety-related functions and sys‐
tems.
When using the features and systems described
here, adhere to local regulations.
Universal garage door
opener
The concept
The universal garage door opener can be used
to operate up to 3 functions in remote-control‐
led systems, such as garage door drives or
lighting systems. The universal garage door
opener replaces up to 3 different hand-held
transmitters. To operate it, the buttons on the
interior rearview mirror must be programmed
for the desired functions. The hand-held trans‐
mitter for the system is needed for the pro‐
gramming procedure.
WARNING
Body parts can be jammed when operat‐
ing remote-controlled systems, e.g. the garage
door, using the universal garage door opener.
There is risk of injuries or risk of property dam‐
age. Make sure that the area of movement of
the respective system is clear during program‐
ming and operation. Also follow the safety in‐
structions of the hand-held transmitter. ◀
Before selling the vehicle, delete the stored
functions for security reasons.Compatibility
If this symbol is printed on the packag‐
ing or in the operating instructions of
the system being operated, the system
is generally compatible with the universal ga‐
rage door opener.
If you have any questions, please contact:▷A dealer’s service center or another quali‐
fied service center or repair shop.▷www.homelink.com on the Internet.
HomeLink is a registered trademark of the
Gentex Corporation.
Controls on the interior rearview mirror
1LED2Buttons3Hand-held transmitter, required for pro‐
gramming.
Programming
General information
1.Switch on the ignition.2.Initial setup:
Press the right and left buttons on the inte‐
rior rearview mirror simultaneously for ap‐
prox. 20 seconds until the LED on the inte‐
rior rearview mirror begins to flash. AllSeite 105Interior equipmentCONTROLS105
Online Edition for Part no. 01 40 2 964 459 - VI/15
Page 106 of 282

programmed settings of the buttons on the
interior rearview mirror are deleted.3.Hold the hand-held transmitter of the sys‐
tem to be operated a distance of approx. 1
to 3 in/2.5 to 8 cm away from the buttons
on the interior rearview mirror. The re‐
quired distance depends on the particular
hand-held transmitter.4.Press the button of the desired function on
the hand-held transmitter and the button
being programmed on the interior rearview
mirror simultaneously and hold. The LED on
the interior rearview mirror flashes slowly at
first.5.When the LED flashes more rapidly, release
both buttons. Rapid flashing indicates that
the button on the interior rearview mirror
has been programmed.
If the LED does not flash faster after 60 sec‐
onds, change the distance between the in‐
terior rearview mirror and the hand-held
transmitter and repeat the step. Multiple
trials at different distances may be neces‐
sary. Wait at least 15 seconds between tri‐
als.6.To program additional functions on other
buttons, repeat steps 3 to 5.
The systems can be operated with the buttons
on the interior rearview mirror.
Special characteristics of alternating-
code radio systems
If the system cannot be operated after re‐
peated programming, check whether the sys‐
tem to be operated uses an alternating-code
system.
Read the operating instructions of the system
or press and hold the programmed button on
the interior rearview mirror. If the LED on the
interior rearview mirror flashes rapidly at first
and then lights up continuously for 2 seconds,
the system is equipped with an alternating-
code system. This flashing LED pattern repeats
itself for approx. 20 seconds.
In systems with an alternating-code system, the
universal garage door opener and the system
must be additionally synchronized.
Please obtain additional information on syn‐
chronization in the operating instructions of the
system being set up.
The systems will be easier to synchronize with
the aid of a second person.
Synchronization:1.Park the vehicle within range of the re‐
mote-controlled system.2.Program the corresponding button on the
interior rearview mirror as described.3.Identify and press the synchronization but‐
ton on the system being set up. You have
approx. 30 seconds for the next step.4.Press and hold the button on the interior
rearview mirror for approx. 3 seconds and
then release it. Repeat this step up to three
times if necessary to complete the synchro‐
nization procedure. When synchronization
is completed, the programmed function is
executed.
Reprogramming individual buttons
1.Switch on the ignition.2.Hold the hand-held transmitter at a dis‐
tance of approx. 1 to 3 in/2.5 to 8 cm from
the memory buttons.
The required distance depends on the par‐
ticular hand-held transmitter.3.Press the memory button of the universal
garage door opener.4.If the LED flashes slowly after approx.
20 seconds, press the transmit button on
the hand-held transmitter.5.Release both buttons when the LED flashes
rapidly.
If the LED does not flash rapidly after ap‐
prox. 60 seconds, change the distance and
repeat the step.Seite 106CONTROLSInterior equipment106
Online Edition for Part no. 01 40 2 964 459 - VI/15
Page 107 of 282

Canada: if the LED does not flash rapidly af‐
ter approx. 60 seconds, change the dis‐
tance and repeat the step. If programming
was aborted by the hand-held transmitter,
hold down the memory button and press
and release the button on the hand-held
transmitter several times for 2 seconds.
Controls
WARNING
Body parts can be jammed when operat‐
ing remote-controlled systems, e.g. the garage
door, using the universal garage door opener.
There is risk of injuries or risk of property dam‐
age. Make sure that the area of movement of
the respective system is clear during program‐
ming and operation. Also follow the safety in‐
structions of the hand-held transmitter. ◀
The system, such as the garage door, can be
operated using the button on the interior rear‐
view mirror with the engine running or the igni‐
tion switched on. When you are within the re‐
ception range of the system, press and hold the
button until the function is initiated. The LED on
the interior rearview mirror lights up continu‐
ously while the radio signal is being transmit‐
ted.
Deleting stored functions
Press the right and left buttons on the interior
rearview mirror simultaneously for approx.
20 seconds until the LED flashes rapidly. All
stored functions are deleted. The functions can‐
not be deleted individually.
Sun visor Glare protection
Folding down
Fold the sun visor down.
Folding up
Fold the sun visor up.
Glare protection from the side
Folding down1.Fold the sun visor down.2.Detach from the holder and pivot sideways
to the side window.
Folding up
To close the sun visor, proceed in reverse order.
Vanity mirror A vanity mirror is located behind a cover on
each sun visor.
To open, fold the cover up.
Depending on the vehicle equipment, mirror
lighting comes on when the cover is opened.
Digital compass
1Adjustment button on the back of the mir‐
ror2Display
The display shows the main or secondary com‐
pass direction in which the vehicle is traveling.
Operating concept
Various functions can be called up by pressing
the adjustment button with a pointed object
such as a pen. The following adjustment op‐
tions are displayed one after the other, de‐
Seite 107Interior equipmentCONTROLS107
Online Edition for Part no. 01 40 2 964 459 - VI/15
Page 157 of 282

3.Select the desired station.
Selecting the waveband using the
button on the radio
Press the button repeatedly until the
desired waveband is displayed.
Changing the station Turn and press the MINI joystick
or
Press the button
or
Press the buttons on the steering wheel.
All saved stations are stored for the remote
control currently in use.
Storing a station
1."Radio"2."FM" or "AM"3.Highlight the desired station.4.Press the MINI joystick.5.Select the desired memory location.Press and hold the MINI joystick to store a sta‐
tion that is displayed in the station list but is not
being played.
The stations are stored for the remote control
currently in use.
Selecting a station manually Station selection via the frequency.1."Radio"2."FM" or "AM"3."Manual"4.To select a frequency: turn the MINI joy‐
stick.
To save a station: press and hold the
MINI joystick.
RDS
RDS broadcasts additional information, such as
the station name, in the FM wave band.
Switching the RDS on/off
1."Radio"2."FM"Seite 157RadioENTERTAINMENT157
Online Edition for Part no. 01 40 2 964 459 - VI/15
Page 160 of 282

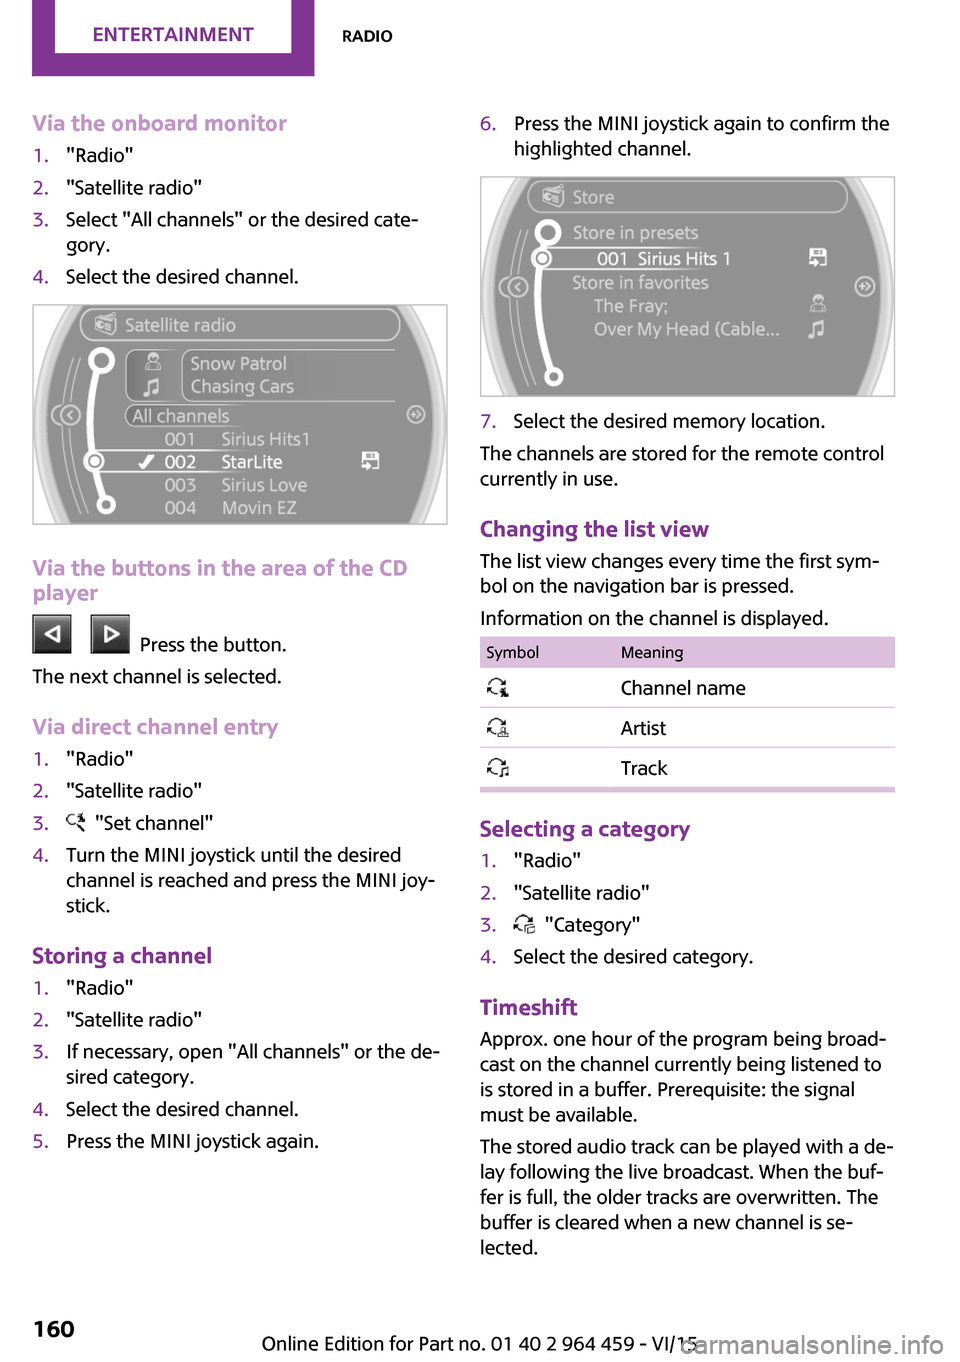
Via the onboard monitor1."Radio"2."Satellite radio"3.Select "All channels" or the desired cate‐
gory.4.Select the desired channel.
Via the buttons in the area of the CD
player
Press the button.
The next channel is selected.
Via direct channel entry
1."Radio"2."Satellite radio"3. "Set channel"4.Turn the MINI joystick until the desired
channel is reached and press the MINI joy‐
stick.
Storing a channel
1."Radio"2."Satellite radio"3.If necessary, open "All channels" or the de‐
sired category.4.Select the desired channel.5.Press the MINI joystick again.6.Press the MINI joystick again to confirm the
highlighted channel.7.Select the desired memory location.
The channels are stored for the remote control
currently in use.
Changing the list view
The list view changes every time the first sym‐
bol on the navigation bar is pressed.
Information on the channel is displayed.
SymbolMeaning Channel name Artist Track
Selecting a category
1."Radio"2."Satellite radio"3. "Category"4.Select the desired category.
Timeshift Approx. one hour of the program being broad‐
cast on the channel currently being listened to is stored in a buffer. Prerequisite: the signal
must be available.
The stored audio track can be played with a de‐
lay following the live broadcast. When the buf‐ fer is full, the older tracks are overwritten. The
buffer is cleared when a new channel is se‐
lected.
Seite 160ENTERTAINMENTRadio160
Online Edition for Part no. 01 40 2 964 459 - VI/15
Page 170 of 282

Not all categories need to be selected. For
example, if all of the tracks by a certain ar‐
tist are to be displayed, call up that artist
only. All of the tracks by that artist are then
displayed.7."Play"
Restarting a track search
"New search"
Playback lists Calling up playback lists.
1."CD/Multimedia"2."External devices"3.Select the or symbol.4."Playlists"
Current playback
List of tracks currently being played.
1."CD/Multimedia"2."External devices"3.Select the or symbol.4."Current playback"
Random playback The current list of tracks is played back in ran‐
dom order.
1."CD/Multimedia"2."External devices"3.Open "Options".4."Random"
Fast forward/reverse
Buttons on the steering wheel or on the CD
player:
Press and hold the button for the
corresponding direction.
Video playback
Overview
Video playback is only possible with a compati‐
ble iPod/iPhone. Connect using a video-capable
adapter cable or, if applicable, a snap-in
adapter.
Playback
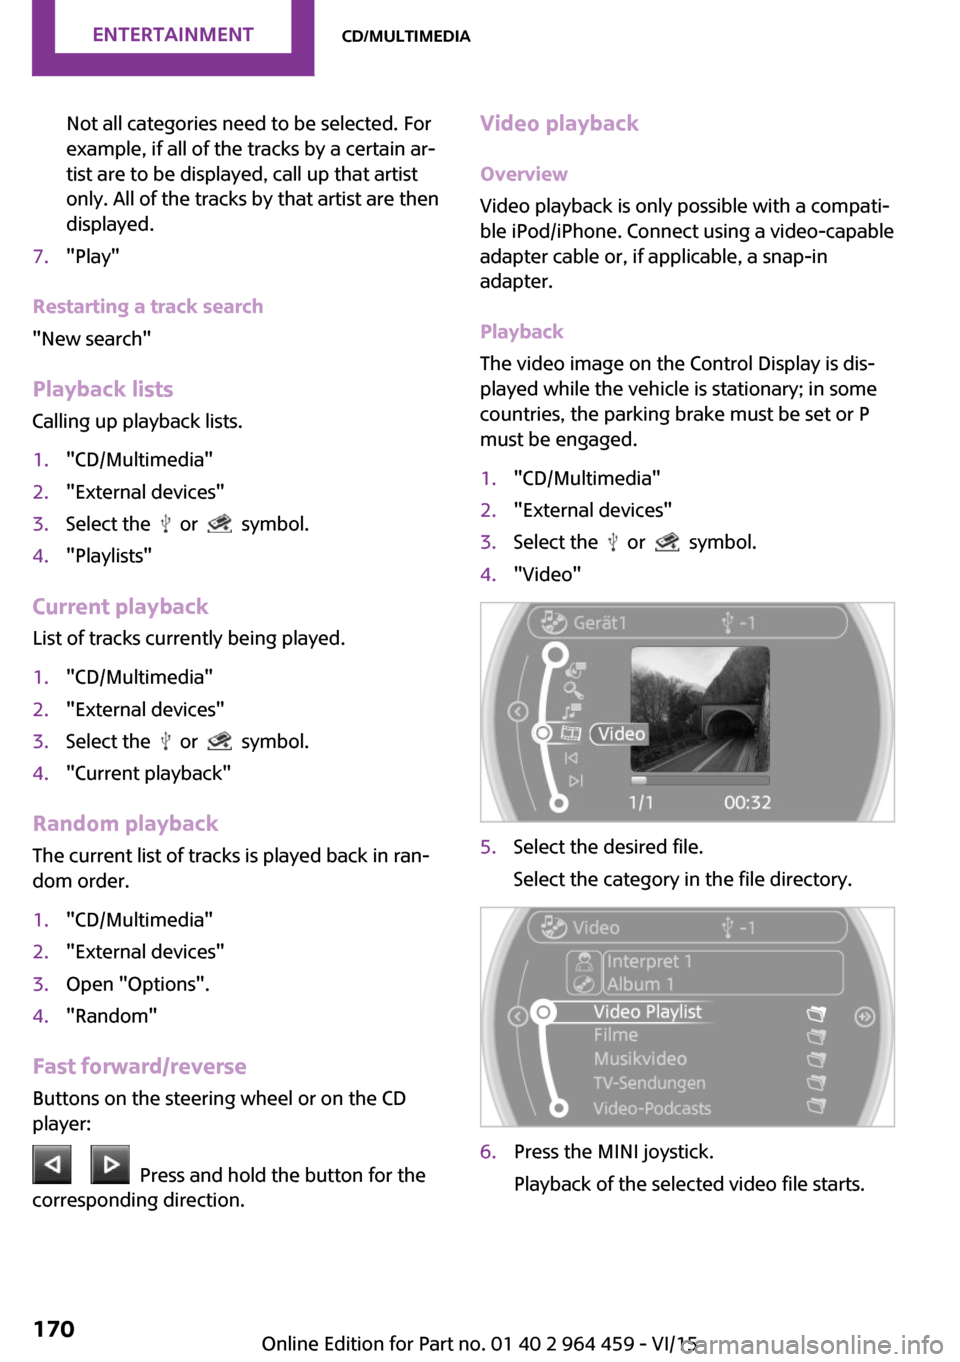
The video image on the Control Display is dis‐
played while the vehicle is stationary; in some
countries, the parking brake must be set or P
must be engaged.1."CD/Multimedia"2."External devices"3.Select the or symbol.4."Video"5.Select the desired file.
Select the category in the file directory.6.Press the MINI joystick.
Playback of the selected video file starts.Seite 170ENTERTAINMENTCD/multimedia170
Online Edition for Part no. 01 40 2 964 459 - VI/15
Page 174 of 282

6."Audio"7."OK"
In the case of a mobile phone, only the audio
connection is disconnected. All other connec‐
tions are retained.
Unpairing a device
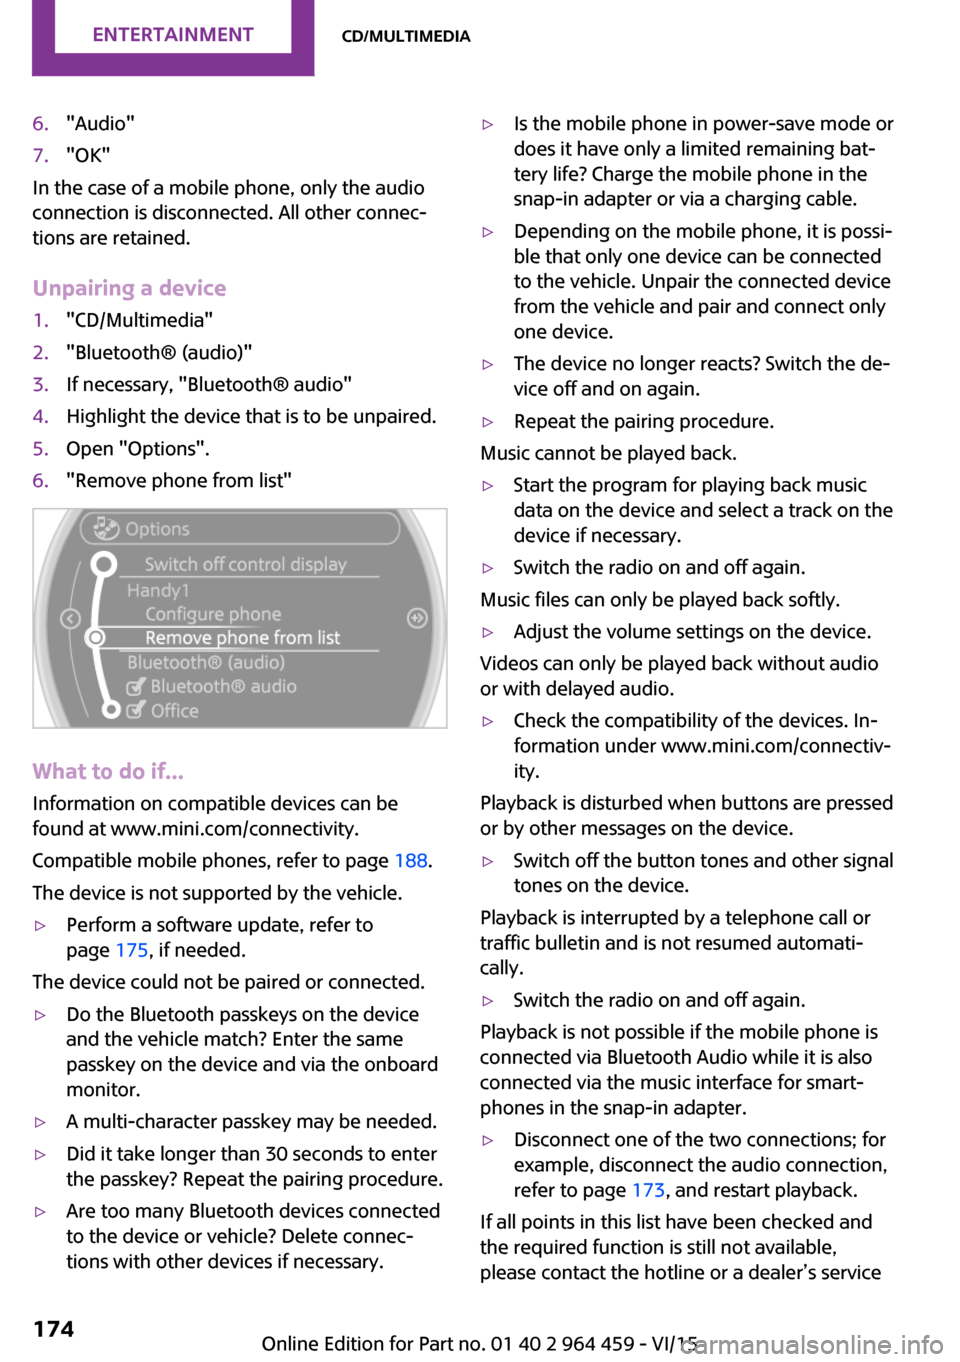
1."CD/Multimedia"2."Bluetooth® (audio)"3.If necessary, "Bluetooth® audio"4.Highlight the device that is to be unpaired.5.Open "Options".6."Remove phone from list"
What to do if...
Information on compatible devices can be
found at www.mini.com/connectivity.
Compatible mobile phones, refer to page 188.
The device is not supported by the vehicle.
▷Perform a software update, refer to
page 175, if needed.
The device could not be paired or connected.
▷Do the Bluetooth passkeys on the device
and the vehicle match? Enter the same
passkey on the device and via the onboard
monitor.▷A multi-character passkey may be needed.▷Did it take longer than 30 seconds to enter
the passkey? Repeat the pairing procedure.▷Are too many Bluetooth devices connected
to the device or vehicle? Delete connec‐
tions with other devices if necessary.▷Is the mobile phone in power-save mode or
does it have only a limited remaining bat‐
tery life? Charge the mobile phone in the
snap-in adapter or via a charging cable.▷Depending on the mobile phone, it is possi‐
ble that only one device can be connected
to the vehicle. Unpair the connected device
from the vehicle and pair and connect only
one device.▷The device no longer reacts? Switch the de‐
vice off and on again.▷Repeat the pairing procedure.
Music cannot be played back.
▷Start the program for playing back music
data on the device and select a track on the
device if necessary.▷Switch the radio on and off again.
Music files can only be played back softly.
▷Adjust the volume settings on the device.
Videos can only be played back without audio
or with delayed audio.
▷Check the compatibility of the devices. In‐
formation under www.mini.com/connectiv‐
ity.
Playback is disturbed when buttons are pressed
or by other messages on the device.
▷Switch off the button tones and other signal
tones on the device.
Playback is interrupted by a telephone call or
traffic bulletin and is not resumed automati‐
cally.
▷Switch the radio on and off again.
Playback is not possible if the mobile phone is
connected via Bluetooth Audio while it is also
connected via the music interface for smart‐
phones in the snap-in adapter.
▷Disconnect one of the two connections; for
example, disconnect the audio connection,
refer to page 173, and restart playback.
If all points in this list have been checked and
the required function is still not available,
please contact the hotline or a dealer’s service
Seite 174ENTERTAINMENTCD/multimedia174
Online Edition for Part no. 01 40 2 964 459 - VI/15
Page 178 of 282

Bluetooth hands-free systemVehicle features and op‐
tions
This chapter describes all standard, country-
specific and optional features offered with the
series. It also describes features that are not
necessarily available in your car, e. g., due to
the selected options or country versions. This
also applies to safety-related functions and sys‐
tems.
When using the features and systems described
here, adhere to local regulations.
Overview The concept
Mobile phones can be connected with the vehi‐
cle via Bluetooth.
Bluetooth® is a registered trademark of Blue‐
tooth® SIG, Inc.
After these devices are paired once, they are
recognized automatically when the ignition is
switched on as soon as they are in the vehicle
and can then be operated via the onboard
monitor, using the buttons on the steering
wheel, and via voice activation.
Up to four external devices can be paired.
Certain functions may need to be enabled by
the mobile phone provider or service provider.
WARNING
Operating the integrated information sys‐
tem and communication devices while driving
can distract from traffic. It is possible to lose
control of the vehicle. There is risk of an acci‐
dent. Only use the systems or devices when the
traffic situation allows. If necessary stop and
use the systems and devices while the vehicle is
stationary. ◀Compatible mobile phones
Details on which mobile phones are supported
by the hands-free system can be obtained at
www.mini.com/connectivity.
Displaying the vehicle identification number and software part number
The vehicle identification number and softwarepart number are needed to determine which
mobile phones are supported by the mobile
phone preparation package. The software ver‐
sion of the mobile phone may also be required.1."Telephone"2.Open "Options".3."Bluetooth® info"4."Display system information"
These compatible mobile phones, with a cer‐
tain software version, support the vehicle func‐
tions described below.
Malfunctions may occur with other mobile
phones or software versions.
Do not operate a mobile phone that is con‐
nected to the vehicle on the mobile phone key‐
pad, as this may lead to a malfunction.
InformationAt high temperatures, the charging function of
the mobile phone may be limited and functions
may not be executed.
When using the mobile phone via the vehicle,
note the operating instructions of the mobile
phone.
Seite 178COMMUNICATIONBluetooth hands-free system178
Online Edition for Part no. 01 40 2 964 459 - VI/15
Page 188 of 282

Bluetooth mobile phone
preparation packageVehicle features and op‐
tions
This chapter describes all standard, country-
specific and optional features offered with the
series. It also describes features that are not
necessarily available in your car, e. g., due to
the selected options or country versions. This
also applies to safety-related functions and sys‐
tems.
When using the features and systems described
here, adhere to local regulations.
Overview
The concept
Mobile phones or other external devices such
as audio players can be connected to the vehi‐
cle via Bluetooth.
Bluetooth® is a registered trademark of Blue‐
tooth® SIG, Inc.
After these devices are paired once, they are
recognized automatically when the ignition is
switched on as soon as they are in the vehicle
and can then be operated via the onboard
monitor, using the buttons on the steering
wheel, and via voice activation.
Depending on their functionality, external devi‐
ces can be used via the vehicle as a telephone
or as an audio source. The telephone functions
are described in the following. Operating the
audio functions, refer to page 171.
Up to four external devices can be paired.
Certain functions may need to be enabled by
the mobile phone provider or service provider.WARNING
Operating the integrated information sys‐
tem and communication devices while driving
can distract from traffic. It is possible to lose
control of the vehicle. There is risk of an acci‐
dent. Only use the systems or devices when the
traffic situation allows. If necessary stop and
use the systems and devices while the vehicle is
stationary. ◀
Snap-in adapter
The snap-in adapter is used to:▷Hold the mobile phone.▷Recharge the battery.▷Connect the mobile phone to an outside
antenna of the vehicle.
This provides for better network reception
and consistent sound quality.
Compatible mobile phones
Displaying the vehicle identification
number and software part number
The vehicle identification number and software
part number are needed to determine which
mobile phones are supported by the mobile
phone preparation package. The software ver‐
sion of the mobile phone may also be required.
1."Telephone"2.Open "Options".3."Bluetooth® info"4."Display system information"
These compatible mobile phones, with a cer‐
tain software version, support the vehicle func‐
tions described below.
Malfunctions may occur with other mobile
phones or software versions.
Seite 188COMMUNICATIONBluetooth mobile phone preparation package188
Online Edition for Part no. 01 40 2 964 459 - VI/15
Page 198 of 282

Saving an entry in the contacts1.Highlight the entry.2.Open "Options".3."Store as new contact" or "Add to existing
contact"4.Select the contact if necessary.5.Select the type of number: "Home",
"Business", "Mobile" or "Other"6.Complete the entries if necessary.7."Store contact"
Snap-in adapter
General information For more information about snap-in adapters
that support the functions of the mobile phone
in a compatible way, contact a dealer's service
center or another qualified service center or re‐
pair shop.
Information At high temperatures, the charging function of
the mobile phone may be limited and functions
may not be executed.
When using the mobile phone via the vehicle,
note the operating instructions of the mobile
phone.
Installation position
In the center armrest.
Inserting/removing the snap-in adapter1.Press the button, arrow 1, and remove the
cover, arrow 2.2.Insert the snap-in adapter at the front, ar‐
row 1, and press down, arrow 2, until it en‐
gages.
To remove:
To remove the snap-in adapter, press the but‐
ton.
Inserting the mobile phone
1.Depending on the mobile phone, remove
the protective cap from the antenna con‐
nector and from the USB connection of the
mobile phone.2.With the buttons facing up, slide the mobile
phone up toward the electrical contacts, ar‐Seite 198COMMUNICATIONBluetooth mobile phone preparation package198
Online Edition for Part no. 01 40 2 964 459 - VI/15