head light bulbs MINI Countryman 2016 Owner's Manual
[x] Cancel search | Manufacturer: MINI, Model Year: 2016, Model line: Countryman, Model: MINI Countryman 2016Pages: 223, PDF Size: 5.52 MB
Page 175 of 223

3.Press the wiper blade against the stop to
push it out of the fixation.4.Press the new wiper blade into the fixation
until it engages audibly.5.Fold down the wiper arm.
Lamp and bulb replace‐
ment
Information
Lamps and bulbs Lamps and bulbs make an essential contribu‐
tion to vehicle safety. Therefore, exercise cau‐
tion when handling lights and bulbs.
The vehicle manufacturer recommends that
you have the necessary work performed by a
dealer’s service center or another qualified
service center or repair shop if you are unfami‐
liar with it or it is not described here.
A spare lamp box is available from a dealer’s
service center or another qualified service cen‐
ter or repair shop.
WARNING
Bulbs can get hot during operation. Con‐
tact with the bulbs can cause burns. There is
risk of injuries. Only change bulbs after they
have cooled off. ◀
WARNING
Work on switched-on lighting systems
can cause short circuits. There is risk of injuries
or risk of property damage. When working on
the lighting system, switch off the lamps in
question. If necessary, heed the bulb manufac‐
turer's instructions. ◀
CAUTION
Contaminated bulbs reduce their service
life. There is risk of property damage. Do not
hold new bulbs with your bare hands. Use a
clean cloth or something similar, or hold the
bulb by its base. ◀
Caring for the headlights, refer to page 191.
For bulb replacement procedures that are not
described here, contact a dealer’s service cen‐
ter or another qualified service center or repair
shop.
For checking and adjusting headlamp aim, con‐
tact a dealer’s service center or another quali‐
fied service center or repair shop.
Light-emitting diodes LEDs In some equipment, the light source is provided
by light-emitting diodes behind a cover.
These light-emitting diodes, which operate us‐
ing a concept similar to that applied in conven‐
tional lasers, are designated as Class 1 light-
emitting diodes.
WARNING
Too intensive brightness can irritate or
damage the retina of the eye. There is risk of
injuries. Do not look directly into the headlights
or other light sources for an extended period of
time. Do not remove the LED covers. ◀
Headlight glass
Condensation can form on the inside of the ex‐
ternal lights in cool or humid weather. When
you drive with the lights switched on, the con‐
densation evaporates after a short time. The
headlight glass does not need to be changed.
If despite driving with the lights switched on,
increasing humidity forms, e. g. water droplets
in the lamp, the manufacturer of your vehicle
recommends having it checked by a dealer’s
service center or another qualified service cen‐
ter or repair shop.
Bi-xenon headlights
These bulbs have a very long life and the likeli‐
hood of failure is very low, provided that they
are not switched on and off excessively. If a
bulb should nevertheless fail, you can continueSeite 175Replacing componentsMOBILITY175
Online Edition for Part no. 01 40 2 964 433 - VI/15
Page 176 of 223

driving cautiously with the front fog lights, pro‐
vided this is permitted by local laws.
DANGER
There can be high voltage in the lighting
system. There is danger to life. The manufac‐
turer of your vehicle recommends that the
work on the lighting system including bulb re‐
placement be performed by a dealer’s service
center or another qualified service center or re‐
pair shop. ◀
Front lights, bulb replacement
Overview
Headlights1Low beams/high-beams2Turn signal
Lower front lights
1Parking lights2Daytime running lights or fog lightsLower LED front lights1Parking lights / daytime running lights2Fog lights
Halogen low beams and high-beams
H13 bulb, 60/55 watt
Access to the bulbs through the engine
compartment
Follow the general instructions on lamps and
bulbs, refer to page 175.
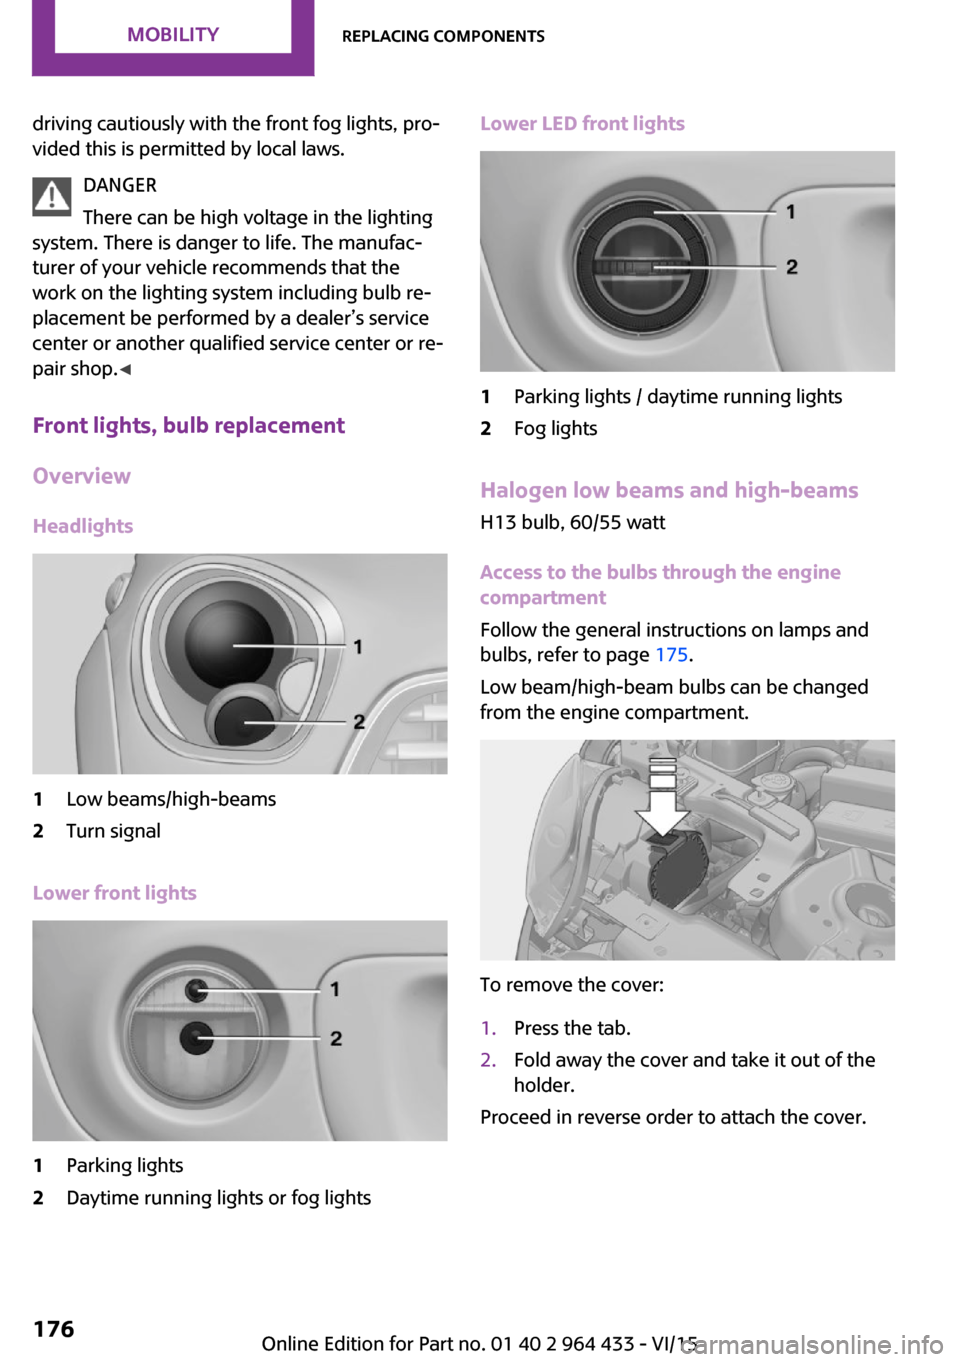
Low beam/high-beam bulbs can be changed
from the engine compartment.
To remove the cover:
1.Press the tab.2.Fold away the cover and take it out of the
holder.
Proceed in reverse order to attach the cover.
Seite 176MOBILITYReplacing components176
Online Edition for Part no. 01 40 2 964 433 - VI/15