MINI Coupe 2012 Owner's Manual
Manufacturer: MINI, Model Year: 2012, Model line: Coupe, Model: MINI Coupe 2012Pages: 218, PDF Size: 3.84 MB
Page 161 of 218
MOBILITYMaintenance
160
Socket for On-Board
Diagnosis OBD
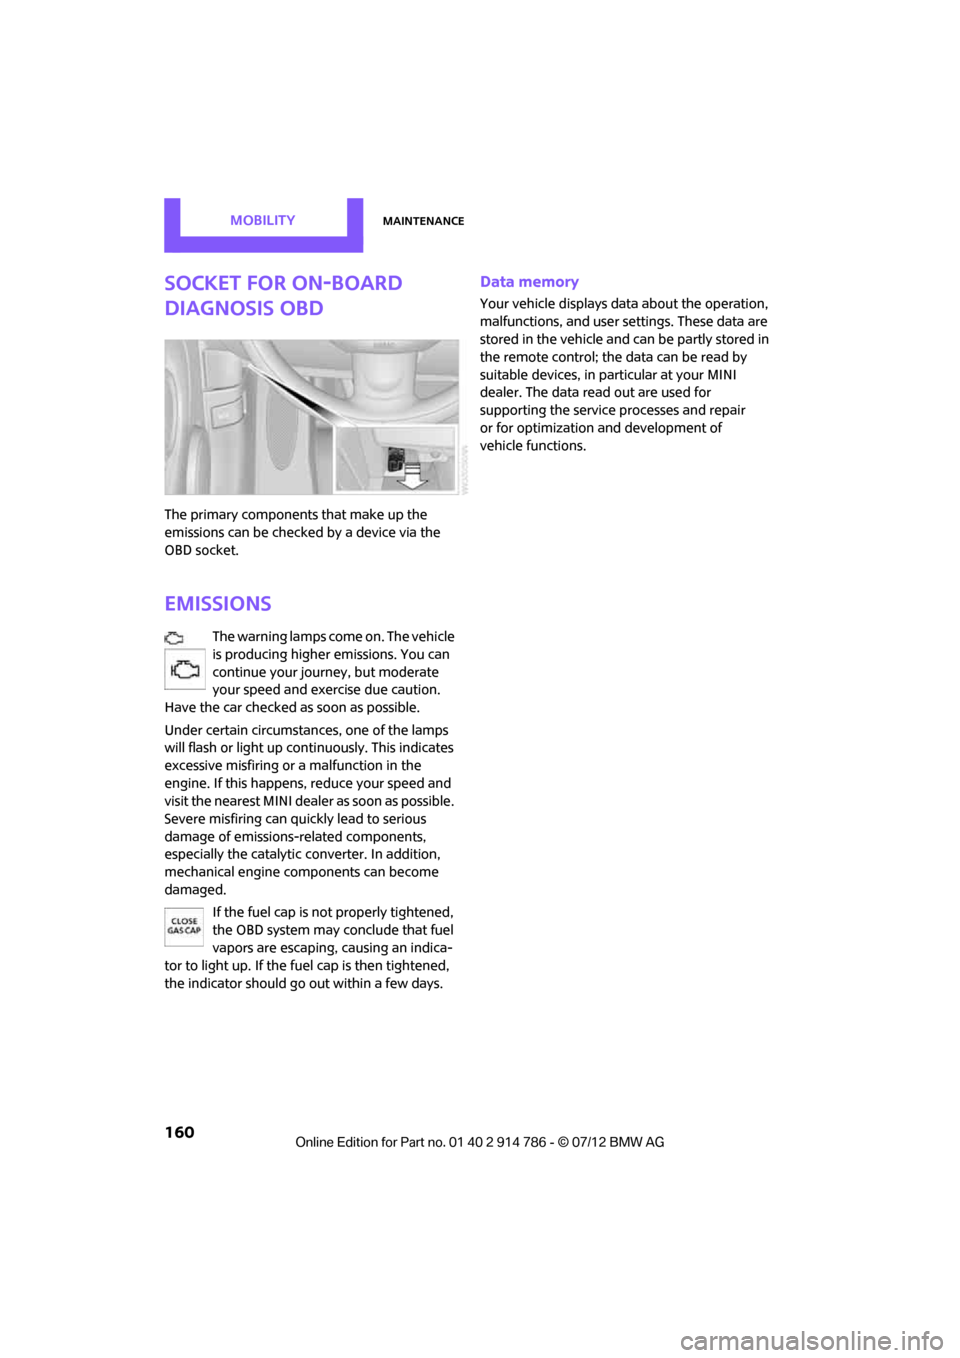
The primary components that make up the
emissions can be checked by a device via the
OBD socket.
Emissions
The warning lamps come on. The vehicle
is producing higher emissions. You can
continue your journey, but moderate
your speed and exercise due caution.
Have the car checked as soon as possible.
Under certain circumstances, one of the lamps
will flash or light up cont inuously. This indicates
excessive misfiring or a malfunction in the
engine. If this happens, reduce your speed and
visit the nearest MINI dealer as soon as possible.
Severe misfiring can quickly lead to serious
damage of emissions-related components,
especially the catalytic converter. In addition,
mechanical engine components can become
damaged.
If the fuel cap is not properly tightened,
the OBD system may conclude that fuel
vapors are escaping, causing an indica-
tor to light up. If the fuel cap is then tightened,
the indicator should go out within a few days.
Data memory
Your vehicle displays data about the operation,
malfunctions, and user settings. These data are
stored in the vehicle and can be partly stored in
the remote control; the data can be read by
suitable devices, in pa rticular at your MINI
dealer. The data read out are used for
supporting the service processes and repair
or for optimization and development of
vehicle functions.
Online Edition for Part no. 01 40 2 914 786 - \251 07/12 BMW AG
Page 162 of 218
CareMOBILITY
161
Care
Vehicle equipment
In this chapter, all production, country, and
optional equipment that is offered in the model
range is described. Equipment is also described
that is not available because of, for example,
selected options or count ry version. This also
applies to safety related functions and systems.
Car-care products
Regular cleaning and care helps to maintain the
value of your MINI.
The manufacturer of your MINI recommends
using manufacturer-approved products to clean
and care for your vehicle.
Your MINI dealer would be pleased to advise
you on cleaning and care products and services
for your MINI.
The ingredients of original MINI Care
Products have been tested, and the
products have been tested in the laboratory
and in practice. They offer optimum care and
protection for your vehicle. <
Do not use any cleansers containing
alcohol or solvents as these may cause
damage. <
Cleaning agents may contain hazardous
or health-damaging substances. Follow
the warning and hazard instructions on the
packaging. For interior cleaning, always open
the doors or windows of the vehicle.
Do not use any products that are not intended
for cleaning the vehicle. <
External care
Washing your vehicle
Especially during the winter months the
vehicle should be frequently washed. Dirt
and road salt can damage the vehicle.<
After washing the vehicle, apply the
brakes briefly to dry them; otherwise,
water can reduce braking efficiency over the
short term and the brake rotors can corrode. <
Car washes
Preference should be given to cloth car washes.
Do not use automatic high-pressure car
washes; otherwise, water may drip into
the vehicle around the windows. <
Before driving into the car wash, check if the
system is suitable for your MINI. Observe the
following points:
> Vehicle dimensions, page 197.
> If necessary: fold in the outside mirrors,
page 49.
> Maximum permissible tire width.
Avoid car washes with tracks higher than
4 in/10 cm; otherwise, the chassis could
be damaged. <
Preparations for driving into the car wash:
> Unscrew the rod antenna.
> MINI Coupe, MINI Roadster: retract spoiler.
> Deactivate the rain sensor to prevent
unintentional wiping.
> Remove additional attachments, e.g.
spoilers or telephone antennas, if there is
a possibility that they could be damaged.
> Insert the remote control into the ignition
lock.
Online Edition for Part no. 01 40 2 914 786 - \251 07/12 BMW AG
Page 163 of 218
MOBILITYCare
162
Automatic transmission
Before driving into the car wash, make sure that
the vehicle can roll:
1.Place the remote control, even with Comfort
Access, in the ignition lock.
2. Move the selector lever to position N.
3. Release the parking brake.
4. Switch off the engine.
5. Insert the remote control in the ignition lock
so that the vehicle can roll.
Steam jets/high-pressure washers
When using steam jets or high-pressure
washers, make sure that you maintain
sufficient distance from the vehicle and do not
exceed a maximum temperature of 140 7/
60 6 .
If the distance is too close, the pressure too high,
or the temperature too high, parts of the vehicle
can be damaged, or water can penetrate.
Observe the operating instructions for high-
pressure washers. <
Do not spray sensors, such as the Park
Distance Control, with high-pressure
washers for a long time or at a distance of less
than 1 ft/30 cm. <
Manual washing
Use a great deal of water and, if necessary, car
shampoo when washing your car by hand. Clean
the vehicle with a sponge or a washing brush
applying a slight amount of pressure.
Before cleaning the windshield, deacti-
vate the rain sensor or turn off the ignition
to prevent unintentional wiping. <
Observe local regulations regarding
washing vehicles by hand. <
Headlamps
Do not wipe dry and do not use abrasive or
corrosive cleaning agents. Remove dirt and
contamination, such as in sects, by soaking with
shampoo and then washing with plenty of
water. Do not remove accumulated ice and snow with
an ice scraper; use window deicers instead.
Windows
Clean the outside and inside of the windows and
mirrors with a window cleaner.
Do not clean the mirrors with cleaners
containing quartz. <
Wiper blades
Clean with soapy water and change regularly to
prevent the formation of streaks.
Wax, preservatives and dirt on the
windows cause streaks when the wind-
shield wipers are on, and can cause premature
wear of the wiper blades and interfere with the
rain sensor. <
Care of the convertible top
The appearance and service life of the conver-
tible top largely depends on its proper care and
operation.
Please follow these instructions:
>Never attempt to fold and stow the conver-
tible top in the convertible compartment
when the top is wet or frozen. Otherwise,
water stains, mildew, and chafe marks may
occur.
> If water spots occur on the inside headliner
despite precautions, remove them using a
microfiber cloth and interior cleaner.
> If the vehicle is parked in an enclosed area
for a longer period of time, make sure that
there is sufficient ventilation.
> Remove any bird droppings immediately,
since they have corrosive properties which
will corrode the conver tible top and damage
the rubber seals.
When attempting to remove stains from
the convertible top, do not use spot
removers, paint thinners, solvents, gasoline, or
similar fluids. These cleaners may damage the
rubber seals. The improper care or cleaning
methods may cause the convertible top and its
seams to leak. <
Online Edition for Part no. 01 40 2 914 786 - \251 07/12 BMW AG
Page 164 of 218
CareMOBILITY
163
Use special convertible top cleaning agents if
attempting to remove heavy stains.
Always read and foll ow the manufacturer's
instructions.
Use an impregnating agent to treat the conver-
tible top once a year.
MINI Coupe, MINI Roadster: rear spoiler
compartment
So that the operation of the rear spoiler is not
compromised, e.g., by leaves, snow or ice, clean
the rear spoiler compartment at regular inter-
vals.
Paintwork, care
Regular care helps your vehicle retain its value
and protects the paint from the long-term
effects of aggre ssive substances.
Environmental influences in areas with
increased air pollution or natural contaminants,
such as tree sap or pollen, can affect the vehicle
paintwork. It is therefor e important to adjust the
frequency and extent of vehicle care corre-
spondingly.
Immediately remove any pa rticularly aggressive
substances, such as fuel that has overflowed, oil,
grease, brake fluid, or bi rd droppings; otherwise,
paint damage can be caused.
Removing paintwork damage
Depending on the severity of the damage,
immediately repair stone damage or
scratches to prevent rusting. <
The manufacturer of the MINI recommends
repairing paint damage pr ofessionally according
to factory specifications with original MINI
paints.
Preservation
Preservation is necessary when water no longer
beads on the clean paint surface. To preserve
the paint, only use preservatives that contain
carnauba or synthetic waxes.
Rubber seals
Only treat with water or rubber care products.
Do not use silicon spra ys or other silicon-
containing care products on rubber seals;
otherwise, noise and damage could occur. <
Chrome parts
Carefully clean vehicle parts such as the radiator
grill and door handles with copious quantities of
water and, if necessary, a shampoo additive,
especially when contaminated with road salt.
For additional treatment, use chrome polish.
Light alloy wheels
The system produces brake dust that collects on
the light alloy wheels. Clean them regularly with
acid-free wheel cleaner.
Do not use aggressive, acid-containing,
highly alkaline, or abrasive cleansers or
steam jets hotter than 140 7/60 6 as they may
cause damage. <
External sensors
Keep the outside sensors on the vehicle
such as the Park Di stance Control clean
and ice-free to ensure that they function
properly. <
Internal care
Upholstery/fabrics
Regularly use a vacuum cleaner to remove
surface dirt.
In case of serious spots such as liquid stains, use
a soft sponge or lint-free microfiber cloth and
suitable interior cleane rs. Observe the instruc-
tions on the packaging.
Clean upholstery up to the seams. Do not
rub forcefully. <
Velcro fasteners on pants or other items of
clothing can damage seat covers. Make
sure that all Velcro fasteners are closed. <
Online Edition for Part no. 01 40 2 914 786 - \251 07/12 BMW AG
Page 165 of 218
MOBILITYCare
164
Leather/leather coverings
The leather processed by the manufac-
turer of your MINI is a high-quality natural
product. Light variations in the grain is one of
the typical properties of natural leather. <
Dust and road grit in th e pores and folds of the
leather have an abrasive effect, leading to
increased wear and causing the leather surface
to become brittle prematurely. Use a cloth or
vacuum cleaner to remo ve dust on a regular
basis.
Especially when the leather has a light color, it
should be cleaned regularl y since it tends to get
heavily soiled.
Treat the leather twice a year using a leather
lotion since dirt and grease will gradually attack
the leather's protective layer.
Carpets/floor mats
Keep floor mats, carpet, and other objects
out of the movement range of the pedals;
otherwise, they may inhibit the function of the
pedals during driving.
Do not place additional floor mats onto an
existing one or onto other objects.
Only use floor mats that have been approved for
the vehicle and can be appropriately fastened.
Make sure that the fl oor mats are securely
fastened again after they have been removed,
e.g. for cleaning. <
Floor mats can be removed to be cleaned.
If the carpets are very dirty, clean with a micro-
fiber cloth and water or an interior cleaner.
When doing so, rub forw ard and back in the
driving direction; othe rwise, the carpet may
become matted.
Interior plastic parts
These include:
> Plastic surfaces
> Lamp glass
> Display panes
> Mat parts Only clean with water and, if necessary, solvent-
free plastic cleaners.
Do not use solvents such as alcohol,
lacquer thinner, cold cleaners, fuel, or
similar, as these will damage the surfaces. <
Decorative strips
Only clean decorative strips and fine wood parts
with damp cloths. Wipe dry with a soft cloth.
Safety belts
Dirty belt straps impede the reeling action and
thus have a negative impact on safety.
Do not clean chemically, as this may
destroy the webbing. <
Displays
To clean displays, such as the radio or display
elements, use an anti-static microfiber cloth.
Avoid pressing too hard when cleaning
the display as this can cause damage. <
Do not use chemical or abrasive house-
hold cleaning agents. Keep fluids of any
kind away from the device. Surfaces or electrical
components may otherwise become corroded
or damaged. <
CD/DVD drives
Do not use cleaning CDs as this could
damage parts of the drive. <
Vehicle storage
If you park your vehicle longer than three
months, ask your MINI dealer to advise you.
Online Edition for Part no. 01 40 2 914 786 - \251 07/12 BMW AG
Page 166 of 218
Replacing componentsMOBILITY
165
Replacing components
Vehicle equipment
In this chapter, all production, country, and
optional equipment that is offered in the model
range is described. Equipment is also described
that is not available because of, for example,
selected options or count ry version. This also
applies to safety related functions and systems.
Toolkit
Your vehicle comes with a toolkit that varies
with the equipment version; it is stored under-
neath the flat load floor.
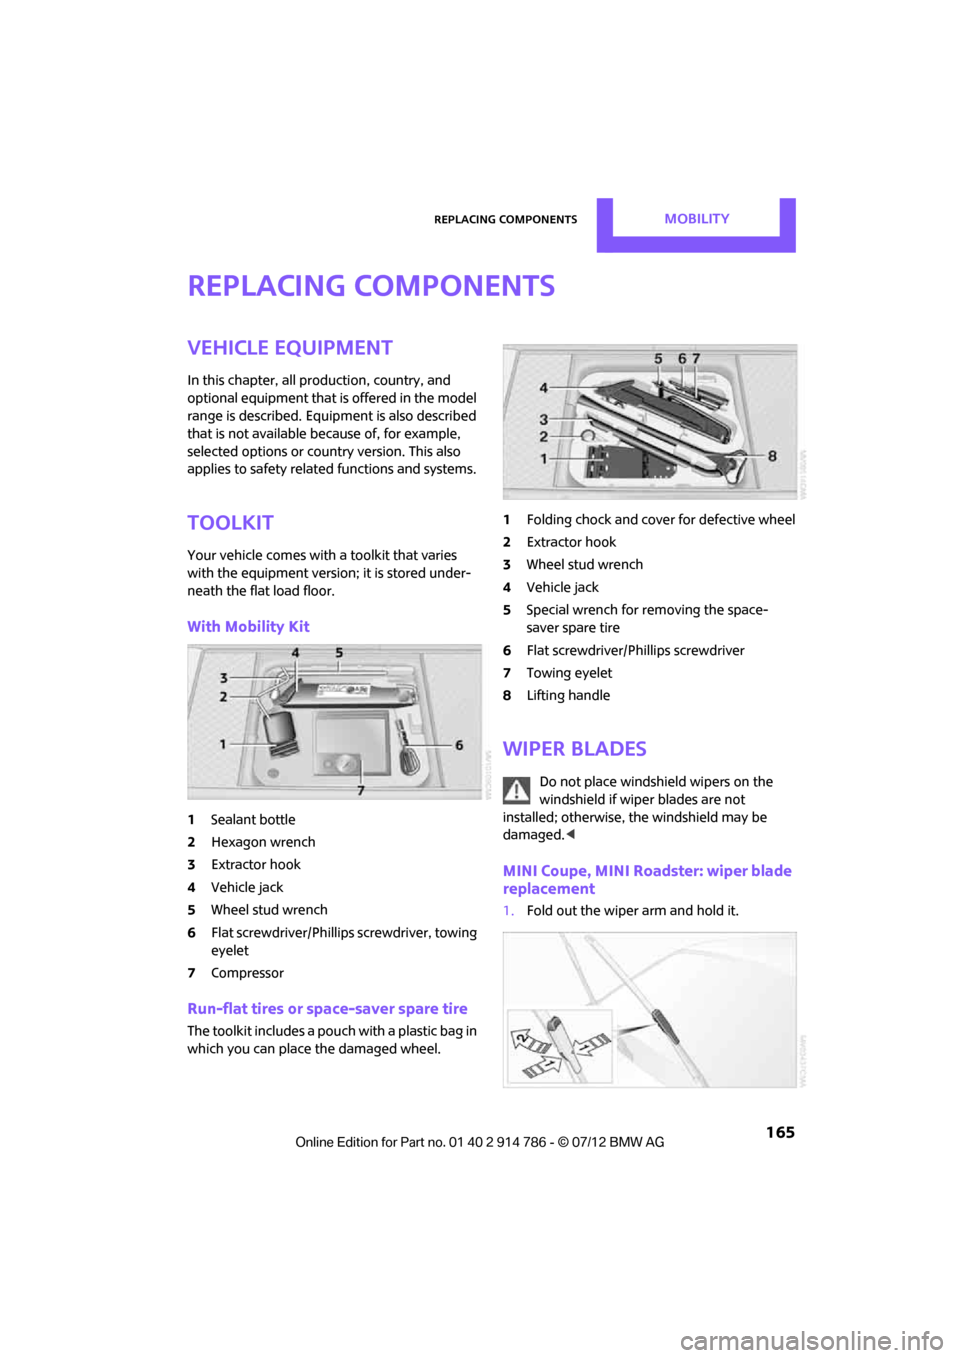
With Mobility Kit
1 Sealant bottle
2 Hexagon wrench
3 Extractor hook
4 Vehicle jack
5 Wheel stud wrench
6 Flat screwdriver/Phillips screwdriver, towing
eyelet
7 Compressor
Run-flat tires or space-saver spare tire
The toolkit includes a pouch with a plastic bag in
which you can place the damaged wheel. 1
Folding chock and cove r for defective wheel
2 Extractor hook
3 Wheel stud wrench
4 Vehicle jack
5 Special wrench for removing the space-
saver spare tire
6 Flat screwdriver/Phillips screwdriver
7 Towing eyelet
8 Lifting handle
Wiper blades
Do not place windshield wipers on the
windshield if wiper blades are not
installed; otherwise, the windshield may be
damaged. <
MINI Coupe, MINI Roadster: wiper blade
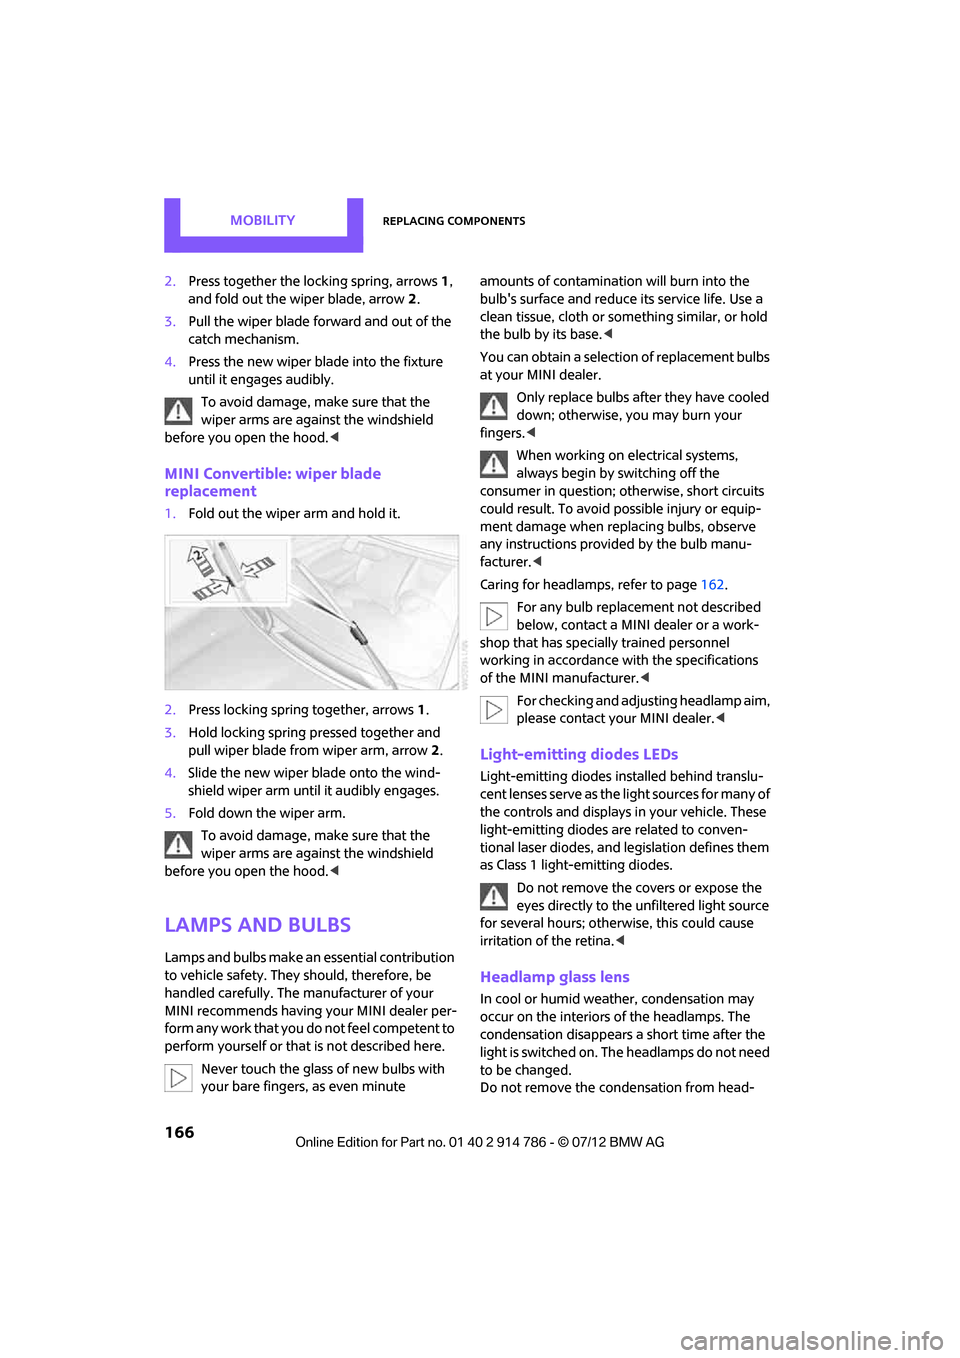
replacement
1.Fold out the wiper arm and hold it.
Online Edition for Part no. 01 40 2 914 786 - \251 07/12 BMW AG
Page 167 of 218
MOBILITYReplacing components
166
2.Press together the lo cking spring, arrows1,
and fold out the wiper blade, arrow 2.
3. Pull the wiper blade forward and out of the
catch mechanism.
4. Press the new wiper blade into the fixture
until it engages audibly.
To avoid damage, make sure that the
wiper arms are against the windshield
before you open the hood. <
MINI Convertible: wiper blade
replacement
1.Fold out the wiper arm and hold it.
2. Press locking spring together, arrows1.
3. Hold locking spring pressed together and
pull wiper blade from wiper arm, arrow 2.
4. Slide the new wiper blade onto the wind-
shield wiper arm until it audibly engages.
5. Fold down the wiper arm.
To avoid damage, make sure that the
wiper arms are against the windshield
before you open the hood. <
Lamps and bulbs
Lamps and bulbs make an essential contribution
to vehicle safety. They should, therefore, be
handled carefully. The manufacturer of your
MINI recommends having your MINI dealer per-
form any work that you do not feel competent to
perform yourself or that is not described here.
Never touch the glass of new bulbs with
your bare fingers, as even minute amounts of contaminatio
n will burn into the
bulb's surface and reduce its service life. Use a
clean tissue, cloth or some thing similar, or hold
the bulb by its base. <
You can obtain a selectio n of replacement bulbs
at your MINI dealer.
Only replace bulbs after they have cooled
down; otherwise, you may burn your
fingers. <
When working on electrical systems,
always begin by switching off the
consumer in question; ot herwise, short circuits
could result. To avoid possible injury or equip-
ment damage when replacing bulbs, observe
any instructions provided by the bulb manu-
facturer. <
Caring for headlamp s, refer to page162.
For any bulb replacement not described
below, contact a MINI dealer or a work-
shop that has specia lly trained personnel
working in accordance wi th the specifications
of the MINI manufacturer. <
For checking and adjusting headlamp aim,
please contact your MINI dealer. <
Light-emitting diodes LEDs
Light-emitting diodes installed behind translu-
cent lenses serve as the light sources for many of
the controls and displays in your vehicle. These
light-emitting diodes are related to conven-
tional laser diodes, and legislation defines them
as Class 1 light-emitting diodes.
Do not remove the covers or expose the
eyes directly to the unfiltered light source
for several hours; otherw ise, this could cause
irritation of the retina. <
Headlamp glass lens
In cool or humid weather, condensation may
occur on the interiors of the headlamps. The
condensation disappears a short time after the
light is switched on. The headlamps do not need
to be changed.
Do not remove the condensation from head-
Online Edition for Part no. 01 40 2 914 786 - \251 07/12 BMW AG
Page 168 of 218
Replacing componentsMOBILITY
167
lamps, despite driving with lights on, and if
condensation increases, e.g., because of water
droplets, have this checked by your MINI dealer.
Xenon lamps
The service life of these bulbs is very long and
the probability of failure very low, provided that
they are not switched on and off an excessive
number of times. If a xenon lamp fails neverthe-
less, switch on the fog lamps and continue the
journey with great care, provided that local
legislation does not prohibit this.
Work on the xenon lighting system,
including lamp replacem ent, is only to be
carried out only by your MINI dealer. Due to high
voltage, there is a risk of fatal injury if work on
the xenon lamps is carried out improperly. <
Halogen low beams and high beams
H13 bulb, 60/55 watts
The H13 bulb is pressurized. Therefore,
wear safety glasses an d protective gloves.
Otherwise, there is a risk of injury if the bulb is
damaged. <
Be careful when inst alling the cover;
otherwise, leaks co uld occur and cause
damage to the headlamp system. <
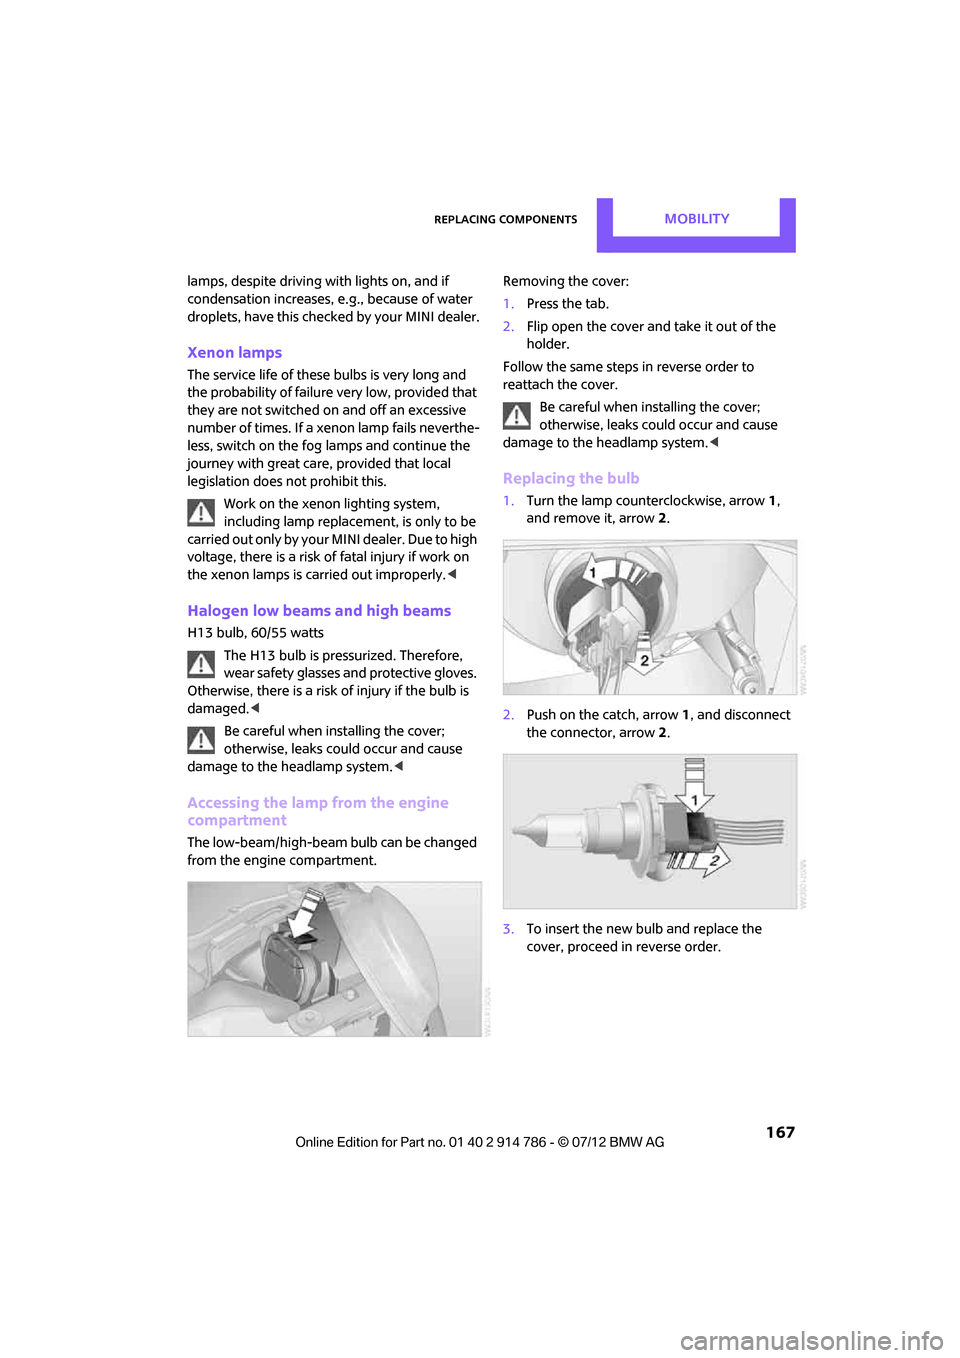
Accessing the lamp from the engine
compartment
The low-beam/high-beam bulb can be changed
from the engine compartment. Removing the cover:
1.
Press the tab.
2. Flip open the cover and take it out of the
holder.
Follow the same steps in reverse order to
reattach the cover. Be careful when inst alling the cover;
otherwise, leaks could occur and cause
damage to the headlamp system. <
Replacing the bulb
1.Turn the lamp counterclockwise, arrow 1,
and remove it, arrow 2.
2. Push on the catch, arrow 1, and disconnect
the connector, arrow 2.
3. To insert the new bulb and replace the
cover, proceed in reverse order.
Online Edition for Part no. 01 40 2 914 786 - \251 07/12 BMW AG
Page 169 of 218
MOBILITYReplacing components
168
Turn signals, parking lamps, roadside
parking lamps, and fog lamps
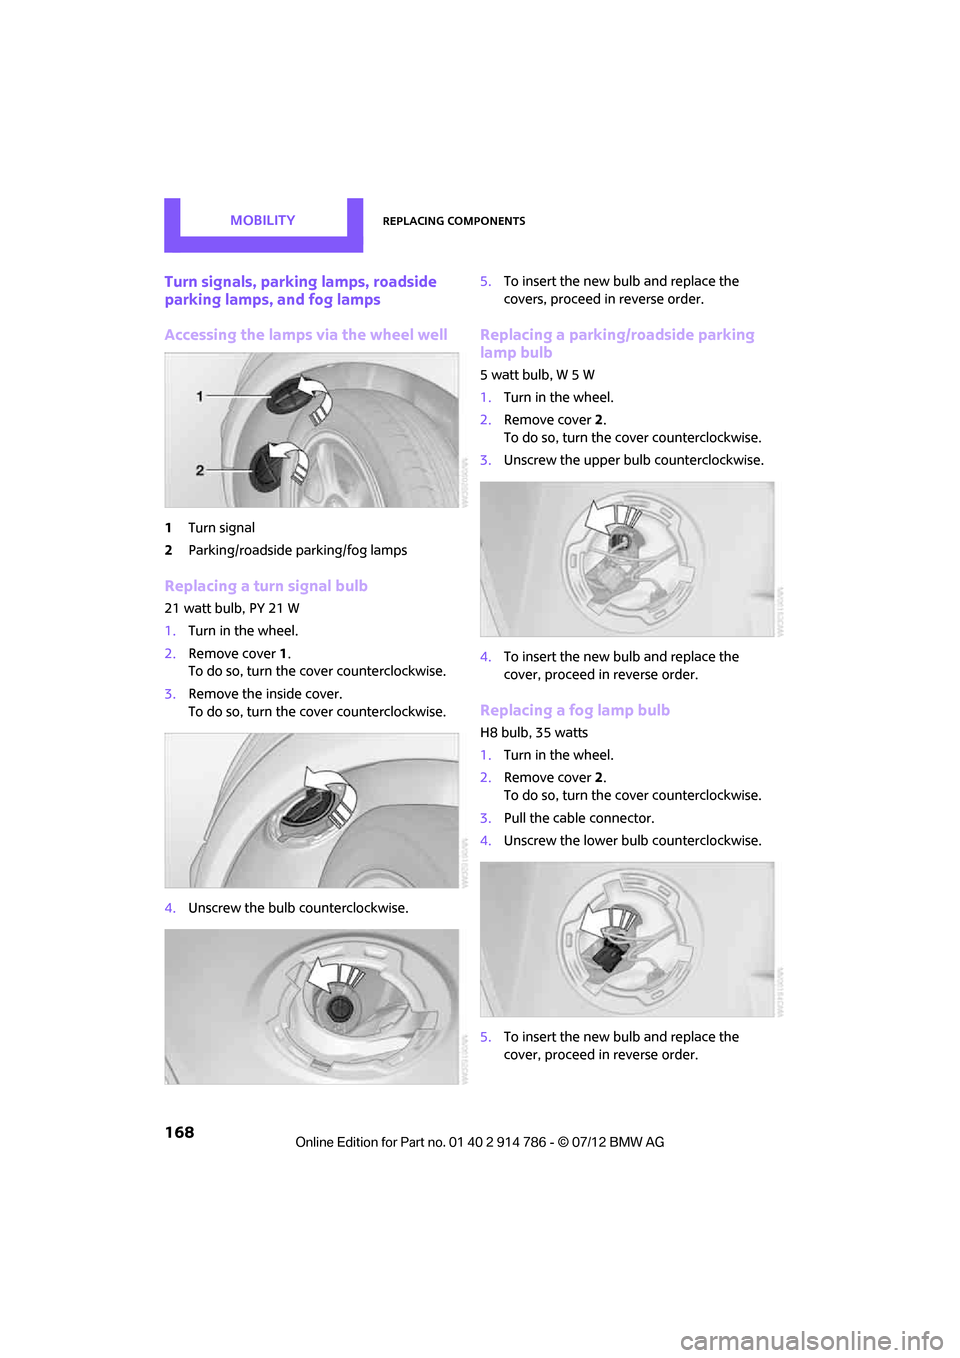
Accessing the lamps via the wheel well
1Turn signal
2 Parking/roadside parking/fog lamps
Replacing a turn signal bulb
21 watt bulb, PY 21 W
1.Turn in the wheel.
2. Remove cover 1.
To do so, turn the cover counterclockwise.
3. Remove the inside cover.
To do so, turn the cover counterclockwise.
4. Unscrew the bulb counterclockwise. 5.
To insert the new bulb and replace the
covers, proceed in reverse order.
Replacing a parking/roadside parking
lamp bulb
5 watt bulb, W 5 W
1.Turn in the wheel.
2. Remove cover 2.
To do so, turn the cover counterclockwise.
3. Unscrew the upper bulb counterclockwise.
4. To insert the new bulb and replace the
cover, proceed in reverse order.
Replacing a fog lamp bulb
H8 bulb, 35 watts
1.Turn in the wheel.
2. Remove cover 2.
To do so, turn the cover counterclockwise.
3. Pull the cable connector.
4. Unscrew the lower bulb counterclockwise.
5. To insert the new bulb and replace the
cover, proceed in reverse order.
Online Edition for Part no. 01 40 2 914 786 - \251 07/12 BMW AG
Page 170 of 218
Replacing componentsMOBILITY
169
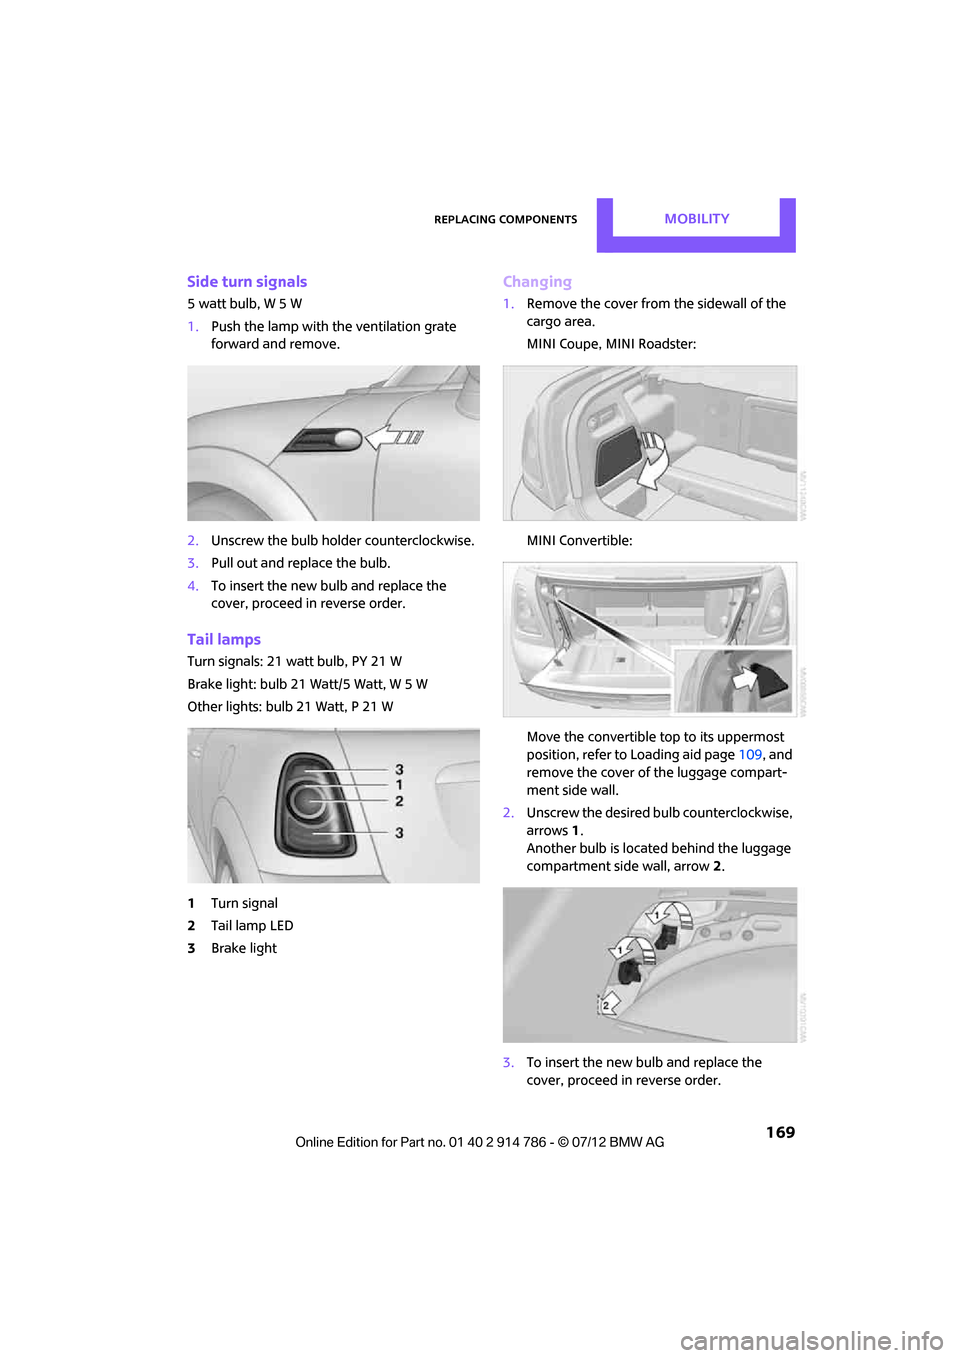
Side turn signals
5watt bulb, W5W
1.Push the lamp with the ventilation grate
forward and remove.
2. Unscrew the bulb holder counterclockwise.
3. Pull out and replace the bulb.
4. To insert the new bulb and replace the
cover, proceed in reverse order.
Tail lamps
Turn signals: 21 watt bulb, PY 21 W
Brake light: bulb 21 Watt/5 Watt, W 5 W
Other lights: bulb 21 Watt, P 21 W
1Turn signal
2 Tail lamp LED
3 Brake light
Changing
1.Remove the cover from the sidewall of the
cargo area.
MINI Coupe, MINI Roadster:
MINI Convertible:
Move the convertible top to its uppermost
position, refer to Loading aid page 109, and
remove the cover of the luggage compart-
ment side wall.
2. Unscrew the desired bulb counterclockwise,
arrows 1.
Another bulb is located behind the luggage
compartment side wall, arrow 2.
3. To insert the new bulb and replace the
cover, proceed in reverse order.
Online Edition for Part no. 01 40 2 914 786 - \251 07/12 BMW AG