ESP MINI Coupe 2012 Owner's Guide
[x] Cancel search | Manufacturer: MINI, Model Year: 2012, Model line: Coupe, Model: MINI Coupe 2012Pages: 218, PDF Size: 3.84 MB
Page 92 of 218
LampsCONTROLS
91
High beams/
roadside parking lamps
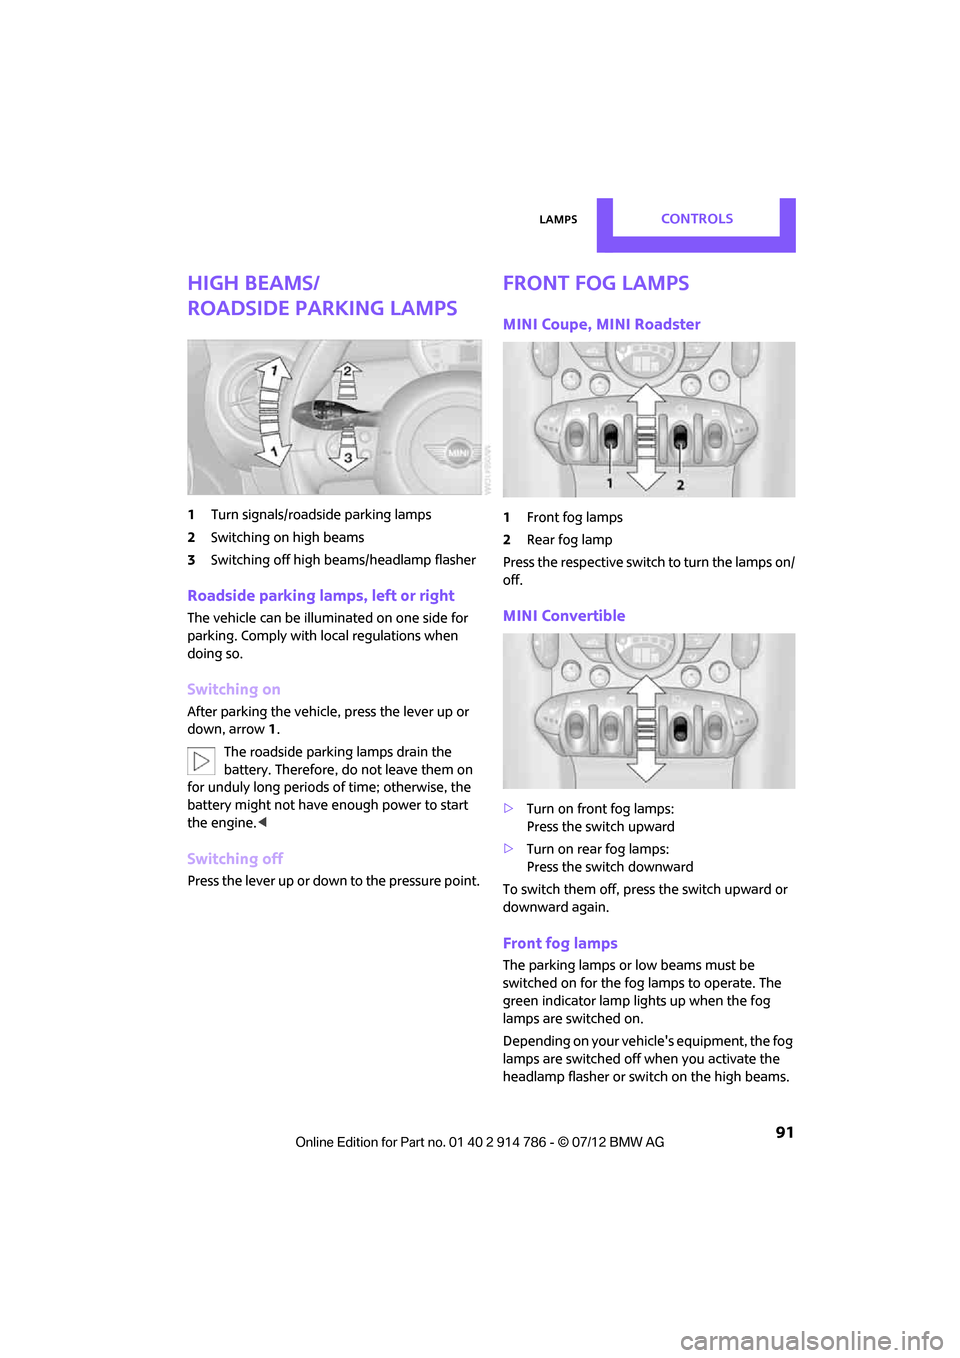
1Turn signals/roadside parking lamps
2 Switching on high beams
3 Switching off high be ams/headlamp flasher
Roadside parking lamps, left or right
The vehicle can be illumi nated on one side for
parking. Comply with local regulations when
doing so.
Switching on
After parking the vehicle, press the lever up or
down, arrow 1.
The roadside parking lamps drain the
battery. Therefore, do not leave them on
for unduly long periods of time; otherwise, the
battery might not have enough power to start
the engine. <
Switching off
Press the lever up or down to the pressure point.
Front fog lamps
MINI Coupe, MINI Roadster
1Front fog lamps
2 Rear fog lamp
Press the respective switch to turn the lamps on/
off.
MINI Convertible
> Turn on front fog lamps:
Press the switch upward
> Turn on rear fog lamps:
Press the switch downward
To switch them off, pre ss the switch upward or
downward again.
Front fog lamps
The parking lamps or low beams must be
switched on for the fog lamps to operate. The
green indicator lamp lights up when the fog
lamps are switched on.
Depending on your vehicle's equipment, the fog
lamps are switched off when you activate the
headlamp flasher or switch on the high beams.
Online Edition for Part no. 01 40 2 914 786 - \251 07/12 BMW AG
Page 94 of 218
LampsCONTROLS
93
To turn off, press the respective switch forward
again or back.
Ambient lighting
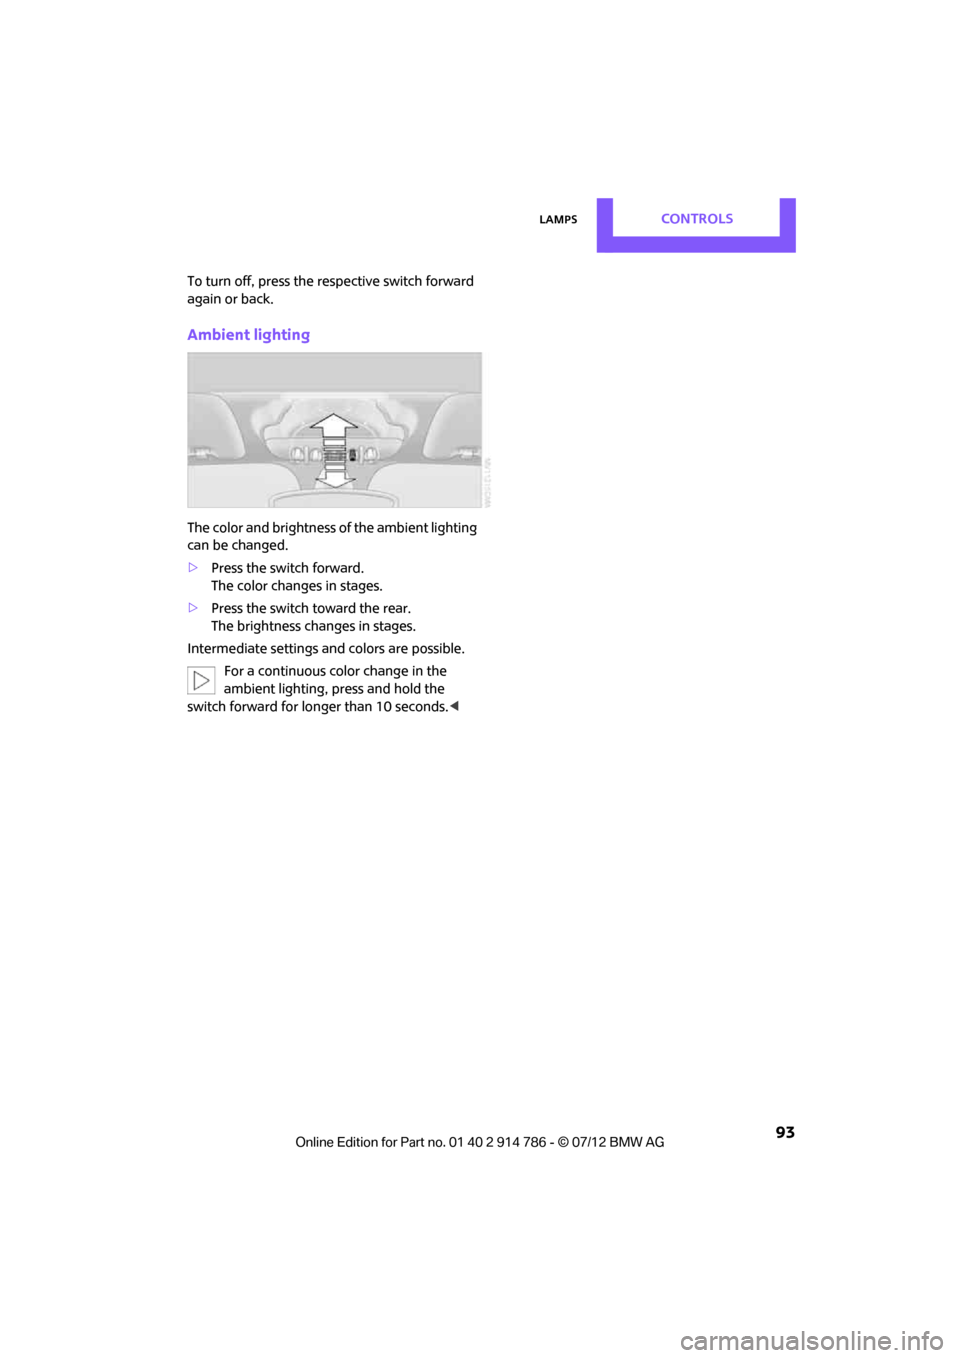
The color and brightness of the ambient lighting
can be changed.
>Press the switch forward.
The color changes in stages.
> Press the switch toward the rear.
The brightness changes in stages.
Intermediate settings and colors are possible. For a continuous color change in the
ambient lighting, press and hold the
switch forward for lo nger than 10 seconds. <
Online Edition for Part no. 01 40 2 914 786 - \251 07/12 BMW AG
Page 108 of 218
Things to remember when drivingDRIVING TIPS
107
Hot exhaust system
As in all vehicles, extremely high tempera-
tures are generated on the exhaust sys-
tem. Do not remove the heat shields installed
adjacent to various se ctions of the exhaust
system, and never apply undercoating to them.
Make sure that when driving, idling or when
parking, no easily flamma ble materials, such as
hay, leaves, grass, etc. come into contact with
the hot exhaust system. Such contact could lead
to a fire, with the risk of serious personal injuries
and property damage. Do not touch hot exhaust
tail pipes. Otherwise, there is a risk of burns. <
Hydroplaning
When driving on wet or slushy roads,
reduce road speed. If you do not, a wedge
of water can form betw een tires and road sur-
face. This situation, known as hydroplaning, can
cause partial or complete loss of tire contact
with the road surface, so that the car cannot be
steered or braked properly. <
The risk of hydroplaning increases with declining
tread depth on the tires, refer also to Tread
depth on page 151.
Driving through water
Drive through water on the road only if it is
not deeper than 1 ft/30 cm, and then only
at walking speed at the most. Otherwise, the
vehicle's engine, the electrical systems and the
transmission may be damaged. <
Parking brake on inclines
On inclines, do not hold the vehicle with
the clutch; use the parking brake. Other-
wise, greater clutch wear will result. <
For information on drivin g off using Hill Assist,
refer to page 78.
Braking safely
Your MINI is equipped with ABS. If you are in a
situation which requires full braking, it is best to
brake using maximum brake pressure. Since the
vehicle maintains steeri ng responsiveness, you can still avoid possible obstacles with a mini-
mum of steering effort.
The pulsation of the brake pedal, together with
the sound of hydraulic regulation, indicates that
ABS is functioning properly.
Objects in the movement range of the
pedals
Keep floor mats, carp
et, and other objects
out of the movement range of the pedals;
otherwise, they may inhi bit the function of the
pedals during driving.
Do not place additional floor mats onto an
existing one or onto other objects.
Only use floor mats that have been approved for
the vehicle and can be appropriately fastened.
Make sure that the fl oor mats are securely
fastened again after they have been removed,
e.g. for cleaning. <
Driving in wet conditions
When roads are wet or ther e is heavy rain, briefly
exert gentle pressure on the brake pedal every
few miles. Monitor traffic conditions to ensure
that this maneuver does not endanger other
road users. The heat generated in this process
helps dry the pads and rotors to ensure that.
Then full braking force will be immediately
available when it is needed.
Hills
To prevent overheatin g and the resulting
reduced efficiency of the brake system,
drive long or steep downhill gradients in the
gear in which the least braking is required. Even
light but consistent brake pressure can lead to
high temperatures, brake wear and possibly
even brake failure. <
You can increase the engine's braking effect by
shifting down, all the way to first gear if neces-
sary. This strategy helps you avoid placing
excessive loads on the brake system. Downshift-
ing in manual mo de of the automatic transmis-
sion, page 59.
Online Edition for Part no. 01 40 2 914 786 - \251 07/12 BMW AG
Page 109 of 218
DRIVING TIPSThings to remember when driving
108
Never drive with the clutch held down,
with the transmission in neutral or with
the engine switched off; otherwise, engine
braking action will not be present or there will be
no power assistance to the brakes or steering.
Never allow floor mats, carpets or any other
objects to protrude into the area around the
pedals; otherwise, pedal function could be
impaired. <
Corrosion on brake rotors
When the vehicle is driven only occasionally,
during extended periods when the vehicle is not
used at all, and in op erating conditions where
brake applications are less frequent, there is an
increased tendency for corrosion to form on
rotors, while contaminan ts accumulate on the
brake pads. This occurs because the minimum
pressure which must be exerted by the pads
during brake applications to clean the rotors is
not reached.
Should corrosion form on the brake rotors, the
brakes will tend to respond with a pulsating
effect that even extended application will fail to
cure.
When the vehicle is parked
Condensation forms while the automatic climate
control is in operation, and then exits under the
vehicle. Traces of condensed water under the
vehicle are therefore normal.
In the MINI Cooper S, the coolant pump may
continue to run for some time after the engine is
switched off. This will generate noise in the
engine compartment.
Cargo loading
To avoid loading the tires beyond their
approved carrying ca pacity, never over-
load the vehicle. Overloading can lead to over-
heating and increases the rate at which damage
develops inside the tires. The ultimate result can
assume the form of a sudden blowout.
<
MINI Coupe: cargo area cover
Do not place any objects on the cover;
otherwise, they could endanger the car's
occupants, e.g. in the case of braking or sudden
swerving, or they may damage the cover. <
Your MINI Coupe is equipped with two cargo
area covers. When you open the tailgate, the
rear cargo area cover is raised.
The cargo area covers can be removed
individually.
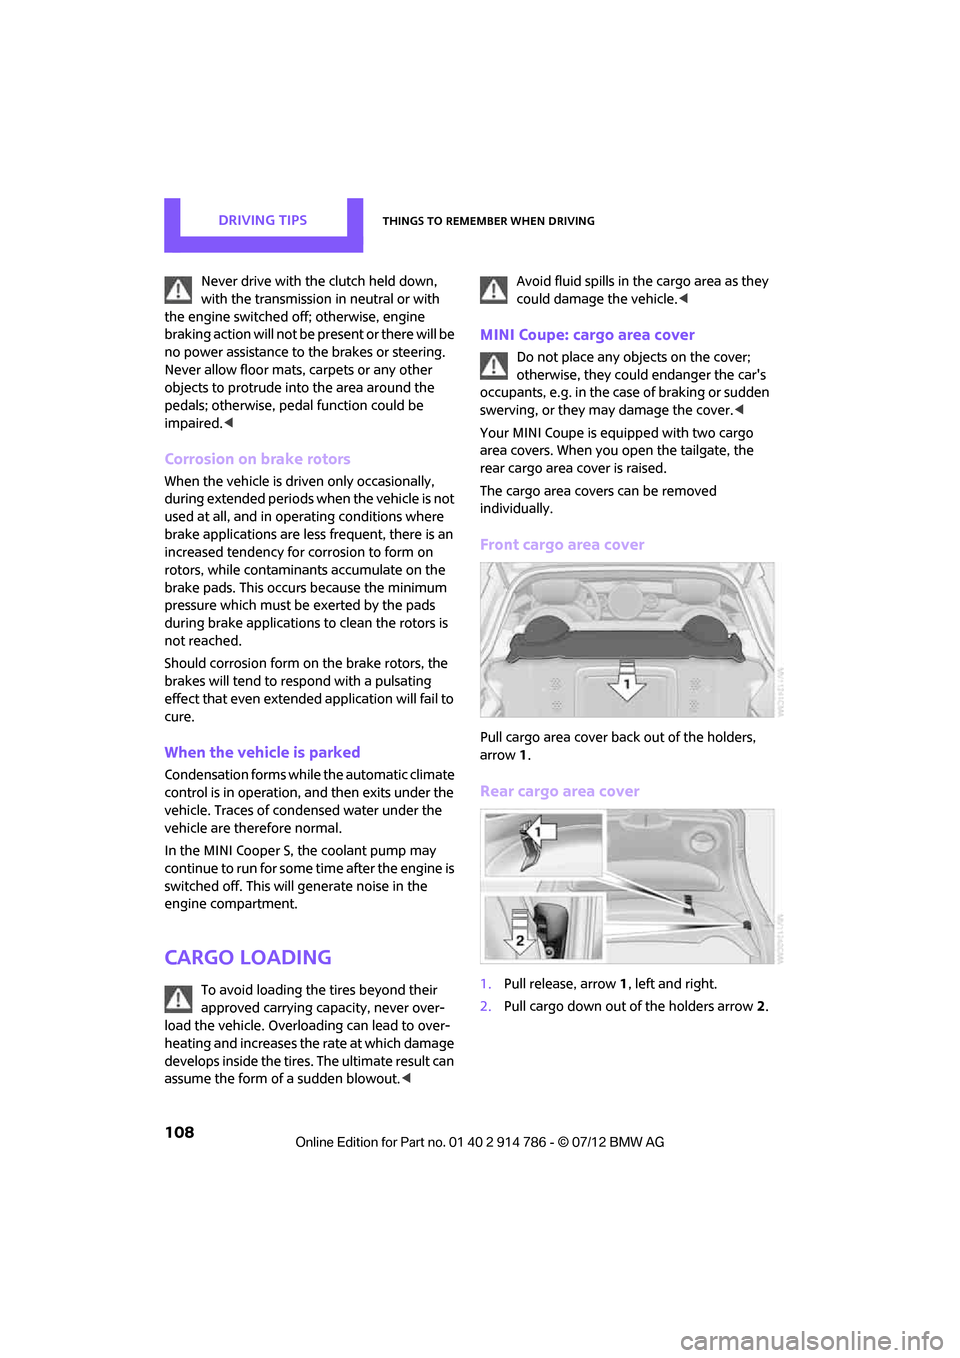
Front cargo area cover
Pull cargo area cover back out of the holders,
arrow 1.
Rear cargo area cover
1. Pull release, arrow 1, left and right.
2. Pull cargo down out of the holders arrow 2.
Online Edition for Part no. 01 40 2 914 786 - \251 07/12 BMW AG
Page 112 of 218
Things to remember when drivingDRIVING TIPS
111
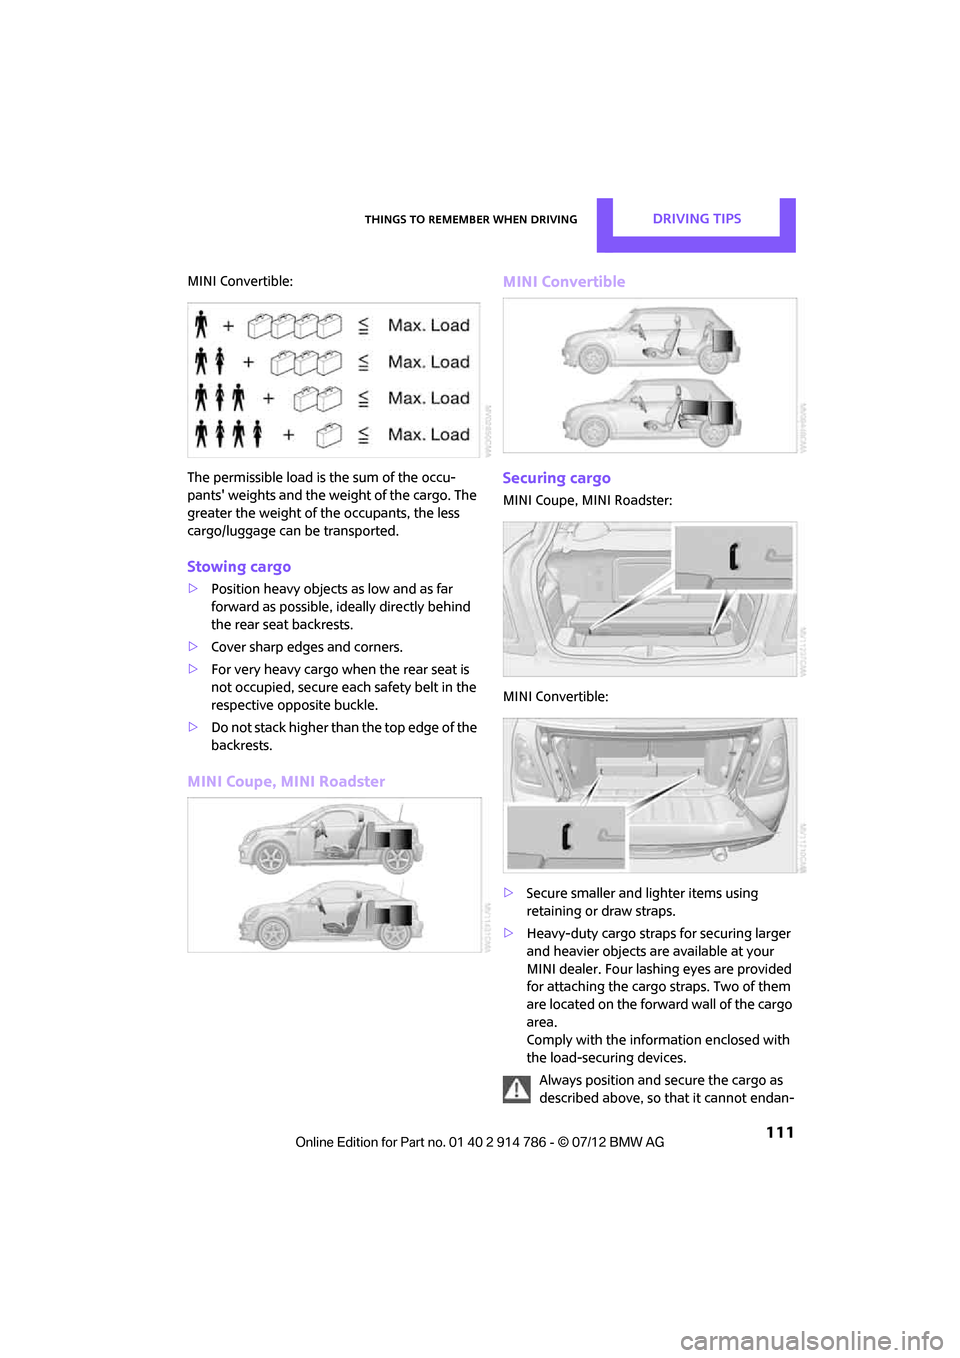
MINI Convertible:
The permissible load is the sum of the occu-
pants' weights and the weight of the cargo. The
greater the weight of the occupants, the less
cargo/luggage can be transported.
Stowing cargo
>Position heavy objects as low and as far
forward as possible, id eally directly behind
the rear seat backrests.
> Cover sharp edges and corners.
> For very heavy cargo when the rear seat is
not occupied, secure each safety belt in the
respective opposite buckle.
> Do not stack higher than the top edge of the
backrests.
MINI Coupe, MINI Roadster MINI Convertible
Securing cargo
MINI Coupe, MINI Roadster:
MINI Convertible:
>
Secure smaller and lighter items using
retaining or draw straps.
> Heavy-duty cargo straps for securing larger
and heavier objects ar e available at your
MINI dealer. Four lashing eyes are provided
for attaching the cargo straps. Two of them
are located on the forward wall of the cargo
area.
Comply with the information enclosed with
the load-securing devices.
Always position and secure the cargo as
described above, so that it cannot endan-
Online Edition for Part no. 01 40 2 914 786 - \251 07/12 BMW AG
Page 113 of 218
DRIVING TIPSThings to remember when driving
112
ger the car's occupants, for example if sudden
braking or swerves are necessary.
Do not exceed the approved gross vehicle
weight and axle loads, page 203; otherwise, the
operating safety of the vehicle is no longer
assured and the vehicle will not be in compli-
ance with the construction and use regulations.
Heavy or hard objects should not be carried
loose inside the car, since they could be thrown
around, for example as a result of heavy braking,
sudden swerves, etc., and endanger the occu-
pants. Do not secure cargo using the fastening
points for the tether strap, page 52; they may
become damaged. <
Rear luggage rack
A special rack system is available as an option for
your MINI. Please note the information con-
tained in the assembly instructions.
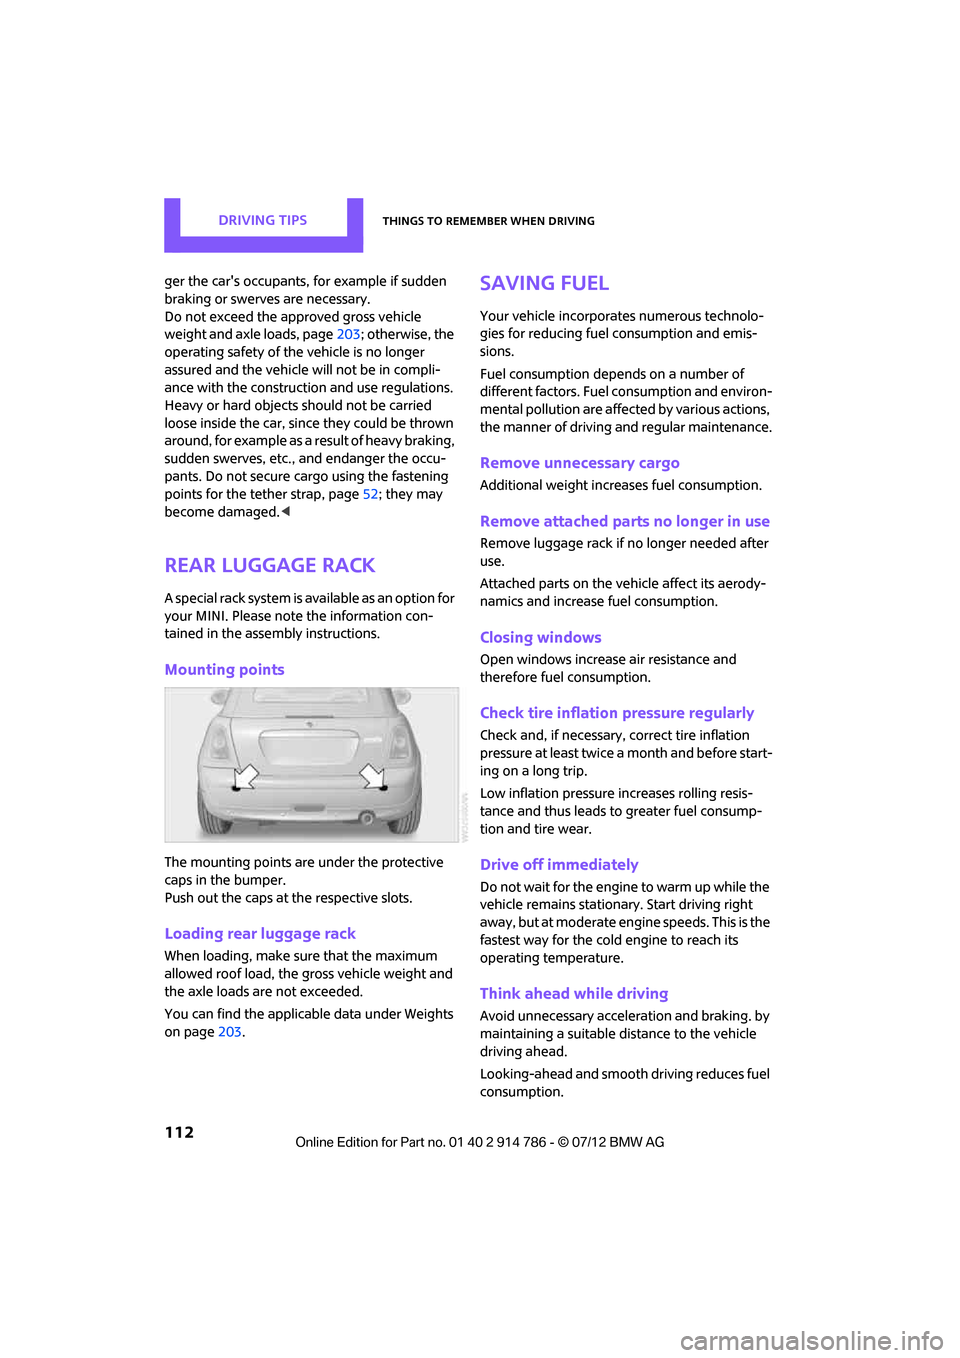
Mounting points
The mounting points are under the protective
caps in the bumper.
Push out the caps at the respective slots.
Loading rear luggage rack
When loading, make su re that the maximum
allowed roof load, the gross vehicle weight and
the axle loads are not exceeded.
You can find the applicable data under Weights
on page 203.
Saving fuel
Your vehicle incorporates numerous technolo-
gies for reducing fuel consumption and emis-
sions.
Fuel consumption depends on a number of
different factors. Fuel consumption and environ-
mental pollution are affect ed by various actions,
the manner of driving and regular maintenance.
Remove unnecessary cargo
Additional weight increases fuel consumption.
Remove attached parts no longer in use
Remove luggage rack if no longer needed after
use.
Attached parts on the ve hicle affect its aerody-
namics and increase fuel consumption.
Closing windows
Open windows increase air resistance and
therefore fuel consumption.
Check tire inflation pressure regularly
Check and, if necessary, correct tire inflation
pressure at least twice a month and before start-
ing on a long trip.
Low inflation pressure increases rolling resis-
tance and thus leads to greater fuel consump-
tion and tire wear.
Drive off immediately
Do not wait for the engine to warm up while the
vehicle remains stationary. Start driving right
away, but at moderate engi ne speeds. This is the
fastest way for the cold engine to reach its
operating temperature.
Think ahead while driving
Avoid unnecessary accelera tion and braking. by
maintaining a suitable di stance to the vehicle
driving ahead.
Looking-ahead and smooth driving reduces fuel
consumption.
Online Edition for Part no. 01 40 2 914 786 - \251 07/12 BMW AG
Page 114 of 218
Things to remember when drivingDRIVING TIPS
113
Avoid high engine speeds
Use first gear only for driving off. In second and
higher gears, accelerate smoothly to a suitable
engine and road speed. In doing so, avoid high
engine speeds and shift up early.
When you reach your desired traveling speed,
shift to the highest suitable gear and drive at
constant speed.
As a rule: driving at lo w engine speeds lowers
fuel consumption and reduces wear.
Coasting
When approaching a red traffic light, take your
foot off the accelerator and let the car roll to a
stop in the highest gear possible.
On a downhill gradient, take your foot off the
accelerator and let the vehi cle coast in a suitable
gear.
Fuel supply is shut off automatically when the
vehicle is coasting.
Switch off the engine during lengthy
stops
Switch off the engine when stopping for lengthy
periods, e.g. at traffic lights, railroad crossings or
in traffic jams.
Switch off any features that are not
currently required
Features such as air conditioning, seat heaters
and the rear window defroster require a great
deal of energy and result in greater fuel con-
sumption, especially in city driving and during
Stop & Go operation. For this reason, switch off
these features if they are not really needed.
Have the vehicle serviced
Have your vehicle serviced regularly to achieve
good economy and a long vehicle life. The
manufacturer of your MINI recommends having
the vehicle serviced by a MINI dealer. Also note
the MINI Maintenance System, page 159.
Online Edition for Part no. 01 40 2 914 786 - \251 07/12 BMW AG
Page 117 of 218
ENTERTAINMENTRadio MINI Boost CD
116
Radio MINI Boost CD
Vehicle equipment
In this chapter, all production, country, and
optional equipment that is offered in the model
range is described. Equipment is also described
that is not available because of, for example,
selected options or coun try version. This also
applies to safety relate d functions and systems.
Switching radio on/off
Press the left rotary knob. The radio
selects the last set audio source:
>Radio
> HD Radio
> Satellite radio
> CD
> External audio device
> USB audio interface.
Listening to the radi o when the ignition
is switched off
After switching off the radio readiness, the radio
functions are available for approx. 20 minutes.
To do so, switch the radio on again.
To spare the battery, ensure that the radio
is switched off when leaving the vehicle. <
Adjusting volume
Turn left rotary knob. The setting is
stored for the remote control in use.
As soon as you make a phone call using
the hands-free device, the radio will auto-
matically be muted. <
Setting the volume for the PDC and gong
You can raise or lower the audio signals for the
PDC or gong with respect to the volume of the
audio sources.
The audio signals have a set minimum and
maximum volume, below which they can not fall
and above which they can not go.
Set the audio source to a high volume to
be able to better set the volume of the
audio signals. <
1. Press the button.
2. Press the button if necessary.
3. Press the button.
or
Press the button.
4. Select the desired vo lume and press the
knob on the right.
Setting the speed-dependent volume
The speed-dependent volume controls auto-
matically increases the volume as the speed of
the vehicle increases. You can set different levels
for increasing the volume.
1. Press the button.
2. Press the button if necessary.
3. Press the button.
4. Select the desired vo lume and press the
knob on the right.
Setting the volume for external audio
devices
Your radio has the option of connecting an
external audio device, e.g., an MP3 player, and
playing it over the loudspeakers in the vehicle.
You can set the volume by using the radio.
Online Edition for Part no. 01 40 2 914 786 - \251 07/12 BMW AG
Page 118 of 218
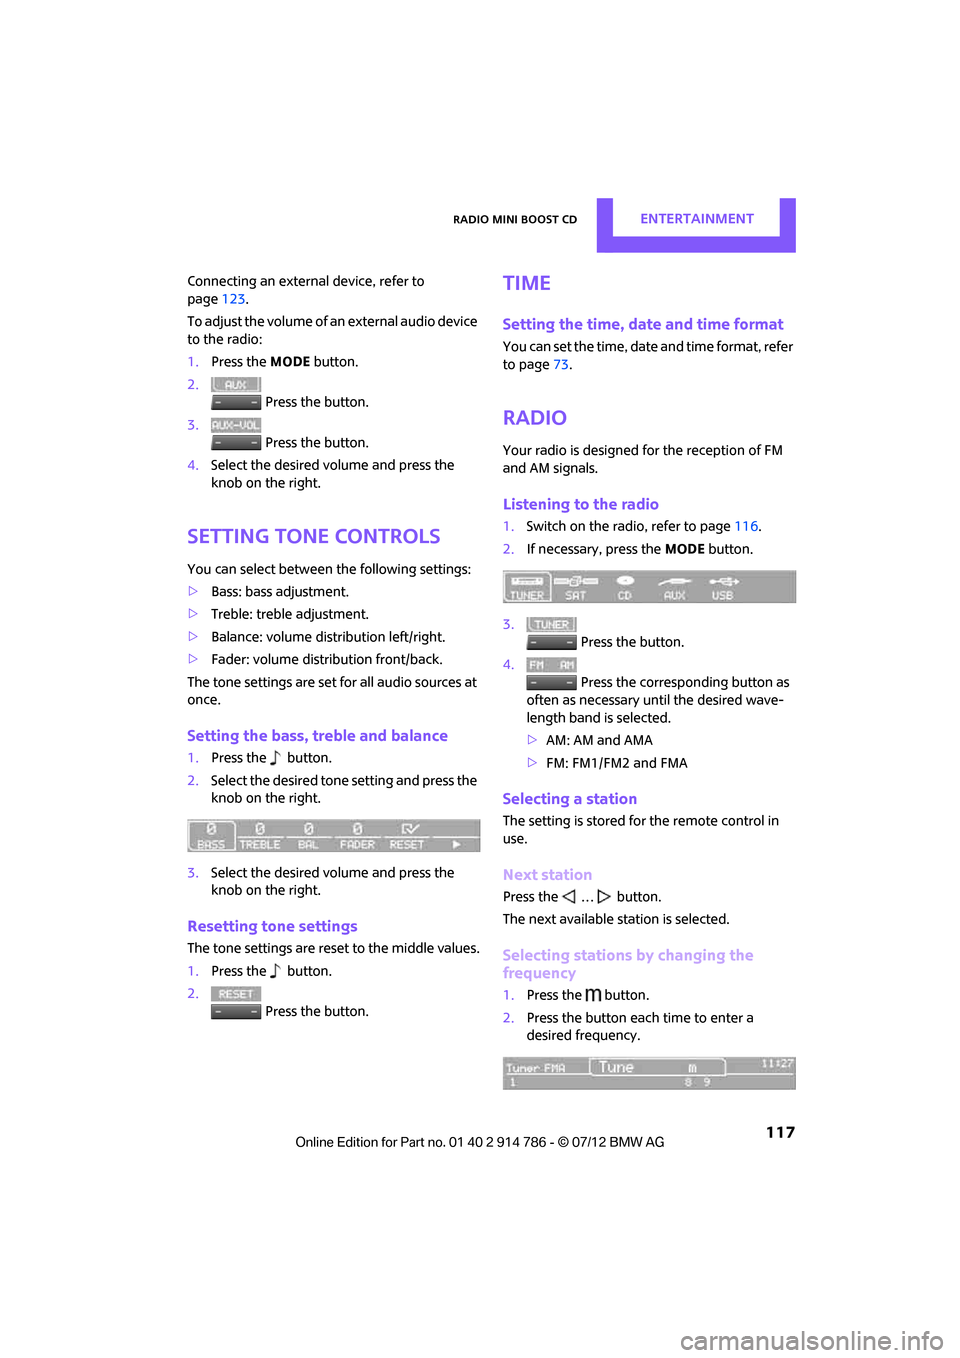
Radio MINI Boost CDENTERTAINMENT
117
Connecting an external device, refer to
page123.
To adjust the volume of an external audio device
to the radio:
1. Press the MODEbutton.
2. Press the button.
3. Press the button.
4. Select the desired volume and press the
knob on the right.
Setting tone controls
You can select between the following settings:
>Bass: bass adjustment.
> Treble: treble adjustment.
> Balance: volume distribution left/right.
> Fader: volume distri bution front/back.
The tone settings are set for all audio sources at
once.
Setting the bass, treble and balance
1. Press the button.
2. Select the desired tone setting and press the
knob on the right.
3. Select the desired volume and press the
knob on the right.
Resetting tone settings
The tone settings are reset to the middle values.
1.Press the button.
2. Press the button.
Time
Setting the time, date and time format
You can set the time, date and time format, refer
to page73.
Radio
Your radio is designed for the reception of FM
and AM signals.
Listening to the radio
1.Switch on the radio, refer to page 116.
2. If necessary, press the MODEbutton.
3. Press the button.
4. Press the corresponding button as
often as necessary until the desired wave-
length band is selected.
> AM: AM and AMA
> FM: FM1/FM2 and FMA
Selecting a station
The setting is stored for the remote control in
use.
Next station
Press the … button.
The next available st ation is selected.
Selecting stations by changing the
frequency
1. Press the button.
2. Press the button each time to enter a
desired frequency.
Online Edition for Part no. 01 40 2 914 786 - \251 07/12 BMW AG
Page 119 of 218
ENTERTAINMENTRadio MINI Boost CD
118
Or, by using the knob on the right:
1.Press the button.
2. Turn the knob on the right until the desired
frequency is reached.
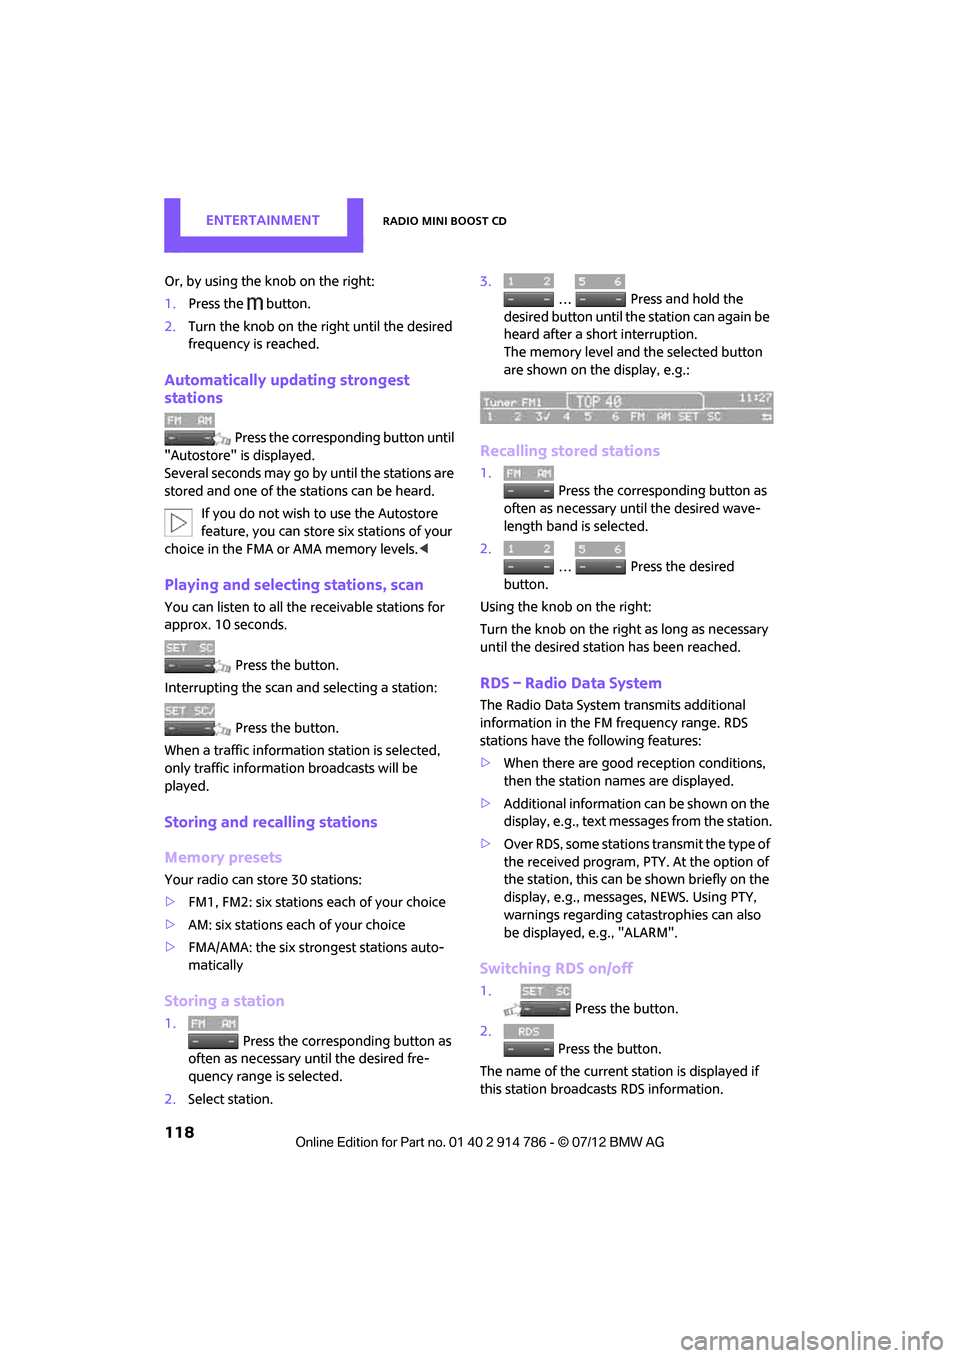
Automatically updating strongest
stations
Press the correspon ding button until
"Autostore" is displayed.
Several seconds may go by until the stations are
stored and one of the stations can be heard.
If you do not wish to use the Autostore
feature, you can store six stations of your
choice in the FMA or AMA memory levels.<
Playing and selecting stations, scan
You can listen to all the receivable stations for
approx. 10 seconds.
Press the button.
Interrupting the scan an d selecting a station:
Press the button.
When a traffic information station is selected,
only traffic information broadcasts will be
played.
Storing and recalling stations
Memory presets
Your radio can store 30 stations:
> FM1, FM2: six stations each of your choice
> AM: six stations each of your choice
> FMA/AMA: the six stro ngest stations auto-
matically
Storing a station
1.
Press the corresponding button as
often as necessary until the desired fre-
quency range is selected.
2. Select station. 3.
… Press and hold the
desired button until th e station can again be
heard after a short interruption.
The memory level and the selected button
are shown on the display, e.g.:
Recalling stored stations
1. Press the corresponding button as
often as necessary until the desired wave-
length band is selected.
2.
… Press the desired
button.
Using the knob on the right:
Turn the knob on the right as long as necessary
until the desired stat ion has been reached.
RDS – Radio Data System
The Radio Data System transmits additional
information in the FM frequency range. RDS
stations have the following features:
>When there are good reception conditions,
then the station names are displayed.
> Additional information can be shown on the
display, e.g., text me ssages from the station.
> Over RDS, some stations transmit the type of
the received program, PTY. At the option of
the station, this can be shown briefly on the
display, e.g., message s, NEWS. Using PTY,
warnings regarding ca tastrophies can also
be displayed, e.g., "ALARM".
Switching RDS on/off
1. Press the button.
2. Press the button.
The name of the current station is displayed if
this station broadcasts RDS information.
Online Edition for Part no. 01 40 2 914 786 - \251 07/12 BMW AG