display MINI Coupe 2012 Owner's Manual
[x] Cancel search | Manufacturer: MINI, Model Year: 2012, Model line: Coupe, Model: MINI Coupe 2012Pages: 218, PDF Size: 3.84 MB
Page 5 of 218
Notes
4
Notes
Using this Owner's
Manual
We have tried to make all the information in this
Owner's Manual easy to find. The fastest way to
find specific topics is to refer to the detailed
index at the back of the manual. If you wish to
gain an initial overview of your vehicle, you will
find this in the first chapter.
Should you wish to sell yo ur MINI at some time in
the future, remember to hand over this Owner's
Manual to the new owner; it is an important part
of the vehicle.
Additional sources of information
Should you have any other questions, your MINI
dealer will be glad to advise you at any time.
You can find more information about the MINI,
for example on its technology, on the Internet at
www.MINI.com.
Symbols used
Indicates precautions that must be
followed precisely in order to avoid the
possibility of personal injury and serious
damage to the vehicle. <
Indicates information that will assist you in
gaining the optimum benefit from your
vehicle and enable you to care more effectively
for your vehicle. <
Refers to measures that can be taken to
help protect the environment. <
< Marks the end of a specific item of informa-
tion.
"..." Identifies radio display texts used to select
individual functions.
Symbols on vehicle components
Indicates that you should consult the rele-
vant section of this Owner's Manual for
information on a particular part or assembly.
Vehicle equipment
The manufacturer of your MINI is the Bayerische
Motoren Werke Aktien gesellschaft, BMW AG.
This Owner's Manual describes all models as well
as all production, country and special equip-
ment that is offered in the model range. Equip-
ment is also described that is not available
because of, for example, selected options or
country version. This also applies to safety
related functions and systems. For equipment
and models that are not described in this
Owner's Manual, please see the supplementary
Owner's Manuals that are provided.
Status of this Owner's
Manual at time of
printing
The high level of safety and quality of the MINI
vehicles is ensured through continuous develop-
ment. In rare cases, there may be differences
between the description and the vehicle.
For your safety
Maintenance and repair
Advanced technology, e.g. the use of
modern materials and high-performance
electronics, requires specially adapted mainte-
nance and repair methods. Therefore, have the
necessary work on your MI NI only carried out by
a MINI dealer or a work shop that has specially
trained personnel workin g in accordance with
Online Edition for Part no. 01 40 2 914 786 - \251 07/12 BMW AG
Page 13 of 218
AT A GLANCECockpit
12
Displays
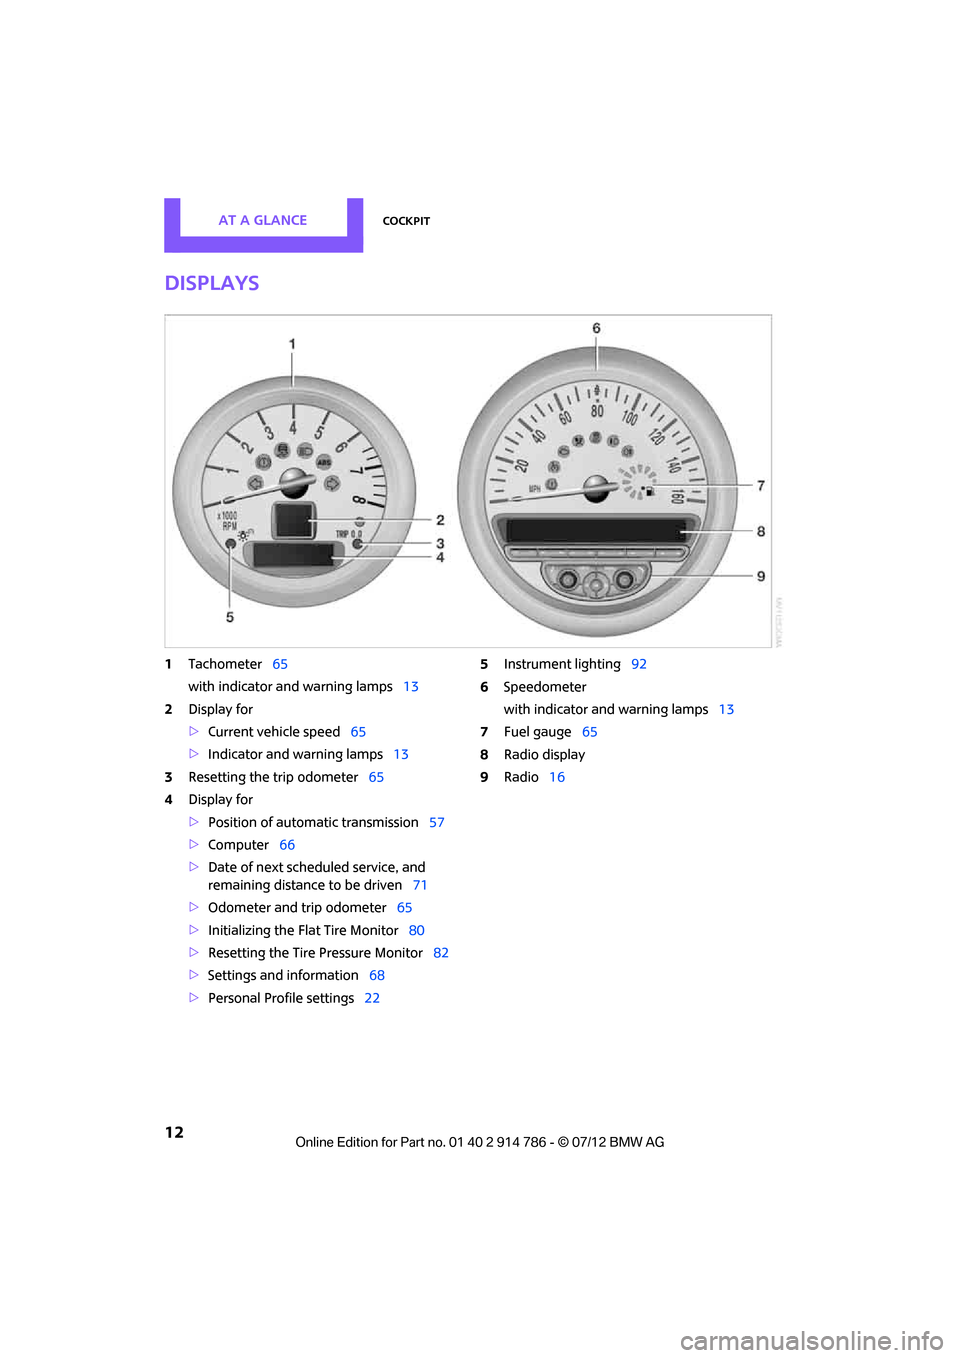
1Tachometer 65
with indicator and warning lamps 13
2 Display for
>Current vehicle speed 65
> Indicator and warning lamps 13
3 Resetting the trip odometer 65
4 Display for
>Position of automatic transmission 57
> Computer 66
> Date of next scheduled service, and
remaining distance to be driven 71
> Odometer and trip odometer 65
> Initializing the Fl at Tire Monitor 80
> Resetting the Tire Pressure Monitor 82
> Settings and information 68
> Personal Prof ile settings22 5
Instrument lighting 92
6 Speedometer
with indicator and warning lamps 13
7 Fuel gauge 65
8 Radio display
9 Radio 16
Online Edition for Part no. 01 40 2 914 786 - \251 07/12 BMW AG
Page 17 of 218
AT A GLANCERadio
16
Radio
Vehicle equipment
In this chapter, all production, country, and
optional equipment that is offered in the model range is described. Equi
pment is also described
that is not available because of, for example,
selected options or coun try version. This also
applies to safety relate d functions and systems.
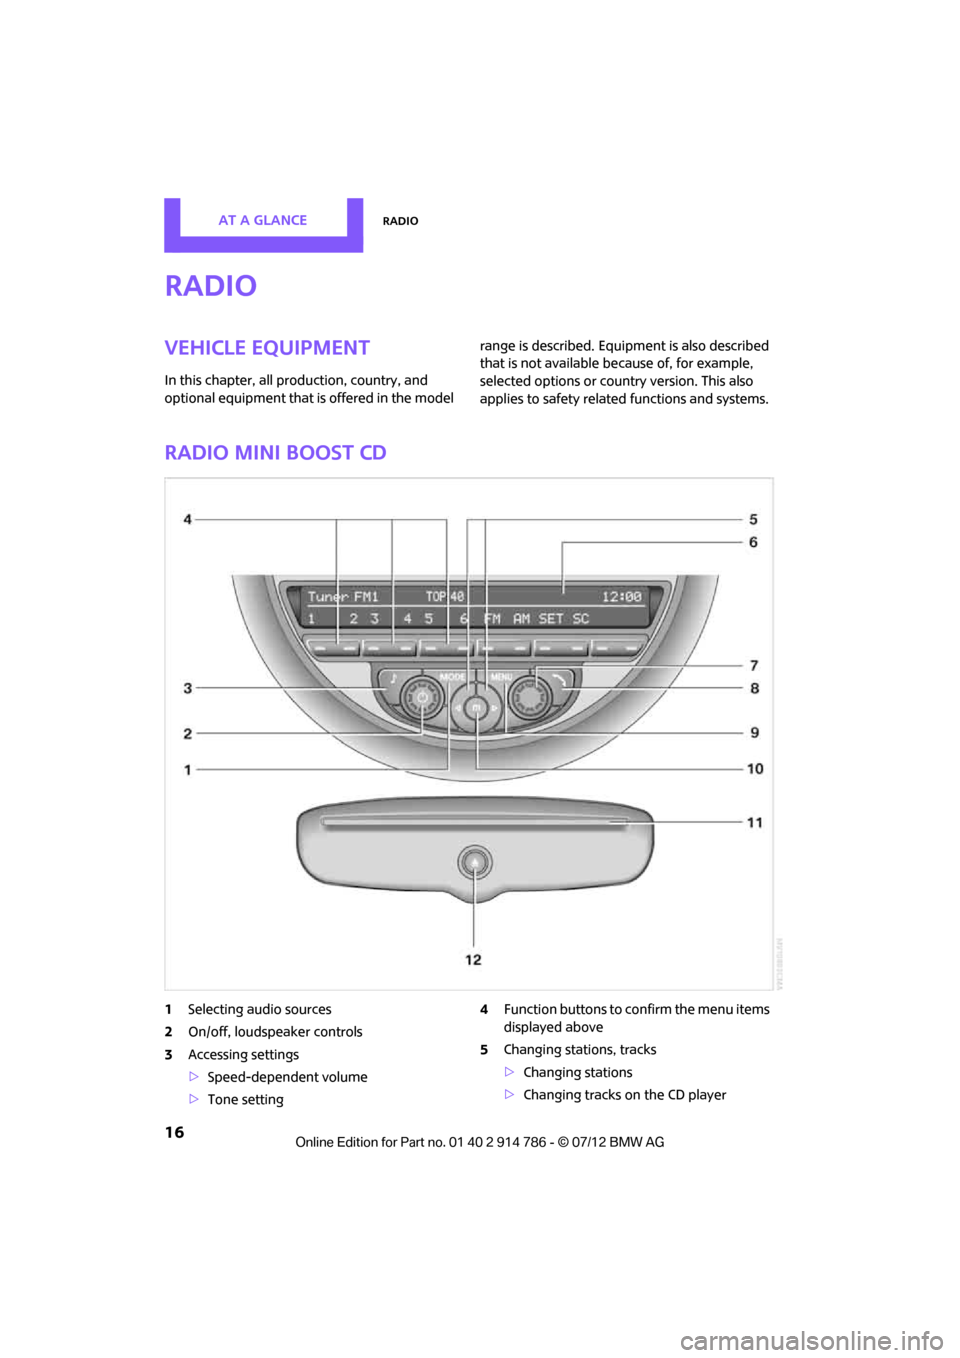
Radio MINI Boost CD
1Selecting audio sources
2 On/off, loudspeaker controls
3 Accessing settings
>Speed-dependent volume
> Tone setting 4
Function buttons to confirm the menu items
displayed above
5 Changing stations, tracks
>Changing stations
> Changing tracks on the CD player
Online Edition for Part no. 01 40 2 914 786 - \251 07/12 BMW AG
Page 18 of 218
RadioAT A GLANCE
17
6Display
7 Selecting functions
>Turn: to select menu items or set values
> Press: to confirm selection or store
settings
8 Establishing/ending voice connections
9 Calling up settings menu
10 Selecting frequency manually
11 CD slot
12 Ejecting CD
Menu navigation
Radio and telephone functions can be called up
by using the buttons on the radio and menus.
Calling up settings menu
Press the MENU button
> Settings
> Computer
> MINI phone numbers
> Telephone
Calling up the audio menu
Press the MODEbutton
> Radio
> HD Radio
> Satellite radio
> CD player
> External audio devi ce, e.g., MP3 player
> USB audio interface
Selecting a menu item
Menu items can be selected by using the knob
on the right, the MODEbutton or function
buttons.
Using the knob on the right
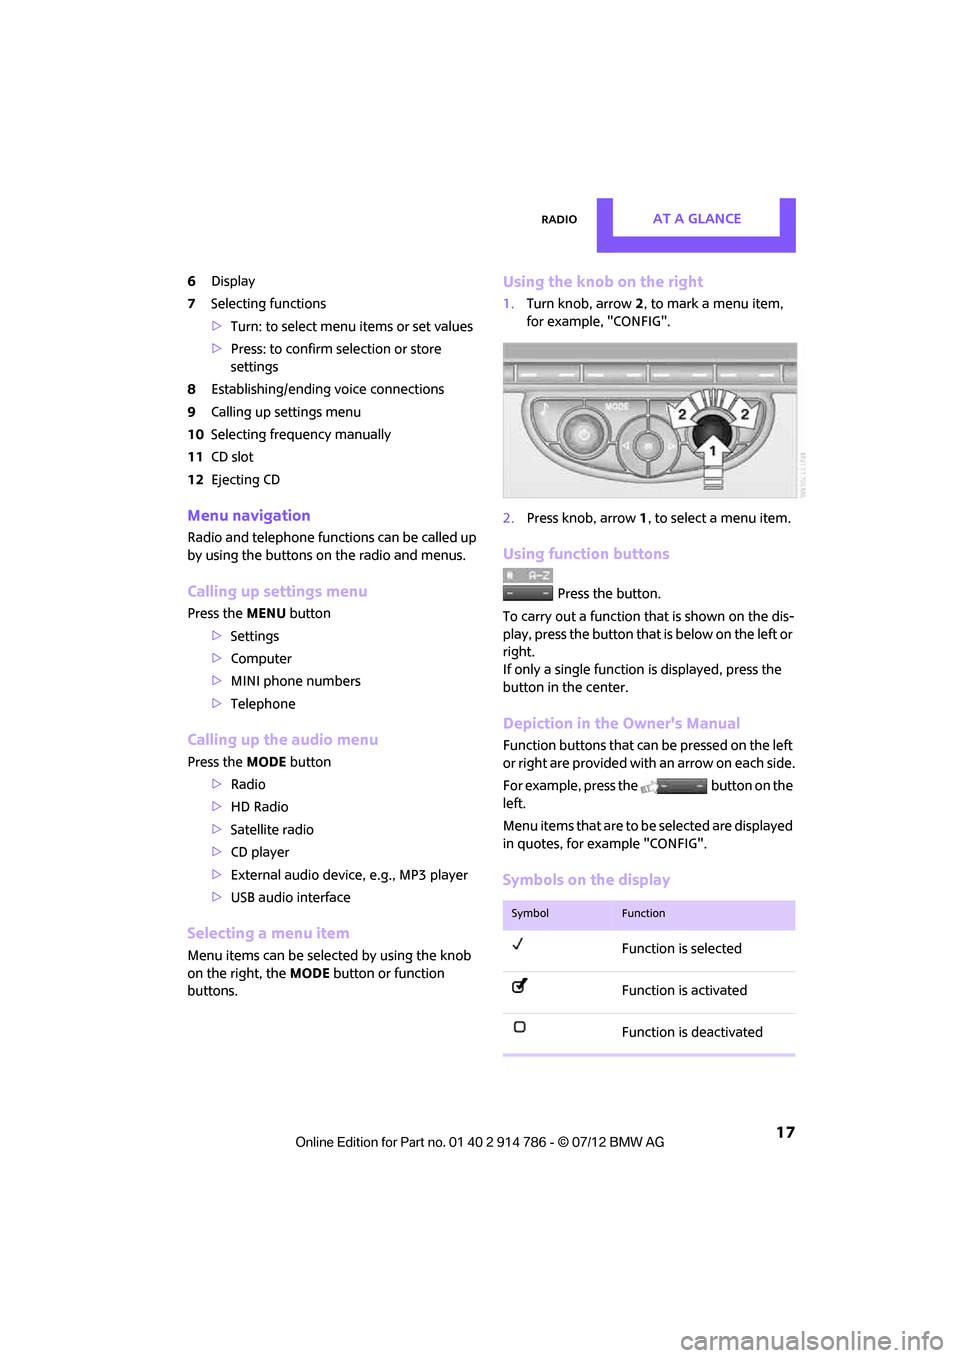
1. Turn knob, arrow 2, to mark a menu item,
for example, "CONFIG".
2. Press knob, arrow 1, to select a menu item.
Using function buttons
Press the button.
To carry out a function that is shown on the dis-
play, press the button that is below on the left or
right.
If only a single function is displayed, press the
button in the center.
Depiction in the Owner's Manual
Function buttons that can be pressed on the left
or right are provided with an arrow on each side.
For example, press the button on the
left.
Menu items that are to be selected are displayed
in quotes, for example "CONFIG".
Symbols on the display
SymbolFunction
Function is selected
Function is activated
Function is deactivated
Online Edition for Part no. 01 40 2 914 786 - \251 07/12 BMW AG
Page 19 of 218
AT A GLANCERadio
18
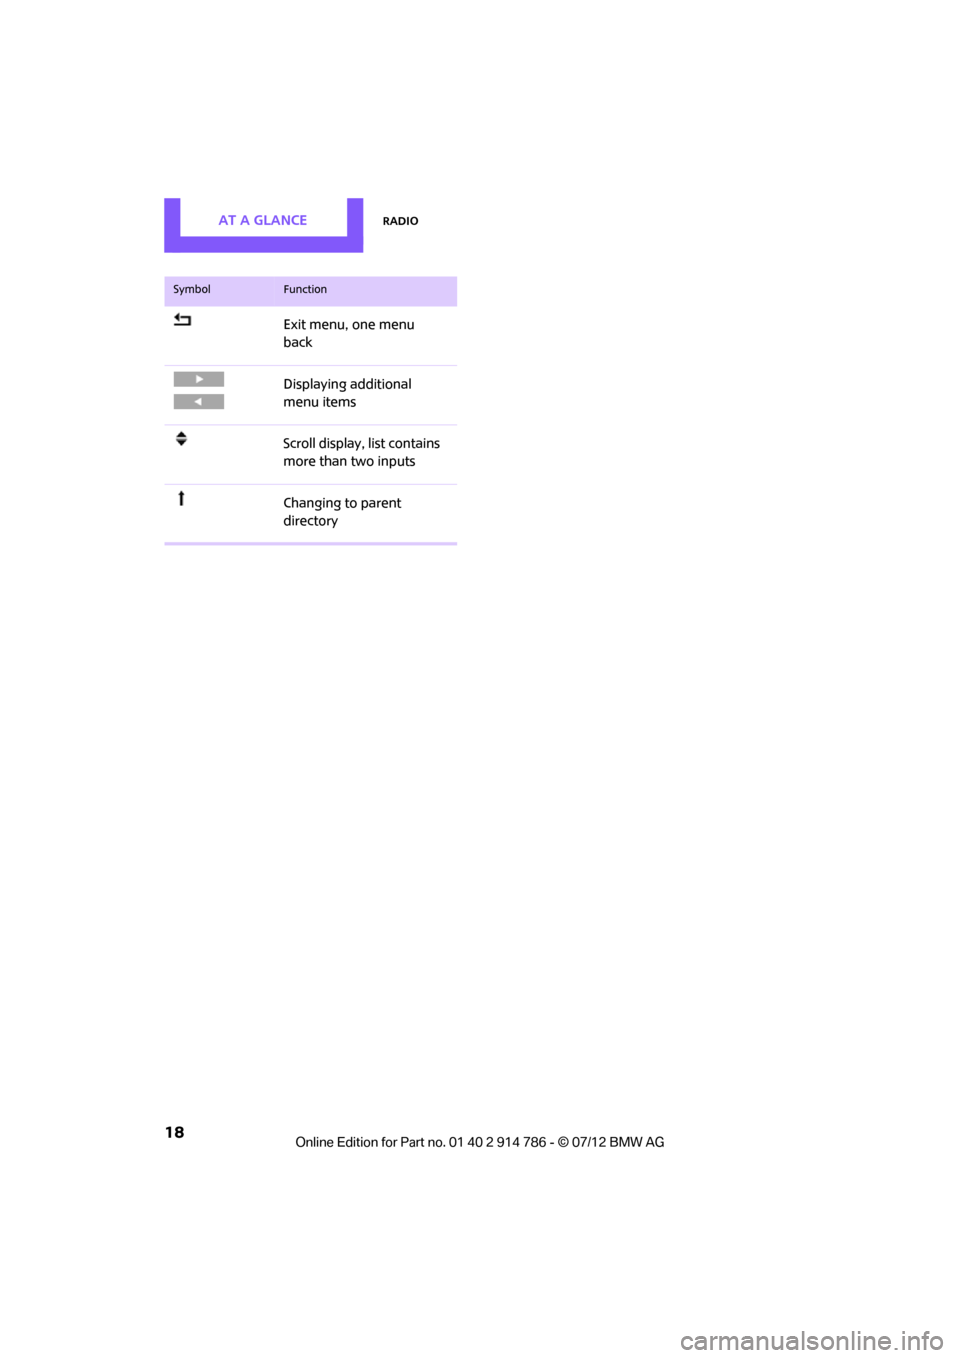
Exit menu, one menu
back
Displaying additional
menu items
Scroll display, list contains
more than two inputs
Changing to parent
directory
SymbolFunction
Online Edition for Part no. 01 40 2 914 786 - \251 07/12 BMW AG
Page 24 of 218
Opening and closingCONTROLS
23
This means that your settings will be activated
for you, even if in the meantime your car was
used by someone else with another remote
control and the corresponding settings.
Individual settings are stored for a maximum of
three remote controls.
Personal Profile settings
For more information on specific settings, refer
to the specified pages.
> Response of the central locking system
when the car is being unlocked 24
> Automatic locking of the vehicle 27
> Triple turn signal activation 60
> Settings for the displays in the speedometer
and tachometer:
>12 h/24 h mode of the clock, refer to
Formats and units of measure 70
> Date format, refer to Formats and units
of measure 70
> Units of measure for fuel consumption,
distance covered/re maining distances
and temperature, refer to Formats and
units of measure 70
> Light settings:
>Pathway lighting 89
> Daytime running lights 89
> Automatic climate control: activating/
deactivating the AUTO program, setting the
temperature, air volume and air
distribution 96
> Entertainment:
>Most recent ente rtainment source
> Radio MINI Boost CD:
Setting the volume 116
Setting the tone 117
Central locking system
The concept
The central locking system is ready for operation
whenever the driver's door is closed.
The system simultaneously engages and
releases the locks on the following:
>Doors
> Tailgate
> Fuel filler flap
Operating from outside
>Via the remote control
> Using the door lock
> In cars with Comfor t Access, via the door
handles on the driver's and passenger's
sides
The anti-theft system is also operated at the
same time. It prevents the doors from being
unlocked using the lock buttons or door han-
dles. The remote control can also be used to
switch on/off the welcome lamps and interior
lamps. The alarm system is also activated or
deactivated, page 29.
Operating from inside
Button for central locking system, page 27.
In the event of a sufficiently severe accident, the
central locking system unlocks automatically. In
addition, the hazard warning flashers and inte-
rior lamps come on.
Opening and closing:
from outside
Persons or animals in a parked vehicle
could lock the doors from the inside. Take
the key with you when you leave the vehicle so
that the vehicle can be opened from the out-
side. <
Online Edition for Part no. 01 40 2 914 786 - \251 07/12 BMW AG
Page 25 of 218
CONTROLSOpening and closing
24
Using the remote control
Unlocking
Press the button.
The welcome lamps and interior lamps come on.
Unlocking mode
You can also set which parts of the car are
unlocked. The setting is stored for the remote
control in use.
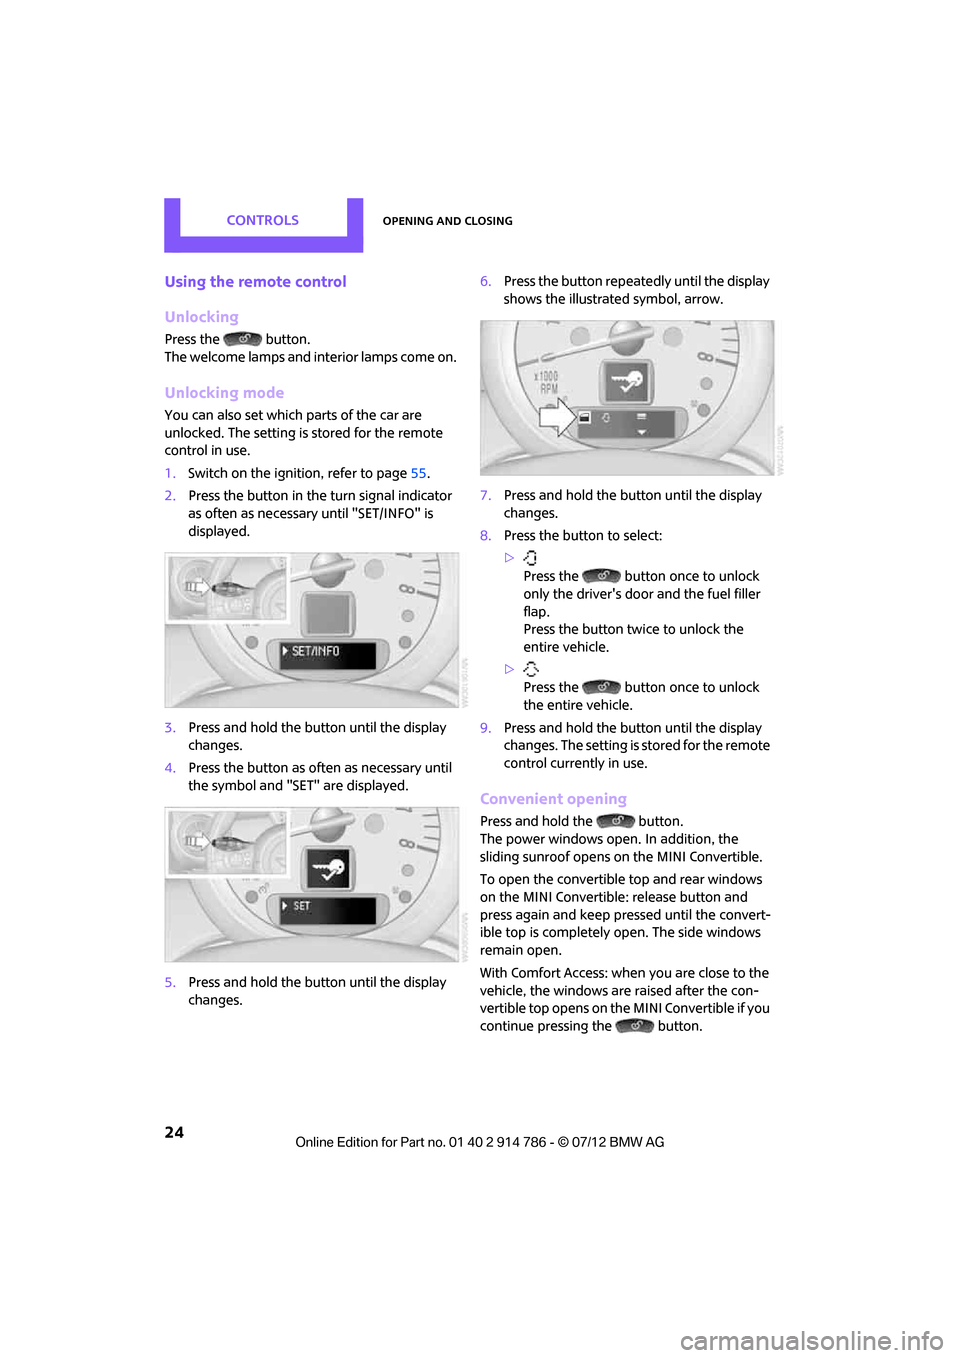
1.Switch on the ignition, refer to page 55.
2. Press the button in the turn signal indicator
as often as necessary until "SET/INFO" is
displayed.
3. Press and hold the button until the display
changes.
4. Press the button as often as necessary until
the symbol and "SET" are displayed.
5. Press and hold the button until the display
changes. 6.
Press the button repeat edly until the display
shows the illustra ted symbol, arrow.
7. Press and hold the button until the display
changes.
8. Press the button to select:
>
Press the button once to unlock
only the driver's door and the fuel filler
flap.
Press the button twice to unlock the
entire vehicle.
> Press the button once to unlock
the entire vehicle.
9. Press and hold the button until the display
changes. The setting is stored for the remote
control currently in use.
Convenient opening
Press and hold the button.
The power windows open. In addition, the
sliding sunroof opens on the MINI Convertible.
To open the convertible top and rear windows
on the MINI Convertible: release button and
press again and keep pr essed until the convert-
ible top is completely open. The side windows
remain open.
With Comfort Access: when you are close to the
vehicle, the windows are raised after the con-
vertible top opens on the MINI Convertible if you
continue pressing the button.
Online Edition for Part no. 01 40 2 914 786 - \251 07/12 BMW AG
Page 26 of 218
Opening and closingCONTROLS
25
Convenient closing
MINI Convertible:
When you are close to the vehicle, the remote
control for Comfort Access can be used to close
the convertible top, the sliding sunroof and the
windows.
Press and hold the button.
The convertible top and the windows are closed.Watch during the closing process to be
sure that no one is injured. Releasing the
button interrupts the closing process. <
MINI Coupe, MINI Roadster: Convenient closing using the remote
control is not possible. <
Locking
Press the button.
Do not lock the vehicle from the outside if
there is any person inside, because the
vehicle cannot be unlocked from inside without
special knowledge. <
Setting confirmation signals
To have the vehicle confirm when it has been
locked or unlocked.
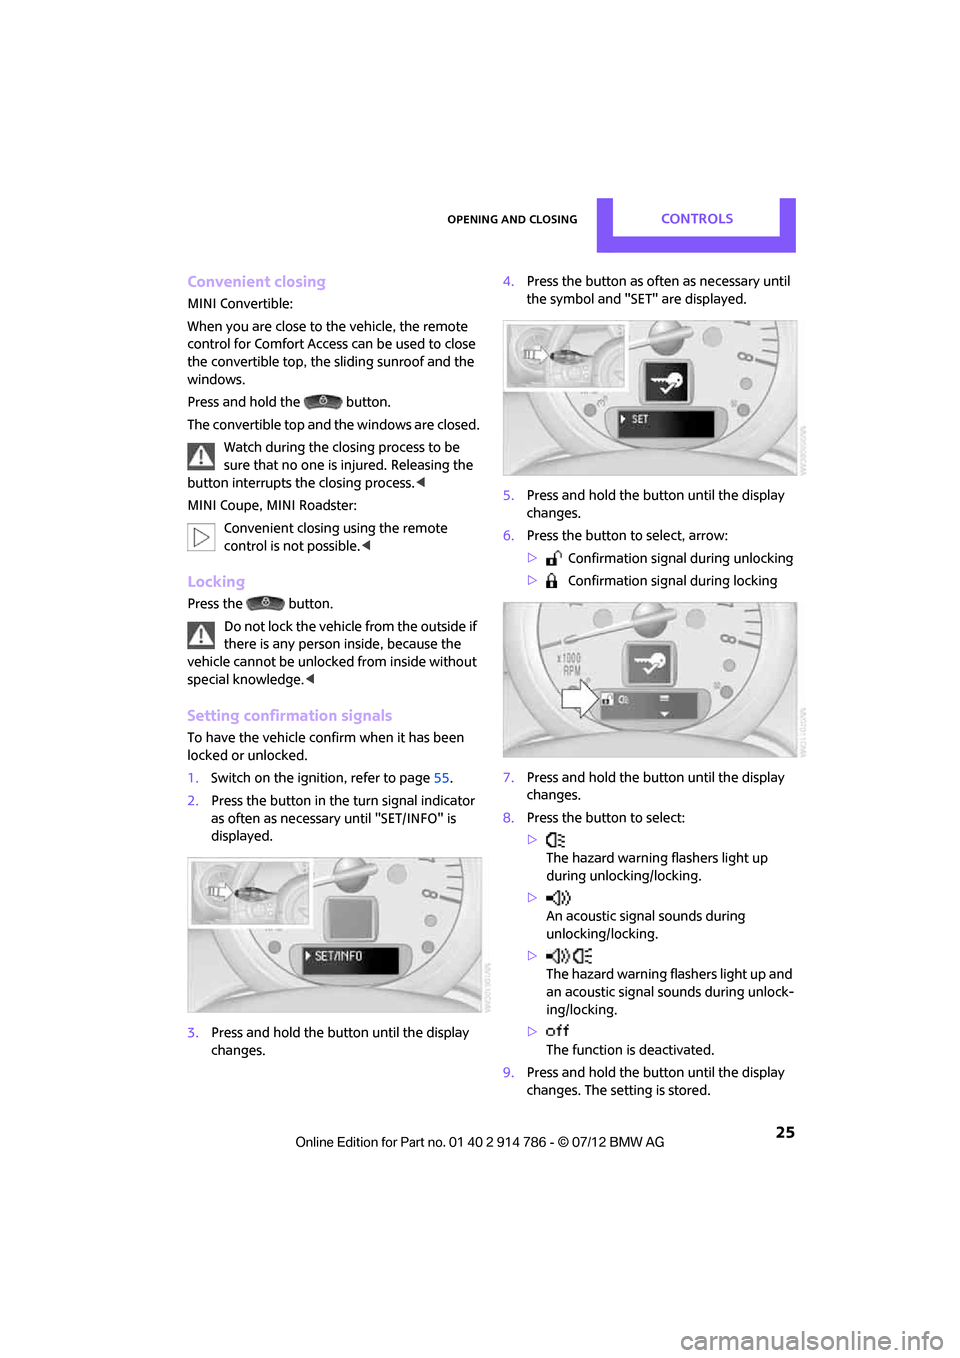
1.Switch on the ignition, refer to page 55.
2. Press the button in the turn signal indicator
as often as necessary until "SET/INFO" is
displayed.
3. Press and hold the butt on until the display
changes. 4.
Press the button as of ten as necessary until
the symbol and "SET" are displayed.
5. Press and hold the butt on until the display
changes.
6. Press the button to select, arrow:
> Confirmation signal during unlocking
> Confirmation signal during locking
7. Press and hold the butt on until the display
changes.
8. Press the button to select:
>
The hazard warning flashers light up
during unlocking/locking.
> An acoustic signal sounds during
unlocking/locking.
> The hazard warning flashers light up and
an acoustic signal so unds during unlock-
ing/locking.
> The function is deactivated.
9. Press and hold the butt on until the display
changes. The setting is stored.
Online Edition for Part no. 01 40 2 914 786 - \251 07/12 BMW AG
Page 28 of 218
Opening and closingCONTROLS
27
Manual operation
In the event of an electrical malfunction, the
driver's door can be unlocked or locked by
turning the integrated key in the door lock to
the end positions.
Opening and closing:
from inside
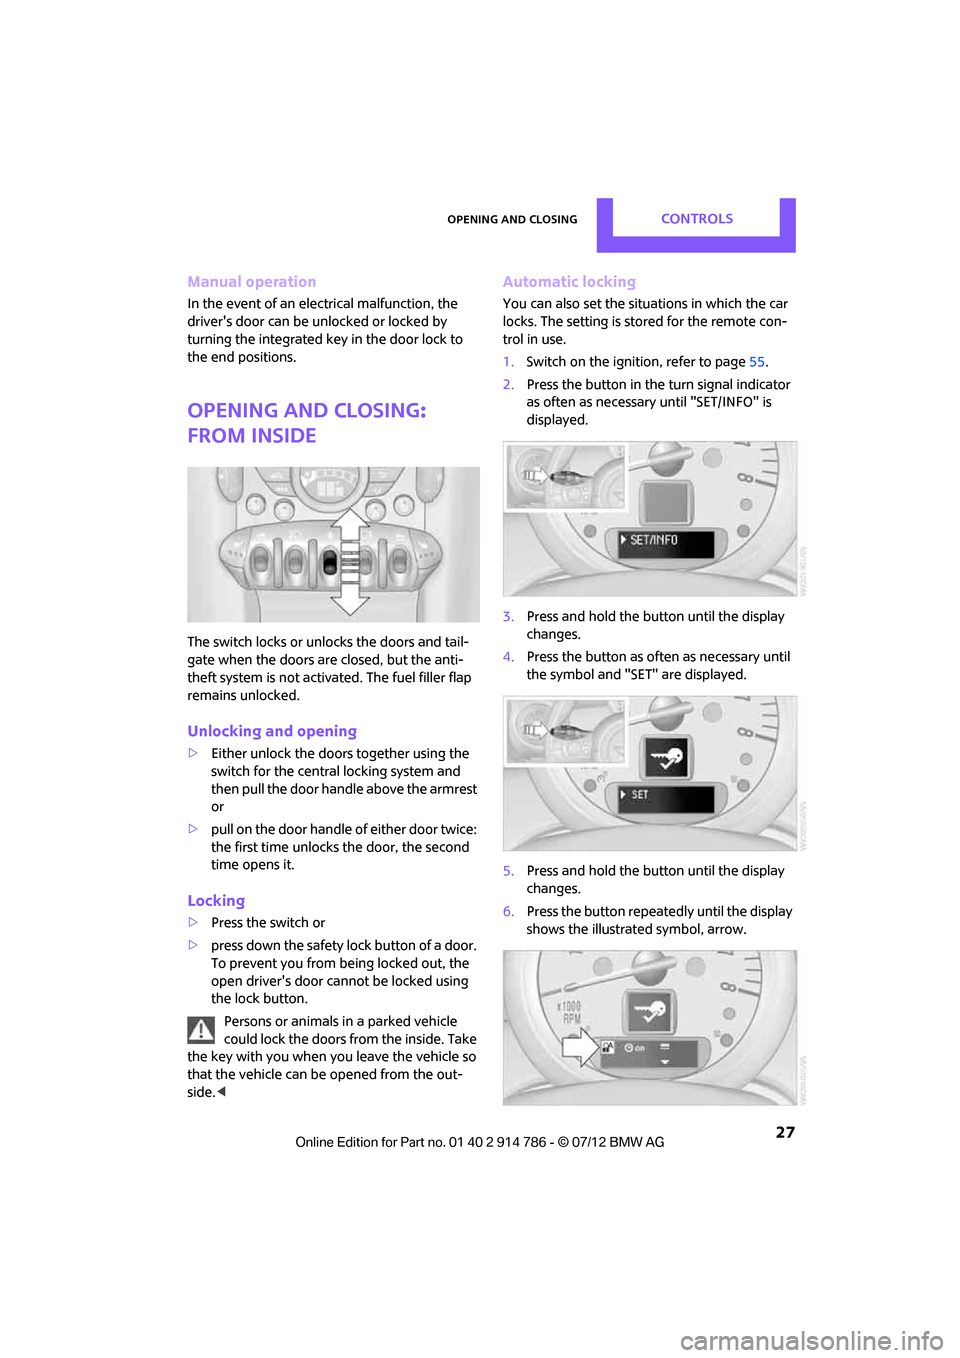
The switch locks or unloc ks the doors and tail-
gate when the doors are closed, but the anti-
theft system is not activated. The fuel filler flap
remains unlocked.
Unlocking and opening
> Either unlock the doors together using the
switch for the central locking system and
then pull the door handle above the armrest
or
> pull on the door handle of either door twice:
the first time unlocks the door, the second
time opens it.
Locking
>Press the switch or
> press down the safety lock button of a door.
To prevent you from being locked out, the
open driver's door cannot be locked using
the lock button.
Persons or animals in a parked vehicle
could lock the doors from the inside. Take
the key with you when you leave the vehicle so
that the vehicle can be opened from the out-
side. <
Automatic locking
You can also set the situ ations in which the car
locks. The setting is st ored for the remote con-
trol in use.
1. Switch on the ignition, refer to page 55.
2. Press the button in the turn signal indicator
as often as necessary until "SET/INFO" is
displayed.
3. Press and hold the butt on until the display
changes.
4. Press the button as of ten as necessary until
the symbol and "SET" are displayed.
5. Press and hold the butt on until the display
changes.
6. Press the button repeatedly until the display
shows the illustra ted symbol, arrow.
Online Edition for Part no. 01 40 2 914 786 - \251 07/12 BMW AG
Page 29 of 218
CONTROLSOpening and closing
28
7.Press and hold the button until the display
changes.
8. Press the button to select:
>
The central locking system automatically
locks the vehicle afte r some time if no
door has been opened.
> The central locking system automatically
locks the vehicle as soon as you drive off.
> The central locking system automatically
locks the vehicle afte r some time if no
door has been opened, or as soon as you
drive off.
> The central locking system remains
unlocked.
9. Press and hold the button until the display
changes. The setting is stored.
Tailgate
To avoid damage, make sure there is
sufficient clearance before opening the
tailgate. <
While driving, sharp objects or objects
with edges may strike against the rear
window and damage th e heating element for
the rear window. Assure that there are no
objects with sharp ed ges near the rear
window. <
Opening
In some market-specific versions, the tail-
gate cannot be unlocked using the remote
control unless the vehicle is unlocked first.
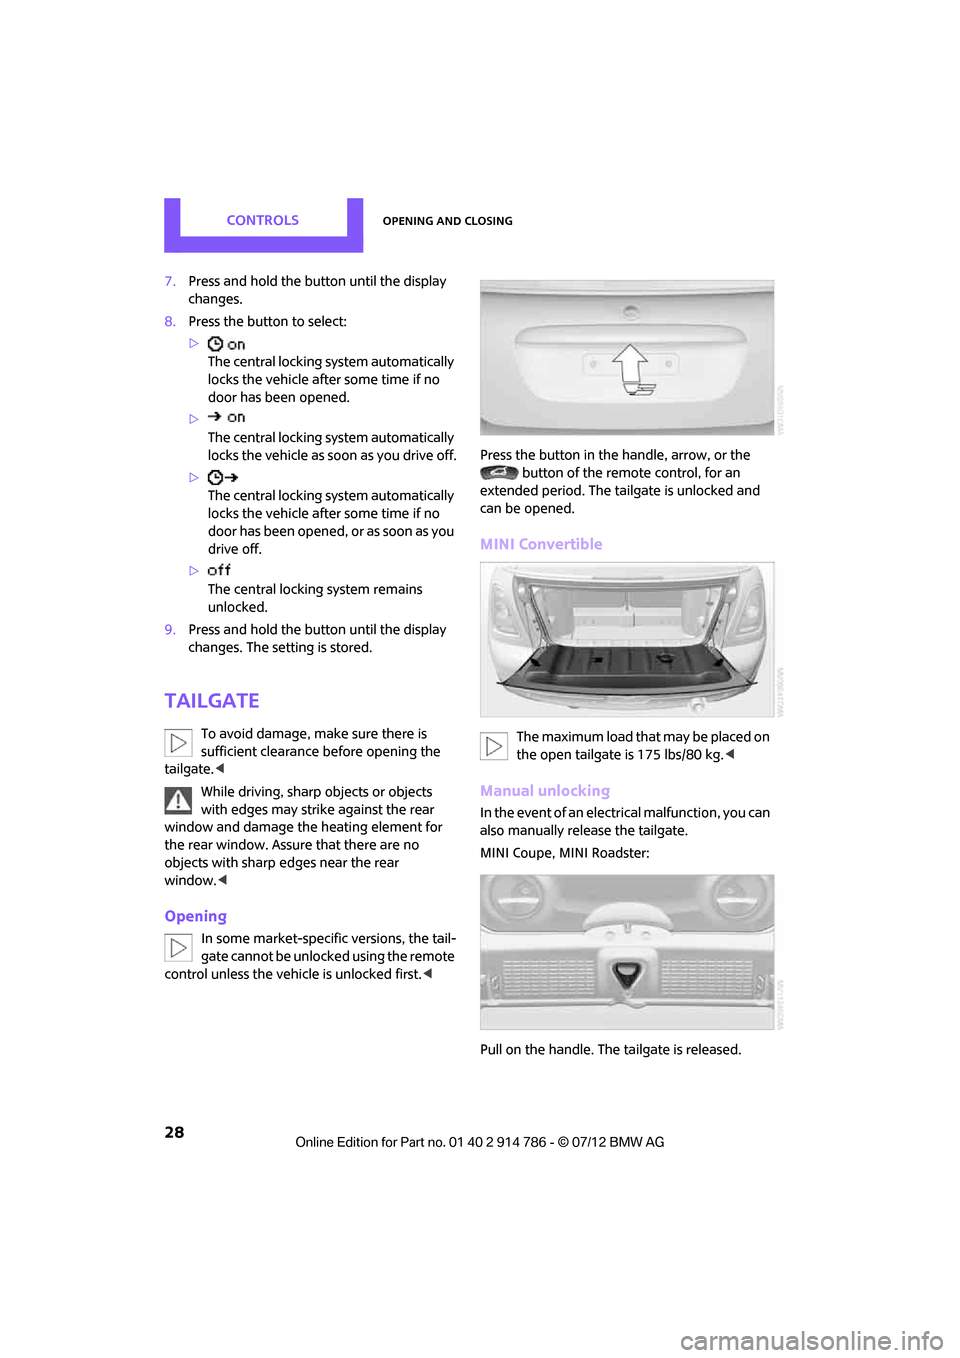
extended period. The tailgate is unlocked and
can be opened.
MINI Convertible
The maximum load that may be placed on
the open tailgate is 175 lbs/80 kg. <
Manual unlocking
In the event of an electrical malfunction, you can
also manually release the tailgate.
MINI Coupe, MINI Roadster:
Pull on the handle. The tailgate is released.
Online Edition for Part no. 01 40 2 914 786 - \251 07/12 BMW AG