height adjustment MINI Coupe 2013 Owner's Manual
[x] Cancel search | Manufacturer: MINI, Model Year: 2013, Model line: Coupe, Model: MINI Coupe 2013Pages: 292, PDF Size: 7.02 MB
Page 53 of 292

AdjustingVehicle equipment
This chapter describes all series equipment as
well as country-specific and special equipment
offered for this model series.Therefore, it also
describes equipment that may not be found in
your vehicle, for instance due to the selected
special equipment or the country version. This
also applies to safety-related functions and sys‐
tems.
Sitting safely The ideal seating position can make a vital con‐
tribution to relaxed, fatigue-free driving.
The seating position plays an important role in
an accident in combination with:▷Safety belts, refer to page 55.▷Head restraints, refer to page 56.▷Airbags, refer to page 90.
Seats
Note before adjusting Do not adjust the seat while driving
Never attempt to adjust the driver's seat
while driving. The seat could respond with un‐
expected movement and the ensuing loss of
vehicle control could lead to an accident. ◀
Do not incline the backrest too far to the
rear
Do not incline the backrest on the front passen‐
ger side too far to the rear during driving. Oth‐
erwise, there is the danger of sliding under the
safety belt in an accident. This would eliminate
the protection normally provided by the belt. ◀
Seat adjustment
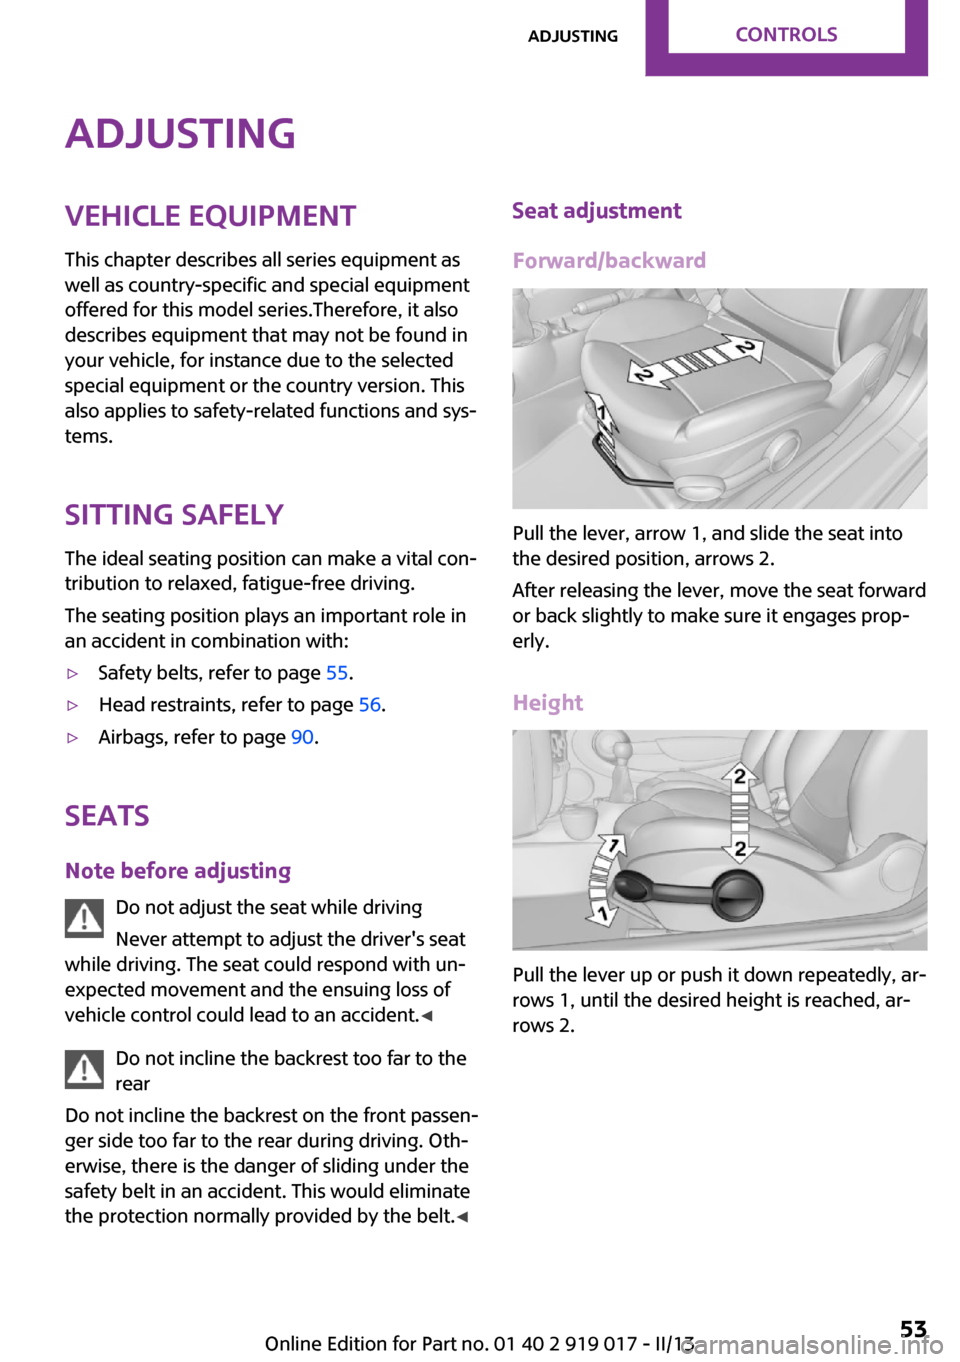
Forward/backward
Pull the lever, arrow 1, and slide the seat into
the desired position, arrows 2.
After releasing the lever, move the seat forward
or back slightly to make sure it engages prop‐
erly.
Height
Pull the lever up or push it down repeatedly, ar‐
rows 1, until the desired height is reached, ar‐
rows 2.
Seite 53AdjustingControls53
Online Edition for Part no. 01 40 2 919 017 - II/13
Page 56 of 292

Unbuckling the belt1.Hold the belt firmly.2.Press the red button in the belt buckle.3.Guide the belt back into its reel.
MINI Convertible: rear belt guide
When fastening the safety belts on the rear
seats, ensure that the belt guide loop, arrow, is
closed.
Safety belt reminder for driver's seat
and front passenger seat
The indicator lamps light up and a sig‐
nal sounds. In addition, a message ap‐
pears on the Control Display. Check
whether the safety belt has been fas‐
tened correctly.
Damage to safety belts
In the case of strain caused by accidents or
damage:
Have the safety belts, including the safety belt
tensioners, replaced and have the belt anchors
checked.
Checking and replacing safety belts
Have the work performed only by your
service center; otherwise, it cannot be ensured
that this safety feature will function properly. ◀
Head restraints
Correctly set head restraint
A correctly adjusted head restraint reduces the
risk of spinal injury in the event of an accident.
Adjusting the head restraint
Correctly adjust the head restraints of all
occupied seats; otherwise, there is an increased
risk of injury in an accident. ◀
Height Adjust the head restraint so that its center is
approx. at ear level.
Distance
Adjust the distance so that the head restraint is as close as possible to the back of the head.
Height adjustment
To raise: pull.
To lower: press the button, arrow 1, and push
the head restraint down.
Removing
Only remove the head restraint if no one will be
sitting in the seat in question.
1.Pull upward as far as possible.2.Press the button, arrow 1, and pull the
head restraint out completely.
To remove the head restraint, fold the backrest
forward if necessary.
Seite 56ControlsAdjusting56
Online Edition for Part no. 01 40 2 919 017 - II/13
Page 284 of 292

HHalogen headlamps, bulb re‐ placement 245
Hand car wash, care 260
Hands-free microphone 16
Hazard warning system 16
HD Radio 161
Head airbags 90
Headlamp control, auto‐ matic 85
Headlamp courtesy delay fea‐ ture 86
Headlamp flasher 67, 86
Headlamp flasher, indicator lamp 15
Headlamps 85
Headlamps, care 260
Headlamps, cleaning, washer fluid 69
Head restraints 56
Head restraints– Adjusting the height 56– Removing 56
Heatable
– Windshield 112
Heating
– Rear window 109, 112– Seats 55– Windshield 112
Height adjustment
– Seats 53
High beams 86
High beams, bulb replace‐ ment 245
High beams, indicator lamp 15
Hill drive-off assistant 103
Hills 126
Holder for remote control, re‐ fer to Ignition lock 64
Homepage 6
Hood 236
Hood, closing 237
Hood, opening 237
Hood, unlocking 237
Horn 12
House number, entering for
navigation 139
Hydraulic brake assistant 101
I
Ice warning, refer to External temperature warning 74
Icy roads, refer to External temperature warning 74
Identification marks, run-flat tires 232
Identification marks, tires 228
iDrive– Changing settings 80– Changing the date and
time 79– Changing the language 80– Changing the units of meas‐
ure and display format 78– Setting the brightness 80
Ignition 64
Ignition key position 1, refer to Radio ready state 64
Ignition key position 2, refer to Ignition on 64
Ignition key, refer to Remote control with integrated
key 30
Ignition lock 64
Ignition, switched off 65
Ignition, switched on 64
Indicator and warning lamps 15
Indicator and warning lamps
– Tire Pressure Monitor
TPM 97
Individual air distribution 109
Inflation pressure monitor, re‐ fer to Flat Tire Monitor 93
Inflation pressure monitor, re‐ fer to Tire Pressure Monitor
TPM 95
Inflation pressure, refer to Tire inflation pressure 222
Information on the navigation data 136
Initializing– Refer to Setting the time and
date 79
Initializing, Flat Tire Monitor
FTM 94
Instrument cluster, refer to Displays 14
Instrument lighting 88
Instruments, refer to Cock‐ pit 12
Integrated key 30
Interactive map 143
Interior lamps 88
Interior lamps
– Remote control 33
Interior mirror 57
Interior temperature, setting
– Air conditioner 108– Automatic climate con‐
trol 110
Internet page 6
Intersection, entering for navi‐ gation 139
J
Jump-starting 254
K Keyless Go, refer to Comfort Access 37
Keyless opening and closing, refer to Comfort Access 37
Key Memory, refer to Personal Profile 31
Key, refer to Remote control with integrated key 30
Kickdown
– Automatic transmission with
Steptronic 71
Knocking control 220
L Lamp and bulb replacement, bulb replacement 244
Seite 284ReferenceEverything from A to Z284
Online Edition for Part no. 01 40 2 919 017 - II/13