change wheel MINI Coupe 2014 (Mini Connected) User Guide
[x] Cancel search | Manufacturer: MINI, Model Year: 2014, Model line: Coupe, Model: MINI Coupe 2014Pages: 288, PDF Size: 6.72 MB
Page 233 of 288

▷If a warning triangle or portable hazard
warning lamp is required, set it up on the
roadside at an appropriate distance from
the rear of the vehicle. Comply with all
safety guidelines and regulations. ◀
The procedure to correct a flat tire depends on
the equipment in the vehicle:
▷Run-flat tires, refer to page 232.▷MINI Mobility System, refer to page 233.▷Wheel change with a compact wheel, refer
to page 249.
MINI Mobility System
Notes
▷Follow the instructions on using the Mobi‐
lity System found on the compressor and
sealant bottle.▷Use of the Mobility System may be ineffec‐
tive if tire damage is greater than approx.
1/8 in/4 mm in size.▷Contact the nearest service center if the tire
cannot be made drivable.▷If possible, do not remove foreign bodies
that have penetrated the tire.▷Pull the speed limit sticker off the sealant
bottle and apply it to the steering wheel.
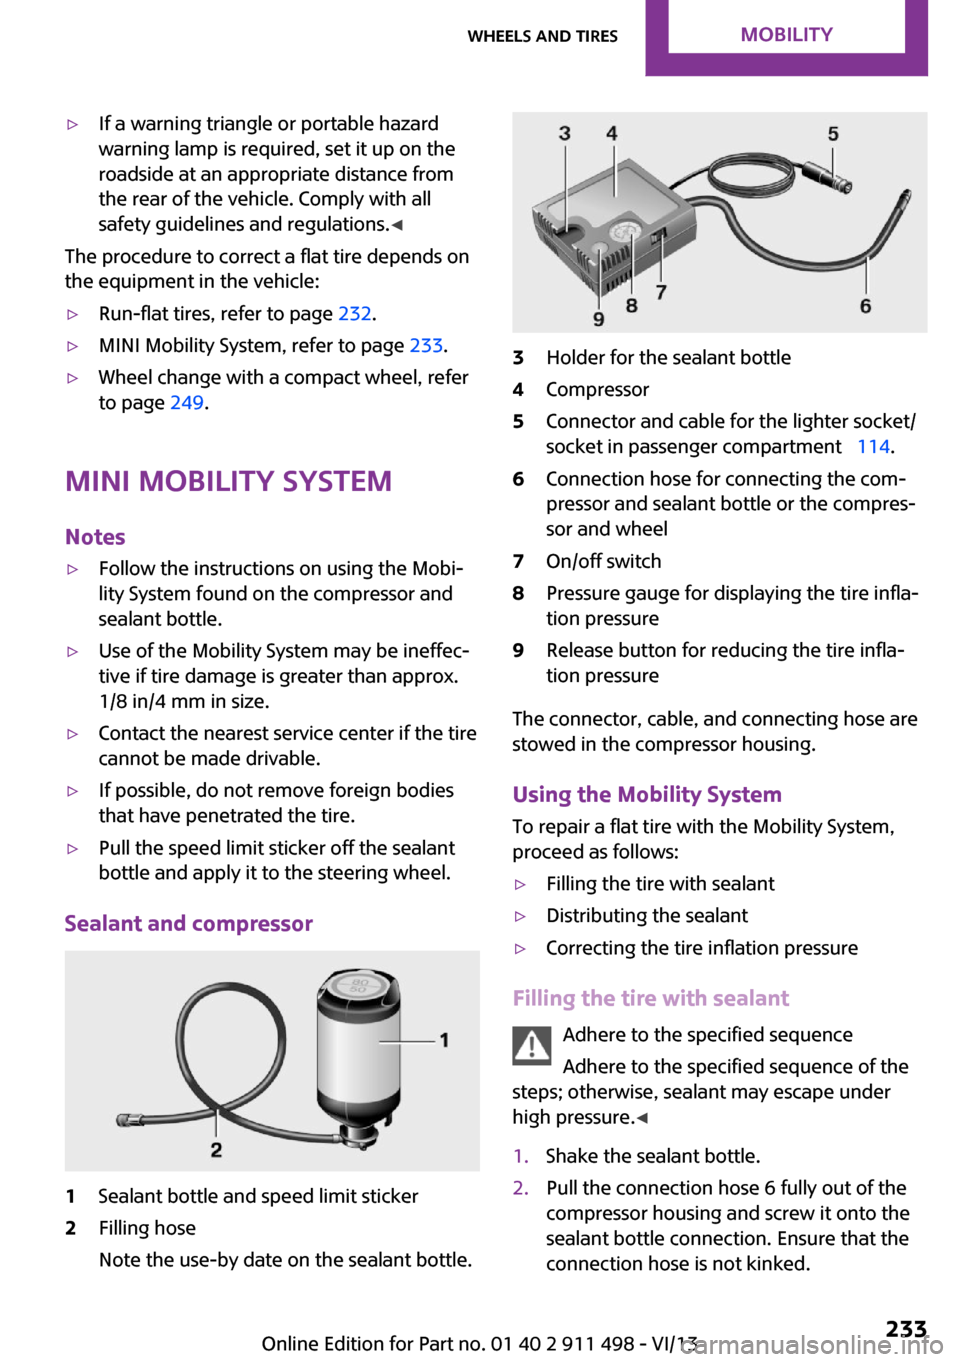
Sealant and compressor
1Sealant bottle and speed limit sticker2Filling hose
Note the use-by date on the sealant bottle.3Holder for the sealant bottle4Compressor5Connector and cable for the lighter socket/
socket in passenger compartment 114.6Connection hose for connecting the com‐
pressor and sealant bottle or the compres‐
sor and wheel7On/off switch8Pressure gauge for displaying the tire infla‐
tion pressure9Release button for reducing the tire infla‐
tion pressure
The connector, cable, and connecting hose are
stowed in the compressor housing.
Using the Mobility System
To repair a flat tire with the Mobility System,
proceed as follows:
▷Filling the tire with sealant▷Distributing the sealant▷Correcting the tire inflation pressure
Filling the tire with sealant
Adhere to the specified sequence
Adhere to the specified sequence of the
steps; otherwise, sealant may escape under
high pressure. ◀
1.Shake the sealant bottle.2.Pull the connection hose 6 fully out of the
compressor housing and screw it onto the
sealant bottle connection. Ensure that the
connection hose is not kinked.Seite 233Wheels and tiresMobility233
Online Edition for Part no. 01 40 2 911 498 - VI/13
Page 249 of 288

1.Squeeze the clips, arrows, and remove the
bulb holder.2.Pull off the bulb and replace it.3.Insert the new bulb and bulb holder in re‐
verse order.4.Re-engage the bulb holder so that it audi‐
bly clicks into place.
John Cooper Works: aerodynamic bumper
The lamps are accessed via the rear side or the
underside of the bumper.
1.Remove the bulb holder by turning it coun‐
terclockwise, arrow.2.Pull off the bulb and replace it.3.Insert the new bulb and bulb holder in re‐
verse order.
License plate lamps
5-watt bulb, C 5 W
Replacing1.Push the lamp to the left in the catch of the
lamp housing using the screwdriver, ar‐
row 1.2.Take out the lamp, arrow 2.3.Replace the bulb.4.Insert the lamp.
Center brake lamp
This lamp uses LED technology for operation.
Contact your service center in the event of a
malfunction.
Changing wheels Notes
Wheel change for run-flat tires:
▷Prepare for the wheel change, refer to
page 251.▷Jack up the vehicle, refer to page 251.▷Tighten the lug bolts, refer to page 252.
Compact wheel
Wheel change with a compact wheel:
▷Remove the compact wheel, refer to
page 250.▷Prepare for the wheel change, refer to
page 251.▷Jack up the vehicle, refer to page 251.▷Mount the compact wheel, refer to
page 251.Seite 249Replacing componentsMobility249
Online Edition for Part no. 01 40 2 911 498 - VI/13
Page 250 of 288

▷Tighten the lug bolts, refer to page 252.▷Drive with the compact wheel, refer to
page 250.
Removing the compact wheel
The screw fitting of the compact wheel is lo‐
cated in the cargo area under the floor mat, on
the floor of the storage compartment holding
the wheel change set.
1.Release the screw fitting with the special
wrench.2.Take out the cover.3.Screw the lifting handle from the onboard
vehicle tool kit onto the thread.4.Raise the lifting handle slightly.5.Squeeze the locking spring.6.Lower the compact wheel with the lifting
handle.7.Lower the compact wheel with the lifting
handle.8.Unscrew the lifting handle again.9.Pull the compact wheel out from under the
vehicle toward the back.10.Lay the compact wheel down with the
valve facing up.11.Unscrew the valve extension from the valve
of the compact wheel.12.Unscrew the dust cap from the extension
and attach it to the valve of the compact
wheel.
The defective wheel cannot be stowed in the
compact wheel holder because it has a differ‐
ent size.
Driving with compact wheel Do not exceed a speed of
50 mph/80 km/h.
Drive conservatively and do not exceed a speed
of 50 mph/80 km/h. Otherwise, changes in the
Seite 250MobilityReplacing components250
Online Edition for Part no. 01 40 2 911 498 - VI/13
Page 251 of 288

driving characteristics could result, for example
reduced track stability on braking, extended
braking distance, and altered self-steering
characteristics in the limit range. In conjunction
with winter tires, these characteristics are more
pronounced. ◀
Only mount one compact wheel
Only one compact wheel may be
mounted. Restore the wheels and tires to their
original size as quickly as possible. Failure to do
so is a safety risk. ◀
Check the tire inflation pressure at the next op‐
portunity and correct it if necessary. Replace
the defective tire as soon as possible and have
the new wheel balanced.
Preparing wheel change
Observe the safety precautions regarding flat
tires, refer to page 232.
Additional safety precautions in the event
of a wheel change
Change the wheel only on a level, firm surface
which is not slippery.
The vehicle or the jack could slip to the side if
you attempt to raise the vehicle on a soft or
slippery surface, snow, ice, tiles, etc. Do not use
a wooden block or similar object as a support
base for the jack, as this would prevent it from
extending to its full support height and reduce
its load-carrying capacity.
To avoid serious or fatal injury: never lie under
the vehicle, and never start the engine while it
is supported by the jack. ◀1.Place the folding wheel chock behind the
front wheel of the other vehicle side; if the
vehicle is on an incline, place it in front of
this wheel. If the vehicle is parked on a
steep incline, additionally secure the vehi‐
cle against rolling.2.Expose the lug bolts if necessary.3.Loosen the lug bolts a half turn.Jacking up vehicle
The vehicle jack is designed for changing
wheels only.
The vehicle jack is designed for changing
wheels only. Do not attempt to raise another
vehicle model with it or to raise any load of any
kind. To do so could cause accidents and per‐
sonal injury. ◀
1.Position the vehicle jack at the jacking point
closest to the wheel.
The entire surface of the jack base must
rest on the ground vertically beneath the
jacking point.2.Guide the jack head into the rectangular re‐
cess of the jacking point when cranking up.3.Jack the vehicle up until the wheel you are
changing is raised from the ground.
Mounting the compact wheel
1.Unscrew the lug bolts and remove the
wheel.2.Remove accumulations of mud or dirt from
the mounting surfaces of the wheel and
hub. Also clean the lug bolts.Seite 251Replacing componentsMobility251
Online Edition for Part no. 01 40 2 911 498 - VI/13
Page 277 of 288

Bluetooth connection, activat‐ing/deactivating 183, 193
Bluetooth hands-free sys‐ tem 182
Brake assistant 101
Brake discs, breaking in 124
Brake fluid, refer to Service re‐ quirements 81
Brake force distribution, elec‐ tronic 101
Brake pads, breaking in 124
Brakes– Handbrake 67
Brakes, MINI maintenance
system 241
Brakes, service require‐ ments 81
Brake system, MINI mainte‐ nance system 241
Braking, notes 126
Breakdown assistance, Road‐ side Assistance 254
Breaking in 124
Brightness on the Control Dis‐ play 80
Button for starting the engine, refer to Start/Stop button 65
C
Calendar 208
California Proposition 65 Warning 7
Car battery, refer to Vehicle battery 252
Car care products 260
Care, displays 263
Care, vehicle 260
Cargo area
– Comfort Access 40– Emergency activation, refer
to Unlocking manually 38– Emergency unlocking 39– Opening from the out‐
side 37
Cargo area lamp, refer to Inte‐
rior lamps 88
Cargo area tailgate, refer to
Tailgate 37
Car horn, refer to Horn 14
Carpet, care 262
Car phone, refer to Tele‐ phone 182, 192
Car wash 259
CBC, Cornering Brake Con‐ trol 101
CBS Condition Based Serv‐ ice 241
CD 168
CD/DVD drives, care 263
CD player 168
Center console, refer to Around the center con‐
sole 18
Central locking– Comfort Access 39– From the inside 37– From the outside 34
Central locking system
– Concept 33– From the outside 33
Central screen, see Control
Display 20
Changes, technical, refer to Safety 7
Changing wheels/tires 231
Check Control 82
Children, transporting 60
Child restraint fixing system LATCH 62
Child restraint fixing sys‐ tems 60
Child restraint fixing systems, mounting 60
Child seat, mounting 60
Child seats, refer to Transport‐ ing children safely 60
Chrome parts, care 262
Circulation of air, refer to Re‐ circulated air
mode 109, 111
Cleaning, displays 263
Cleaning, refer to Care 259
Climate 108
Climate mode– Ventilation 113
Clock 74
Clock
– 12h/24h format 79– Setting the time and date 79
Closing
– From the inside 37– From the outside 34
Clutch, breaking in 124
Cockpit 14
Cold start, refer to Starting the engine 66
Combination instrument, refer to Displays 16
Combination switch, refer to Turn signal/high beams/
headlamp flasher 68
Combination switch, refer to Washer/wiper system 68
Comfort Access
– In the car wash 41– Replacing the battery 41
Comfort area, refer to Around
the center console 18
Compact wheel, inflation pres‐ sure 226
Compartment for remote con‐ trol, refer to Ignition lock 65
Computer 75
Computer, displaying informa‐ tion 75
Condition Based Service CBS 241
Confirmation signals for vehi‐ cle locking/unlocking 35
Connecting, mobile phone, re‐ fer to Pairing the mobile
phone 182, 193
Consumption, refer to Aver‐ age fuel consumption 76
Contacts 189, 205
Control Display 20
Control Display, care 263
Control Display, settings 80
Controls and displays 14
Seite 277Everything from A to ZReference277
Online Edition for Part no. 01 40 2 911 498 - VI/13
Page 279 of 288

Engine oil, additives, refer toApproved engine oils 239
Engine oil, alternative oil types 239
Engine oil change intervals, refer to Service require‐
ments 81
Engine oil, dip stick 238
Engine oil, filling capacity 269
Engine oil, MINI maintenance system 241
Engine oil types, alterna‐ tive 239
Engine oil types, ap‐ proved 239
Engine, overheating, refer to Coolant temperature 75
Engine power, refer to Engine data 266
Engine, RPM 266
Engine start, assistance 254
Engine, starting 66
Engine, starting– Comfort Access 39
Engine, starting, Start/Stop
button 65
Engine, stopping, Start/Stop button 65
Engine, switching off 67
ESP Electronic Stability Pro‐ gram, refer to Dynamic Sta‐
bility Control DSC 101
Exchanging wheels/tires 231
Exterior mirrors 58
Exterior mirrors, adjusting 58
Exterior mirrors, folding in and out 58
Exterior sensors, care 262
External devices 171
External temperature dis‐ play 74
External temperature display
– Changing the unit of meas‐
ure 78– On computer 78
External temperature warn‐
ing 74
Externel temperature dis‐
play 74
F
Fader 158
Failure messages, refer to Check Control 82
False alarm, refer to Avoiding unintentional alarms 42
Fastening safety belts, refer to Safety belts 56
Fault messages, refer to Check Control 82
Filling capacities 269
Filter– Refer to Activated-charcoal
filter 110– Refer to Microfilter 110– Refer to Microfilter/acti‐
vated-charcoal filter with
automatic climate con‐
trol 112
First aid kit 254
First aid, refer to First aid kit 254
Flashing when locking/unlock‐ ing 35
Flat tire
– Flat Tire Monitor 94– Indicator/warning lamp 94– Run-flat tire 95– Tire Pressure Monitor
TPM 95
Flat Tire Monitor FTM 93
Flat Tire Monitor FTM
– Flat tire message 94– Initializing the system 94– Limits of the system 93– Snow chains 93
Flat tire, wheel change 249
Floor mats, care 262
FM/AM station 160
Fog lamps 87
Folding roof, refer to Convertible top with
integrated sliding sun‐
roof 43
Foot brake 126
Footwell lamps, refer to Inte‐ rior lamps 88
Front airbags 90
Front fog lamp, bulb replace‐ ment 246
Front fog lamps 87
Front lamps, bulb replace‐ ment 245
Front passenger airbags, de‐ activating 91
FTM Flat Tire Monitor 93
Fuel 220
Fuel– Refer to Average fuel con‐
sumption 76
Fuel, additives 220
Fuel, average consump‐ tion 76
Fuel cap, closing 218
Fuel consumption display
– Average fuel consump‐
tion 76
Fuel filler flap, closing 218
Fuel filler flap, opening 218
Fuel filler flap, unlocking in case of an electrical malfunc‐
tion 218
Fuel gauge 75
Fuel, saving 131
Fuel tank capacity, refer to Filling capacities 269
Fuel tank contents, refer to Filling capacities 269
Fuel tank, refer to Filling ca‐ pacities 269
Fuse 253
G Gasoline 220
Gasoline gauge, refer to Fuel gauge 75
Gasoline quality 220
Gas station recommenda‐ tion 149
Seite 279Everything from A to ZReference279
Online Edition for Part no. 01 40 2 911 498 - VI/13
Page 284 of 288

Shift lever– Automatic transmission with
Steptronic 72
Shift paddles on the steering
wheel 73
Short commands, voice acti‐ vation 270
Side airbags 90
Side windows, refer to Win‐ dows 42
Slot for remote control 65
Snap-in adapter, mobile phone 202
Socket, OBD Onboard Diagno‐ sis 242
Software applications, iPhone 212
Software part num‐ ber 182, 192
Software update 178
Special destinations, naviga‐ tion 142
Special equipment, series equipment 6
Speed, average 76
Speed limit 99
Speed limit
– Setting 99
Speedometer 16
Speed, with winter tires 232
Spoken instructions, naviga‐ tion 149
Sport button 103
Sport program, automatic transmission with Step‐
tronic 72
Stability control systems 101
Start/Stop button 65
Start/Stop button, starting the engine 66
Start/Stop button, switching off the engine 67
Starting the engine 66
Start problems, refer to Jump- starting 254
State/province, selecting for navigation 138
Stations, stored 166
Station, storing 161
Status information, onboard monitor 23
Steering wheel 59
Steering wheel– Shift paddles 73
Steering wheel, adjusting 59
Steering wheel lock 65
Stopping, engine 67
Storage, tires 232
Storing the vehicle 263
Street, entering for naviga‐ tion 139
Summer tires, refer to Wheels and tires 222
Summer tires, tread 229
Switches, refer to Cockpit 14
Switching off, engine 67
Switching off, vehicle 67
Symbols 6
T Tachometer 75
Tailgate
– Comfort Access 40– Emergency activation 39– Emergency unlocking 39– Opening/closing 37– Opening from the out‐
side 37– Unlocking manually 38– Unlocking with remote con‐
trol 35
Tail lamps 247
Tank gauge, refer to Fuel gauge 75
Tasks 209
Technical changes, refer to Safety 7
Technical data 266
Telephone 182, 192
Telephone, adjusting the vol‐ ume 185, 197
Temperature– Air conditioner 109– Automatic climate con‐
trol 112– Changing the unit of meas‐
ure 78
Temperature, coolant, refer to
Coolant temperature 75
Temperature display
– External temperature 74– External temperature warn‐
ing 74– Setting the unit 78
Temperature warning 74
Text messages 207
Theft alarm system, refer to Alarm system 41
Time
– Setting the time 79– Setting the time zone 79
Tire age 230
Tire identification marks 228
Tire inflation pressure 222
Tire inflation pressure
– Pressure loss 94, 96
Tire pressure monitor, refer to
Flat Tire Monitor 93
Tire Pressure Monitor TPM
– System limits 95– System reset 96– Warning lamp 97
Tire Quality Grading 228
Tires
– Flat tire 94– Inflation pressure 222– Inflation pressure loss 97– Pressure monitoring, refer to
Tire Pressure Monitor
TPM 95
Tires, breaking in 124
Tires, changing 231
Tires, condition 229
Tires, damage 230
Tire size 228
Tires, minimum tread 230
Tires, retreaded tires 231
Tires, storage 232
Tire tread 229
Seite 284ReferenceEverything from A to Z284
Online Edition for Part no. 01 40 2 911 498 - VI/13
Page 285 of 288

Toll roads, route 147
Tone 158
Tool kit, refer to Onboard ve‐ hicle tool kit 243
Tools, refer to Onboard vehi‐ cle tool kit 243
Torque, refer to Engine data 266
Towing another vehicle 256
Towing, being towed 256
Town/city, navigation 138
Tow-starting 256
TPM, refer to Tire Pressure Monitor 95
Traction control 102
Traffic bulletins, naviga‐ tion 151
Transmission– Overriding selector lever
lock in case of automatic
transmission with Step‐
tronic 73
Transmission lock
– Refer to Changing selector
lever positions 72
Transmission, manual 71
Transporting children safely 60
Treble, tone 158
Trip-distance counter, refer to Trip odometer 74
Triple turn signal activa‐ tion 68
Trip odometer 74
Trips, planning 145
Trunk
– Opening from the inside 38
Trunk lid
– Emergency activation, refer
to Unlocking manually 38
Trunk lid, refer to Tailgate 37
Trunk, refer to Cargo area 37
Turning lamps, refer to Adap‐ tive Light Control 87
Turn signal
– Indicator lamp 16Turn signal, bulb replace‐
ment 246
Turn signals 68
Turn signals, triple turn signal activation 68
U
Uniform Tire Quality Grading/ UTQG 228
Unintentional alarms, avoid‐ ing 42
Units– Average fuel consump‐
tion 78– Temperature 78
Units of measure, changing on
Control Display 78
Unlocking
– From the inside 37– From the outside 34– Tailgate 40– Without remote control, re‐
fer to Comfort Access 39
Update, software 178
Upholstery care 262
Upholstery material care 262
V
Vehicle
– Identification num‐
ber 182, 192
Vehicle battery 252
Vehicle, breaking in 124
Vehicle care 260
Vehicle care, refer to Care 259
Vehicle equipment 6
Vehicle paintwork, care 261
Vehicle storage 263
Vehicle, switching off 67
Vehicle wash 259
Ventilation
– Air conditioning 113
Version of the navigation
data 136
Video playback, iPhone 174
Video playback, snap-in adapter 174
Voice activation– Navigation 144
Voice activation, short com‐
mands 270
Voice activation system 26
Volume, setting 158
W Warning and indicator lamps 17
Warning messages, refer to Check Control 82
Warning signal volumes 158
Warning triangle 254
Washer/wiper system 68
Washer/wiper system, rain sensor 69
Washer/wiper system, washer fluid 70
Washer fluid 70
Washer fluid reservoir 70
Washing, vehicle 259
Welcome lamps 86
Wheel change 249
Wheels and tires 222
Wheels, changing 231
Wheels, Flat Tire Monitor FTM 93
Wind baffle, refer to Wind de‐ flector 47, 53
Wind deflector 47, 53
Windows
– Closing 42– Convenient operation 34– Opening 42
Windows, care 260
Windows, defrosting and de‐ fogging 109
Windshield
– Defrosting and defog‐
ging 109
Windshield, defrosting, refer
to Defrosting windows 109
Seite 285Everything from A to ZReference285
Online Edition for Part no. 01 40 2 911 498 - VI/13