clock MINI Coupe 2014 Owner's Manual (Mini Connected)
[x] Cancel search | Manufacturer: MINI, Model Year: 2014, Model line: Coupe, Model: MINI Coupe 2014Pages: 288, PDF Size: 6.72 MB
Page 23 of 288

Changing settings1.Select a field.2.Turn the MINI joystick until the desired set‐
ting is displayed.3.Press the MINI joystick to confirm the set‐
ting.
Activating/deactivating the functions
Several menu items are preceded by a check‐box. It indicates whether the function is acti‐
vated or deactivated. Selecting the menu item
activates or deactivates the function.
The function is activated.
The function is deactivated.
Example: setting the
clock
Setting the clock1. Press the button. The main menu is
displayed.2.Turn the MINI joystick until "Settings" is
highlighted and press the MINI joystick.3.If necessary, move the MINI joystick to the
left to display "Time/Date".4.Turn the MINI joystick until "Time/Date" is
highlighted and press the MINI joystick.5.Turn the MINI joystick to set the hours and
press the MINI joystick.6.Turn the MINI joystick to set the minutes
and press the MINI joystick.
Status information
Status fieldThe following information is displayed in the
status field at the top right:
Seite 23Onboard monitorAt a glance23
Online Edition for Part no. 01 40 2 911 498 - VI/13
Page 33 of 288
Personal Profile
The concept
You can set several of your vehicle's functions
to suit your personal needs and preferences.▷Through Personal Profile, most of these set‐
tings are stored for the remote control cur‐
rently in use.▷While the vehicle is being unlocked, the re‐
mote control is recognized and the settings
stored with it are called up and imple‐
mented.▷Your personal settings will be recognized
and called up again even if the vehicle has
been used in the meantime by someone
else with another remote control.▷The individual settings are stored for no
more than three remote controls.
Personal Profile settings
The following functions and settings can be
stored in a profile.
More information on the settings can be found
under:
▷Response of the central locking system
when the car is being unlocked, refer to
page 34.▷Automatic locking of the vehicle, refer to
page 37.▷Triple turn signal activation, refer to
page 68.▷Settings for the displays on the onboard
monitor, in the speedometer, and in the
tachometer:▷12h/24h clock format, refer to
page 79.▷Date format, refer to page 80.▷Brightness of the Control Display, refer
to page 80.▷Language on the Control Display, refer
to page 80.▷Units of measure for fuel consumption,
distance covered/remaining distances,
and temperature, refer to page 78.▷Light settings:▷Headlamp courtesy delay feature, refer
to page 86.▷Daytime running lights, refer to
page 86.▷Automatic climate control, refer to
page 110: AUTO program, activating/deac‐
tivating the cooling function, setting the
temperature, air volume, and air distribu‐
tion.▷Entertainment:▷Tone settings, refer to page 158.▷Volume, refer to page 158.
Central locking system
The concept
The central locking system becomes active
when the driver's door is closed.
The system simultaneously engages and re‐
leases the locks on the following:
▷Doors.▷Tailgate.▷Fuel filler flap.
Operating from the outside
▷Via the remote control.▷Via the door lock.▷In cars with Comfort Access, via the door
handles on the driver's and front passenger
sides.
The following takes place simultaneously when
locking/unlocking the vehicle via the remote
control:
▷Depending on the vehicle equipment, the
anti-theft protection is switched on and off
as well. The anti-theft protection makes itSeite 33Opening and closingControls33
Online Edition for Part no. 01 40 2 911 498 - VI/13
Page 50 of 288

Closing1.Switch the ignition on so that the windows
can be slightly lowered automatically. Re‐
move the wind deflector if necessary.2.Press button 1.
The convertible top is unlocked and moves
up slightly.3.Exit the vehicle.4.Guide the convertible top forward.5.Pull the convertible top onto the windshield
frame.6.Turn the handle clockwise until it engages
audibly.
The convertible top is locked.
If the convertible top was open for a
lengthy period, it may be necessary to ap‐
ply greater force when locking the top.7.Fold the handle back in.
MINI Roadster: semi-auto‐
matic convertible top
General information
The fabric convertible top combines reliable
weather protection with simple and convenient
operation.
To ensure that you will continue to enjoy your
MINI Convertible, here are a few tips:
▷It is advisable that you close the convertible
top when you park the vehicle. Not only
does the closed convertible top protect thevehicle interior against unanticipated
weather damage, it also offers a certain
amount of theft protection. However, even
when the convertible top is closed, valua‐
bles should only be stored in the locked
cargo area.▷Do not attach roof rack systems to the
convertible top.
Safety notes on the convertible top
▷At temperatures below +14 ℉/-10 ℃,
do not move the convertible top or
else damage could result.▷Do not leave the convertible top open for
longer than one day while it is wet; other‐
wise, damage could be caused by the mois‐
ture.▷Do not place any objects on the convertible
top; otherwise, they could fall during oper‐
ation of the convertible top and cause
damage or injury.▷The convertible top pivots up when it is
opened and closed. When moving the
convertible top in places like garages, en‐
sure that there is a minimum height of
79 inches/2 meters; otherwise, damage
could result.▷When the rollover protection system is ex‐
tended, do not move the convertible top
under any circumstances.▷Always carry out the convertible top move‐
ment to the end. Driving when the
convertible top is not fully opened or closed
may result in damage or injury.▷During opening and closing, ensure that
people cannot be injured by the convertible
top frame or other moving parts. Keep chil‐
dren away from the opening path of the
convertible top.▷For safety reasons, only move the
convertible top while the vehicle is station‐
ary, if possible. ◀Seite 50ControlsOpening and closing50
Online Edition for Part no. 01 40 2 911 498 - VI/13
Page 52 of 288

2.Push the unlocked convertible top upward
at the handle and open it about a hand's
width.3.Press the switch back to open the
convertible top. The windows opens during
this procedure.
Closing
1.Press the switch forward.2.Pull the convertible top onto the windshield
frame.3.Turn the handle clockwise until it engages
audibly.
The convertible top is locked.
If the convertible top was open for a
lengthy period, it may be necessary to ap‐
ply greater force when locking the top.4.Fold the handle back in.5.Close the windows if necessary.Manual closing in case of electrical
malfunction
Only close the convertible top manually if
there is an electrical malfunction
Only close the convertible top manually if this is
absolutely necessary; never open it manually.
Damage may occur if incorrectly operated. The
closing procedure must be fully completed;
otherwise, there is a risk of injury or damage. ◀
Before closing
Lower the side windows slightly, switch off the
engine, and switch off the ignition.1.Take out the cover plate, refer to
page 116.2.Take out the cargo area insert, arrow.3.Using the hex key from the onboard vehicle
tool kit, unscrew the gold-colored screw,
see arrow, all the way to the stop, approx.
four to five turns.Seite 52ControlsOpening and closing52
Online Edition for Part no. 01 40 2 911 498 - VI/13
Page 53 of 288

Closing1.Hold on to the convertible top frame and
guide it to the windshield frame.2.Fold out the handle and turn it counter‐
clockwise all the way to the stop.3.Pull the convertible top onto the windshield
frame.4.Turn the handle clockwise until it engages
audibly.
The convertible top is locked.
MINI Roadster: wind de‐
flector
The wind deflector keeps air movements in the
passenger compartment to a minimum when
the convertible top is open and provides a
comfortable ride, even at high speeds.
Do not allow pointed object to come into con‐
tact with the wind deflector as these may dam‐
age the net.
Before installing
1.Take the wind deflector out of the storage
pouch.2.Unfold the wind deflector, arrow.Installation1.Insert the wind deflector with parts 1 facing
back into the holders 2 on the rollover bars.2.Push the wind deflector down until it en‐
gages, arrow 3.
Attach the wind deflector properly
The wind deflector must be firmly en‐
gaged; otherwise, it may come lose from the
fixations at high speeds. ◀
Removing The unit is removed in the reverse order from
which it was mounted. Pull the wind deflector
upward out of the holders.
Storage
Fold up the wind deflector 1 and slide it into
the storage pouch 2.
The wind deflector can be stored on the rear
storage shelf behind the seats, refer to
page 120.
Seite 53Opening and closingControls53
Online Edition for Part no. 01 40 2 911 498 - VI/13
Page 74 of 288
DisplaysVehicle equipment
This chapter describes all series equipment as
well as country-specific and special equipment
offered for this model series.Therefore, it also
describes equipment that may not be found in
your vehicle, for instance due to the selected
special equipment or the country version. This
also applies to safety-related functions and sys‐
tems.
Odometer, external tem‐
perature display, clock
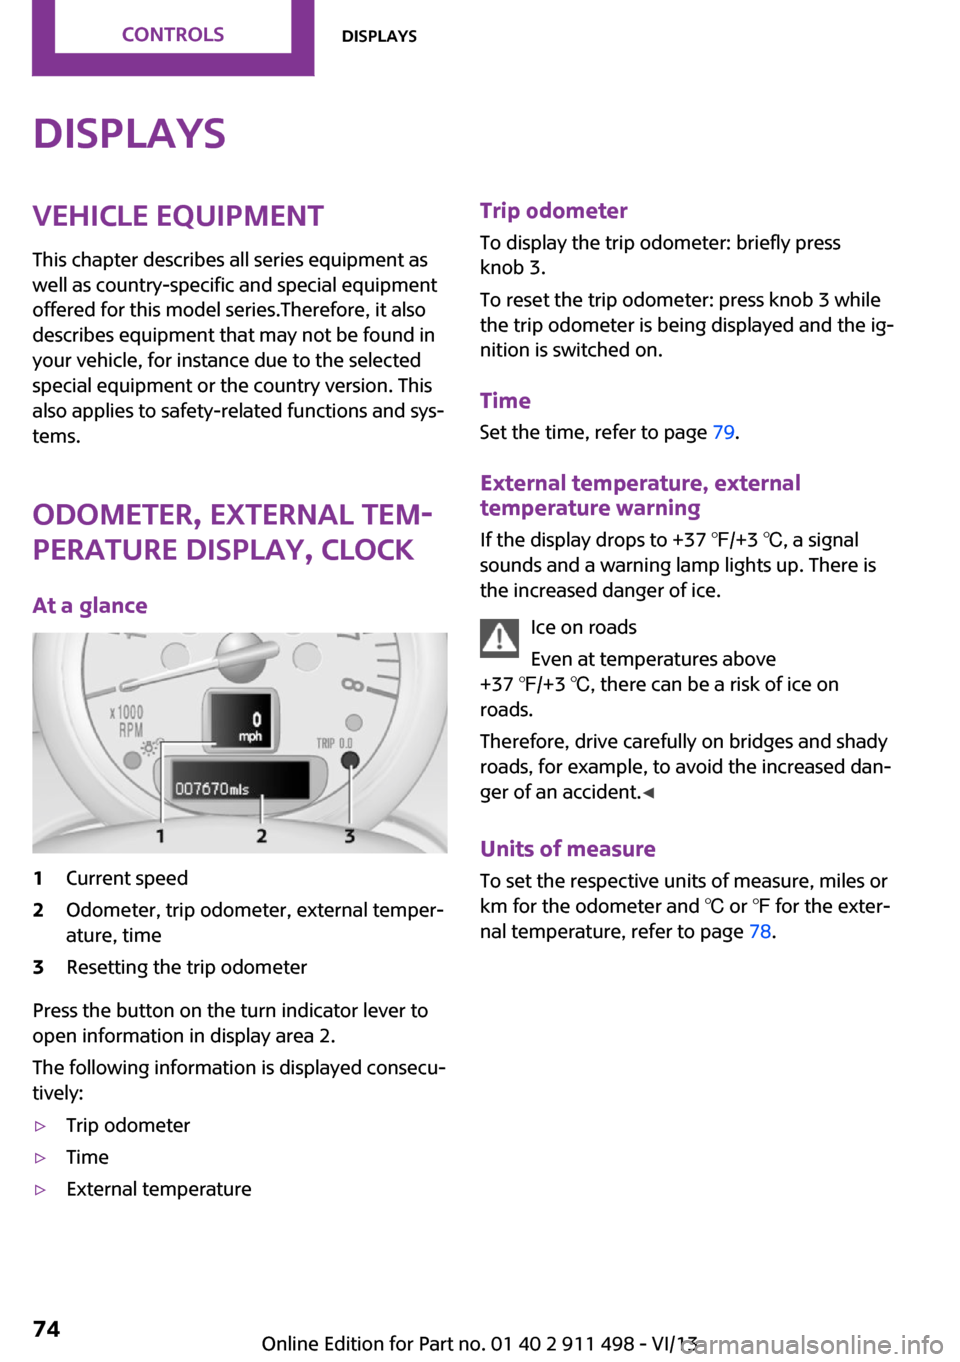
At a glance1Current speed2Odometer, trip odometer, external temper‐
ature, time3Resetting the trip odometer
Press the button on the turn indicator lever to
open information in display area 2.
The following information is displayed consecu‐
tively:
▷Trip odometer▷Time▷External temperatureTrip odometer
To display the trip odometer: briefly press
knob 3.
To reset the trip odometer: press knob 3 while
the trip odometer is being displayed and the ig‐
nition is switched on.
Time Set the time, refer to page 79.
External temperature, external temperature warning
If the display drops to +37 ℉/+3 ℃, a signal
sounds and a warning lamp lights up. There is
the increased danger of ice.
Ice on roads
Even at temperatures above
+37 ℉/+3 ℃, there can be a risk of ice on
roads.
Therefore, drive carefully on bridges and shady
roads, for example, to avoid the increased dan‐
ger of an accident. ◀
Units of measure
To set the respective units of measure, miles or
km for the odometer and ℃ or ℉ for the exter‐
nal temperature, refer to page 78.Seite 74ControlsDisplays74
Online Edition for Part no. 01 40 2 911 498 - VI/13
Page 79 of 288
changed. The settings are stored for the remote
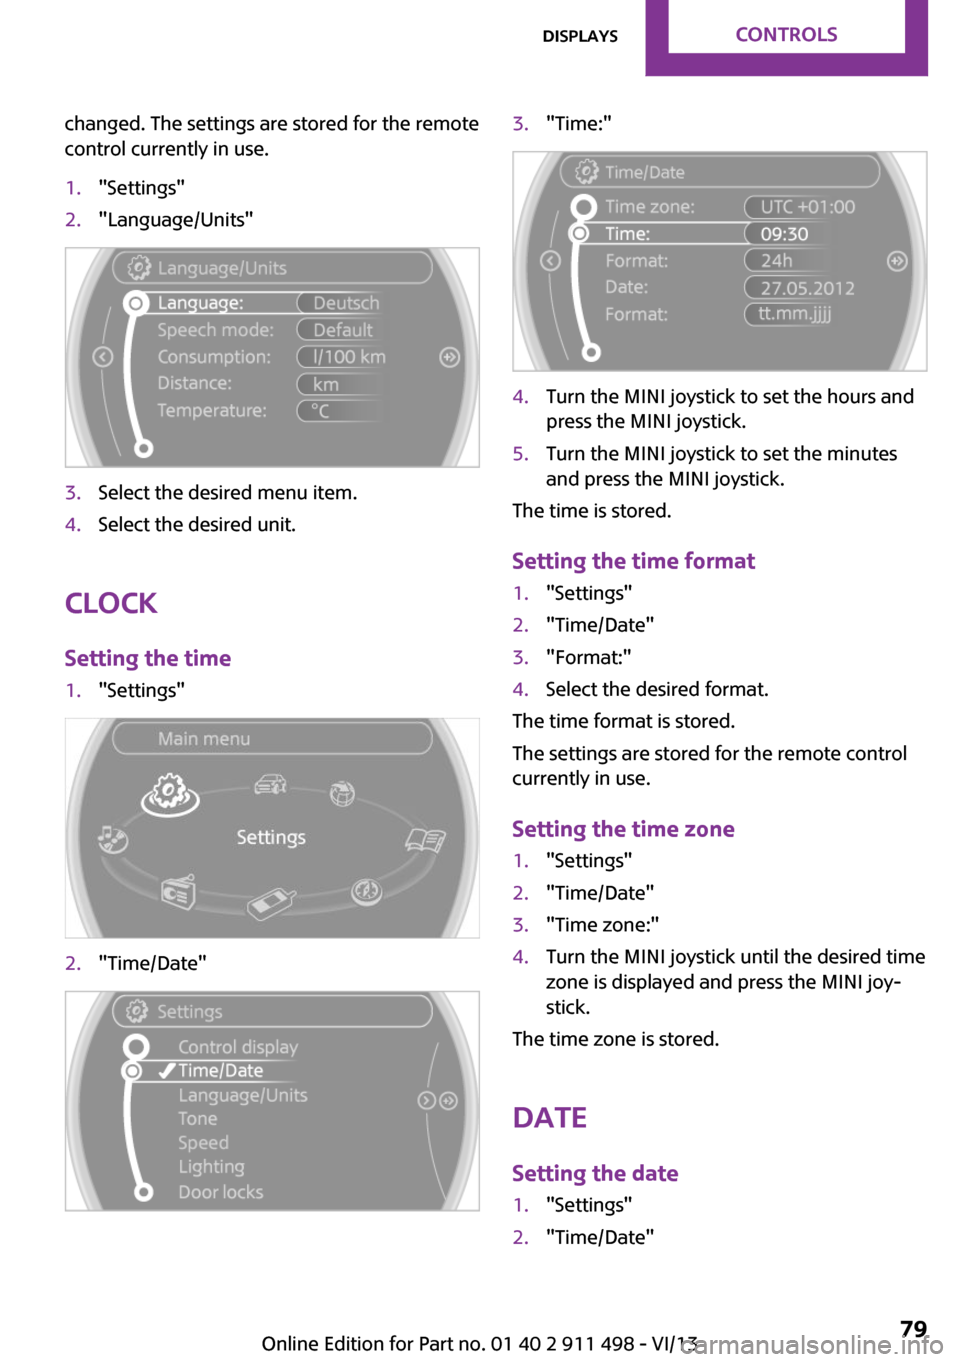
control currently in use.1."Settings"2."Language/Units"3.Select the desired menu item.4.Select the desired unit.
Clock
Setting the time
1."Settings"2."Time/Date"3."Time:"4.Turn the MINI joystick to set the hours and
press the MINI joystick.5.Turn the MINI joystick to set the minutes
and press the MINI joystick.
The time is stored.
Setting the time format
1."Settings"2."Time/Date"3."Format:"4.Select the desired format.
The time format is stored.
The settings are stored for the remote control
currently in use.
Setting the time zone
1."Settings"2."Time/Date"3."Time zone:"4.Turn the MINI joystick until the desired time
zone is displayed and press the MINI joy‐
stick.
The time zone is stored.
Date
Setting the date
1."Settings"2."Time/Date"Seite 79DisplaysControls79
Online Edition for Part no. 01 40 2 911 498 - VI/13
Page 90 of 288
SafetyVehicle equipment
This chapter describes all series equipment as
well as country-specific and special equipment
offered for this model series.Therefore, it also
describes equipment that may not be found in
your vehicle, for instance due to the selected
special equipment or the country version. This
also applies to safety-related functions and sys‐
tems.
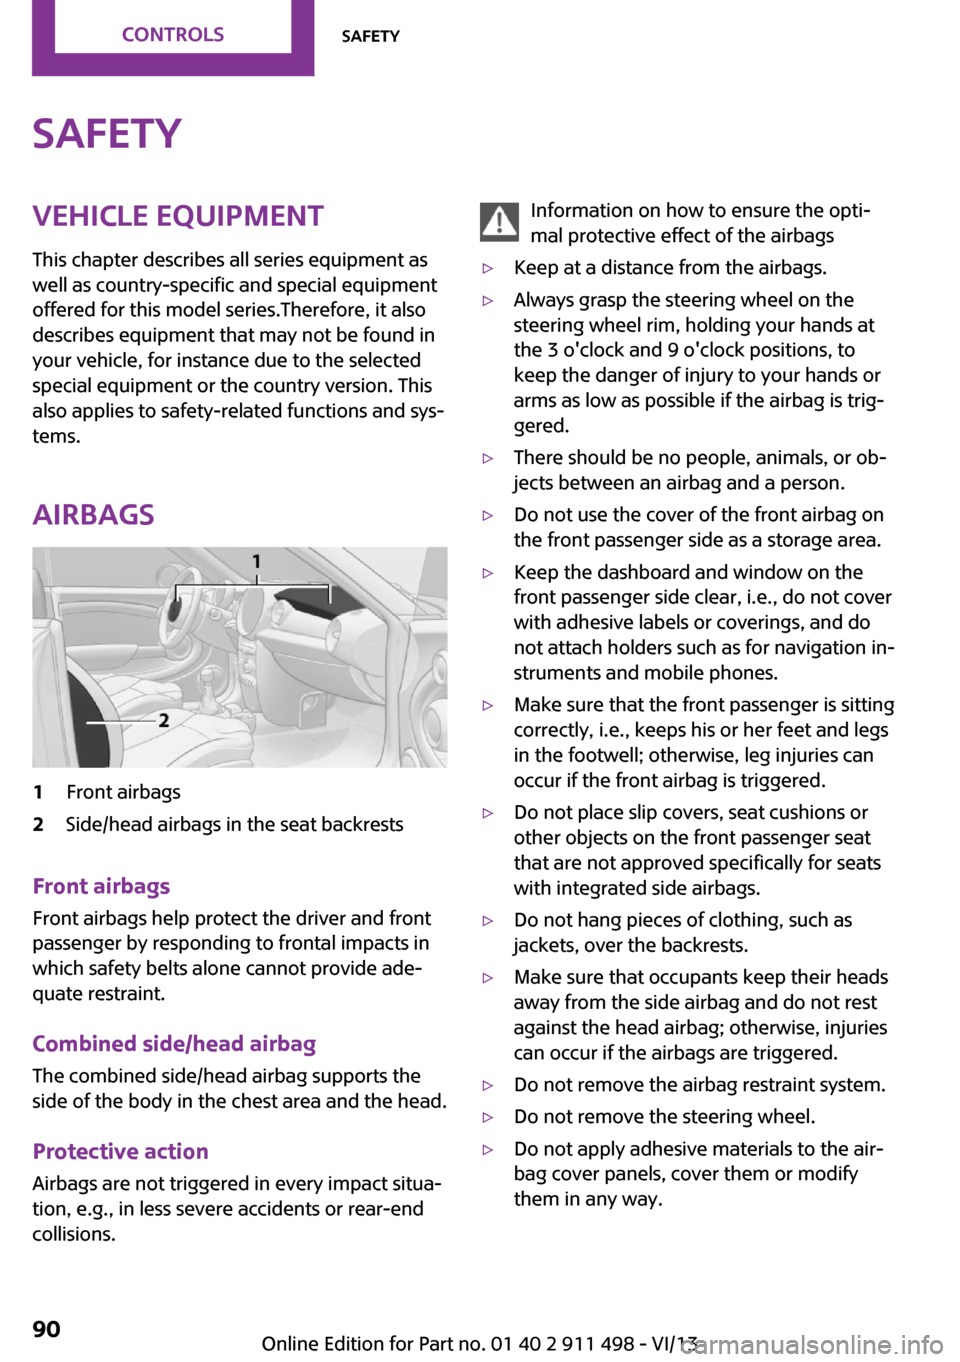
Airbags1Front airbags2Side/head airbags in the seat backrests
Front airbags
Front airbags help protect the driver and front
passenger by responding to frontal impacts in
which safety belts alone cannot provide ade‐
quate restraint.
Combined side/head airbag
The combined side/head airbag supports the
side of the body in the chest area and the head.
Protective action Airbags are not triggered in every impact situa‐
tion, e.g., in less severe accidents or rear-end
collisions.
Information on how to ensure the opti‐
mal protective effect of the airbags▷Keep at a distance from the airbags.▷Always grasp the steering wheel on the
steering wheel rim, holding your hands at
the 3 o'clock and 9 o'clock positions, to
keep the danger of injury to your hands or
arms as low as possible if the airbag is trig‐
gered.▷There should be no people, animals, or ob‐
jects between an airbag and a person.▷Do not use the cover of the front airbag on
the front passenger side as a storage area.▷Keep the dashboard and window on the
front passenger side clear, i.e., do not cover
with adhesive labels or coverings, and do
not attach holders such as for navigation in‐
struments and mobile phones.▷Make sure that the front passenger is sitting
correctly, i.e., keeps his or her feet and legs
in the footwell; otherwise, leg injuries can
occur if the front airbag is triggered.▷Do not place slip covers, seat cushions or
other objects on the front passenger seat
that are not approved specifically for seats
with integrated side airbags.▷Do not hang pieces of clothing, such as
jackets, over the backrests.▷Make sure that occupants keep their heads
away from the side airbag and do not rest
against the head airbag; otherwise, injuries
can occur if the airbags are triggered.▷Do not remove the airbag restraint system.▷Do not remove the steering wheel.▷Do not apply adhesive materials to the air‐
bag cover panels, cover them or modify
them in any way.Seite 90ControlsSafety90
Online Edition for Part no. 01 40 2 911 498 - VI/13
Page 218 of 288
RefuelingVehicle equipmentThis chapter describes all series equipment as
well as country-specific and special equipment
offered for this model series.Therefore, it also
describes equipment that may not be found in
your vehicle, for instance due to the selected
special equipment or the country version. This
also applies to safety-related functions and sys‐
tems.
General information Refuel promptly
At the latest, refuel at a range below
30 miles/50 km; otherwise, the engine function
is not ensured and damage may occur. ◀
Notes Switch off the engine before refueling
Always switch off the engine before refu‐
eling; otherwise, fuel cannot be added to the
tank and a message will be displayed. ◀
Observe when handling fuel▷Take all precautionary measures and
observe all applicable regulations
when handling fuel.▷Do not carry any spare fuel containers in
your vehicle. They can develop a leak and
cause an explosion or cause a fire in the
event of an accident. ◀
Fuel cap
Opening
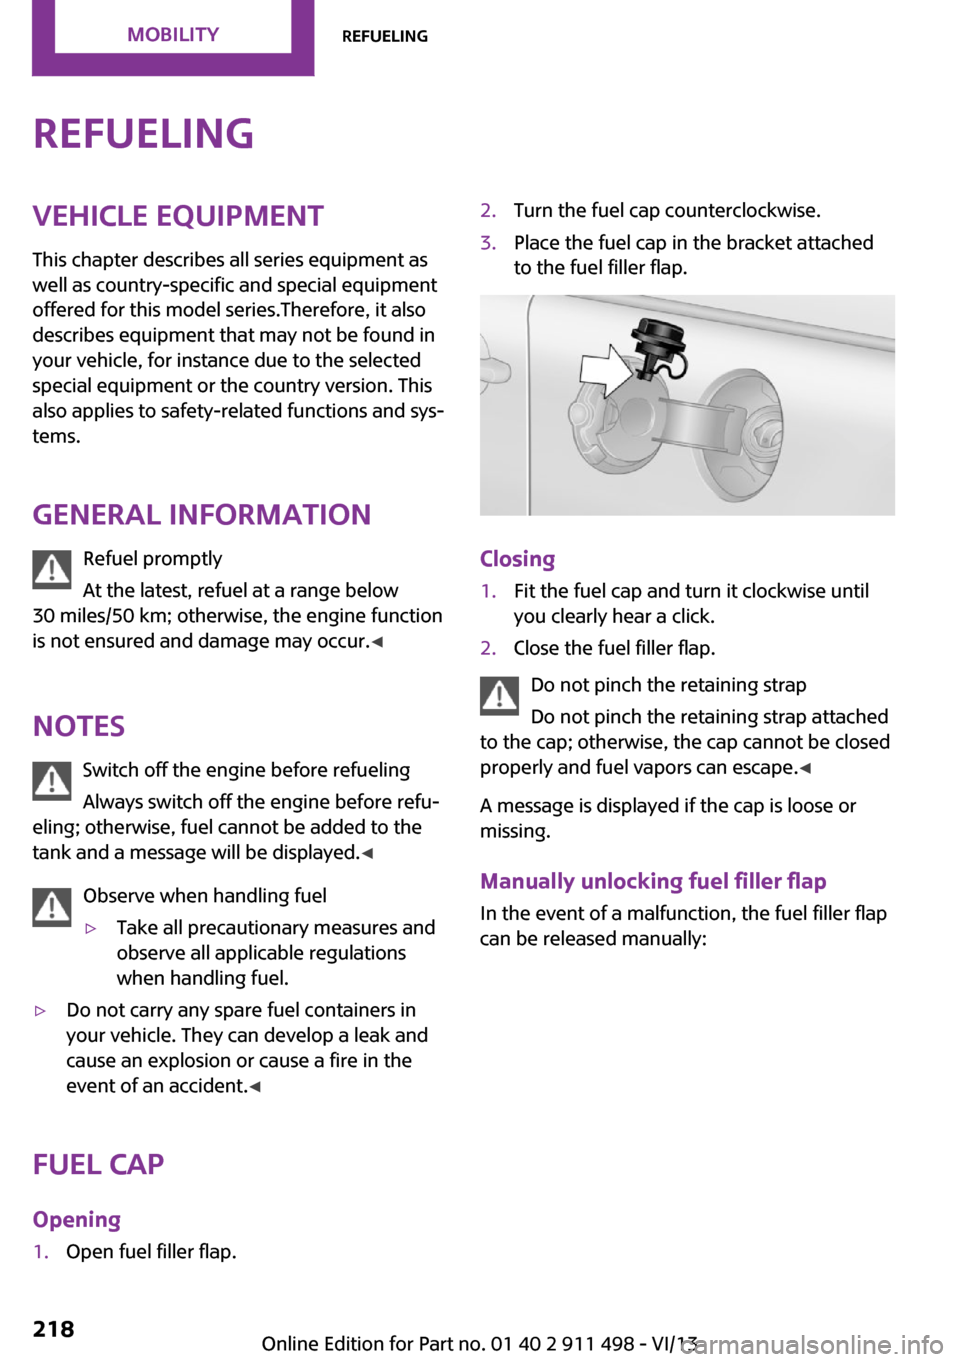
1.Open fuel filler flap.2.Turn the fuel cap counterclockwise.3.Place the fuel cap in the bracket attached
to the fuel filler flap.
Closing
1.Fit the fuel cap and turn it clockwise until
you clearly hear a click.2.Close the fuel filler flap.
Do not pinch the retaining strap
Do not pinch the retaining strap attached
to the cap; otherwise, the cap cannot be closed
properly and fuel vapors can escape. ◀
A message is displayed if the cap is loose or
missing.
Manually unlocking fuel filler flap In the event of a malfunction, the fuel filler flap
can be released manually:
Seite 218MobilityRefueling218
Online Edition for Part no. 01 40 2 911 498 - VI/13
Page 240 of 288

CoolantVehicle equipment
This chapter describes all series equipment as
well as country-specific and special equipment
offered for this model series.Therefore, it also
describes equipment that may not be found in
your vehicle, for instance due to the selected
special equipment or the country version. This
also applies to safety-related functions and sys‐
tems.
General information Danger of burns from hot engine
Do not open the cooling system while the
engine is hot; otherwise, escaping coolant may
cause burns. ◀
Suitable additives
Only use suitable additives; otherwise,
engine damage may occur. The additives are
harmful to your health. ◀
Coolant consists of water and additives.
Not all commercially available additives are
suitable for your MINI vehicle. Ask your service
center for suitable additives.
Coolant temperature
If the coolant and therefore the engine over‐
heat, a warning lamp lights up. A message ap‐
pears on the Control Display.
Coolant level Checking1.Do not open the hood until the engine has
cooled down.2.Turn the expansion tank cap counterclock‐
wise slightly to allow any accumulated
pressure to escape; then continue turning
to open.3.The coolant level is correct if it is between
the markings. The markings are located on
the side of the coolant reservoir.
Refilling
1.Do not open the hood until the engine has
cooled down.2.Turn the expansion tank cap counterclock‐
wise slightly to allow any accumulated
pressure to escape, then continue turning
to open.3.If the coolant level is low, slowly add cool‐
ant up to the specified level; do not overfill.4.Twist the cap closed.5.Have the cause of the coolant loss elimi‐
nated as soon as possible.
Disposal
Comply with the appropriate environ‐mental protection regulations when dis‐
posing of coolant additives.
Seite 240MobilityCoolant240
Online Edition for Part no. 01 40 2 911 498 - VI/13