service MINI Coupe 2014 Owner's Manual
[x] Cancel search | Manufacturer: MINI, Model Year: 2014, Model line: Coupe, Model: MINI Coupe 2014Pages: 224, PDF Size: 5.46 MB
Page 6 of 224
NotesUsing this Owner's
Manual
The fastest way to find information on a partic‐
ular topic is by using the index.
An initial overview of the vehicle is provided in
the first chapter.
Additional sources of information
Should you have any questions, your service
center will be glad to advise you at any time.
Information on MINI, e.g., on technology, is
available on the Internet: www.mini.com
Symbols
Indicates precautions that must be followed
precisely in order to avoid the possibility of per‐
sonal injury and serious damage to the vehicle.
◄ Marks the end of a specific item of informa‐
tion.
"..." Identifies radio display texts used to select
individual functions.
Refers to measures that can be taken to
help protect the environment.
Symbols on vehicle components
Indicates that you should consult the rele‐
vant section of this Owner's Manual for infor‐
mation on a particular part or assembly.
Vehicle equipmentThe manufacturer of your MINI is the Bayeri‐
sche Motoren Werke Aktiengesellschaft, BMW
AG.
This Owner's Manual describes all models, all
series equipment, as well as country-specific
and special equipment offered in the model
series. Therefore, this Owner's Manual also de‐
scribes and depicts equipment that may not be
contained in your vehicle because of the se‐
lected special equipment or country version, for
example.
This also applies to safety-related functions and
systems.
For options and equipment not described in
this Owner's Manual, please refer to the Sup‐
plementary Owner's Manuals.
On right-hand drive vehicles, some controls are
arranged differently than shown in the illustra‐
tions.
Status of this Owner's
Manual at time of print‐
ing
The manufacturer of your vehicle pursues a
policy of constant development that is con‐
ceived to ensure that our vehicles continue to
embody the highest quality and safety stan‐
dards. In rare cases, therefore, the features de‐
scribed in this Owner's Manual may differ from
those in your vehicle.
For your own safety
Warranty Your vehicle is technically configured for the
operating conditions and registration require‐
ments applying in the country of first delivery
— homologation. If your vehicle is to be oper‐
ated in a different country it might be neces‐
sary to adapt your vehicle to potentially differ‐
ing operating conditions and permit
requirements. If your vehicle does not comply
with the homologation requirements in a cer‐Seite 6Notes6
Online Edition for Part no. 01 40 2 911 475 - VI/13
Page 7 of 224
tain country you cannot lodge warranty claims
for your vehicle there. Further information can
be obtained from your Service Centre.
Maintenance and repairs Advanced technology, e.g., the use of modern
materials and high-performance electronics,
requires suitable maintenance and repair
methods.
Therefore, have this work performed only by a
MINI service center or a workshop that works
according to MINI repair procedures with ap‐
propriately trained personnel.
If this work is not carried out properly, there is
the danger of subsequent damage and related
safety hazards.
Parts and accessories
For your own safety, use genuine parts and ac‐
cessories approved by the manufacturer of the
MINI. When you purchase accessories tested
and approved by the manufacturer of the MINI
and Original MINI Parts, you simultaneously ac‐
quire the assurance that they have been thor‐ oughly tested by the manufacturer of the MINI
to ensure optimum performance when instal‐
led on your vehicle. The manufacturer of the
MINI warrants these parts to be free from de‐
fects in material and workmanship. The manu‐
facturer of the MINI will not accept any liability
for damage resulting from installation of parts
and accessories not approved by the manufac‐
turer of the MINI. The manufacturer of the MINI
cannot test every product made by other man‐
ufacturers to verify if it can be used on a MINI
safely and without risk to either the vehicle, its
operation, or its occupants. Original MINI Parts,
MINI Accessories and other products approved
by the manufacturer of the MINI, together with
professional advice on using these items, are
available from all MINI Dealers. Installation and
operation of non-MINI approved accessories
such as alarms, radios, amplifiers, radar detec‐
tors, wheels, suspension components, brake
dust shields, telephones, including operation ofany mobile phone from within the vehicle with‐
out using an externally mounted antenna, or
transceiver equipment, for instance, CBs,
walkie-talkies, ham radios or similar accesso‐
ries, may cause extensive damage to the vehi‐
cle, compromise its safety, interfere with the
vehicle's electrical system or affect the validity
of the MINI Limited Warranty. See your MINI
Dealer for additional information. Maintenance,
replacement, or repair of the emission control
devices and systems may be performed by any
automotive repair establishment or individual
using any certified automotive part.
California Proposition 65 Warning
California laws require us to state the following
warning:
Engine exhaust and a wide variety of automo‐
bile components and parts, including compo‐
nents found in the interior furnishings in a vehi‐
cle, contain or emit chemicals known to the
State of California to cause cancer and birth de‐
fects and reproductive harm. In addition, cer‐
tain fluids contained in vehicles and certain
products of component wear contain or emit
chemicals known to the State of California to
cause cancer and birth defects or other repro‐
ductive harm. Battery posts, terminals and re‐
lated accessories contain lead and lead com‐
pounds. Wash your hands after handling. Used
engine oil contains chemicals that have caused
cancer in laboratory animals. Always protect
your skin by washing thoroughly with soap and
water.
Service and warranty We recommend that you read this publication
thoroughly. Your vehicle is covered by the fol‐
lowing warranties:▷New Vehicle Limited Warranty.▷Rust Perforation Limited Warranty.▷Federal Emissions System Defect Warranty.▷Federal Emissions Performance Warranty.Seite 7Notes7
Online Edition for Part no. 01 40 2 911 475 - VI/13
Page 8 of 224
▷California Emission Control System Limited
Warranty.
Detailed information about these warranties is
listed in the Service and Warranty Information
Booklet for US models or in the Warranty and
Service Guide Booklet for Canadian models.
Your vehicle has been specifically adapted and
designed to meet the particular operating con‐
ditions and homologation requirements in your
country and continental region in order to de‐
liver the full driving pleasure while the vehicle is
operated under those conditions. If you wish to
operate your vehicle in another country or re‐
gion, you may be required to adapt your vehi‐
cle to meet different prevailing operating con‐
ditions and homologation requirements. You
should also be aware of any applicable war‐
ranty limitations or exclusions for such country
or region. In such case, please contact Cus‐
tomer Relations for further information.
Maintenance
Maintain the vehicle regularly to sustain the
road safety, operational reliability and the New
Vehicle Limited Warranty.
Specifications for required maintenance meas‐
ures:
▷MINI Maintenance system▷Service and Warranty Information Booklet
for US models▷Warranty and Service Guide Booklet for
Canadian models
If the vehicle is not maintained according to
these specifications, this could result in serious
damage to the vehicle. Such damage is not
covered by the MINI New Vehicle Limited War‐
ranty.
Data memory
Numerous electronic components in your vehi‐
cle contain data memories that store technical
information on the vehicle condition, events
and faults, either temporarily or permanently. This technical information generally documents
the state of a component, a module, a system
or the environment.▷Operating conditions of system compo‐
nents, such as filling levels.▷Status messages from the vehicle and its in‐
dividual components, such as wheel rpm/
speed, motion delay, transverse accelera‐
tion.▷Malfunctions and defects in important sys‐
tem components, such as lights and brakes.▷Vehicle responses to special driving situa‐
tions, such as airbag deployment, use of
the stability control systems.▷Ambient conditions, such as the tempera‐
ture.
These data are of a technical nature only and
are used to detect and eliminate faults and to
optimize vehicle functions. Travel profiles of
routes driven with the vehicle cannot be cre‐
ated from these data. If services are used, for
instance in the event of repairs, service proc‐
esses, warranty cases, quality assurance, etc.,
this technical information can be read out from
the event and fault data memories by service
personnel, including the manufacturer, using
special diagnosis tools. This service personnel
can provide you with more information if
needed. After troubleshooting, the information
in the fault memory is cleared or overwritten
continuously.
Situations are conceivable during the use of the
vehicle in which these technical data could be‐
come associated with a specific person in com‐
bination with other information, such as an ac‐
cident report, damage to the vehicle, witness
accounts, etc., possibly with the involvement of
an authorized expert.
Additional functions that are contractually
agreed with the customer, such as vehicle lo‐
calization in the event of an emergency, permit
the transfer of certain vehicle data out of the
vehicle.
Seite 8Notes8
Online Edition for Part no. 01 40 2 911 475 - VI/13
Page 14 of 224
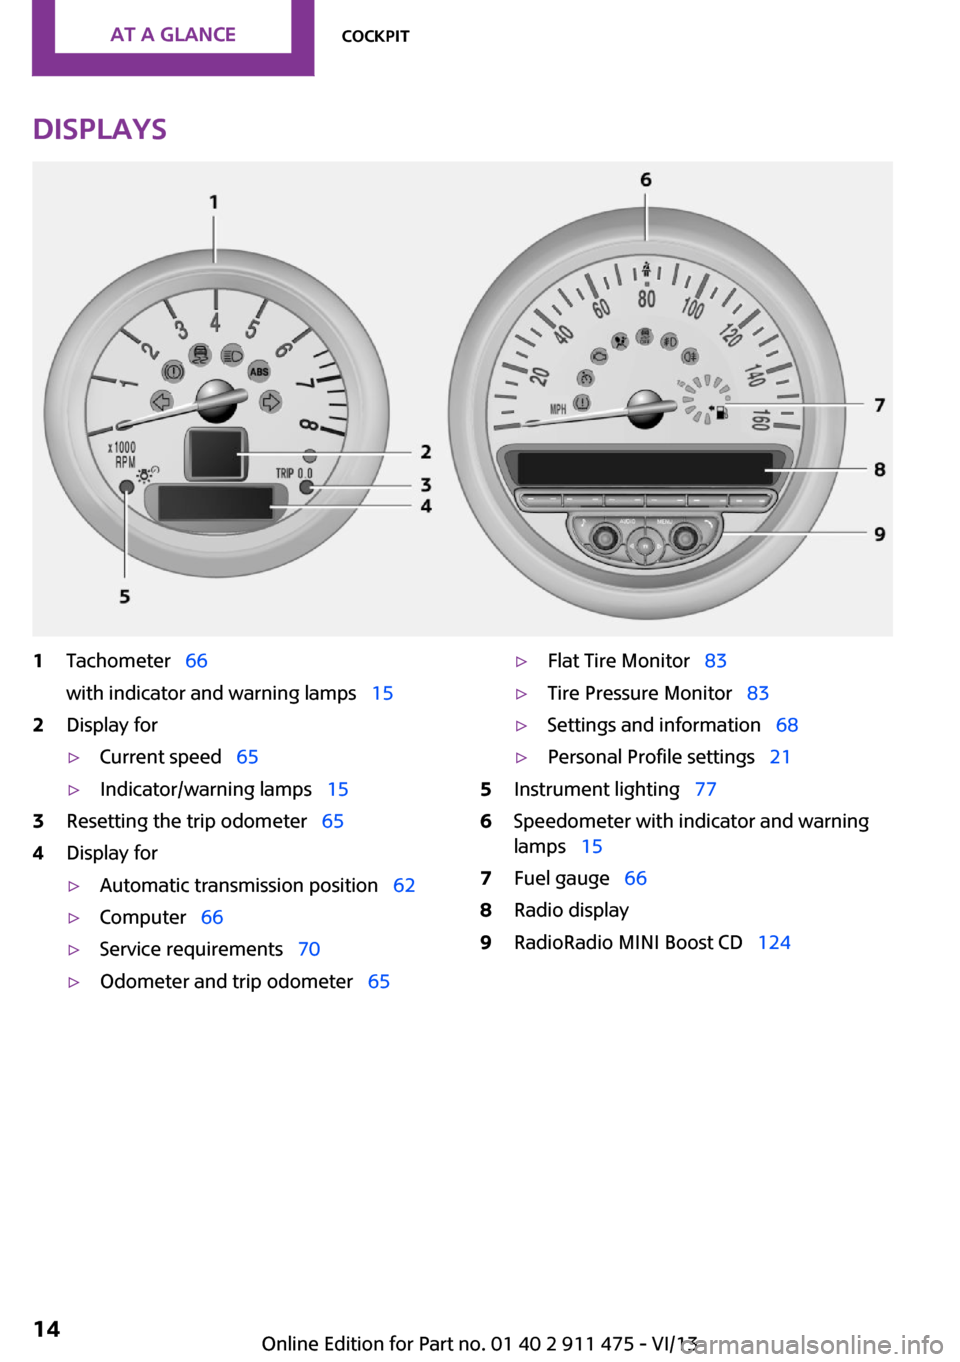
Displays1Tachometer 66
with indicator and warning lamps 152Display for▷Current speed 65▷Indicator/warning lamps 153Resetting the trip odometer 654Display for▷Automatic transmission position 62▷Computer 66▷Service requirements 70▷Odometer and trip odometer 65▷Flat Tire Monitor 83▷Tire Pressure Monitor 83▷Settings and information 68▷Personal Profile settings 215Instrument lighting 776Speedometer with indicator and warning
lamps 157Fuel gauge 668Radio display9RadioRadio MINI Boost CD 124Seite 14At a glanceCockpit14
Online Edition for Part no. 01 40 2 911 475 - VI/13
Page 20 of 224
Opening and closingVehicle equipmentThis chapter describes all series equipment as
well as country-specific and special equipment
offered for this model series.Therefore, it also
describes equipment that may not be found in
your vehicle, for instance due to the selected
special equipment or the country version. This
also applies to safety-related functions and sys‐
tems.
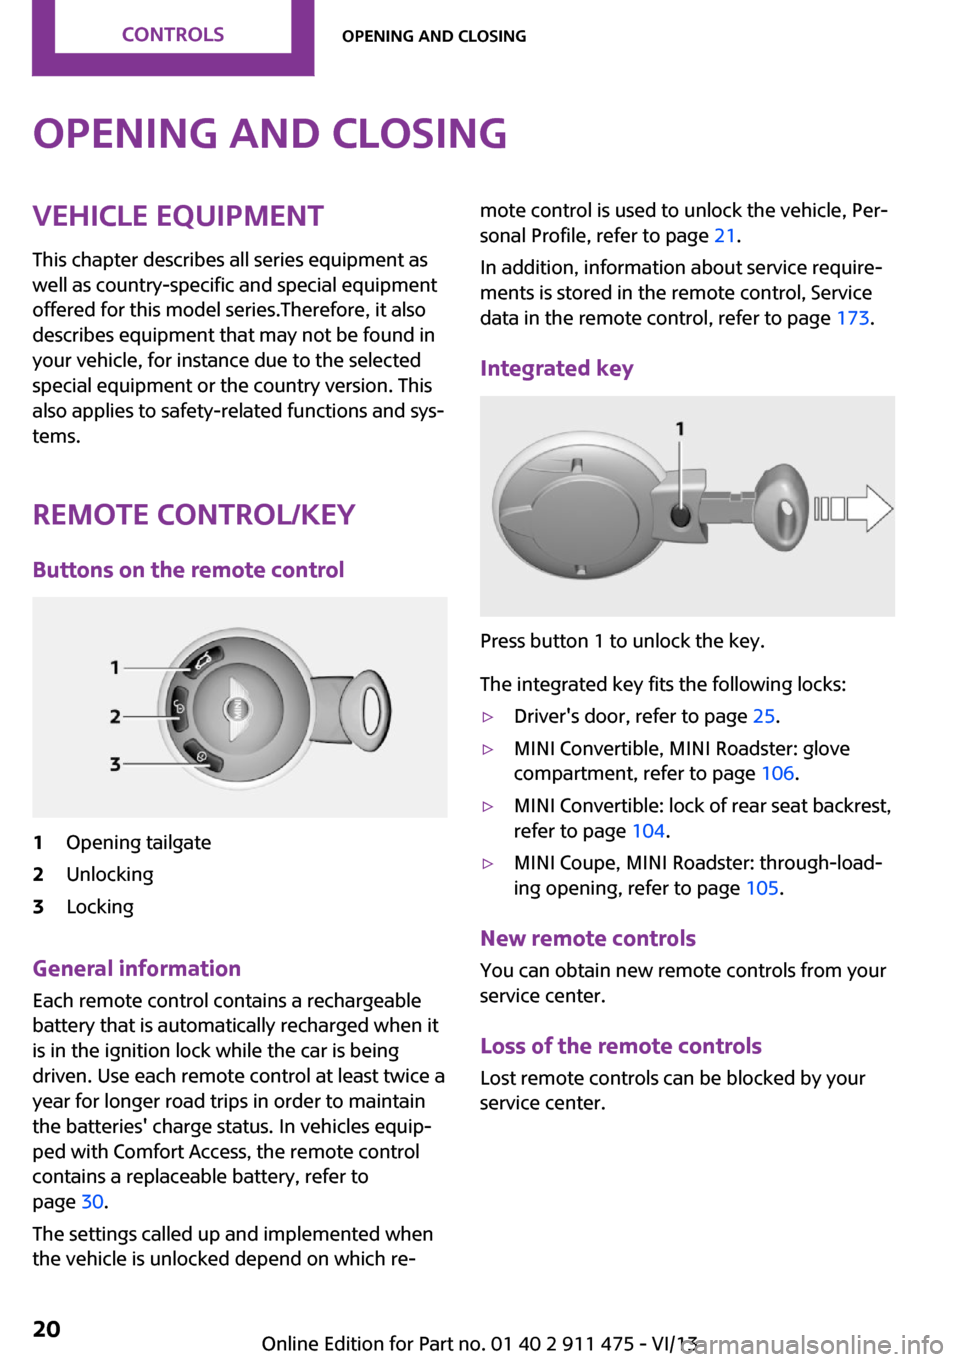
Remote control/key Buttons on the remote control1Opening tailgate2Unlocking3Locking
General information
Each remote control contains a rechargeable
battery that is automatically recharged when it
is in the ignition lock while the car is being
driven. Use each remote control at least twice a
year for longer road trips in order to maintain
the batteries' charge status. In vehicles equip‐
ped with Comfort Access, the remote control
contains a replaceable battery, refer to
page 30.
The settings called up and implemented when
the vehicle is unlocked depend on which re‐
mote control is used to unlock the vehicle, Per‐
sonal Profile, refer to page 21.
In addition, information about service require‐
ments is stored in the remote control, Service
data in the remote control, refer to page 173.
Integrated key
Press button 1 to unlock the key.
The integrated key fits the following locks:
▷Driver's door, refer to page 25.▷MINI Convertible, MINI Roadster: glove
compartment, refer to page 106.▷MINI Convertible: lock of rear seat backrest,
refer to page 104.▷MINI Coupe, MINI Roadster: through-load‐
ing opening, refer to page 105.
New remote controls
You can obtain new remote controls from your
service center.
Loss of the remote controls Lost remote controls can be blocked by your
service center.
Seite 20ControlsOpening and closing20
Online Edition for Part no. 01 40 2 911 475 - VI/13
Page 30 of 224
Do not depress the brake or the clutch; other‐
wise, the engine will start.
Starting the engine The engine can be started or the ignition can
be switched on, refer to page 55, when a re‐
mote control is inside the vehicle. It is not nec‐
essary to insert a remote control into the igni‐
tion lock.
Switching off the engine in cars with
automatic transmission
The engine can only be switched off with the
selector lever in position P, refer to page 62.
To switch off the engine with the selector lever
in position N, the remote control must be in‐
serted in the ignition lock.
Before driving a vehicle with automatic
transmission into a car wash1.Insert the remote control into the ignition
switch.2.Depress the brake pedal.3.Move the selector lever to position N.4.Switch the engine off.
The vehicle can roll.
Malfunction The Comfort Access functions can be disturbed
by local radio waves, such as by a mobile
phone in the immediate vicinity of the remote
control or when a mobile phone is being
charged in the vehicle.
If this occurs, open or close the vehicle using
the buttons on the remote control or use the
integrated key in the door lock.
To start the engine afterward, insert the remote
control into the ignition switch.
Warning lamps The warning lamp in the instrument
cluster lights up when you attempt to
start the engine: the engine cannot be started.
The remote control is not in the vehicle or has a
malfunction. Take the remote control with you
inside the vehicle or have it checked. If neces‐
sary, insert another remote control into the ig‐
nition switch.
The warning lamp in the instrument
cluster lights up while the engine is run‐
ning: the remote control is no longer in‐
side the vehicle.
After switching off the engine, the engine can
only be started again within approx. 10 sec‐
onds if no door has been opened.
The indicator lamp lights up: replace
the remote control battery.
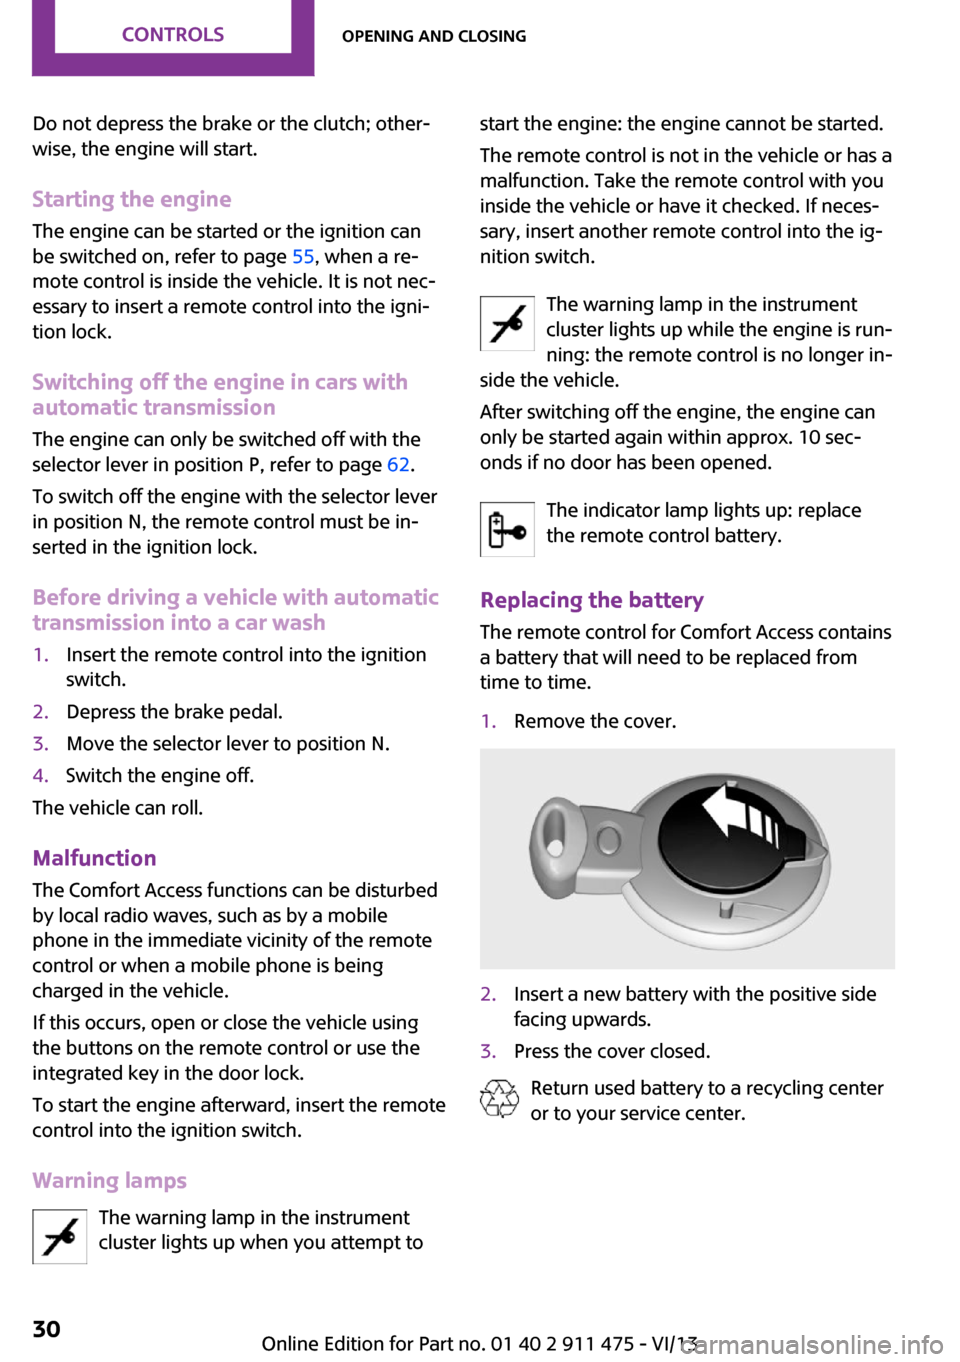
Replacing the battery
The remote control for Comfort Access contains
a battery that will need to be replaced from
time to time.1.Remove the cover.2.Insert a new battery with the positive side
facing upwards.3.Press the cover closed.
Return used battery to a recycling center
or to your service center.
Seite 30ControlsOpening and closing30
Online Edition for Part no. 01 40 2 911 475 - VI/13
Page 32 of 224

The window opens until the switch is re‐
leased.▷Press the switch downward briefly.
In the radio ready state and higher, the
window opens automatically. Press again
briefly to stop the opening procedure.
To open the window by a crack, briefly press
the switch downward twice in close succession.
Closing Danger of pinching
Monitor the closing process and make
sure that the closing path of the window is
clear; otherwise, injuries may result. ◀
To close, press the switch upward. The window
closes until the switch is released.
Initializing the power windows If the battery was disconnected, for example to
change the battery or to put the vehicle into
storage, reinitialize the power windows; other‐
wise, the windows will not be lowered.
1.Close the doors.2.Open both windows.3.Close both windows.
Please contact your service center in the event
of a malfunction.
MINI Convertible: central power
windows switch
▷Press the switch downward.The rear and front windows open consecu‐
tively until the switch is released.▷Press the switch downward briefly.
With the ignition switched on: the rear and
front windows open automatically. Press
again briefly to stop the opening proce‐
dure.
To close the windows, press the switch upward
and hold it.
Do not close the windows until the closing pro‐
cedure of the convertible top is completed;
otherwise, it cannot be ensured that the side
windows will form a tight seal with the rubber
seals of the convertible top. Convertible top, re‐
fer to page 34.
After the ignition is switched off The windows can be operated for approx. 1 mi‐
nute after the remote control is removed or the
ignition is switched off.
Take the remote control with you
Take the remote control with you when
leaving the vehicle so that children, for exam‐
ple, cannot operate the power windows and in‐
jure themselves. ◀
MINI Convertible:
convertible top with
integrated sliding sun‐
roof
If possible, conserve the battery by only operat‐
ing the convertible top while the engine is run‐
ning.
Before closing the convertible top, remove all
foreign objects from the windshield frame as
these could prevent the top from closing prop‐
erly.
Seite 32ControlsOpening and closing32
Online Edition for Part no. 01 40 2 911 475 - VI/13
Page 36 of 224

4.Release the second screw, arrow, using the
hex key to unlock the convertible top.5.Take out the screw.6.Lift the side frame slightly, arrow 1, and pull
the sensor and cable forward out of the
guide.7.Pivot the cable out sideways, arrow 2.
When setting it down, ensure that the cable
is not pinched.8.Unlock the second side frame.
Closing the convertible top
1.Hold on to the convertible top on the re‐
spective side frames with both hands.2.Lift it out on both sides and pivot it forward
onto the cowl.3.In the vehicle, pry out the cover in the mid‐
dle of the roof using the screwdriver.
Closing the sliding sunroof
1.Insert the hex key into the opening de‐
signed for this purpose in the middle of the
roof and press upward, arrow 1.2.Turn the hex key in the direction of arrow 2.3.Open the two locks and take off the locking
pieces.
Ensure that the locking pieces do not fall
onto the vehicle, as this could cause dam‐
age.4.Insert the pins into the respective mount on
the cowl, arrow.
Locking the convertible top
Turn the hex key opposite to the direction of
arrow 2 until the convertible top is locked.
Please contact your service center to eliminate
the malfunction.
Seite 36ControlsOpening and closing36
Online Edition for Part no. 01 40 2 911 475 - VI/13
Page 47 of 224

The shoulder strap's anchorage point will be
correct for adult seat occupants of every build if
the seat is correctly adjusted, refer to page 44.
Unbuckling the belt1.Hold the belt firmly.2.Press the red button in the belt buckle.3.Guide the belt back into its reel.
MINI Convertible: rear belt guide
When fastening the safety belts on the rear
seats, ensure that the belt guide loop, arrow, is
closed.
Safety belt reminder for driver's seat
and front passenger seat
The indicator lamps light up and a sig‐
nal sounds. Check whether the safety
belt has been fastened correctly.
Damage to safety belts In the case of strain caused by accidents or
damage:
Have the safety belts, including the safety belt tensioners, replaced and have the belt anchors checked.
Checking and replacing safety belts
Have the work performed only by your
service center; otherwise, it cannot be ensured
that this safety feature will function properly. ◀
Head restraints
Correctly set head restraint
A correctly adjusted head restraint reduces the
risk of spinal injury in the event of an accident.
Adjusting the head restraint
Correctly adjust the head restraints of all
occupied seats; otherwise, there is an increased
risk of injury in an accident. ◀
Height Adjust the head restraint so that its center is
approx. at ear level.
Distance
Adjust the distance so that the head restraint is as close as possible to the back of the head.
Height adjustment
To raise: pull.
To lower: press the button, arrow 1, and push
the head restraint down.
Removing
Only remove the head restraint if no one will be
sitting in the seat in question.
1.Pull upward as far as possible.2.Press the button, arrow 1, and pull the
head restraint out completely.
To remove the head restraint, fold the backrest
forward if necessary.
Seite 47AdjustingControls47
Online Edition for Part no. 01 40 2 911 475 - VI/13
Page 68 of 224

Settings and informationOperating concept
Some settings and information can only be cre‐
ated or opened while the ignition is switched
on, the vehicle is standing, and the doors are
closed.1Button for:▷Selecting the display.▷Setting values.▷Confirming the selected display or set
values.▷Calling up computer information 66.SymbolFunctionSet the rain sensor, refer to
page 59.Open Check-Control, refer to
page 72.View service requirement dis‐
play, refer to page 70SymbolFunctionInitialize the Flat Tire Monitor,
refer to page 83.
Resetting the Tire Pressure
Monitor, refer to page 86.Set the formats and units of
measure, reset to the factory
settings, refer to page 69.Personal Profile settings, refer
to page 21.Exit the menu.
Exiting displays
1.Press the button on the turn indicator lever
repeatedly until "HOME" is displayed.2.Hold the button down.
The current speed is displayed again.
Displays are also exited if no entries are made
within approx. 8 seconds.
Seite 68ControlsDisplays68
Online Edition for Part no. 01 40 2 911 475 - VI/13