fuel MINI COUPE ROADSTER CONVERTIBLE 2012 User Guide
[x] Cancel search | Manufacturer: MINI, Model Year: 2012, Model line: COUPE ROADSTER CONVERTIBLE, Model: MINI COUPE ROADSTER CONVERTIBLE 2012Pages: 283, PDF Size: 9.38 MB
Page 74 of 283
Controls overviewCONTROLS
73
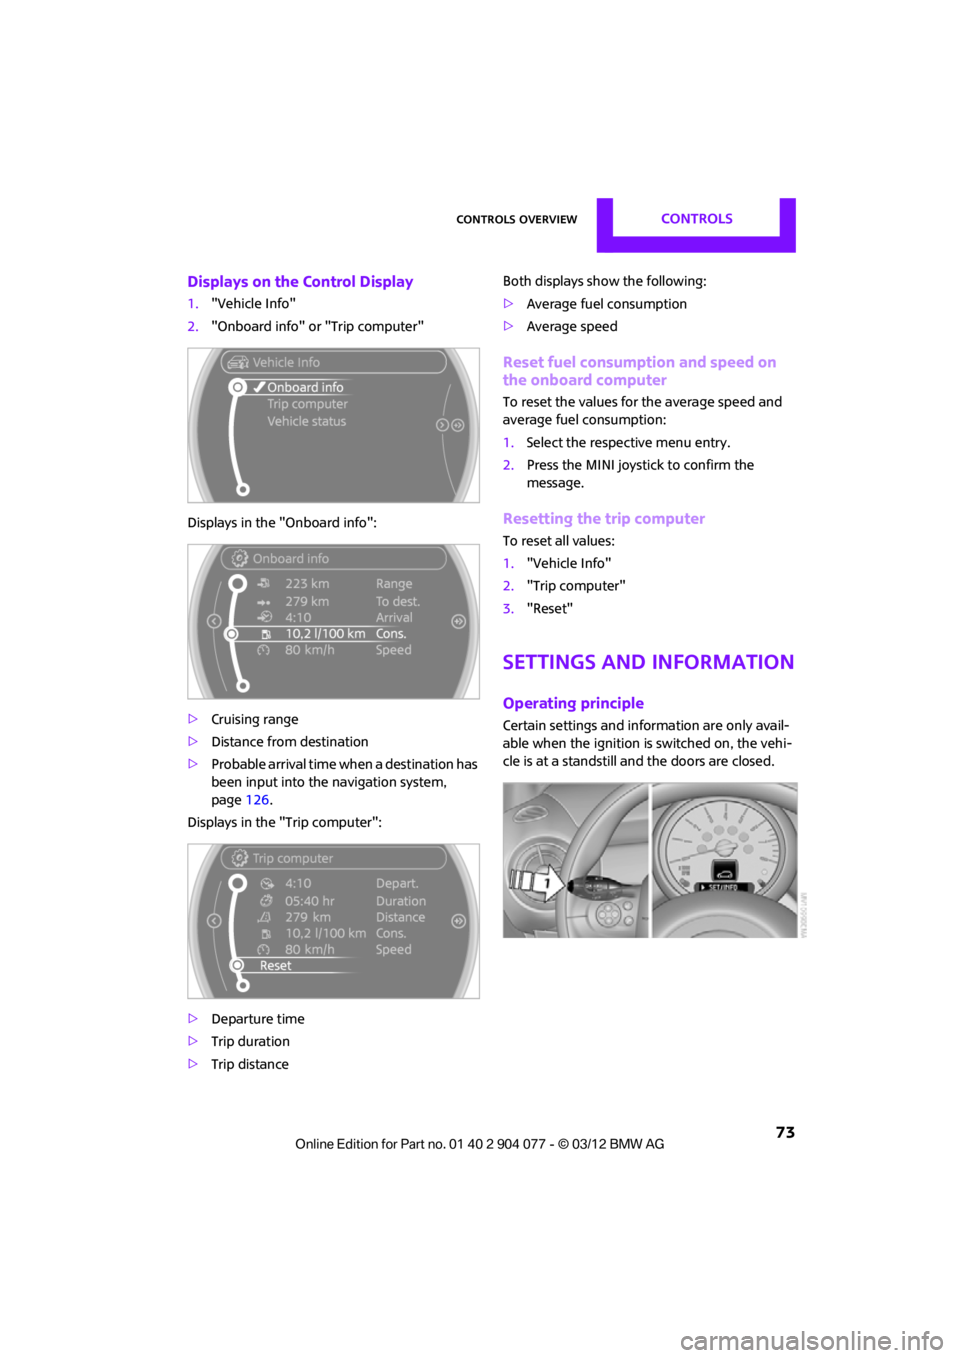
Displays on the Control Display
1."Vehicle Info"
2. "Onboard info" or "Trip computer"
Displays in the "Onboard info":
> Cruising range
> Distance from destination
> Probable arrival time when a destination has
been input into the navigation system,
page 126.
Displays in the "Trip computer":
> Departure time
> Trip duration
> Trip distance Both displays show the following:
>
Average fuel consumption
> Average speed
Reset fuel consumption and speed on
the onboard computer
To reset the values for the average speed and
average fuel consumption:
1.Select the respective menu entry.
2. Press the MINI joystick to confirm the
message.
Resetting the trip computer
To reset all values:
1."Vehicle Info"
2. "Trip computer"
3. "Reset"
Settings and information
Operating principle
Certain settings and information are only avail-
able when the ignition is switched on, the vehi-
cle is at a standstill and the doors are closed.
00320051004F004C00510048000300280047004C0057004C005200510003
Page 93 of 283

CONTROLSTechnology for driving comfort and safety
92
Declaration according to NHTSA/
FMVSS 138 Tire Pressure Monitoring
Systems
Each tire, including the spare, should be
checked monthly when cold and inflated to the
inflation pressure recommended by the vehicle
manufacturer on the vehicle placard or tire infla-
tion pressure label. If your vehicle has tires of a
different size than the size indicated on the vehi-
cle placard or tire inflation pressure label, you
should determine the proper tire inflation pres-
sure for those tires. As an added safety feature,
your vehicle has been equipped with a tire pres-
sure monitoring system TPMS that illuminates a
low tire pressure telltal e when one or more of
your tires are significantly underinflated.
Accordingly, when the low tire pressure telltale
illuminates, you should st op and check your tires
as soon as possible, and inflate them to the
proper pressure. Driving on a significantly
underinflated tire causes the tire to overheat
and can lead to tire fail ure. Underinflation also
reduces fuel efficiency and tire tread life and
may affect the vehicle’s handling and stopping
ability. Please note that the TPMS is not a substi-
tute for proper tire maintenance, and it is the
driver’s responsibility to maintain correct tire
pressure, even if underi nflation has not reached
the level sufficient to trigger illumination of the
TPMS low tire pressure telltale. The TPMS malfunction indicator is combined
with the low tire pressure telltale. When the sys-
tem detects a malfunction, the telltale will flash
for approximately one minute and then remain
continuously lit. This
sequence will continue
upon subsequent vehicle startups as long as the
malfunction exists. When the malfunction indi-
cator is illuminated, the system may not be able
to detect or signal low tire pressure as intended.
TPMS malfunctions may occur for a variety of
reasons, including the installation of replace-
ment or alternate tires or wheels on the vehicle
that prevent the TPMS from functioning prop-
erly. Always check the TP MS malfunction telltale
after replacing one or mo re tires or wheels on
your vehicle to ensure that the replacement or
alternate tires and wheels allow the TPMS to
continue to function properly.
00320051004F004C00510048000300280047004C0057004C005200510003
Page 121 of 283

DRIVING TIPSThings to remember when driving
120
Always position and secure the cargo as
described above, so that it cannot endan-
ger the car's occupants, for example if sudden
braking or swerves are necessary.
Do not exceed the approved gross vehicle
weight and axle loads, page 257 257; other-
wise, the operating safety of the vehicle is no
longer assured and the vehicle will not be in
compliance with the construction and use
regulations.
Heavy or hard objects should not be carried
loose inside the car, since they could be thrown
around, for example as a result of heavy braking,
sudden swerves, etc., and endanger the occu-
pants. Do not secure cargo using the fastening
points for the tether strap, page 58; they may
become damaged. <
Rear luggage rack
A special rack system is available as an option
for your MINI. Please note the information
contained in the asse mbly instructions.
Mounting points
The mounting points are under the protective
caps in the bumper.
Push out the caps at the respective slots.
Loading rear luggage rack
When loading, make su re that the maximum
allowed roof load, the gross vehicle weight and
the axle loads are not exceeded.
You can find the applicable data under Weights
on page 257.
Saving fuel
Your vehicle incorporates numerous technolo-
gies for reducing fuel consumption and
emissions.
Fuel consumption depends on a number of dif-
ferent factors. Fuel consumption and environ-
mental pollution are affect ed by various actions,
the manner of driving and regular maintenance.
Remove unnecessary cargo
Additional weight increases fuel consumption.
Remove attached parts no longer in use
Remove luggage rack if no longer needed after
use.
Attached parts on the ve hicle affect its aerody-
namics and increase fuel consumption.
Closing windows
Open windows increase air resistance and
therefore fuel consumption.
Check tire inflation pressure regularly
Check and, if necessary, correct tire inflation
pressure at least twic e a month and before
starting on a long trip.
Low inflation pressure increases rolling resis-
tance and thus leads to greater fuel consump-
tion and tire wear.
Drive off immediately
Do not wait for the engine to warm up while the
vehicle remains stationary. Start driving right
away, but at moderate engi ne speeds. This is the
fastest way for the cold engine to reach its oper-
ating temperature.
Think ahead while driving
Avoid unnecessary accelera tion and braking. by
maintaining a suitable di stance to the vehicle
driving ahead.
Looking-ahead and smooth driving reduces fuel
consumption.
00320051004F004C00510048000300280047004C0057004C005200510003
Page 122 of 283
Things to remember when drivingDRIVING TIPS
121
Avoid high engine speeds
Use first gear only for driving off. In second and
higher gears, accelerate smoothly to a suitable
engine and road speed. In doing so, avoid high
engine speeds and shift up early.
When you reach your desired traveling speed,
shift to the highest suitable gear and drive at
constant speed.
As a rule: driving at lo w engine speeds lowers
fuel consumption and reduces wear.
Coasting
When approaching a red traffic light, take your
foot off the accelerator and let the car roll to a
stop in the highest gear possible.
On a downhill gradient, take your foot off the
accelerator and let the vehi cle coast in a suitable
gear.
Fuel supply is shut off automatically when the
vehicle is coasting.
Switch off the engine during lengthy
stops
Switch off the engine when stopping for lengthy
periods, e.g. at traffic lights, railroad crossings or
in traffic jams.
Switch off any features that are not
currently required
Features such as air conditioning, seat heaters
and the rear window defroster require a great
deal of energy and result in greater fuel con-
sumption, especially in city driving and during
Stop & Go operation. For this reason, switch off
these features if they are not really needed.
Have the vehicle serviced
Have your vehicle serviced regularly to achieve
good economy and a long vehicle life. The man-
ufacturer of your MINI recommends having the
vehicle serviced by a MINI dealer. Also note the
MINI Maintenance System, page 225.
00320051004F004C00510048000300280047004C0057004C005200510003
Page 138 of 283
Route guidanceNAVIGATION
137
1."Navigation"
2. "Route information"
3. "New route for:"
4. Turn the MINI joystick: enter the desired
mileage.
5. Press the MINI joystick.
Resuming the original route
If the route section should no longer be
bypassed:
1."Navigation"
2. "Route information"
3. "New route for:"
4. "Remove blocking"
Recommended refueling
The remaining driving ra nge is calculated, and
gas stations along the route are shown.
Even with the latest navigation data, informa-
tion on various points of interest may have
changed, e.g., service st ations may not be in
operation.
1. "Navigation"
2. "Route information"
3. "Recommended refuel"
A list of gas stations is displayed.
4. Select a gas station.
5. Select the symbol.
6. "Start guidance": th e guidance to the
selected gas station is started.
"Add as another destination": the gas sta-
tion is included in the route.
Map display
Displaying map view
1. "Navigation"
2. "Map"
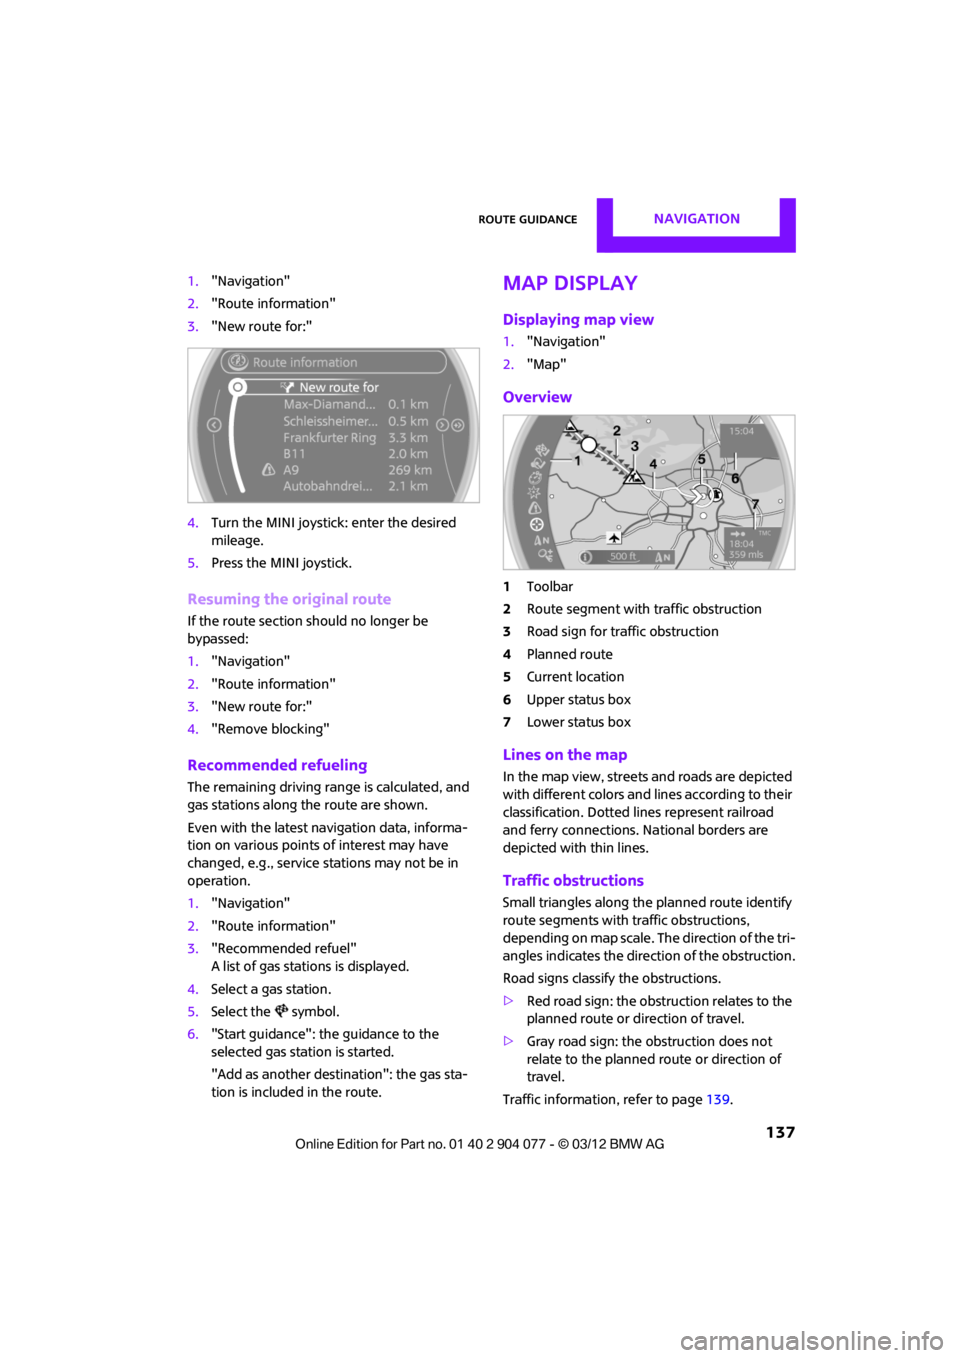
Overview
1Toolbar
2 Route segment with traffic obstruction
3 Road sign for traffic obstruction
4 Planned route
5 Current location
6 Upper status box
7 Lower status box
Lines on the map
In the map view, streets and roads are depicted
with different colors and lines according to their
classification. Dotted lines represent railroad
and ferry connections. National borders are
depicted with thin lines.
Traffic obstructions
Small triangles along the planned route identify
route segments with traffic obstructions,
depending on map scale. The direction of the tri-
angles indicates the dire ction of the obstruction.
Road signs classify the obstructions.
> Red road sign: the obstruction relates to the
planned route or direction of travel.
> Gray road sign: the obstruction does not
relate to the planned route or direction of
travel.
Traffic information, refer to page 139.
00320051004F004C00510048000300280047004C0057004C005200510003
Page 207 of 283
MOBILITYRefueling
206
Refueling
Vehicle equipment
In this chapter, all production, country, and
optional equipment that is offered in the model
range is described. Equipment is also described
that is not available because of, for example,
selected options or coun try version. This also
applies to safety relate d functions and systems.
General
Switch off the engine before refueling;
otherwise, fuel cannot be added to the
tank and a message will be displayed. <
Take all precautionary measures and
observe all applicable regulations when
handling fuel. Do not carry any spare fuel con-
tainers in your vehicle. They can develop a leak
and cause an explosion or cause a fire in the
event of an accident. <
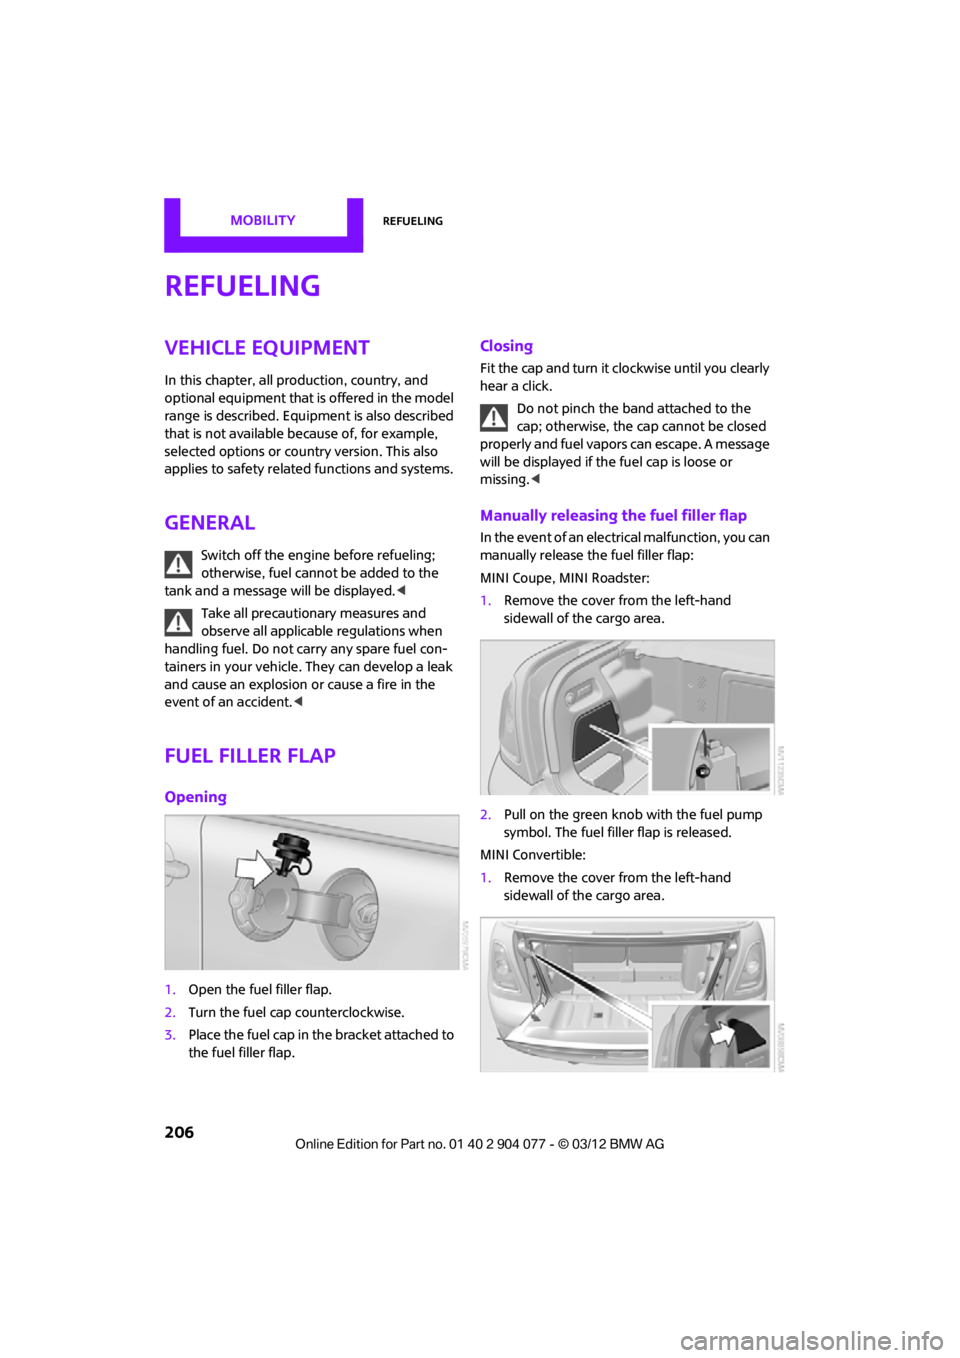
Fuel filler flap
Opening
1.Open the fuel filler flap.
2. Turn the fuel cap counterclockwise.
3. Place the fuel cap in the bracket attached to
the fuel filler flap.
Closing
Fit the cap and turn it clockwise until you clearly
hear a click.
Do not pinch the band attached to the
cap; otherwise, the ca p cannot be closed
properly and fuel vapors can escape. A message
will be displayed if the fuel cap is loose or
missing. <
Manually releasing the fuel filler flap
In the event of an electrical malfunction, you can
manually release the fuel filler flap:
MINI Coupe, MINI Roadster:
1.Remove the cover from the left-hand
sidewall of the cargo area.
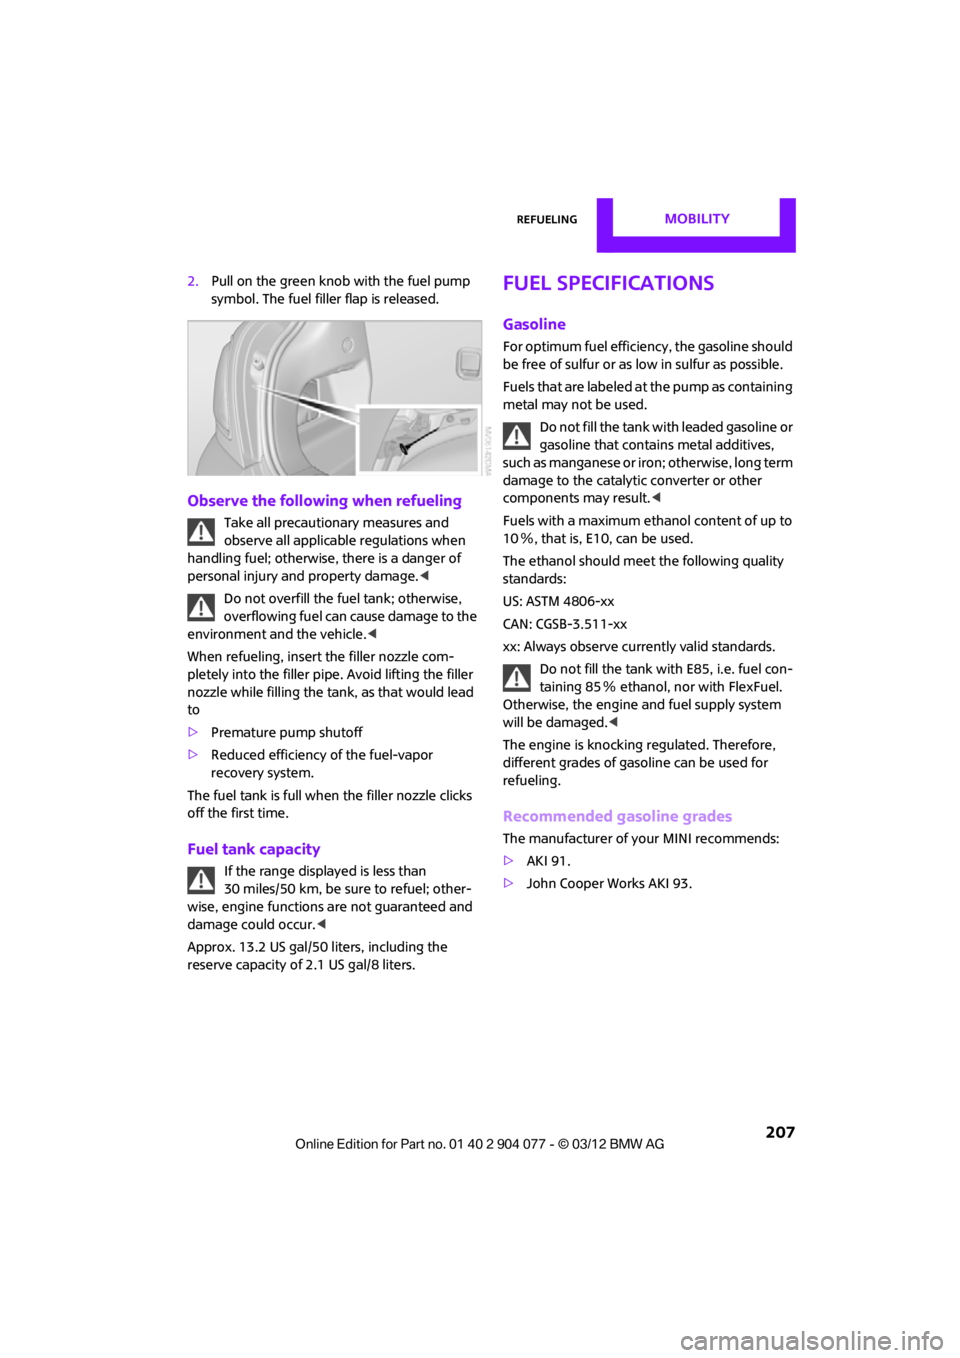
2. Pull on the green knob with the fuel pump
symbol. The fuel filler flap is released.
MINI Convertible:
1. Remove the cover from the left-hand
sidewall of the cargo area.
00320051004F004C00510048000300280047004C0057004C005200510003
Page 208 of 283
RefuelingMOBILITY
207
2.Pull on the green knob with the fuel pump
symbol. The fuel filler flap is released.
Observe the following when refueling
Take all precautionary measures and
observe all applicable regulations when
handling fuel; otherwise, there is a danger of
personal injury and property damage. <
Do not overfill the fuel tank; otherwise,
overflowing fuel can cause damage to the
environment and the vehicle.<
When refueling, insert the filler nozzle com-
pletely into the filler pipe. Avoid lifting the filler
nozzle while filling the tank, as that would lead
to
> Premature pump shutoff
> Reduced efficiency of the fuel-vapor
recovery system.
The fuel tank is full when the filler nozzle clicks
off the first time.
Fuel tank capacity
If the range displayed is less than
30 miles/50 km, be sure to refuel; other-
wise, engine functions are not guaranteed and
damage could occur.<
Approx. 13.2 US gal/50 liters, including the
reserve capacity of 2.1 US gal/8 liters.
Fuel specifications
Gasoline
For optimum fuel efficiency, the gasoline should
be free of sulfur or as low in sulfur as possible.
Fuels that are labeled at the pump as containing
metal may not be used.
Do not fill the tank with leaded gasoline or
gasoline that contai ns metal additives,
such as manganese or iron; otherwise, long term
damage to the catalytic converter or other
components may result. <
Fuels with a maximum ethanol content of up to
10 %, that is, E10, can be used.
The ethanol should meet the following quality
standards:
US: ASTM 4806-xx
CAN: CGSB-3.511-xx
xx: Always observe currently valid standards.
Do not fill the tank with E85, i.e. fuel con-
taining 85 % ethanol, nor with FlexFuel.
Otherwise, the engine and fuel supply system
will be damaged. <
The engine is knocking regulated. Therefore,
different grades of gasoline can be used for
refueling.
Recommended gasoline grades
The manufacturer of your MINI recommends:
> AKI 91.
> John Cooper Works AKI 93.
00320051004F004C00510048000300280047004C0057004C005200510003
Page 209 of 283
MOBILITYRefueling
208
Minimum grade
The manufacturer of your MINI recommends
AKI 89.Do not use any gasoline below the speci-
fied minimum fuel grade. Otherwise, the
engine could be damaged. <
If you use gasoline with this minimum AKI rating,
the engine may produce knocking sounds when
starting at high external temperatures. This has
no effect on the engine life.
The use of poor-quality fuels may result in
harmful engine deposits or damage. Addi-
tionally, problems relating to driveability, start-
ing and stalling, especially under certain envi-
ronmental conditions such as high ambient
temperatures and high altitudes, may occur.
If driveability problems are encountered, we
recommend switching to a high quality gasoline
brand and a higher octane grade - AKI number -
for a few tank fulls. To avoid harmful engine
deposits, it is highly recommended to purchase
gasoline from BP or Top Tier retailers.
Failure to comply with these recommendations
may result in the need for unscheduled mainte-
nance. <
00320051004F004C00510048000300280047004C0057004C005200510003
Page 221 of 283
MOBILITYWheels and tires
220
Special characteristics of winter tires
The manufacturer of your MINI recommends the
use of winter tires on snowy roads or if temper-
atures drop below 457/ +7 6. Although all-
season M+S tires provide better winter traction
than summer tires, they generally fail to provide
the same levels of cold-weather performance as
winter tires.
Pay attention to speed
Always comply with the speed limit for the
winter tires mounted on your car; failure
to do so could result in tire damage and
accidents. <
If the car is capable of speeds higher than that
permitted for the winter tires, a label stating the
maximum permitted speed for the mounted
tires must be displayed in your field of view. This
label is available at your tire dealer or MINI
dealer.
Storage
Always store wheels and tires in a cool, dry place
with as little exposure to light as possible.
Always protect tires agains t all contact with oil,
grease and fuels.
Do not exceed the maximum tire inflation
pressure indicated on the sidewall of the tire.
Swapping wheels among the axles
Depending on the individual use, front and rear
tires may exhibit different wear and tear.
In order to maintain an even wear and tear, the
wheels may be rotated between the axles. Your
MINI dealer will be glad to advise you.
Always check the inflation pressure after the tire
rotation, if necessary change the pressure.
Snow chains
Only certain types of fine-link snow chains have
been tested by the manufacturer of your MINI,
classified as road-safe and recommended.
Contact your MINI deal er for more details.
Only attach snow chains in pairs to the front
wheels with the following tires.
> 175/65 R 15 M+S
> 175/60 R 16 M+S
John Cooper Works:
> 185/50 R 17 86 H M+S XL RSC
Observe the manufacturer's instructions when
mounting snow chains. Do not exceed a speed
of 30 mph or 50 km/h. Do not initialize the Flat Tire Monitor if
snow chains are mounted; otherwise, the
instrument might issue an incorrect reading.
When driving with snow ch ains, it can be useful
to briefly deactivate DSC or activate DTC, refer to
page 84.<
00320051004F004C00510048000300280047004C0057004C005200510003
Page 223 of 283
MOBILITYEngine compartment
222
Hood
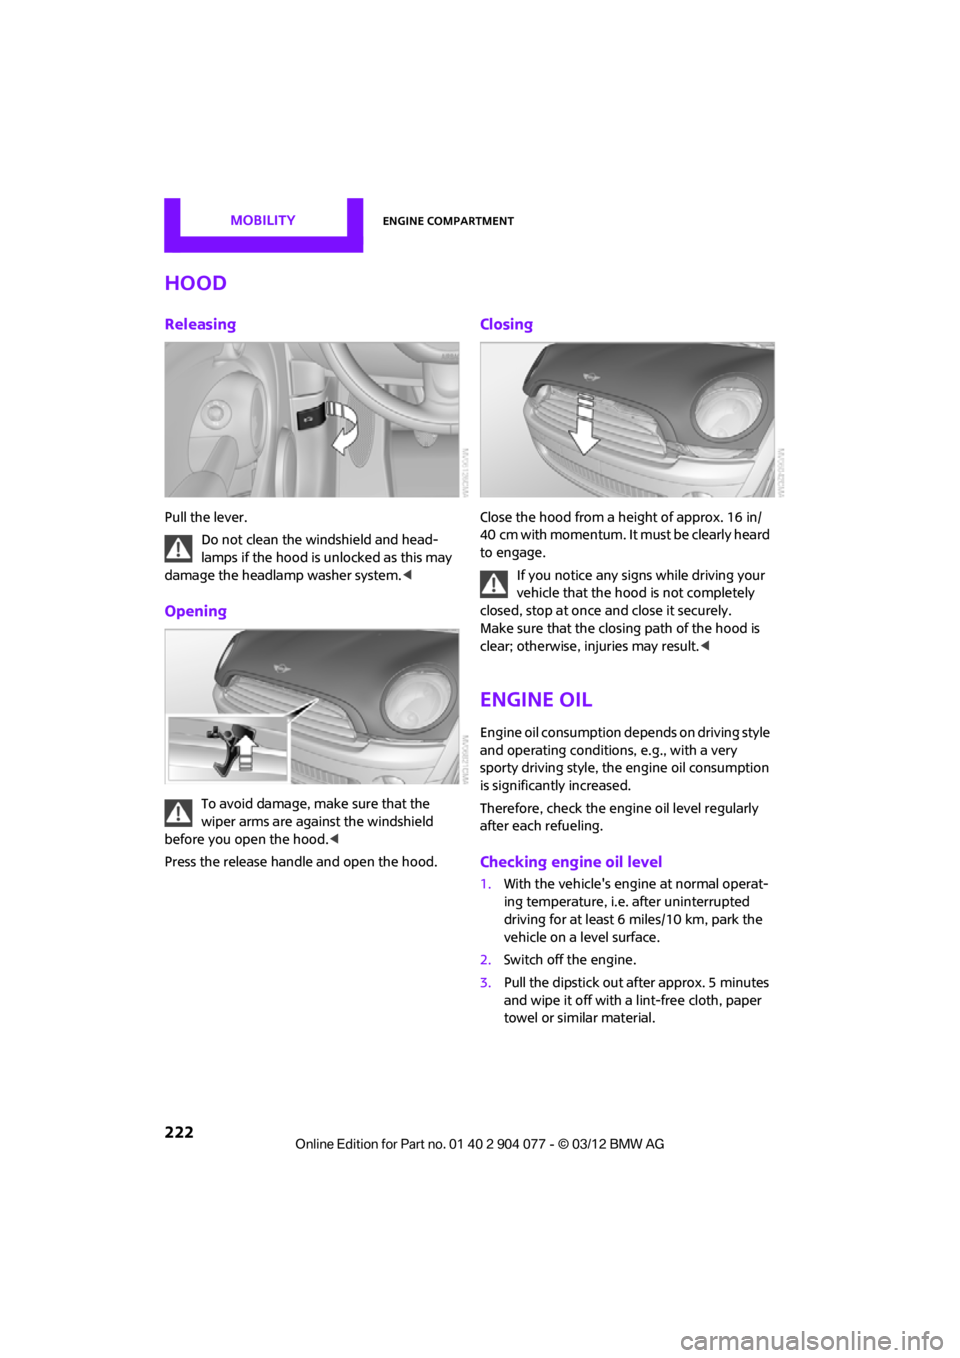
Releasing
Pull the lever.Do not clean the windshield and head-
lamps if the hood is unlocked as this may
damage the headlamp washer system. <
Opening
To avoid damage, make sure that the
wiper arms are against the windshield
before you open the hood. <
Press the release handle and open the hood.
Closing
Close the hood from a height of approx. 16 in/
40 cm with momentum. It must be clearly heard
to engage.
If you notice any signs while driving your
vehicle that the hood is not completely
closed, stop at once and close it securely.
Make sure that the closing path of the hood is
clear; otherwise, injuries may result. <
Engine oil
Engine oil consumption depends on driving style
and operating conditions, e.g., with a very
sporty driving style, the engine oil consumption
is significantly increased.
Therefore, check the engine oil level regularly
after each refueling.
Checking engine oil level
1. With the vehicle's engine at normal operat-
ing temperature, i.e. after uninterrupted
driving for at least 6 miles/10 km, park the
vehicle on a level surface.
2. Switch off the engine.
3. Pull the dipstick out after approx. 5 minutes
and wipe it off with a lint-free cloth, paper
towel or similar material.
00320051004F004C00510048000300280047004C0057004C005200510003