window MINI COUPE ROADSTER CONVERTIBLE 2012 User Guide
[x] Cancel search | Manufacturer: MINI, Model Year: 2012, Model line: COUPE ROADSTER CONVERTIBLE, Model: MINI COUPE ROADSTER CONVERTIBLE 2012Pages: 283, PDF Size: 9.38 MB
Page 42 of 283
Opening and closingCONTROLS
41
Operating while driving
The convertible top may be opened or closed
while driving not faster than 20 mph/30 km/h.
While operating the convertible top, pay
close attention to the surrounding traffic;
otherwise, an accident may happen. Try to avoid
operating the convertible top while reversing
the vehicle since the rear view is very limited
during the convertible top's movement. Do not
operate the convertible top when driving on
winding and rough roads or during windy
conditions. <
For better control
>The LED lights up during convertible top
operation until the opening or closing
procedure is completely finished.
> The LED flashes after releasing the switch.
The opening or closing procedure has not
yet been completed. The procedure can be
continued in the desired direction by press-
ing the appropriate switch.
> The Convertible top not locked indicator
lamp lights up and a message appears on
the Control Display.
Interruption
A convertible top which is not completely
open or closed is hazardous. <
The automatic movement is immediately inter-
rupted when the switch for the convertible top
operation is released. The procedure can be
continued in the desired direction by pressing
the appropriate switch.
If the opening or closing procedure is inter-
rupted by releasing the respective switch, the
convertible top stays in its current position for
several seconds before it slowly moves into a
more stable position. The procedure can be
continued by pressing the appropriate switch.
The opening and cl osing procedure is also inter-
rupted in case of a mech anical blockage. In this
case, in order to operate the convertible top
again: 1.
Switch off the ignition and then switch it on
again.
2. Press the switch to continue the procedure
in the desired direction.
Opening and closing procedure
Do not interrupt and restart the closing
procedure several times one after
another, or the convertible top mechanism
could be damaged. <
If the convertible top can be moved in only
one direction after several consecutive
attempts to operate it, the convertible top
system has overheated. Allow the system to cool
down for approx. 4 minutes. <
If the battery was disconnected, e.g. for
changing batteries or vehicle storage,
reinitialize the power windows, refer to page 39.
Otherwise, the windows cannot be lowered or
the convertible top cannot be opened. <
Convenience operation
For convenience operation using the remote
control, refer to page30; for operation via the
door lock, refer to page 31.
Manual closing in the event of an
electrical malfunction
Only close the convertible top manually if
it is absolutely necessary. Never open it
manually. Improper handling of the convertible
top can result in damage. The closing procedure
must be completely finished. Otherwise,
damage or injury could result.<
Before closing
1.Remove Allen key and screwdriver from
vehicle tools, refer to page 231.
2. Pry out luggage compartment lamp from
the left side trim using the screwdriver.
00320051004F004C00510048000300280047004C0057004C005200510003
Page 46 of 283
Opening and closingCONTROLS
45
Do not place any objects on the convertible top,
as they could otherwise fall off while the con-
vertible top is being operated and result in
property damage or personal injury.
Always completely finish the operation of the
convertible top. Driving off before an opening or
closing procedure is completely finished can
lead to property damage or personal injury.
During the opening an d closing operation,
ensure that no one is in jured by the convertible
top linkage or other moving parts. Keep children
away from the pivoting range of the convertible
top.
Only open or close the convertible top when the
vehicle is stopped. <
While opening and closing, the convertible
top pivots upward. When opening or clos-
ing the convertible top in garages, under bridges
or similar locations, ensure that there is a mini-
mum clearance of 2 meters; otherwise damage
may occur to the vehicle. <
Opening
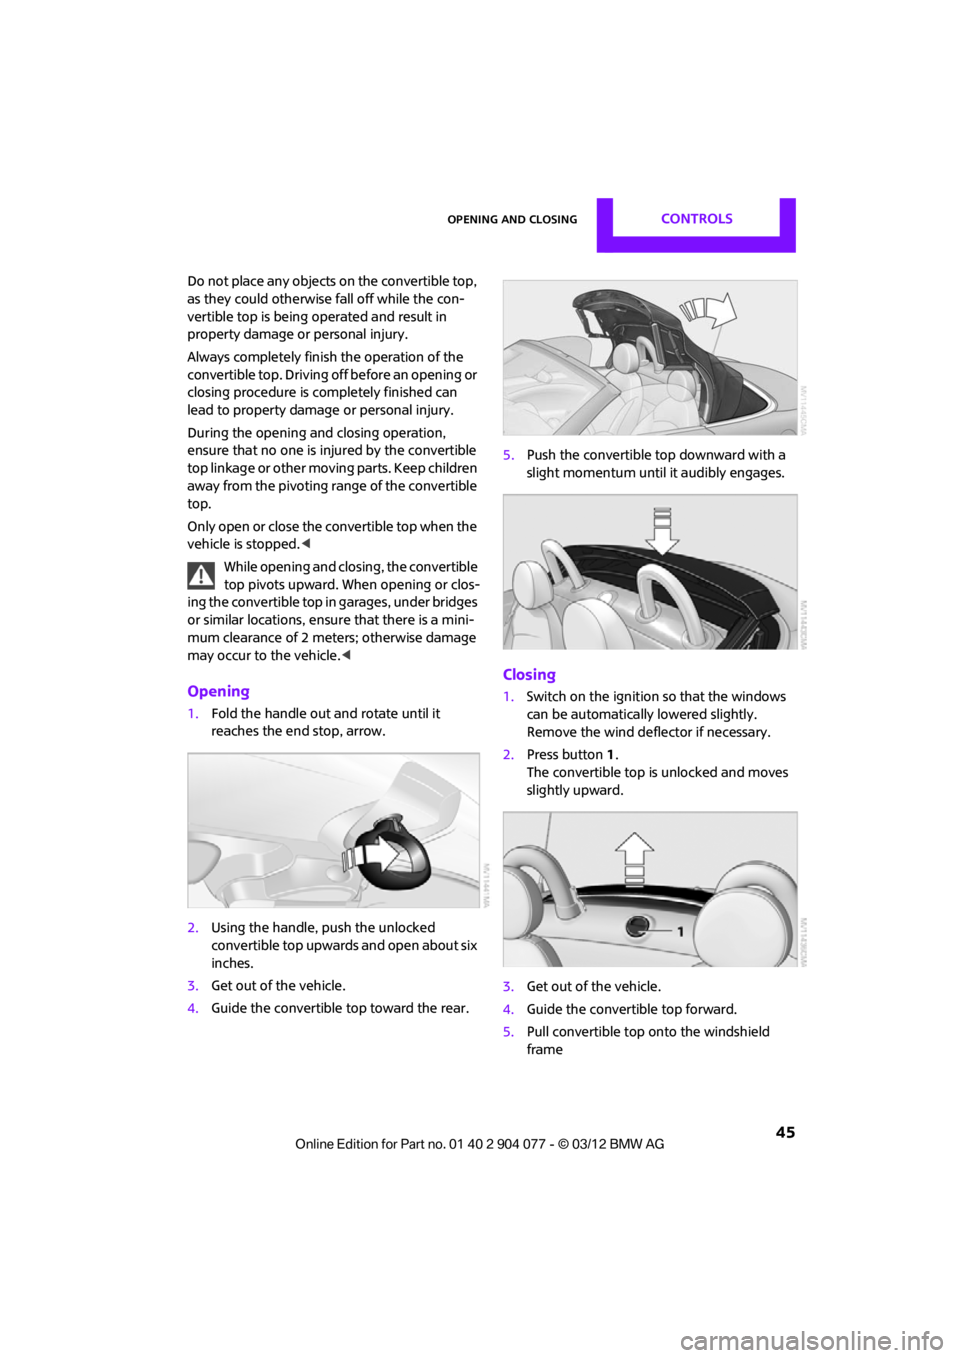
1.Fold the handle out and rotate until it
reaches the end stop, arrow.
2. Using the handle, push the unlocked
convertible top upwards and open about six
inches.
3. Get out of the vehicle.
4. Guide the convertible top toward the rear. 5.
Push the convertible top downward with a
slight momentum until it audibly engages.
Closing
1.Switch on the ignition so that the windows
can be automatically lowered slightly.
Remove the wind deflector if necessary.
2. Press button 1.
The convertible top is unlocked and moves
slightly upward.
3. Get out of the vehicle.
4. Guide the convertible top forward.
5. Pull convertible top onto the windshield
frame
00320051004F004C00510048000300280047004C0057004C005200510003
Page 48 of 283
Opening and closingCONTROLS
47
Malfunction
The Convertible top not locked indicator lamp
lights up and a message appears on the Control
Display.
Interruption
A convertible top which is not completely
open or closed is hazardous. <
The automatic movement is immediately inter-
rupted when the switch for the convertible top
operation is released. The procedure can be
continued in the desired direction by pressing
the appropriate switch.
If the opening or closing operation is interrupted
by releasing the switch, the convertible top
remains in the current position. The procedure
can be continued by pressing the appropriate
switch.
The opening and cl osing procedure is also inter-
rupted in case of a mech anical blockage. In this
case, in order to operate the convertible top
again:
1. Switch off the ignition and then switch it on
again.
2. Press the switch to continue the procedure
in the desired direction.
Opening and closing the convertible top
Switching on radio readiness or ignition, see
page 60.
To spare the battery, operate the convert-
ible top only when the engine is running, if
possible.
Before closing the conver tible top, remove any
foreign objects from the windshield frame that
may interfere with the closing of the convertible
top. <
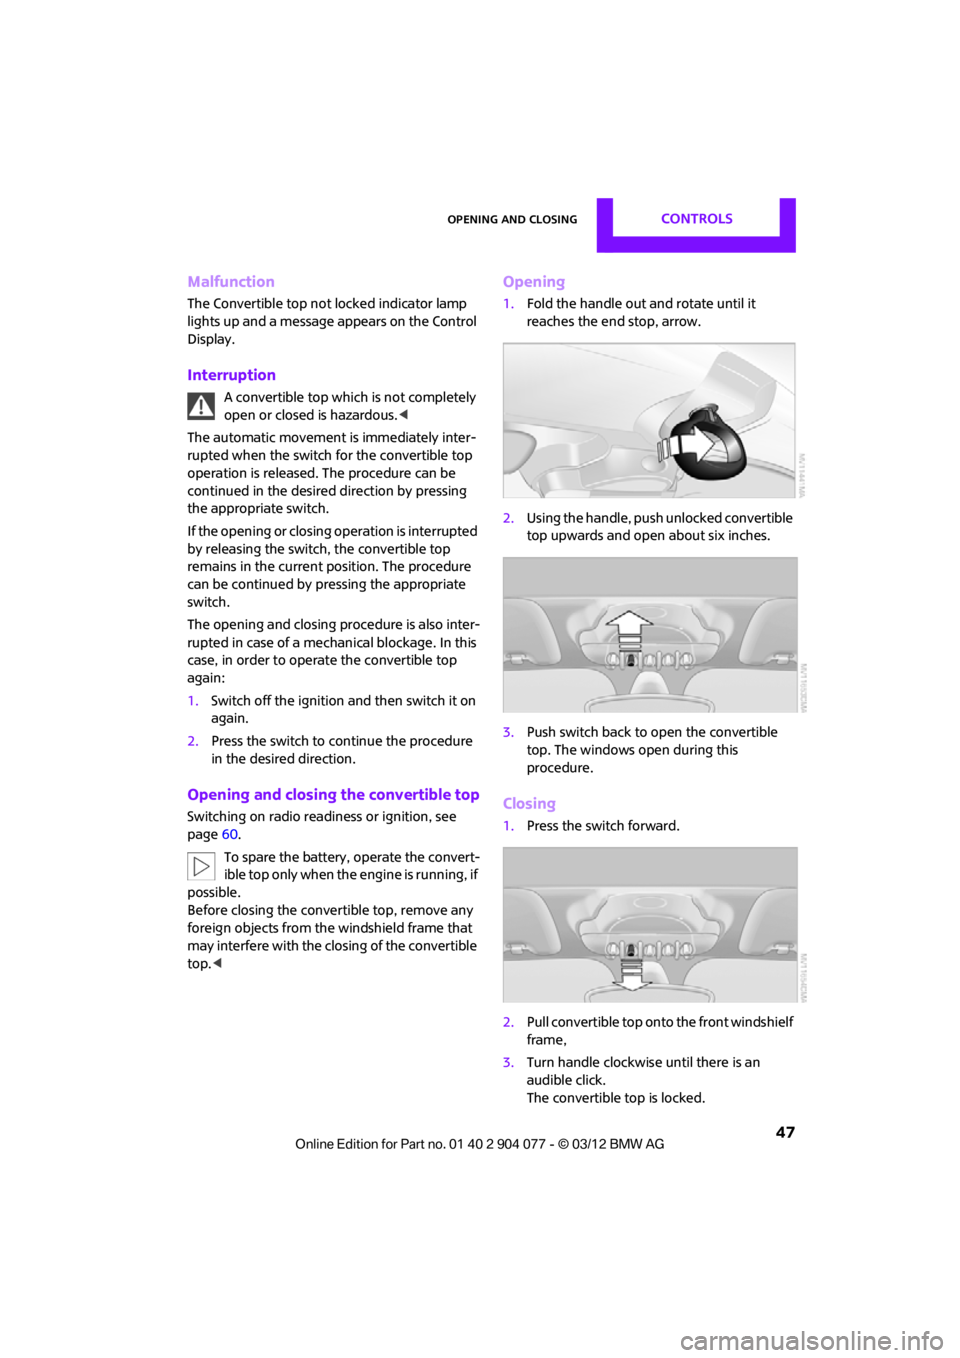
Opening
1.Fold the handle out and rotate until it
reaches the end stop, arrow.
2. Using the handle, push unlocked convertible
top upwards and open about six inches.
3. Push switch back to open the convertible
top. The windows open during this
procedure.
Closing
1.Press the switch forward.
2. Pull convertible top onto the front windshielf
frame,
3. Turn handle clockwise until there is an
audible click.
The convertible top is locked.
00320051004F004C00510048000300280047004C0057004C005200510003
Page 49 of 283
CONTROLSOpening and closing
48
If the convertible top has been open
for a longer time, a greater force for
locking may be necessary. <
4. Fold the handle back in.
5. If necessary, close windows.
Manual closing in the event of an
electrical malfunction
Only close the convertible top manually if
it is absolutely nece ssary. Never open it
manually. Improper handling of the convertible
top can result in damage . The closing procedure
must be completely finished. Otherwise,
damage or injury could result. <
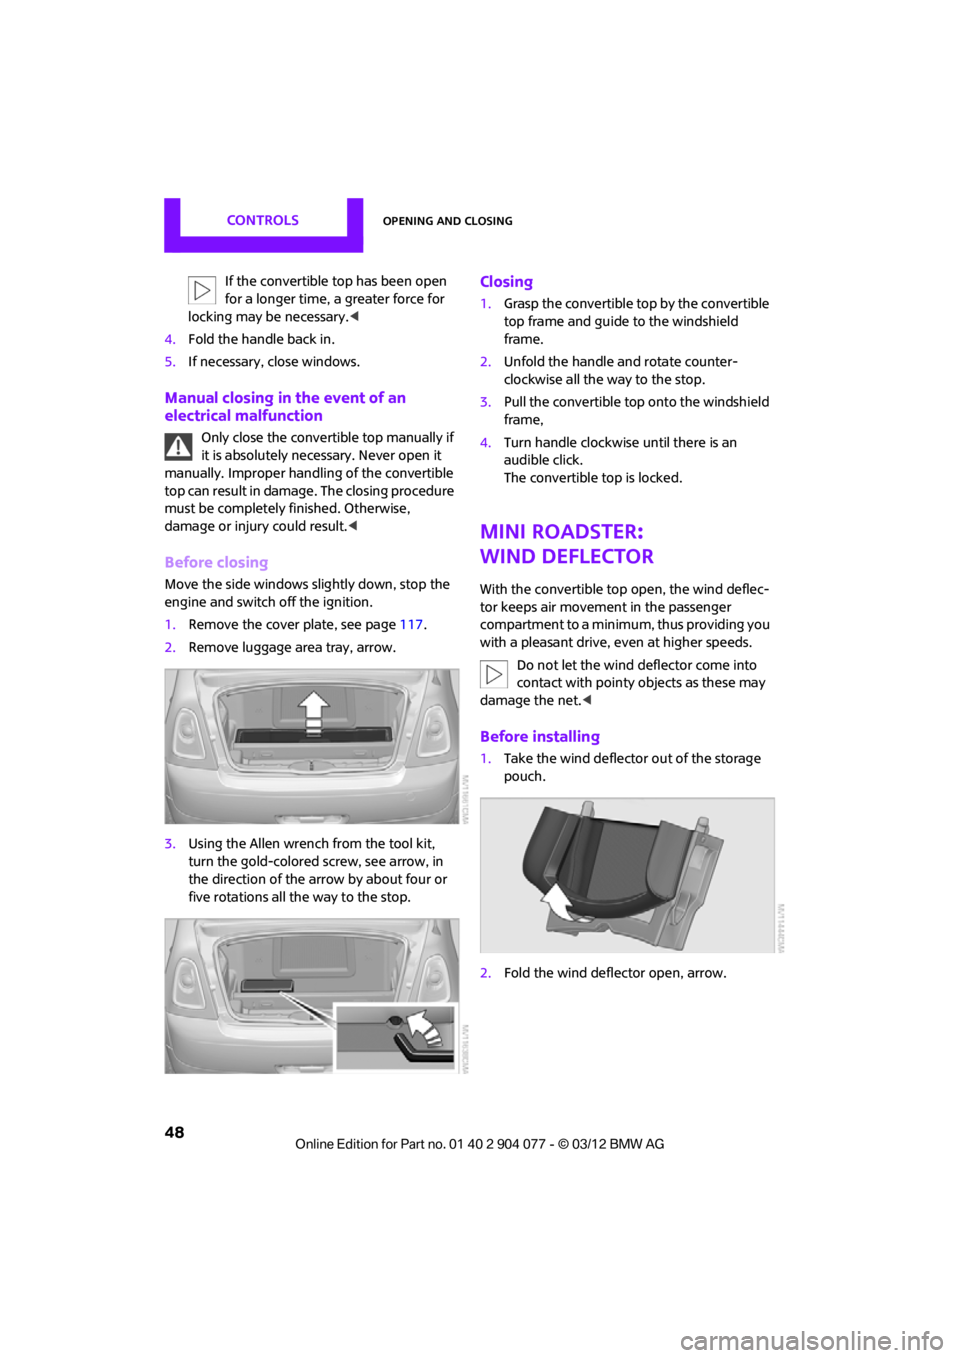
Before closing
Move the side windows slightly down, stop the
engine and switch off the ignition.
1. Remove the cover plate, see page117.
2. Remove luggage area tray, arrow.
3. Using the Allen wrench from the tool kit,
turn the gold-colored screw, see arrow, in
the direction of the arrow by about four or
five rotations all the way to the stop.
Closing
1.Grasp the convertible top by the convertible
top frame and guide to the windshield
frame.
2. Unfold the handle and rotate counter-
clockwise all the way to the stop.
3. Pull the convertible top onto the windshield
frame,
4. Turn handle clockwise until there is an
audible click.
The convertible top is locked.
MINI Roadster:
Wind deflector
With the convertible top open, the wind deflec-
tor keeps air movement in the passenger
compartment to a minimum, thus providing you
with a pleasant drive, even at higher speeds.
Do not let the wind deflector come into
contact with pointy objects as these may
damage the net. <
Before installing
1.Take the wind deflector out of the storage
pouch.
2. Fold the wind deflector open, arrow.
00320051004F004C00510048000300280047004C0057004C005200510003
Page 68 of 283

DrivingCONTROLS
67
5.Press and hold the butt on until the display
changes.
6. Press the button to select the desired
sensitivity.
7. Wait, or press and hold the button until the
display changes.
The settings are stored.
Deactivating intermittent wipe or
rain sensor
Press the button again, arrow 3.
Brief wipe
Press the lever downward once, arrow 2.
Cleaning windshield and headlamps
Pull the lever, arrow 4.
Washer fluid is sprayed onto the windshield and
the wipers are operated briefly.
When the vehicle lighting system is switched on,
the headlamps are cleaned at regular and
appropriate intervals.
In cars equipped with an alarm system, the
headlamps cannot be cleaned when the hood is
open. Do not use the washers when the washer
fluid reservoir is empt y; otherwise, you will
damage the washer pump.
Only use the washers if the hood has been com-
pletely closed; otherwise, the headlamp washer
system may be damaged. Do not use the wash-
ers if there is any danger that the fluid will freeze
on the windshield. If you do, your vision could be
obscured. For this reason, use antifreeze. <
Window washer nozzles
The window washer nozzles are heated auto-
matically while the engine is running or the
ignition is switched on.
Washer fluid
Washer fluid is flammable. Keep it away
from ignition sources, only store it in the
closed, original container, and keep out of reach
of children; otherwise, there is a danger of
injury. Comply with th e instructions on the
container. <
Washer fluid reservoir
Only refill washer fluid that contains
antifreeze when the engine is cool, to
avoid contact with hot engine parts. Otherwise,
fluid spills constitute a fi re hazard and a risk to
personal safety. <
Fill with water and, if required, with a washer
antifreeze, according to manufacturer's
recommendations. Mix the water and antifreeze before filling
the washer fluid reservoir to make sure
the correct concentration is maintained. <
Capacity
Approx. 2.6 US quarts/2.5 liters.
With headlamp washer system:
Approx. 4.8 US quarts/4.5 liters.
00320051004F004C00510048000300280047004C0057004C005200510003
Page 94 of 283
Technology for driving comfort and safetyCONTROLS
93
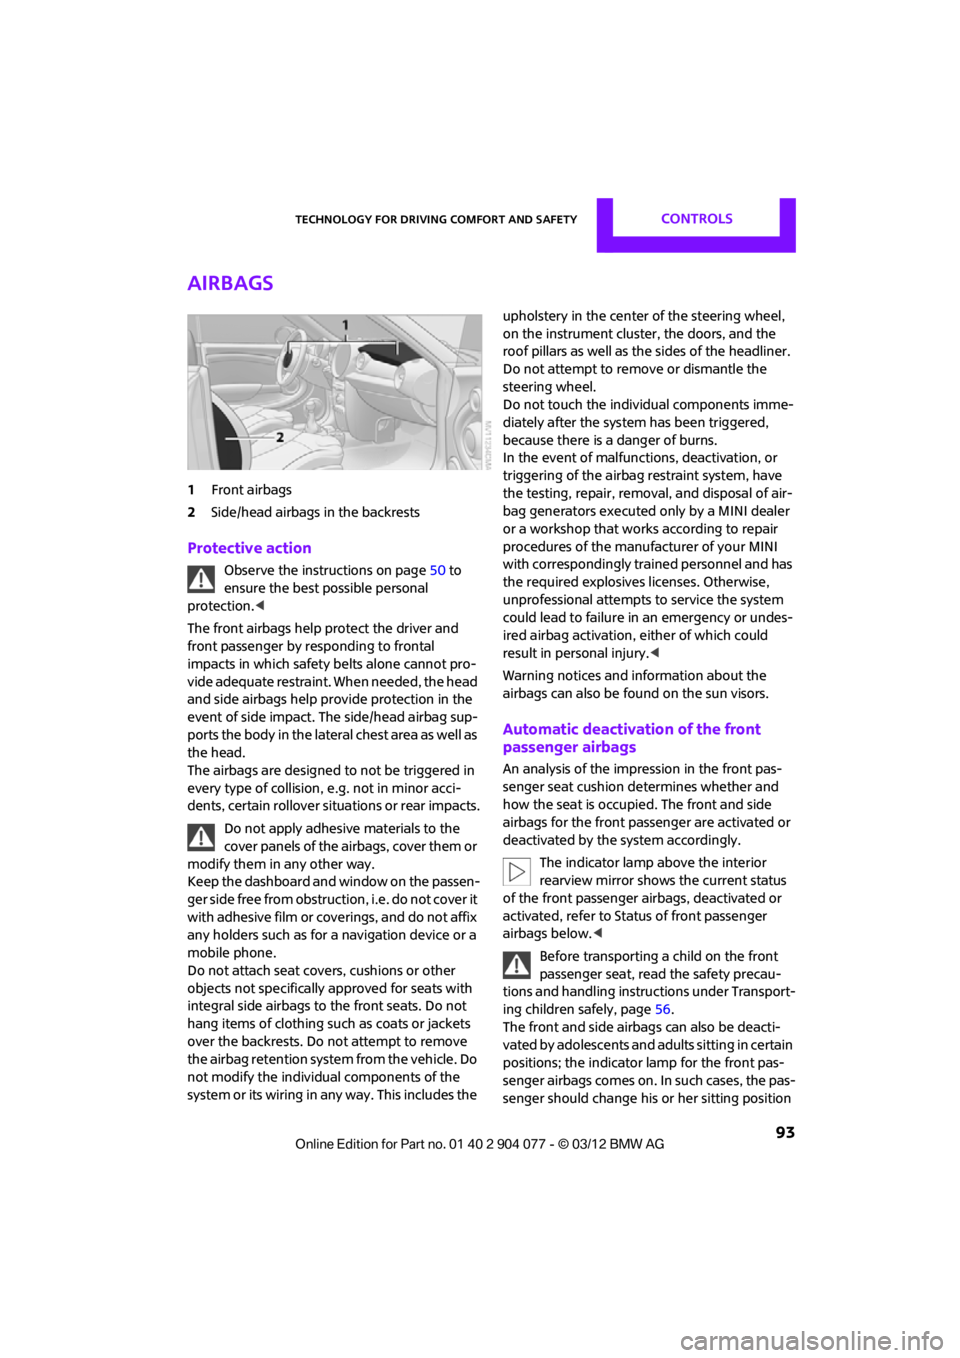
Airbags
1Front airbags
2 Side/head airbags in the backrests
Protective action
Observe the instructions on page 50 to
ensure the best possible personal
protection.<
The front airbags help protect the driver and
front passenger by responding to frontal
impacts in which safety belts alone cannot pro-
vide adequate restraint. When needed, the head
and side airbags help provide protection in the
event of side impact. The side/head airbag sup-
ports the body in the lateral chest area as well as
the head.
The airbags are designed to not be triggered in
every type of collision, e.g. not in minor acci-
dents, certain rollover si tuations or rear impacts.
Do not apply adhesive materials to the
cover panels of the airbags, cover them or
modify them in any other way.
Keep the dashboard and window on the passen-
g e r s i d e f r e e f r o m o b s t r u c t i o n , i . e . d o n o t c o v e r i t
with adhesive film or coverings, and do not affix
any holders such as for a navigation device or a
mobile phone.
Do not attach seat covers, cushions or other
objects not specifically approved for seats with
integral side airbags to the front seats. Do not
hang items of clothing such as coats or jackets
over the backrests. Do not attempt to remove
the airbag retention system from the vehicle. Do
not modify the individual components of the
system or its wiring in any way. This includes the upholstery in the center of the steering wheel,
on the instrument cluster, the doors, and the
roof pillars as well as the sides of the headliner.
Do not attempt to remove or dismantle the
steering wheel.
Do not touch the individual components imme-
diately after the system has been triggered,
because there is a danger of burns.
In the event of malfuncti
ons, deactivation, or
triggering of the airbag restraint system, have
the testing, repair, remova l, and disposal of air-
bag generators executed only by a MINI dealer
or a workshop that work s according to repair
procedures of the manufacturer of your MINI
with correspondingly trained personnel and has
the required explosives licenses. Otherwise,
unprofessional attempts to service the system
could lead to failure in an emergency or undes-
ired airbag activation, either of which could
result in personal injury.<
Warning notices and in formation about the
airbags can also be found on the sun visors.
Automatic deactivation of the front
passenger airbags
An analysis of the impression in the front pas-
senger seat cushion determines whether and
how the seat is occupied. The front and side
airbags for the front passenger are activated or
deactivated by the system accordingly.
The indicator lamp above the interior
rearview mirror shows the current status
of the front passenger airbags, deactivated or
activated, refer to Status of front passenger
airbags below. <
Before transporting a child on the front
passenger seat, read the safety precau-
tions and handling instructions under Transport-
ing children safely, page 56.
The front and side airbag s can also be deacti-
vated by adolescents and adults sitting in certain
positions; the indicator lamp for the front pas-
senger airbags comes on. In such cases, the pas-
senger should change his or her sitting position
00320051004F004C00510048000300280047004C0057004C005200510003
Page 102 of 283
ClimateCONTROLS
101
Climate
Vehicle equipment
In this chapter, all production, country, and
optional equipment that is offered in the model
range is described. Equipment is also described that is not available because of, for example,
selected options or count
ry version. This also
applies to safety related functions and systems.
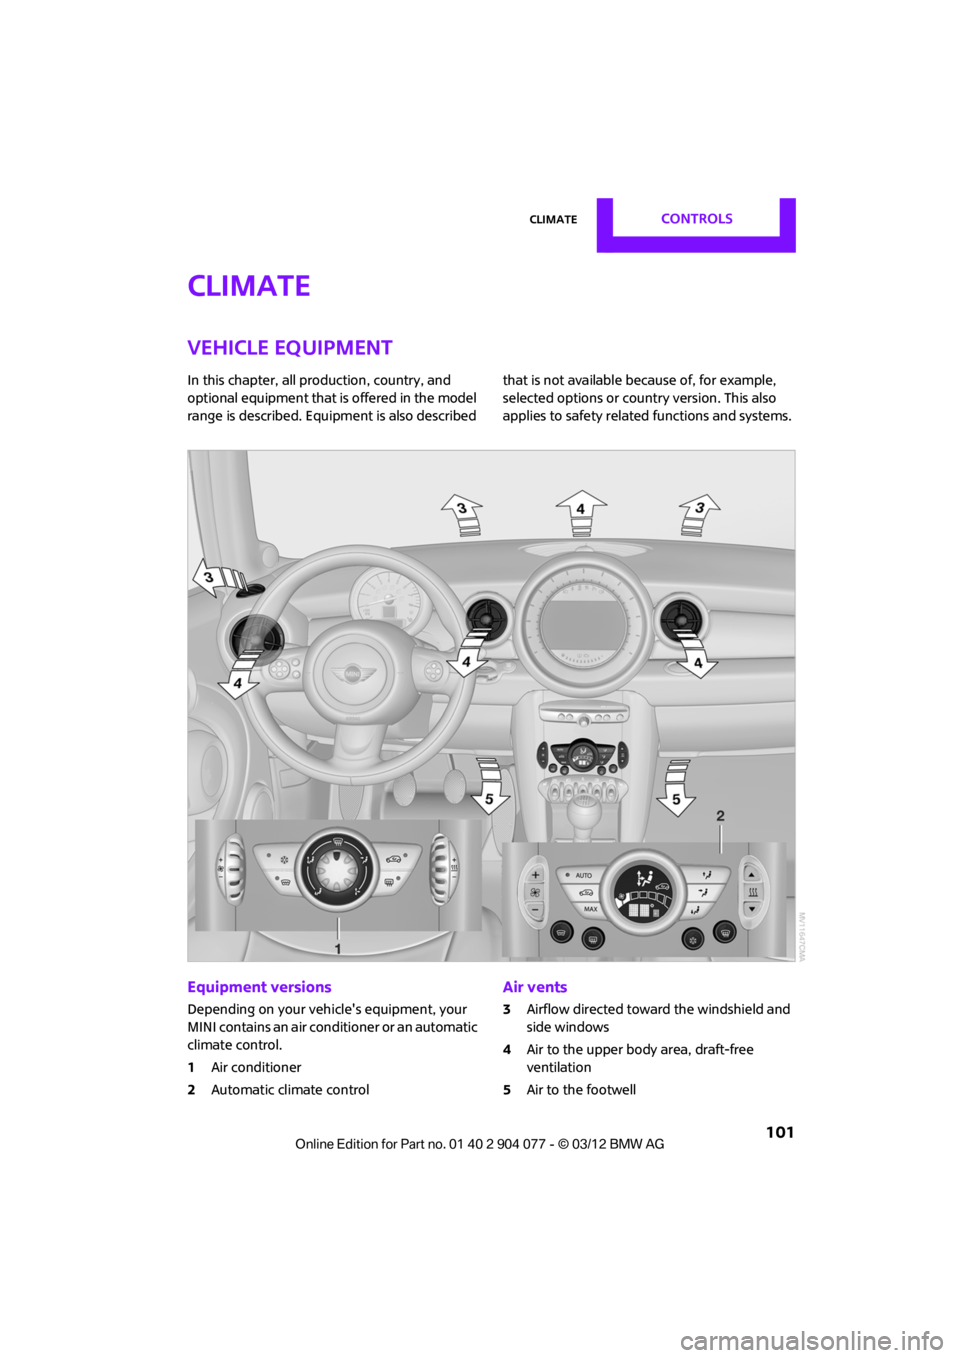
Equipment versions
Depending on your vehicle's equipment, your
MINI contains an air conditioner or an automatic
climate control.
1 Air conditioner
2 Automatic climate control
Air vents
3Airflow directed toward the windshield and
side windows
4 Air to the upper body area, draft-free
ventilation
5 Air to the footwell
00320051004F004C00510048000300280047004C0057004C005200510003
Page 103 of 283
CONTROLSClimate
102
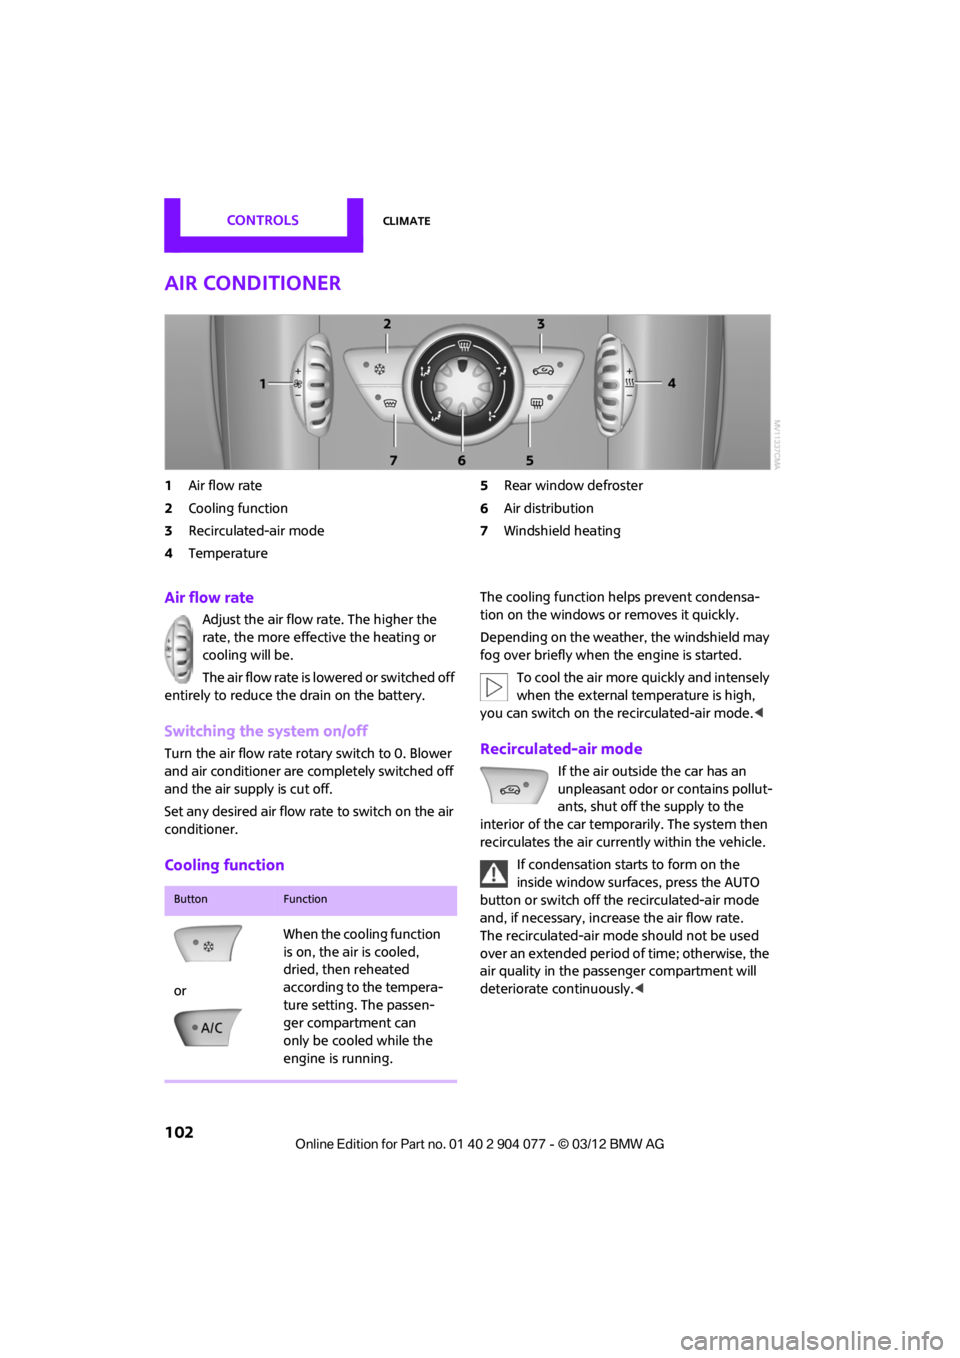
Air conditioner
1Air flow rate
2 Cooling function
3 Recirculated-air mode
4 Temperature 5
Rear window defroster
6 Air distribution
7 Windshield heating
Air flow rate
Adjust the air flow rate. The higher the
rate, the more effective the heating or
cooling will be.
The air flow rate is lowered or switched off
entirely to reduce the drain on the battery.
Switching the system on/off
Turn the air flow rate rota ry switch to 0. Blower
and air conditioner are co mpletely switched off
and the air supply is cut off.
Set any desired air flow rate to switch on the air
conditioner.
Cooling function
The cooling function helps prevent condensa-
tion on the windows or removes it quickly.
Depending on the weather, the windshield may
fog over briefly when the engine is started.
To cool the air more quickly and intensely
when the external temperature is high,
you can switch on the recirculated-air mode.<
Recirculated-air mode
If the air outside the car has an
unpleasant odor or contains pollut-
ants, shut off the supply to the
interior of the car temporarily. The system then
recirculates the air currently within the vehicle.
If condensation starts to form on the
inside window surfac es, press the AUTO
button or switch off the recirculated-air mode
and, if necessary, increa se the air flow rate.
The recirculated-air mode should not be used
over an extended period of time; otherwise, the
air quality in the passenger compartment will
deteriorate continuously.<
ButtonFunction
or When the cooling function
is on, the air is cooled,
dried, then reheated
according to the tempera-
ture setting. The passen-
ger compartment can
only be cooled while the
engine is running.
00320051004F004C00510048000300280047004C0057004C005200510003
Page 104 of 283
ClimateCONTROLS
103
Temperature
Turn upward, red, to increase the
temperature.
Turn downward, blue, to decrease the
temperature.
Rear window defroster
The defroster is switched off
automatically after a certain time.
The rear window heating is lowered
or switched off entirely to reduce the drain on
the battery.
Air distribution
Direct the flow of air to the
windows , to the upper body
area or to the footwell .
Intermediate settings are possible.
Windshield heating
The windshield heating is switched
off automatically after a short time.
The front window heating is low-
ered or switched off entirely to reduce the drain
on the battery.
Defrosting windows and removing
condensation
1. Set air flow rate to the maximum level.
2. Set air distributi on to position .
Condensation is removed from the windows
more quickly when the cooling function is
also activated.
3. Set to the highest temperature, red.
4. Deactivate recirculated-air mode.
5. Turn on windshield heating if necessary.
6. Turn on rear window defroster if necessary.
Microfilter
The microfilter captures dust and pollen. The
microfilter is changed by your MINI dealer
during routine maintenance work.
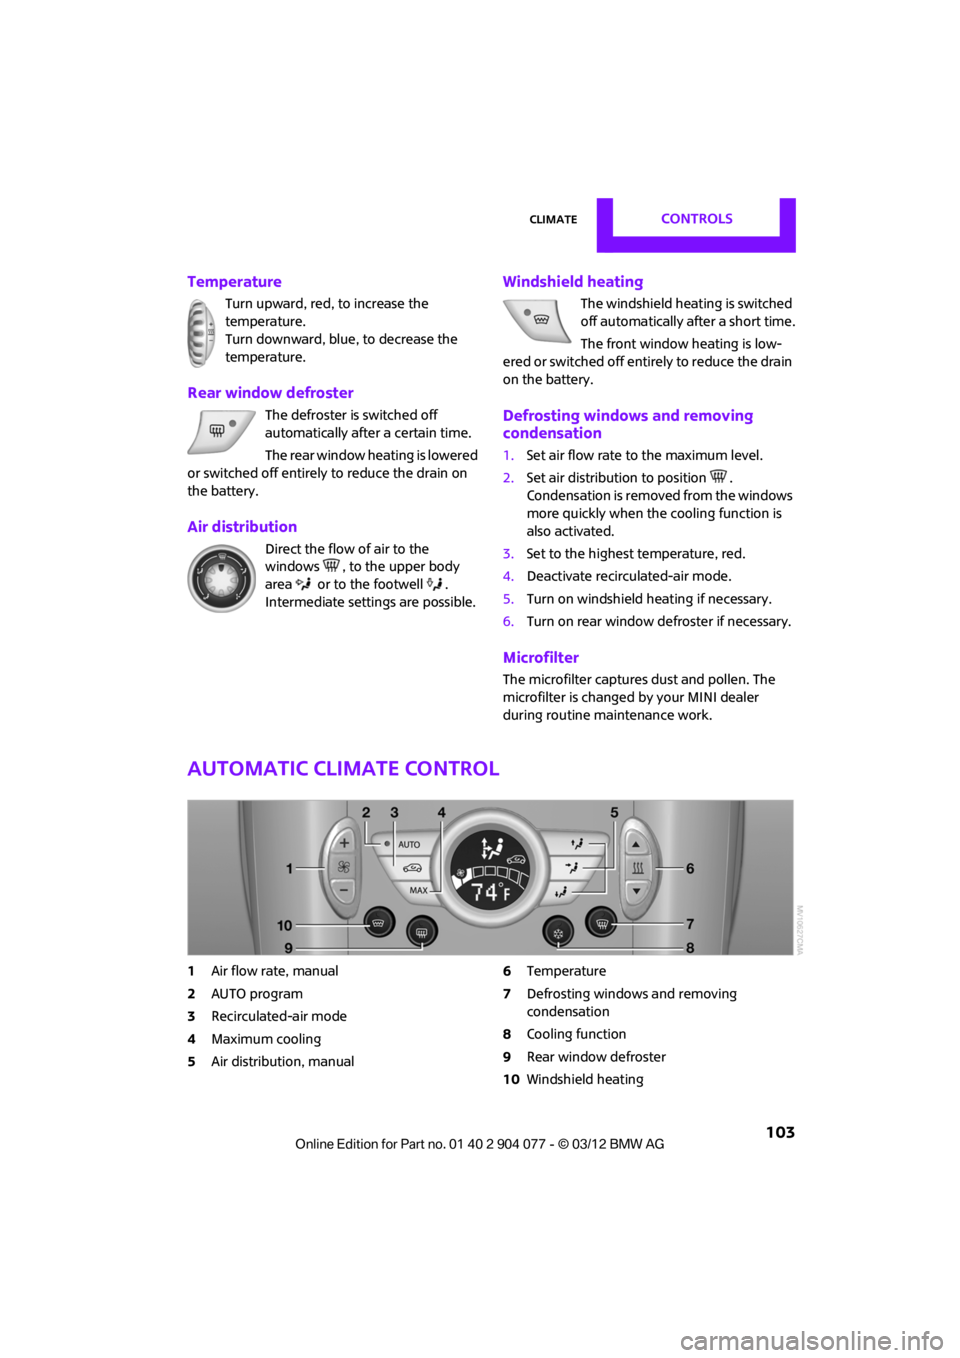
Automatic climate control
1 Air flow rate, manual
2 AUTO program
3 Recirculated-air mode
4 Maximum cooling
5 Air distribution, manual 6
Temperature
7 Defrosting windows and removing
condensation
8 Cooling function
9 Rear window defroster
10 Windshield heating
00320051004F004C00510048000300280047004C0057004C005200510003
Page 105 of 283
CONTROLSClimate
104
Comfortable interior climate
AUTO program2 offers the ideal air distribution
and air flow rate for almo st all conditions, refer
to AUTO program below. All you need to do is
select an interior temperature which is comfort-
able for you.
The following sections inform you in detail about
how to adjust the settings.
Most settings are stored for the remote control
currently in use, refer also to Personal Profile set-
tings on page 29.
Air flow rate, manual
Press the – button to reduce air flow. Press
the + button to increase it.
You can reactivate the automatic mode
for the air flow rate with the AUTO button.
The air flow rate is lo wered or switched off
entirely to reduce the drain on the battery. The
display remains the same.
Switching the system on/off
Reduce the air flow by pressing the – button
repeatedly until the system is switched off. All
displays go out.
Press the AUTO button to switch the automatic
climate control back on.
AUTO program
The AUTO program adjusts the air
distribution to the windshield and
side windows, toward the upper body area and
into the footwell for you. The air flow rate and
your temperature specifications will be adapted
to outside influences in accordance with
seasonal changes, e.g. sunlight.
The cooling function is automatically switched
on along with the AUTO program.
The program is switched off if the air distribution
is manually adjusted or if the button is pressed
again.
Convertible Program
If the convertible top is open, the Convertible
Program is activated. During the Convertible
Program, the automatic climate control is opti-
mized for driving with the convertible top down.
Furthermore, with increasing vehicle speed, the
airflow is also increased.
If attaching the wind reflector, the perfor-
mance of the Convertible Program can be
significantly improved. <
Recirculated-air mode
Recirculated-air mode: the supply
of outside air is permanently shut
off. The system then recirculates
the air currently within the vehicle.
If condensation starts to form on the
inside window surfac es, press the AUTO
button or switch off the recirculated-air mode
and, if necessary, increa se the air flow rate.
The recirculated-air mode should not be used
over an extended period of time; otherwise, the
air quality in the passenger compartment will
deteriorate continuously.<
Maximum cooling
You will receive maximally cooled
air as quickly as possible when the
outside temperature is above
32 7 /06 and while the engine is running.
The automatic clim ate control goes into recircu-
lated-air mode at the lowest temperature. Air
flows at maximum rate from the vents for the
upper body area. You should therefore open
them for maximum cooling.
Air distribution, manual
The flow of air is directed to the
windows, to the upper body area or
to the footwell as selected.
You can switch the automatic air
distribution back on by pressing the AUTO
button.
00320051004F004C00510048000300280047004C0057004C005200510003