roof MINI COUPE ROADSTER CONVERTIBLE 2012 Owners Manual
[x] Cancel search | Manufacturer: MINI, Model Year: 2012, Model line: COUPE ROADSTER CONVERTIBLE, Model: MINI COUPE ROADSTER CONVERTIBLE 2012Pages: 283, PDF Size: 9.38 MB
Page 17 of 283
AT A GLANCECockpit
16
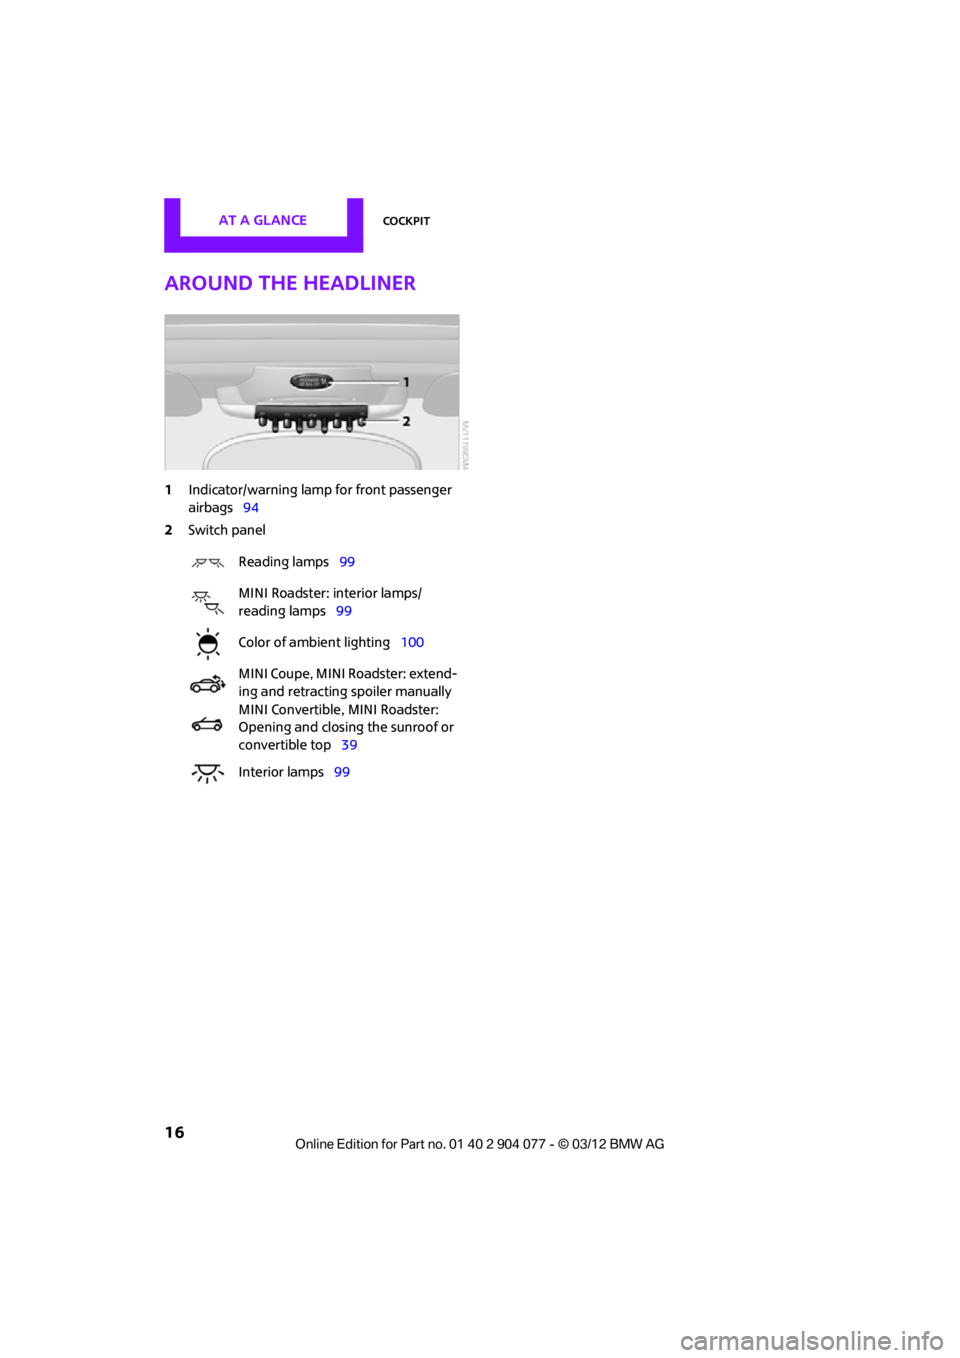
Around the headliner
1Indicator/warning lamp for front passenger
airbags 94
2 Switch panel
Reading lamps 99
MINI Roadster: interior lamps/
reading lamps 99
Color of ambient lighting 100
MINI Coupe, MINI Roadster: extend-
ing and retracting spoiler manually
MINI Convertible, MINI Roadster:
Opening and closing the sunroof or
convertible top 39
Interior lamps 99
00320051004F004C00510048000300280047004C0057004C005200510003
Page 31 of 283
CONTROLSOpening and closing
30
Using the remote control
Unlocking
Press the button.
The welcome lamps and interior lamps come on.
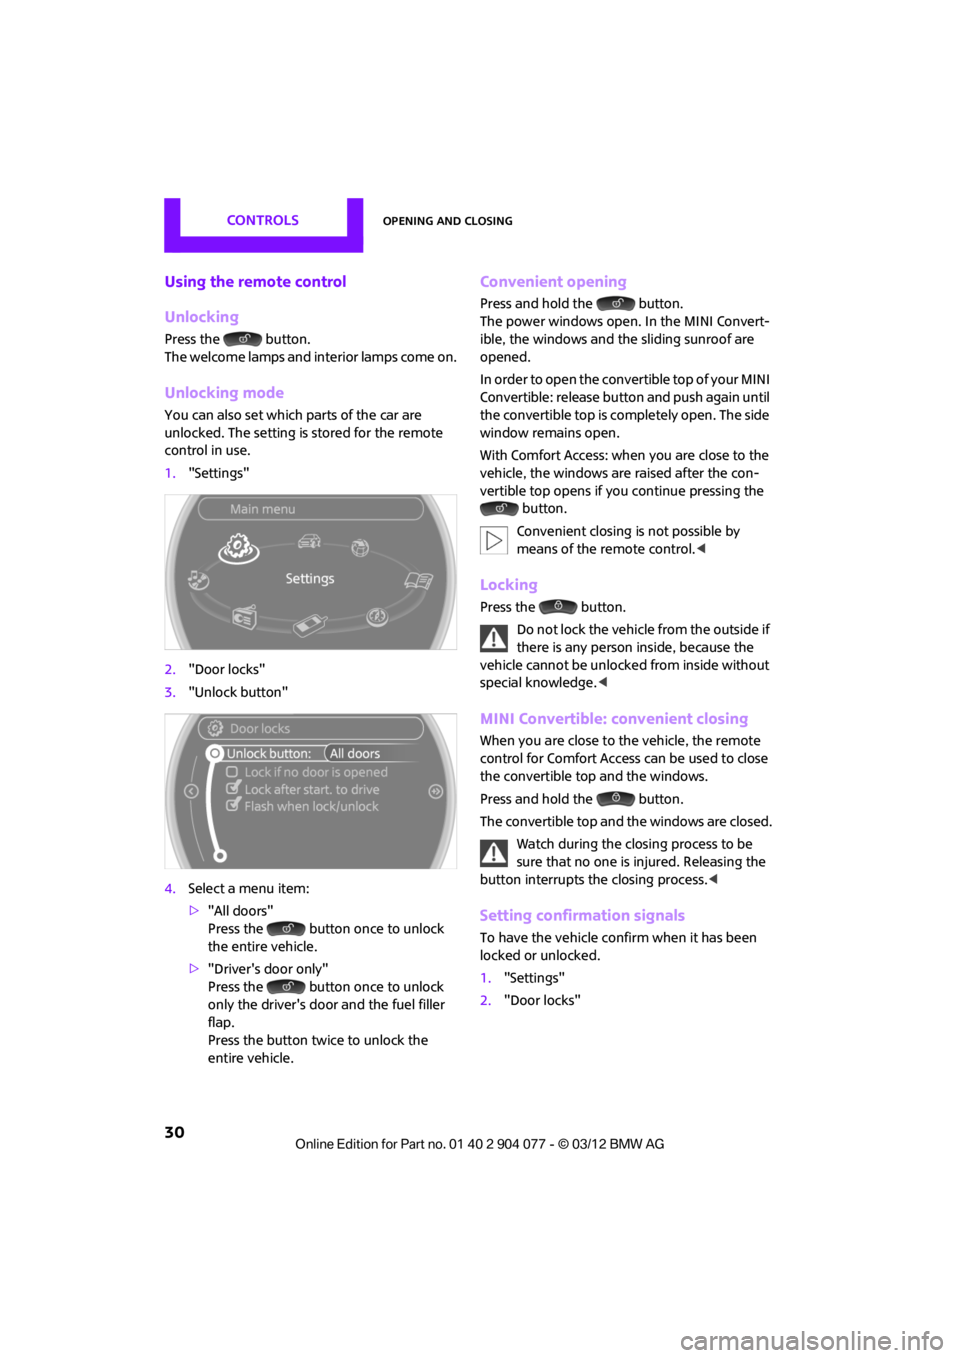
Unlocking mode
You can also set which parts of the car are
unlocked. The setting is stored for the remote
control in use.
1."Settings"
2. "Door locks"
3. "Unlock button"
4. Select a menu item:
>"All doors"
Press the button once to unlock
the entire vehicle.
> "Driver's door only"
Press the button once to unlock
only the driver's door and the fuel filler
flap.
Press the button twice to unlock the
entire vehicle.
Convenient opening
Press and hold the button.
The power windows open. In the MINI Convert-
ible, the windows and the sliding sunroof are
opened.
In order to open the convertible top of your MINI
Convertible: release butt on and push again until
the convertible top is completely open. The side
window remains open.
With Comfort Access: when you are close to the
vehicle, the windows are raised after the con-
vertible top opens if yo u continue pressing the
button.
Convenient closing is not possible by
means of the remote control. <
Locking
Press the button.
Do not lock the vehicle from the outside if
there is any person inside, because the
vehicle cannot be unlocked from inside without
special knowledge. <
MINI Convertible: convenient closing
When you are close to the vehicle, the remote
control for Comfort Access can be used to close
the convertible top and the windows.
Press and hold the button.
The convertible top and the windows are closed.
Watch during the closing process to be
sure that no one is injured. Releasing the
button interrupts the closing process. <
Setting confirmation signals
To have the vehicle confirm when it has been
locked or unlocked.
1."Settings"
2. "Door locks"
00320051004F004C00510048000300280047004C0057004C005200510003
Page 33 of 283
CONTROLSOpening and closing
32
When there is no alarm system or Comfort
Access, only the driver's door is locked
with the door lock. <
To lock all doors, the fuel filler flap, and the
tailgate together:
With the doors closed, press the interior central
locking button, page 32, to lock the vehicle.
Unlocking and opening the driver or passenger
door, page 32.
Lock the vehicle.
>Lock the driver's door with the integrated
key via the door lock, or
> Press the safety lo ck button on the
passenger's door and close the door
from the outside.
Convenience operation
With an alarm system or Comfort Access, the
windows can be operated via the door lock.
Opening/closing
Hold the key in the position for unlocking or
locking.
In the MINI Convertible, the convertible top
closes first, followed by the folding sunroof, and
finally the side windows close.
During the roof closing process (in case of
the convertible top also during the open-
ing process) ensure no one gets pinched.
Releasing the key stops the operation. <
Manual operation
In the event of an electrical malfunction, the
driver's door can be unlocked or locked by turn-
ing the integrated key in the door lock to the end
positions.
Opening and closing:
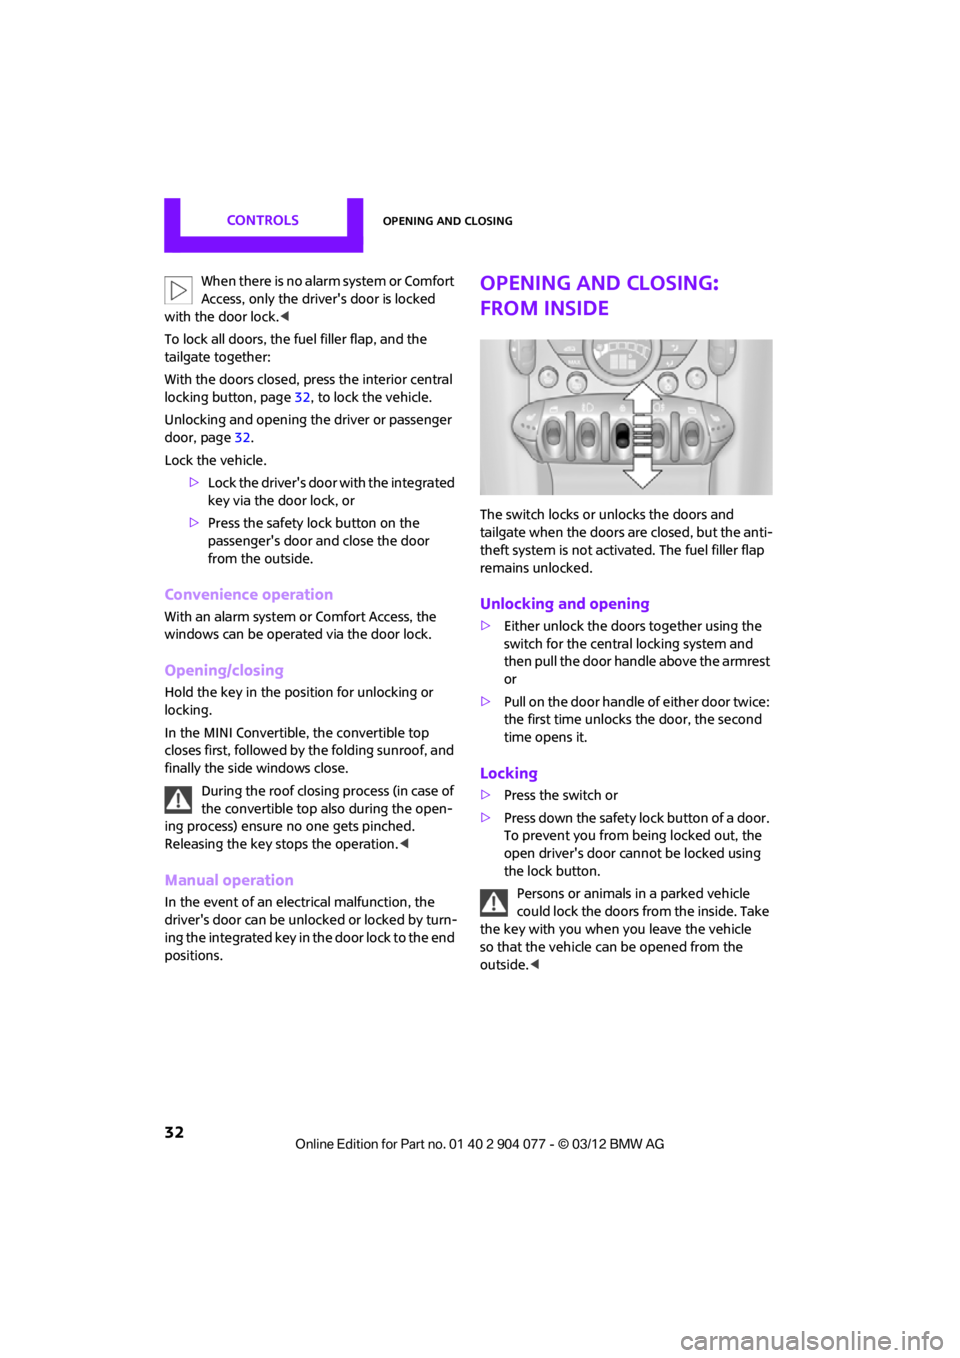
from inside
The switch locks or unlocks the doors and
tailgate when the doors are closed, but the anti-
theft system is not activated. The fuel filler flap
remains unlocked.
Unlocking and opening
>Either unlock the doors together using the
switch for the central locking system and
then pull the door handle above the armrest
or
> Pull on the door handle of either door twice:
the first time unlocks the door, the second
time opens it.
Locking
>Press the switch or
> Press down the safety lo ck button of a door.
To prevent you from being locked out, the
open driver's door cannot be locked using
the lock button.
Persons or animals in a parked vehicle
could lock the doors from the inside. Take
the key with you when you leave the vehicle
so that the vehicle can be opened from the
outside. <
00320051004F004C00510048000300280047004C0057004C005200510003
Page 36 of 283

Opening and closingCONTROLS
35
>The car’s inclination changes, for example if
an attempt is made to jack it up and steal the
wheels or to raise it prior to towing it away
> There is an interruption in the power supply
from the battery
The alarm system briefly indicates unauthorized
entry or tampering by means of:
> An acoustic alarm
> Switching on the hazard warning flashers
Arming and disarming
General information
Whenever the car is locked or unlocked, the
alarm system is armed or disarmed.
Door lock with armed alarm system
Because of the design, unlocking the door lock
may trigger the alarm in some countries.
To turn off the alarm, unlock the vehicle using
the remote control or switch on the ignition.
Tailgate with armed alarm system
Even when the alarm syst em is armed, you can
open the tailgate by means of the button
on the remote control.
When you subsequently close the tailgate it is
again locked and monitored.
Panic mode
You can activate the alarm system if you find
yourself in a dangerous situation.
Press the button for at least two seconds.
Switching off the alarm:
Press any button.
Switching off an alarm
> Unlock the car with the remote control.
> Insert the key fully into the ignition lock.
> In cars with Comfort Access, press the button
on the door lock.
Display on the revolution counter
When the system is armed, all LEDs pulse. After
approx. 16 minutes one LED flashes.
>LEDs pulse or LED flashes: system is armed.
> One LED flashes at short intervals:
Doors, the hood or the tailgate are not prop-
erly closed. Even if these are not closed fully,
the remaining items are deadlocked and the
LEDs pulse after approx. 10 seconds for
approx. 16 minutes. Afterwards, one LED
flashes.
The interior movement detector is not
activated.
> LEDs go out after the vehicle is unlocked:
No attempt was made to tamper with the
car.
> LEDs flash after unlocking until the key is
inserted in the ignition, but for no longer
than approx. 5 minutes: an attempt was
made to tamper with the vehicle.
Tilt alarm sensor
The vehicle's inclination is monitored. The alarm
is triggered, for instance, if an attempt is made
to steal the vehicle's wheels or tow it away.
Interior movement detector
Before the interior mo vement detector can
operate correctly, the windows and glass roof
must be closed.
00320051004F004C00510048000300280047004C0057004C005200510003
Page 40 of 283
Opening and closingCONTROLS
39
Initializing electric power windows
If the battery was disconnected, e.g. for
changing batteries or vehicle storage,
reinitialize the power wi ndows; otherwise, the
windows will not be lowered.
MINI Convertible: opening the convertible top is
not possible. <
1. Close the doors.
2. Open both windows.
3. Close both windows.
In the event of a system malfunction, please
contact your MINI dealer.
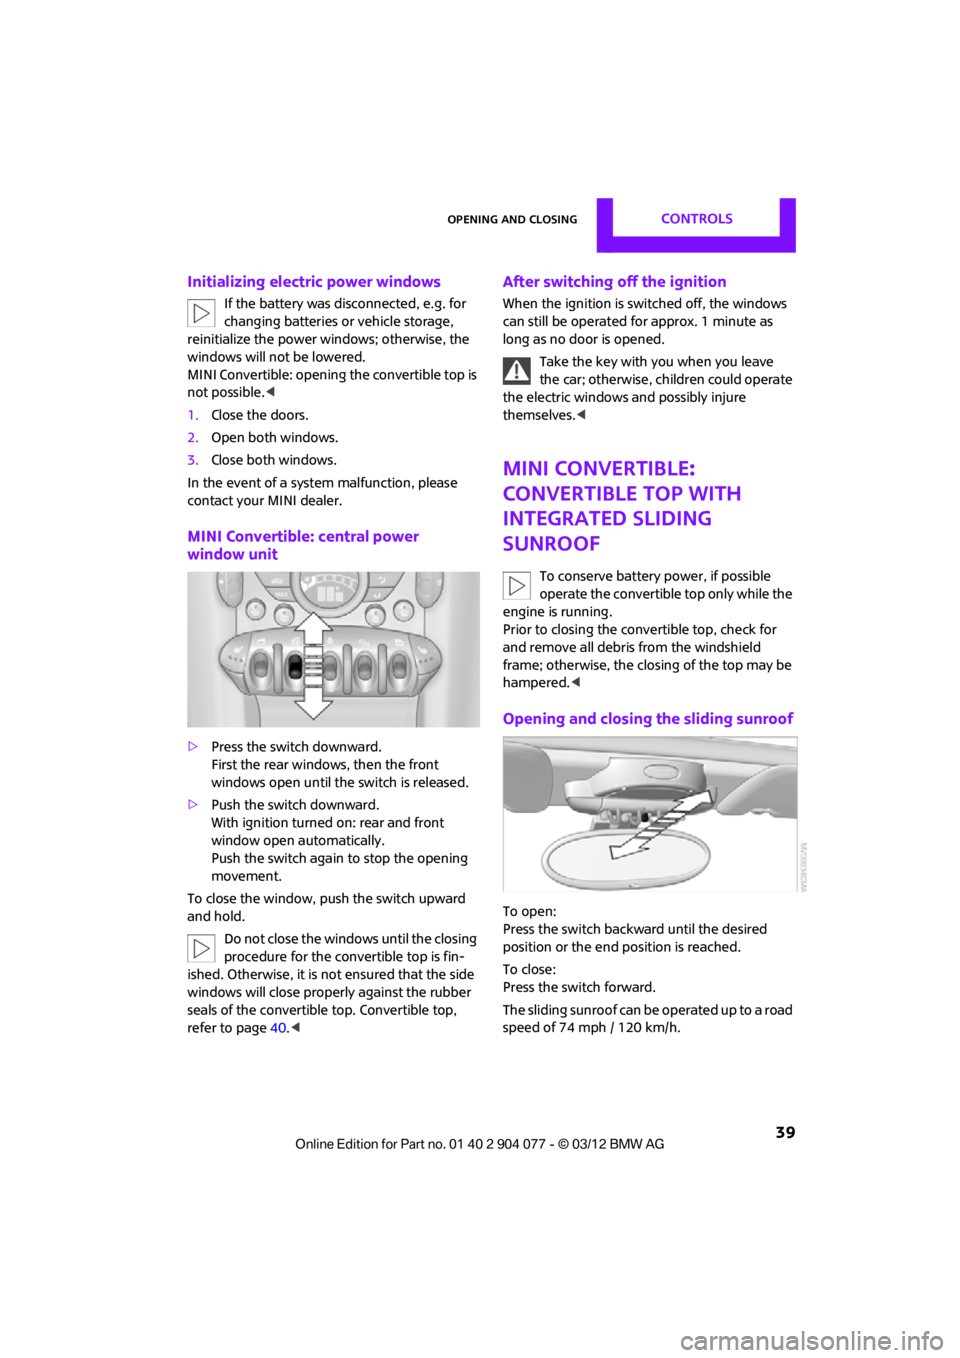
MINI Convertible: central power
window unit
> Press the switch downward.
First the rear windows, then the front
windows open until the switch is released.
> Push the switch downward.
With ignition turned on: rear and front
window open automatically.
Push the switch again to stop the opening
movement.
To close the window, push the switch upward
and hold. Do not close the windows until the closing
procedure for the convertible top is fin-
ished. Otherwise, it is not ensured that the side
windows will close properly against the rubber
seals of the convertible top. Convertible top,
refer to page 40.<
After switching off the ignition
When the ignition is sw itched off, the windows
can still be operated for approx. 1 minute as
long as no door is opened.
Take the key with you when you leave
the car; otherwise, children could operate
the electric windows and possibly injure
themselves. <
MINI Convertible:
Convertible top with
integrated sliding
sunroof
To conserve battery power, if possible
operate the convertible top only while the
engine is running.
Prior to closing the convertible top, check for
and remove all debris from the windshield
frame; otherwise, the closing of the top may be
hampered. <
Opening and closing the sliding sunroof
To open:
Press the switch backwa rd until the desired
position or the end position is reached.
To close:
Press the switch forward.
The sliding sunroof can be operated up to a road
speed of 74 mph / 120 km/h.
00320051004F004C00510048000300280047004C0057004C005200510003
Page 41 of 283
CONTROLSOpening and closing
40
Power convertible top
The fully automatic convertible top provides
protection from the weather, combined with
simple and easy operation.
Here are some helpful tips for getting the most
enjoyment out of your MINI Convertible:
>It is recommended th at you close the con-
vertible top whenever the vehicle is parked.
The closed convertible top not only protects
the vehicle interior from damage due to
unforeseen bad weather, but also provides a
certain degree of protection against theft.
Always keep your valuables inside the
locked luggage compartment, even if the
convertible top is closed.
> Do not mount any roof rack systems on the
convertible top.
> When opening the wet convertible top, e.g.,
after driving in the rain, water drops may
enter the luggage compartment. In order to
avoid water stains or soiling, remove all
objects from the luggage compartment, if
necessary.
If the temperature drops below +10 7/
–12 6, do not operate the convertible
top; otherwise, damage may occur.
Do not leave a wet convertible top open for
more than one day, since the humidity may
cause damages.
Do not place any objects on the convertible top,
as they could otherwise fall off while the con-
vertible top is being op erated and result in
property damage or personal injury.
If the rollover protective system is extended, do
not operate the convertible top.
Always completely finish the operation of the
convertible top. Driving of f before an opening or
closing procedure is completely finished can
lead to property damage or personal injury.
During the opening and closing operation,
ensure that no one is injured by the convertible
top linkage or other moving parts. Keep children
away from the pivoting range of the convertible
top. For safety reasons, only operate the convertible
top while the vehicle is standing.
<
While opening and clos ing, the convertible
top pivots upward. If operating the con-
vertible top inside a garage or under a bridge, or
similar low structure, ma ke sure that you have
the minimum clearance of 6 ft 7 in/2 m; other-
wise, the vehicle may be damaged. <
Before opening and closing
>Please observe the previous safety
instructions.
> Please ensure the luggage compartment
roller cover is in its lo west position, refer to
page 117; otherwise, the convertible top
cannot be opened.
> Ensure the cargo does not push against the
luggage compartment roller cover from
below.
> Make sure that the tailgate is closed.
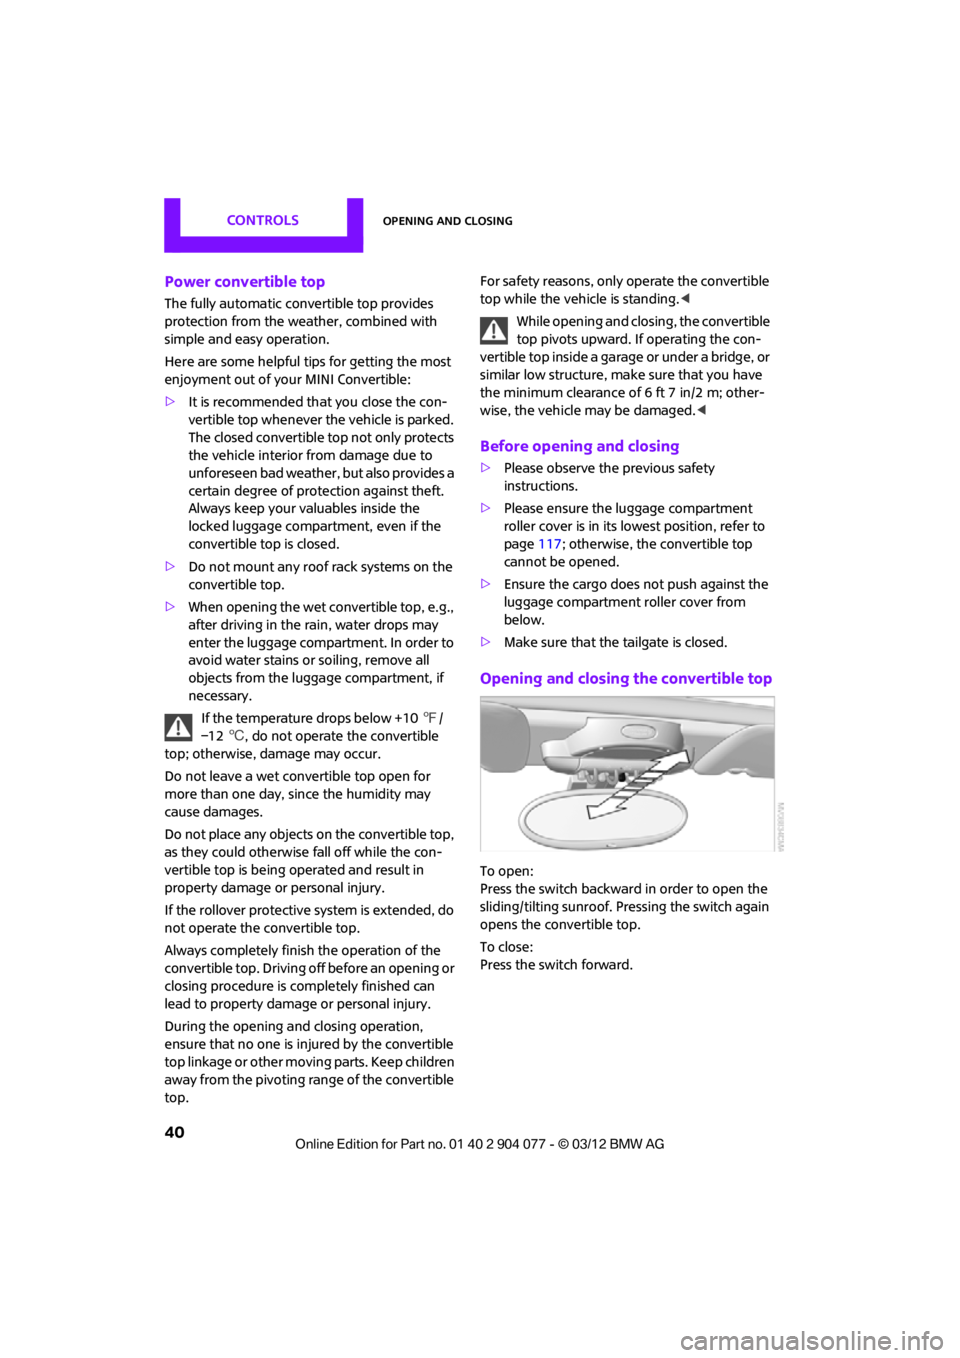
Opening and closing the convertible top
To open:
Press the switch backward in order to open the
sliding/tilting sunroof. Pr essing the switch again
opens the convertible top.
To close:
Press the switch forward.
00320051004F004C00510048000300280047004C0057004C005200510003
Page 44 of 283
Opening and closingCONTROLS
43
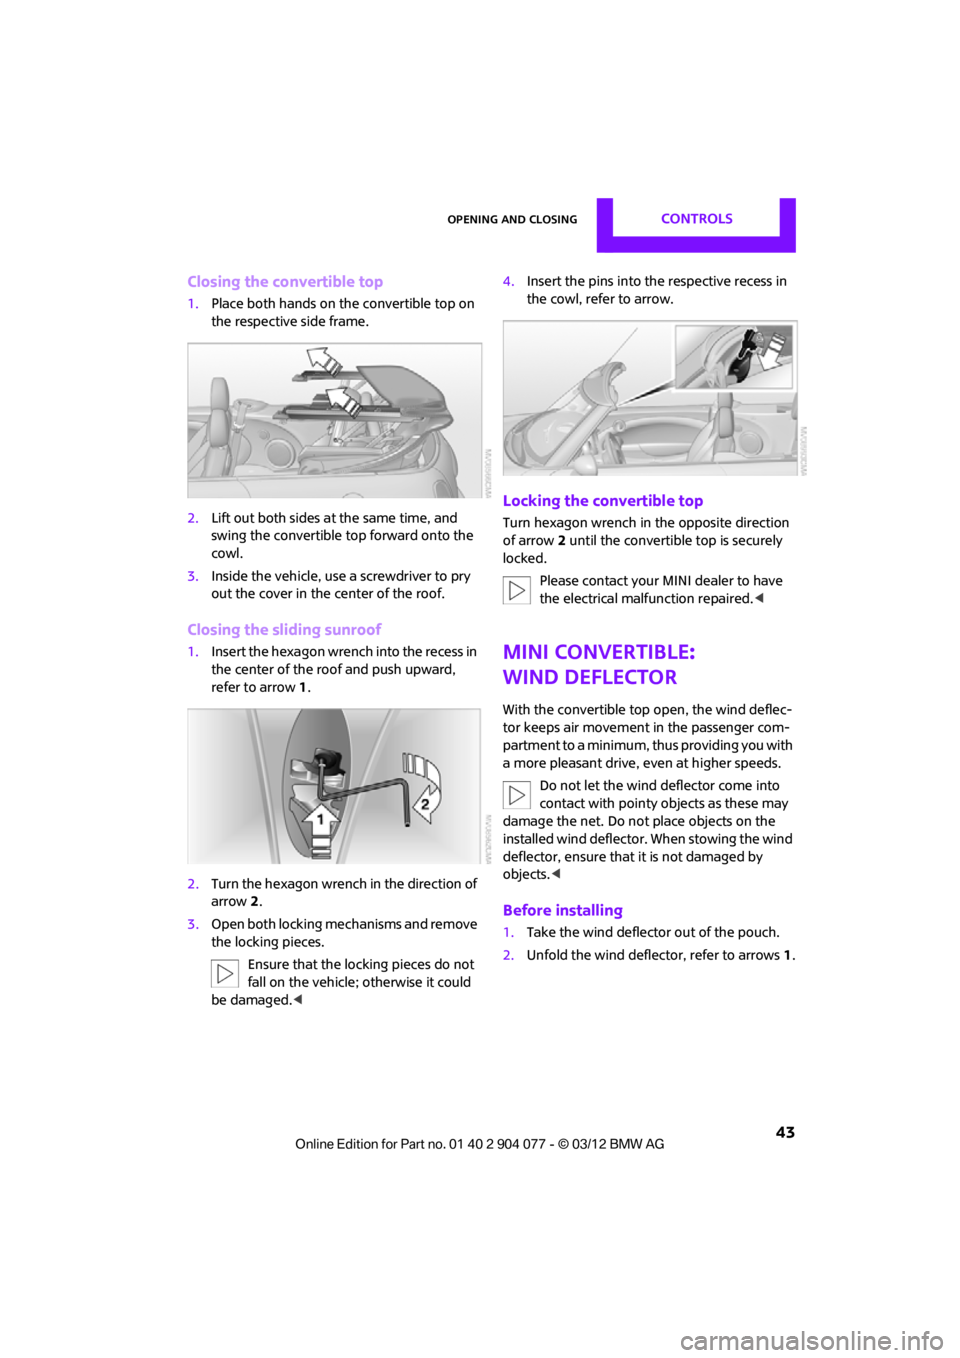
Closing the convertible top
1.Place both hands on the convertible top on
the respective side frame.
2. Lift out both sides at the same time, and
swing the convertible top forward onto the
cowl.
3. Inside the vehicle, use a screwdriver to pry
out the cover in the center of the roof.
Closing the sliding sunroof
1.Insert the hexagon wren ch into the recess in
the center of the roof and push upward,
refer to arrow 1.
2. Turn the hexagon wrench in the direction of
arrow 2.
3. Open both locking me chanisms and remove
the locking pieces.
Ensure that the locking pieces do not
fall on the vehicle; otherwise it could
be damaged. < 4.
Insert the pins into the respective recess in
the cowl, refer to arrow.
Locking the convertible top
Turn hexagon wrench in the opposite direction
of arrow 2 until the convertible top is securely
locked.
Please contact your MINI dealer to have
the electrical malfunction repaired. <
MINI Convertible:
Wind deflector
With the convertible top open, the wind deflec-
tor keeps air movement in the passenger com-
partment to a minimum, thus providing you with
a more pleasant drive, even at higher speeds.
Do not let the wind deflector come into
contact with pointy objects as these may
damage the net. Do not place objects on the
installed wind deflector. When stowing the wind
deflector, ensure that it is not damaged by
objects. <
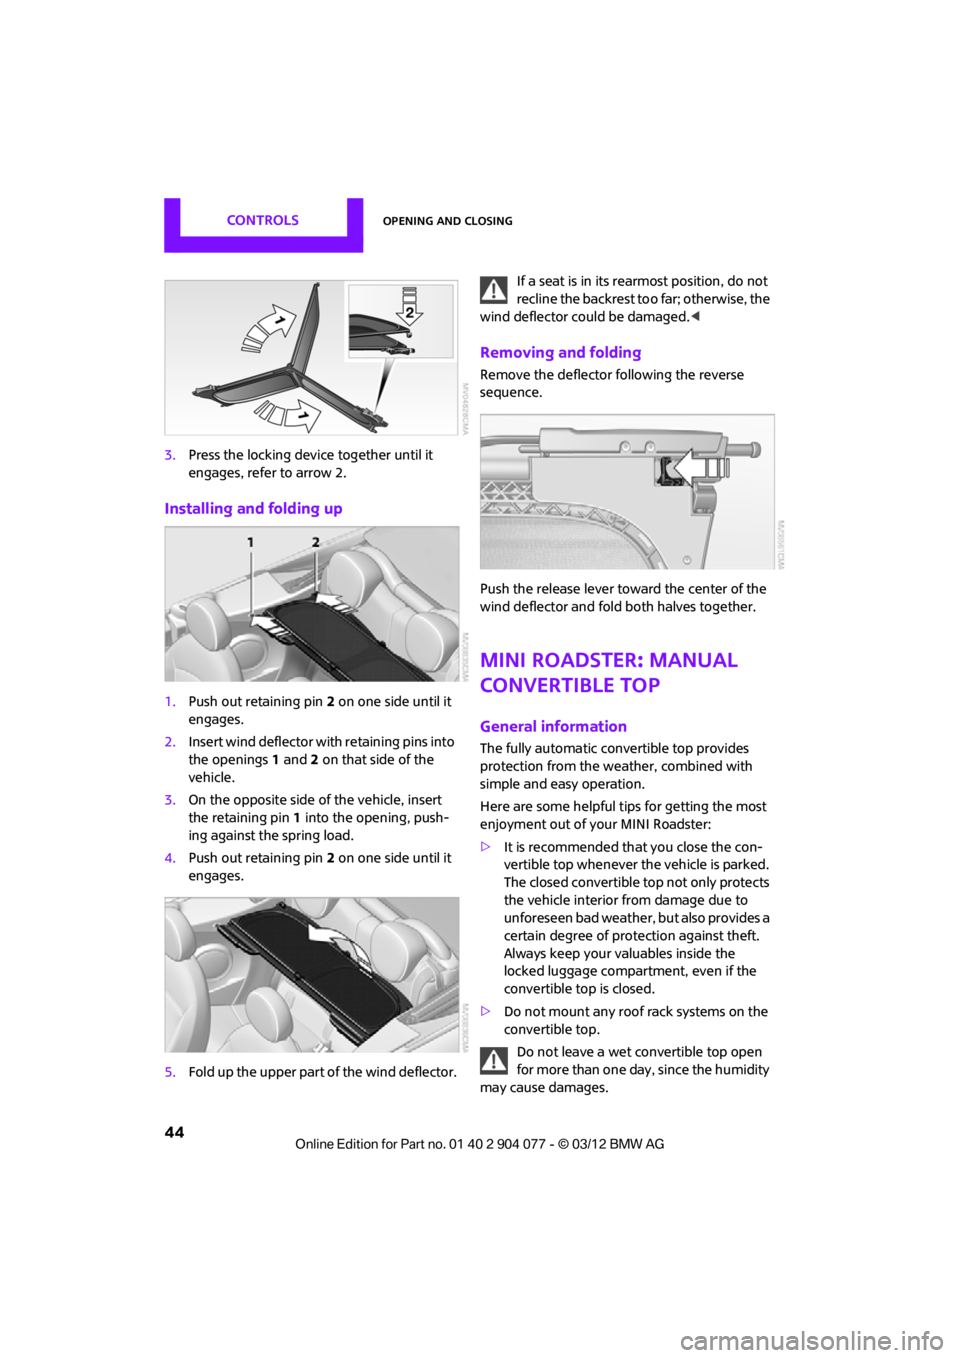
Before installing
1.Take the wind deflector out of the pouch.
2. Unfold the wind deflector, refer to arrows 1.
00320051004F004C00510048000300280047004C0057004C005200510003
Page 45 of 283
CONTROLSOpening and closing
44
3.Press the locking device together until it
engages, refer to arrow 2.
Installing and folding up
1.Push out retaining pin 2 on one side until it
engages.
2. Insert wind deflector wi th retaining pins into
the openings 1 and 2 on that side of the
vehicle.
3. On the opposite side of the vehicle, insert
the retaining pin 1 into the opening, push-
ing against the spring load.
4. Push out retaining pin 2 on one side until it
engages.
5. Fold up the upper part of the wind deflector. If a seat is in its re
armost position, do not
recline the backrest to o far; otherwise, the
wind deflector could be damaged. <
Removing and folding
Remove the deflector following the reverse
sequence.
Push the release lever toward the center of the
wind deflector and fold both halves together.
MINI Roadster: Manual
convertible top
General information
The fully automatic convertible top provides
protection from the weather, combined with
simple and easy operation.
Here are some helpful tips for getting the most
enjoyment out of your MINI Roadster:
> It is recommended th at you close the con-
vertible top whenever the vehicle is parked.
The closed convertible top not only protects
the vehicle interior from damage due to
unforeseen bad weather, but also provides a
certain degree of protection against theft.
Always keep your valuables inside the
locked luggage compartment, even if the
convertible top is closed.
> Do not mount any roof rack systems on the
convertible top.
Do not leave a wet convertible top open
for more than one day, since the humidity
may cause damages.
00320051004F004C00510048000300280047004C0057004C005200510003
Page 47 of 283
CONTROLSOpening and closing
46
6.Turn handle clockwise until there is an
audible click.
The convertible top is locked.
If the convertible top has been open
for a longer time, a greater force for
locking may be necessary. <
7. Fold the handle back in.
MINI Roadster: Semi-
automatic convertible
top
General information
The fully automatic convertible top provides
protection from the weather, combined with
simple and easy operation.
Here are some helpful tips for getting the most
enjoyment out of your MINI Roadster:
>It is recommended th at you close the con-
vertible top whenever the vehicle is parked.
The closed convertible top not only protects
the vehicle interior from damage due to
unforeseen bad weather, but also provides a
certain degree of protection against theft.
Always keep your valuables inside the
locked luggage compartment, even if the
convertible top is closed.
> If the temperature drops below +14 7/
–10 6, do not operate the convertible
top; otherwise, damage may occur.
> Do not mount any roof rack systems on the
convertible top.
For reasons of safety, operate the convert-
ible top only while the vehicle is not
moving, if possible.
During the opening and closing operation,
ensure that no one is injured by the convertible
top linkage or other moving parts. Keep children
away from the pivoting range of the convertible
top. Do not place any objects on the convertible top,
as they could otherwise fall off while the con-
vertible top is being op
erated and result in
property damage or personal injury.
Always completely finish the operation of the
convertible top. Driving off before an opening or
closing procedure is completely finished can
lead to property damage or personal injury.
Do not leave a wet convertible top open for
more than one day, since the humidity may
cause damages. <
While opening and clos ing, the convertible
top pivots upward. When opening or clos-
ing the convertible top in garages, under bridges
or similar locations, ensure that there is a mini-
mum clearance of 2 meters; otherwise damage
may occur to the vehicle. <
Operating while driving
The convertible top may be opened or closed
while driving not faster than 20 mph/30 km/h.
Only operate the convertible top when
traffic conditions permit and vehicle con-
trol is not affected; otherwise, an accident may
occur.
Do not operate the convertible top when the
vehicle is moving in reve rse, because rear visibil-
ity is severely restricted while the convertible top
is opening or closing. Do not operate the con-
vertible top when drivin g on winding and rough
roads or during windy conditions. <
For better control
Indicator lamp lights up. Convertible top
has stopped moving. Convertible top is
fully open.
Indicator lamp lights up. Convertible top
has stopped moving. Close convertible
top using the handle.
00320051004F004C00510048000300280047004C0057004C005200510003
Page 94 of 283
Technology for driving comfort and safetyCONTROLS
93
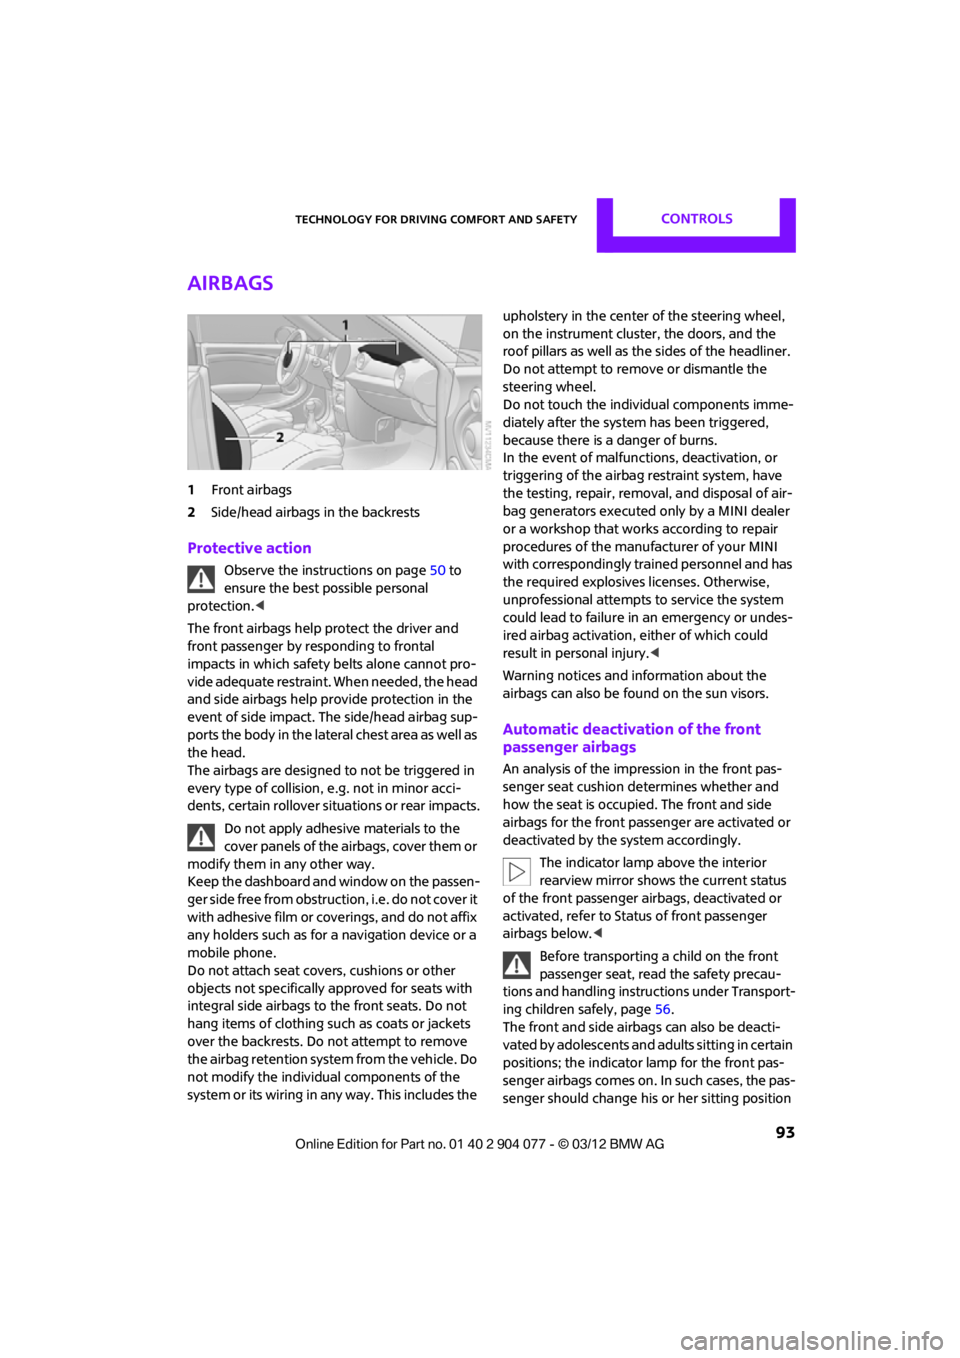
Airbags
1Front airbags
2 Side/head airbags in the backrests
Protective action
Observe the instructions on page 50 to
ensure the best possible personal
protection.<
The front airbags help protect the driver and
front passenger by responding to frontal
impacts in which safety belts alone cannot pro-
vide adequate restraint. When needed, the head
and side airbags help provide protection in the
event of side impact. The side/head airbag sup-
ports the body in the lateral chest area as well as
the head.
The airbags are designed to not be triggered in
every type of collision, e.g. not in minor acci-
dents, certain rollover si tuations or rear impacts.
Do not apply adhesive materials to the
cover panels of the airbags, cover them or
modify them in any other way.
Keep the dashboard and window on the passen-
g e r s i d e f r e e f r o m o b s t r u c t i o n , i . e . d o n o t c o v e r i t
with adhesive film or coverings, and do not affix
any holders such as for a navigation device or a
mobile phone.
Do not attach seat covers, cushions or other
objects not specifically approved for seats with
integral side airbags to the front seats. Do not
hang items of clothing such as coats or jackets
over the backrests. Do not attempt to remove
the airbag retention system from the vehicle. Do
not modify the individual components of the
system or its wiring in any way. This includes the upholstery in the center of the steering wheel,
on the instrument cluster, the doors, and the
roof pillars as well as the sides of the headliner.
Do not attempt to remove or dismantle the
steering wheel.
Do not touch the individual components imme-
diately after the system has been triggered,
because there is a danger of burns.
In the event of malfuncti
ons, deactivation, or
triggering of the airbag restraint system, have
the testing, repair, remova l, and disposal of air-
bag generators executed only by a MINI dealer
or a workshop that work s according to repair
procedures of the manufacturer of your MINI
with correspondingly trained personnel and has
the required explosives licenses. Otherwise,
unprofessional attempts to service the system
could lead to failure in an emergency or undes-
ired airbag activation, either of which could
result in personal injury.<
Warning notices and in formation about the
airbags can also be found on the sun visors.
Automatic deactivation of the front
passenger airbags
An analysis of the impression in the front pas-
senger seat cushion determines whether and
how the seat is occupied. The front and side
airbags for the front passenger are activated or
deactivated by the system accordingly.
The indicator lamp above the interior
rearview mirror shows the current status
of the front passenger airbags, deactivated or
activated, refer to Status of front passenger
airbags below. <
Before transporting a child on the front
passenger seat, read the safety precau-
tions and handling instructions under Transport-
ing children safely, page 56.
The front and side airbag s can also be deacti-
vated by adolescents and adults sitting in certain
positions; the indicator lamp for the front pas-
senger airbags comes on. In such cases, the pas-
senger should change his or her sitting position
00320051004F004C00510048000300280047004C0057004C005200510003