MINI COUPE ROADSTER CONVERTIBLE 2013 User Guide
Manufacturer: MINI, Model Year: 2013, Model line: COUPE ROADSTER CONVERTIBLE, Model: MINI COUPE ROADSTER CONVERTIBLE 2013Pages: 292, PDF Size: 6.96 MB
Page 11 of 292
At a glanceControlsDriving tipsNavigationEntertainmentCommunicationMobilityReferenceOnline Edition for Part no. 01 40 2 919 017 - II/13
Page 12 of 292
CockpitVehicle equipment
This chapter describes all series equipment as
well as country-specific and special equipment
offered for this model series.Therefore, it alsodescribes equipment that may not be found in
your vehicle, for instance due to the selected
special equipment or the country version. This
also applies to safety-related functions and sys‐
tems.
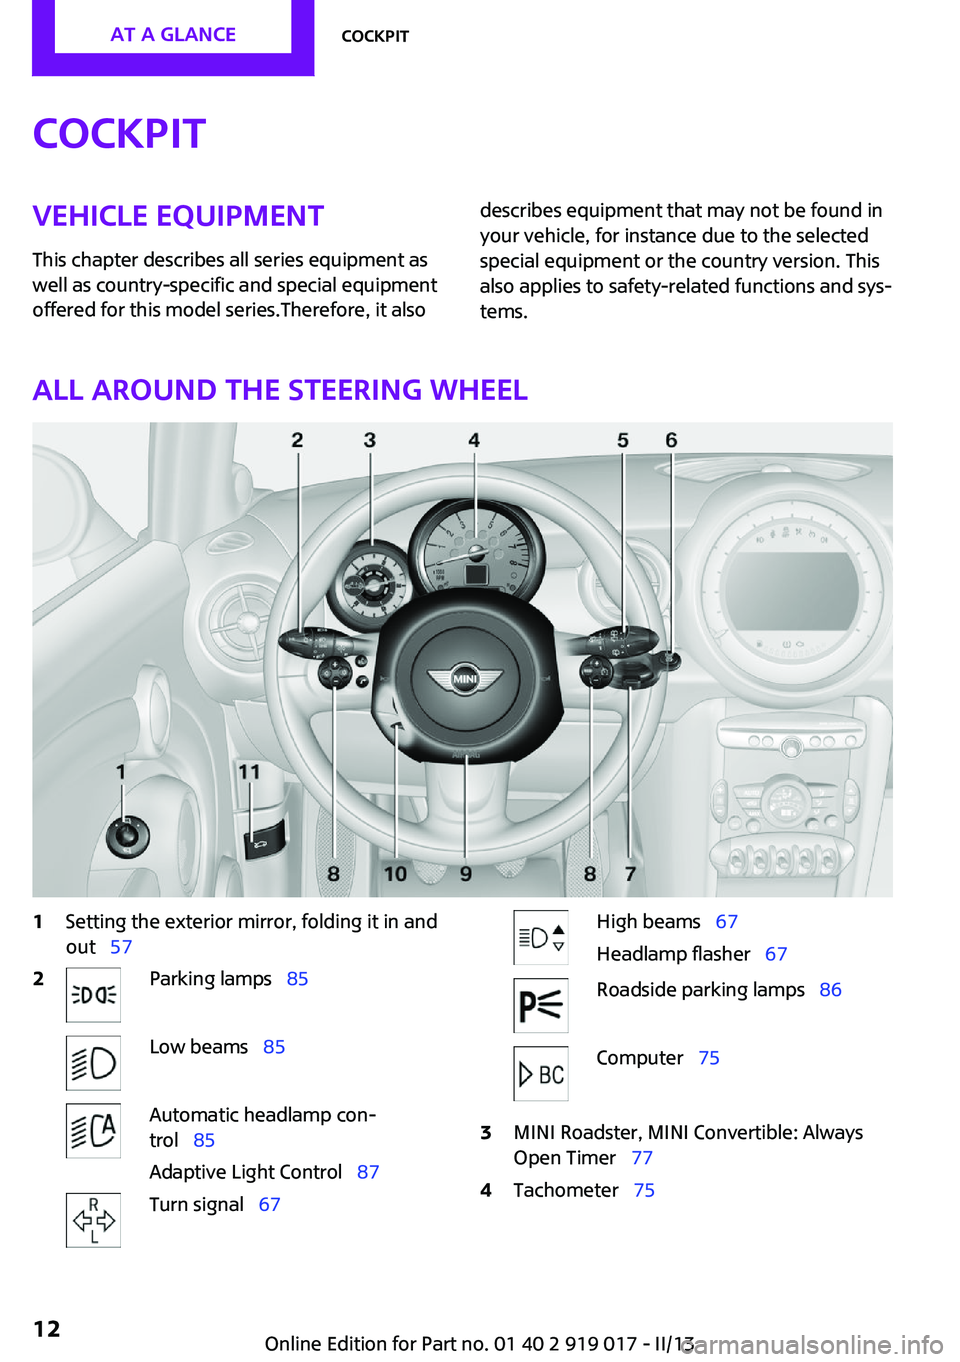
All around the steering wheel
1Setting the exterior mirror, folding it in and
out 572Parking lamps 85Low beams 85Automatic headlamp con‐
trol 85
Adaptive Light Control 87Turn signal 67High beams 67
Headlamp flasher 67Roadside parking lamps 86Computer 753MINI Roadster, MINI Convertible: Always
Open Timer 774Tachometer 75Seite 12At a glanceCockpit12
Online Edition for Part no. 01 40 2 919 017 - II/13
Page 13 of 292
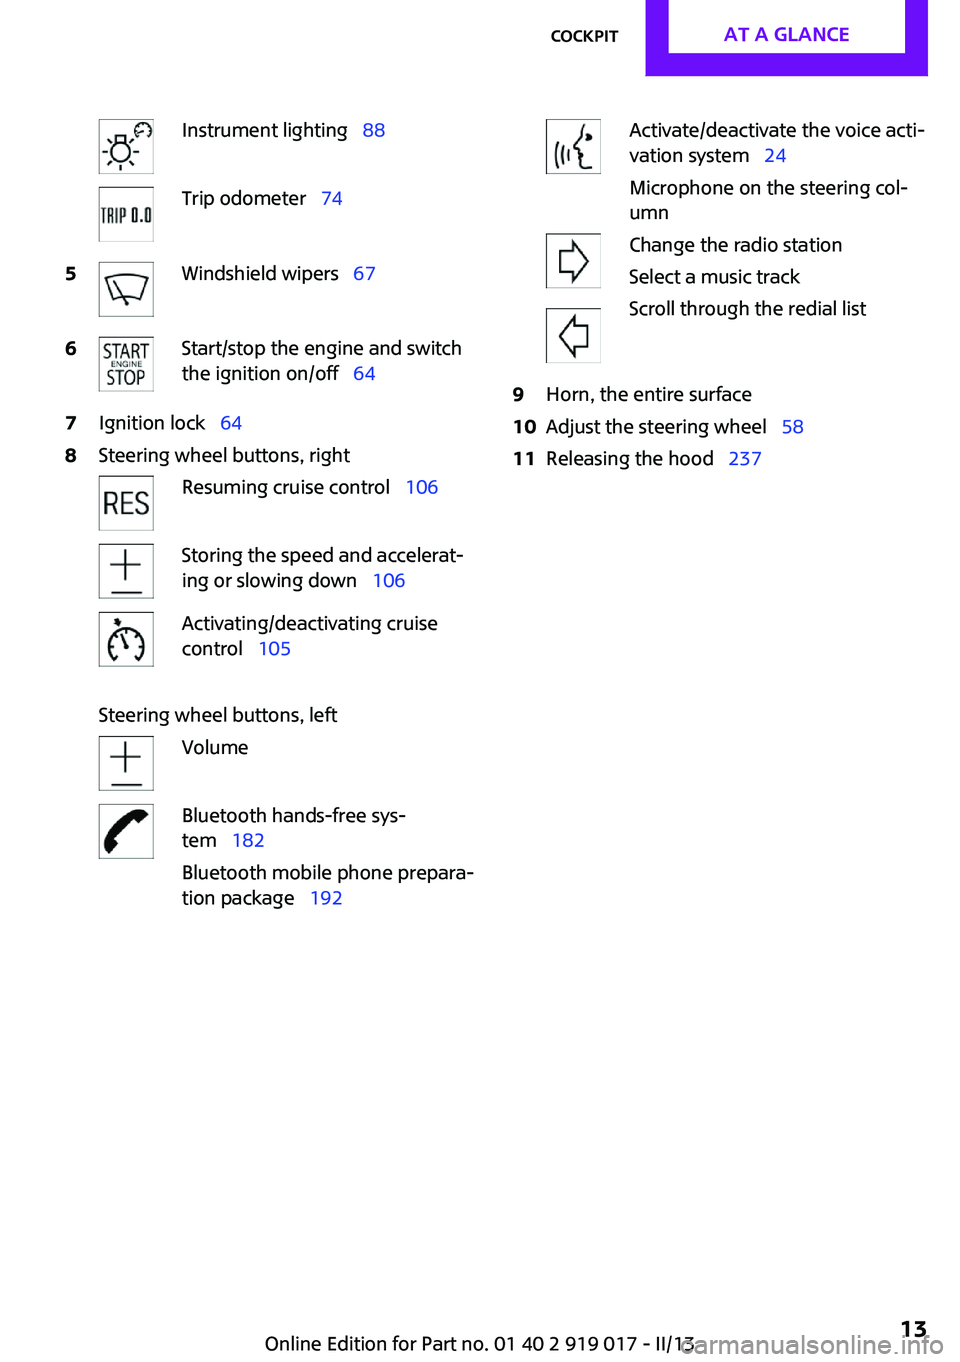
Instrument lighting 88Trip odometer 745Windshield wipers 676Start/stop the engine and switch
the ignition on/off 647Ignition lock 648Steering wheel buttons, rightResuming cruise control 106Storing the speed and accelerat‐
ing or slowing down 106Activating/deactivating cruise
control 105
Steering wheel buttons, left
VolumeBluetooth hands-free sys‐
tem 182
Bluetooth mobile phone prepara‐
tion package 192Activate/deactivate the voice acti‐
vation system 24
Microphone on the steering col‐
umnChange the radio station
Select a music track
Scroll through the redial list9Horn, the entire surface10Adjust the steering wheel 5811Releasing the hood 237Seite 13CockpitAt a glance13
Online Edition for Part no. 01 40 2 919 017 - II/13
Page 14 of 292
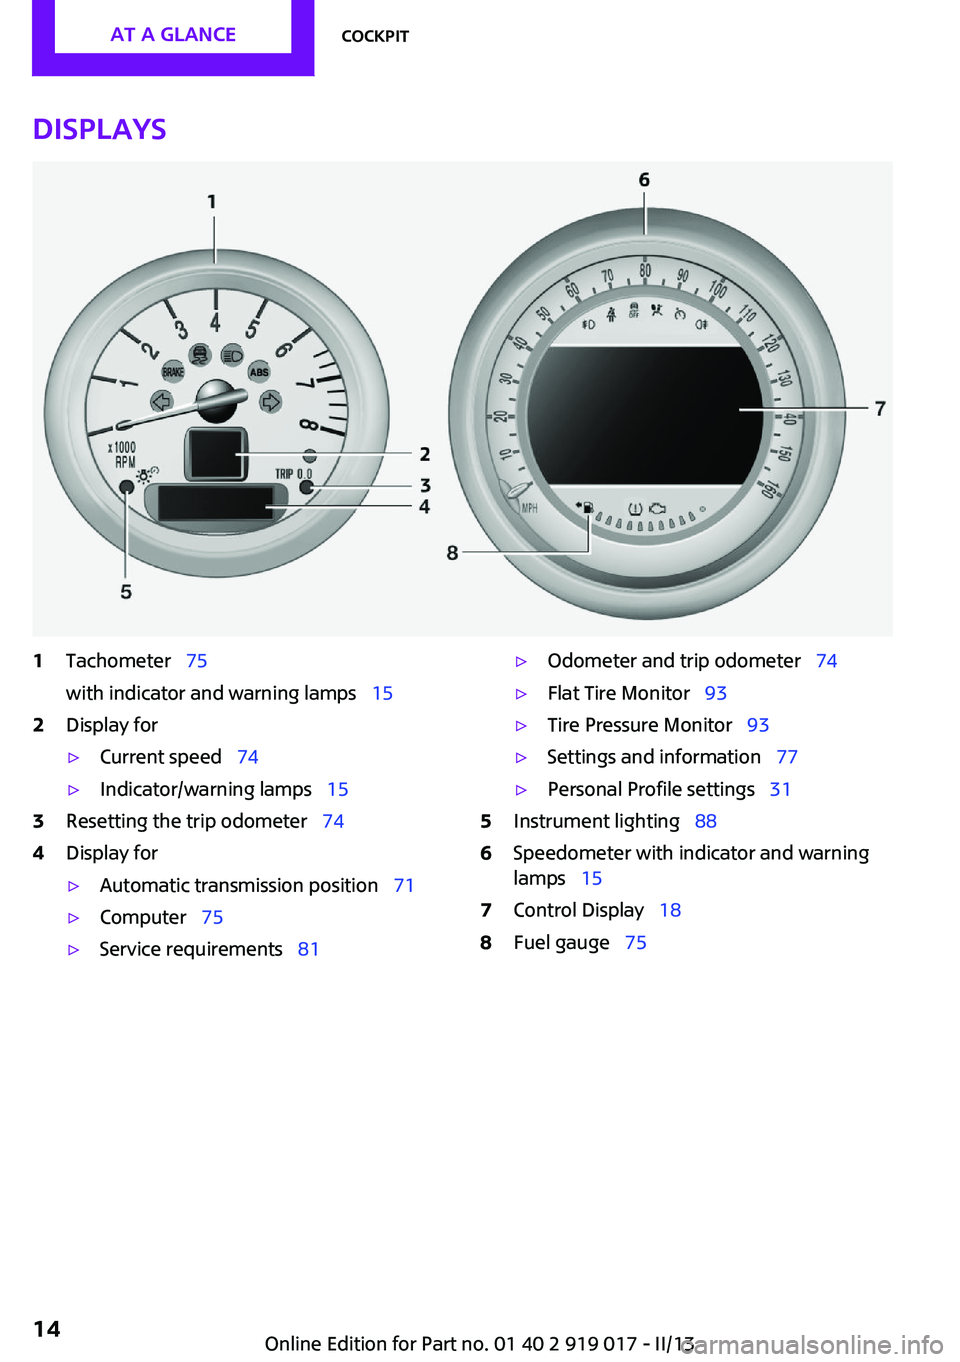
Displays1Tachometer 75
with indicator and warning lamps 152Display for▷Current speed 74▷Indicator/warning lamps 153Resetting the trip odometer 744Display for▷Automatic transmission position 71▷Computer 75▷Service requirements 81▷Odometer and trip odometer 74▷Flat Tire Monitor 93▷Tire Pressure Monitor 93▷Settings and information 77▷Personal Profile settings 315Instrument lighting 886Speedometer with indicator and warning
lamps 157Control Display 188Fuel gauge 75Seite 14At a glanceCockpit14
Online Edition for Part no. 01 40 2 919 017 - II/13
Page 15 of 292
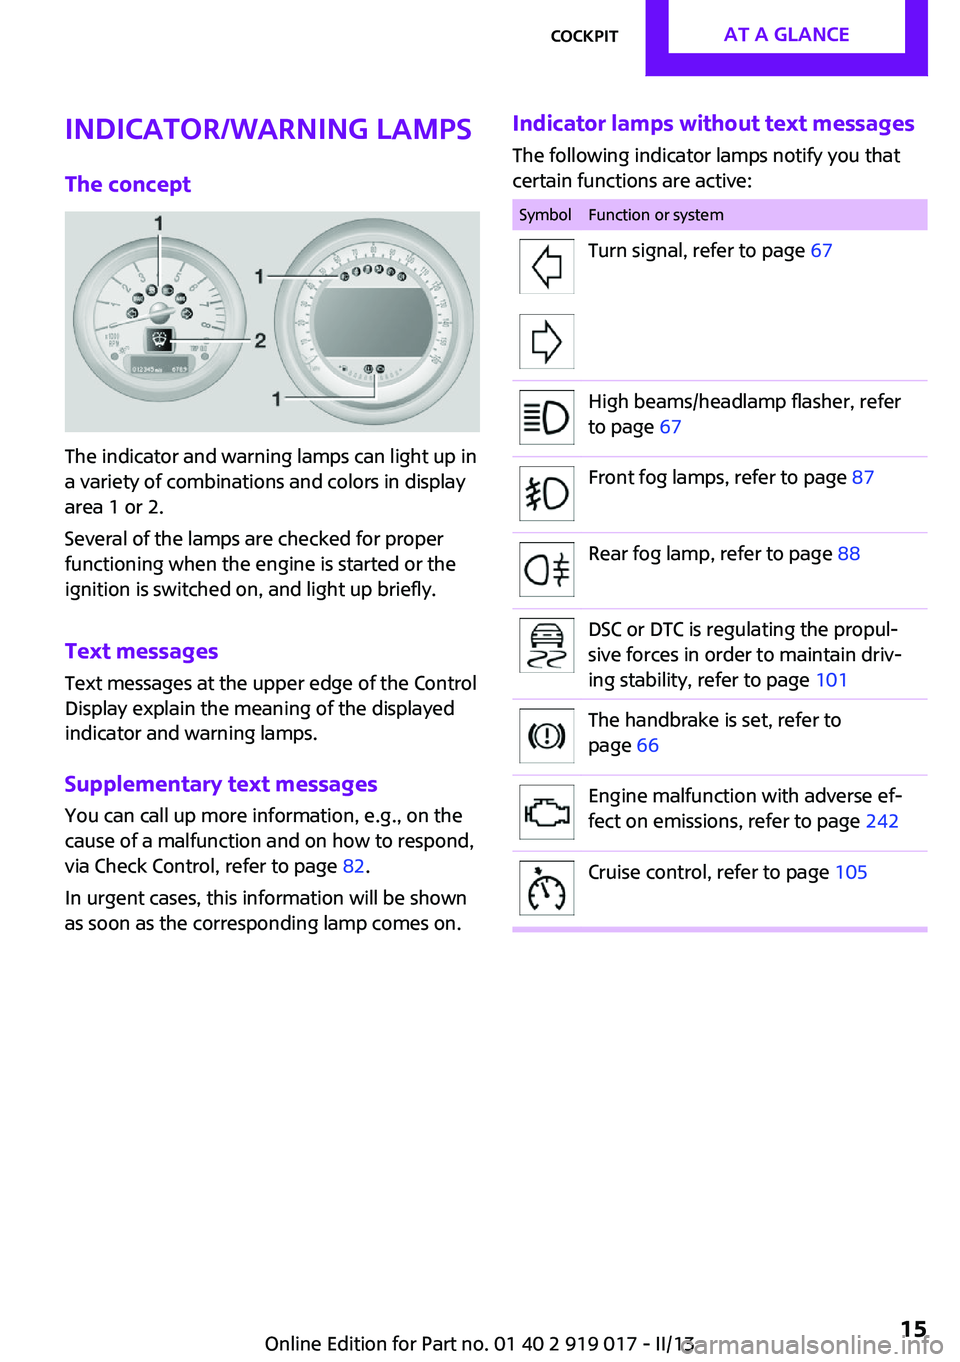
Indicator/warning lamps
The concept
The indicator and warning lamps can light up in
a variety of combinations and colors in display
area 1 or 2.
Several of the lamps are checked for proper
functioning when the engine is started or the
ignition is switched on, and light up briefly.
Text messages
Text messages at the upper edge of the Control
Display explain the meaning of the displayed
indicator and warning lamps.
Supplementary text messages
You can call up more information, e.g., on the
cause of a malfunction and on how to respond,
via Check Control, refer to page 82.
In urgent cases, this information will be shown
as soon as the corresponding lamp comes on.
Indicator lamps without text messages
The following indicator lamps notify you that
certain functions are active:SymbolFunction or systemTurn signal, refer to page 67High beams/headlamp flasher, refer
to page 67Front fog lamps, refer to page 87Rear fog lamp, refer to page 88DSC or DTC is regulating the propul‐
sive forces in order to maintain driv‐
ing stability, refer to page 101The handbrake is set, refer to
page 66Engine malfunction with adverse ef‐
fect on emissions, refer to page 242Cruise control, refer to page 105Seite 15CockpitAt a glance15
Online Edition for Part no. 01 40 2 919 017 - II/13
Page 16 of 292
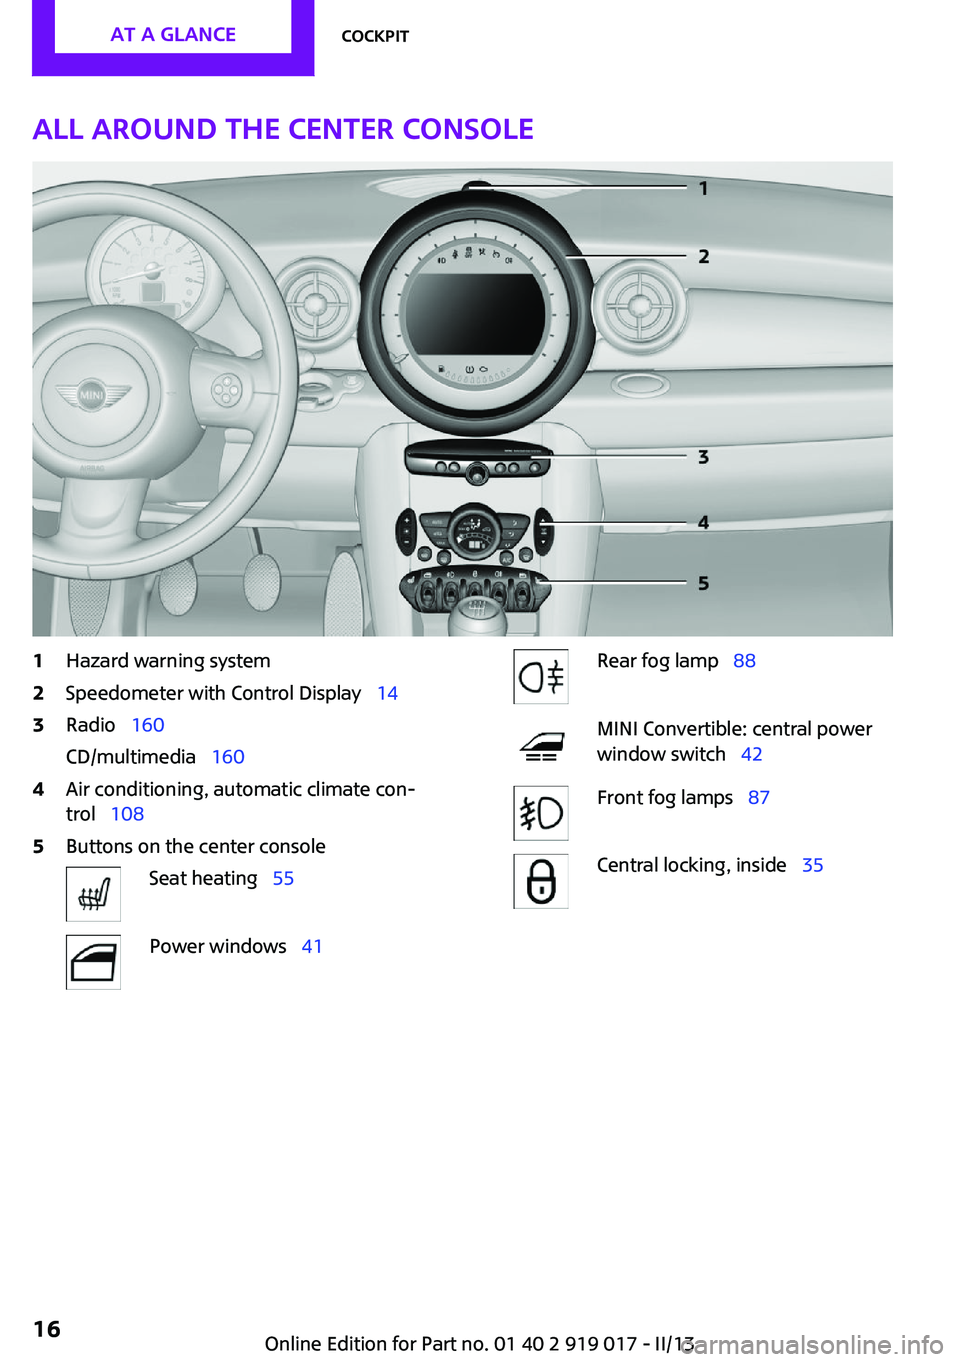
All around the center console1Hazard warning system2Speedometer with Control Display 143Radio 160
CD/multimedia 1604Air conditioning, automatic climate con‐
trol 1085Buttons on the center consoleSeat heating 55Power windows 41Rear fog lamp 88MINI Convertible: central power
window switch 42Front fog lamps 87Central locking, inside 35Seite 16At a glanceCockpit16
Online Edition for Part no. 01 40 2 919 017 - II/13
Page 17 of 292
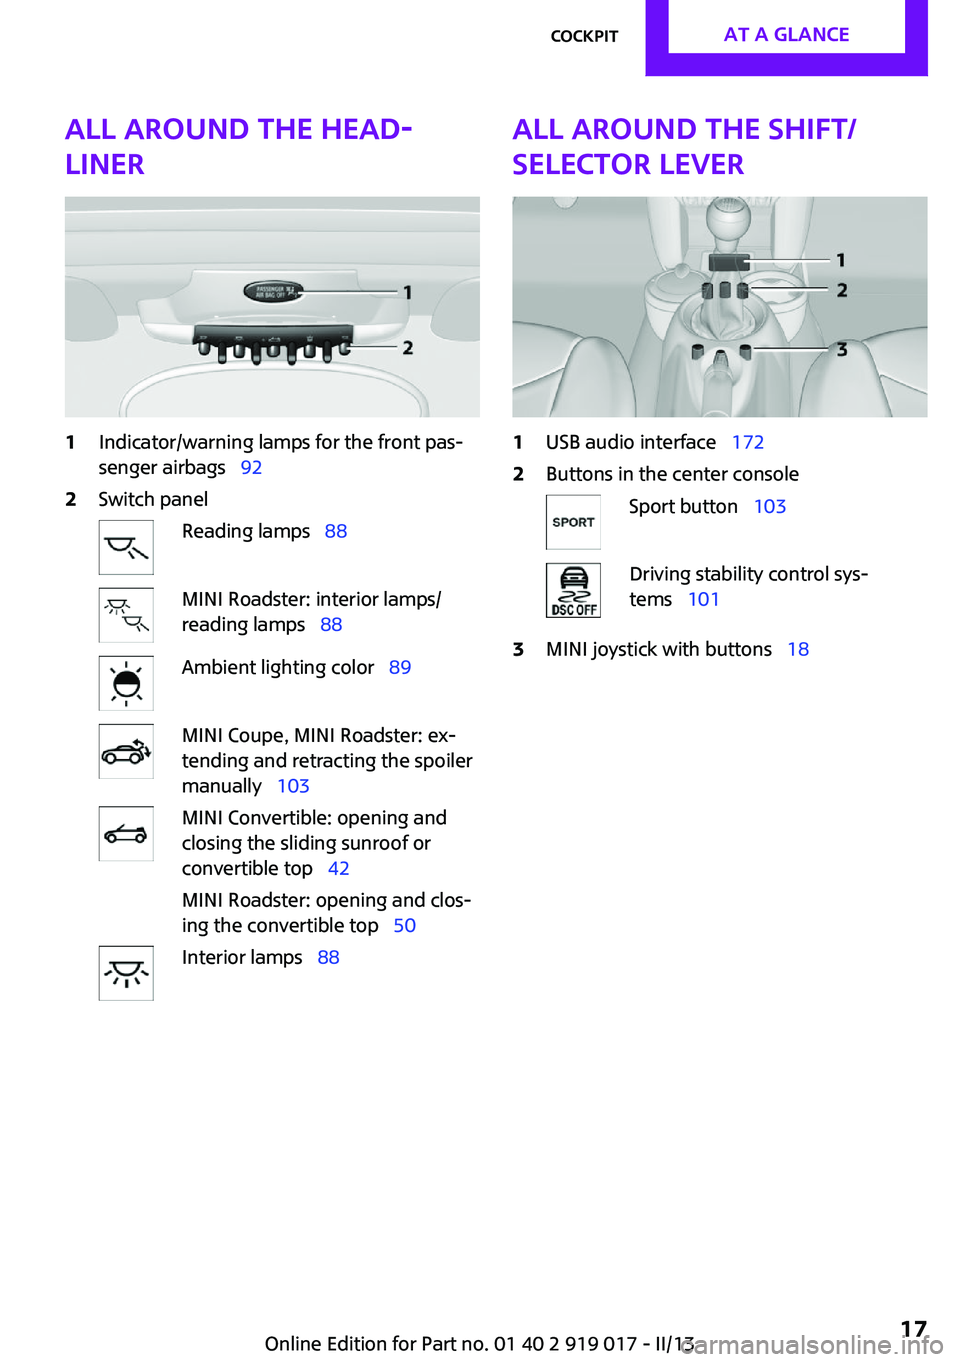
All around the head‐
liner1Indicator/warning lamps for the front pas‐
senger airbags 922Switch panelReading lamps 88MINI Roadster: interior lamps/
reading lamps 88Ambient lighting color 89MINI Coupe, MINI Roadster: ex‐
tending and retracting the spoiler
manually 103MINI Convertible: opening and
closing the sliding sunroof or
convertible top 42
MINI Roadster: opening and clos‐
ing the convertible top 50Interior lamps 88All around the shift/
selector lever1USB audio interface 1722Buttons in the center consoleSport button 103Driving stability control sys‐
tems 1013MINI joystick with buttons 18Seite 17CockpitAt a glance17
Online Edition for Part no. 01 40 2 919 017 - II/13
Page 18 of 292
Onboard monitorVehicle equipmentThis chapter describes all series equipment as
well as country-specific and special equipment
offered for this model series.Therefore, it also
describes equipment that may not be found in
your vehicle, for instance due to the selected
special equipment or the country version. This
also applies to safety-related functions and sys‐
tems.
The concept The onboard monitor combines the functions
of a large number of different switches. Thus,
these functions can be operated from a central
location.
Using the onboard monitor during a trip
To avoid becoming distracted and posing
an unnecessary hazard to your vehicle's occu‐
pants and to other road users, never attempt to
use the controls or enter information unless
traffic and road conditions allow this. ◀
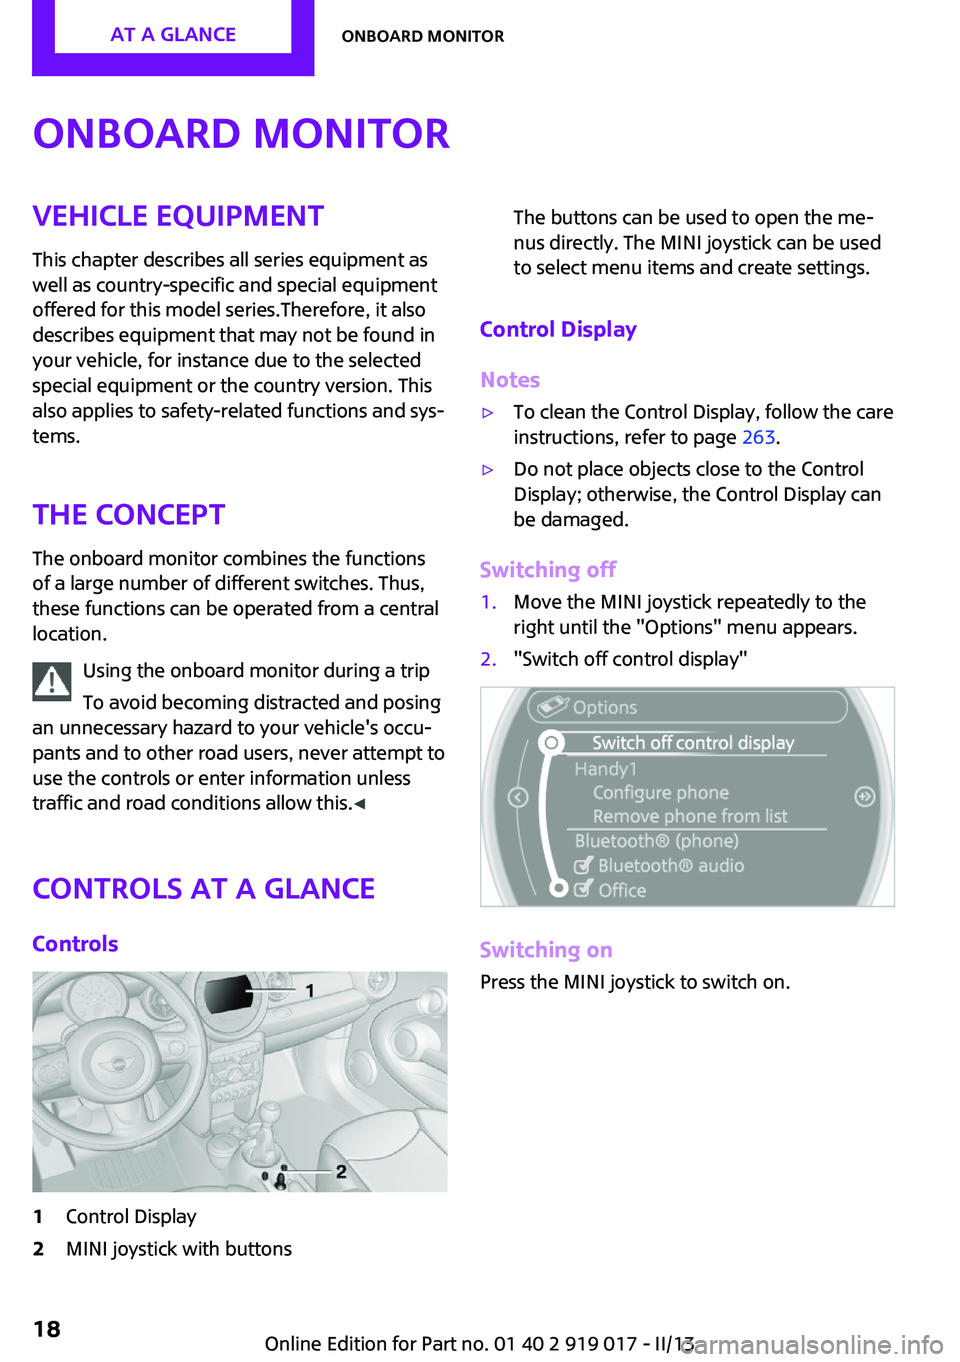
Controls at a glance Controls1Control Display2MINI joystick with buttonsThe buttons can be used to open the me‐
nus directly. The MINI joystick can be used
to select menu items and create settings.
Control Display
Notes
▷To clean the Control Display, follow the care
instructions, refer to page 263.▷Do not place objects close to the Control
Display; otherwise, the Control Display can
be damaged.
Switching off
1.Move the MINI joystick repeatedly to the
right until the "Options" menu appears.2."Switch off control display"
Switching on
Press the MINI joystick to switch on.
Seite 18At a glanceOnboard monitor18
Online Edition for Part no. 01 40 2 919 017 - II/13
Page 19 of 292
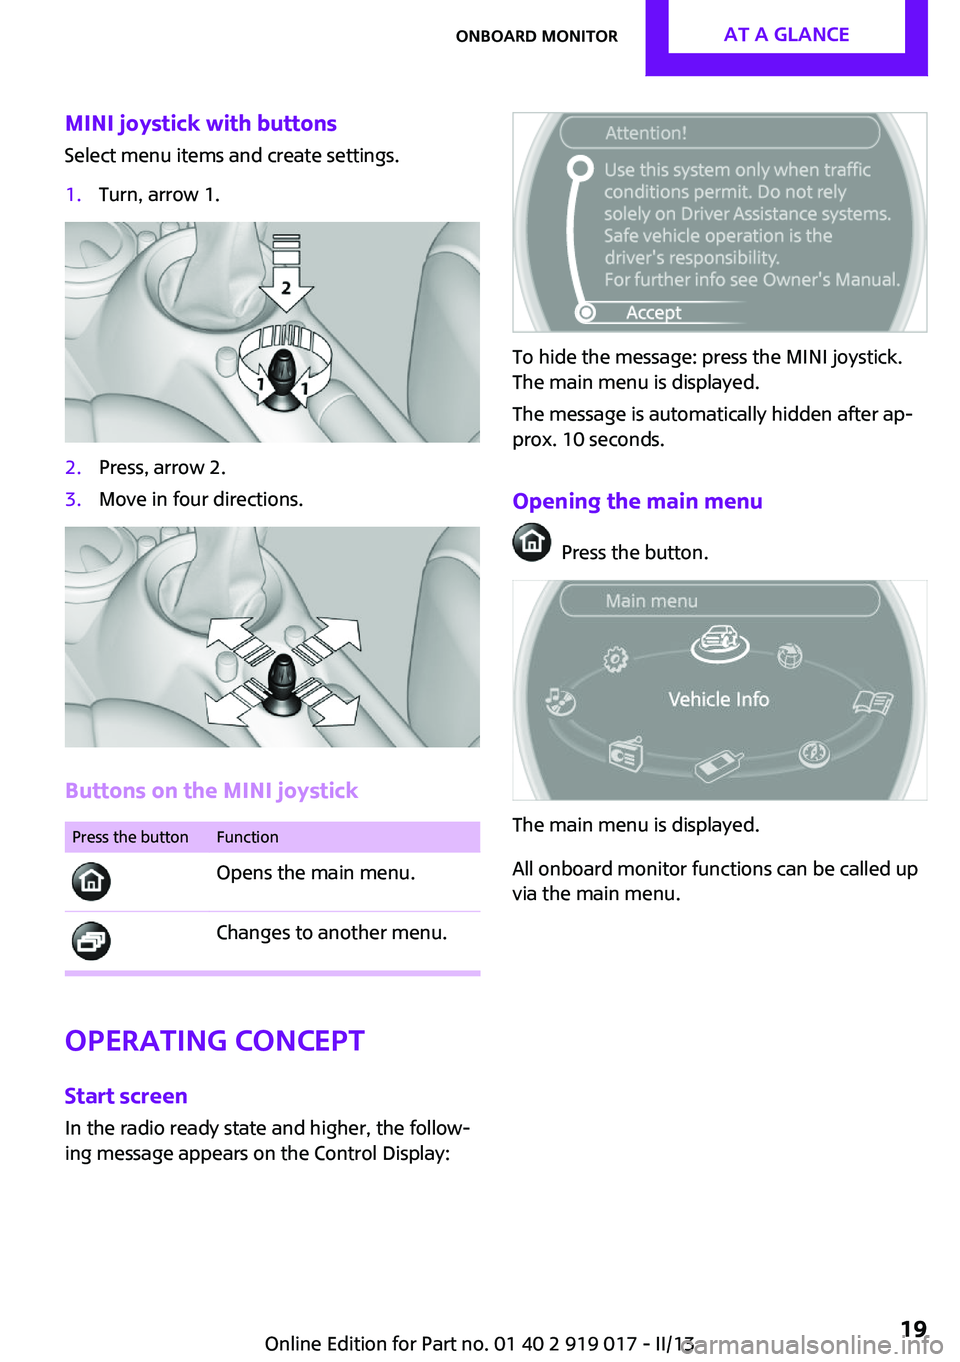
MINI joystick with buttonsSelect menu items and create settings.1.Turn, arrow 1.2.Press, arrow 2.3.Move in four directions.
Buttons on the MINI joystick
Press the buttonFunction
Opens the main menu. Changes to another menu.
Operating concept
Start screen In the radio ready state and higher, the follow‐
ing message appears on the Control Display:
To hide the message: press the MINI joystick.
The main menu is displayed.
The message is automatically hidden after ap‐
prox. 10 seconds.
Opening the main menu
Press the button.
The main menu is displayed.
All onboard monitor functions can be called up
via the main menu.
Seite 19Onboard monitorAt a glance19
Online Edition for Part no. 01 40 2 919 017 - II/13
Page 20 of 292
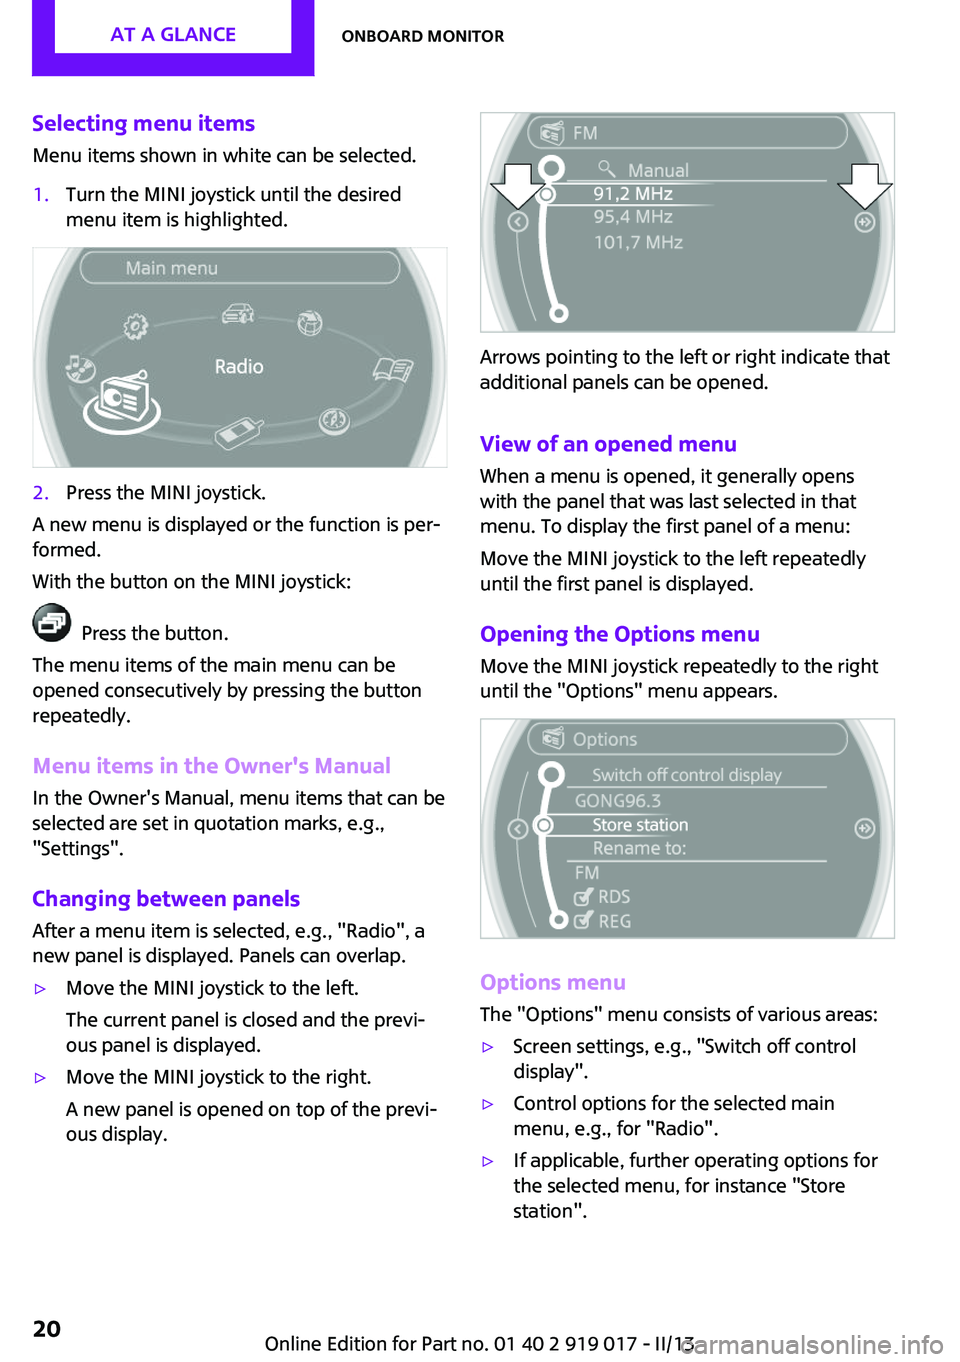
Selecting menu items
Menu items shown in white can be selected.1.Turn the MINI joystick until the desired
menu item is highlighted.2.Press the MINI joystick.
A new menu is displayed or the function is per‐
formed.
With the button on the MINI joystick:
Press the button.
The menu items of the main menu can be
opened consecutively by pressing the button
repeatedly.
Menu items in the Owner's Manual
In the Owner's Manual, menu items that can be
selected are set in quotation marks, e.g.,
"Settings".
Changing between panelsAfter a menu item is selected, e.g., "Radio", a
new panel is displayed. Panels can overlap.
▷Move the MINI joystick to the left.
The current panel is closed and the previ‐
ous panel is displayed.▷Move the MINI joystick to the right.
A new panel is opened on top of the previ‐
ous display.
Arrows pointing to the left or right indicate that
additional panels can be opened.
View of an opened menu
When a menu is opened, it generally opens
with the panel that was last selected in that
menu. To display the first panel of a menu:
Move the MINI joystick to the left repeatedly
until the first panel is displayed.
Opening the Options menu
Move the MINI joystick repeatedly to the right
until the "Options" menu appears.
Options menu
The "Options" menu consists of various areas:
▷Screen settings, e.g., "Switch off control
display".▷Control options for the selected main
menu, e.g., for "Radio".▷If applicable, further operating options for
the selected menu, for instance "Store
station".Seite 20At a glanceOnboard monitor20
Online Edition for Part no. 01 40 2 919 017 - II/13