steering wheel MINI Hardtop 2 Door 2002 User Guide
[x] Cancel search | Manufacturer: MINI, Model Year: 2002, Model line: Hardtop 2 Door, Model: MINI Hardtop 2 Door 2002Pages: 140, PDF Size: 1.63 MB
Page 84 of 140

82
TIRE CONDITIONTire tread/tire damageInspect your tires frequently for tread wear,
signs of damage and for foreign objects
lodged in the tread. Check the tread depth.
The tread depth should not fall below
0.12 in (3 mm), although e. g. European
legislation only prescribes a minimum
tread depth of 0.063 in (1.6 mm).
Below 0.12 in (3 mm) tread pattern depth,
there is an increased risk of hydroplaning,
even at relatively moderate speeds and
with only small amounts of water on the
road.
Wear indicators in the tread-groove base,
see arrow, are spread around the circum-
ference of the tire and are marked on the
side wall of the tire with TWI Ð Tread Wear
Indicator.
The indicators in the tread indicate at
0.063 in (1.6 mm) tread depth that the
legally permitted wear limit has been
reached. Do not continue driving on depres-
surized (flat) tires, except with safety
tires. A flat tire greatly impairs steering and
braking response, and can lead to complete
loss of control over the vehicle.
Avoid overloading the vehicle so that the
permitted load on the tires is not exceeded.
Overloading can lead to overheating and
increases the rate at which damage
develops inside the tires. The ultimate
result can assume the form of a sudden air
loss.
Unusual vibrations while driving, e. g.
driving over a curb or similar, can indicate
tire damage or other damage to the
vehicle. This is also true for irregularities in
the vehicle's handling characteristics, such
as a pronounced tendency to pull to the left
or right. Should this occur, respond by
immediately reducing your speed. Proceed
carefully to the nearest MINI center or
professional tire center, or have the vehicle
towed in to have its wheels and tires
inspected.
Tire damage (up to and including blowouts)
can endanger the lives of both the vehicle
occupants and other road users.<
Page 87 of 140

85
OVERVIEW REPAIRSOPERATIONCONTROLS DATA INDEX
WINTER TIRESSNOW CHAINS
*
Choosing the right tire
The manufacturer recommends winter
tires (M+S radial tires) for driving in adverse
winter road conditions. While so-called all-
season tires (M+S designation) provide
better winter traction than summer tires
with the load ratings S, T, H, V, W, they do
not achieve the performance of winter
tires.
In the interest of safe tracking and steering
response, install winter tires made by the
same manufacturer having the same tread
configuration on all four wheels.
Before purchasing winter tires, check
whether your MINI is fitted with safety
tires. You will recognize safety tires by a
circular symbol containing the letters RSC
on the side of the tire, see page 110. In this
case, use only safety tires, as in the event of
a flat tire there is no space-saver spare tire.
Only winter tires recommended by the
manufacturer of your MINI should be
fitted. Any MINI center will be glad to
advise you on the selection of the right
winter tires for the relevant operating
conditions.
Observing speeds
Never exceed the maximum speed
for which the tires are rated.
Unprofessional attempts by laymen to
service tires can lead to damage and acci-
dents.
Have this work performed by skilled profes-
sionals only. Your MINI center will be glad
to assist you with both their expertise and
the proper equipment for your vehicle.<
Tire condition, tire inflation pressure
Once the tire wears to below 0.16 in
(4 mm), winter tires display a percep-
tible decrease in their ability to cope with
winter driving conditions, and should be
replaced in the interest of safety.<
Comply with the specified tire inflation
pressures and be sure to have the wheel
and tire assemblies balanced every time
you change the tires.
The use of narrow-link snow chains is
permitted in pairs only and only on
the front wheels with the following tires:
175/65 R 15
175/60 R 16
When fitting, comply with the manufac-
turer's instructions.<
With chains, do not exceed a speed
of 30 mph (50 km/h).<
After fitting the snow chains, do not
activate the Flat Tire Monitor.
When driving with snow chains, it can be
helpful to switch off the ASC+T or DSC for
a brief period, see pages 60, 61.<
Page 108 of 140

106
REPAIRING A FLAT TIRE CHANGING TIRES Ð MINI WITH SPACE-SAVER SPARE TIRE
*
Safety measures in the event of a flat
tire:
Stop the vehicle as far as possible from
passing traffic. Switch on the hazard
warning flashers.
Turn the steering wheel to the straight-
ahead wheel position and engage the
steering lock. Engage the parking brake and
shift into 1st or reverse gear (selector lever
in P).
All passengers should be outside the
vehicle and well away from your imme-
diate working area (behind a guardrail, for
instance).
If a warning triangle or portable hazard
warning lamp is available, set it up on the
roadside at an appropriate distance from
the rear of the vehicle. Comply with all
safety guidelines and regulations.<
In the event of a flat tire, different proce-
dures should be followed depending on the
equipment included in your MINI:
>Vehicles with space-saver spare tire, see
next column
>Vehicles with safety tires, see page 110.
Additional safety measures in the
event of a wheel change: change the
wheel only on a level, firm surface which is
not slippery.
Avoid jacking the vehicle on a soft or slip-
pery support surface (snow, ice, loose
gravel, etc.), as either the vehicle or the jack
could slip sideways.
Do not use a wooden block or similar object
as a support base for the jack, as this would
prevent it from extending to its full support
height and reduce its load-carrying
capacity .
Do not lie under the vehicle or start the
engine when the vehicle is supported by
the jack Ð risk of fatal injury.<
To change a space-saver tire, proceed as
follows:
>Remove the space-saver spare tire, see
page 107
>Prepare the vehicle, see page 108
>Jack up the vehicle, see page 108
>Fit the space-saver spare tire, see
page 109
>Tighten the lug bolts, see page 109
>Drive with space-saver spare tire, see
page 109.
Tire change setOn vehicles with a space-saver spare tire,
the tire change set is stored in the luggage
compartment under the floor mat.
1 Chock, folding
2 Hubcap remover
3 Wheel stud wrench
4 Jack
5 Spanner
6 Tow fitting
7 Lifting handle
Page 111 of 140

109
OVERVIEW REPAIRSOPERATION CONTROLS DATA INDEX
CHANGING TIRES Ð MINI WITH SPACE-SAVER SPARE TIRE
*
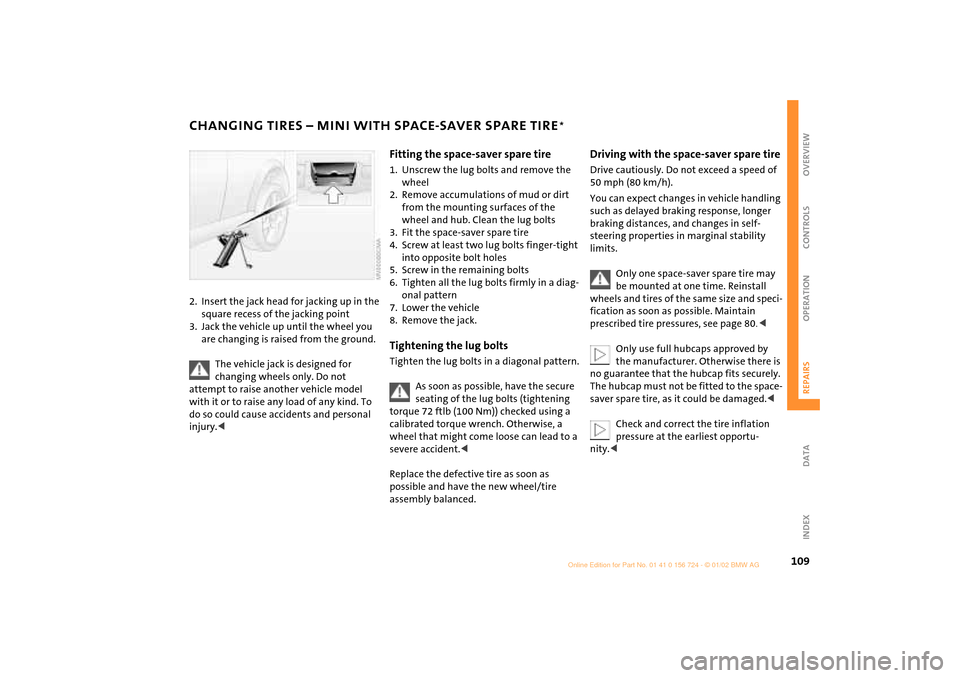
2. Insert the jack head for jacking up in the
square recess of the jacking point
3. Jack the vehicle up until the wheel you
are changing is raised from the ground.
The vehicle jack is designed for
changing wheels only. Do not
attempt to raise another vehicle model
with it or to raise any load of any kind. To
do so could cause accidents and personal
injury.<
Fitting the space-saver spare tire1. Unscrew the lug bolts and remove the
wheel
2. Remove accumulations of mud or dirt
from the mounting surfaces of the
wheel and hub. Clean the lug bolts
3. Fit the space-saver spare tire
4. Screw at least two lug bolts finger-tight
into opposite bolt holes
5. Screw in the remaining bolts
6. Tighten all the lug bolts firmly in a diag-
onal pattern
7. Lower the vehicle
8. Remove the jack.Tightening the lug boltsTighten the lug bolts in a diagonal pattern.
As soon as possible, have the secure
seating of the lug bolts (tightening
torque 72 ftlb (100 Nm)) checked using a
calibrated torque wrench. Otherwise, a
wheel that might come loose can lead to a
severe accident.<
Replace the defective tire as soon as
possible and have the new wheel/tire
assembly balanced.
Driving with the space-saver spare tireDrive cautiously. Do not exceed a speed of
50 mph (80 km/h).
You can expect changes in vehicle handling
such as delayed braking response, longer
braking distances, and changes in self-
steering properties in marginal stability
limits.
Only one space-saver spare tire may
be mounted at one time. Reinstall
wheels and tires of the same size and speci-
fication as soon as possible. Maintain
prescribed tire pressures, see page 80.<
Only use full hubcaps approved by
the manufacturer. Otherwise there is
no guarantee that the hubcap fits securely.
The hubcap must not be fitted to the space-
saver spare tire, as it could be damaged.<
Check and correct the tire inflation
pressure at the earliest opportu-
nity.<
Page 112 of 140

110
FLAT TIRE Ð SAFETY (RUN-FLAT) TIRES
*
You will recognize safety tires by a circular
symbol containing the letters RSC on the
side of the tire.
Safety tires consist of self-contained tires
and special rims. The tire reinforcement
ensures that the tire retains some residual
safety in the event of pressure drop and
driving remains possible to a restricted
degree.
The reinforcement on the flanks of
the safety tires means that it is
usually not possible to detect an air loss
from outside.<
Flat tire The yellow indicator lamp in the instru-
ment cluster lights up to indicate a flat tire.
In addition, a gong sounds, see
pages 17, 62.
1. Reduce vehicle speed carefully to under
50 mph (80 km/h), avoiding hard brake
applications and steering maneuvers
2. Do not exceed a speed of 50 mph
(80 km/h)
3. Identify damaged tires; check tire infla-
tion pressures on all four wheels at the
next opportunity, see page 80
4. Correct the tire inflation pressure if you
wish to continue your journey and this is
permitted, see next column
5. Have damaged tires changed by your
MINI center, see page 84.
Your MINI center has the information
needed for working with safety tires
and is equipped with the necessary special
tools. They provide advice if you wish to
replace the tires on your MINI or wish to
re-equip from summer to winter tires Ð or
vice versa, see also pages 80, 84, 85.<
For safety reasons, do not have a
damaged safety tire repaired.<
Continuing driving with a damaged
tireDriving can continue under certain condi-
tions with safety tires, depending on the
vehicle load and the severity of the tire
damage, at a maximum speed of 50 mph
(80 km/h).
You can determine the possible mileage for
continued driving on the basis of the
following general indications:
>Tire inflation pressure 0 bar (0 psi):
approx. 95 miles (150 km)
>Tire inflation pressure 0.5 bar Ð 1 bar
(7.2 psi Ð 14.5 psi): approx. 300 miles
(500 km)
>Tire inflation pressure greater than 1 bar
(14.5 psi): approx. 600 miles (1,000 km).
Page 118 of 140

116
TOW-STARTING AND TOWINGTow-starting
On vehicles with Continuously Vari-
able automatic Transmission (CVT), it
is not permitted to start the engine by tow-
starting. The transmission could be
damaged.
For jump-starting, see page 113
.<
Only tow-start vehicles with a catalytic
converter when the engine is cold, other-
wise, unburned fuel in the catalytic
converter could catch fire. It is better to use
jumper cables.
1. Switch on the hazard warning flashers
(comply with national regulations)
2. Ignition key in position 2
3. Engage 3rd gear
4. Tow-start with the clutch pedal pressed
5. Slowly release the clutch
6. When the engine starts, press the clutch
pedal again
7. Switch off the hazard warning flashers.
Have the cause of the starting problems
rectified by your MINI center.
Towing
Only tow vehicles with Continuously
Variable automatic Transmission
(CVT) with the front wheels raised or on a
special transport vehicle, otherwise the
transmission can be damaged.<
1 Ignition key in position 1:
The brake lamps, turn signals, horn and
windshield wipers can be operated
2 Switch on the hazard warning flashers
(comply with national regulations).
If the electrical system has failed, place
some kind of warning on the towed vehicle,
e. g. a sign or warning triangle in the rear
window.
Ensure that if the electrical system
has failed the ignition key is in posi-
tion 1, otherwise the steering lock could
engage and make it impossible to steer the
vehicle.
When the engine is not running, there is no
power-assist. This means that greater
effort is required for braking and
steering.<
Towing with a commercial tow truck >Do not tow with sling-type equipment
>Use a wheel-lift or flatbed carrier
>Please comply with applicable towing
laws.
Never allow passengers to ride in a
towed vehicle for any reason.<
Page 130 of 140

EVERYTHING FROM A TO Z
128A
ABS (Antilock Brake
System) 16,
17,
78
Activated-charcoal filter 69
Adjusting
backrest 33
seats 31
steering wheel 35
thigh support 33
Air conditioner operation 65
automatic climate
control 68
Air conditioner system 64
Air distribution
air conditioner system 65
automatic climate
control 68,
69
Air pressure 80
Air recirculation 65,
68
Air supply
air conditioner system 65
automatic climate
control 69
Air vents 66,
69
Air, dry 65, 68
Airbags 16, 31,
37
All-season tires 85
Antenna 94 Antifreeze 91
Antilock Brake System
(ABS) 16,
17,
78
Aquaplaning 76
ASC+T (Automatic Stability
Control plus
Traction) 16, 17,
60
Ashtray 70
Automatic air distribution 68
Automatic air supply 68
Automatic car wash 94
Automatic cruise control 53
Automatic dimming of interior
rearview mirror 37
Automatic program, see
Automatic air
distribution 68
Automatic Stability Control
plus Traction
(ASC+T) 16,
17,
60
Average fuel consumption 59
Average speed 59
Axle loads 122
B
Backrest, adjusting 33
Backup lamps 45
bulb replacement 103
Bar, towing 115
Battery 111,
113,
114,
124
capacity 124
charge current 15
charging 111
maintenance 111
Battery changing
remote control 22
Battery, remote control 22
Beverage holder 70
Blower 65,
69
BMW 6
Bore 120
Brake 16
Brake fluid change 57
Brake fluid level 15,
79,
92
Brake hydraulic system 15
Brake lamp
bulb replacement 103
Brake pads 76,
79
Brake rotors 76
Brake system 76, 79
brake fluid 92
Brakes 79 Break-in procedure 76
Breaking in the vehicle 76
Bridging 113,
114
Bulb replacement 101
backup lamps 103
brake lamp, third 104
footwell lamps 105
front fog lamps 102
front turn signal
indicators 102
glove compartment
lamp 105
high beams 101
interior lamps 104
license plate lamp 104
low beams 101
luggage compartment
lamps 105
parking lamps 102
rear lamps 103
side turn signal
indicators 102
standing lamps 102
tail lamps 103
vanity mirror 105
Hilfsrahmen fŸr Querverweise
Page 133 of 140

EVERYTHING FROM A TO Z
131
OVERVIEW REPAIRS OPERATION CONTROLS DATA INDEX
G
Gasoline 78
Gasoline gauge 55
Gear display 48
Continuously Variable
automatic Transmission
(CVT) 48
General driving notes 76
Glove compartment 70
Glove compartment lamps
bulb replacement 105
Grilles 66,
69
Gross weight 122
H
Handbrake 44
Hazard warning flashers 12
Head airbags 37
Head restraints 34
Headlamp cleaning
system 52,
89
filling 89
Headlamp flasher 49
Headlamps
care 94,
101
cleaning 52 Heated
outside mirrors 36
rear window 65,
68
seats 34
windshield 65, 68
windshield washer jets 52
Heavy cargo 72
Height 121
High beams 17, 49
bulb replacement 101
Hood 16,
86
Horn 12
Hubcap remover 100,
106
I
Ignition lock 42
Illuminated vanity mirror 36
Imitation leather 95
Imprint 6
Indicator lamps 15
Individual air distribution 69
INSPECTION 57
Instrument cluster, see Display
elements 13
Instrument lighting 50
Instrument panel 12
Interface socket
for Onboard Diagnostics 96 Interior lamps 50
bulb replacement 104
Interior rearview mirror 36
automatic dimming 37
Interlock 42
Interval display 93
J
Jack 100,
106
Jump-starting 113,
114
K
Keys 22
multifunction steering
wheel 18
Kickdown 47 L
Lamps 49,
101
backup lamps 103
brake lamp 103,
104
daytime driving lamps 49
fog lamps 50
footwell lamps 105
front fog lamps 102
glove compartment 105
high beams 101
instrument lighting 50 interior lamps 50,
104
license plate lamp 104
low beams 49,
101
luggage compartment
lamps 105
parking lamps 49,
102
reading lamps 50
rear fog lamp 103
standing lamps 49, 102
tail lamp 103
turn signal indicators 102
xenon lamps 101
Lashing eyes 72
LATCH child-restraint
system 41
Leather care 95
LED light-emitting diodes 51
Length 121
License plate lamp
bulb replacement 104
Light-alloy wheels 94
"Lights on" warning 49
Loading 72
Load-securing devices 72
Low beams 49
bulb replacement 101
Luggage compartment 72
content 122
Page 134 of 140

EVERYTHING FROM A TO Z
132
Luggage compartment
cover 71
Luggage compartment lamp
bulb replacement 105
Luggage rack
see Roof-mounted luggage
rack 73
Lumbar support 32 M
M+S tires 85
Maintenance 57,
93
Maintenance System 93
Manual operation
driver's door 25
sliding/tilt sunroof 30
tailgate 27
Manual transmission 45
Manufacturer 6
Master key 22
initialization 22
MD player, see separate
Owner's Manual
Mechanical key 22
MFL (Multifunction steering
wheel) 18
Microfilter 66,
69
Mini Disc player, see separate
Owner's Manual MINI Maintenance System 93
MINI manufacturer 6
MINI Mobility System 100
Mirrors 36
Mobility System, see MINI
Mobility System 100
Modifications, technical 96
Multifunction steering wheel
(MFL) 18
Multifunction switch 49
N
Navigation system, see
separate Owner's
Manual 14
Non-smoker's equipment
package, see Cigarette lighter
socket 70
Nozzles 66,
69
O
OBD interface socket 96
Odometer 55
Oil 89
additives 90
level 15
prescribed oils 90
pressure 15 Oil change intervals, see Service
and Warranty Booklet (US
models)/Warranty and
Service Guide Booklet
(Canadian models)
Oil service 57
Old batteries 111
Onboard tool kit 100
Opening
from inside 26
from outside 23
Outside temperature
display 59
P
Package tray, see Luggage
compartment cover 71
Park Distance Control (PDC) 63
Parking brake 16,
44
Parking lamps 49
bulb replacement 102
Parking lamps/Low beams 49
Parking, vehicle 76
PDC (Park Distance Control) 63
Plastic 95
Pollen 66
Pollen filter 69
Power output 17, 120 Power supply 12 V 70
Power windows 28
Pressure, tires 80,
109
Q
Quality Grading, tire 83 R
Radiator 91
Radio, see separate Owner's
Manual
Rain sensor 51
Reading lamps 50
Rear backrest
foldable 71
Rear fog lamp 50
bulb replacement 103
Rear lamps 45,
103
Rear window defroster
automatic climate
control 68
heating and climate
control 65
Rear window wiper 52
replacing 100
Rearview mirror 36
Recirculated-air mode
air contitioner system 65
automatic climate
control 68