fuel MINI Hardtop 2 Door 2004 User Guide
[x] Cancel search | Manufacturer: MINI, Model Year: 2004, Model line: Hardtop 2 Door, Model: MINI Hardtop 2 Door 2004Pages: 152, PDF Size: 1.41 MB
Page 56 of 152
54
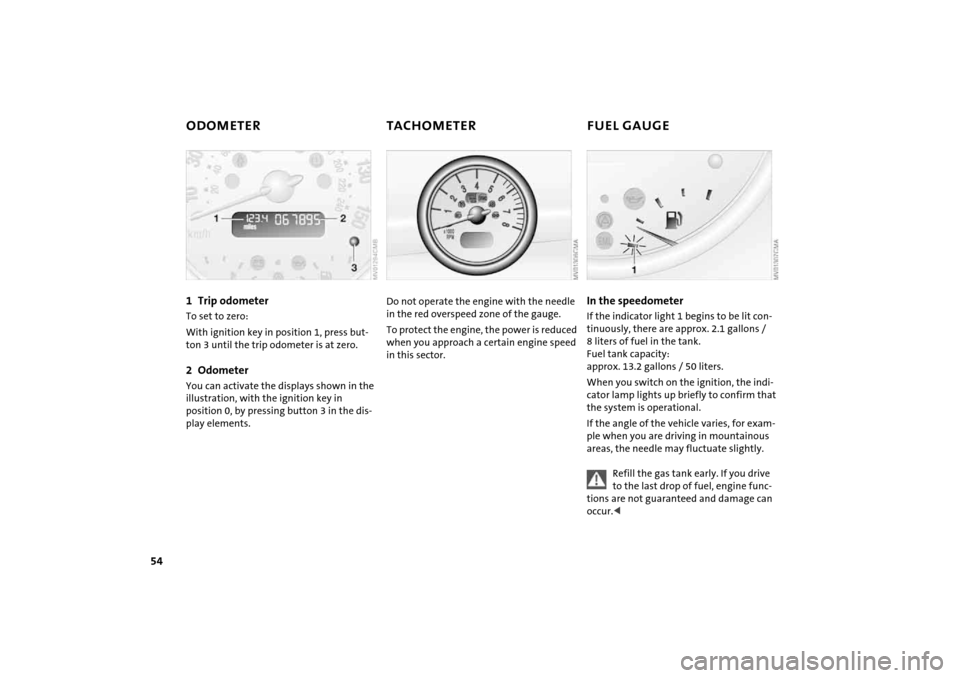
ODOMETER TACHOMETER FUEL GAUGE 1Trip odometer To set to zero:
With ignition key in position 1, press but-
ton 3 until the trip odometer is at zero.2OdometerYou can activate the displays shown in the
illustration, with the ignition key in
position 0, by pressing button 3 in the dis-
play elements.
Do not operate the engine with the needle
in the red overspeed zone of the gauge.
To protect the engine, the power is reduced
when you approach a certain engine speed
in this sector.
In the speedometer If the indicator light 1 begins to be lit con-
tinuously, there are approx. 2.1 gallons /
8 liters of fuel in the tank.
Fuel tank capacity:
approx. 13.2 gallons / 50 liters.
When you switch on the ignition, the indi-
cator lamp lights up briefly to confirm that
the system is operational.
If the angle of the vehicle varies, for exam-
ple when you are driving in mountainous
areas, the needle may fluctuate slightly.
Refill the gas tank early. If you drive
to the last drop of fuel, engine func-
tions are not guaranteed and damage can
occur.<
Page 57 of 152

55
OVERVIEW REPAIRS OPERATIONCONTROLS DATA INDEX
FUEL GAUGE COOLANT TEMPERATURE GAUGEIn the navigation system
Please also comply with the instruc-
tions in the previous section.<
If the indicator light 1 changes from orange
to red, there are approx. 2.1 gallons /
8 liters of fuel in the tank.
Low temperature The needle is at the bottom or on the right
of the range.
The engine is still cold. Drive at moderate
engine and vehicle speeds.Center positionNormal operating temperature of the
engine.High temperatureAs soon as there is a deviation from the
center position upwards or to the left:
Drive moderately and at low engine speed.
If necessary, switch off the engine and
allow it to cool down.
Checking coolant level, refer to page 100.
1Red indicator lampWhen you switch on the ignition, warning
lamp 1 comes on briefly to confirm that the
system is operational.
Lights up while driving:
Engine is too hot. Switch off the engine
immediately and allow it to cool down.Navigation system option
Coolant temperature warning
lamp in the speedometer lights up
while driving:
Engine is too hot. Switch off the engine
immediately and allow it to cool down.
Page 60 of 152

58
ONBOARD COMPUTER
*
Range
The onboard computer bases its calcula-
tions for the cruising range on the driving
style and on the remaining fuel in the tank.
If the range displayed is less than
35 miles / 50 km, be sure to refuel;
otherwise engine functions are not guaran-
teed and damage could occur.
lever for a longer period.
The displayed average speed value and
consumption value are recalculated.
Any time spent when the vehicle is station-
ary and the engine is shut off is ignored for
the calculation.
You can have an other unit of mea-
surement set by your MINI Dealer.<
Current fuel consumption The current consumption value is calcu-
lated and displayed on the basis of your
driving style.
You can have a different unit of mea-
surement set by your MINI Dealer.<
Page 86 of 152

84
REFUELING
Always switch off the engine before
refueling. If you do not, fuel cannot
be filled into the tank and the SERVICE
ENGINE SOON lamp may come on.<
1. Open the fuel filler door
2. Turn the gas cap counterclockwise
3. Put the gas cap in the bracket attached
to the fuel filler door.
Always observe all applicable precau-
tions and regulations when handling
fuels. Never carry spare fuel containers in
your vehicle. Whether empty or full, these
containers can leak, cause an explosion,
and lead to fire in the event of a collision.<
Unlocking manually In the event of an electrical malfunction,
the gas cap can be unlocked manually.
1. Remove the side trim panel on the left-
hand side of the cargo area.
Remove the first aid pouch
2. Pull the white lever toward the rear.
The central locking system releases the
gas cap
3. Open the fuel filler door.
Simple and environmentally friendly
Always observe all safety precautions
posted at the service station when
handling fuel.<
When refueling, insert the filler nozzle
completely into the filler pipe. Pulling the
nozzle out of the pipe during refueling:
>Results in premature pump shutoff
>Will reduce the effect of the fuel vapor
recovery system on the pump.
As long as the filler nozzle is used properly,
the fuel tank is full whenever the nozzle
shuts off the first time.
Page 87 of 152

85
OVERVIEW REPAIRSOPERATIONCONTROLS DATA INDEX
REFUELING FUEL SPECIFICATIONS Close the tank1. Put on gas cap
2. Turn gas cap clockwise until it clicks
3. Close fuel filler door.
Fuel tank capacity:
Approx. 13.2 gallons / 50 liters, of which
approx. 2.1 gallons / 8 liters are reserve
capacity.
Close the gas cap carefully after refu-
elling until a click is heard.
While closing, be sure not to squeeze the
strap which is fastened to the cap.
US models only:
A loose or missing cap will activate the
message CHECK GAS CAP in the Check Con-
trol
* or the Check Gas Cap lamp
*.<
Do not drive until the fuel tank is
totally empty. Otherwise engine
operations are not guaranteed and damage
could occur.<
The engine uses lead-free gasoline only.
Required fuel:
>Premium Unleaded Gasoline,
min. 91 AKI.
AKI = Anti Knock Index.
Do not use leaded fuels. The use of
leaded fuels will cause permanent
damage to the emissions-control system's
oxygen sensor and the catalytic con-
verter.<
Page 94 of 152
92
WHEEL AND TIRE REPLACEMENT
Unprofessional attempts by laymen
to service tires can lead to damage
and accidents.
Have this work performed by skilled profes-
sionals only. Your MINI Dealer will be glad
to assist you with both their expertise and
the proper equipment for your vehicle.<
The correct wheel and tire combination
also affects various systems that would
otherwise be impaired, e.g. ABS or DSC.
Have the wheels balanced after each tire or
wheel replacement.
The manufacturer of your MINI rec-
ommends that you avoid using
retread tires, as this could impair driving
safety. This is due to the possible variations
in casing structures and, in some cases, to
their extreme age, which can lead to a
decrease in their durability.<
The correct wheels and tires
The manufacturer of your MINI rec-
ommends never mounting wheels
and tires that have not been specifically
approved by the manufacturer for use on
your particular model. Although other
wheels and tires may theoretically have the
same dimensions, variations in factors such
as manufacturing tolerances can result in
contact between tire and bodywork, ulti-
mately leading to serious accidents. The
manufacturer of your MINI cannot evaluate
non-approved wheels and tires to deter-
mine if they are suited for use, and there-
fore cannot ensure the operating safety of
the vehicle if they are fitted.<
Recommended tire makes:
To maintain good handling and vehicle
response, use only tires of a single tread
configuration from a single manufacturer.
In the event of a flat tire, remount the pre-
vious wheel and tire combination as soon
as possible.
Run Flat tires:
If your MINI is equipped with Run Flat tires
– refer to Run Flat tires – use only these
tires, since no space-saver spare tire may be
available in the event of a flat. Special characteristics of winter tires The manufacturer of your MINI recom-
mends winter tires for driving in adverse
winter road conditions. While all-season
tires with the M+S designation provide bet-
ter winter traction than summer tires, they generally do not achieve the full perfor-
mance of winter tires.
For mounting winter tires, refer to the
descriptions under Tire condition, page 91,
and Wheel and tire replacement.
Run Flat tires:
If your MINI is equipped with Run Flat tires
– refer to Run Flat tires – use only these
tires, since no space-saver spare tire may be
available in the event of a flat.
Observing speeds:
Never exceed the maximum speed
for which the winter tires are rated.
Unprofessional attempts by laymen to ser-
vice tires can lead to damage and accidents.
Have this work performed by skilled profes-
sionals only. The technicians at your MINI
Dealer will be glad to assist you with the
required professional knowledge and spe-
cialized equipment.<
StorageStore tires in a cool, dry place, protecting
them against light whenever possible. Pro-
tect the tires against contact with oil,
grease and fuel. Do not exceed the maxi-
mum tire inflation pressure specified on
the tire sidewall.
Page 100 of 152
98
WASHER FLUID ENGINE OILHeadlamp* and windshield washer
system The capacity of the headlamp washer sys-
tem is approx. 2.6 quarts / 2.5 liters, that of
the windshield washer system approx.
2.1 quarts / 2.0 liters.
Fill with water and, if required, with anti-
freeze, according to manufacturer's recom-
mendations.
We recommend that you mix the
washer fluid before adding it to the
reservoir.<
Antifreeze agent for the washer sys-
tems is flammable. Always keep it well
away from sparks and open flames, and store
it in tightly closed containers well out of the
reach of children. Always observe the instruc-
tions for use provided on the container.<
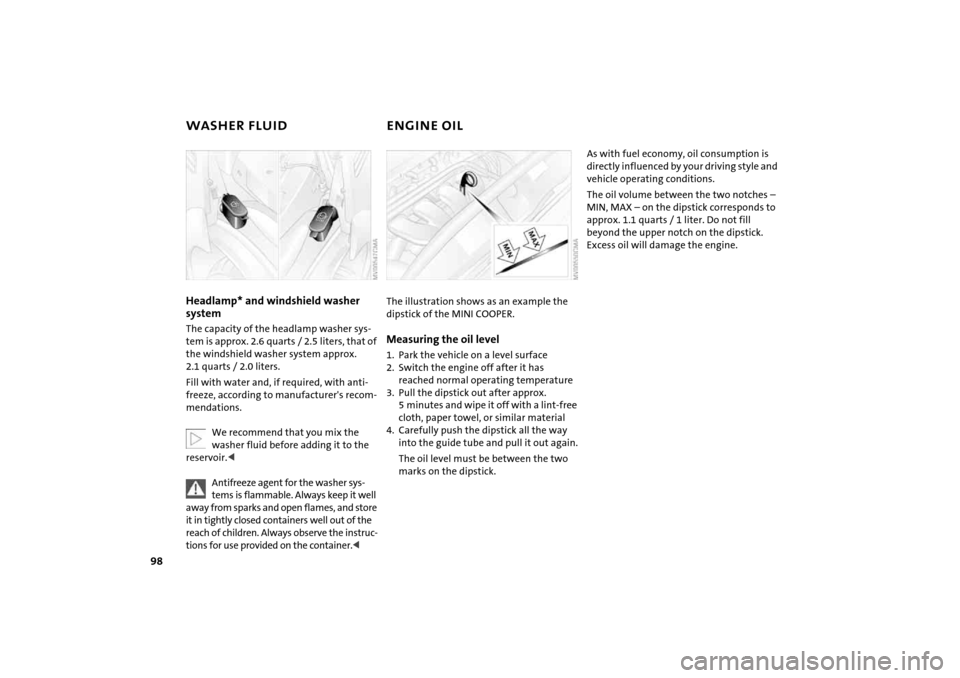
The illustration shows as an example the
dipstick of the MINI COOPER.Measuring the oil level1. Park the vehicle on a level surface
2. Switch the engine off after it has
reached normal operating temperature
3. Pull the dipstick out after approx.
5 minutes and wipe it off with a lint-free
cloth, paper towel, or similar material
4. Carefully push the dipstick all the way
into the guide tube and pull it out again.
The oil level must be between the two
marks on the dipstick.
As with fuel economy, oil consumption is
directly influenced by your driving style and
vehicle operating conditions.
The oil volume between the two notches –
MIN, MAX – on the dipstick corresponds to
approx. 1.1 quarts / 1 liter. Do not fill
beyond the upper notch on the dipstick.
Excess oil will damage the engine.
Page 106 of 152
104
CARING FOR YOUR VEHICLECare of special parts>Light-alloy wheels
*:
Use wheel cleaner especially during the
winter months, but do not use any ag-
gressive, acidic, strong alkali or rough
cleansers or steam jets above 1407/
606 . Observe the manufacturer's in-
structions
>Chrome parts
* such as bonnet grill, door
handles, etc.:
Especially if exposed to road salt, care-
fully clean these parts with plenty of
water and possibly with a shampoo addi-
tive.
For additional treatment, use chrome
polish
>Rubber parts:
Treat only with water or rubber care
products
Do not use silicon sprays or other
silicon-containing care products,
otherwise noise and damage could
occur.<
>Plastic parts, imitation leather surfaces,
headliner, lamp glass, covering glass for
the display elements, as well as matt
black molded parts:
Clean with water and, if necessary, plas-
tic care products. Do not dampen seats
and the headliner.
Never use solvents such as lacquer thin-
ner, heavy-duty grease remover, fuel or
similar
>Wood paneling
*:
Please clean wood paneling and other
wood parts only with a damp cloth. Dry
off with a soft cloth
>Safety belts:
Only clean using mild soap, leaving the
belts fitted.
Do not dry clean, as the fabric can be
destroyed.
Always roll up safety belts only when dry.
Dirty safety belts prevent unrolling and
thus negatively affect safety>Floor carpets and floor mats
*:
If heavily soiled, clean using interior
cleaner. Floor mats can be removed to
allow the interior to be cleaned
>Wiper blades:
Clean with soapy water. Replace wiper
blades twice a year, before and after the
cold season. This is particularly impor-
tant on vehicles fitted with a rain sensor.
Page 134 of 152

132
ENGINE DATA
MINI COOPER MINI COOPER S
Displacement
Number of cylinders cu in / cmµ97.52 / 1,598
497.52 / 1,598
4
Maximum output
at engine speed hp / kW
rpm115 / 85
6,000163 / 120
6,000
Maximum torque
at engine speedlb ft / Nm
rpm110 / 149
4,500155 / 210
4,000
Compression ratioε10.6 8.3
Stroke
Borein / mm
in / mm3.38 / 85.8
3.03 / 773.38 / 85.8
3.03 / 77
Fuel mixture preparation Digital electronic engine-management system
Page 137 of 152
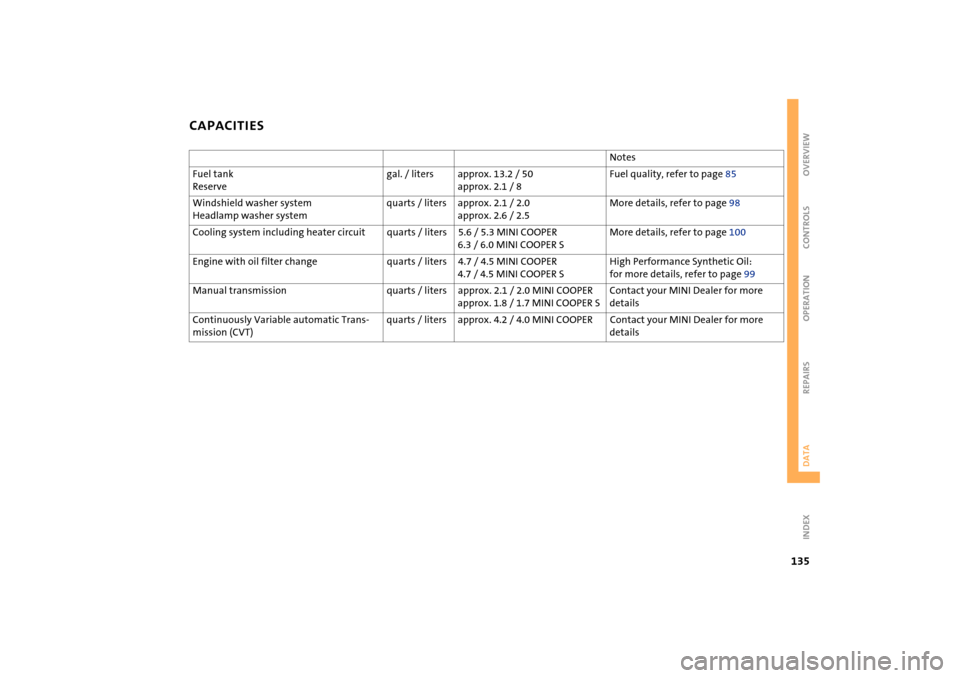
135
OVERVIEW REPAIRS OPERATION CONTROLS DATA INDEX
CAPACITIES
Notes
Fuel tank
Reservegal. / liters approx. 13.2 / 50
approx. 2.1 / 8Fuel quality, refer to page 85
Windshield washer system
Headlamp washer systemquarts / liters approx. 2.1 / 2.0
approx. 2.6 / 2.5 More details, refer to page 98
Cooling system including heater circuit quarts / liters 5.6 / 5.3 MINI COOPER
6.3 / 6.0 MINI COOPER SMore details, refer to page 100
Engine with oil filter change quarts / liters 4.7 / 4.5 MINI COOPER
4.7 / 4.5 MINI COOPER SHigh Performance Synthetic Oil:
for more details, refer to page 99
Manual transmission quarts / liters approx. 2.1 / 2.0 MINI COOPER
approx. 1.8 / 1.7 MINI COOPER SContact your MINI Dealer for more
details
Continuously Variable automatic Trans-
mission (CVT)quarts / liters approx. 4.2 / 4.0 MINI COOPER Contact your MINI Dealer for more
details