roof MINI Hardtop 2 Door 2004 Owner's Manual
[x] Cancel search | Manufacturer: MINI, Model Year: 2004, Model line: Hardtop 2 Door, Model: MINI Hardtop 2 Door 2004Pages: 152, PDF Size: 1.41 MB
Page 4 of 152
CONTENTS
2
© 2003 Bayerische Motoren Werke
Aktiengesellschaft
Munich, Germany
Reprinting, including excerpts, only with the
written consent of BMW AG, Munich.
Order No. 01 41 0 157 644
US English VIII/03
Printed in Germany
Printed on environmentally friendly paper,
bleached without chlorine, suitable for recycling.
NOTES
About this Owner's Manual6
Symbols used6
Your individual vehicle6
Editorial notice7
For your own safety7
Symbol on vehicle parts8
Service and warranty8
Reporting safety defects9
OVERVIEW
Cockpit12
Display elements13
Display elements with navigation
system14
Indicator and warning lamps15
Multifunction steering wheels18
CONTROLS
Opening and closing:
Keys22
Central locking system23
Opening and closing: from outside23
Opening and closing: from inside26
Tailgate27
Electric power windows28
Glass sunroof, electric29
Roller sun blind30
Adjustments:
Safe seating position31
Seat adjustment32
Head restraints33
Entry to the rear34
Safety belts35
Seat heating35
Steering wheel36
Mirrors36
Vehicle Memory37
Transporting children safely38
Page 5 of 152
3
OVERVIEW REPAIRS OPERATION CONTROLS DATA INDEX
Driving:
Ignition lock41
Starting the engine41
Switching off the engine43
Parking brake43
Manual transmission44
Continuously Variable automatic
Transmission (CVT)45
Parking lamps/Low beams48
Turn signal indicator/Headlamp
flasher49
Instrument lighting49
Fog lamps49
Interior lamps50
Washer/wiper system50
Cruise control52
Everything under control:
Odometer54
Tachometer54
Fuel gauge54
Coolant temperature gauge55
Service interval display56
Clock56
Onboard computer57
Technology for safety and driving
convenience:
All Season traction Control (ASC)59
Dynamic Stability Control (DSC)60
Antilock Brake System (ABS)61
Flat Tire Monitor62
Park Distance Control (PDC)64
Airbags65
Controlling the climate for pleasant
driving:
Air conditioning system67
Automatic climate control70
Interior conveniences:
Glove compartment73
Ashtray, beverage holders74
Cigarette lighter, 12 V power supply74
Loading and transporting cargo:
Cargo area75
Loading cargo76
Roof-mounted luggage rack78
OPERATION, CARE, MAINTENANCE
Special operating instructions:
Break-in procedures82
General driving notes83
Refueling84
Fuel specifications85
Brake system86
Wheels and tires:
Tire inflation pressure87
Tire coding89
Tire condition91
Wheel and tire replacement92
Run Flat tires93
Snow chains94
Page 25 of 152
23
OVERVIEW REPAIRS OPERATIONCONTROLS DATA INDEX
CENTRAL LOCKING SYSTEM OPENING AND CLOSING: FROM OUTSIDEThe conceptThe central locking system is ready for
operation whenever the driver's door is
closed. The doors, the tailgate and the fuel
filler door are unlocked or locked.
The central locking system secures your
MINI:
>When operated from the outside via the
remote control as well as via the door
lock
>When operated from the inside via a
switch.
If operated from outside, the anti-theft sys-
tem is activated at the same time. This pre-
vents the doors from being unlocked via
safety lock buttons or door handles.
In the event of an accident, the central lock-
ing system unlocks automatically. The haz-
ard warning system and interior lamps are
also switched on.
Via remote controlThe remote control gives you an exception-
ally convenient method for unlocking and
locking your vehicle. It also offers addi-
tional functions:
>To open the power windows and the
glass sunroof, refer to page 24.
Locking/unlocking the vehicle automati-
cally activates/deactivates the anti-theft
system and switches the interior lamps off/
on.
If the vehicle has been properly locked
using the remote control, the hazard warn-
ing system flashes once.
When the vehicle is unlocked, the hazard
warning system does not react.
Children might be able to lock the
doors from the inside. Always take
the vehicle keys with you so that the vehi-
cle can be opened again from the outside at
any time.<
For US owners only The transmitter and receiver units comply
with part 15 of the FCC, Federal Communi-
cations Commission, regulations. Opera-
tion is governed by the following:
FCC ID: LX8765S
LX8765E
LX8CAS
Compliance statement:
This device complies with part 15 of the
FCC Rules. Operation is subject to the fol-
lowing two conditions:
>This device may not cause harmful inter-
ference, and
>this device must accept any interference
received, including interference that may
cause undesired operation.
Any unauthorized modifications or
changes to these devices could void
the user's authority to operate this equip-
ment.<
Page 26 of 152
24
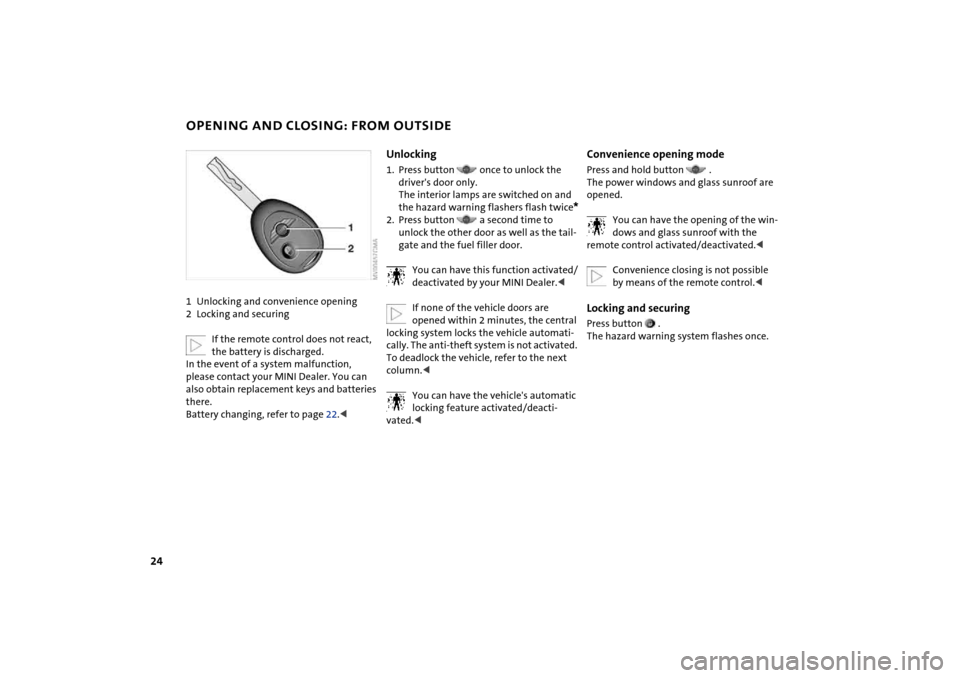
OPENING AND CLOSING: FROM OUTSIDE1Unlocking and convenience opening
2Locking and securing
If the remote control does not react,
the battery is discharged.
In the event of a system malfunction,
please contact your MINI Dealer. You can
also obtain replacement keys and batteries
there.
Battery changing, refer to page 22.<
Unlocking1. Press button once to unlock the
driver's door only.
The interior lamps are switched on and
the hazard warning flashers flash twice
*
2. Press button a second time to
unlock the other door as well as the tail-
gate and the fuel filler door.
You can have this function activated/
deactivated by your MINI Dealer.<
If none of the vehicle doors are
opened within 2 minutes, the central
locking system locks the vehicle automati-
cally. The anti-theft system is not activated.
To deadlock the vehicle, refer to the next
column.<
You can have the vehicle's automatic
locking feature activated/deacti-
vated.<
Convenience opening modePress and hold button .
The power windows and glass sunroof are
opened.
You can have the opening of the win-
dows and glass sunroof with the
remote control activated/deactivated.<
Convenience closing is not possible
by means of the remote control.
Page 27 of 152
25
OVERVIEW REPAIRS OPERATIONCONTROLS DATA INDEX
OPENING AND CLOSING: FROM OUTSIDEMalfunctionsExternal systems or devices may cause local
interference in the functions of the remote
control.
In this case, unlock the vehicle via the door
lock.
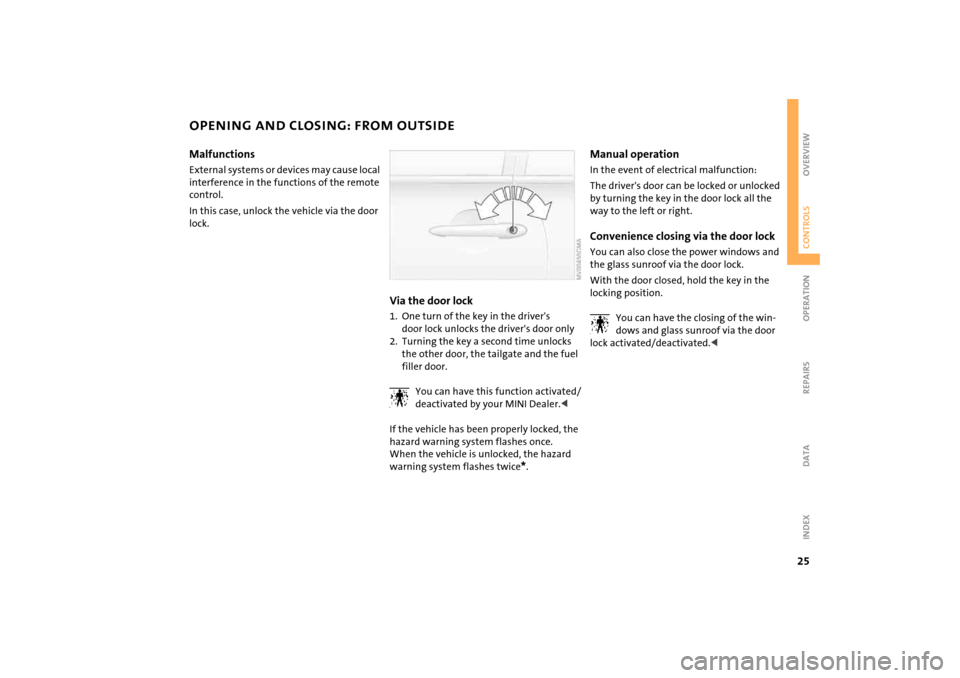
Via the door lock1. One turn of the key in the driver's
door lock unlocks the driver's door only
2. Turning the key a second time unlocks
the other door, the tailgate and the fuel
filler door.
You can have this function activated/
deactivated by your MINI Dealer.<
If the vehicle has been properly locked, the
hazard warning system flashes once.
When the vehicle is unlocked, the hazard
warning system flashes twice
*.
Manual operationIn the event of electrical malfunction:
The driver's door can be locked or unlocked
by turning the key in the door lock all the
way to the left or right.Convenience closing via the door lockYou can also close the power windows and
the glass sunroof via the door lock.
With the door closed, hold the key in the
locking position.
You can have the closing of the win-
dows and glass sunroof via the door
lock activated/deactivated.<
Page 29 of 152
27
OVERVIEW REPAIRS OPERATIONCONTROLS DATA INDEX
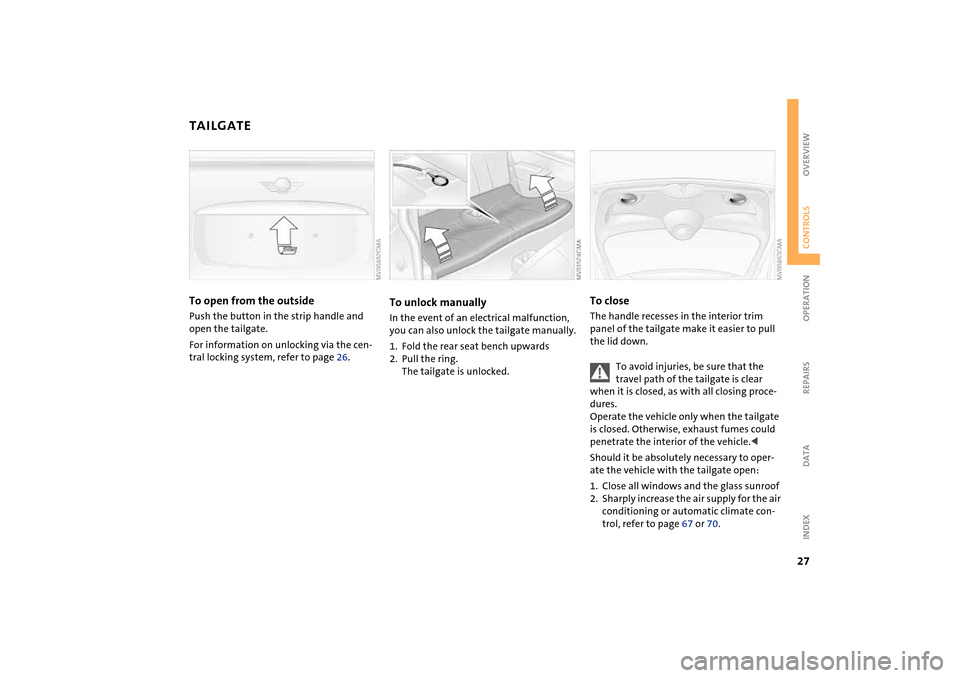
TAILGATE To open from the outsidePush the button in the strip handle and
open the tailgate.
For information on unlocking via the cen-
tral locking system, refer to page 26.
To unlock manually In the event of an electrical malfunction,
you can also unlock the tailgate manually.
1. Fold the rear seat bench upwards
2. Pull the ring.
The tailgate is unlocked.
To closeThe handle recesses in the interior trim
panel of the tailgate make it easier to pull
the lid down.
To avoid injuries, be sure that the
travel path of the tailgate is clear
when it is closed, as with all closing proce-
dures.
Operate the vehicle only when the tailgate
is closed. Otherwise, exhaust fumes could
penetrate the interior of the vehicle.<
Should it be absolutely necessary to oper-
ate the vehicle with the tailgate open:
1. Close all windows and the glass sunroof
2. Sharply increase the air supply for the air
conditioning or automatic climate con-
trol, refer to page 67 or 70.
Page 31 of 152
29
OVERVIEW REPAIRS OPERATIONCONTROLS DATA INDEX
GLASS SUNROOF, ELECTRIC
*
To prevent injuries, exercise care
when closing the glass sunroof and
keep it in your field of vision until it is shut.
Make sure that the closing path of the sun-
roof is clear.
When leaving the vehicle, always remove
the ignition key from the lock and remem-
ber to close the doors, e.g. to prevent chil-
dren from operating the sunroof and injur-
ing themselves.
Be sure that adequate clearance is main-
tained for the opening path of the glass
sunroof; otherwise damage can occur.<
Convenience operationFor convenience operation using the
remote control refer to page 24, for opera-
tion via the door lock refer to page 25.
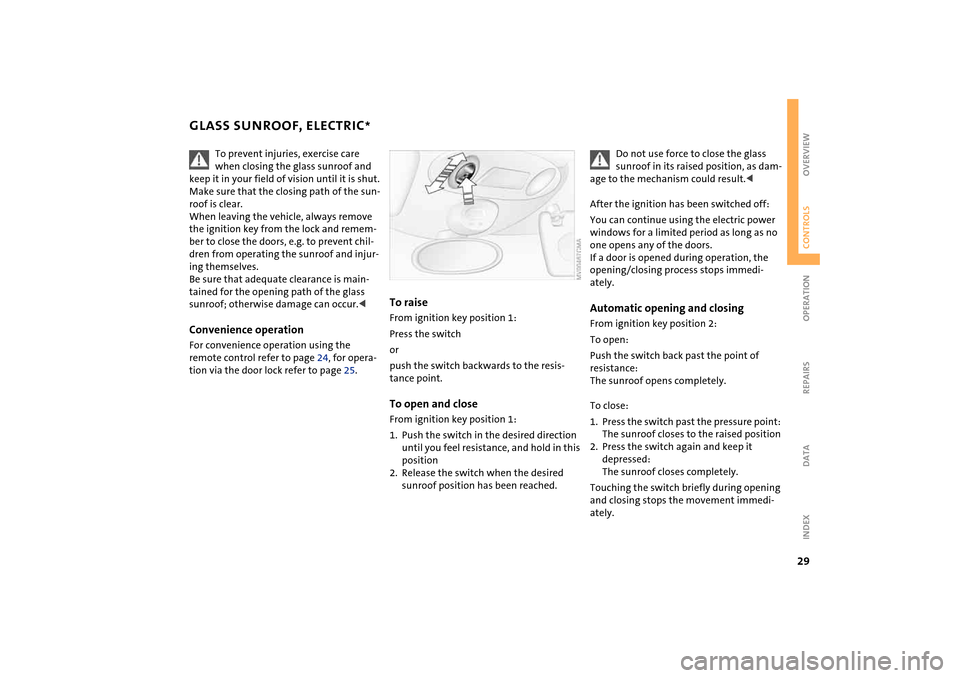
To raiseFrom ignition key position 1:
Press the switch
or
push the switch backwards to the resis-
tance point.To open and closeFrom ignition key position 1:
1. Push the switch in the desired direction
until you feel resistance, and hold in this
position
2. Release the switch when the desired
sunroof position has been reached.
Do not use force to close the glass
sunroof in its raised position, as dam-
age to the mechanism could result.<
After the ignition has been switched off:
You can continue using the electric power
windows for a limited period as long as no
one opens any of the doors.
If a door is opened during operation, the
opening/closing process stops immedi-
ately.
Automatic opening and closing From ignition key position 2:
To open:
Push the switch back past the point of
resistance:
The sunroof opens completely.
To close:
1. Press the switch past the pressure point:
The sunroof closes to the raised position
2. Press the switch again and keep it
depressed:
The sunroof closes completely.
Touching the switch briefly during opening
and closing stops the movement immedi-
ately.
Page 32 of 152
30
GLASS SUNROOF, ELECTRIC
*
ROLLER SUN BLIND
*
Pinch protection
If, while closing, the glass sunroof encoun-
ters resistance within roughly the last 8 in /
20 cm, the closing procedure is interrupted
and the roof reopens.
Despite the pinch protection, be
extremely careful that the travel path
of the sunroof is not obstructed whenever
it is closed. Otherwise, it is not guaranteed
that the closing procedure will be inter-
rupted, for instance if the obstructions
offer very little resistance.
You can disable the pinch protection by
pressing the switch past the pressure point
and holding it.<
When closing the sunroof from the
raised position, ensure that the travel
path of the sunroof is not obstructed since
the pinch protection is not active in this
position.<
Manual opening and closing In the event of an electrical malfunction,
you can also open and close the glass sun-
roof manually:
1. Push the clock towards the interior and
remove
2. Use an Allen key to turn the glass sun-
roof in the direction required.
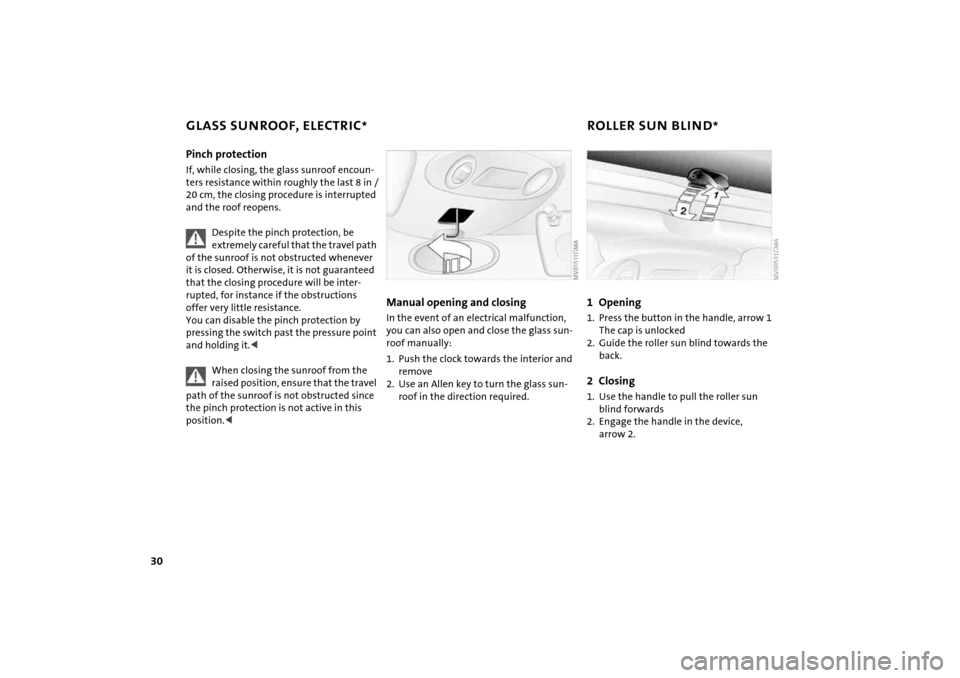
1Opening1. Press the button in the handle, arrow 1
The cap is unlocked
2. Guide the roller sun blind towards the
back.2Closing1. Use the handle to pull the roller sun
blind forwards
2. Engage the handle in the device,
arrow 2.
Page 67 of 152
65
OVERVIEW REPAIRS OPERATIONCONTROLS DATA INDEX
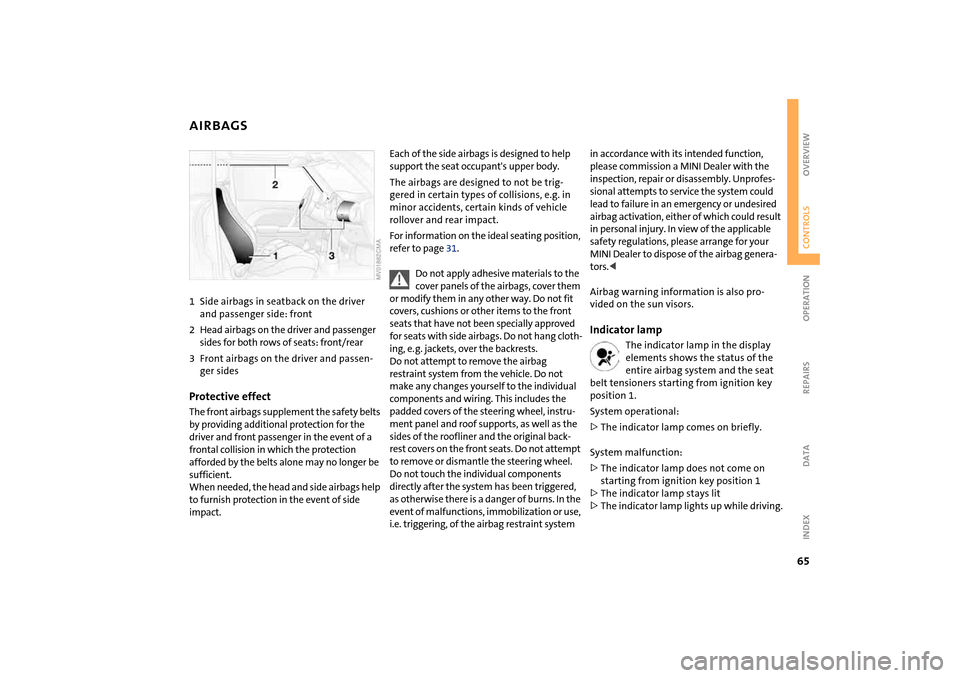
AIRBAGS1Side airbags in seatback on the driver
and passenger side: front
2Head airbags on the driver and passenger
sides for both rows of seats: front/rear
3Front airbags on the driver and passen-
ger sidesProtective effectThe front airbags supplement the safety belts
by providing additional protection for the
driver and front passenger in the event of a
frontal collision in which the protection
afforded by the belts alone may no longer be
sufficient.
When needed, the head and side airbags help
to furnish protection in the event of side
impact.
Each of the side airbags is designed to help
support the seat occupant's upper body.
The airbags are designed to not be trig-
gered in certain types of collisions, e.g. in
minor accidents, certain kinds of vehicle
rollover and rear impact.
For information on the ideal seating position,
refer to page 31.
Do not apply adhesive materials to the
cover panels of the airbags, cover them
or modify them in any other way. Do not fit
covers, cushions or other items to the front
seats that have not been specially approved
for seats with side airbags. Do not hang cloth-
ing, e. g. jackets, over the backrests.
Do not attempt to remove the airbag
restraint system from the vehicle. Do not
make any changes yourself to the individual
components and wiring. This includes the
padded covers of the steering wheel, instru-
ment panel and roof supports, as well as the
sides of the roofliner and the original back-
rest covers on the front seats. Do not attempt
to remove or dismantle the steering wheel.
Do not touch the individual components
directly after the system has been triggered,
as otherwise there is a danger of burns. In the
event of malfunctions, immobilization or use,
i.e. triggering, of the airbag restraint system
in accordance with its intended function,
please commission a MINI Dealer with the
inspection, repair or disassembly. Unprofes-
sional attempts to service the system could
lead to failure in an emergency or undesired
airbag activation, either of which could result
in personal injury. In view of the applicable
safety regulations, please arrange for your
MINI Dealer to dispose of the airbag genera-
tors.<
Airbag warning information is also pro-
vided on the sun visors.Indicator lamp
The indicator lamp in the display
elements shows the status of the
entire airbag system and the seat
belt tensioners starting from ignition key
position 1.
System operational:
>The indicator lamp comes on briefly.
System malfunction:
>The indicator lamp does not come on
starting from ignition key position 1
>The indicator lamp stays lit
>The indicator lamp lights up while driving.
Page 80 of 152
78
ROOF-MOUNTED LUGGAGE RACK
*
Always position and secure the load
carefully. If you do not, it can endan-
ger the passengers during braking or eva-
sive maneuvers.
Do not exceed the permissible gross weight
and axle load, refer to page 134; otherwise
the vehicle's operating safety is no longer
assured and it will not be in compliance
with the certification regulations.
Do not stow heavy or hard objects in the
passenger compartment without first
securing them. Otherwise they would be
thrown around during braking and evasive
maneuvers and endanger the occupants.<
When loading a roof-mounted lug-
gage rack, ensure that there is suffi-
cient space for the movement of the glass
sunroof and that no objects protrude into
the swiveling area of the tailgate, as other-
wise damage can occur.<
Do not secure the roof-mounted lug-
gage rack to the trim panels/strips:
the lack of a secure hold could lead to dam-
age or accidents.<
Special roof-mounted luggage racks
for your MINI are available as acces-
sories from your MINI Dealer.<