remove seats MINI Hardtop 2 Door 2005 Owner's Manual
[x] Cancel search | Manufacturer: MINI, Model Year: 2005, Model line: Hardtop 2 Door, Model: MINI Hardtop 2 Door 2005Pages: 165, PDF Size: 2.32 MB
Page 45 of 165

43
OVERVIEW REPAIRS OPERATIONCONTROLS DATA INDEX
SEAT ADJUSTMENT
HEAD RESTRAINTS
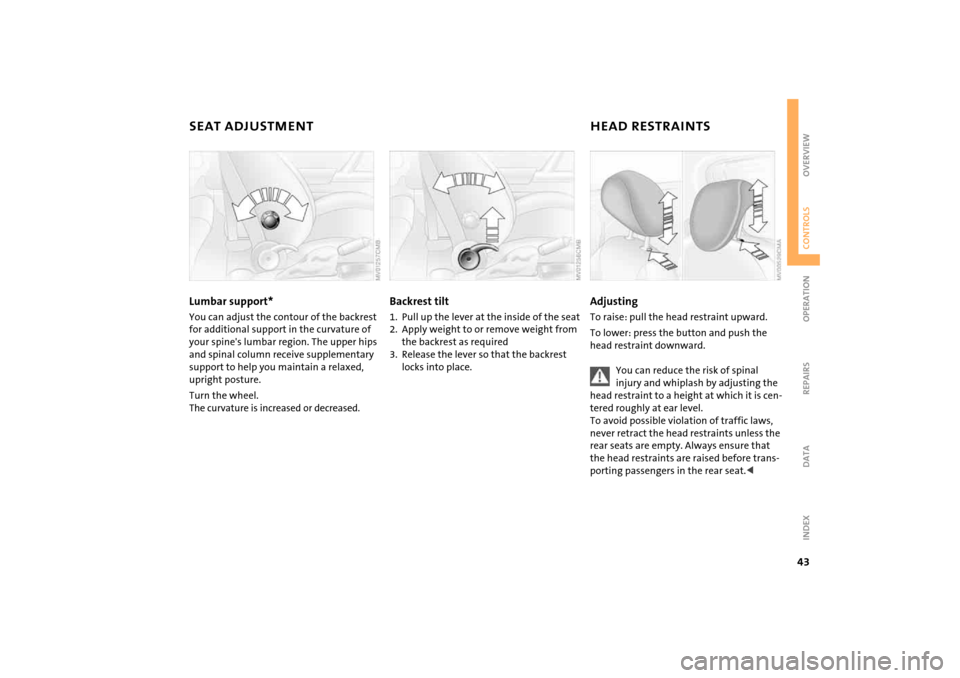
Lumbar support* You can adjust the contour of the backrest
for additional support in the curvature of
your spine's lumbar region. The upper hips
and spinal column receive supplementary
support to help you maintain a relaxed,
upright posture. Turn the wheel.
The curvature is increased or decreased.
Backrest tilt 1. Pull up the lever at the inside of the seat2. Apply weight to or remove weight from
the backrest as required3. Release the lever so that the backrest
locks into place.
AdjustingTo raise: pull the head restraint upward.To lower: press the button and push the
head restraint downward.
You can reduce the risk of spinal injury and whiplash by adjusting the
head restraint to a height at which it is cen
-
tered roughly at ear level.
To avoid possible violation of traffic laws,
never retract the head restraints unless the
rear seats are empty. Always ensure that
the head restraints are raised before trans
-
porting passengers in the rear seat.<
Page 46 of 165

44
HEAD RESTRAINTS
ENTRY TO THE REAR
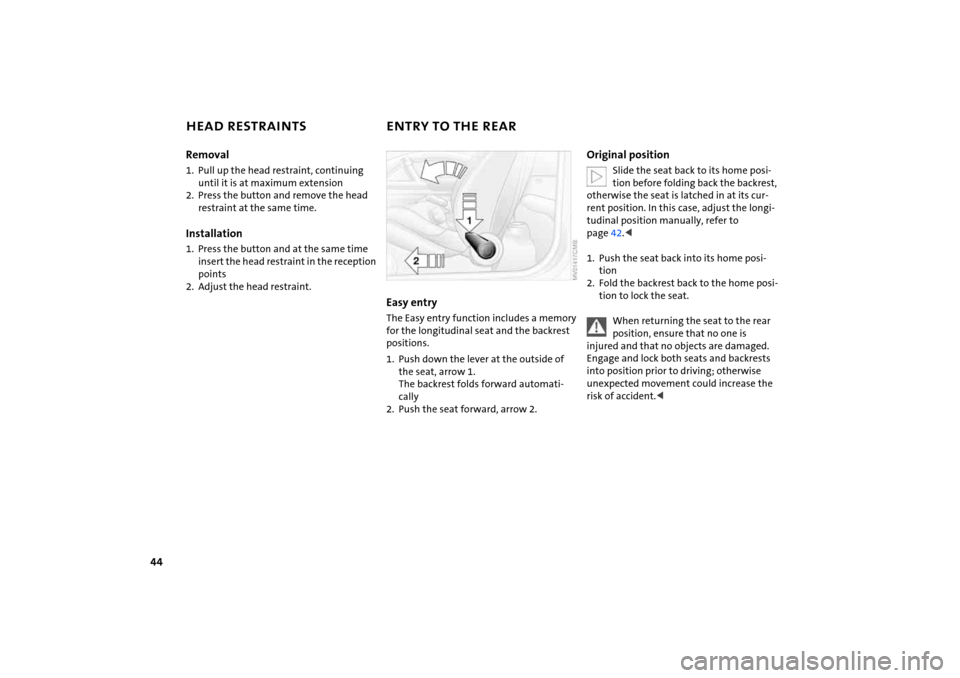
Removal1. Pull up the head restraint, continuing
until it is at maximum extension2. Press the button and remove the head
restraint at the same time.Installation1. Press the button and at the same time
insert the head restraint in the reception
points2. Adjust the head restraint.
Easy entryThe Easy entry function includes a memory
for the longitudinal seat and the backrest
positions.1.
Push down the lever at the outside of the seat, arrow 1.
The backrest folds forward automati
-
cally
2. Push the seat forward, arrow
2.
Original position
Slide the seat back to its home posi
-
tion before folding back the backrest,
otherwise the seat is latched in at its cur
-
rent position. In this case, adjust the longi
-
tudinal position manually, refer to
page
42.<
1. Push the seat back into its home posi
-
tion
2. Fold the backrest back to the home posi
-
tion to lock the seat.
When returning the seat to the rear position, ensure that no one is
injured and that no objects are damaged.
Engage and lock both seats and backrests
into position prior to driving; otherwise
unexpected movement could increase the
risk of accident.<
Page 75 of 165

73
OVERVIEW REPAIRS OPERATIONCONTROLS DATA INDEX
AIRBAGSProtective effectThe front airbags supplement the safety
belts by providing additional protection for
the driver and front passenger in the event
of a frontal collision in which the protec
-
tion afforded by the belts alone may no
longer be sufficient. When needed, the
head and side airbags help to furnish pro
-
tection in the event of side impact. Each of
the side airbags is designed to help support
the seat occupant's upper body. The corre
-
sponding side/head airbag in the MINI Con
-
vertible or the head airbag in the MINI sup
-
ports the head.The airbags are designed to not be trig
-
gered in certain types of collisions, e.g. in
minor accidents, certain kinds of vehicle
rollover and rear impact.For information on the ideal seating posi
-
tion, refer to page
41.
Do not apply adhesive materials to the cover panels of the airbags, cover
them or modify them in any other way. Do
not fit covers, cushions or other items to
the front seats that have not been specially
approved for seats with side airbags. Do
not hang clothing, e.
g. jackets, over the
backrests.
Do not attempt to remove the airbag
restraint system from the vehicle. Do not
touch the individual components directly
after the system has been triggered, as oth
-
erwise there is a danger of burns. In the
event of malfunctions, deactivation or
deployment of the airbag restraint system,
have the system checked, repaired or disas
-
sembled only by a MINI Dealer or a work
-
shop with specially trained personnel work
-
ing in accordance with the specifications of
the MINI manufacturer and having the nec
-
essary permits for handling explosive
devices. Unprofessional attempts to service
the system could lead to failure in an emer
-
gency or undesired airbag activation, either
of which could result in personal injury.
vided on the sun visors.Airbag system operational
The warning lamp in the display elements shows the status of the
entire airbag system and the seat
belt tensioners starting from ignition key
position 1. The warning lamp goes out after
several seconds.
Airbag system malfunctioning >The warning lamp does not come on
starting from ignition key position
1
>The warning lamp stays lit>The warning lamp lights up while driv
-
ing.
In the event of a malfunction, have the airbag system checked immedi
-
ately. Otherwise, there is a risk that the sys
-
tem will not function as intended in
response to a severe impact occurring
within the system's normal triggering
range.<
Page 116 of 165

114
CARING FOR YOUR VEHICLEdamage caused by undesired wiper activa
-
tion.
elevator ramp, remove the rod antenna.
To do so, grip the rod antenna at the base
and unscrew it from the antenna foot by
turning it to the left.
rub them dry, and never use abrasives or
strong solvents. Remove dirt and contami
-
nation, such as insects, by soaking with
shampoo and then rinsing with plenty of
water. Always use a deicer spray to remove
accumulated ice and snow; never use a
scraper.<
Vehicle paintwork Regular care contributes greatly to driving
safety and value retention.Environmental influences varying from one
region to the next can affect the vehicle
paintwork. Please base the frequency and
scope of car care on these various influ
-
ences.Care of upholsteryDepressions that come about on the uphol
-
stery material of the seats in daily use can
be brushed out using a slightly damp brush
against the grain.The fact that velour lays down is not a qual
-
ity defect, but rather is inevitable in the
case of home textiles or clothing materials.In the case of strong sunlight and longer
parking periods, cover the seats or all win
-
dows to prevent discoloration.
Care of special parts>Light-alloy wheels
*:
Use wheel cleaner especially during the
winter months, but do not use any
aggressive, acidic, strong alkali or rough
cleansers or steam jets above 140
7 /
60
6. Observe the manufacturer's
instructions
>Chrome parts
* such as bonnet grill, door
handles, etc.:
Especially if exposed to road salt, care
-
fully clean these parts with plenty of
water and possibly with a shampoo addi
-
tive. For additional treatment, use
chrome polish>Rubber parts:
Treat only with water or rubber care
products.
Do not use silicon sprays or other silicon-containing care products,
otherwise noise and damage could
occur.<
>Plastic parts, imitation leather surfaces,
headliner, lamp glass, covering glass for
the display elements, as well as matt
black molded parts:
Clean with water and, if necessary, plas
-
tic care products. Do not dampen seats
and the headliner.
Never use solvents such as lacquer thin
-