towing MINI Hardtop 2 Door 2005 Owner's Manual
[x] Cancel search | Manufacturer: MINI, Model Year: 2005, Model line: Hardtop 2 Door, Model: MINI Hardtop 2 Door 2005Pages: 165, PDF Size: 2.32 MB
Page 6 of 165
CONTENTS
4
In the engine compartment:Bonnet
105
Engine compartment:
MINI COOPER and
MINI
COOPER
CONVERTIBLE
106
MINI COOPER S and
MINI
COOPER
S CONVERTIBLE
107
Washer fluid
108
Engine oil
108
Coolant
110
Brake fluid
111
Maintenance and care:MINI Maintenance System
112
OBD socket
113
Caring for your vehicle
113
Vehicle storage
116
OWNER SERVICE PROCEDURESReplacement procedures:Onboard tool kit
120
Wiper blades
120
Lamps and bulbs
121
Repairing a flat tire
125
Space-saver spare tire
125
Changing tires
127
MINI Mobility System
129
Battery
132
Fuses
133
Giving and receiving assistance:Jump-starting
134
Towing and tow-starting
136
TECHNICAL DATAEngine data
140
Dimensions:
MINI
141
MINI Convertible
142
Weights:
MINI
143
MINI Convertible
144
Capacities
145
Page 58 of 165
56
CONTINUOUSLY VARIABLE AUTOMATIC TRANSMISSION (CVT)
*
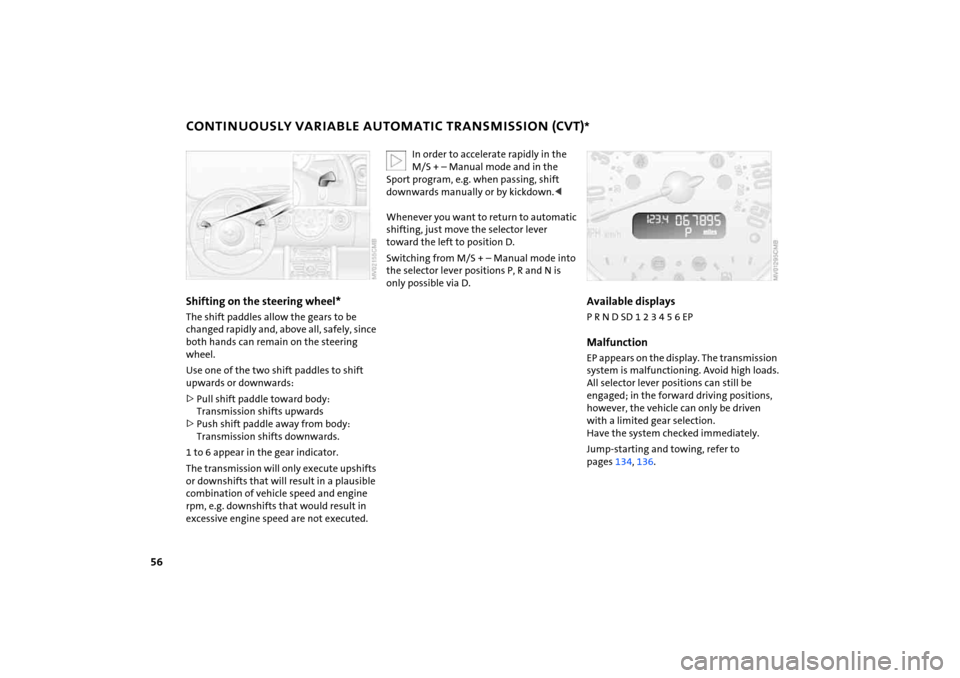
Shifting on the steering wheel* The shift paddles allow the gears to be
changed rapidly and, above all, safely, since
both hands can remain on the steering
wheel.Use one of the two shift paddles to shift
upwards or downwards:>Pull shift paddle toward body:
Transmission shifts upwards>Push shift paddle away from body:
Transmission shifts downwards.1 to 6 appear in the gear indicator.
The transmission will only execute upshifts
or downshifts that will result in a plausible
combination of vehicle speed and engine
rpm, e.g. downshifts that would result in
excessive engine speed are not executed.
In order to accelerate rapidly in the M/S
+ – Manual mode and in the
Sport program, e.g. when passing, shift
downwards manually or by kickdown.<
Whenever you want to return to automatic
shifting, just move the selector lever
toward the left to position D.Switching from M/S
+ – Manual mode into
the selector lever positions P, R and N is
only possible via D.
Available displaysP R N D SD 1 2 3 4 5 6 EPMalfunctionEP appears on the display. The transmission
system is malfunctioning. Avoid high loads.
All selector lever positions can still be
engaged; in the forward driving positions,
however, the vehicle can only be driven
with a limited gear selection.
Have the system checked immediately.Jump-starting and towing, refer to
pages
134
, 136
.
Page 76 of 165
74
PARK DISTANCE CONTROL (PDC)
*
The conceptThe PDC assists you when you back into a
parking space. A signal tone tells you the
current distance to an object behind your
vehicle. To do this, four ultrasonic sensors
in the rear bumper measure the distance to
the nearest object.
The sensors on each side have a range of
approx. 2
ft / 60
cm, the middle sensors
one of approx. 5 ft / 1.5
m.
PDC is a parking aid that can identify objects if they are approached slowly,
as is generally the case when parking.
Avoid driving towards objects rapidly; due
to underlying physical principles, the sys
-
tem may otherwise alert you too late for
you to take evasive steps.
-
tem starts to operate automatically about
one second after you select reverse gear or
place the selector lever in position R.
Wait for this one second before you drive backwards.<
The system is deactivated when you shift
away from Reverse.
You can have a signal tone set as a confirmation that PDC has been acti
-
vated.
between vehicle and object decreases, the
intervals between the tones become
shorter. A continuous tone indicates the
presence of an object less than 8
in / 20
cm
away.
The warning signal is canceled after
approx. three seconds if the distance to the
object remains constant during this time,
for instance if you are moving parallel to a
wall.MalfunctionA continuous high-pitched tone will sound
during initial activation. The system is mal
-
functioning. Have the system checked.Volume controlThe volume of the Park Distance Control
signal can be adjusted from level
1, soft, to
level
6, loud.You can have this function set.<
System limitations
Even with PDC, final responsibility for estimating the distance between the
vehicle and any objects always remains
with the driver.
Even when sensors are involved, there is a
blind spot in which objects cannot be
detected. Recognition of some objects can
be beyond the limits of physical ultrasonic
measurement, for example with towing
bars or hitches or with thin or wedge-
shaped objects. Moreover, low objects that
have already been detected, such as a curb
edge, can disappear out of the range of the
sensors before a continuous tone sounds.
Loud sources of sound outside and inside
your vehicle can drown the PDC signal
tone.<
Keep the sensors clean and free of ice or snow in order to ensure that they
will continue to operate effectively.
Do not apply high pressure spray to the
sensors for a prolonged period of time.
Always maintain a distance which is
greater than 4
in / 10
cm.<
Page 89 of 165
87
OVERVIEW REPAIRS OPERATIONCONTROLS DATA INDEX
LOADING CARGO
Avoid overloading the vehicle so that the permitted load on the tires is not
exceeded. Overloading can lead to over
-
heating and damage inside the tires.
Depending on the circumstances, this can
result in sudden air loss.<
Determining cargo limit1. Locate the following statement on your
vehicle's placard:
The combined weight of occu
-
pants and cargo should never
exceed XXX
kg or YYY
lbs, as this could
otherwise result in damage to the vehi
-
cle and unstable driving conditions.<
2. Determine the combined weight of the
driver and passengers that will be riding
in your vehicle3. Substract the combined weight of the
driver and passengers from XXX kilo
-
grams or YYY
pounds
4. The resulting figure equals the available
amount of cargo and luggage load
capacity.
For example, if the XXX amount equals
1,400 lbs. and there will be four 150
lbs.
passengers in your vehicle, the amount
of available cargo and luggage load
capacity is 800
lbs.:
1,400
lbs. minus 600
lbs. = 800
lbs.
5. Determine the combined weight of lug
-
gage and cargo being loaded on the
vehicle. That weight may not safely
exceed the available cargo and luggage
load capacity calculated in Step
4
6. If your vehicle will be towing a trailer,
load from your trailer will be transferred
to your vehicle. Consult the manual for
transporting a trailer to determine how
this may reduce the available cargo and
luggage load capacity of your vehicle.
Page 90 of 165
88
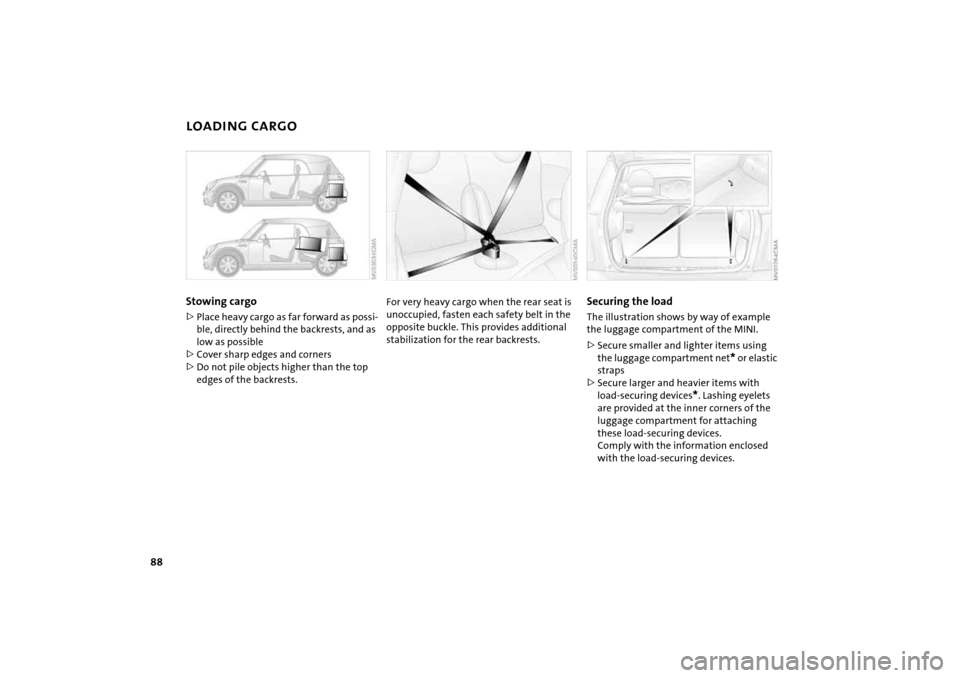
LOADING CARGOStowing cargo >Place heavy cargo as far forward as possi
-
ble, directly behind the backrests, and as
low as possible>Cover sharp edges and corners>Do not pile objects higher than the top
edges of the backrests.
For very heavy cargo when the rear seat is unoccupied, fasten each safety belt in the
opposite buckle. This provides additional
stabilization for the rear backrests.
Securing the load The illustration shows by way of example
the luggage compartment of the MINI.>Secure smaller and lighter items using
the luggage compartment net
* or elastic
straps
>Secure larger and heavier items with
load-securing devices
*. Lashing eyelets
are provided at the inner corners of the
luggage compartment for attaching
these load-securing devices.
Comply with the information enclosed
with the load-securing devices.
Page 127 of 165
125
OVERVIEW REPAIRSOPERATION CONTROLS DATA INDEX
REPAIRING A FLAT TIRE
SPACE-SAVER SPARE TIRE
*
Safety measures in the event of a flat tire:
Stop the vehicle as far as possible from
passing traffic. Switch on the hazard warn
-
ing flashers.
Turn the steering wheel to the straight-
ahead wheel position and engage the
steering lock. Engage the parking brake and
shift into 1st or reverse gear – selector lever
in P.
All passengers should be outside the vehi
-
cle and well away from your immediate
working area – behind a guardrail, for
instance.
If a portable hazard warning lamp is avail
-
able, set it up on the roadside at an appro
-
priate distance from the rear of the vehicle.
Comply with all safety guidelines and regu
-
lations.
dures should be followed depending on the
equipment included in your vehicle:>Vehicles with Run Flat tires, refer to
page
101
>Vehicles with a space-saver spare tire,
refer to the following section>Vehicles with MINI Mobility System,
refer to page
129
.
To change a space-saver spare tire, proceed
as follows:>Remove space-saver spare tire, refer to
the section after the next one>Prepare for tire change, refer to page
127
>Jack up the vehicle, refer to page
128
>Mount the space-saver spare tire, refer
to page
128
>Tighten the lug bolts, refer to page
128
>Drive with space-saver spare tire, refer to
page
127
.
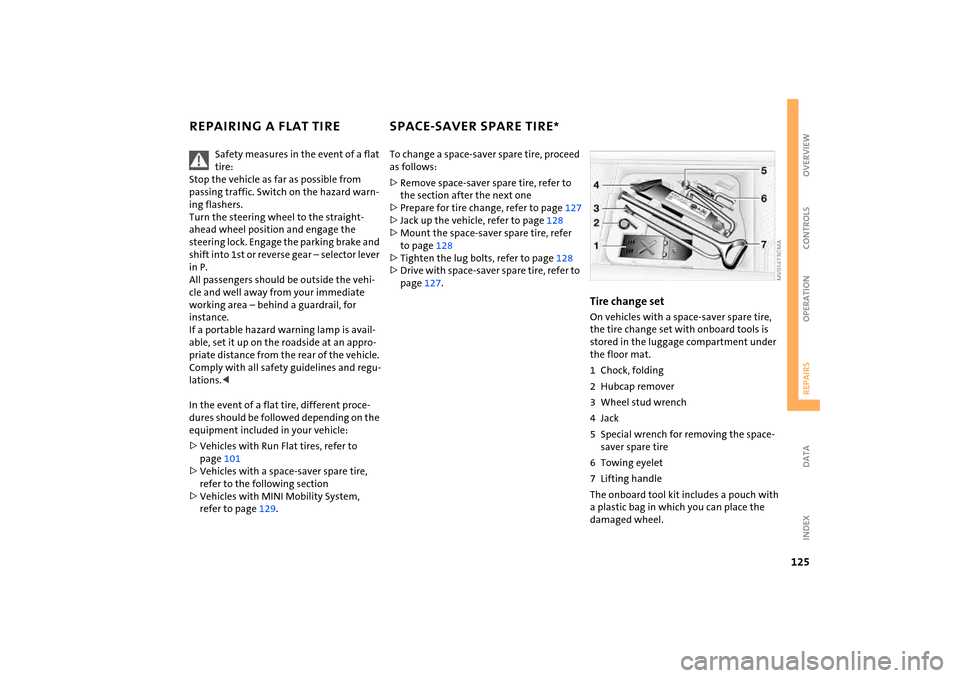
Tire change setOn vehicles with a space-saver spare tire,
the tire change set with onboard tools is
stored in the luggage compartment under
the floor mat.1 Chock, folding2 Hubcap remover3 Wheel stud wrench4Jack5 Special wrench for removing the space-
saver spare tire6 Towing eyelet7 Lifting handleThe onboard tool kit includes a pouch with
a plastic bag in which you can place the
damaged wheel.
Page 131 of 165

129
OVERVIEW REPAIRSOPERATION CONTROLS DATA INDEX
MINI MOBILITY SYSTEM
*
MINI Mobility SystemThe MINI Mobility System is provided to
help you repair a flat tire. With the help of
this system you can apply a liquid sealant
on the inside of the tire, which seals the
damaged area and enables you to continue
to drive. Preparing for tire repair
Before using the MINI Mobility Sys
-
tem read the warning and danger
precautions on the equipment.<
If possible, leave objects in which have
been forced into the tire.Take off the tag regarding speed limits and
stick it onto the steering wheel.Using the MINI Mobility SystemIn order to repair a flat tire with the MINI
Mobility System, proceed as follows:>Pump in liquid sealant, refer to page
130
>Reinflate the tire, refer to page
130
>Distribute liquid sealant, refer to
page
131
>Check tire inflation pressure, refer to
page
131
>Drive on, refer to page
131
.
MINI Mobility System with onboard tools The MINI Mobility System with tire change
set and onboard tools is located in the lug
-
gage compartment under the floor mat:
1Jack2 Wheel stud wrench3 Hubcap remover4 Wrench, screwdriver/Phillips screw
-
driver, towing eyelet5 Compressor, hose with manometer and
plug for cigarette lighter socket6 Package with filling hose, valve remover
and valve core7 Filling canister8 Hex wrench/screwdriver9 Adapter for wheel lug lock
Page 138 of 165

136
TOWING AND TOW-STARTINGUsing the towing eyelet The screw-in towing eyelet is stored in the
onboard tool kit, refer to page
120
; be sure
that it remains with the vehicle at all times.
It can be attached at the front or rear of
your vehicle.
To prevent damage to the towing eyelet and the vehicle, please observe
the following instructions:
Use only the towing eyelet supplied with
the vehicle and screw it in firmly until it
stops. Use the towing eyelet for towing on
paved roads only. Avoid subjecting the
towing eyelet to lateral loads, e.g. do not
lift the vehicle using the towing eyelet.<
Access to the threaded socket The illustration shows by way of example
the MINI COOPER and the MINI COOPER
Convertible.Pry out the cover in the front or rear
bumper by inserting a screwdriver into the
recess.Being towed
Make sure that the ignition key is in position
1; otherwise the steering
lock could engage and prevent the vehicle
from being steered. There is no power
assist while the engine is off. Therefore,
you will need to exert more force to brake
and steer the vehicle.<
Turn on the hazard warning flashers, if
required by national regulations. If the
electrical system has failed, clearly identify
the vehicle being towed, e.g. by placing a
sign or a warning triangle in the rear win
-
dow.MINI or MINI Convertible with manual
transmission:Put the manual gearshift lever in Neutral.MINI or MINI Convertible with Continu
-
ously Variable automatic Transmission
(CVT):
Only tow vehicles with Continuously Variable automatic Transmission
(CVT) with a tow truck, otherwise the trans
-
mission can be damaged, refer to
page
137
.<
Towing methodsIn some countries, it is not permitted to
tow the vehicle with a tow bar or tow rope
on public roads.Familiarize yourself with the applicable
towing regulations for the country in which
you are driving.
Page 139 of 165

137
OVERVIEW REPAIRSOPERATION CONTROLS DATA INDEX
TOWING AND TOW-STARTINGWith a tow bar:
The towing vehicle must not be lighter than the vehicle being towed;
otherwise, vehicle handling can no longer
be controlled.<
The towing eyelets of both vehicles should
be on the same side. If the tow bar can only
be used in a diagonal position, please note
the following:>Clearance and maneuverability will be
strictly limited in corners>The inclination of the tow bar produces
lateral force.
Only attach the tow bar to the towing eyelets. Other parts of the vehicles
could otherwise be damaged.<
With a tow rope: When the towing vehicle is driving off,
make sure that the tow rope is taut.
Use nylon ropes or straps for towing because they prevent sudden jerking
movements. Attach the tow rope only to
the towing eyelets. Other parts of the vehi
-
cles could otherwise be damaged.<
With a tow truck:Have the MINI or MINI Convertible trans
-
ported by a tow truck with a lift sling, or on
a flatbed.
Only tow vehicles with Continuously Variable automatic Transmission
(CVT) with the front wheels raised or on a
special transport vehicle, otherwise the
transmission can be damaged.
Do not lift the vehicle by the towing eyelet,
nor by parts of the body or chassis. Other
-
wise damage could result.<
Tow-starting
Do not tow-start vehicles with Con
-
tinuously Variable automatic Trans
-
mission (CVT).
Jump-starting, refer to page
134
.<
Only tow-start vehicles with catalytic con
-
verters if the engine is cold. It is better to
have the engine jump-started, refer to
page
134
.
1. Turn on the hazard warning flashers;
comply with national regulations2. Turn the ignition key to position
2
3. Engage the 3rd
gear
4. Have the vehicle towed with the clutch
pedal completely depressed and then
slowly release the clutch pedal. After the
engine has started, immediately depress
the clutch pedal again completely5. Pull over at a suitable location, remove
the tow bar or tow rope, and turn off the
hazard warning flashers6. Have the vehicle checked.
Page 150 of 165
EVERYTHING FROM A TO Z
148
A ABS Antilock Brake System
70
indicator lamp
17, 18
Accessories, refer to Your
individual vehicle
6
Activated-charcoal filter
80
Adjusting interior
temperature
76, 79
Air circulation, refer to
Recirculated air mode
76, 79
Air conditioning
air conditioning system
76
automatic climate control
79
Air conditioning system
75
Air distribution
air conditioning system
76
automatic climate control
79
Air outlets, refer to
Ventilation
77, 80
Air pressure, refer to Tire
inflation pressure
97
Air volume
air conditioning system
76
automatic climate control
79
Airbags
72
safe seating position
41
warning lamp
18
AKI, refer to Fuel quality
94
All Season traction Control
(ASC)
68
indicator lamps
17, 18
All-season tires, refer to Winter
tires
103
Antenna
114
Antifreeze
coolant
110
washer fluid
108
Antilock Brake System (ABS)
70
indicator lamp
17, 18
Anti-theft system
24
Approved axle load, refer to
Weights
143
, 144
Approved engine oils
109
Approved gross vehicle weight,
refer to Weights
143
, 144
ASC All Season traction
Control
68
indicator lamps
17, 18
Ashtray
81
Assistant systems, refer to
All Season traction Control
(ASC)
68
Dynamic Stability Control
(DSC)
69
AUTO program, refer to
Automatic air distribution
79
Automatic
air distribution
79
air volume
79
cruise control
61
Automatic car washes
113
Automatic climate control
78
Automatic transmission
with Steptronic
indicator lamp
56
interlock
51
selector lever lock
54
shiftlock
54
towing
136
tow-starting
137
Average consumption
67
setting units
67
Average speed
67
setting units
67
Axle loads, refer to
Weights
143
, 144
B Backrests, refer to
Adjusting seats
43
Backup lamp
54
bulb replacement
123
Bar, towing
137
Battery
132
charging
132
disposal
132
indicator lamp
16
jump-starting
134
power failure
132
Battery care
65, 112
Belts, refer to Safety belts
45
Beverage holders
81
Blower
air conditioning system
76
automatic climate control
79
Blower, refer to Air volume
76
Blowers, refer to Draft-free
ventilation
77, 80
Bonnet
105
indicator lamp
17
Bottle holders, refer to
Beverage holders
81
Brake discs
brake system
96
break-in procedures
92
Brake fluid
111
adding
111
level
96
warning lamp
16
Brake lamps, bulb
replacement
123
Brake pads
96
break-in procedures
92
warning lamp
18
Brake system
96
brake fluid
96
brake pads
96
break-in procedures
92
disc brakes
96
warning lamp
17
Brake wear warning
brake pads
96
warning lamp
18