ECU MINI Hardtop 2 Door 2006 Owner's Manual
[x] Cancel search | Manufacturer: MINI, Model Year: 2006, Model line: Hardtop 2 Door, Model: MINI Hardtop 2 Door 2006Pages: 168, PDF Size: 2.22 MB
Page 26 of 168

24
KEYS CENTRAL LOCKING SYSTEM
Depending on your vehicle's equipment
vesion, you will have received the following
keys:
1 Master keys with remote control
2 Spare key
Master keys with remote control
In every master key with remote control,
there is an extended-life battery as a power
supply that is charged automatically in the
ignition lock as you drive.
You should therefore use each master key at
least twice a year to maintain the charge sta-
tus.
Depending on which master key the vehicle
detects when it is unlocked, different settings
will be called up and executed inside the vehi-
cle, refer to Vehicle Memory on page49.
Spare key
For keeping in a safe place, e.g. in your wal-
let. This key is not intended for constant
use.
The concept
The central locking system is ready for
operation whenever the driver's door is
closed. The doors, the tailgate and the fuel
filler door are unlocked or locked.
The central locking system locks or unlocks
your vehicle:
>When operated from the outside via the
remote control as well as via the door
lock
>When operated from the inside via a
switch
>The vehicle is unlocked automatically
when the ignition key is pulled out of the
ignition switch.
If operated from outside, the anti-theft sys-
tem is activated at the same time. This pre-
vents the doors from being unlocked via
safety lock buttons or door handles.
In the event of a sufficiently severe acci-
dent, the central locking system unlocks
automatically. The hazard warning flashers
and interior lamps are also switched on.
Page 28 of 168

26
OPENING AND CLOSING: FROM OUTSIDE
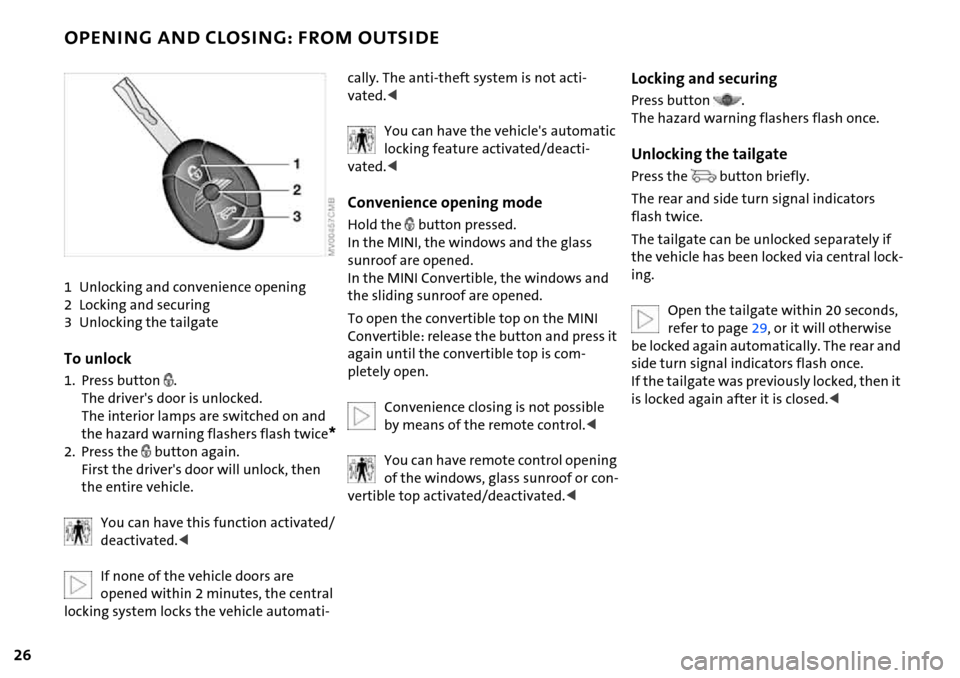
1 Unlocking and convenience opening
2 Locking and securing
3 Unlocking the tailgate
To unlock
1. Press button .
The driver's door is unlocked.
The interior lamps are switched on and
the hazard warning flashers flash twice
*
2. Press the button again.
First the driver's door will unlock, then
the entire vehicle.
You can have this function activated/
deactivated.<
If none of the vehicle doors are
opened within 2 minutes, the central
locking system locks the vehicle automati-
cally. The anti-theft system is not acti-
vated.<
You can have the vehicle's automatic
locking feature activated/deacti-
vated.<
Convenience opening mode
Hold the button pressed.
In the MINI, the windows and the glass
sunroof are opened.
In the MINI Convertible, the windows and
the sliding sunroof are opened.
To open the convertible top on the MINI
Convertible: release the button and press it
again until the convertible top is com-
pletely open.
Convenience closing is not possible
by means of the remote control.<
You can have remote control opening
of the windows, glass sunroof or con-
vertible top activated/deactivated.<
Locking and securing
Press button .
The hazard warning flashers flash once.
Unlocking the tailgate
Press the button briefly.
The rear and side turn signal indicators
flash twice.
The tailgate can be unlocked separately if
the vehicle has been locked via central lock-
ing.
Open the tailgate within 20 seconds,
refer to page29, or it will otherwise
be locked again automatically. The rear and
side turn signal indicators flash once.
If the tailgate was previously locked, then it
is locked again after it is closed.<
Page 39 of 168

37
OVERVIEW REPAIRS OPERATIONCONTROLS DATA INDEX
CONVERTIBLE TOP WITH INTEGRATED SLIDING SUNROOF
Checking
>The LED lights up during convertible top
operation until the opening or closing
procedure is completely finished
>The LED flashes after the button has
been released.
The opening or closing procedure is not
completely finished; additionally, a sig-
nal sounds.
The procedure can be continued in the
desired direction by pressing the appro-
priate button
>The LED flashes rapidly. The convertible
top cannot be operated.
The luggage compartment cover is not in
its lower position, refer to page89, or the
loading aid is not correctly locked, refer
to page89.
Interruption
The automatic movement is immediately
interrupted when the buttons for convert-
ible top operation are released. The proce-
dure can be continued in the desired direc-
tion by pressing the appropriate buttons.
If the opening or closing procedure is inter-
rupted by releasing the respective button,
the convertible top stays in its current posi-
tion for several seconds before it slowly
moves into a more stable position. The pro-
cedure can be continued by pressing the
appropriate button.
Movement is also interrupted when there
is a mechanical blockage. In this case, in
order to operate the convertible top again:
1. Turn off the ignition and then switch it
on again
2. Press the button to continue the proce-
dure in the desired direction.
Opening and closing procedure
Do not interrupt and restart the clos-
ing procedure several times one after
another, or the convertible top mechanism
could be damaged.<
If the convertible top can be moved in
only one direction after several con-
secutive attempts to operate it, the con-
vertible top system has overheated. Allow
the system to cool down for approx.
20 minutes.<
If the battery is disconnected, e.g. for
changing batteries or vehicle storage,
reinitialize the power windows, refer to
page32. Otherwise the windows will not
be lowered when the convertible top is
opened.<
Convenience operation
For convenience operation using the
remote control refer to page26, for opera-
tion via the door lock refer to page27.
Page 42 of 168

40
WIND DEFLECTOR*
With the convertible top open, the wind
deflector keeps air movement in the pas-
senger compartment to a minimum, thus
providing you with a pleasant drive, even at
higher speeds. The wind deflector comes
folded in a protective pouch and can be
stored in the luggage compartment.
Do not allow the wind deflector to
come into contact with sharp objects,
as the net could otherwise be damaged. Do
not place any objects on the installed wind
deflector. When storing the wind deflector
in the luggage compartment, make sure
that it cannot be damaged by other
objects.<
Before installing
1. Take the wind deflector out of the pouch
2. Fold out the wind deflector, arrow 1
3. Press the locking device together until it
engages, arrow 2.
Installing and folding up
1. Slide out securing pins 1 and 2 on one
side until they engage
2. Insert the wind deflector with the secur-
ing pins into the designated openings on
the corresponding side of the vehicle
3. Slide securing pins 1 and 2 on the other
side into the designated openings until
they engage
4. Fold up the upper part of the wind
deflector.
If a seat is in its rearmost position, do
not recline the backrest too far, oth-
erwise the wind deflector could be dam-
aged.<
Page 43 of 168

41
OVERVIEW REPAIRS OPERATIONCONTROLS DATA INDEX
WIND DEFLECTOR*
Removing
1. Fold down the upper part of the wind
deflector
2. Push back securing pin 1. To do so, turn
the handle forward, see arrow 1, and
push it back, see arrow 2
3. Push back securing pin 2 and remove the
wind deflector.
Collapsing
1. To unlock, push the handle of the secur-
ing pin on the side into its rearmost posi-
tion, see arrow 1
2. Collapse the wind deflector, see
arrows 2.
Adjusting screws
The gap between the wind deflector and
the side trim panel can be adjusted using
the adjusting screw.
Page 45 of 168

43
OVERVIEW REPAIRS OPERATIONCONTROLS DATA INDEX
SEAT ADJUSTMENT
Important adjustment information
Never try to adjust your seat while
operating the vehicle. The seat could
respond with an unexpected movement,
and the ensuing loss of vehicle control
could lead to an accident.
While driving, do not recline the backrest
too far toward the rear; this especially
applies to the front passenger seat. Other-
wise there is a risk that you will slide under
the safety belt in an accident, thus reducing
the protection provided by the safety
belt.<
Comply with the instructions on head
restraint height adjustment on page44
and on damaged safety belts on page47.
Longitudinal adjustment
1. Lift the handle
2. Push the seat into the desired position
3. After releasing the handle, apply pres-
sure to the seat to ensure that the latch
engages securely.
Height adjustment
1. To raise:
Pull the handle up repeatedly, continu-
ing until the seat reaches the desired
height
2. To lower:
Push the handle repeatedly, continuing
until the seat reaches the desired height.
Page 52 of 168

50
TRANSPORTING CHILDREN SAFELY
The proper place for children
Do not leave children unattended in
the vehicle; otherwise they could
endanger themselves and others by open-
ing the doors, for example.<
In principle, all seats in your MINI or MINI
Convertible except for the driver's seat are
suitable for installing universal child-
restraint systems for all age groups that
have been approved for the age group in
question.
Children should always sit in the rear
Accident research shows that the safest
place for children is on the rear seats.
Only transport children under the age
of 13 or smaller than 5 ft/150 cm in
the rear in a child-restraint system suitable
for their age, weight and size. Otherwise
there is an increased risk of injury in the
event of an accident.<
Children 13 years of age or older must wear
a fastened safety belt as soon as a child-
restraint system is no longer suitable due
to their age, size or weight.
All rear seat positions in your vehicle meet
the recommendations of the SAE J1819 stan-
dard for securely mounting child-restraint
systems in motor vehicles.
Exception for the front passenger seat
Should it be necessary to use a child-
restraint system on the front passen-
ger seat, the front and side airbags for the
front passenger must be deactivated. Oth-
erwise, there is a significant risk of injury to
the child if the airbags deploy, even if the
child is seated in a child-restraint system.
Your MINI Dealer will be glad to advise
you.<
For additional information on automatic
deactivation of the front passenger airbags,
refer to page75.
Installing child-restraint systems
Always follow the manufacturer's
instructions when selecting, install-
ing and using child-restraint systems; oth-
erwise the system's protective effect could
be diminished.<
Commercially available child-restraint sys-
tems are designed to be secured with a lap
belt or with the lap-belt section of a lap-
and-shoulder belt. Incorrectly or improperly
installed child-restraint systems can
increase the risk of injury to children.
Always follow the instructions on installing
the system precisely.
Page 53 of 168

51
OVERVIEW REPAIRS OPERATIONCONTROLS DATA INDEX
TRANSPORTING CHILDREN SAFELY
Child seat security
All rear safety belts and the safety belt for
the front passenger can be prevented from
being pulled out in order to secure child-
restraint systems.
To lock the safety belt
1. Secure the child-restraint system with
the belt
2. Pull the belt strap all the way out
3. Allow the belt strap to retract and pull it
taut against the child-restraint system.
The safety belt is locked.
To unlock the safety belt
1. Open the seat belt buckle
2. Remove the child-restraint system
3. Allow the belt strap to retract all the way.
Child-restraint systems with tether
strap
As an example, the illustration shows the
MINI COOPER and the MINI COOPER S.
There are two additional anchors for child-
restraint systems with tether straps.
Guiding the tether strap
1. Slide the head restraint up
2. Guide the tether strap through the
mounting for the head restraint
3. Push the head restraint into its lower-
most position.
Page 60 of 168

58
AUTOMATIC TRANSMISSION WITH STEPTRONIC*
Switching from M/S + – Manual mode into
the selector lever positions P, R and N is
only possible via D.
Shifting with the selector lever
>Press selector lever briefly towards +:
Transmission shifts upwards
>Press selector lever briefly towards –:
Transmission shifts downwards.
M1 to M6 appear in the gear indicator.
Shifting on the steering wheel*
The shift paddles allow the gears to be
changed rapidly and, above all, safely, since
both hands can remain on the steering
wheel.
To shift up or down with one of the two
shift paddles:
>Pull the shift paddle:
Transmission shifts up
>Press the shift paddle:
Transmission shifts down.
M1 to M6 appear in the gear indicator.
The transmission will only execute upshifts
or downshifts that will result in a plausible
combination of vehicle speed and engine
rpm, e.g. downshifts that would result in
excessive engine speed are not executed.
In the MINI COOPER S, with the selec-
tor lever in position D, automatic
mode, you can shift gears using the shift
paddles on the steering wheel. The trans-
mission automatically switches to manual
mode. If you do not shift gears with the
shift paddles or accelerate for a certain
amount of time, the transmission auto-
matically returns to automatic mode.<
Malfunction
EP appears on the display. The transmission
system is malfunctioning. Avoid high loads.
All selector lever positions can still be
engaged; in the forward driving positions,
however, the vehicle can only be driven
with a limited gear selection.
Have the system checked immediately.
Jump-starting and towing, refer to
page140 ff.
Page 88 of 168

86
INTEGRATED UNIVERSAL REMOTE CONTROL*
The concept
The integrated universal remote control
takes the place of up to three different con-
trol devices for different radio-remote-con-
trolled systems such as gate openers and
household alarm systems. The integrated
universal remote control detects and learns
the signal transmitted by the original con-
trol device.
The signal of an original control device can
be programmed onto one of the three
memory buttons 1. The system in question
can then be operated by means of the pro-
grammed memory button 1. Signal trans-
mission is indicated by LED 2.
If you decide to sell your vehicle one day, in
the interest of your own security, remem-
ber to delete the programs before the vehi-
cle leaves your possession, refer to page87.
While programming is in progress
and before operating any pro-
grammed system by remote control using
the integrated universal remote control,
make sure that the movement area of the
system in question is clear of people, ani-
mals and inanimate obstructions, in order
to avoid possible injury or damage. Also
comply with the safety precautions issued
for the original control device.<
Checking compatibility
If this symbol is shown on the pack-
aging or in the operating instruc-
tions of the original control device,
it is safe to assume that the remote-con-
trolled system is compatible with the inte-
grated universal remote control.
If you have any additional question,
please contact your MINI Dealer or
call: 1-800-355-3515.
You can also find more information on the
Internet at
www.miniusa.com or
www.homelink.com.
HomeLink is a registered trademark of
Johnson Controls, Inc.<
Programming
1 Memory buttons
2LED
Fixed-code control device
1. Switch on the ignition
2. During initial operation: press both
outer buttons 1 for approx. 20 seconds
until LED 2 flashes. This clears all three
memory buttons 1
3. Hold the original control device approx.
2 to 8 in/5 to 20 cm away from memory
buttons 1.
The required distance between the
control device and memory
buttons 1 may vary, depending on the
system of the original control device in
question.<