key MINI Hardtop 2 Door 2006 Owner's Manual
[x] Cancel search | Manufacturer: MINI, Model Year: 2006, Model line: Hardtop 2 Door, Model: MINI Hardtop 2 Door 2006Pages: 168, PDF Size: 2.22 MB
Page 4 of 168
CONTENTS
2
© 2005 Bayerische Motoren Werke
Aktiengesellschaft
Munich, Germany
Reprinting, including excerpts, only with the
written consent of BMW AG, Munich.
Order No. 01 41 0 159 801
US-English VIII/05
Printed in Germany
Printed on environmentally friendly paper,
bleached without chlorine, suitable for recycling.
NOTES
About this Owner's Manual6
Additional sources of information6
Symbols used6
Your individual vehicle6
Editorial notice7
For your own safety7
Symbol on vehicle parts8
Service and warranty8
Reporting safety defects9
OVERVIEW
Cockpit12
Display elements13
Display elements with navigation system
or Cockpit Chrono Pack14
Indicator and warning lamps16
Multifunction steering wheel20
CONTROLS
Opening and closing:
Keys24
Central locking system24
Opening and closing: from outside25
Opening and closing: from inside28
Tailgate29
Electric power windows31
Glass sunroof, electric33
Roller sun blind34
Convertible top with integrated sliding
sunroof35
Wind deflector40
Adjustments:
Safe seating position42
Seat adjustment43
Head restraints44
Entry to the rear45
Safety belts46
Seat heating47
Steering wheel47
Mirrors48
Vehicle Memory49
Transporting children safely50
Page 18 of 168
16
INDICATOR AND WARNING LAMPS
Technology that monitors itself
The system runs a check on the indicator
and warning lamps marked by
+ when you
turn the key in the ignition lock. They each
light up once for different periods of time.
If a malfunction should occur in one of
these systems, the corresponding lamp
does not go out after the engine is started
or it lights up while the vehicle is moving.
You will see below the correct way to react
to this.
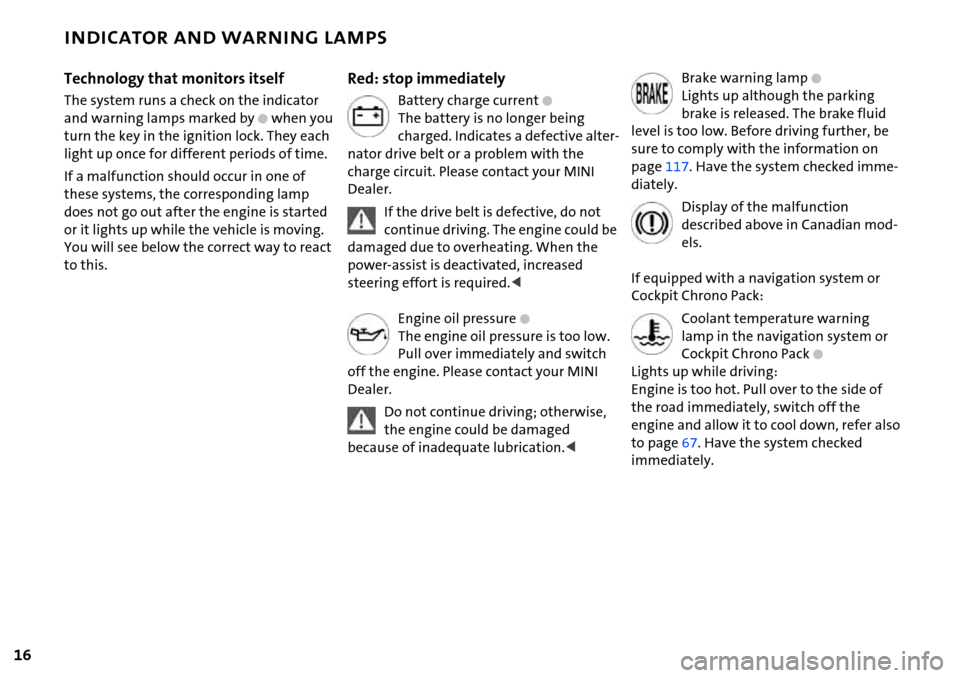
Red: stop immediately
Battery charge current+
The battery is no longer being
charged. Indicates a defective alter-
nator drive belt or a problem with the
charge circuit. Please contact your MINI
Dealer.
If the drive belt is defective, do not
continue driving. The engine could be
damaged due to overheating. When the
power-assist is deactivated, increased
steering effort is required.<
Engine oil pressure
+
The engine oil pressure is too low.
Pull over immediately and switch
off the engine. Please contact your MINI
Dealer.
Do not continue driving; otherwise,
the engine could be damaged
because of inadequate lubrication.<
Brake warning lamp+
Lights up although the parking
brake is released. The brake fluid
level is too low. Before driving further, be
sure to comply with the information on
page117. Have the system checked imme-
diately.
Display of the malfunction
described above in Canadian mod-
els.
If equipped with a navigation system or
Cockpit Chrono Pack:
Coolant temperature warning
lamp in the navigation system or
Cockpit Chrono Pack
+
Lights up while driving:
Engine is too hot. Pull over to the side of
the road immediately, switch off the
engine and allow it to cool down, refer also
to page67. Have the system checked
immediately.
Page 19 of 168
17
OVERVIEW REPAIRS OPERATION CONTROLS DATA INDEX
INDICATOR AND WARNING LAMPS
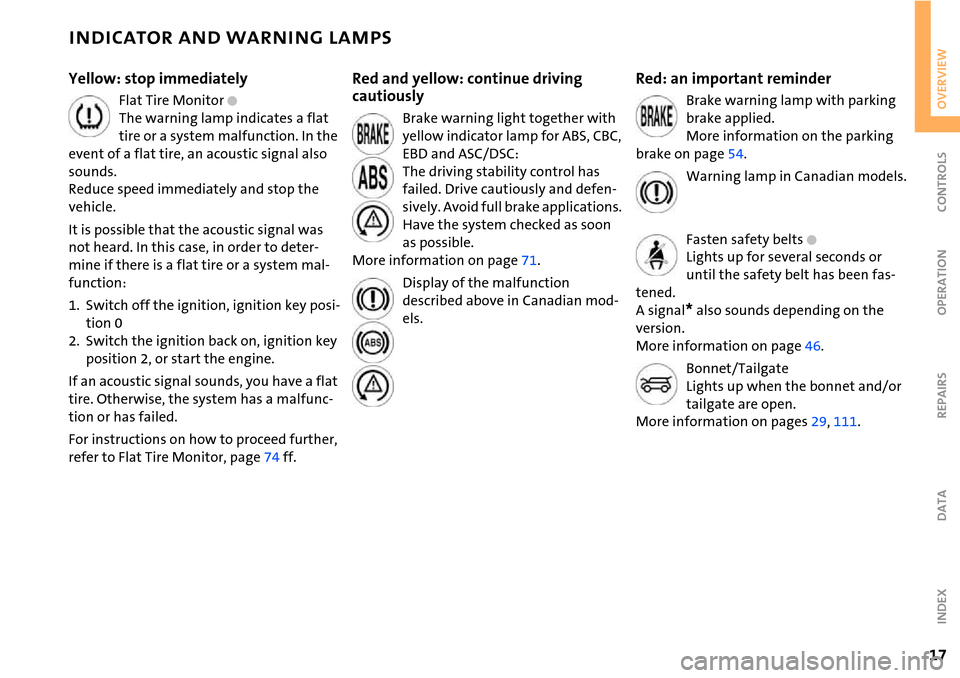
Yellow: stop immediately
Flat Tire Monitor +
The warning lamp indicates a flat
tire or a system malfunction. In the
event of a flat tire, an acoustic signal also
sounds.
Reduce speed immediately and stop the
vehicle.
It is possible that the acoustic signal was
not heard. In this case, in order to deter-
mine if there is a flat tire or a system mal-
function:
1. Switch off the ignition, ignition key posi-
tion 0
2. Switch the ignition back on, ignition key
position 2, or start the engine.
If an acoustic signal sounds, you have a flat
tire. Otherwise, the system has a malfunc-
tion or has failed.
For instructions on how to proceed further,
refer to Flat Tire Monitor, page74 ff.
Red and yellow: continue driving
cautiously
Brake warning light together with
yellow indicator lamp for ABS, CBC,
EBD and ASC/DSC:
The driving stability control has
failed. Drive cautiously and defen-
sively. Avoid full brake applications.
Have the system checked as soon
as possible.
More information on page71.
Display of the malfunction
described above in Canadian mod-
els.
Red: an important reminder
Brake warning lamp with parking
brake applied.
More information on the parking
brake on page54.
Warning lamp in Canadian models.
Fasten safety belts
+
Lights up for several seconds or
until the safety belt has been fas-
tened.
A signal
* also sounds depending on the
version.
More information on page46.
Bonnet/Tailgate
Lights up when the bonnet and/or
tailgate are open.
More information on pages29, 111.
Page 26 of 168

24
KEYS CENTRAL LOCKING SYSTEM
Depending on your vehicle's equipment
vesion, you will have received the following
keys:
1 Master keys with remote control
2 Spare key
Master keys with remote control
In every master key with remote control,
there is an extended-life battery as a power
supply that is charged automatically in the
ignition lock as you drive.
You should therefore use each master key at
least twice a year to maintain the charge sta-
tus.
Depending on which master key the vehicle
detects when it is unlocked, different settings
will be called up and executed inside the vehi-
cle, refer to Vehicle Memory on page49.
Spare key
For keeping in a safe place, e.g. in your wal-
let. This key is not intended for constant
use.
The concept
The central locking system is ready for
operation whenever the driver's door is
closed. The doors, the tailgate and the fuel
filler door are unlocked or locked.
The central locking system locks or unlocks
your vehicle:
>When operated from the outside via the
remote control as well as via the door
lock
>When operated from the inside via a
switch
>The vehicle is unlocked automatically
when the ignition key is pulled out of the
ignition switch.
If operated from outside, the anti-theft sys-
tem is activated at the same time. This pre-
vents the doors from being unlocked via
safety lock buttons or door handles.
In the event of a sufficiently severe acci-
dent, the central locking system unlocks
automatically. The hazard warning flashers
and interior lamps are also switched on.
Page 27 of 168

25
OVERVIEW REPAIRS OPERATIONCONTROLS DATA INDEX
OPENING AND CLOSING: FROM OUTSIDE
Via remote control
When the vehicle is unlocked or locked, the
anti-theft system is also deactivated/acti-
vated and the interior lamp is switched on/
off.
People or animals could lock the
doors from the inside. Always take
the vehicle keys with you so that the vehi-
cle can be opened again from the outside at
any time.<
For US owners only
The transmitter and receiver units comply
with part 15 of the FCC, Federal Communi-
cations Commission, regulations. Opera-
tion is governed by the following:
FCC ID: LX8765S
LX8765E
LX8CAS
Compliance statement:
This device complies with part 15 of the
FCC Rules. Operation is subject to the fol-
lowing two conditions:
>This device may not cause harmful inter-
ference, and
>this device must accept any interference
received, including interference that may
cause undesired operation.
Any unauthorized modifications or
changes to these devices could void
the user's authority to operate this equip-
ment.<
Page 29 of 168

27
OVERVIEW REPAIRS OPERATIONCONTROLS DATA INDEX
OPENING AND CLOSING: FROM OUTSIDE
Malfunction
Local radio waves can interfere with func-
tions of the remote control.
If this occurs, lock and unlock the vehicle
via a door lock.
In the event of a system malfunction,
please contact your MINI Dealer. You can
also obtain replacement keys there.
If it is no longer possible to lock the
vehicle with the remote control, then
the battery is discharged. Use the corre-
sponding key for a longer journey so that
its battery can be recharged.<
Via the door lock
1. Turn the key.
The driver's door is unlocked.
2. Turn the key again.
All other doors, the tailgate and the fuel
filler door are unlocked.
You can have this function activated/
deactivated.<
When the vehicle is locked, the hazard
warning flashers flash once.
When the vehicle is unlocked, the hazard
warning flashers flash twice
*.
Manual operation
In the event of an electrical malfunction,
the driver's door can be unlocked or locked
by turning the key in the door lock to the
end positions.
Convenience closing via the door lock
You can also close the power windows,
glass sunroof or the convertible top via the
door lock.
With the door closed, hold the key in the
locking position.
In the MINI Convertible, the convertible top
is closed first and then the side windows.
You can have the closing of the win-
dows and glass sunroof via the door
lock activated/deactivated.<
Page 30 of 168

28
OPENING AND CLOSING: FROM INSIDE
This switch locks or unlocks the doors and
tailgate when the front doors are closed,
but the anti-theft system is not activated.
The fuel filler door remains unlocked.
To lock
>Briefly press the switch downward or
>push down the safety lock button on the
passenger door. To prevent yourself from
being locked outside the vehicle acciden-
tally, the driver's door cannot be locked
with its safety lock button while it is
open.
After you have driven off, the central
locking system automatically locks
your vehicle once a certain speed has been
reached.<
You can have this function activated/
deactivated and the speed set.<
People or animals inside the vehicle
could lock the doors from the inside.
Always take the vehicle's keys with you so
that you can open the vehicle again from
the outside at any time.<
To unlock and open the doors
1. Briefly press the switch upward
2. Pull the respective door handle over the
armrest or pull the door handle for each
door twice:
The first pull unlocks the door, the sec-
ond pull opens it.
Convenience opening mode
Press the central locking switch and hold it
pressed.
MINI:
Windows and glass sunroof are opened.
MINI Convertible:
Windows and sliding sunroof are opened.
To open the convertible top:
Release the switch, then press it upwards
until the convertible top is completely open
and the windows are again closed.
Page 32 of 168
30
TAILGATE
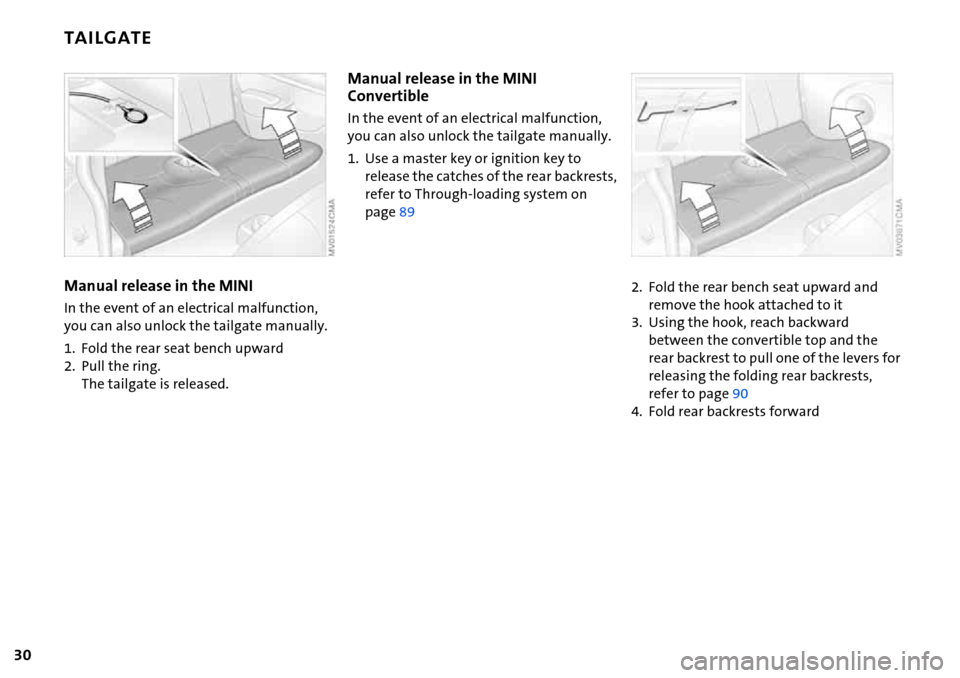
Manual release in the MINI
In the event of an electrical malfunction,
you can also unlock the tailgate manually.
1. Fold the rear seat bench upward
2. Pull the ring.
The tailgate is released.
Manual release in the MINI
Convertible
In the event of an electrical malfunction,
you can also unlock the tailgate manually.
1. Use a master key or ignition key to
release the catches of the rear backrests,
refer to Through-loading system on
page89
2. Fold the rear bench seat upward and
remove the hook attached to it
3. Using the hook, reach backward
between the convertible top and the
rear backrest to pull one of the levers for
releasing the folding rear backrests,
refer to page90
4. Fold rear backrests forward
Page 33 of 168
31
OVERVIEW REPAIRS OPERATIONCONTROLS DATA INDEX
TAILGATE ELECTRIC POWER WINDOWS
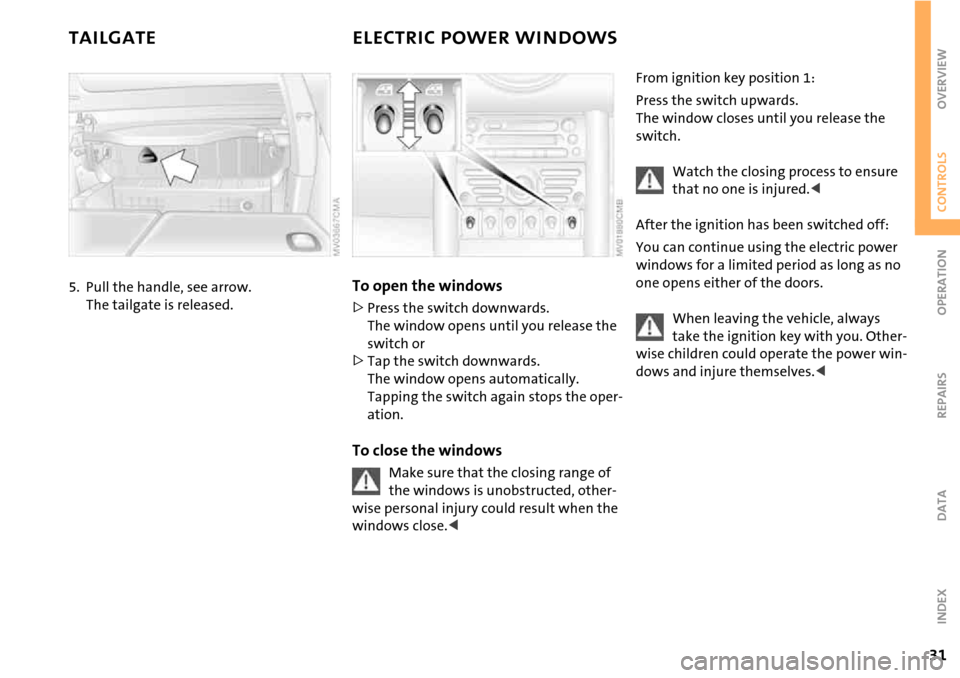
5. Pull the handle, see arrow.
The tailgate is released.To open the windows
>Press the switch downwards.
The window opens until you release the
switch or
>Tap the switch downwards.
The window opens automatically.
Tapping the switch again stops the oper-
ation.
To close the windows
Make sure that the closing range of
the windows is unobstructed, other-
wise personal injury could result when the
windows close.<
From ignition key position 1:
Press the switch upwards.
The window closes until you release the
switch.
Watch the closing process to ensure
that no one is injured.<
After the ignition has been switched off:
You can continue using the electric power
windows for a limited period as long as no
one opens either of the doors.
When leaving the vehicle, always
take the ignition key with you. Other-
wise children could operate the power win-
dows and injure themselves.<
Page 35 of 168
33
OVERVIEW REPAIRS OPERATIONCONTROLS DATA INDEX
GLASS SUNROOF, ELECTRIC*
To raise
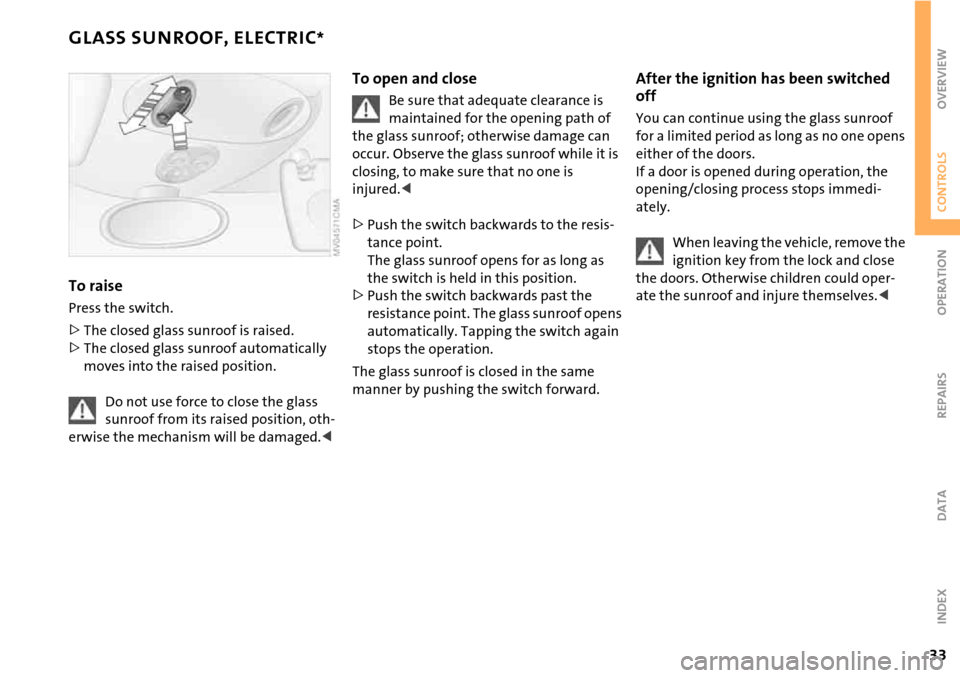
Press the switch.
>The closed glass sunroof is raised.
>The closed glass sunroof automatically
moves into the raised position.
Do not use force to close the glass
sunroof from its raised position, oth-
erwise the mechanism will be damaged.<
To open and close
Be sure that adequate clearance is
maintained for the opening path of
the glass sunroof; otherwise damage can
occur. Observe the glass sunroof while it is
closing, to make sure that no one is
injured.<
>Push the switch backwards to the resis-
tance point.
The glass sunroof opens for as long as
the switch is held in this position.
>Push the switch backwards past the
resistance point. The glass sunroof opens
automatically. Tapping the switch again
stops the operation.
The glass sunroof is closed in the same
manner by pushing the switch forward.
After the ignition has been switched
off
You can continue using the glass sunroof
for a limited period as long as no one opens
either of the doors.
If a door is opened during operation, the
opening/closing process stops immedi-
ately.
When leaving the vehicle, remove the
ignition key from the lock and close
the doors. Otherwise children could oper-
ate the sunroof and injure themselves.<