ESP MINI Hardtop 2 Door 2007 Owner's Guide
[x] Cancel search | Manufacturer: MINI, Model Year: 2007, Model line: Hardtop 2 Door, Model: MINI Hardtop 2 Door 2007Pages: 148, PDF Size: 2.43 MB
Page 101 of 148

ReferenceAt a glance Controls Driving tips Mobility
99
Exhaust emission values
The warning lamps light up. The exhaust
emission values have turned poor and
there is a danger of engine damage. You
can continue your journey, but moder-
ate your speed and exercise due caution. Have
the car checked as soon as possible.
Canadian models display these warning
lamps.
Under certain conditions one of the lamps
flashes or stays lit continuously. This indicates
excessive misfiring or a malfunction in the
engine. If this happens, reduce your speed and
visit the nearest MINI Dealer as soon as possible.
Severe misfiring can quickly lead to serious dam-
age of emissions-related components, espe-
cially the catalytic converter. In addition,
mechanical engine components can become
damaged.
If the fuel filler cap is not properly tightened, the
OBD system may conclude that fuel vapors are
escaping, causing an indicator to light up. If the
filler cap is then tightened, the indicator should
go out within a few days.
Event data recorders
Your vehicle may be equipped with one or sev-
eral measuring or diagnostic modules or a
device for recording or sending certain vehicle
data or information.
Page 102 of 148

Care
100
Care
Suitable car-care products
Use the cleaning and car-care products
available at your MINI Dealer.<
Cleaning agents may contain hazardous
or health-damaging substances. Follow
the warning and hazard instructions on the
packaging. For interior cleaning, always open
the doors or windows of the vehicle.
Do not use any products that are not intended
for cleaning the vehicle.<
Washing your vehicle
You can wash your new MINI in an automatic car
wash from the first day. Preference should be
given to cloth car washes. If, due to lack of avail-
ability, brush car washes must be used, modern
systems with soft brushes should be given pref-
erence.
When using steam jets or high-pressure
washers, ensure that you maintain a suffi-
cient distance to the vehicle. If the jet is too close
or the pressure is too high, this can lead to dam-
age or initial damage that can develop into more
serious damage. Water that enters vehicle com-
ponents can lead to damage over the long term.
After washing the vehicle, apply the brakes
briefly to dry them, otherwise water can reduce
braking efficiency over the short term and the
brake rotors can corrode.
Switch the rain sensor off when passing through
an automatic car wash, page40. Failure to do so
could result in damage caused by undesired
wiper activation.<
Rod antenna
If necessary, for example before entering a car
w a s h o r a g a r a g e w i t h a n e l e v a t o r r a m p , r e m o v e
the rod antenna.
Headlamps
Do not wipe dry and do not use abrasive or cor-
rosive cleaning agents. Remove dirt and con-
tamination, such as insects, by soaking with
shampoo and then rinsing with plenty of water. Always use a deicer spray to remove accumu-
lated ice and snow; never use a scraper. Use
window de-icers.
Vehicle paintwork
Regular care contributes greatly to driving safety
and value retention.
Environmental influences varying from one
region to the next can affect the vehicle paint-
work. Base the frequency and scope of car care
on these various influences.
Care of upholstery
Depressions that come about on the upholstery
material of the seats in daily use can be brushed
out using a slightly damp brush against the
grain.
The fact that velour lays down is not a quality
defect but rather is inevitable, as it is with home
textiles or clothing.
In the case of strong sunlight and longer parking
periods, cover the seats or all windows to pre-
vent discoloration.
Care of special parts
Light-alloy wheels*
Especially in the winter months, care for the
wheel rims with wheel rim cleaner. Do not use
acidic, strongly alkaline and abrasive cleaning
agents or steam jets. Follow the manufacturer's
instructions.
Chrome parts*
Carefully clean vehicle parts such as the radiator
grill and door handles with copious quantities of
water and, if necessary, a shampoo additive,
especially when contaminated with road salt.
For additional treatment, use chrome polish.
Rubber parts
Treat only with water or rubber care products.
Page 118 of 148

Indicator and warning lamps
116
Indicator and warning lamps
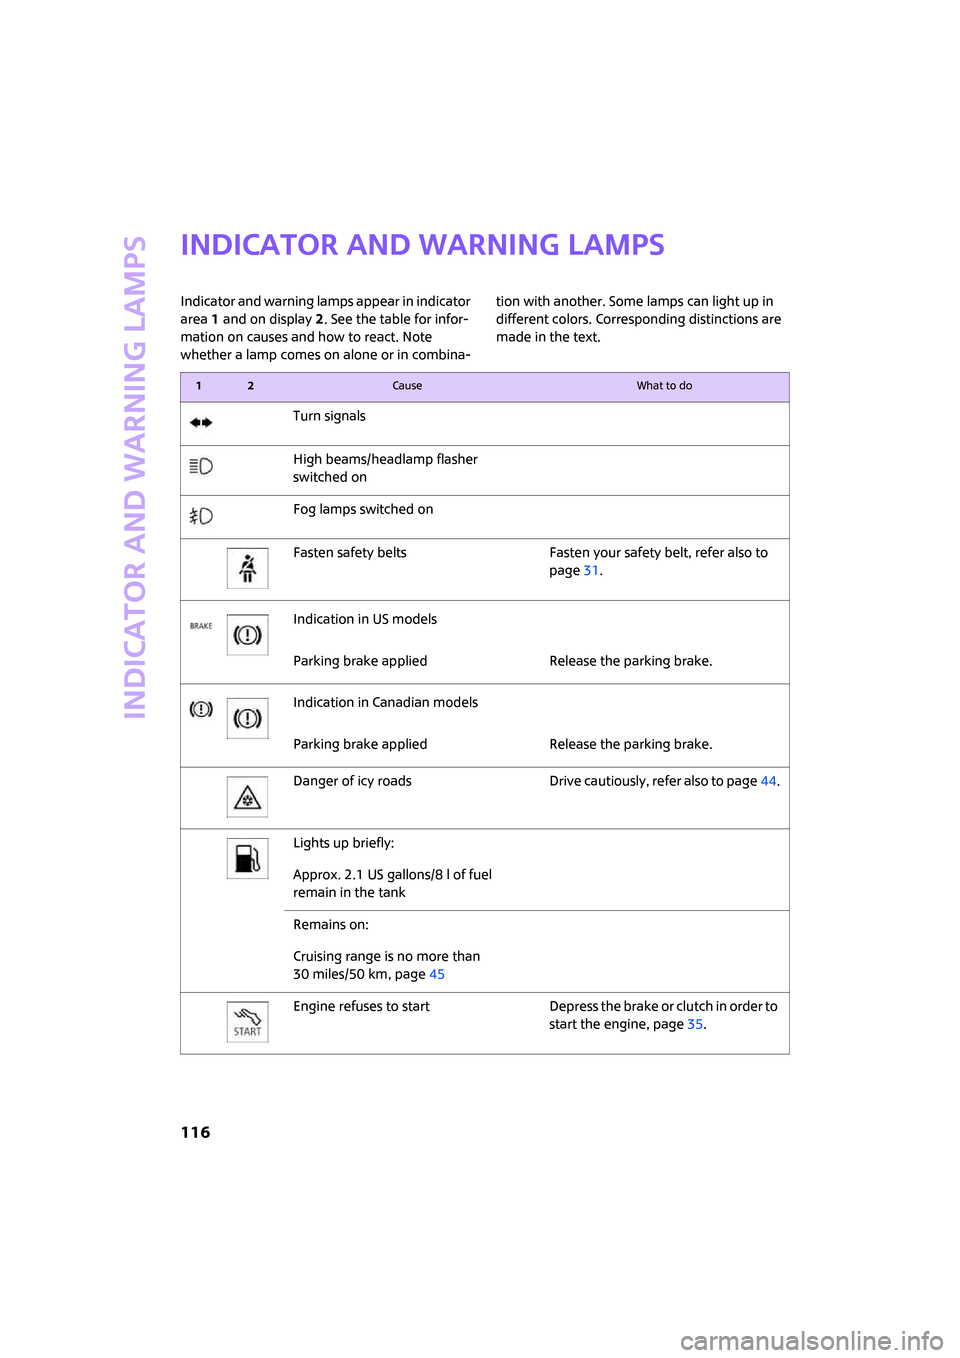
Indicator and warning lamps appear in indicator
area 1 and on display 2. See the table for infor-
mation on causes and how to react. Note
whether a lamp comes on alone or in combina-tion with another. Some lamps can light up in
different colors. Corresponding distinctions are
made in the text.
12Cause What to do
Turn signals
High beams/headlamp flasher
switched on
Fog lamps switched on
Fasten safety belts Fasten your safety belt, refer also to
page31.
Indication in US models
Parking brake applied Release the parking brake.
Indication in Canadian models
Parking brake applied Release the parking brake.
Danger of icy roads Drive cautiously, refer also to page44.
Lights up briefly:
Approx. 2.1 US gallons/8 l of fuel
remain in the tank
Remains on:
Cruising range is no more than
30 miles/50 km, page45
Engine refuses to start Depress the brake or clutch in order to
start the engine, page35.
Page 120 of 148

Indicator and warning lamps
118
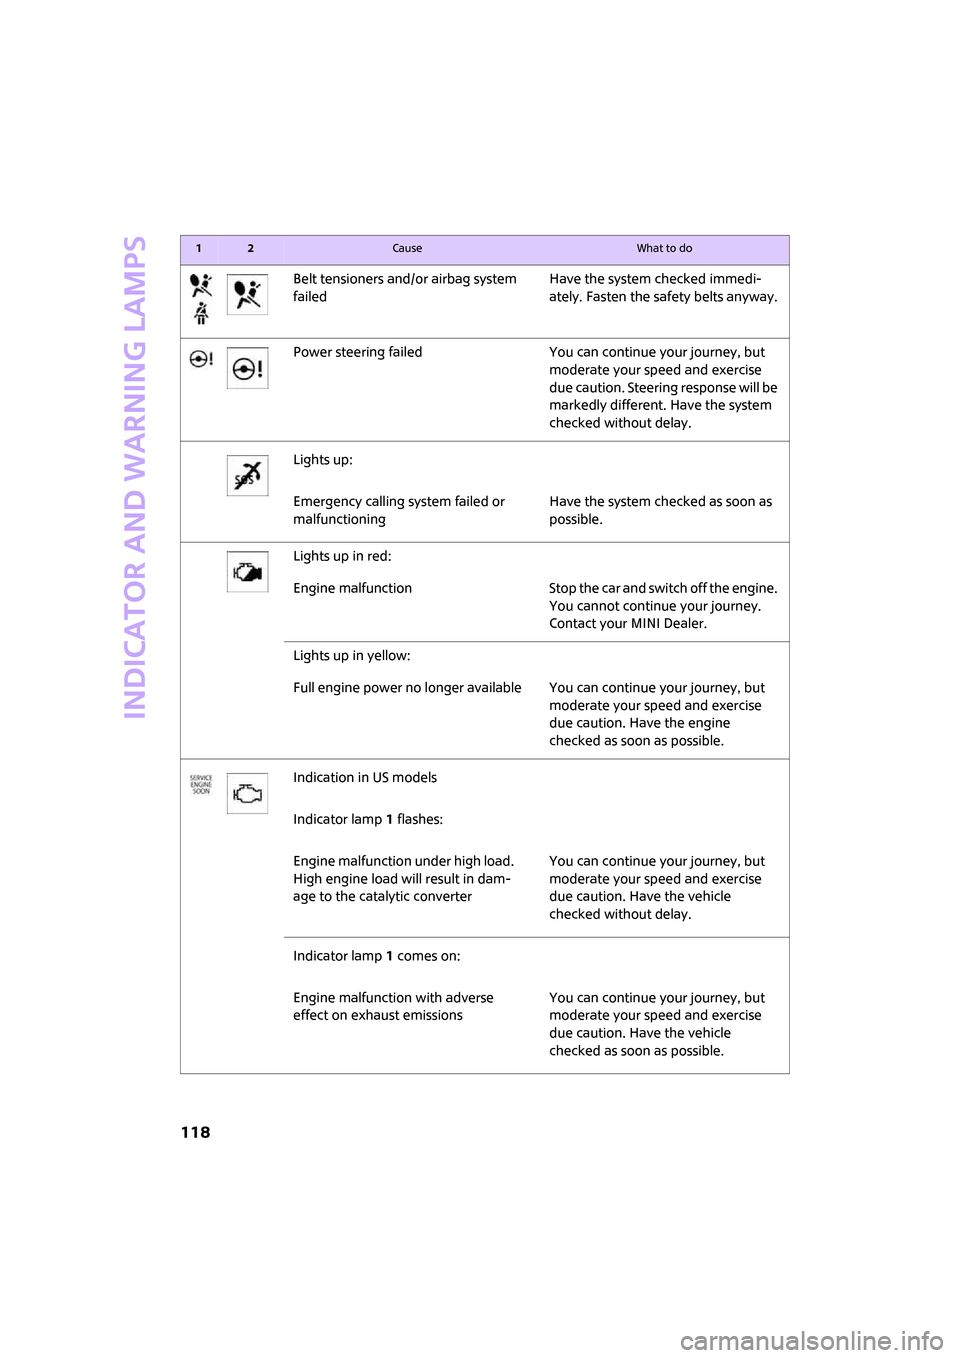
Belt tensioners and/or airbag system
failedHave the system checked immedi-
ately. Fasten the safety belts anyway.
Power steering failed You can continue your journey, but
moderate your speed and exercise
due caution. Steering response will be
markedly different. Have the system
checked without delay.
Lights up:
Emergency calling system failed or
malfunctioningHave the system checked as soon as
possible.
Lights up in red:
Engine malfunction Stop the car and switch off the engine.
You cannot continue your journey.
Contact your MINI Dealer.
Lights up in yellow:
Full engine power no longer available You can continue your journey, but
moderate your speed and exercise
due caution. Have the engine
checked as soon as possible.
Indication in US models
Indicator lamp1 flashes:
Engine malfunction under high load.
High engine load will result in dam-
age to the catalytic converterYou can continue your journey, but
moderate your speed and exercise
due caution. Have the vehicle
checked without delay.
Indicator lamp1 comes on:
Engine malfunction with adverse
effect on exhaust emissionsYou can continue your journey, but
moderate your speed and exercise
due caution. Have the vehicle
checked as soon as possible.
12Cause What to do
Page 139 of 148

ReferenceAt a glance Controls Driving tips Mobility
137
Engine oil
– adding96
– additives, refer to Approved
engine oils96
– approved engine oils96
– capacity96
– checking level95
– dipstick95
– intervals between changes,
refer to Service
requirements49
– MINI Maintenance System98
Engine oil level, checking95
Engine output, refer to Engine
data130
Engine starting, refer to
Starting the engine36
Error messages, refer to Check
Control51
ESP Electronic Stability
Program, refer to DSC
Dynamic Stability Control54
Event data recorders99
Exhaust system, refer to Hot
exhaust system76
Exterior mirrors31
– adjusting31
– automatic heating31
– folding in and out31
External audio device71
Eyes
– for tow-starting and towing
away113
– for tying down loads80
F
Failure messages, refer to
Check Control51
Failure of an electrical
consumer111
Fastening safety belts, refer to
Safety belts30
Fasten safety belts reminder,
refer to Seat belt
reminder31Filter
– microfilter/activated-
charcoal filter for automatic
climate control68
– microfilter for air
conditioner66
Fine wood, care101
First aid pouch112
Fixture for remote control,
refer to Ignition lock35
Flash when locking/
unlocking20
Flat tire
– Flat Tire Monitor56
– indicator/warning lamp56
– Run-Flat Tires56,92
Flat Tire Monitor FTM55
– indicating a flat tire56
– initializing the system55
– malfunction56
– snow chains55
– system limits55
Flat tires, refer to Tire
condition91
Floor mats, care101
Fog lamps
– replacing bulb104,106
Folding rear seat backrest78
Footbrake, refer to Braking
safely77
Footwell lamps62
For your own safety5
Front airbags57
Front fog lamps62
– indicator lamp116
– replacing bulb104
Front seat adjustment28
Frost on windows, refer to
Defrosting windows66,67
FTM, refer to Flat Tire
Monitor55
Fuel85
– gauge45
– high-quality brands85
– quality85
– specifications85
– tank capacity133
Fuel clock, refer to Fuel
gauge45Fuel display, refer to Fuel
gauge45
Fuel filler door84
– releasing in the event of
electrical malfunction84
Fuses111
G
Garage door opener, refer to
Integrated universal remote
control69
Gasoline
– refer to Average
consumption45
Gasoline, refer to Required
fuel85
Gasoline display, refer to Fuel
gauge45
Gear indicator
– automatic transmission with
Steptronic37
Gear shifting
– automatic transmission37
– manual transmission37
Gearshift lever
– automatic transmission with
Steptronic37
– manual transmission37
General driving notes76
Glass sunroof, electric26
– convenient operation20,21
– opening, closing26
– raising26
– remote control20
Glove compartment70
Grills, refer to Air vents64
Gross vehicle weight, refer to
Weights132
H
Halogen lamps
– replacing bulb103
Handbrake, refer to Parking
brake37
Hands-free system14
Hazard warning flashers14
Head airbags57
Page 147 of 148

Refueling
So that you always have access to the data you
need when refueling, you are recommended to
enter the relevant figures for your car in the
table provided below. Consult the index for indi-
vidual specifications.Fuel
Engine oil
Do not add engine oil until the corresponding
message appears, refer to page96.
Tire inflation pressures
Quality
Enter your preferred fuel quality here.
Preferred oil specifications
Summer tiresWinter tires
frontrearfrontrear
Up to 4 persons
4 persons plus luggage