service MINI Hardtop 2 Door 2008 User Guide
[x] Cancel search | Manufacturer: MINI, Model Year: 2008, Model line: Hardtop 2 Door, Model: MINI Hardtop 2 Door 2008Pages: 164, PDF Size: 2.66 MB
Page 104 of 164

Wheels and tires
102
Tire coding
Knowledge of the labeling on the side of the tire
makes it easier to identify and choose the right
tires.
Tire size
Speed code letter
Q = up to 100 mph or 160 km/h
T = up to 118 mph or 190 km/h
H = up to 131 mph or 210 km/h
V = up to 150 mph or 240 km/h
W = up to 167 mph or 270 km/h
Y = up to 186 mph or 300 km/h
Tire Identification Number
Tires with DOT codes meet the guidelines of the
US Department of Transportation.
DOT code:
Uniform Tire Quality Grading
Quality grades can be found where applicable
on the tire sidewall between tread shoulder and
maximum section width. For example:
Tread wear 200 Traction AA
Temperature A
DOT Quality Grades
Tread wear
Traction AA A B C
Temperature A B C
All passenger car tires must conform to
Federal Safety Requirements in addition
to these grades.<
Tread wear
The tread wear grade is a comparative rating
based on the wear rate of the tire when tested
under controlled conditions on a specified gov-
ernment test course. For example, a tire graded
150 would wear one and one-half (1γ) times as
well on the government course as a tire graded
100. The relative performance of tires depends
upon the actual conditions of their use, how-
ever, and may depart significantly from the
norm due to variations in driving habits, service
practices and differences in road characteristics
and climate.
Traction
The traction grades, from highest to lowest, are
AA, A, B, and C.
Those grades represent the tire's ability to stop
on wet pavement as measured under controlled
conditions on specified government test sur-
faces of asphalt and concrete. A tire marked C
may have poor traction performance.
The traction grade assigned to this tire is
based on straight-ahead braking traction
tests, and does not include acceleration, corner-
ing, hydroplaning, or peak traction characteris-
tics.<
Temperature
The temperature grades are A, the highest, B,
and C, representing the tire's resistance to the
generation of heat and its ability to dissipate
heat when tested under controlled conditions
on a specified indoor laboratory test wheel. Sus-
tained high temperature can cause the material
of the tire to degenerate and reduce tire life, and
excessive temperature can lead to sudden tire
failure. The grade C corresponds to a level of
performance which all passenger car tires must e.g.
Nominal width in mm
Aspect ratio in Ξ
Radial belt construction
Rim diameter in inches
Load rating,
not on ZR tires
Speed code letter, in
front of the R on ZR tires
225/45 R 17 91 V
e.g.
Manufacturer's
code for tire make
Tire size and
tire design
Tire ageDOT xxxx xxx 4707
Page 106 of 164

Wheels and tires
104
ommends tire replacement after no more than
6 years, regardless of the actual wear of the
tires.
Run-Flat Tires*
The symbol identifying Run-Flat Tires is a circle
with the letters RSC on the sidewall.
Run-Flat Tires comprise a conditionally self-sup-
porting tire and a special rim. The reinforcement
in the sidewalls ensures that the tire can con-
tinue to be used subject to certain restrictions,
even if depressurized.
For information on continuing to drive with a flat
tire, refer to Indication of a flat tire, page60.
New wheels and tires
Have new wheels and tires mounted only
by your MINI Dealer or a specialized tire
shop that has specially trained personnel work-
ing in accordance with the specifications of the
MINI manufacturer. If this work is not carried out
properly, there is a danger of subsequent dam-
age and related safety hazards. Make sure that
the new wheels are balanced.<
Retreaded tires
The manufacturer of your MINI recom-
mends that you avoid using retreaded
tires, as this could impair driving safety. The
causes for this include potentially different tire
casing structures and often wide variations in
tire age, which can result in a limited service
life.<
Correct wheels and tires
The manufacturer of your MINI recom-
mends mounting only wheels and tires
that it has specifically approved for use on your
particular model. Although other wheels and
tires may theoretically have the same dimen-
sions, variations in factors such as manufactur-
ing tolerances can result in contact between tire
and bodywork, ultimately leading to serious
accidents. The manufacturer of your MINI can-
not evaluate non-approved wheels and tires to
determine if they are suited for use, and there-
fore cannot ensure the operating safety of the
vehicle if they are mounted.<
Your MINI Dealer will be glad to inform you
about the correct wheel and tire combination for
your vehicle.
The correct combination of wheels and tires is
also necessary to ensure reliable operation of
various vehicle systems such as ABS and DSC.
To maintain good handling and vehicle
response, use only tires of a single brand and
tread configuration. After a tire has been dam-
aged, mount the previous wheel and tire combi-
nation again as soon as possible.
Wheels with Tire Pressure Monitor TPM
electronics
When mounting new tires or changing over from
summer to winter tires, or vice versa, only use
wheels with TPM electronics; otherwise the Tire
Pressure Monitor may not be able to detect a
puncture, refer to page62. Your MINI Dealer will
be glad to advise you.
Page 110 of 164

Under the bonnet
108
Adding engine oil
Do not add the maximum quantity of 1 US
quart/1 liter of engine oil until the oil level has
dropped to just above the lower mark on the
dipstick, page107.
Add oil within the next 30 miles/50 km,
otherwise the engine could be dam-
aged.<
Keep oils, greases, etc. out of the reach of
children and comply with the warnings on
the containers. Otherwise, health hazards may
result.<
Oil change
Have the oil changed only by a MINI Dealer or a
workshop that has specially trained personnel
working in accordance with the specifications of
the MINI manufacturer.
Approved engine oils
The quality of the engine oil selected has critical
significance for the operation and service life of
an engine. Based on extensive testing, the man-
ufacturer of your MINI approves only certain
grades of engine oil on a regular basis.
Only use High Performance Synthetic Oil
approved by the manufacturer of your MINI.
If MINI High Performance Synthetic Oil is not
available, you can add small quantities of
another synthetic oil in between oil changes.
Only use oils with the API SM specification or
higher.
If you have any further questions regard-
ing MINI High Performance Synthetic Oil
or approved synthetic oils, your MINI Dealer will
be glad to advise you.
www.miniusa.com to obtain this information.
Viscosity grades
Viscosity is a measure of an oil's flow rating and
is categorized in SAE classes.
The correct SAE grade for your MINI is deter-
mined by the climatic conditions of the region in
which you normally drive your MINI.
Approved oils belong to the 5W-40 and
5W-30 classes.<
These oils can be used for driving at all outside
temperatures.
Coolant
Do not add coolant to the cooling system
when the engine is hot. Escaping coolant
can cause burns.<
Coolant consists of half water and half additive.
Not all commercially available additives are suit-
able for your MINI. Your MINI Dealer knows
which additives are suitable and will be glad to
advise you.
Only use suitable additives, otherwise
engine damage may result. Because addi-
tives are harmful to your health, it is important
to follow the instructions on the containers.<
Comply with the appropriate environmen-
tal protection regulations when disposing
of coolant additives.<
Checking coolant level
1.Do not open the bonnet until the engine has
cooled down.
2.Turn the cap of the expansion tank a little
counterclockwise to allow any accumulated
pressure to escape, then continue turning to
open.
3.The coolant level is correct if it is between
the Min and Max markings.
Page 112 of 164

Maintenance
110
Maintenance
MINI Maintenance System
The MINI Maintenance System supports the
preservation of the traffic and operating safety
of your MINI. The objective is to optimize efforts
with respect to minimal vehicle maintenance
costs.
If and when you come to sell your MINI, a com-
prehensive record of servicing will prove a signif-
icant benefit.
Condition Based Service CBS
Sensors and special algorithms take the different
driving conditions of your MINI into account.
Condition Based Service uses this to determine
the current and future service requirements. By
letting you define a service and maintenance
regimen that reflects your own individual
requirements, the system builds the basis for
trouble-free driving.
In the tachometer, you can have the remaining
times or distances for selected maintenance
tasks and any legally prescribed dates displayed,
page53.
Service data in the remote control
Your vehicle continuously stores service-
requirement information in the remote control
while you are driving. Your MINI Dealer can read
out this data from the remote control unit, and
propose an optimized maintenance approach.
Whenever you take your car in for servicing you
should therefore hand your MINI Dealer the
remote control unit that you last used.Make sure that the date in the tachometer
i s a l w a y s s e t co rr e ct l y, p a g e55; otherwise
the effectiveness of Condition Based Service CBS
is not assured.<
Service and Warranty Information
Booklet for US models and Warranty and
Service Guide Booklet for Canadian
models
Please consult your Service and Warranty Infor-
mation Booklet for US models and Warranty and
Service Guide Booklet for Canadian models for
additional information on service requirements.
The manufacturer of the MINI recom-
mends that you have service and repair
operations performed at your MINI Dealer.
Take the time to ensure that these service pro-
cedures are confirmed by entries in your vehi-
cle's Service and Warranty Information Booklet
for US models and Warranty and Service Guide
Booklet for Canadian models. These entries ver-
ify that your vehicle has received the specified
regular maintenance.<
Socket for Onboard Diag-
nosis OBD
Primary components that make up exhaust
emissions can be checked by a device via the
OBD socket.
This socket is located to the left of the driver's
side, on the bottom of the instrument panel.
Page 117 of 164
ReferenceAt a glance Controls Driving tips Mobility
115
Lamps and bulbs
Lamps and bulbs make an essential contribution
to vehicle safety. They should, therefore, be
handled carefully. The manufacturer of your
MINI recommends having your MINI Dealer per-
f o r m a n y w o r k t h a t y o u d o n o t f e e l c o m p e t e n t t o
perform yourself or that is not described here.
Never touch the glass of new bulbs with
your bare fingers, as even minute
amounts of contamination will burn into the
bulb's surface and reduce its service life. Use a
clean tissue, cloth or something similar, or hold
the bulb by its base.<
You can obtain a selection of replacement bulbs
at your MINI Dealer.
When working on electrical systems,
always begin by switching off the con-
sumer in question, otherwise short circuits could
result. To avoid possible injury or equipment
damage when replacing bulbs, observe any
instructions provided by the bulb manufac-
turer.<
Caring for headlamps, refer to page112.
For any bulb replacement not described
below, contact a MINI Dealer or a work-
shop that has specially trained personnel work-
ing in accordance with the specifications of the
MINI manufacturer.<
For checking and adjusting headlamp aim,
please contact your MINI Dealer.<
Light-emitting diodes LEDs
Light-emitting diodes installed behind translu-
cent lenses serve as the light sources for many of
the controls and displays in your vehicle. These
light-emitting diodes are related to conven-
tional laser diodes, and legislation defines them
as Class 1 light-emitting diodes.
Do not remove the covers or expose the
eyes directly to the unfiltered light source
for several hours, otherwise this could cause irri-
tation to the retina.<
Bi-Xenon lamps*
The service life of these bulbs is very long and
the probability of failure very low, provided that
they are not switched on and off an excessive
number of times. If a xenon lamp fails neverthe-
less, switch on the fog lamps and continue the
journey with great care, provided that local leg-
islation does not prohibit this.
Have any work on the xenon lamp system,
including bulb replacement, carried out
only by a MINI Dealer or a workshop that has
specially trained personnel working in accor-
dance with the specifications of the MINI manu-
facturer. Due to high voltage, there is a risk of
fatal injury if work on the xenon lamps is carried
out improperly.<
Halogen low beams and high beams
H13 bulb, 60/55 watts
The H13 bulb is pressurized. Therefore,
wear safety glasses and protective gloves.
Otherwise there is a risk of injury if the bulb is
damaged.<
Be careful when installing the cover, oth-
erwise leaks could occur and cause dam-
age to the headlamp system.<
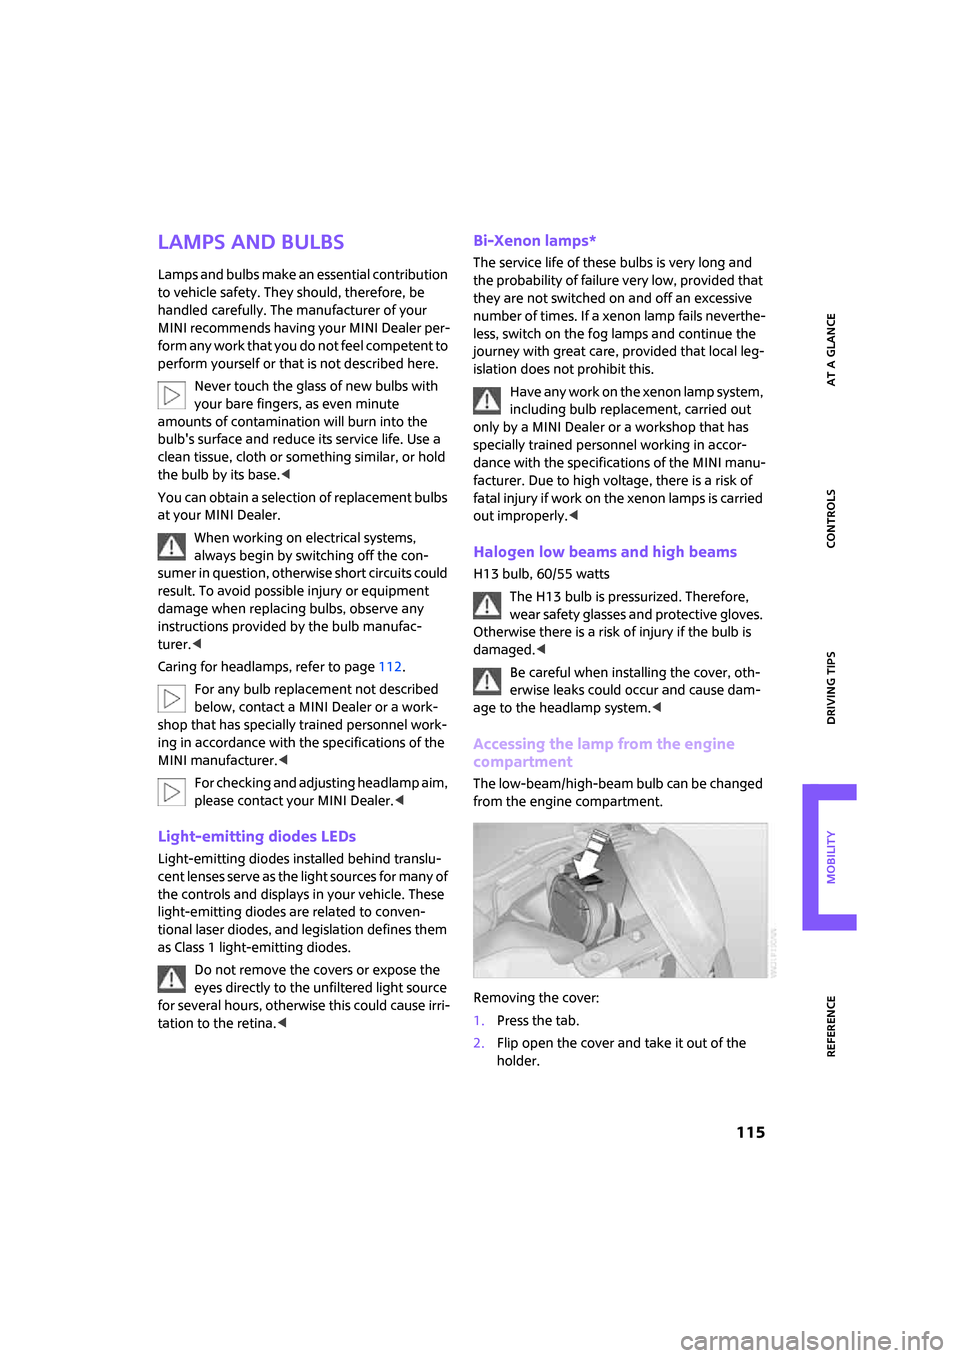
Accessing the lamp from the engine
compartment
The low-beam/high-beam bulb can be changed
from the engine compartment.
Removing the cover:
1.Press the tab.
2.Flip open the cover and take it out of the
holder.
Page 129 of 164
ReferenceAt a glance Controls Driving tips Mobility
127
Giving and receiving assistance
Roadside Assistance
The Roadside Assistance service is there to assist
you around the clock in the event of a break-
down, including on weekends and public holi-
days.
The phone numbers of the Roadside Assistance
in your home country can be found in the Con-
tact brochure.
First aid pouch*
Some of the articles contained in the first aid
pouch have a limited service life. Therefore,
check the expiration dates of the contents regu-
larly and replace any items in good time, if nec-
essary.
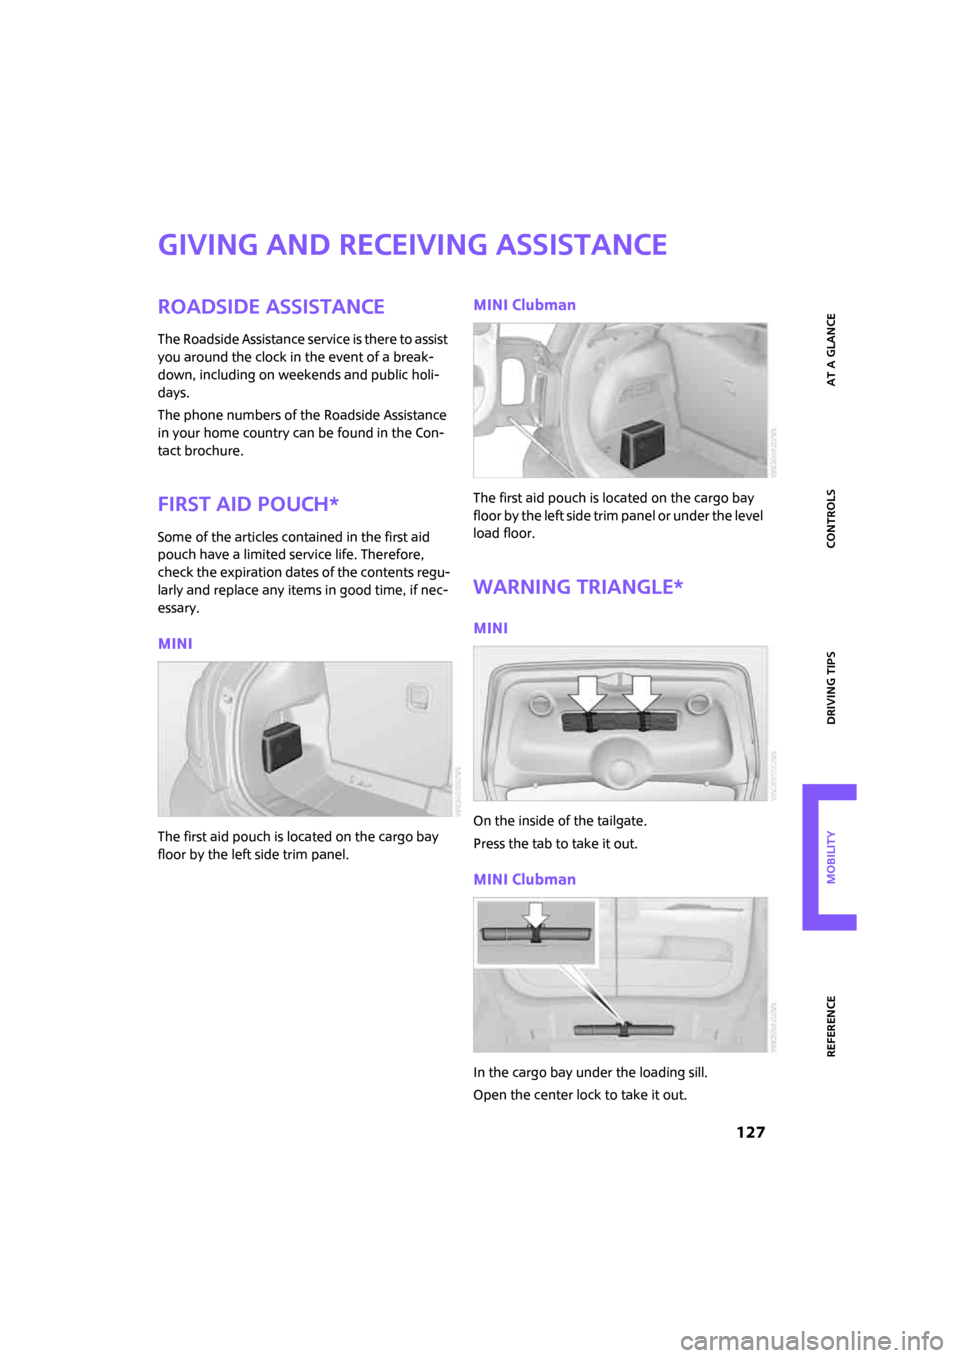
MINI
The first aid pouch is located on the cargo bay
floor by the left side trim panel.
MINI Clubman
The first aid pouch is located on the cargo bay
floor by the left side trim panel or under the level
load floor.
Warning triangle*
MINI
On the inside of the tailgate.
Press the tab to take it out.
MINI Clubman
In the cargo bay under the loading sill.
Open the center lock to take it out.
Page 143 of 164
ReferenceAt a glance Controls Driving tips Mobility
141
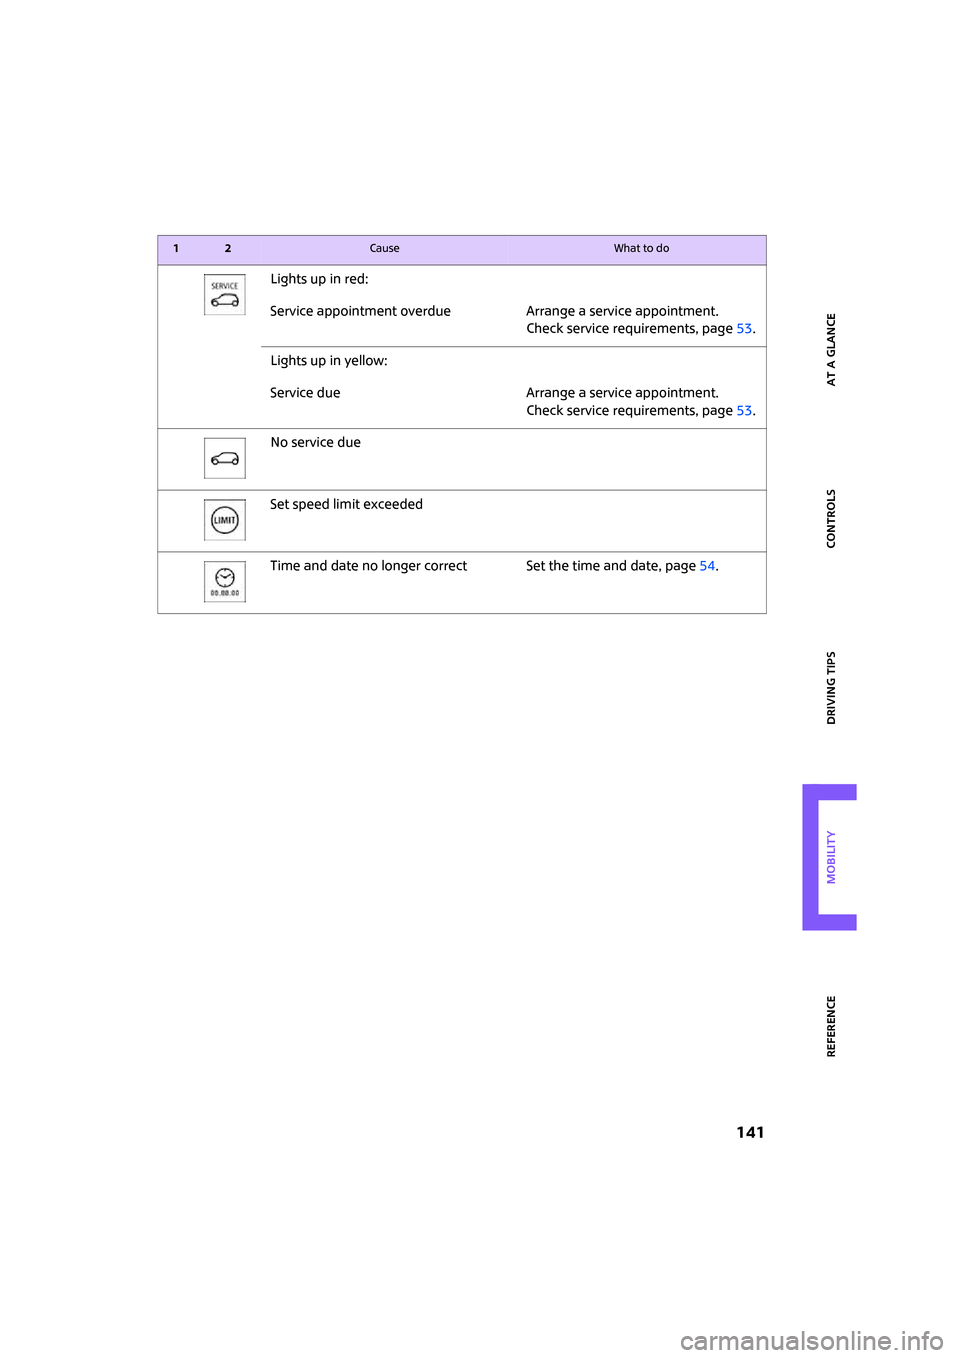
Lights up in red:
Service appointment overdue Arrange a service appointment.
Check service requirements, page53.
Lights up in yellow:
Service due Arrange a service appointment.
Check service requirements, page53.
No service due
Set speed limit exceeded
Time and date no longer correct Set the time and date, page54.
12Cause What to do
Page 153 of 164
ReferenceAt a glance Controls Driving tips Mobility
151
Belts, refer to Safety belts33
Belt tensioner, refer to Safety
belts33
Beverage holders, refer to Cup
holders80
Blower, refer to Air flow
rate72,73
Bonnet106
Bottle holders, refer to Cup
holders80
Brake Assist58
Brake fluid, refer to Service
requirements53
Brake lamps
– replacing bulbs in MINI118
– replacing bulbs in MINI
Clubman118
Brake pads, breaking in84
Brake rotors85
– brakes84
– breaking in84
Brakes
– ABS58
– breaking in84
– MINI Maintenance
System110
– parking brake40
– service requirements53
Brakes, refer to Braking
safely85
Brake system84
– breaking in84
– disc brakes85
– MINI Maintenance
System110
Breakdown service, refer to
Roadside Assistance127
Breaking in the clutch84
Break-in period84
Bulb changing, refer to Lamps
and bulbs115
Button for starting the
engine39
Buttons on the steering
wheel11C
California Proposition 65
warning5
Can holders, refer to Cup
holders80
Capacities148
Capacity of cargo bay146
Car battery, refer to Vehicle
battery125
Car care112
Car-care products, refer to
Suitable car-care
products112
Care112
Cargo, securing89
Cargo area
– capacity147
Cargo area partition net, refer
to Partition net in MINI
Clubman87
Cargo bay86
– capacity146
– convenient access26
– cover86
– doors, refer to Splitdoor23
– lamp69
– lid, refer to Tailgate23
– opening from outside24
– volume146
Cargo bay, expanding86
Cargo bay doors, refer to
Splitdoor23
Cargo bay lamp69
Cargo bay lid, refer to
Tailgate23
Cargo bay partition net, refer
to Partition net in MINI
Clubman87
Cargo loading
– securing cargo89
– stowing cargo88
– vehicle86
Car key, refer to Keys/remote
controls18
Carpets, care113Car phone
– installation location, refer to
Center armrest78
– refer to separate Owner's
Manual
Car wash86
Car wash, care112
Catalytic converter, refer to
Hot exhaust system84
Center armrest78
Center brake lamp119
Center console, refer to
Around the center
console14
Central locking system19
– convenient access26
– from inside22
– from outside19
Changing bulbs
115
Changing wheels122
Chassis number, refer to
Engine compartment107
Check Control55
Child's seats36
Child-restraint fixing system
LATCH37
Child-restraint systems36
Chock, folding
– space-saver spare tire122
Chrome parts, care113
Chrome parts, refer to
Care112
Cigarette lighter80
Cleaning headlamps45
– washer fluid46
Clock48
– 12h/24h mode51
– setting time54
Closing
– from inside22
– from outside19
Clothes hooks79
Clubdoor23
Cockpit10
Cold start, refer to Starting the
engine39
Comfort access, refer to
Convenient access26
Page 154 of 164
From A to Z
152
Comfort area, refer to Around
the center console14
Compartment for remote
control, refer to Ignition
lock39
Computer49
Condensation, refer to When
the vehicle is parked85
Condition Based Service
CBS110
Configuring settings, refer to
Personal Profile18
Confirmation signals for
vehicle locking/unlocking20
Connecting vacuum cleaner,
refer to Connecting electrical
appliances80
Consumption, refer to Average
fuel consumption49
Consumption indicator
– average fuel consumption49
Control Display
– settings50
Controls and displays10
Convenience start, refer to
Starting the engine39
Convenient access26
– replacing the battery27
– what to observe before
entering a car wash27
Convenient operation
– windows20
Coolant108
– checking level108
– filling108
Coolant temperature48
Cooling, maximum74
Cooling fluid, refer to
Coolant108
Copyright2
Cruising range49
Cup holders80
Curb weight, refer to
Weights146,147
Current fuel consumption50
D
Dashboard, refer to Cockpit10Dashboard instruments, refer
to Displays12
Dashboard lighting, refer to
Instrument lighting69
Data144
– capacities148
– dimensions145
– engine144
– weights146,147
Date
– setting55
Daytime running lamps67
DBC Dynamic Brake Control,
refer to Brake assist58
Deactivating front passenger
airbags64
Deadlocking, refer to
Locking20
Defect
– door lock22
– fuel filler door94
Defogging windows73,75
Defrosting windows73,75
Defrosting windows and
removing condensation
– air conditioner73
– automatic climate control75
Defrost position, refer to
Defrosting windows73,75
Differential, breaking in84
Digital clock48
Dimensions145
Dipstick, engine oil107
Directional indicators, refer to
Turn signals43
Displacement, refer to Engine
data144
Display lighting, refer to
Instrument lighting69
Displays12
– instrument combination12
Displays, care113
Displays and controls10
Disposal
– of coolant108
– remote control battery27
– vehicle battery125Distance remaining to service,
refer to Service
requirements53
Distance warning, refer to Park
Distance Control PDC57
Diving stability control
systems57
Door
– rear, refer to Clubdoor23
Door key, refer to Integrated
key/remote control18
Door lock22
Door lock, confirmation
signals20
Doors, manual operation22
DOT Quality Grades102
Double doors, refer to
Splitdoor23
Drinks holders, refer to Cup
holders80
Drive-off assistant, refer to Hill
Start Assist59
Driving dynamics control, refer
to Sport button59
Driving lamps, refer to Parking
lamps/low beams66
Driving notes84
Driving off on inclines, refer to
Hill Start Assist59
Driving through water85
Driving tips, refer to Driving
notes84
Dry air, refer to Cooling
function75
Dynamic Brake Control DBC,
refer to Brake assist58
Dynamic Stability Control
DSC58
E
Electrical malfunction
– door lock22
– fuel filler door94
Electronic brake-force
distribution58
Electronic Stability Program
ESP, refer to Dynamic
Stability Control DSC58
Page 155 of 164

ReferenceAt a glance Controls Driving tips Mobility
153
Emergency operation, refer to
Manual operation
– door lock22
– fuel filler door94
– transmission lock, automatic
transmission43
Emergency services, refer to
Roadside Assistance127
Engine
– breaking in84
– data144
– overheated, refer to Coolant
temperature48
– speed144
– starting39
– starting, convenient
access26
– switching off40
Engine compartment107
Engine coolant, refer to
Coolant108
Engine oil
– adding108
– additives, refer to Approved
engine oils108
– approved engine oils108
– capacity108
– checking level107
– dipstick107
– intervals between changes,
refer to Service
requirements53
– MINI Maintenance
System110
Engine oil level, checking107
Engine output, refer to Engine
data144
Engine starting, refer to
Starting the engine39
Error messages, refer to Check
Control55
ESP Electronic Stability
Program, refer to Dynamic
Stability Control DSC58
Event data recorders111
Exhaust system, refer to Hot
exhaust system84Exterior mirrors33
– adjusting33
– automatic heating34
– folding in and out34
External audio device78
Eyes
– for tow-starting and towing
away129
– for tying down loads89
F
Failure messages, refer to
Check Control55
Failure of an electrical
consumer125
Fastening safety belts, refer to
Safety belts33
Fasten safety belts reminder,
refer to Seat belt
reminder33
Filter
– microfilter/activated-
charcoal filter for automatic
climate control75
– microfilter for air
conditioner73
Fine wood, care113
First aid pouch127
Fixture for remote control,
refer to Ignition lock39
Flash when locking/
unlocking20
Flat tire
– Run-Flat Tires104
– Tire Pressure Monitor TPM61
Flat Tire Monitor FTM59
– indicating a flat tire60
– initializing the system60
– malfunction61
– snow chains59
– system limits59
Flat tires, refer to Tire
condition103
Floor mats, care113
Floor panel, refer to Level load
floor in MINI Clubman87
Fog lamps
– replacing bulb116,118Folding rear seat backrest86
Footbrake, refer to Braking
safely85
Footwell lamps69
For your own safety4
Front airbags64
Front fog lamps69
– indicator lamp131
– replacing bulb116
Front seat adjustment30
Frost on windows, refer to
Defrosting windows73,75
FTM, refer to Flat Tire
Monitor59
Fuel95
– gauge49
– high-quality brands95
– quality95
– specifications95
– tank capacity148
Fuel clock, refer to Fuel
gauge
49
Fuel display, refer to Fuel
gauge49
Fuel filler door94
– releasing in the event of
electrical malfunction94
Fuses125
G
Garage door opener, refer to
Integrated universal remote
control76
Gasoline
– refer to Average
consumption49
Gasoline, refer to Required
fuel95
Gasoline display, refer to Fuel
gauge49
Gear indicator
– automatic transmission with
Steptronic41
Gear shifting
– automatic transmission41
– manual transmission41