tire size MINI Hardtop 2 Door 2008 Owner's Manual
[x] Cancel search | Manufacturer: MINI, Model Year: 2008, Model line: Hardtop 2 Door, Model: MINI Hardtop 2 Door 2008Pages: 164, PDF Size: 2.66 MB
Page 65 of 164

ReferenceAt a glance Controls Driving tips Mobility
63
cause accidents. Do not continue driving and
contact your MINI Dealer.<
Malfunction
The small warning lamp flashes in yel-
low and then lights up continuously; the
larger warning lamp comes on in yel-
low.
No punctures can be detected.
This type of message is shown in the following
situations:
>If there is a malfunction
Have the system checked.
>If a wheel without TPM electronics has been
mounted
>If TPM is temporarily malfunctioning due to
other systems or devices using the same
radio frequency.
Message for unsuccessful system reset
Both warning lamps come on in yellow.
The system is not reset after a tire has
been changed, for example.
Check the tire inflation pressure and
reset the system, refer to the Owner's Manual
for Vehicle.
Declaration according to NHTSA/
FMVSS 138 Tire Pressure Monitoring
Systems
Each tire, including the spare, should be
checked monthly when cold and inflated to the
inflation pressure recommended by the vehicle
manufacturer on the vehicle placard or tire infla-
tion pressure label. If your vehicle has tires of a
different size than the size indicated on the vehi-
cle placard or tire inflation pressure label, you
should determine the proper tire inflation pres-
sure for those tires. As an added safety feature,
your vehicle has been equipped with a tire pres-
sure monitoring system TPMS that illuminates a
low tire pressure telltale when one or more of
your tires are significantly under-inflated.
Accordingly, when the low tire pressure telltale
illuminates, you should stop and check your tires
as soon as possible, and inflate them to the
proper pressure. Driving on a significantly under-inflated tire causes the tire to overheat
and can lead to tire failure. Underinflation also
reduces fuel efficiency and tire tread life, and
may affect the vehicle's handling and stopping
ability. Please note that the TPMS is not a substi-
tute for proper tire maintenance, and it is the
driver's responsibility to maintain correct tire
pressure, even if underinflation has not reached
the level at which the TPMS low tire pressure tell-
tale illuminates.
The TPMS malfunction indicator is combined
with the low tire pressure telltale. When the sys-
tem detects a malfunction, the telltale will flash
for approximately one minute and then remain
continuously lit. This sequence will continue
upon subsequent vehicle startups as long as the
malfunction exists. When the malfunction indi-
cator is illuminated, the system may not be able
to detect or signal low tire pressure as intended.
TPMS malfunctions may occur for a variety of
reasons, including the installation of replace-
ment or alternate tires or wheels on the vehicle
that prevent the TPMS from functioning prop-
erly. Always check the TPMS malfunction telltale
after replacing one or more tires or wheels on
your vehicle to ensure that the replacement or
alternate tires and wheels allow the TPMS to
continue to function properly.
Page 67 of 164

ReferenceAt a glance Controls Driving tips Mobility
65
tions and handling instructions under Transport-
ing children safely, page36.
The front and side airbags can also be deacti-
vated by adolescents and adults sitting in certain
positions; the indicator lamp for the front pas-
senger airbags comes on. In such cases, the pas-
senger should change his or her sitting position
so that the front passenger airbags are activated
and the indicator lamp goes out. If the desired
airbag status cannot be achieved by changing
the sitting position, transport the relevant pas-
senger on a rear seat. Do not attach covers,
cushions, ball mats or other items to the front
passenger seat unless they are specifically rec-
ommended by the manufacturer of your MINI.
Do not place any items under the seat which
could press against the seat from below. Other-
wise a correct analysis of the seat cushion is not
ensured.<
Status of front passenger airbags
The indicator lamp for the front passenger air-
bags shows the functional status of the front
passenger's front and side airbags in accordance
with whether and how the front passenger seat
is occupied. The indicator lamp shows whether
the front passenger airbags are activated or
deactivated.
>The indicator lamp comes on as intended
when a child in a specially designated child-
restraint system is detected on the seat.
The front and side airbags for the front pas-
senger are not activated.
Most child seats are detected by the
system. This particularly applies to
child seats that were required by the NHTSA
at the time of manufacture of the vehicle.
After installing a child's seat, check that the indicator lamp for the front passenger air-
bags comes on. It indicates that the child's
seat has been detected and that the front
passenger airbags are deactivated.<
>T h e i n d i c a t o r l a m p d o e s n o t c o m e o n a s l o n g
as a person of sufficient size and in a correct
sitting position is detected on the seat.
The front and side airbags for the front pas-
senger are activated.
>The indicator lamp does not come on if the
seat is empty.
The front and side airbags for the front pas-
senger are not activated.
Operational readiness of airbag system
As of radio readiness, page39, the warning
lamp comes on briefly to indicate that the entire
airbag system and the belt tensioners are oper-
ational.
Airbag system malfunction
>The warning lamp does not come on when
radio readiness or the ignition is switched
on.
>The warning lamp stays lit continuously.
In the event of a fault in the airbag system,
have it checked without delay, otherwise
there is the risk that the system will not function
as intended even if a sufficiently severe accident
occurs.<
Page 82 of 164

Practical interior accessories
80
Cup holders and ash-
tray*
Cup holders
Two cup holders are located in the front of the
center console, another is in the rear at the back
of the center console.
In the MINI Clubman there are two additional
cup holders in the armrests in the rear.
Do not place glass containers in the cup
holders, as this increases the risk of injury
in the event of an accident.<
Ashtray*
The ashtray is located in one of the cup holders
in the center console.
Emptying
Remove the entire ashtray.
Lighter
With the engine running or the ignition switched
on, press in the cigarette lighter.
The lighter can be pulled out as soon as it pops
back out.Hold or touch the hot cigarette lighter by
the knob only. Holding or touching it in
other areas could result in burns.
When leaving the car, always remove the key so
that children cannot operate the cigarette
lighter and burn themselves.<
Connecting electrical
appliances
In your MINI, you can use electrical devices such
as a flashlight, car vacuum cleaner, etc., up to
approx. 200 watts at 12 volts, as long as one of
the following sockets is available. Avoid damag-
ing the sockets by attempting to insert plugs of
unsuitable shape or size.
Cigarette lighter socket
Remove the lighter* or cover from the socket.
Power socket in cargo bay
By way of example, the illustration shows the
cargo bay in the MINI.
Pull out the cover.
Page 98 of 164

Wheels and tires
96
Wheels and tires
Tire inflation pressures
Information for your safety
It is not merely the tires' service life, but also
driving comfort and, to a great extent, driving
safety that depend on the condition of the tires
and the maintenance of the specified tire pres-
sure.
Checking pressure
Check the tire inflation pressure regularly
and correct it, if necessary: at least twice a
month and before starting long trips. If you fail
to observe this precaution you may be driving
on tires with incorrect tire pressures, a condition
that can not only compromise your vehicle's
driving stability, but also lead to tire damage and
the risk of an accident. Do not drive with
deflated, i.e. flat tires, except when using Run-
Flat Tires. A flat tire will seriously impair your
vehicle's handling and braking response.
Attempts to drive on a flat tire can lead to loss of
control over the vehicle.<
Check the tire inflation pressures only on cold
tires. This means after a maximum of 1.25 miles/
2 km driving or when the vehicle has been
parked for at least 2 hours. When tires are warm,
the tire inflation pressure is higher.
After correcting the tire inflation pressure,
reinitialize the Flat Tire Monitor, page60,
or reset the Tire Pressure Monitor, page61.<
Checking the inflation pressure of the
space-saver spare tire* of the MINI
A valve extension for checking the inflation pres-
sure is located behind the bumper.
Checking the inflation pressure of the
space-saver spare tire* of the MINI
Clubman
To check the inflation pressure, fold up the level
load floor. Remove the onboard tool kit and the
space-saver spare tire, refer to page123.
Inflation pressure specifications
The tables below provide all the correct inflation
pressures for the specified tire sizes at ambient
temperature.
The tire inflation pressures apply to the
tire sizes approved and the tire brands
recommended by the manufacturer of your
MINI. Your MINI Dealer will be glad to advise
you.<
For correct identification of the right tire infla-
tion pressures, observe the following:
>Tire sizes for your vehicle
>Load conditions
>Maximum allowable driving speed
Tire inflation pressures for driving up to
100 mph or 160 km/h
For normal driving up to 100 mph or 160 km/h
and to achieve optimum driving comfort, adjust
pressures to the respective tire inflation pres-
sures listed on the following pages in the col-
Page 100 of 164

Wheels and tires
98
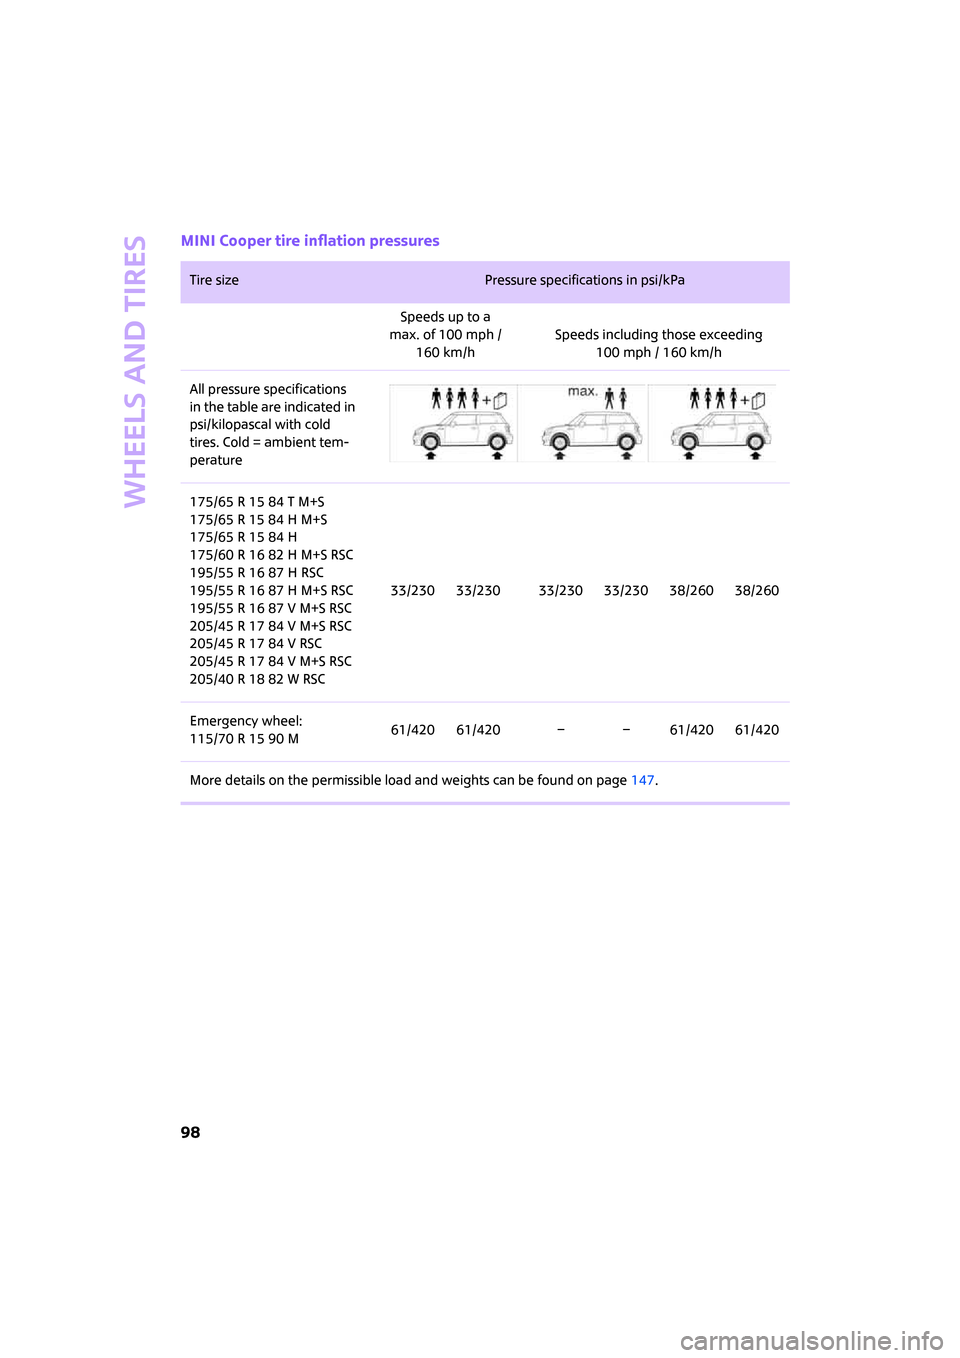
MINI Cooper tire inflation pressures
Tire size Pressure specifications in psi/kPa
Speeds up to a
max. of 100 mph /
160 km/hSpeeds including those exceeding
100 mph / 160 km/h
All pressure specifications
in the table are indicated in
psi/kilopascal with cold
tires. Cold = ambient tem-
perature
175/65 R 15 84 T M+S
175/65 R 15 84 H M+S
175/65 R 15 84 H
175/60 R 16 82 H M+S RSC
195/55 R 16 87 H RSC
195/55 R 16 87 H M+S RSC
195/55 R 16 87 V M+S RSC
205/45 R 17 84 V M+S RSC
205/45 R 17 84 V RSC
205/45 R 17 84 V M+S RSC
205/40 R 18 82 W RSC33/230 33/230 33/230 33/230 38/260 38/260
Emergency wheel:
115/70 R 15 90 M61/420 61/420 – – 61/420 61/420
More details on the permissible load and weights can be found on page147.
Page 101 of 164

ReferenceAt a glance Controls Driving tips Mobility
99
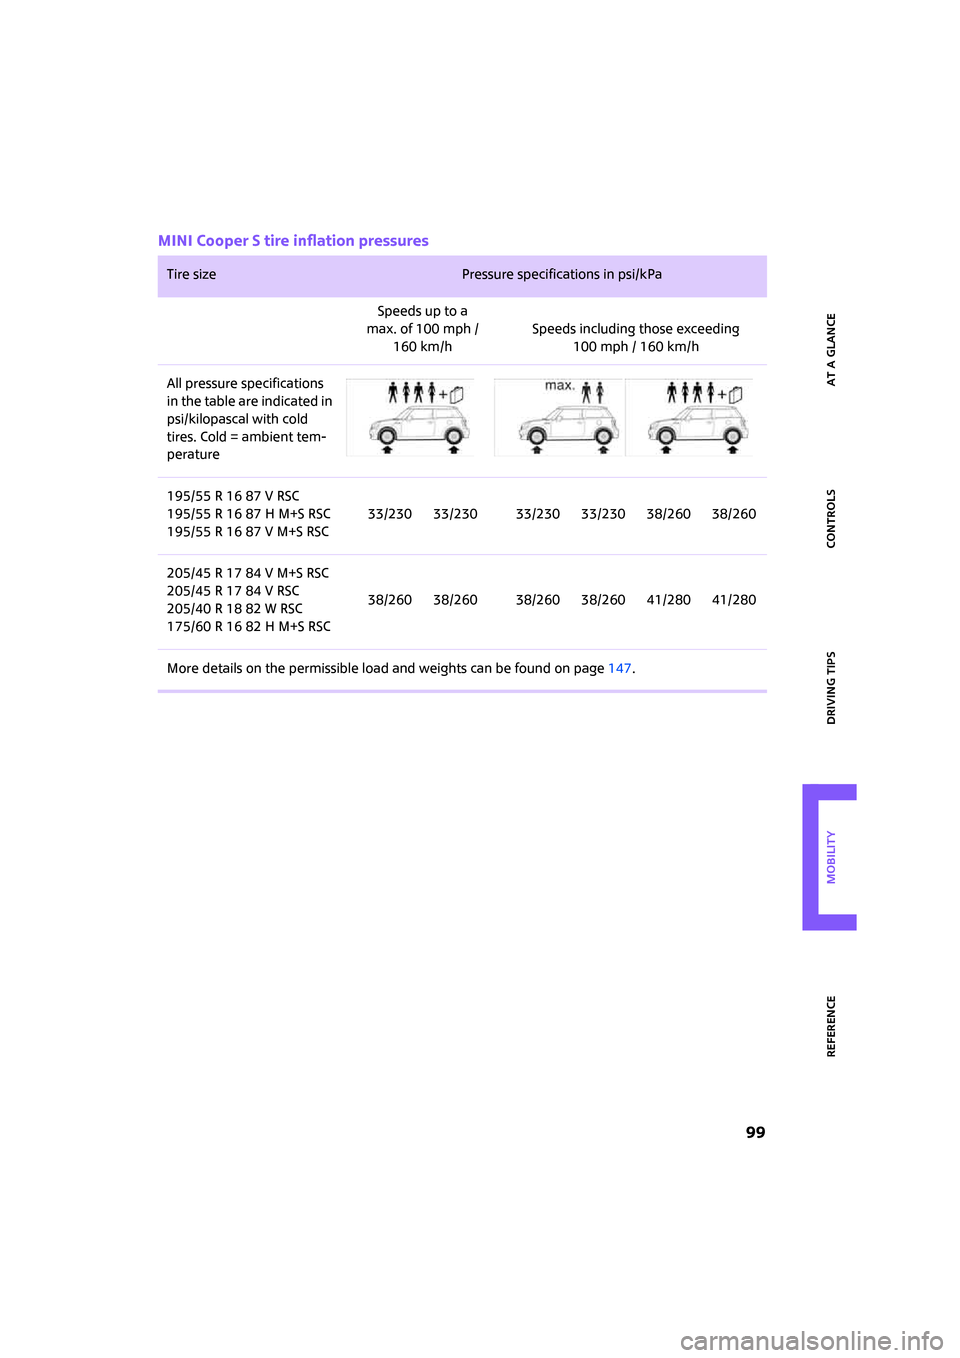
MINI Cooper S tire inflation pressures
Tire size Pressure specifications in psi/kPa
Speeds up to a
max. of 100 mph /
160 km/hSpeeds including those exceeding
100 mph / 160 km/h
All pressure specifications
in the table are indicated in
psi/kilopascal with cold
tires. Cold = ambient tem-
perature
195/55 R 16 87 V RSC
195/55 R 16 87 H M+S RSC
195/55 R 16 87 V M+S RSC33/230 33/230 33/230 33/230 38/260 38/260
205/45 R 17 84 V M+S RSC
205/45 R 17 84 V RSC
205/40 R 18 82 W RSC
175/60 R 16 82 H M+S RSC38/260 38/260 38/260 38/260 41/280 41/280
More details on the permissible load and weights can be found on page147.
Page 102 of 164

Wheels and tires
100
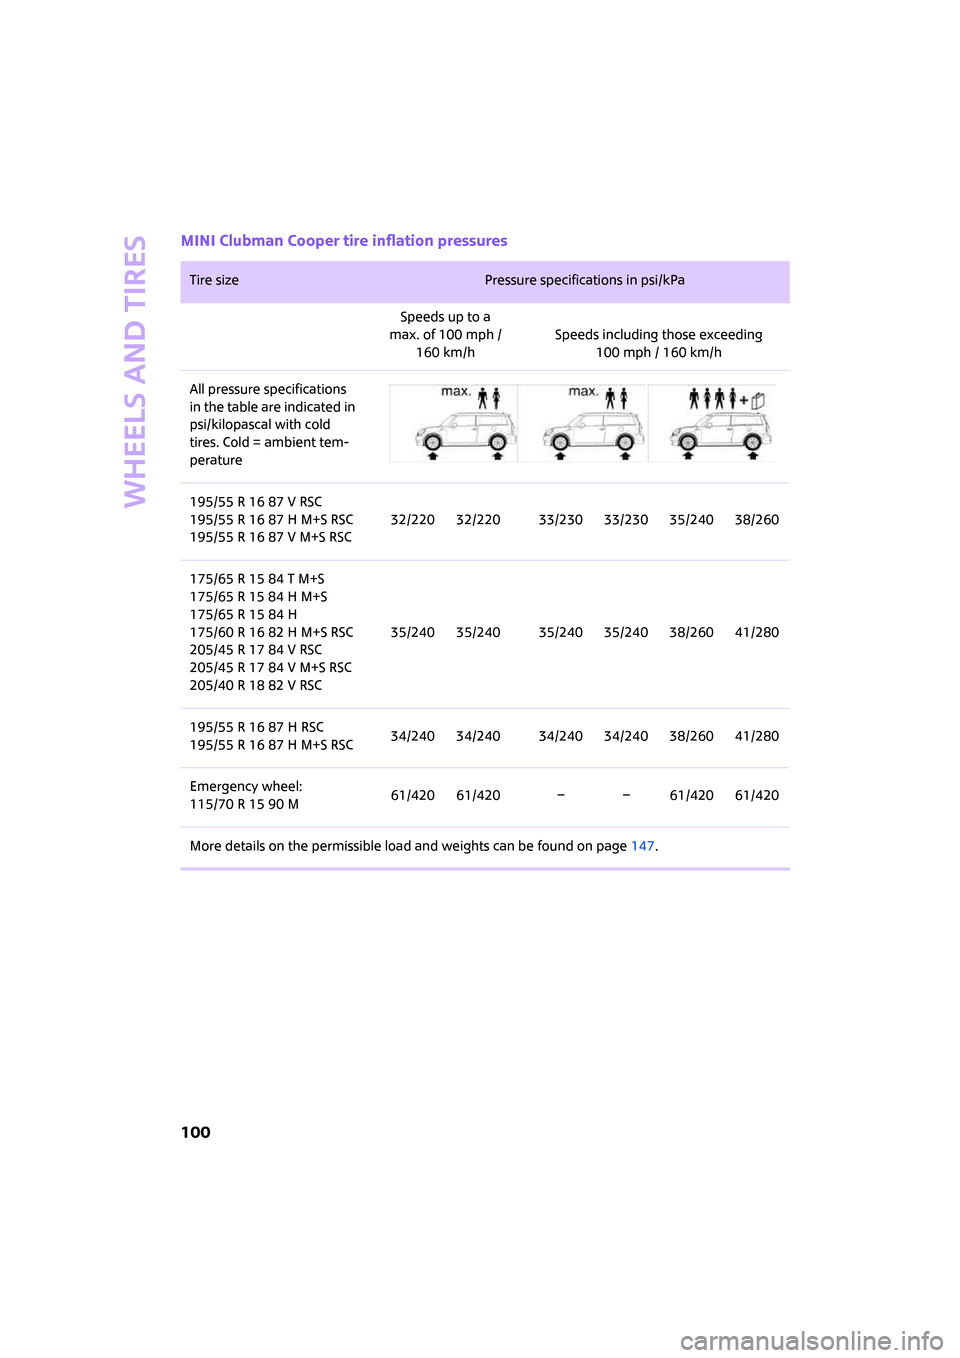
MINI Clubman Cooper tire inflation pressures
Tire size Pressure specifications in psi/kPa
Speeds up to a
max. of 100 mph /
160 km/hSpeeds including those exceeding
100 mph / 160 km/h
All pressure specifications
in the table are indicated in
psi/kilopascal with cold
tires. Cold = ambient tem-
perature
195/55 R 16 87 V RSC
195/55 R 16 87 H M+S RSC
195/55 R 16 87 V M+S RSC32/220 32/220 33/230 33/230 35/240 38/260
175/65 R 15 84 T M+S
175/65 R 15 84 H M+S
175/65 R 15 84 H
175/60 R 16 82 H M+S RSC
205/45 R 17 84 V RSC
205/45 R 17 84 V M+S RSC
205/40 R 18 82 V RSC35/240 35/240 35/240 35/240 38/260 41/280
195/55 R 16 87 H RSC
195/55 R 16 87 H M+S RSC34/240 34/240 34/240 34/240 38/260 41/280
Emergency wheel:
115/70 R 15 90 M61/420 61/420 – – 61/420 61/420
More details on the permissible load and weights can be found on page147.
Page 103 of 164

ReferenceAt a glance Controls Driving tips Mobility
101
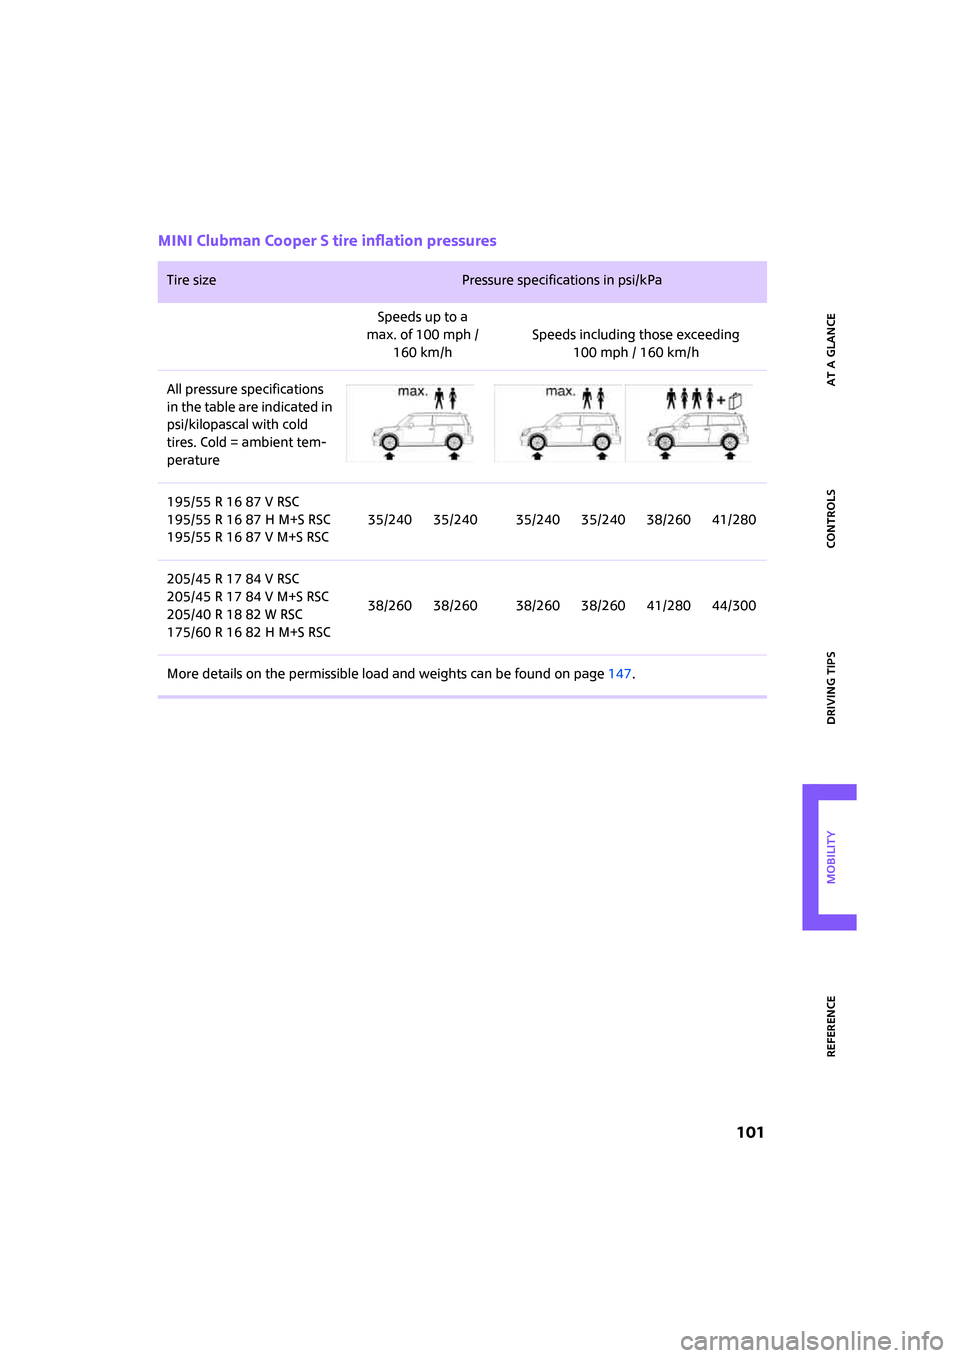
MINI Clubman Cooper S tire inflation pressures
Tire size Pressure specifications in psi/kPa
Speeds up to a
max. of 100 mph /
160 km/hSpeeds including those exceeding
100 mph / 160 km/h
All pressure specifications
in the table are indicated in
psi/kilopascal with cold
tires. Cold = ambient tem-
perature
195/55 R 16 87 V RSC
195/55 R 16 87 H M+S RSC
195/55 R 16 87 V M+S RSC35/240 35/240 35/240 35/240 38/260 41/280
205/45 R 17 84 V RSC
205/45 R 17 84 V M+S RSC
205/40 R 18 82 W RSC
175/60 R 16 82 H M+S RSC38/260 38/260 38/260 38/260 41/280 44/300
More details on the permissible load and weights can be found on page147.
Page 104 of 164

Wheels and tires
102
Tire coding
Knowledge of the labeling on the side of the tire
makes it easier to identify and choose the right
tires.
Tire size
Speed code letter
Q = up to 100 mph or 160 km/h
T = up to 118 mph or 190 km/h
H = up to 131 mph or 210 km/h
V = up to 150 mph or 240 km/h
W = up to 167 mph or 270 km/h
Y = up to 186 mph or 300 km/h
Tire Identification Number
Tires with DOT codes meet the guidelines of the
US Department of Transportation.
DOT code:
Uniform Tire Quality Grading
Quality grades can be found where applicable
on the tire sidewall between tread shoulder and
maximum section width. For example:
Tread wear 200 Traction AA
Temperature A
DOT Quality Grades
Tread wear
Traction AA A B C
Temperature A B C
All passenger car tires must conform to
Federal Safety Requirements in addition
to these grades.<
Tread wear
The tread wear grade is a comparative rating
based on the wear rate of the tire when tested
under controlled conditions on a specified gov-
ernment test course. For example, a tire graded
150 would wear one and one-half (1γ) times as
well on the government course as a tire graded
100. The relative performance of tires depends
upon the actual conditions of their use, how-
ever, and may depart significantly from the
norm due to variations in driving habits, service
practices and differences in road characteristics
and climate.
Traction
The traction grades, from highest to lowest, are
AA, A, B, and C.
Those grades represent the tire's ability to stop
on wet pavement as measured under controlled
conditions on specified government test sur-
faces of asphalt and concrete. A tire marked C
may have poor traction performance.
The traction grade assigned to this tire is
based on straight-ahead braking traction
tests, and does not include acceleration, corner-
ing, hydroplaning, or peak traction characteris-
tics.<
Temperature
The temperature grades are A, the highest, B,
and C, representing the tire's resistance to the
generation of heat and its ability to dissipate
heat when tested under controlled conditions
on a specified indoor laboratory test wheel. Sus-
tained high temperature can cause the material
of the tire to degenerate and reduce tire life, and
excessive temperature can lead to sudden tire
failure. The grade C corresponds to a level of
performance which all passenger car tires must e.g.
Nominal width in mm
Aspect ratio in Ξ
Radial belt construction
Rim diameter in inches
Load rating,
not on ZR tires
Speed code letter, in
front of the R on ZR tires
225/45 R 17 91 V
e.g.
Manufacturer's
code for tire make
Tire size and
tire design
Tire ageDOT xxxx xxx 4707
Page 107 of 164

ReferenceAt a glance Controls Driving tips Mobility
105
Recommended tire brands
For each tire size, the manufacturer of your MINI
recommends certain tire brands. They are
marked with a clearly visible MINI designation
on the sidewall of the tire.
When properly used, these tires meet the high-
est standards in terms of safety and handling
characteristics.
Run-Flat Tires*
When mounting new tires or changing over from
summer to winter tires and vice versa, mount
Run-Flat Tires for your own safety. Keep in mind
that no space-saver spare tire is available in the
event of a flat. Your MINI Dealer will be glad to
advise you.
Special characteristics of winter tires
The manufacturer of your MINI recommends
winter tires for driving in adverse winter road
conditions. Although all-season M+S tires pro-
vide better winter traction than summer tires,
they generally fail to provide the same levels of
cold-weather performance as winter tires.
Pay attention to speed
Always comply with the speed limit for the
winter tires mounted on your car; failure
to do so could result in tire damage and acci-
dents.<
If the car is capable of speeds higher than that
permitted for the winter tires, a label stating the
maximum permitted speed for the mounted
tires must be displayed in your field of view. Spe-
cialist tire dealers and your MINI Dealer can sup-
ply these labels.
Storage
Always store wheels and tires in a cool, dry place
with as little exposure to light as possible.
Always protect tires against all contact with oil,
grease and fuels.
Do not exceed the maximum tire inflation pres-
sure indicated on the sidewall of the tire.
Swapping wheels among the axles
The manufacturer of your MINI recommends
that you do not swap the front wheels with the
rear wheels.
Snow chains*
Only certain types of fine-link snow chains have
been tested by the manufacturer of your MINI,
classified as road-safe and recommended. Con-
tact your MINI Dealer for more details.
Only attach snow chains in pairs to the front
wheels with the following tires.
>175/65 R 15 M+S
>175/60 R 16 M+S
Observe the manufacturer's instructions when
mounting snow chains. Do not exceed a speed
of 30 mph or 50 km/h.
Do not initialize the Flat Tire Monitor if
snow chains are mounted, otherwise the
instrument might issue an incorrect reading.
When driving with snow chains, you may find it
helpful to deactivate ASC or DSC temporarily,
refer to page58.<