check engine light MINI Hardtop 2 Door 2010 (Mini Connected) User Guide
[x] Cancel search | Manufacturer: MINI, Model Year: 2010, Model line: Hardtop 2 Door, Model: MINI Hardtop 2 Door 2010Pages: 230, PDF Size: 4.02 MB
Page 188 of 230

Replacing components
186
When working on electrical systems,
always begin by switching off the con-
sumer in question; otherwise, short circuits
could result. To avoid possible injury or equip-
ment damage when replacing bulbs, observe
any instructions provided by the bulb manufac-
turer.<
Caring for headlamps, refer to page182.
For any bulb replacement not described
below, contact a MINI dealer or a work-
shop that has specially trained personnel work-
ing in accordance with the specifications of the
MINI manufacturer.<
For checking and adjusting headlamp aim,
please contact your MINI dealer.<
Light-emitting diodes LEDs
Light-emitting diodes installed behind translu-
cent lenses serve as the light sources for many of
the controls and displays in your vehicle. These
light-emitting diodes are related to conven-
tional laser diodes, and legislation defines them
as Class 1 light-emitting diodes.
Do not remove the covers or expose the
eyes directly to the unfiltered light source
for several hours; otherwise, this could cause
irritation of the retina.<
Xenon lamps*
The service life of these bulbs is very long and
the probability of failure very low, provided that
they are not switched on and off an excessive
number of times. If a xenon lamp fails neverthe-
less, switch on the fog lamps and continue the
journey with great care, provided that local leg-
islation does not prohibit this.
Have any work on the xenon lamp system,
including bulb replacement, carried out
only by a MINI dealer or a workshop that has
specially trained personnel working in accor-
dance with the specifications of the MINI manu-
facturer. Due to high voltage, there is a risk of
fatal injury if work on the xenon lamps is carried
out improperly.<
Halogen low beams and high beams
H13 bulb, 60/55 watts
The H13 bulb is pressurized. Therefore,
wear safety glasses and protective gloves.
Otherwise, there is a risk of injury if the bulb is
damaged.<
Be careful when installing the cover; oth-
erwise, leaks could occur and cause dam-
age to the headlamp system.<
Accessing the lamp from the engine
compartment
The low-beam/high-beam bulb can be changed
from the engine compartment.
Removing the cover:
1.Press the tab.
2.Flip open the cover and take it out of the
holder.
Follow the same steps in reverse order to reat-
tach the cover.
Be careful when installing the cover; oth-
erwise, leaks could occur and cause dam-
age to the headlamp system.<
Page 199 of 230

MOBILITYAT A GLANCE CONTROLS DRIVING TIPS ENTERTAINMENT
197
NAVIGATION REFERENCE
There must not be any contact between
the bodies of the two vehicles; otherwise,
there is a danger of shorting.<
Connecting jumper cables
Connect the jumper cables in the correct
order, so that no sparks which could cause
injury occur.<
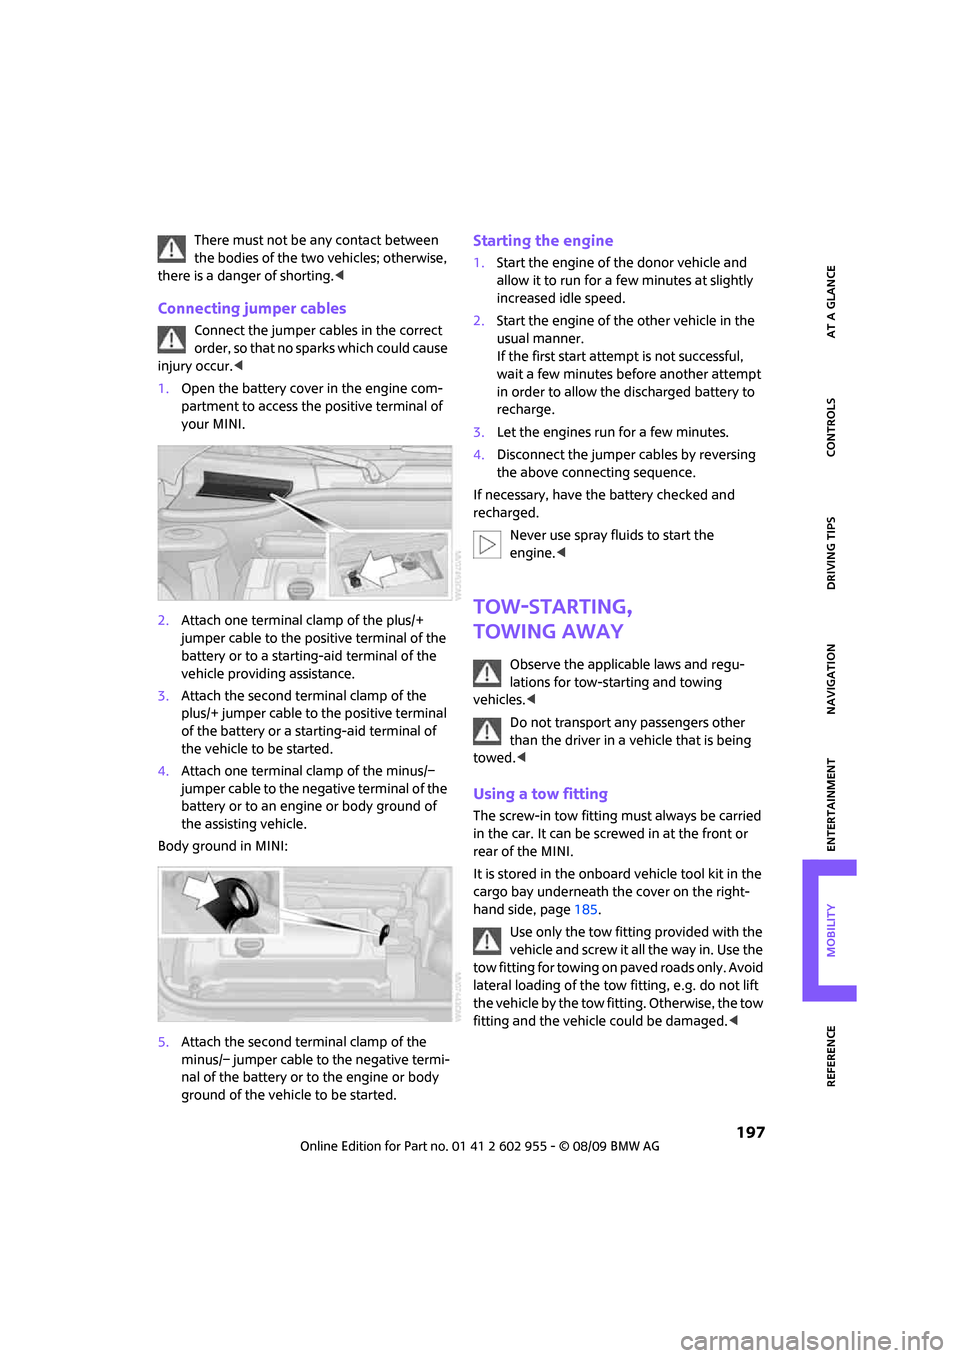
1.Open the battery cover in the engine com-
partment to access the positive terminal of
your MINI.
2.Attach one terminal clamp of the plus/+
jumper cable to the positive terminal of the
battery or to a starting-aid terminal of the
vehicle providing assistance.
3.Attach the second terminal clamp of the
plus/+ jumper cable to the positive terminal
of the battery or a starting-aid terminal of
the vehicle to be started.
4.Attach one terminal clamp of the minus/–
jumper cable to the negative terminal of the
battery or to an engine or body ground of
the assisting vehicle.
Body ground in MINI:
5.Attach the second terminal clamp of the
minus/– jumper cable to the negative termi-
nal of the battery or to the engine or body
ground of the vehicle to be started.
Starting the engine
1.Start the engine of the donor vehicle and
allow it to run for a few minutes at slightly
increased idle speed.
2.Start the engine of the other vehicle in the
usual manner.
If the first start attempt is not successful,
wait a few minutes before another attempt
in order to allow the discharged battery to
recharge.
3.Let the engines run for a few minutes.
4.Disconnect the jumper cables by reversing
the above connecting sequence.
If necessary, have the battery checked and
recharged.
Never use spray fluids to start the
engine.<
Tow-starting,
towing away
Observe the applicable laws and regu-
lations for tow-starting and towing
vehicles.<
Do not transport any passengers other
than the driver in a vehicle that is being
towed.<
Using a tow fitting
The screw-in tow fitting must always be carried
in the car. It can be screwed in at the front or
rear of the MINI.
It is stored in the onboard vehicle tool kit in the
cargo bay underneath the cover on the right-
hand side, page185.
Use only the tow fitting provided with the
vehicle and screw it all the way in. Use the
tow fitting for towing on paved roads only. Avoid
lateral loading of the tow fitting, e.g. do not lift
the vehicle by the tow fitting. Otherwise, the tow
fitting and the vehicle could be damaged.<
Page 214 of 230

From A to Z
212
From A to Z
INDEX
"..." Identifies Control Display
texts used to select
individual functions and
refers you to the page where
these texts can be found.
A
Accessories, refer to Your
individual vehicle4
Activated-charcoal filter for
automatic climate control93
"Add to destination
list"117,119
Additives
– coolant178
– engine oil178
Address for navigation
– deleting123
– entering114,117,122
– selecting122
– storing122
– storing current position122
Adjusting temperature inside
the car, refer to Automatic
climate control92
Adjusting the sound during
audio playback, refer to Tone
control139
Air conditioning mode
– automatic climate control92
– ventilation93
Air distribution
– automatic92
Air flow rate92
– automatic climate control92
Air pressure, checking, refer to
Tire inflation pressure164
Air recirculation, refer to
Recirculated-air mode92Air supply
– automatic climate control92
– ventilation93
Air vents91
Airbags84
– sitting safely42
– warning lamp86
Airing, refer to Ventilation93
AKI, refer to Fuel
specifications163
Alarm system32
"All channels"147
"All stations" on the radio141
All-season tires, refer to Winter
tires175
Always Open Timer62
"AM", waveband138
Ambient air, refer to
Recirculated-air mode92
Ambient lighting90
Antenna, care181
Antifreeze
– coolant178
– washer fluid57
Antilock Brake System ABS76
Anti-theft alarm system, refer
to Alarm system
32
Anti-theft system27
Approved axle loads, refer to
Weights205
Approved engine oils178
Approved gross vehicle
weight, refer to Weights205
Armrest, refer to Center
armrest96
Arrival time
– computer62,63
– destination guidance126
"Arrow display" in
navigation127
Ashtray97Assistant systems, refer to
– Dynamic Stability Control
DSC76
Audio138
– controls138
– switching on/off138
– tone control139
– volume139
Audio device, external96
AUTO program for automatic
climate control92
Automatic
– air distribution92
– air flow rate92
– cruise control58
– headlamp control87
– storing of stations142
Automatic climate control91
– automatic air distribution92
Automatic station search142
Automatic transmission with
Steptronic53
– interlock53
– overriding selector lever
lock55
– shiftlock53
– sport program54
"Autostore"
– on the radio143
"AUX"155,157
– AUX-IN port155
– USB audio interface156
AUX-IN port155
AUX-IN, refer to External audio
device96
Average fuel consumption61
– setting the units65
Average speed62
"Avoid ferries" in
navigation124
Page 216 of 230

From A to Z
214
CD changer149
– controls138
– fast forward/reverse152
– playing a track151
– random order152
– repeating a track151
– selecting a CD149
– selecting a track150
– switching on/off138
– tone control139
– volume139
CD player149
– controls138
– fast forward/reverse152
– playing a track151
– random order152
– repeating a track151
– selecting a track150
– switching on/off138
– tone control139
– volume139
Center armrest96
Center brake lamp189
Center console, refer to
Around the center
console14
"Central locking"28
Central locking system27
– Comfort Access33
– from inside30
– from outside27
Changing bulbs185
Changing the language on the
Control Display73
Changing the measurement
units on the Control
Display65
Changing wheels192
Chassis number, refer to
Engine compartment177
Check Control70
"Check Control messages"72
Child restraint systems48
Child seats48
Child-restraint fixing system
LATCH49
Chock, folding
– space-saver spare tire192
Chrome parts, care183Chrome parts, refer to
Care181
Cigarette lighter97
Cleaning headlamps57
– washer fluid58
Clock60
– 12h/24h mode
69
– hour signal69
– setting time68
Closing
– from inside30
– from outside27
Clothes hooks97
Cockpit10
Cold start, refer to Starting the
engine52
Comfort Access33
– replacing the battery35
Comfort access
– what to observe before
entering a car wash34
Comfort area, refer to Around
the center console14
Compact disc, refer to
– CD changer149
– CD player149
Compartment for remote
control, refer to Ignition
lock51
Computer61
– displays on Control
Display62
– hour signal69
Condensation, refer to When
the vehicle is parked103
Condition Based Service
CBS179
Configuring settings, refer to
Personal Profile26
Confirmation signals for
vehicle locking/unlocking28
Connecting vacuum cleaner,
refer to Connecting electrical
appliances98
Consumption indicator
– average fuel consumption61
Consumption, refer to Average
fuel consumption61Control Display
– settings64
– switching off/on20
Control Display, refer to
Onboard monitor16
Control stick, refer to Onboard
monitor16
Control unit, refer to Onboard
monitor16
Controls and displays10
Convenient access, refer to
Comfort Access33
Convenient operation
– convertible top30
– windows28
Convenient start, refer to
Starting the engine52
Convertible top37
Coolant178
– checking level178
– filling178
Coolant temperature61
Cooling fluid, refer to
Coolant178
Cooling, maximum92
Copyright2
Country of destination for
navigation115
Cross-hairs in navigation119
Cruise control
– indicator lamp13
Cruising range61
Cupholders97
Curb weight, refer to
Weights205
Current fuel consumption62
"Current position"134
Current position
– displaying134
– entering122
– storing122
D
Dashboard instruments, refer
to Displays12
Dashboard lighting, refer to
Instrument lighting89
Page 227 of 230

225
MOBILITYAT A GLANCE CONTROLS DRIVING TIPS ENTERTAINMENT NAVIGATION REFERENCE
Volume138
– audio sources138
– speed-dependent
control139
– voice instructions129
Volume distribution
– front/rear139
– left/right139
Volume of cargo area205
W
Warning and indicator
lamps13
Warning messages, refer to
Check Control70
Warning triangle196
Washer fluid57
– capacity of reservoir58
Washer fluid reservoir58
Waste tray, refer to Ashtray97
Water on roads, refer to
Driving through water103
Waterfall lighting, refer to
Ambient lighting90
Waveband of radio141
Wear indicators in tires, refer to
Minimum tread depth173
Weights205
Welcome lamps87
Wheel stud wrench
– space-saver spare tire192
Wheelbase, refer to
Dimensions203
Wheels and tires164
Wheels, new174
Width, refer to
Dimensions203
Wind deflector40
Window washer, refer to
Washer fluid58
Window washer reservoir,
refer to Washer fluid
– volume, refer to
Capacities206Windows36
– closing36
– convenient operation28
– opening36
– pinch protection system37
Windows, indicator on Control
Display16
Windshield
– cleaning57
– defrosting and removing
condensation93
Windshield, defrosting, refer to
Defrosting windows93
Windshield washer system56
– washer fluid58
– washer nozzles57
Windshield wiper blades,
changing185
Windshield wipers, refer to
Wiper system56
Winter tires175
– setting speed limit72
– storage175
Wiper blade replacement185
Wiper system56
"With highways" in
navigation124
Word-matching principle for
navigation125
Work in the engine
compartment176
Wrench/screwdriver, refer to
Onboard vehicle tool kit185
X
Xenon lamps
– replacing bulb186