heating MINI Hardtop 2 Door 2010 Owner's Manual (Mini Connected)
[x] Cancel search | Manufacturer: MINI, Model Year: 2010, Model line: Hardtop 2 Door, Model: MINI Hardtop 2 Door 2010Pages: 230, PDF Size: 4.02 MB
Page 17 of 230
MOBILITYAT A GLANCE CONTROLS DRIVING TIPS ENTERTAINMENT
15
NAVIGATION REFERENCE
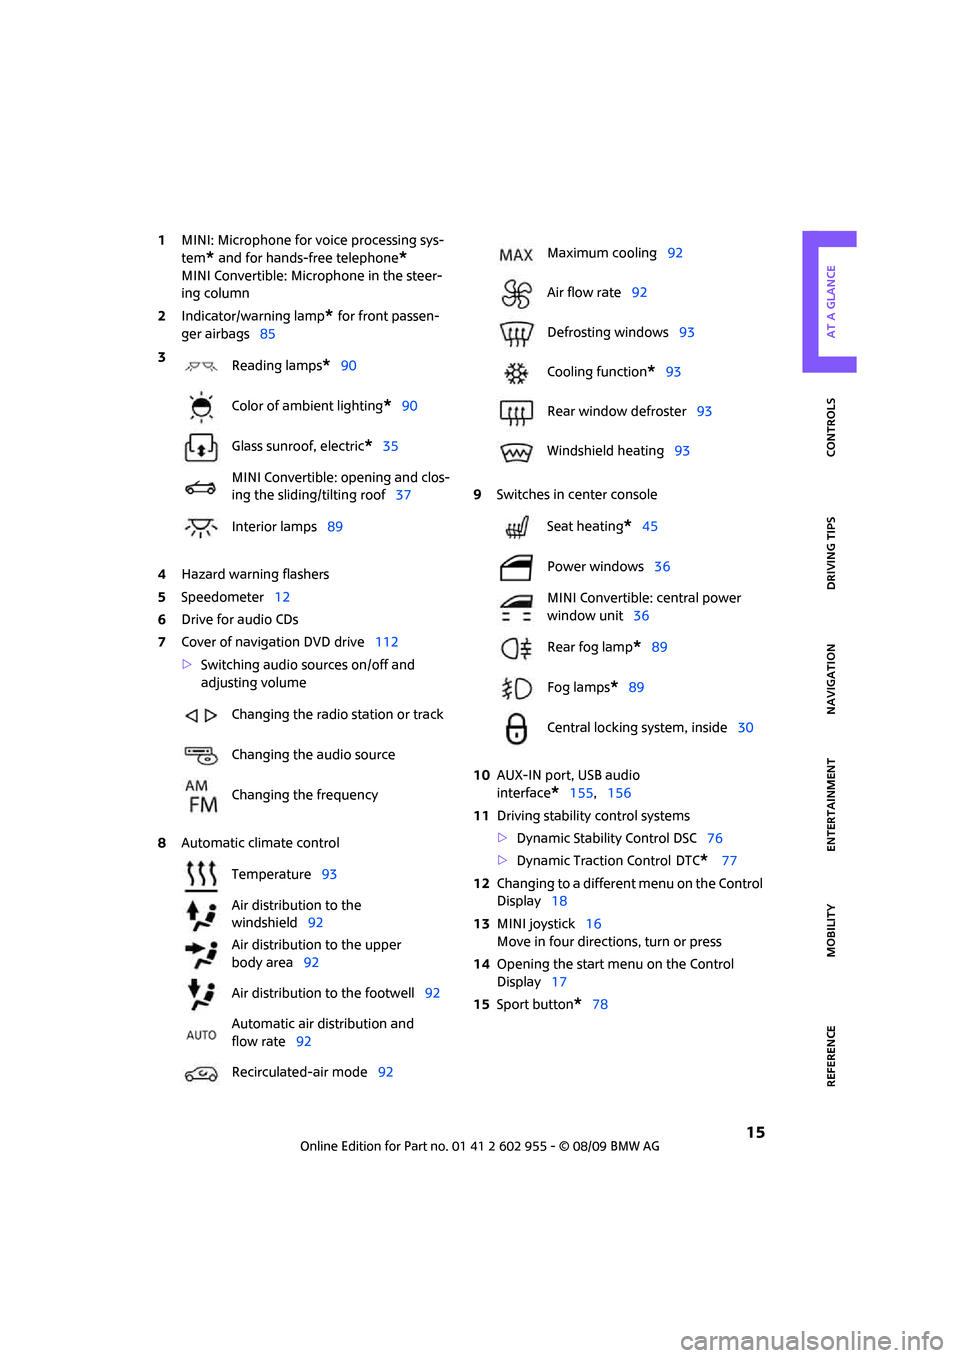
1MINI: Microphone for voice processing sys-
tem
* and for hands-free telephone*
MINI Convertible: Microphone in the steer-
ing column
2Indicator/warning lamp
* for front passen-
ger airbags85
4Hazard warning flashers
5Speedometer12
6Drive for audio CDs
7Cover of navigation DVD drive112
>Switching audio sources on/off and
adjusting volume
8Automatic climate control9Switches in center console
10AUX-IN port, USB audio
interface
*155,156
11Driving stability control systems
>Dynamic Stability Control DSC76
>Dynamic Traction Control
DTC* 77
12Changing to a different menu on the Control
Display18
13MINI joystick16
Move in four directions, turn or press
14Opening the start menu on the Control
Display17
15Sport button
*78 3
Reading lamps
*90
Color of ambient lighting
*90
Glass sunroof, electric
*35
MINI Convertible: opening and clos-
ing the sliding/tilting roof37
Interior lamps89
Changing the radio station or track
Changing the audio source
Changing the frequency
Temperature93
Air distribution to the
windshield92
Air distribution to the upper
body area92
Air distribution to the footwell92
Automatic air distribution and
flow rate92
Recirculated-air mode92
Maximum cooling92
Air flow rate92
Defrosting windows93
Cooling function
*93
Rear window defroster93
Windshield heating93
Seat heating
*45
Power windows36
MINI Convertible: central power
window unit36
Rear fog lamp
*89
Fog lamps
*89
Central locking system, inside30
Page 47 of 230

MOBILITYAT A GLANCE CONTROLS DRIVING TIPS ENTERTAINMENT
45
NAVIGATION REFERENCE
3.Press button1 and pull the head restraint
out as far as it will go.
4.Additionally press button 2 and pull the
head restraint out completely.
5.Fold back the backrest.
Rear
1.Pull up as far as it will go.
2.Press button1 and pull the head restraint
out completely.
Seat heating*
Switching on
Press once for each temperature level.
Three LEDs indicate the highest temperature.
If you continue driving within the next 15 min-
utes, the seat heating is automatically activated
at the previously set temperature.
The temperature is lowered or the heating is
switched off entirely to save on battery power.
The LEDs stay lit.
Switching off
Press button longer.
Safety belts
Observe the instructions on page42 to
ensure the best possible personal pro-
tection.
safety belt as an additional safety device, but
they do not represent a substitute.
Front and rear seats
Closing
Make sure you hear the lock engage in the belt
buckle.
The upper belt anchor is suitable for adults of
any stature as long as the seat is adjusted prop-
erly, page42.
Opening
1.Grasp the belt firmly.
2.Press the red button in the buckle.
3.Guide the belt into its reel.
MINI Convertible: rear belt guide
Please ensure that the belt guide loop,
arrow, is locked when putting on the rear
seat belts.<
Page 48 of 230

Adjustments
46
Seat belt reminder
Front seats
The indicator lamps come on and an
acoustic signal sounds. In addition, a
message appears on the Control Dis-
play. Check whether the safety belt has
been fastened correctly. The "Fasten safety
belts" reminder is issued when the driver's
safety belt has not been fastened. The "Fasten
safety belts" reminder is also activated at road
speeds above approx. 5 mph or 8 km/h if the
front passenger's safety belt has not been fas-
tened, if objects are placed on the front passen-
ger seat, or if driver or front passenger unfasten
their safety belts.
Damage to safety belts
If the safety belts are damaged or stressed
in an accident: have the safety belt system
and its seat-belt tensioners replaced and the
belt anchors checked. Have this work carried out
only by a MINI dealer or by a workshop that has
specially trained personnel working in accor-
dance with the specifications of the MINI manu-
facturer; otherwise, correct operation of these
safety systems is not ensured.<
Mirrors
Exterior mirrors
The front passenger's mirror is more con-
vex than the driver's mirror. The objects
seen in the mirror are closer than they appear.
Do not gauge your distance from traffic behind
you on the basis of what you see in the mirror;
otherwise, there is an increased risk of an
accident.<1Adjusting the left or right exterior mirror
2Folding mirrors in and out
*
Manual adjustment
The mirrors can also be adjusted manually: press
the edge of the glass.
Folding mirrors in and out*
Turn the knob beyond the pressure point in
direction 2. The mirrors can be folded in at road
speeds up to approx. 20 mph/30 km/h.
This can be beneficial in narrow streets, for
example, or for moving mirrors that were folded
in by hand back out into their correct positions.
Automatic heating*
At outside temperatures below a certain limit,
both exterior mirrors are automatically heated
while the engine is running or the ignition
switched on.
Interior rearview mirror
To reduce glare from vehicles behind you when
you are driving at night:
Turn the knob.
Page 54 of 230

Driving
52
Starting the engine
Do not allow the engine to run in enclosed
areas; otherwise, inhalation of the noxious
exhaust gases can lead to loss of consciousness
and death. Exhaust gases contain carbon mon-
oxide, an odorless and colorless, but highly toxic
gas. Never leave an unattended vehicle with the
engine running; otherwise, such a vehicle repre-
sents a potential safety hazard.
Before leaving the car while the engine is run-
ning, place the transmission in neutral or move
the selector lever to position P and forcefully
apply the parking brake to prevent the car from
moving.<
Avoid frequent starting in quick succes-
sion or repeated start attempts in which
the engine does not start. Otherwise, the fuel is
not burned or inadequately burned and there is
a danger of overheating and damaging the cat-
alytic converter.<
Do not let the engine warm up with the vehicle
at a standstill. Move off immediately at a moder-
ate engine speed.
When starting the engine, do not depress the
accelerator pedal.
Manual transmission
Key in ignition lock or inside vehicle with Com-
fort Access, refer to page33.
1.Depress the brake.
2.Depress the clutch.
3.Press the start/stop button.
Automatic transmission
Key in ignition lock or inside vehicle with Com-
fort Access, refer to page33.
1.Depress the brake.
2.Shift the selector lever into position P or N.
3.Press the start/stop button.
The starter operates automatically for a certain
time, and stops automatically as soon as the
engine has started.
Switching off the engine
Always take the key with you when you
leave the vehicle.
When parking, apply the parking brake force-
fully; otherwise, the vehicle could begin to roll.<
Manual transmission
1.With the car at a standstill, press the start/
stop button.
2.Shift into first gear or reverse.
3.Forcefully apply the parking brake.
Automatic transmission
1.With the car at a standstill, move the selector
lever to position P.
2.Press the start/stop button.
3.Forcefully apply the parking brake.
Before driving into a car wash
By following these steps, the vehicle is able
to roll:
1.Place the remote control, even with Comfort
Access, in the ignition lock.
2.Depress the brake.
3.Move the selector lever to position N.
4.Switch off the engine.
Parking brake
The parking brake is primarily intended to pre-
vent the vehicle from rolling while parked; it
brakes the rear wheels.
Page 93 of 230
MOBILITYAT A GLANCE CONTROLS DRIVING TIPS ENTERTAINMENT
91
NAVIGATION REFERENCE
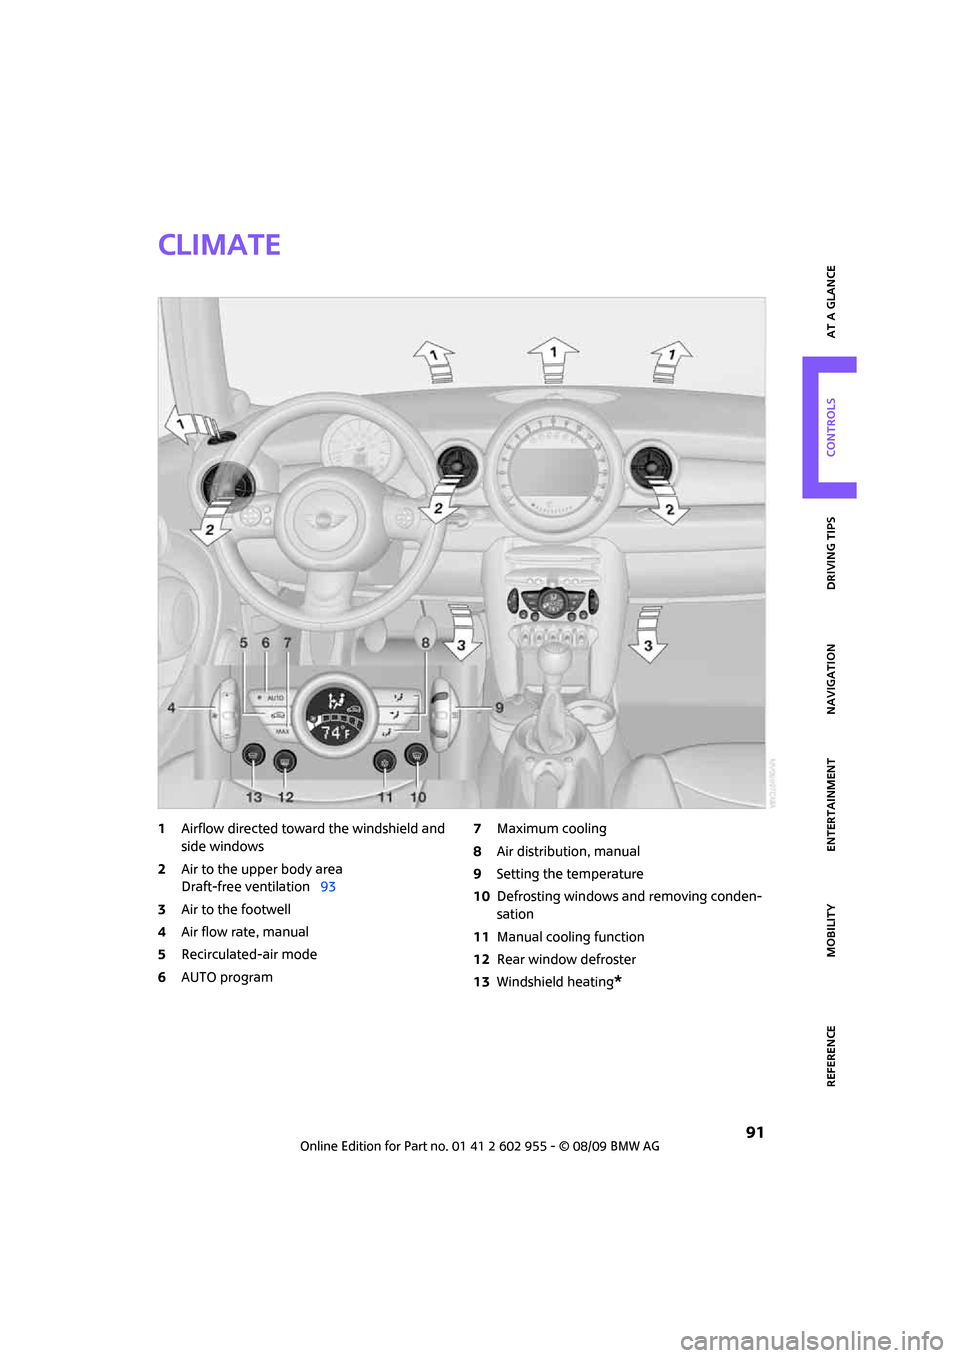
Climate
1Airflow directed toward the windshield and
side windows
2Air to the upper body area
Draft-free ventilation93
3Air to the footwell
4Air flow rate, manual
5Recirculated-air mode
6AUTO program7Maximum cooling
8Air distribution, manual
9Setting the temperature
10Defrosting windows and removing conden-
sation
11Manual cooling function
12Rear window defroster
13Windshield heating
*
Page 95 of 230
MOBILITYAT A GLANCE CONTROLS DRIVING TIPS ENTERTAINMENT
93
NAVIGATION REFERENCE
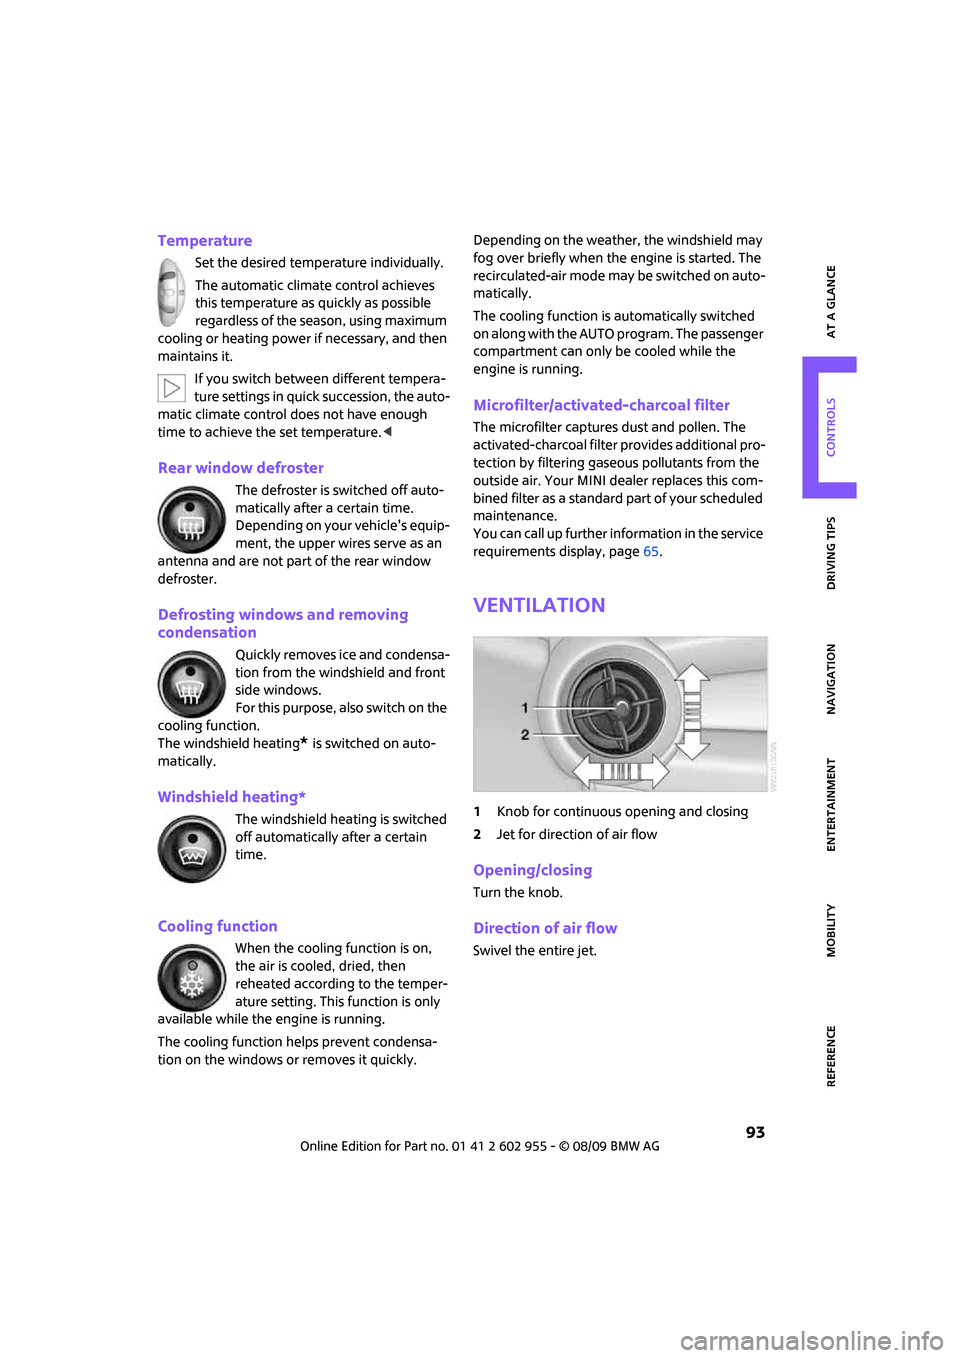
Temperature
Set the desired temperature individually.
The automatic climate control achieves
this temperature as quickly as possible
regardless of the season, using maximum
cooling or heating power if necessary, and then
maintains it.
If you switch between different tempera-
ture settings in quick succession, the auto-
matic climate control does not have enough
time to achieve the set temperature.<
Rear window defroster
The defroster is switched off auto-
matically after a certain time.
Depending on your vehicle's equip-
ment, the upper wires serve as an
antenna and are not part of the rear window
defroster.
Defrosting windows and removing
condensation
Quickly removes ice and condensa-
tion from the windshield and front
side windows.
For this purpose, also switch on the
cooling function.
The windshield heating
* is switched on auto-
matically.
Windshield heating*
The windshield heating is switched
off automatically after a certain
time.
Cooling function
When the cooling function is on,
the air is cooled, dried, then
reheated according to the temper-
ature setting. This function is only
available while the engine is running.
The cooling function helps prevent condensa-
tion on the windows or removes it quickly.Depending on the weather, the windshield may
fog over briefly when the engine is started. The
recirculated-air mode may be switched on auto-
matically.
The cooling function is automatically switched
on along with the AUTO program. The passenger
compartment can only be cooled while the
engine is running.
Microfilter/activated-charcoal filter
The microfilter captures dust and pollen. The
activated-charcoal filter provides additional pro-
tection by filtering gaseous pollutants from the
outside air. Your MINI dealer replaces this com-
bined filter as a standard part of your scheduled
maintenance.
You can call up further information in the service
requirements display, page65.
Ventilation
1Knob for continuous opening and closing
2Jet for direction of air flow
Opening/closing
Turn the knob.
Direction of air flow
Swivel the entire jet.
Page 105 of 230
MOBILITYAT A GLANCE CONTROLS DRIVING TIPS ENTERTAINMENT
103
NAVIGATION REFERENCE
The risk of hydroplaning increases with declining
tread depth on the tires, refer also to Tread
depth on page173.
Driving through water
Drive through water on the road only if it is
not deeper than 1 ft/30 cm, and then only
at walking speed at the most. Otherwise, the
vehicle's engine, the electrical systems and the
transmission may be damaged.<
Parking brake on inclines
On inclines, do not hold the vehicle with
the clutch; use the parking brake. Other-
wise, greater clutch wear will result.<
For information on driving off using Hill Assist*,
refer to page78.
Braking safely
Your MINI is equipped with ABS. If you are in a
situation which requires full braking, it is best to
brake using maximum brake pressure. Since the
vehicle maintains steering responsiveness, you
can still avoid possible obstacles with a mini-
mum of steering effort.
The pulsation of the brake pedal, together with
the sound of hydraulic regulation, indicates that
ABS is actively taking effect.
Driving in wet conditions
When roads are wet or there is heavy rain, briefly
exert gentle pressure on the brake pedal every
few miles. Monitor traffic conditions to ensure
that this maneuver does not endanger other
road users. The heat generated in this process
helps dry the pads and rotors to ensure that
Then full braking force will be immediately avail-
able when it is needed.
Hills
To prevent overheating and the resulting
reduced efficiency of the brake system,
drive long or steep downhill gradients in the
gear in which the least braking is required. Even
light but consistent brake pressure can lead to
high temperatures, brake wear and possibly
even brake failure.
sary. This strategy helps you avoid placing
excessive loads on the brake system. Downshift-
ing in manual mode of the automatic transmis-
sion, page54.
Never drive with the clutch held down,
with the transmission in neutral or with
the engine switched off; otherwise, engine brak-
ing action will not be present or there will be no
power assistance to the brakes or steering.
Never allow floor mats, carpets or any other
objects to protrude into the area around the
pedals; otherwise, pedal function could be
impaired.<
Corrosion on brake rotors
When the vehicle is driven only occasionally,
during extended periods when the vehicle is not
used at all, and in operating conditions where
brake applications are less frequent, there is an
increased tendency for corrosion to form on
rotors, while contaminants accumulate on the
brake pads. This occurs because the minimum
pressure which must be exerted by the pads
during brake applications to clean the rotors is
not reached.
Should corrosion form on the brake rotors, the
brakes will tend to respond with a pulsating
effect that even extended application will fail
to cure.
When the vehicle is parked
Condensation forms while the automatic climate
control is in operation, and then exits under the
vehicle. Traces of condensed water under the
vehicle are therefore normal.
In the MINI Cooper S, the coolant pump may
continue to run for some time after the engine is
switched off. This will generate noise in the
engine compartment.
Page 106 of 230
Things to remember when driving
104
Cargo loading
To avoid loading the tires beyond their
approved carrying capacity, never over-
load the vehicle. Overloading can lead to over-
heating and increases the rate at which damage
develops inside the tires. The ultimate result can
assume the form of a sudden blowout.<
Avoid fluid spills in the cargo bay as they
could damage the vehicle.<
MINI: Cargo bay
Cargo bay cover
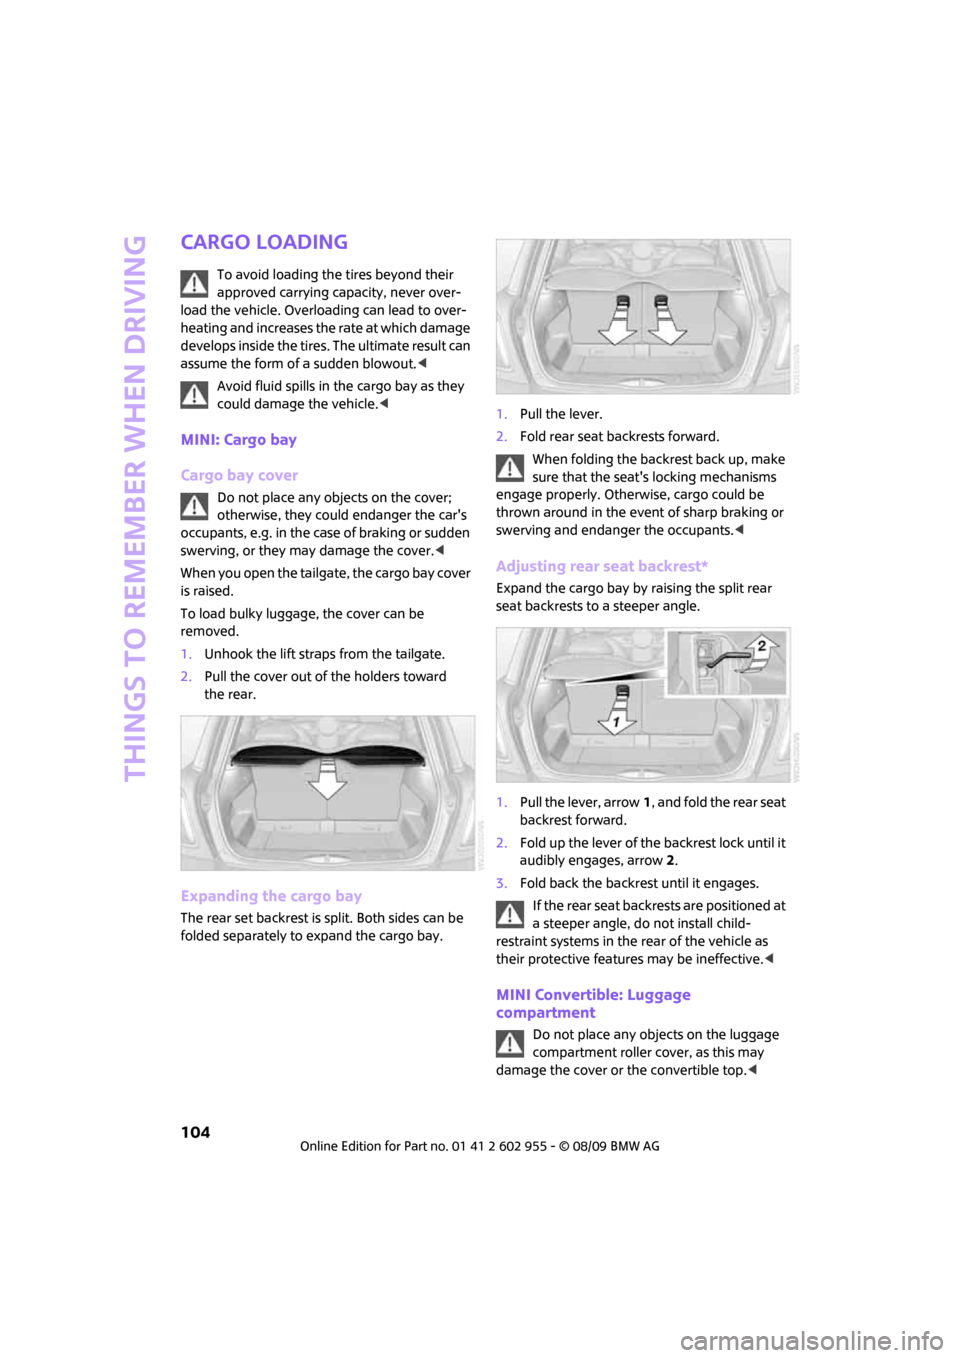
Do not place any objects on the cover;
otherwise, they could endanger the car's
occupants, e.g. in the case of braking or sudden
swerving, or they may damage the cover.<
When you open the tailgate, the cargo bay cover
is raised.
To load bulky luggage, the cover can be
removed.
1.Unhook the lift straps from the tailgate.
2.Pull the cover out of the holders toward
the rear.
Expanding the cargo bay
The rear set backrest is split. Both sides can be
folded separately to expand the cargo bay.1.Pull the lever.
2.Fold rear seat backrests forward.
When folding the backrest back up, make
sure that the seat's locking mechanisms
engage properly. Otherwise, cargo could be
thrown around in the event of sharp braking or
swerving and endanger the occupants.<
Adjusting rear seat backrest*
Expand the cargo bay by raising the split rear
seat backrests to a steeper angle.
1.Pull the lever, arrow1, and fold the rear seat
backrest forward.
2.Fold up the lever of the backrest lock until it
audibly engages, arrow2.
3.Fold back the backrest until it engages.
If the rear seat backrests are positioned at
a steeper angle, do not install child-
restraint systems in the rear of the vehicle as
their protective features may be ineffective.<
MINI Convertible: Luggage
compartment
Do not place any objects on the luggage
compartment roller cover, as this may
damage the cover or the convertible top.<
Page 218 of 230
From A to Z
216
Electric power windows
– initializing36
Electrical malfunction
– convertible top39
– door lock30
– fuel filler flap162
– trunk lid31
Electronic brake-force
distribution76
Electronic Stability Program
ESP, refer to Dynamic
Stability Control DSC76
Emergency operation, refer to
Manual operation
– convertible top39
– door lock30
– fuel filler flap162
– transmission lock, automatic
transmission55
– trunk lid31
Emergency services, refer to
Roadside Assistance196
Engine
– breaking in102
– data202
– overheated, refer to Coolant
temperature61
– speed202
– starting52
– starting, Comfort Access33
– switching off52
Engine compartment177
Engine coolant, refer to
Coolant178
Engine malfunction
– indicator lamp13Engine oil
– adding178
– additives, refer to Approved
engine oils178
– alternative oil types178
– approved engine oils178
– capacity178
– checking level177
– dipstick177
– intervals between changes,
refer to Service
requirements65
– MINI Maintenance
System179
Engine oil level, checking177
Engine output, refer to Engine
data202
Engine starting, refer to
Starting the engine52
Entering address117
Entering destination115
Entering intersection116
Error messages, refer to Check
Control70
"ESN"145,146,147
ESP Electronic Stability
Program, refer to Dynamic
Stability Control DSC76
Exhaust system, refer to Hot
exhaust system102
Exterior mirrors46
– adjusting46
– automatic heating46
– folding in and out46
External audio device96
External audio device, refer to
AUX-IN port155
Eyes
– for tow-starting and towing
away197
– for tying down loads106
F
Fader, tone control139
Failure messages, refer to
Check Control70
Failure of an electrical
consumer195Fast forward
– CD changer152
– CD player152
"Fast route" in navigation124
Fasten safety belts reminder,
refer to Seat belt
reminder46
Fastening safety belts, refer to
Safety belts45
Fastest route for
navigation124
Filter
– microfilter/activated-
charcoal filter for automatic
climate control93
Fine wood, care184
First aid pouch196
Fixture for remote control,
refer to Ignition lock51
Flash when locking/
unlocking28
Flat tire
– run-flat tires174
– Tire Pressure Monitor TPM80
Flat Tire Monitor FTM78
– indicating a flat tire79
– initializing the system79
– snow chains79
– system limits79
Flat tires, refer to Tire
condition173
Floor mats, care183
"FM", waveband138,141
FM, waveband141
Fog lamps
– replacing bulb187,189
Folding rear seat backrest104
Folding roof, refer to
Convertible top with
integrated sliding sunroof37
Footbrake, refer to Braking
safely103
Footwell lamps89
For your own safety5
Frequency, selecting
manually142
Front airbags84
Front fog lamps89
– replacing bulb187
Page 219 of 230
217
MOBILITYAT A GLANCE CONTROLS DRIVING TIPS ENTERTAINMENT NAVIGATION REFERENCE
Front seat adjustment42
Frost on windows, refer to
Defrosting windows93
"FTM"81
FTM, refer to Flat Tire
Monitor78
Fuel163
– gauge61
– high-quality brands163
– quality163
– specifications163
– tank capacity206
Fuel clock, refer to Fuel
gauge61
Fuel display, refer to Fuel
gauge61
Fuel filler flap162
– releasing in the event of
electrical malfunction162
Fuses195
G
Garage door opener, refer to
Integrated universal remote
control94
Gasoline
– refer to Average
consumption61
Gasoline display, refer to Fuel
gauge61
Gasoline, refer to Required
fuel163
Gear indicator
– automatic transmission with
Steptronic53
Gear shifting
– automatic transmission53
– manual transmission53
Gearshift lever
– automatic transmission with
Steptronic53
– manual transmission53
General driving notes102
Glass sunroof, electric35
– convenient operation28,30
– opening, closing35
– raising35
– remote control28Glove compartment95
GPS navigation, refer to
Navigation system112
Grills91
Gross vehicle weight, refer to
Weights205
H
Halogen lamps
– replacing bulb186
Handbrake, refer to Parking
brake52
Hands-free system14
Hazard warning flashers14
"HD radio"144
HD radio, refer to High
Definition Radio144
Head airbags84
Head restraints44
– sitting safely42
Headlamp control,
automatic87
Headlamp flasher55
– indicator lamp11,13
Headlamps
– replacing bulb186
Headlamps, care182
Heated
– mirrors46
– rear window93
– seats45
Heating
– mirrors46
– rear window93
– seats45
Heavy loads, refer to Stowing
cargo106
Height adjustment
– seats43
– steering wheel47
Height, refer to
Dimensions203
High beams88
– headlamp flasher88
– indicator lamp13
– replacing bulb186
High Definition Radio, refer to
HD Radio144High water, refer to Driving
through water103
Highways, refer to Route
criteria124
Hill Assist78
Hills103
Holders for cups97
Home address123
"Home address" in
navigation124
Homepage4
Horn10
Hot exhaust system102
"Hour memo"69
"House number" in
destination entry117
Hydroplaning102
I
IBOC, refer to HD Radio144
Ice warning60
Icy roads, refer to Outside
temperature warning60
ID3 tag, refer to Information
about the track150
Ignition51
– switched off51
– switched on51
Ignition key position 1, refer to
Radio readiness51
Ignition key position 2, refer to
Ignition on51
Ignition key, refer to
Integrated key/remote
control26
Ignition lock51
Imprint2
Indicator and warning
lamps13
– Tire Pressure Monitor TPM82
Indicator lighting, refer to
Instrument lighting89
Individual settings, refer to
Personal Profile26
Inflation pressure monitoring,
refer to Tire Pressure Monitor
TPM80