clock MINI Hardtop 2 Door 2015 Owner's Manual (Mini Connected)
[x] Cancel search | Manufacturer: MINI, Model Year: 2015, Model line: Hardtop 2 Door, Model: MINI Hardtop 2 Door 2015Pages: 244, PDF Size: 11.11 MB
Page 26 of 244

2."Touchpad"3.Select the desired function.▷"Speller": enter letters and numbers.▷"Interactive map": viewing the interac‐
tive map.▷"Audio feedback": pronounces entered
letters and numbers.
Entering letters and numbers
Entering letters requires some practice at the
beginning. When entering, pay attention to the
following:
▷For the input of upper/lower case letters
and numbers, it may be necessary to switch
via the controller to the corresponding In‐
put mode, refer to page 25, e.g. when the
spelling of upper and lower case letters is
identical.▷Enter characters as they are displayed on
the Control Display.▷Always enter associated characters, such as
accents or periods so that the letter can be
clearly recognized. Possible input depends
on the set language. Where necessary, en‐
ter special characters via the controller.▷To delete a character, slide to the left on
the touchpad.▷To enter a blank space, slide to the right in
the center of the touchpad.▷To enter a hyphen, slide to the right in the
upper area of the touchpad.▷To enter an underscore, swipe to the right
in the lower area of the touchpad.
Operating the interactive map
The interactive map in the navigation system
can be moved via the touchpad.
FunctionControlsInteractive map.Swipe into respective
direction.Enlarge/shrink in‐
teractive map.Drag in or out on the
touchpad with fingers.Display menu.Tap once.
Changing settings
You may change control display settings via
touchpad. Swipe left or right accordingly.
Example: setting the clock
Setting the clock
On the Control Display:
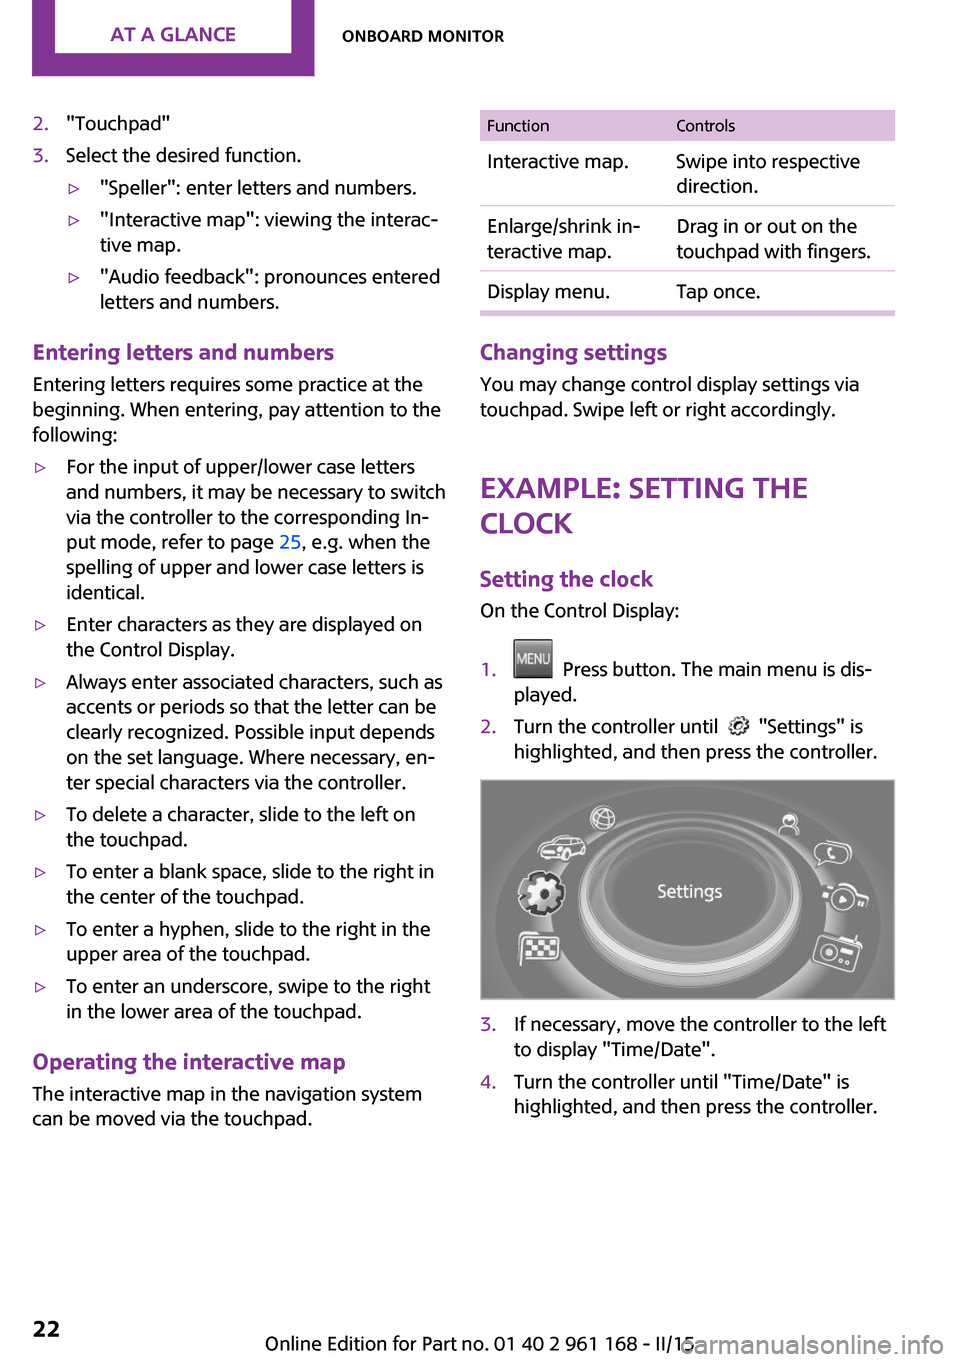
1. Press button. The main menu is dis‐
played.2.Turn the controller until "Settings" is
highlighted, and then press the controller.3.If necessary, move the controller to the left
to display "Time/Date".4.Turn the controller until "Time/Date" is
highlighted, and then press the controller.Seite 22AT A GLANCEOnboard monitor22
Online Edition for Part no. 01 40 2 961 168 - II/15
Page 100 of 244

Knee airbagThe knee airbag supports the legs in a frontal
impact.
Protective action Airbags are not triggered in every impact situa‐
tion, e.g., in less severe accidents or rear-end
collisions.
Information on how to ensure the opti‐
mal protective effect of the airbags▷Keep at a distance from the airbags.▷Always grasp the steering wheel on the
steering wheel rim, holding your hands at
the 3 o'clock and 9 o'clock positions, to
keep the risk of injury to your hands or
arms as low as possible when the airbag is
triggered.▷There should be no person, animals, or ob‐
jects between an airbag and a person.▷Do not use the cover of the front airbag on
the front passenger side as a storage area.▷Dashboard and windshield on the front
passenger side must stay clear - do not at‐
tach adhesive labels or coverings and do
not attach brackets or cables, e. g., for GPS
devices or' mobile phones.▷Make sure that the front passenger is sitting
correctly, i.e., keeps his or her feet and legs
in the footwell; otherwise, leg injuries might
occur when front airbag is activated.▷Do not place slip covers, seat cushions or
other objects on the front passenger seat
that are not approved specifically for seats
with integrated side airbags.▷Do not hang pieces of clothing, such as
jackets, over the backrests.▷Make sure that occupants keep their heads
away from the side airbag and do not rest
against the head airbag; otherwise, injuries
might occur when airbag is activated.▷Do not remove the airbag system.▷Do not remove the steering wheel.▷Do not apply adhesive materials to the air‐
bag cover panels, do not cover them or
modify them in any way.▷Never modify either the individual compo‐
nents or the wiring in the airbag system.
This also applies to steering wheel covers,
the dashboard, the seats, the roof pillars
and the sides of the roofliner. ◀
Even when you follow all instructions very
closely, injury from contact with the airbags
cannot be ruled out in certain situations.
The ignition and inflation noise may lead to
short-term and, in most cases, temporary hear‐
ing impairment in sensitive individuals.
Malfunction, deactivation and after de‐
ploying the airbags
Do not touch the individual components imme‐
diately after the system has been triggered;
otherwise, you may risk burns.
Only have the airbags checked, repaired or dis‐
mantled and the airbag generator scrapped by
the service center or an authorized repair shop
for handling explosives.
Non-professional attempts to service the sys‐
tem could lead to failure in an emergency or
unintentional activation of the airbag - both
may lead to injury. ◀
Warnings and information on the airbags are
also found on the sun visors.
Functional readiness of the airbag
system
When the ignition is reel on, the warn‐
ing lamp in the instrument cluster lights
up briefly and thereby indicates the op‐
erational readiness of the entire airbag system
and the belt tensioner.
Airbag system malfunctioning
▷Warning lamp does not come on when the
ignition is turned on.▷The warning lamp lights up continuously.Seite 96CONTROLSSafety96
Online Edition for Part no. 01 40 2 961 168 - II/15
Page 174 of 244

RefuelingVehicle features and op‐
tions
This chapter describes all standard, country-
specific and optional features offered with the
series. It also describes features that are not necessarily available in your car, e. g., due to
the selected options or country versions. This
also applies to safety-related functions and sys‐
tems. The respectively applicable country provi‐
sions must be observed when using the respec‐
tive features and systems.
General information Observe the fuel recommendation, refer to
page 172, prior to refueling.
Refuel promptly
Refuel no later than at a range of
30 miles/50 km or engine operation might fail and damage might occur. ◀
Fuel lid Opening1.Grasp the fuel filler flap at the rear edge
and open it.2.Turn the tank lid counterclockwise.3.Place the tank lid in the bracket attached to
the fuel filler flap.
Closing
1.Fit the lid and turn it clockwise until you
clearly hear a click.2.Close the fuel filler flap.
Do not pinch the retaining strap
Do not pinch the retaining strap attached
to the lid; otherwise, the lid cannot be closed
properly and fuel vapors can escape. ◀
Manually unlocking fuel filler flap
In the event of an electrical malfunction, e.g.
Seite 170MOBILITYRefueling170
Online Edition for Part no. 01 40 2 961 168 - II/15
Page 197 of 244

CoolantVehicle features and op‐
tions
This chapter describes all standard, country-
specific and optional features offered with the
series. It also describes features that are not
necessarily available in your car, e. g., due to
the selected options or country versions. This
also applies to safety-related functions and sys‐
tems. The respectively applicable country provi‐
sions must be observed when using the respec‐
tive features and systems.
Hints Danger of burns from hot engine
Do not open the cooling system while the
engine is hot; otherwise, esliding coolant may
cause burns. ◀
Suitable additives
Only use suitable additives; otherwise,
engine damage may occur. The additives are
harmful to your health. ◀
Coolant consists of water and additives.
Not all commercially available additives are
suitable for your vehicle. Ask your service cen‐
ter for suitable additives.
Coolant level Checking
There are yellow Min and Max marks in the
coolant reservoir.1.Let the engine cool.2.Turn the coolant reservoir lid counterclock‐
wise to unscrew and open it.3.The coolant level is correct if it lies between
the minimum and maximum marks in the
filler neck.
Adding
1.Let the engine cool.2.Turn the coolant reservoir lid counterclock‐
wise to unscrew and open it.3.If the coolant is low, slowly add coolant up
to the specified level; do not overfill.Seite 193CoolantMOBILITY193
Online Edition for Part no. 01 40 2 961 168 - II/15
Page 204 of 244

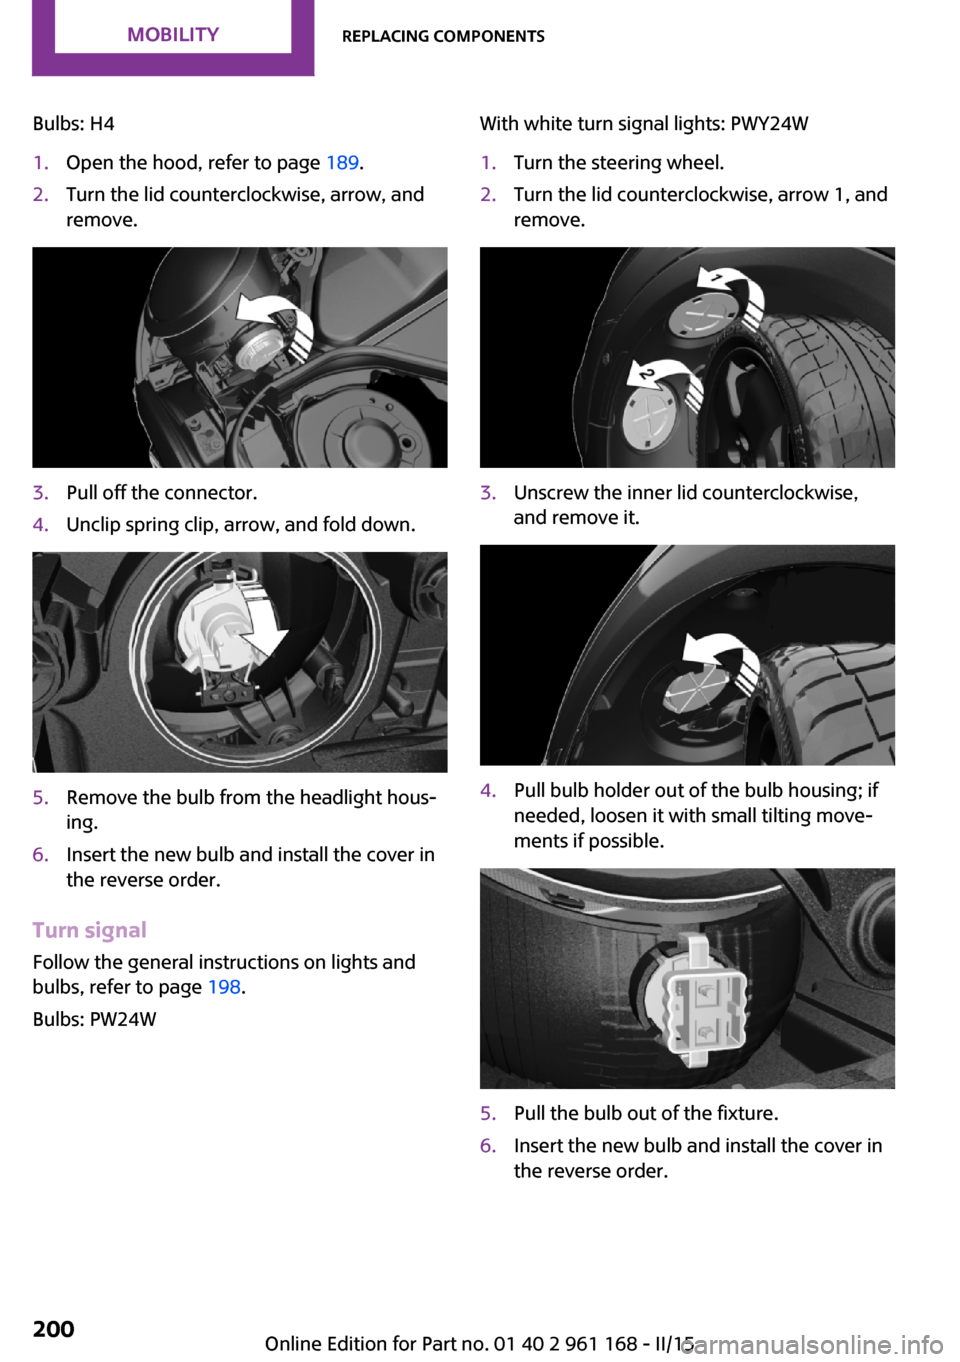
Bulbs: H41.Open the hood, refer to page 189.2.Turn the lid counterclockwise, arrow, and
remove.3.Pull off the connector.4.Unclip spring clip, arrow, and fold down.5.Remove the bulb from the headlight hous‐
ing.6.Insert the new bulb and install the cover in
the reverse order.
Turn signal
Follow the general instructions on lights and
bulbs, refer to page 198.
Bulbs: PW24W
With white turn signal lights: PWY24W1.Turn the steering wheel.2.Turn the lid counterclockwise, arrow 1, and
remove.3.Unscrew the inner lid counterclockwise,
and remove it.4.Pull bulb holder out of the bulb housing; if
needed, loosen it with small tilting move‐
ments if possible.5.Pull the bulb out of the fixture.6.Insert the new bulb and install the cover in
the reverse order.Seite 200MOBILITYReplacing components200
Online Edition for Part no. 01 40 2 961 168 - II/15
Page 205 of 244

LED parking lights/LED fog lightsFollow the general instructions on lights and
bulbs, refer to page 198.
The lights feature LED technology. Contact your
service center in the event of a malfunction.
Parking lights/fog lights/daytime
running lights
Follow the general instructions on lights and
bulbs, refer to page 198.
Bulbs:▷Parking lights for halogen headlights: W5W
Parking lights for LED headlights: W5W NBV▷Daytime running light: PSX24W▷Fog lamp: H81.Turn the steering wheel.2.Turn the lid counterclockwise, arrow 2, and
remove.3.Remove the corresponding connector.4.▷Remove bulb holder of the parking
lamp, arrow 1, by turning it counter‐
clockwise.
Pull the bulb out of the fixture.▷Remove the bulb holder of the daytime
running lights, arrow 2, by pressing to‐
gether the top and bottom latch mech‐
anism.
For better accessibility, if needed, re‐
move the bulb of the fog lamp before‐
hand.▷Turn the bulb holder of the fog lamp
counterclockwise, arrow 3, and re‐
move.5.Insert the new bulbs and install the cover in
the reverse order.
When installing the daytime running lights,
audibly latch the bulb holder first at the
bottom, then at the top.
Tail lights, bulb replacement
Overview
Vehicles with a rear fog lamp
1Side tail lights2Rear fog lamp3License plate lamp4Third brake lampSeite 201Replacing componentsMOBILITY201
Online Edition for Part no. 01 40 2 961 168 - II/15
Page 206 of 244

Vehicle with two rear fog lights1Side tail lights2Rear fog lights3License plate lamp4Third brake lamp
Side tail lights
1Brake lights/tail lights2Turn signal3Reversing lights
Side LED tail lights
1Tail lights2Turn signal3Brake light4Reversing lights
Side tail lights
Follow the general instructions on lights and
bulbs, refer to page 198.
Bulbs: P21W
1.Open the tailgate, refer to page 40.2.Remove left or right cover.3.Through the opening, loosen the plug con‐
nector, arrow 2 on the bulb holder.
Press the latches together, arrows 1, and
remove the bulb holder.4.Remove the bulb holder from the opening.5.Press the defective bulb gently into the
socket, turn counterclockwise and remove.▷Arrow 1: brake lights/tail lights▷Arrow 2: turn signalSeite 202MOBILITYReplacing components202
Online Edition for Part no. 01 40 2 961 168 - II/15
Page 207 of 244

▷Arrow 3: reversing light6.Proceed in the reverse order to insert the
new bulb and attach the bulb holder. Make
sure that the bulb holder engages in all fas‐
teners.
Central brake lamp and license plate
lamp
Follow the general instructions on lights and
bulbs, refer to page 198.
The lights feature LED technology. Contact your
service center in the event of a malfunction.
Vehicles with a rear fog lamp Follow the general instructions on lights and
bulbs, refer to page 198.
Bulbs: W16W
1.On vehicles with heat shield:
Loosen 3 screws, arrow.2.Push the heat shield forward and the
bumper back in order to be able to reach
the fog lamp.3.Turn the bulb socket counterclockwise and
remove.The wire is long enough to guide the socket
down and through between any heat shield
that may be installed and the bumper.4.Replace defective bulb.5.To install the new bulb, proceed in reverse
order of removal.
Vehicle with two rear fog lights
Follow the general instructions on lights and
bulbs, refer to page 198.
Bulbs: W16W
Left rear fog lamp:
1.On vehicles with heat shield:
Loosen 3 screws, arrow.2.Push the heat shield forward and the
bumper back in order to be able to reach
the fog lamp.3.Turn the bulb socket counterclockwise and
remove.Seite 203Replacing componentsMOBILITY203
Online Edition for Part no. 01 40 2 961 168 - II/15
Page 208 of 244

The wire is long enough to guide the socket
down and through between any heat shield
that may be installed and the bumper.4.Replace defective bulb.5.To install the new bulb, proceed in reverse
order of removal.
Right fog lamp:
1.Turn the bulb socket counterclockwise and
remove.
The wire is long enough to guide the socket
down and through between any heat shield
that may be installed and the bumper.2.Replace defective bulb.3.To install the new bulb, proceed in reverse
order of removal.
Side turn signal, bulb replacement
Follow the general instructions on lights and
bulbs, refer to page 198.
Bulbs:
▷With orange lens: W5W▷With white lens: WY5W diadem1.Pull the turn signal housing at the top out
of the catch, then unhook it at the bottom.2.Turn the bulb socket counterclockwise and
remove.3.Replace the bulb.4.Proceed in the reverse order to insert the
new bulb and install the turn signal hous‐
ing.
First hook the turn signal housing to the
bottom, then at the top press it into the
latch.
Changing wheels
Hints
When using run-flat tires or tire sealants, a tire
does not need to be changed immediately in
the event of pressure loss due to a flat tire.
Which is why no spare tire is available.
The tools for changing wheels are available as
accessories from your service center.
Seite 204MOBILITYReplacing components204
Online Edition for Part no. 01 40 2 961 168 - II/15
Page 235 of 244

Camera-based cruise control,ACC 115
Camera lenses, care 217
Camera, rearview cam‐ era 125
Can holder, refer to Cu‐ pholder 148
Car battery 207
Car care products 215
Care, displays 217
Care, vehicle 215
Cargo area 144
Cargo area, adapting size 149
Cargo area, enlarging 145
Cargo area lid 40
Cargo area, storage compart‐ ments 149
Cargo cover 144
Cargo, securing 158
Cargo straps, securing cargo 158
Car key, refer to Remote con‐ trol 34
Carpet, care 217
Car wash 214
Catalytic converter, refer to Hot exhaust system 155
CBS Condition Based Serv‐ ice 195
Center armrest 148
Center console 16
Central instrument cluster, LED ring 85
Central locking system 40
Central screen, refer to Control Display 18
Changes, technical, refer to Safety 7
Changing parts 197
Changing wheels 204
Changing wheels/tires 181
Chassis number, see vehicle identification number 9
Check Control 73
Checking the oil level elec‐ tronically 190 Children, seating position 56
Children, transporting safely 56
Child restraint fixing sys‐ tem 56
Child restraint fixing system LATCH 57
Child restraint fixing systems, mounting 56
Child safety locks 59
Child seat, mounting 56
Child seats 56
Chrome parts, care 216
Chrono package, cockpit 87
Cigarette lighter 143
Cleaning, displays 217
Climate control 132, 135
Clock 77
Closing/opening via door lock 39
Closing/opening with remote control 37
Clothes hooks 149
Coasting 165
Coasting with engine decou‐ pled, coasting 165
Coasting with idling en‐ gine 165
Combination reel, refer to Turn signals 65
Combination reel, refer to Wiper system 65
Comfort Access 41
Compartments in the doors 148
Compass 141
Compressor 183
Computer, refer to On-board computer 81
Condensation on win‐ dows 137
Condensation under the vehi‐ cle 156
Condition Based Service CBS 195 Configuring driving pro‐
gram 114
Confirmation signal 43
Control Display 18
Control Display, settings 84
Controller 19
Control systems, driving stabil‐ ity 111
Convenient opening 38
Coolant 193
Cooling function 133, 136
Cooling, maximum 136
Cooling system 193
Cornering lamp 92
Corrosion on brake discs 156
Cosmetic mirror 143
Courtesy lamps during unlock‐ ing 37
Courtesy lamps with the vehi‐ cle locked 38
Cruise control 121
Cruise control, active 115
Cruising range 78
Cupholder 148
Current fuel consumption 78
D
Damage, tires 180
Damping control, dy‐ namic 112
Data, technical 220
Date 77
Daytime running lights 91
Defrosting, refer to defrosting the windows 133
Defrosting, refer to Windows, defrosting 137
Defrosting the windows 133
Dehumidifying, air 133, 136
Deleting personal data 25
Deletion of personal data 25
Destination distance 82
Digital clock 77
Digital compass 141
Dimensions 220 Seite 231Everything from A to ZREFERENCE231
Online Edition for Part no. 01 40 2 961 168 - II/15