reset MINI Hardtop 2 Door 2015 User Guide
[x] Cancel search | Manufacturer: MINI, Model Year: 2015, Model line: Hardtop 2 Door, Model: MINI Hardtop 2 Door 2015Pages: 251, PDF Size: 11.4 MB
Page 89 of 251
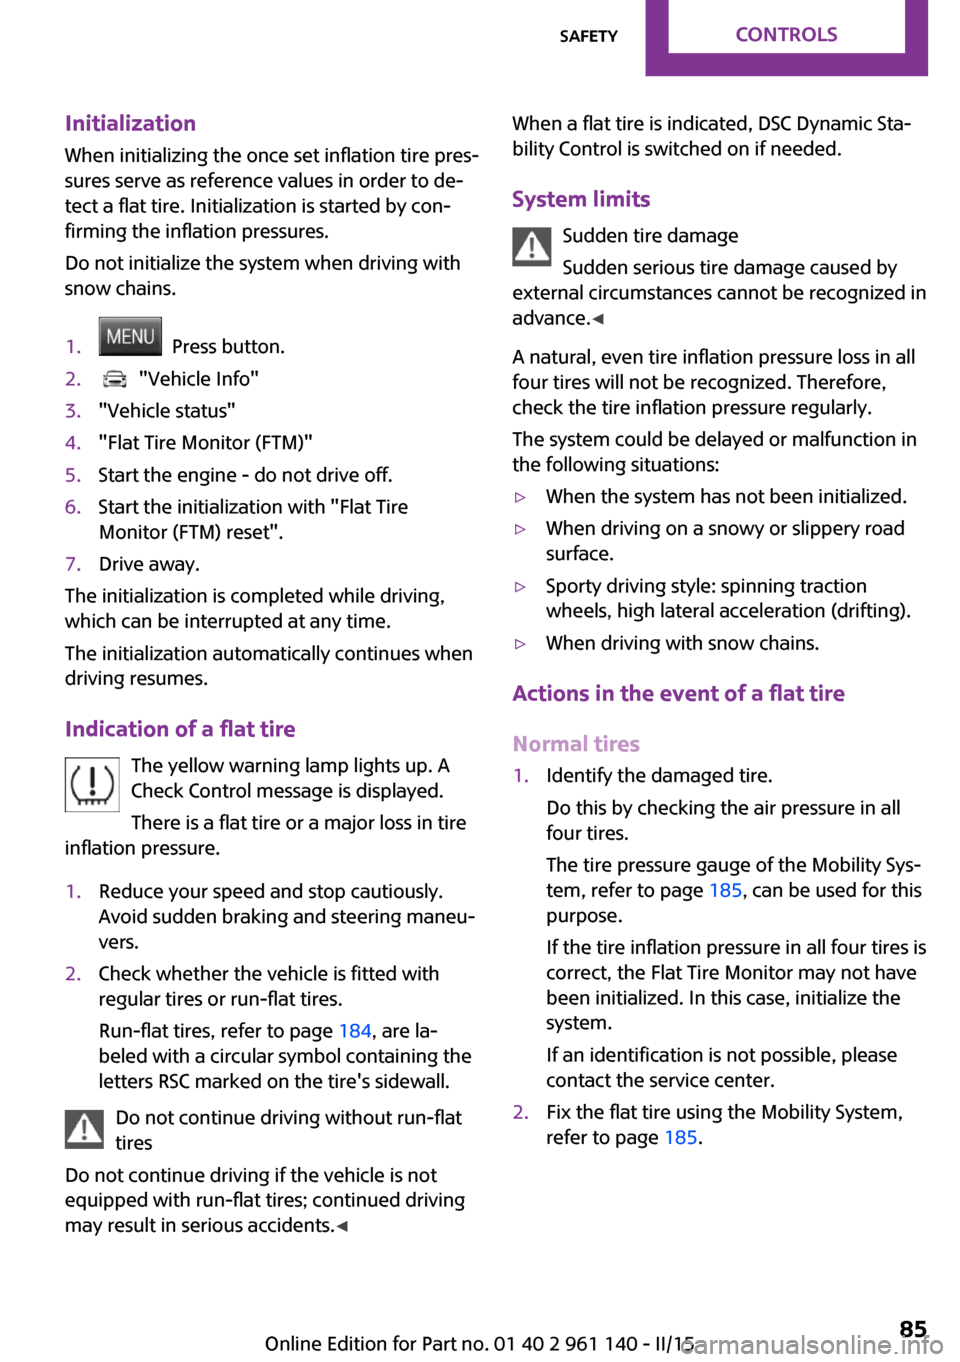
InitializationWhen initializing the once set inflation tire pres‐
sures serve as reference values in order to de‐
tect a flat tire. Initialization is started by con‐
firming the inflation pressures.
Do not initialize the system when driving with
snow chains.1. Press button.2. "Vehicle Info"3."Vehicle status"4."Flat Tire Monitor (FTM)"5.Start the engine - do not drive off.6.Start the initialization with "Flat Tire
Monitor (FTM) reset".7.Drive away.
The initialization is completed while driving,
which can be interrupted at any time.
The initialization automatically continues when
driving resumes.
Indication of a flat tire The yellow warning lamp lights up. A
Check Control message is displayed.
There is a flat tire or a major loss in tire
inflation pressure.
1.Reduce your speed and stop cautiously.
Avoid sudden braking and steering maneu‐
vers.2.Check whether the vehicle is fitted with
regular tires or run-flat tires.
Run-flat tires, refer to page 184, are la‐
beled with a circular symbol containing the
letters RSC marked on the tire's sidewall.
Do not continue driving without run-flat
tires
Do not continue driving if the vehicle is not
equipped with run-flat tires; continued driving
may result in serious accidents. ◀
When a flat tire is indicated, DSC Dynamic Sta‐
bility Control is switched on if needed.
System limits Sudden tire damage
Sudden serious tire damage caused by
external circumstances cannot be recognized in
advance. ◀
A natural, even tire inflation pressure loss in all
four tires will not be recognized. Therefore,
check the tire inflation pressure regularly.
The system could be delayed or malfunction in
the following situations:▷When the system has not been initialized.▷When driving on a snowy or slippery road
surface.▷Sporty driving style: spinning traction
wheels, high lateral acceleration (drifting).▷When driving with snow chains.
Actions in the event of a flat tire
Normal tires
1.Identify the damaged tire.
Do this by checking the air pressure in all
four tires.
The tire pressure gauge of the Mobility Sys‐
tem, refer to page 185, can be used for this
purpose.
If the tire inflation pressure in all four tires is
correct, the Flat Tire Monitor may not have
been initialized. In this case, initialize the
system.
If an identification is not possible, please
contact the service center.2.Fix the flat tire using the Mobility System,
refer to page 185.Seite 85SafetyCONTROLS85
Online Edition for Part no. 01 40 2 961 140 - II/15
Page 147 of 251

The Coasting driving condition is enabled under
certain conditions.
Under certain conditions the engine is auto‐
matically decoupled from the transmission in
selector lever position D. The vehicle continues
traveling with the engine idling to reduce fuel
consumption. Selector lever position D remains
engaged. An indicator provides information
about the distance traveled in Coasting mode.
In addition, context-sensitive instructions are
displayed to assist with an optimized fuel con‐
sumption driving style.
The achieved extended range is displayed in
the instrument cluster.
At a glance The system includes the following MINIMAL
functions and displays:▷GREEN bonus range, refer to page 143.▷GREEN tips driving instruction, refer to
page 144.▷GREEN climate control, refer to page 143.▷Coasting driving condition, refer to
page 144.
Activating GREEN mode
Turn Driving Dynamics Control to
the right until GREEN mode is
displayed in the instrument clus‐
ter.
Configuring GREEN mode
Via radio
1. "Settings"2.Select between "Driving mode" or "GREEN
Mode"
Configure the program.
GREEN tip
"GREEN speed warning":
Displays a reminder when the set GREEN mode
speed is exceeded.
GREEN climate control
"GREEN climate control" :
Climate control is set to be fuel-efficient.
By making a slight change to the set tempera‐
ture, or adjusting the rate of heating or cooling
of the car's interior fuel consumption can be
economized.
The outputs of the seat heater and the exterior
Additionally heat output to seats and exterior
mirror is reduced.
Exterior mirror heat is available when outside
temperatures are very low.
Coasting
Fuel-efficiency can be optimized by disengag‐
ing the engine and Coasting, refer to page 144,
with the engine idling.
This function is only available in GREEN mode.
Display in the instrument cluster
GREEN bonus range An adjusted driving style helps
you extend your driving range.
This may be displayed as the bo‐
nus range in the instrument clus‐
ter.
The bonus range is shown in the range display.
The bonus range is automatically reset every
time the vehicle is refueled.▷Green display: efficient driving style.▷Gray display: adjust driving style, e. g. by
backing off the accelerator pedal.Seite 143Saving fuelDRIVING TIPS143
Online Edition for Part no. 01 40 2 961 140 - II/15
Page 152 of 251

ToneVehicle features and op‐
tions
This chapter describes all standard, country-
specific and optional features offered with the
series. It also describes features that are not
necessarily available in your car, e. g., due to
the selected options or country versions. This
also applies to safety-related functions and sys‐
tems. The respectively applicable country provi‐
sions must be observed when using the respec‐
tive features and systems.
General information Settings are stored for the profile, refer to
page 23, currently in use.
Treble, bass, balance,
and fader
General information▷"Treble": treble adjustment.▷"Bass": depth adjustment.▷"Balance": left/right volume distribution.▷"Fader": front/rear volume distribution.
Adjusting treble, bass, balance, and
fader
1. "Settings", "Radio" or
"Media"2."Tone"3.Select the desired tone settings.4.Set the desired value.Volume
General information▷"Speed volume": speed-dependent volume
control.▷"PDC": volume of the PDC signal compared
to the entertainment sound output.▷"Gong": volume of the signal, such as the
safety belt reminder, compared to the en‐
tertainment sound output.▷"Microphone": volume of the microphone
during a phone call.▷"Loudspeak.": volume of the loudspeakers
during a phone call.
The following volumes are only stored for the
respective paired telephone:
"Microphone", "Loudspeak.".
Adjusting
1. "Settings", "Radio" or
"Media"2."Tone"3."Volume settings"4.Select the desired volume setting.5.Set the desired value.
Resetting the tone set‐
tings
1. "Settings", "Radio" or
"Media"2."Tone"3."Reset"Seite 148ENTERTAINMENTTone148
Online Edition for Part no. 01 40 2 961 140 - II/15
Page 155 of 251
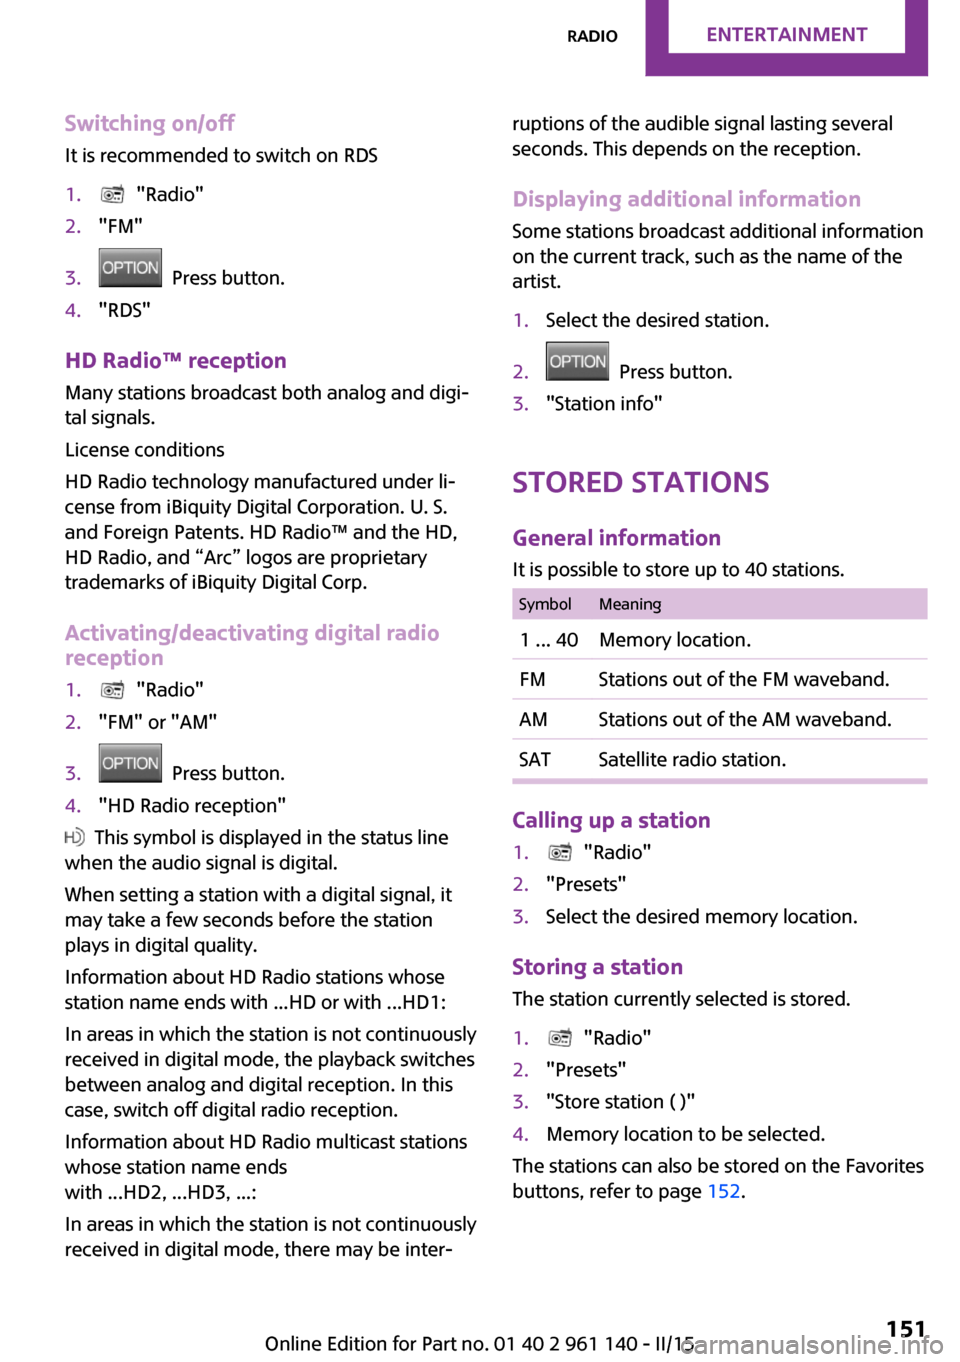
Switching on/offIt is recommended to switch on RDS1. "Radio"2."FM"3. Press button.4."RDS"
HD Radio™ reception
Many stations broadcast both analog and digi‐
tal signals.
License conditions
HD Radio technology manufactured under li‐
cense from iBiquity Digital Corporation. U. S.
and Foreign Patents. HD Radio™ and the HD,
HD Radio, and “Arc” logos are proprietary
trademarks of iBiquity Digital Corp.
Activating/deactivating digital radio
reception
1. "Radio"2."FM" or "AM"3. Press button.4."HD Radio reception"
This symbol is displayed in the status line
when the audio signal is digital.
When setting a station with a digital signal, it
may take a few seconds before the station
plays in digital quality.
Information about HD Radio stations whose
station name ends with ...HD or with ...HD1:
In areas in which the station is not continuously
received in digital mode, the playback switches
between analog and digital reception. In this
case, switch off digital radio reception.
Information about HD Radio multicast stations
whose station name ends
with ...HD2, ...HD3, ...:
In areas in which the station is not continuously
received in digital mode, there may be inter‐
ruptions of the audible signal lasting several
seconds. This depends on the reception.
Displaying additional information
Some stations broadcast additional information
on the current track, such as the name of the
artist.1.Select the desired station.2. Press button.3."Station info"
Stored stations
General information
It is possible to store up to 40 stations.
SymbolMeaning1 ... 40Memory location.FMStations out of the FM waveband.AMStations out of the AM waveband.SATSatellite radio station.
Calling up a station
1. "Radio"2."Presets"3.Select the desired memory location.
Storing a station The station currently selected is stored.
1. "Radio"2."Presets"3."Store station ( )"4.Memory location to be selected.
The stations can also be stored on the Favorites
buttons, refer to page 152.
Seite 151RadioENTERTAINMENT151
Online Edition for Part no. 01 40 2 961 140 - II/15
Page 156 of 251
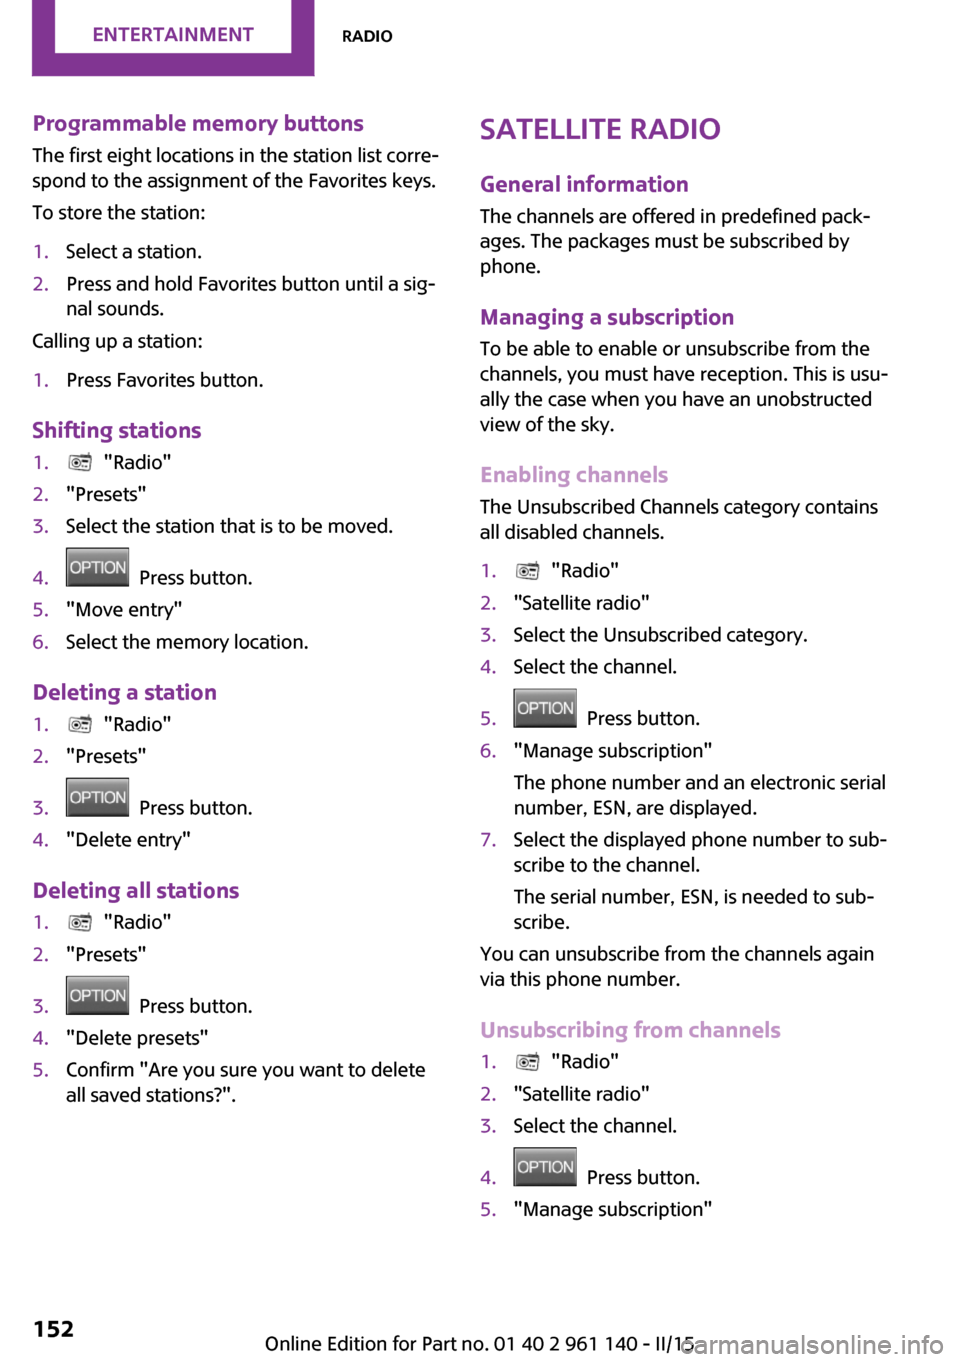
Programmable memory buttons
The first eight locations in the station list corre‐
spond to the assignment of the Favorites keys.
To store the station:1.Select a station.2.Press and hold Favorites button until a sig‐
nal sounds.
Calling up a station:
1.Press Favorites button.
Shifting stations
1. "Radio"2."Presets"3.Select the station that is to be moved.4. Press button.5."Move entry"6.Select the memory location.
Deleting a station
1. "Radio"2."Presets"3. Press button.4."Delete entry"
Deleting all stations
1. "Radio"2."Presets"3. Press button.4."Delete presets"5.Confirm "Are you sure you want to delete
all saved stations?".Satellite radio
General information
The channels are offered in predefined pack‐
ages. The packages must be subscribed by
phone.
Managing a subscription
To be able to enable or unsubscribe from the
channels, you must have reception. This is usu‐
ally the case when you have an unobstructed
view of the sky.
Enabling channels
The Unsubscribed Channels category contains
all disabled channels.1. "Radio"2."Satellite radio"3.Select the Unsubscribed category.4.Select the channel.5. Press button.6."Manage subscription"
The phone number and an electronic serial
number, ESN, are displayed.7.Select the displayed phone number to sub‐
scribe to the channel.
The serial number, ESN, is needed to sub‐
scribe.
You can unsubscribe from the channels again
via this phone number.
Unsubscribing from channels
1. "Radio"2."Satellite radio"3.Select the channel.4. Press button.5."Manage subscription"Seite 152ENTERTAINMENTRadio152
Online Edition for Part no. 01 40 2 961 140 - II/15
Page 167 of 251
▷The ignition is switched on.▷Bluetooth connection on the vehicle and on
the mobile phone activated.▷Bluetooth presets may need to be made on
the mobile phone, e.g., for a connection
without confirmation or visibility, refer to
the mobile phone operating instructions.▷Set Bluetooth passkey for one-time use in
the logon procedure.▷Vehicle is stationary.
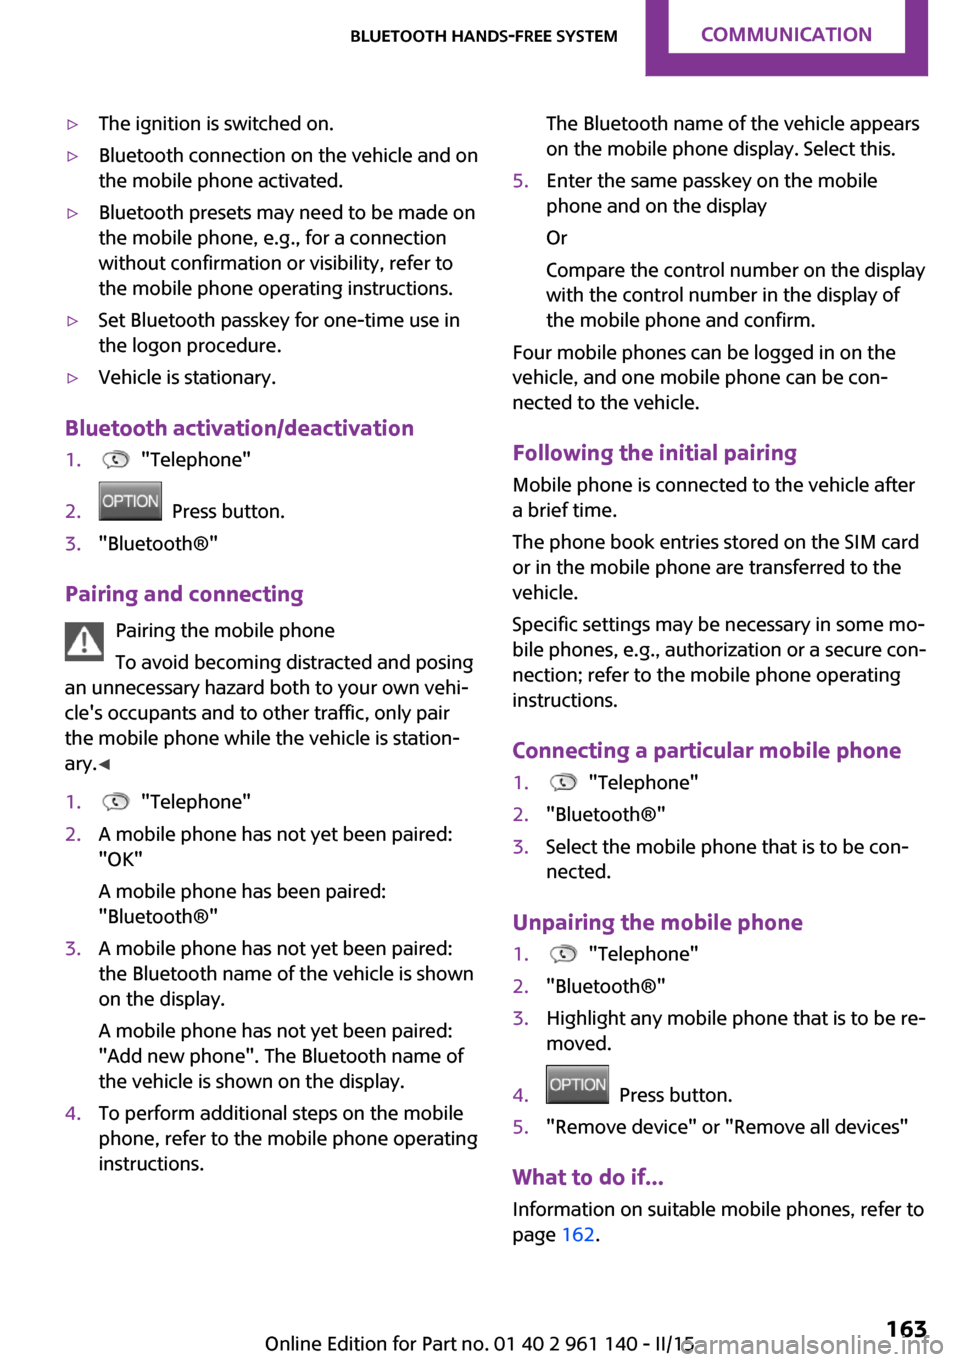
Bluetooth activation/deactivation
1. "Telephone"2. Press button.3."Bluetooth®"
Pairing and connecting
Pairing the mobile phone
To avoid becoming distracted and posing
an unnecessary hazard both to your own vehi‐
cle's occupants and to other traffic, only pair
the mobile phone while the vehicle is station‐
ary. ◀
1. "Telephone"2.A mobile phone has not yet been paired:
"OK"
A mobile phone has been paired:
"Bluetooth®"3.A mobile phone has not yet been paired:
the Bluetooth name of the vehicle is shown
on the display.
A mobile phone has not yet been paired:
"Add new phone". The Bluetooth name of
the vehicle is shown on the display.4.To perform additional steps on the mobile
phone, refer to the mobile phone operating
instructions.The Bluetooth name of the vehicle appears
on the mobile phone display. Select this.5.Enter the same passkey on the mobile
phone and on the display
Or
Compare the control number on the display
with the control number in the display of
the mobile phone and confirm.
Four mobile phones can be logged in on the
vehicle, and one mobile phone can be con‐
nected to the vehicle.
Following the initial pairing Mobile phone is connected to the vehicle after
a brief time.
The phone book entries stored on the SIM card
or in the mobile phone are transferred to the
vehicle.
Specific settings may be necessary in some mo‐
bile phones, e.g., authorization or a secure con‐
nection; refer to the mobile phone operating
instructions.
Connecting a particular mobile phone
1. "Telephone"2."Bluetooth®"3.Select the mobile phone that is to be con‐
nected.
Unpairing the mobile phone
1. "Telephone"2."Bluetooth®"3.Highlight any mobile phone that is to be re‐
moved.4. Press button.5."Remove device" or "Remove all devices"
What to do if...
Information on suitable mobile phones, refer to
page 162.
Seite 163Bluetooth hands-free systemCOMMUNICATION163
Online Edition for Part no. 01 40 2 961 140 - II/15
Page 180 of 251
Wheels and tiresVehicle features and op‐
tions
This chapter describes all standard, country-
specific and optional features offered with the
series. It also describes features that are not
necessarily available in your car, e. g., due to
the selected options or country versions. This
also applies to safety-related functions and sys‐
tems. The respectively applicable country provi‐
sions must be observed when using the respec‐
tive features and systems.
Tire inflation pressure Safety informationThe tire characteristics and tire inflation pres‐
sure influence the following:▷The service life of the tires.▷Road safety.▷Driving comfort.
Checking the tire inflation pressure
Check the tire inflation pressure regularly
Regularly check the tire inflation pressure,
and correct it as needed: at least twice a month
and before a long trip. If you fail to observe this
precaution, you may be driving on tires with in‐
correct tire pressures, a condition that may not
only compromise your vehicle's driving stabil‐
ity, but also lead to tire damage and the risk of
an accident. ◀
Tires have a natural, consistent loss of tire infla‐
tion pressure.
Tires heat up while driving, and the tire inflation
pressure increases along with the tire's temper‐
ature. The tire inflation pressure specifications
relate to cold tires or tires with the ambient
temperature.
Only check the tire inflation pressure when the
tires are cold. This means after driving no more
than 1.25 miles/2 km or when the vehicle has
been parked for at least 2 hours.
The displays of inflation devices may under-
read by up to 1.45 psi/0.1 bar.
For Flat Tire Monitor: after correcting the tire
inflation pressure, reinitialize the Flat Tire Moni‐
tor.
For Tire Pressure Monitor: after correcting the
tire inflation pressure, reset the Tire Pressure
Monitor.▷Reinitialize the Flat Tire Monitor.▷Reinitialize the Tire Pressure Monitor.
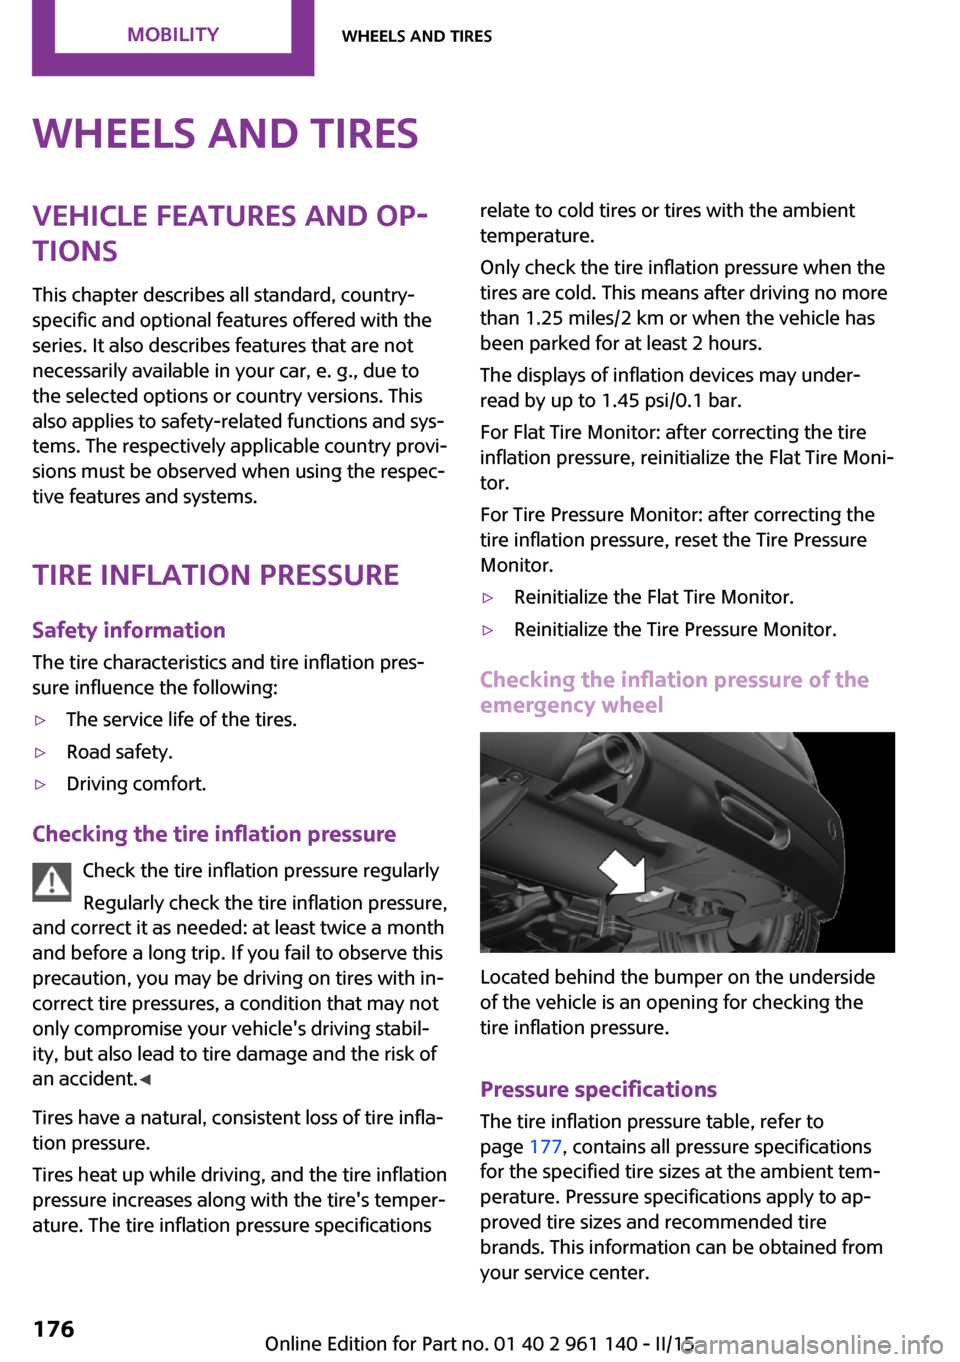
Checking the inflation pressure of the
emergency wheel
Located behind the bumper on the underside
of the vehicle is an opening for checking the
tire inflation pressure.
Pressure specifications
The tire inflation pressure table, refer to
page 177, contains all pressure specifications
for the specified tire sizes at the ambient tem‐
perature. Pressure specifications apply to ap‐
proved tire sizes and recommended tire
brands. This information can be obtained from
your service center.
Seite 176MOBILITYWheels and tires176
Online Edition for Part no. 01 40 2 961 140 - II/15
Page 213 of 251

The defective wheel cannot be stored in the
emergency wheel bracket because of its
size.3.Check tire inflation pressure at the next op‐
portunity and correct as needed.4.Reinitialize the Flat Tire Monitor, refer to
page 85.
Reinitialize the Tire Pressure Monitor, refer
to page 82.5.Replace the damaged tires as soon as pos‐
sible.
Driving with emergency wheel
Watch the speed when driving with the
emergency wheel
Drive conservatively and do not exceed a speed
of 50 mph/80 km/h; otherwise, changed driving
characteristics such as reduced lane stability
while braking, extended braking distance and
changed self-steering properties in the limit
area. ◀
Mount one emergency wheel only
Only a single emergency wheel may be
mounted. Reinstall wheels and tires of the orig‐
inal size as quickly as possible; otherwise, there
is a safety risk. ◀
Vehicle battery
Maintenance
The battery is maintenance-free, i.e., the elec‐
trolyte will last for the life of the battery.
Your service center will be glad to advise you
on questions regarding the battery.
Battery replacement Use approved vehicle batteries only
Only use vehicle batteries that have been
approved for your vehicle by the manufacturer;
otherwise, the vehicle could be damaged and
systems or functions may not be fully availa‐
ble. ◀
After a battery replacement, have the battery
registered on the vehicle by your service center
to ensure that all comfort features are fully
available and that any Check Control messages
are no longer displayed.
Charging the battery
General information Make sure that the battery is always sufficiently
charged to guarantee that the battery remains
usable for its full service life.
The battery may need to be charged in the fol‐
lowing cases:▷When making frequent short-distance
drives.▷If the vehicle is not used for prolonged peri‐
ods, longer than a month.▷Steptronic transmission: when parked for
long periods of time in selector lever posi‐
tion D, R or N.
Note
Do not connect charging devices to the
12 volt socket in the vehicle
Do not connect battery chargers to the factory-
installed 12 volt sockets in the vehicle as this
may damage the vehicle battery due to an in‐ creased power consumption. ◀
Starting aid terminals In the vehicle, only charge the battery via the
starting aid terminals, refer to page 212, in the
engine compartment with the engine off.
Power failure
After a temporary power loss, some equipment
needs to be reset.
Individual settings need to be reprogrammed:
▷Time: update.Seite 209Replacing componentsMOBILITY209
Online Edition for Part no. 01 40 2 961 140 - II/15
Page 247 of 251

NNeck restraints, front, refer to Head restraints 38
Neck restraints, rear, refer to Head restraints 39
New wheels and tires 183
Nylon rope for tow-starting/ towing 214
O
OBD Onboard Diagnos‐ tics 198
Octane rating, refer to Recom‐ mended fuel grade 174
Odometer 64
Oil 192
Oil, adding 193
Oil additives 193
Oil change 194
Oil change interval, service re‐ quirements 65
Oil filler neck 193
Oil types, alternative 194
Oil types, approved 194
Old batteries, disposal 210
On-board computer 67
Onboard Diagnostics OBD 198
Onboard vehicle tool kit 199
Opening/closing via door lock 26
Opening/closing with remote control 24
Optional equipment, standard equipment 6
Outside air, refer to Automatic recirculated-air control 117
Own safety 7
P Paint, vehicle 217
Panoramic glass sunroof 32
Parallel parking assistant 108 Park Distance Control
PDC 106
Parked vehicle, condensa‐ tion 136
Parking aid, refer to PDC 106
Parking assistant 108
Parking brake 51
Parking lights 73
Passenger side mirror, tilting downward 41
PDC Park Distance Con‐ trol 106
Pedestrian warning with city braking function 90
Performance Control 95
Personal Profile 23
Phone 162
Pinch protection system, glass sunroof 33
Pinch protection system, win‐ dows 32
Plastic, care 218
Power failure 209
Power windows 31
Pressure, tire air pressure 176
Pressure warning, tires 84
Profile, refer to Personal Pro‐ file 23
Protective function, glass sun‐ roof 33
Protective function, win‐ dows 32
R
Radiator fluid 195
Radio, AM/FM stations 149
Radio, Apple iPod/iPhone 155
Radio, AUX-IN port 154
Radio, control ele‐ ments 149, 154
Radio, external devices 154
Radio, FM/AM 149
Radio, muting 149
Radio-operated key, refer to Remote control 22 Radio, overview 149, 154
Radio ready state 47
Radio, satellite radio 152
Radio, save stations 151
Radio, USB audio inter‐ face 155
Rain sensor 53
Rear fog lights 76
Rear lights 203
Rear luggage rack 139
Rearview mirror 40
Rear window de‐ froster 114, 117
Recirculated-air filter 117
Recirculated-air mode 113, 117
Recommended fuel grade 174
Recommended tire brands 183
Refueling 172
Remaining range 64
Remote control/key 22
Remote control, blocking 23
Remote control, malfunc‐ tion 25
Remote control, replacing the battery 22
Remote control, univer‐ sal 119
Replacement fuse 210
Replacing parts 199
Replacing the battery, remote control 22
Replacing wheels/tires 183
Reporting safety defects 9
RES button 100
Reserve warning, refer to Range 64
Resetting the tone set‐ tings 148
Reset, Tire Pressure Monitor TPM 82
Retaining straps, securing cargo 138
Retreaded tires 183 Seite 243Everything from A to ZREFERENCE243
Online Edition for Part no. 01 40 2 961 140 - II/15